Prized Peony Monochromatic Petal Pink Card

Prized Peony Monochromatic Petal Pink Card

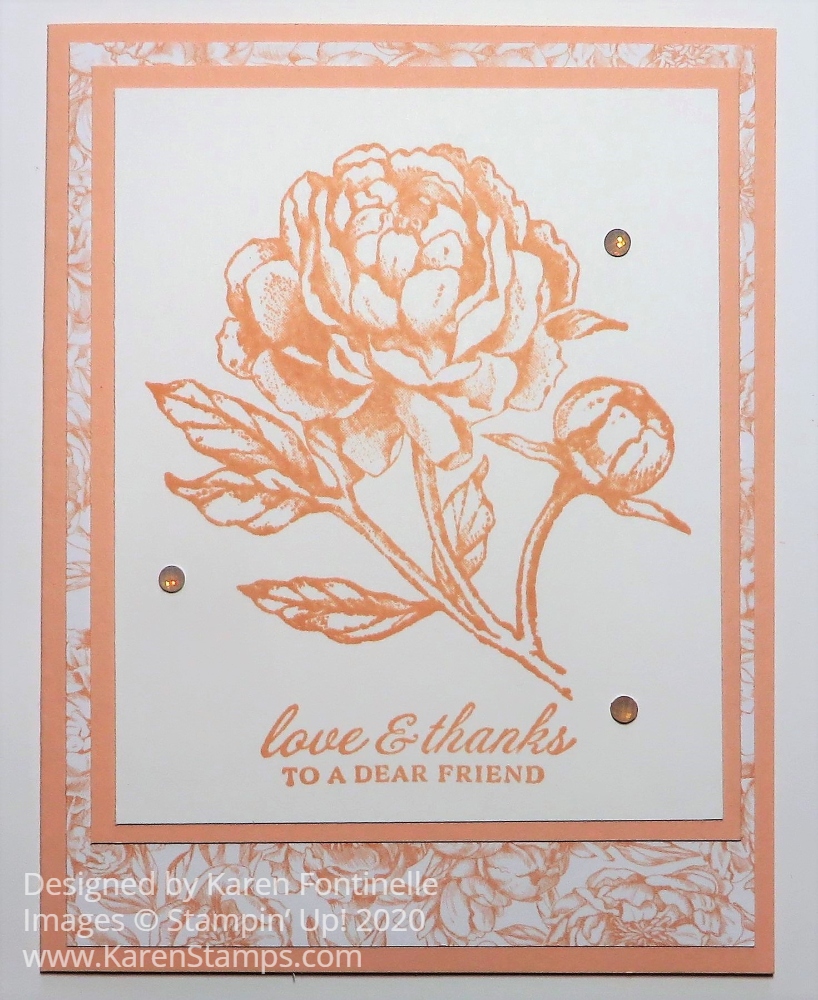
This Prized Peony Monochromatic Petal Pink Card is hot off the press! Just opened my order with this stamp set and paper in it and got to work, amid a few other interruptions!

The card base is Petal Pink to match the ink. It is actually lighter in color than in this photograph although the ink is fairly dark. Maybe I just have a juicy ink pad at the moment. I simply stamped the peony in the Prized Peony Stamp Set and the greeting in the same stamp set and cut down the cardstock a little to make it smaller. Then it was layered on a piece of Petal Pink Cardstock.

I looked through the pretty patterns of the Peony Garden Designer Series Paper and choose this one with a small Petal Pink floral print. It provides some interest and is good for the small amount of design that is actually going to show around the stamped peony.

I opted not to add any ribbon on the card wrapped around the peony piece, but after I had the card all made, of course, I couldn’t resist adding some of the new Elegant Faceted Gems. You can feel the facets on them. They are very pretty.

That’s how easy it is to make a monochromatic card with this stamp set, cardstock, and designer paper. You can also purchase the Prized Peony Bundle which includes the stamp set and Peony Dies and you save 10% on the price! Even if you purchase the entire Suite, you will still be getting the discounted price on the Bundle.

If I would have chosen to use the dies, I could have die cut this entire stamped flower and mounted it maybe with Stampin’ Dimensionals on the card to pop it up. This is going to be a beautiful stamp set to play with! If you order it or order the dies, look up some videos online of how to use the “pieces” of the flower to make it layered. You will wonder at first what on earth to do with the pieces that don’t look like anything, but they simply layer together to make something that looks like a 3D flower if you kind of shade the edges of the petals or pop them up with Dimensionals underneath or just have the pieces layered flat on the card which will still be impressive!

Start out with something easy like this Prized Peony Monochromatic Petal Pink Card. Just stamp the large peony in a colored ink or in black and then color in or sponge on some color. I think this stamp set will make beautiful cards with some basic simple stamping or you can make something extremely impressive to the recipient with easy steps for you to make it! Just play and have fun with this peony!

SHOP STAMPIN’ UP! ONLINE HERE!

(Remember Bonus Days! Spend $50, get a $5 coupon for August!)

Stampin' Up! Bonus Days 2020 Banner

Time to Subscribe to Paper Pumpkin To Get This Kit!

Paper Pumpkin July 2020 Summer Nights Ad

Just a few more days to sign up to get the July Paper Pumpkin Kit in the mail! This one looks really interesting! It is definitely summertime where I live so this kit really fits right in! But you have to be a Paper Pumpkin subscriber by Friday, July 10th!

JOIN PAPER PUMPKIN HERE!

Celebrate the magic of summer nights with the Summer Nights Paper Pumpkin Kit! In this exclusive fun-filled kit, you’ll unbox enough supplies to create nine postcard-style cards, coordinating envelopes, and die-cut tealight bags.

What’s even more spectacular about July’s kit is the add-on you can purchase along with it! The Summer Nights Add-On includes 24 card bases and envelopes in coordinating Summer Nights designs. This add-on is perfect for helping you expand the Summer Nights creative experience beyond the Paper Pumpkin kit. Between the add-on and the leftover supplies from your Summer Nights kit, you will be crafting a summer night worth celebrating all month long!

Don’t miss out on the fireworks, fireflies, and fun! You can subscribe to the Summer Nights Paper Pumpkin Kit between June 11th  and July 10th. But time is running out so don’t delay!!

***Order the Summer Nights Add-On starting 1 July in the Stampin’ Up! Online Store, perhaps with your regular order. Subscribe first and then purchase the Add-On.

While supplies last.

ABOUT THE JULY KIT

Kit contains enough supplies to create nine postcards and coordinating envelopes, as well as nine die-cut tealight bags.

Card size: 4” x 5-1/4” (10.2 x 13.3 cm)
Envelope size: 4-1/2” x 5-3/4” (11.4 x 14.6 cm)
Coordinating Colors: Blackberry Bliss, Calypso Coral, Costal Cabana, Night of Navy

The Paper Pumpkin kit does not require the add-on to create completed projects.

ABOUT THE SUMMER NIGHTS ADD-ON

Contains 24 preprinted card bases and coordinating envelopes.

Card size: 4-1/4″ x 5-1/2″ (10.8 x 14 cm)
Envelope size: 4-1/2″ x 5-3/4″ (11.4 x 14.6 cm)
The Summer Nights Add-On is not required to complete the Paper Pumpkin kit projects.

Note: During demonstrator product testing, we learned that the Summer Nights Add-On could make at least 20 additional cards when combined with the leftover pieces from the Summer Nights kit.

Don’t delay! You must be a current subscriber in order to purchase the Add-On Kit.

***In case you are wondering, I don’t think the little fairy light strings are not included in the kit but you could use them perhaps in the bags or you can use flameless tea lights. Set the bags out on the porch or patio while you are sitting out in the evening watching fireflies!

This is my personal link below so you don’t have to put in my name. However, if you are working with another Demonstrator, then go to www.PaperPumpkin.com and find his or her name.

SUBSCRIBE TO PAPER PUMPKIN TODAY!

Jar of Flowers Daisies Card

Jar of Flowers Daisies

This Jar of Flowers Daisies Card was fun and easy to make, especially when it matched so nicely with the designer paper I already had on an unfinished card. Sometimes your creative card ideas can just come from the pile of stuff on your table!!

The card base is Whisper White Cardstock with a layer of the new In Color, Magenta Madness, which I am loving! It’s a little shocking when you first see it in person but it grows on you! Then I had added a strip of daisies in the Flowers For Every Season 6″ x 6″ Designer Series Paper and adhered a piece of Magenta Madness 1/4″ Ribbon, plus tied on a bow. I already had this card made to this point except for the bow when I found it on my desk and thought I should just finish it off!

I stamped the jar in the Jar of Flowers Stamp Set in Memento Ink and colored in some water with the Light Pool Party Stampin’ Blend. I also stamped the flower stems and colored those with the Old Olive Stampin’ Blend with some shading of Mossy Meadow. Then the jar was punched out with the Jar Punch. I always forget there aren’t dies with this stamp set for the flowers!

For the flowers, since the designer paper had daisies on it, I used the Medium Daisy Punch to punch out six daisies so I would have two daisies layered for each flower. I glued these two layers together with Multipurpose Liquid Glue but then popped them up (the two front daisies) with Stampin’ Dimensionals® on the card. I decided to add some little lines in pink on each petal to copy the designer paper. I just used one of my Stampin’ Blends but you could also use a Stampin’ Write Marker or not do it at all! I also used my Perennial Essence Floral Centers (retired) in the center.

The jar is popped up on Stampin’ Dimensionals with the two front flowers, as I mentioned. the third daisy in the back , at the top, is just glued right onto the card front.

Besides not having much room, I liked the card as is and decided to even try to add a greeting. You don’t have to on every card although we usually do. But we don’t have to!

It’s flower season in the heat of summer so try out that Flowers For Every Season DSP and flower stamps or the flower dies and daisy punches! Soon we will be starting on holiday projects! Yikes!

Here is another card I made with both sizes of daisy punches and you can see another choice to use for the flower center, also retired, but you can substitute the Gold Glitter Enamel Dots.

This Jar of Flowers Daisies Card would make a bright and happy card to send to someone or give with a gift.

Shop Stampin’ Up! Online HERE!

Jar of Flowers Daisies Closeup

4th of July Papercrafting Ideas

4th of July Candy Treat Pouch

This 4th of July Treat Pouch is an easy project to make with just a square piece of designer paper or cardstock. And covering chocolate nuggets is one of my favorite things to do for a treat!

Uncle Sam 4th of July Patriotic Favor

I had forgotten I made this Uncle Sam 4th of July Patriotic Favor until I got my 4th of July decorations out! You can make this whole thing out of a paper towel roll or chips container, just covering it with paper, and then decorate with Uncle Sam! Or just make Uncle Sam and decorate and decorate something else!

Flower Patch 4th of July Fireworks Card

Look through your flower stamp sets and see it you have one that will resemble fireworks like this Flower Patch 4th of July Fireworks Card! These are some old stamps in the Flower Patch Stamp Set (retired) but you can substitute many other things!

4th of July Fireworks Card

I always liked this idea of making firecrackers out of just strips of cardstock or designer paper, then put a little piece of twine or Linen Thread coming out of the top. These, of course, are the only safe kind of fireworks to have! Try this Happy 4th of July! Happy Independence Day! card with whatever paper and stamps you have!

4th of July Wreath Card with Swirly Scribbles

We have lots of ways to make a card like this 4th of July Patriotic Wreath Card with Swirly Scribbles. We have other ways to make the circle wreath or even just punch or die-cut leaves or sprigs or whatever you have to fill in the wreath. On top of the wreath just put flowers or stars or both! You can add some embellishments like Rhinestones or glitter dots, etc. for a little bit of bling and sparkle!

And last but not least, find a way to make an American flag like on this 4th of July Flag Card. Use whatever designer paper you have or cardstock or stamp something. You could make some flags and adhere them to skewers or dowel sticks or even toothpicks and use for a decoration on your table or on top of cupcakes!

I hope you enjoy these past ideas! Have a safe and Happy 4th of July!

Hand-Drawn Blooms Birthday Card For July 4th

Hand-Drawn Blooms Birthday Card For July 4th

This card, Hand-Drawn Blooms Birthday Card For July 4th, could be a birthday card for someone this month or you could think of it as a birthday card for our country while we celebrate Independence Day on Saturday. Do you know someone with a July 4th birthday?

This new Hand-Drawn Blooms Stamp Set comes with an amazing large die plus a few small flowers and I had played with the die and greetings a little bit, but I hadn’t used this stamp of a lovely flower bouquet. The bouquet is actually two parts, the main bouquet and then the bottom part with a bow and the flower stems.

I stamped the two pieces of the bouquet with Memento Ink and then colored in the flowers and leaves with Stampin’ Blends. Actually I was going to use my Watercolor Pencils but I couldn’t find the set I wanted to use! But I love using the Stampin’ Blends. I primarily tried to use red and blue flowers for the 4th of July with a little yellow. I didn’t try at all to be perfect in my coloring, and you would be surprised how quickly you can actually color in most of those flowers. Since they are so small they look difficult, but since they are small you only need a dot or swipe of color to color them in! I just kind of drew over the stems with a swipe of Granny Apple Green with the small tip of the marker. Again, not perfect, but overall the whole thing looks fine!

The birthday greeting comes in the stamp set. Both lines of words are on one stamp, so just stamp it and then cut it out with the Banner Blooms Dies. Since you really only want to cut out the words, use a smaller piece of paper that fits right where the banner area is, otherwise, the die will cut all of the paper you put under it.

This card has a Real Red card base with a layer of Pacific Point blue. I just made narrow margins on this card so it is more difficult to see in the photo. The greeting is popped up on Stampin’ Dimensionals. I added two red Toile Tidings Glitter Enamel Dots (retired) from the Holiday Catalog last year. I couldn’t stop myself so I added some of the smallest Gold Glitter Enamel Dots around the bouquet. Be careful, once you use one of those Gold Glitter Dots, you can’t stop!

Be sure to check out the Hand-Drawn Blooms Bundle with both the Hand-Drawn Blooms Stamp Set and the Banner Blooms Dies. Here is a card I made with the Banner Blooms Die and the new Rainbow Glimmer Paper.

Of course most of the time that you would make this card you probably wouldn’t be thinking about the 4th of July! But you can use these floral bouquet for many occasions and in many color schemes!

SHOP STAMPIN’ UP! ONLINE HERE!

Remember, during July, with every $50 purchase, you will receive via email a $5 coupon code to use on an order in August! No limit!

Stampin' Up! Bonus Days 2020 Banner

Stitched Stars 4th of July Patriotic Card

Stitched Stars 4th of July Patriotic Card

Let’s celebrate with this Stitched Stars 4th of July Patriotic Card because that special day when we celebrate our country is coming up on Saturday! It seems amazing that it is July already! The weather outside does tell me that it is July, though! This year we aren’t having our fireworks displays here so we just have to create our own fireworks by making cards and other 4th of July projects! Use them for decorations in your home!

This red, white, and blue card is designed to make us think of fireworks and patriotism for our country with colors and gleam from the foil paper. The card base is my favorite color, Real Red, with a blue layer of one of the new In Colors, Misty Moonlight. Night of Navy would be another good choice or even Pacific Point. The stars are arranged on a layer of Whisper White.

The stars are all die-cut with the Stitched Stars Dies which first came out in the last holiday catalog. There was also a coordinating stamp set, So Many Stars, in case you still have that. That stamp set retired but the dies survived! I have always said stars, whether stamps or dies are so handy to have to all kinds of congratulatory or celebratory cards and projects.

I die-cut the “flourish” in the die set out of both Gold Foil and Silver Foil Sheets and saved all the stars that poked out of that. That way I could adhere the gold foil flourish to the front of the card and also use the silver foil stars on the card. Then I also die-cut a few red and blue stars out of the set to add to the card. If I would think ahead, it would be a good idea to use Adhesive Sheets before die-cutting on the back of the paper so they would already have adhesive on the back like a sticker. Then there would be no messy glueing with the Multipurpose Liquid Glue! But if you are really careful and put the teeny tiniest dots of glue on these thin lines, you can use it successfully.

The greeting is from the Many Mates Stamp Set, which I’m finding I turn to a lot for sentiments since it has such a good assortment! You might want to add it to your list! The greeting is stamped with the Misty Moonlight In Color Ink and layered on a scrap of Real Red punched at one end with the Lovely Labels Pick A Punch.

I added a Gold Glitter Enamel Dot to the punched piece, but I couldn’t stop myself! I added some more to the card area around the stars with the next larger size of dots. I think that was the finishing touch!

And to help celebrate July, Stampin’ Up! ‘s newest promotion started today, Bonus Days! With every $50 you spend in July, you will receive an email with a coupon code for $5 off in August! No limit! If you spend $100, for example, you will get two coupon codes in an email for $5 each to use on your order in August. Stampin’ Up! will automatically send you the email with your codes right away so be sure to watch for it or even check your spam folder for it. If you don’t receive it after a reasonable time, then let me know and I’ll check with Stampin’ Up! or you can always call yourself. You might consider printing out the emails or writing down the codes you receive so that you will have a “backup”!

READY! SET! SHOP!

Last Day! Two Stampin’ Up! Offers!

Last day for Annual Catalog Kickoff Celebration!

Today, June 30th, is the last day to take advantage of the great offer of an EXTRA $25 in Stampin’ Rewards with an order of $250 or more! If you have a long list for the new Stampin’ Up! Catalog, you might want to take advantage of this offer today! To begin with, you would earn $25 in regular Stampin’ Rewards with a $250 order and then you would get to spend an extra $25 on top of that! So with a $250 order or more, you get to choose $50 in free merchandise right away on your Stampin’ Rewards!

You can collect orders from some friends to get a large enough order, or think ahead to the holidays! Maybe there is a card kit or craft supplies that anyone can use like ribbon, scissors, adhesive, or notecards that you can give as a gift! And don’t forget to shop the Clearance Rack if you need a little more to add!

SHOP HERE!

And also……

Pick a Free Bundle Promo June 2020 Recruit
Click for Information!

If you have thought about becoming a Stampin’ Up! Demonstrator and starting your own business, today is the last day to take advantage of the Pick a Free Bundle Promotion! Any day is a good day to join Stampin’ Up! but if you want a little extra in your Starter Kit, do it today!

Check out the Stampin’ Up! Bundles HERE!

To become a Stampin’ Up! Demonstrator, you simply purchase the Starter Kit for $99, but you choose $125 worth of product to put in it! You also receive catalogs and business supplies and a Paper Pumpkin Kit. And today you will also choose a Bundle for your kit!

Click HERE to read about joining and then feel free to ask me any questions! If you would like to sign up under a Demonstrator local to you, click on “Find a Demonstrator” in the top black bar. Otherwise, I can help you from afar!

Christmas Card With Flowers For Every Season

Christmas Card With Flowers For Every Season

It’s never too early to start on Christmas cards and this one is the first of the season! It’s easy to get started on holiday cards like this Christmas Card With Flowers For Every Season with this poinsettia paper pattern and Christmas stamp sets in the Annual Catalog.

It’s amazing that the Flowers For Every Season 6″ x 6″ Designer Series Paper has a holiday pattern of poinsettias in the package! Just three days ago was 6 months until Christmas Day so I should have made this card for that day!

The card base is Just Jade, one of the new In Colors and one that coordinates with this designer paper. There is a layer of Poppy Parade with a piece of designer paper covering just part of the Poppy Parade. The designer paper layer is 5 1/4″ x 2 3/4″.

Before adhering the designer paper and Poppy Parade layer to the card base, I added a strip of Gold 3/8″ Metallic-Edge Ribbon around the edge of the designer paper.

The greeting stamped on the Poppy Parade at the bottom is from the Perfectly Plaid Stamp Set in the Annual Catalog. You could stamp this on another piece of cardstock and layer it or even heat emboss it in gold, but I went for the simple method!

After adhering the layer to the Just Jade, I tied a bow with the ribbon and adhered it with Mini Glue Dots to the ribbon. You could also put it in the center of the card

This is just a very simple card to get started on the holidays! It’s quick and easy and you can make several cards with the four sheets of this paper in the package.

Get the Flowers For Every Season Designer Series Paper in the Stampin’ Up! Online Store!

Lovely You Floral Stamped Card For a Friend

Lovely You Floral Stamped Card For a Friend

One of my favorite things to do in stamping is to stamp….randomly all over the paper! That repetitive stamping just feels good for the soul! This card didn’t entirely have that feel because I colored the main flower stamp with markers before stamping, so it wasn’t ink pad….stamp….ink pad….stamp. It was color the flower, color the stem, huff (breathe) on it, stamp and repeat! But the little flowers were stamped from the ink pad!

The card base is Granny Apple Green and I used Shimmery White Cardstock for the card front. Shimmery White is my all-time favorite cardstock! It has that shimmer that you can barely see but when you do see it, it is very pretty and subtle. It stands up to watercolor better than regular Whisper White, too.

The floral stamping is done with the Lovely You Stamp Set. You might think that this stamp set is all about the pretty greetings, but as you can see, you can use the flowers as well as the leaves and stems in the set to make cards.

The large flowers and stems are colored with Stampin’ Write markers instead of ink. This is the technique that is good to use when you want different colors on one stamp. I colored the flower with Melon Mambo and the stem with Granny Apple Green. Be sure you huff or breathe on the stamp to moisten the ink before stamping. Using markers gives just a little lighter look to the image.

Next I stamped just a few Daffodil Delight little flowers. Maybe I didn’t clean off my stamp very well or else my Mango Melody ink pad was a little off somehow because I got mostly multi-colored flowers instead of solid Mango! I really liked that accidental shading, though!!

I did have to remind myself to “stop” once I thought I was liking the look of all the stamping. It’s always tempting to keep going, but sometimes you have to know when to stop!

The greeting is stamped from the Lovely You Stamp Set also. A good variety of sentiments to choose from in such a pretty font! I stamped it on a 3/4″ strip of Shimmery White Cardstock and used the new Lovely Labels Pick A Punch to punch one end. Then I cut a 1″ strip of Melon Mambo Cardstock to be the layer under the greeting. If the 1″ wide strip doesn’t fit well in the punch, just trim it down a hair to get it to fit.

Since I didn’t have Melon Mambo ribbon which would have been my first choice, I used the Daffodil Delight 1/4″ Ruched Ribbon to tie a very small bow to put on the greeting. I even moved it in a little bit off the very edge so maybe you can still see the decorative end from the punch! I just used a Mini Glue Dot to adhere the bow.

And then I wanted just a tiny bit more, so I adhered a few sequins! These are the Artistry Blooms Sequins which are great because they already have adhesive on the back! They come in four colors so don’t think the color on the top of the package is the only one. I just used the smallest sequins on the card to just add a little sparkle with out taking away from the flowers.

You can purchase the Lovely You Bundle which includes the stamp set and the new punch! I’m liking the punch so you should check it out! Not everything has to be super fancy so try out some basic stamping like I did on this Lovely You Floral Stamped Card For a Friend.

SHOP STAMPIN’ UP! ONLINE HERE!

Artistry Blooms Friendship Card

Artistry Blooms Friendship Card

We’ve had some really rainy, stormy days here in Houston this week so I thought a bright and happy card was in order like this Artistry Blooms Friendship Card. It’s a quick and easy card to make as is, or you can even make it easier with no die-cutting or more dressed up with additional layers and embellishments.

The card base is the new In Color Magenta Madness Cardstock. The Artistry Blooms Designer Series Paper is amazing with its brushstroke design and also plainer gradient designs on the other sides. This paper can brighten up any cards and projects! I even added a layer of Daffodil Delight Cardstock underneath the designer paper just to brighten it up a bit more.

Artistry Blooms Designer Series Paper
Image copyright Stampin’ Up! 2020

The greeting is from the So Sentimental Stamp Set which has greetings for many occasions in the fun larger fonts mostly. I used one of the Tasteful Labels Dies to cut out the greeting, which fit perfectly. However, there is a die set, the Stitched So Sweetly Dies, that goes with the So Sentimental Stamp Set that you can purchase in a Bundle. This is a great set to have as well! We can never have too many sentiments and greetings to use on our cards and dies with which to cut them out!

To finish off this card, I punched a hole in each end of the greeting with my old Cropadile, but you can use any hole punch, and ran the Magenta Madness 1/4″ In Color Ribbon through the holes and tied a knot in each side. I also added the ribbon running across the card and around the back, going underneath the greeting. The greeting is popped up on Stampin’ Dimensionals®. You could also add some sequins to the card or the In Color Enamel Dots (when they back in stock!).

Don’t be afraid of the Magenta Madness color! I am really liking it! You will likely be toning it down with other papers or using just bits of it to add a touch of brightness and pizzazz to your project. Here is a card I made using Magenta Madness Cardstock in the paper and embellishments.

We don’t always have to make complicated cards or fancy designs. If you are short on time or energy or just want something simple, try a design like this Artistry Blooms Friendship Card.

SHOP ONLINE AT STAMPIN’ UP!

Tasteful Touches Flowers Card

Tasteful Touches Flowers Card

I had the idea for this Tasteful Touches Flowers Card but didn’t know if it would really turn out. If I even have an idea before I start making a card, it often changes as it goes. Usually I just think I’m going to use a certain stamp set or certain designer paper and go from there.

In looking at this Tasteful Touches Stamp Set I thought about stamping three (or maybe more) flowers randomly on the card front and use that flowery design stamp off to the side of the flowers. I thought it would maybe make it look a little antique.

Three flowers stamped with Memento Ink seemed to fit just fine and then I stamped the flowery grid stamp a few more times around the flowers and off the page in a few areas. I colored the first flower with Calypso Coral Stampin’ Blend markers, but then I decided to color each flower differently. The second flower is colored with Mango Melody and the third with Highland Heather. I just love coloring with my Stampin’ Blends markers! They are alcohol markers so the light and dark shades or even other colors together blend. Just color lightly with them to preserve the brush tips. Really all you need is gentle coloring and not necessarily perfect. Sometimes leaving tiny bits of white space makes it look more realistic.

I also made a “mask” by stamping a flower on a sticky note, making sure part of the flower was stamped over the adhesive on the other side to hold the mask in place when I used it. I stamped the flower and then cut it out with Paper Snips. You can even cut the tiniest bit inside the lines when you are doing masking. Then just stick the mask flower over the stamped flower and then stamp something else over it, like the leaves I did from the same Tasteful Touches Stamp Set. This protects the stamped flower but allows the leaf stamping to show outside the flower image. If you had a tiny leaf stamp that fit outside the flower, then you wouldn’t have to cover the flower. But this is a large sprig of leaves so if you just stamped it, you would be stamping over the flower and that wouldn’t look good!

After coloring the flowers and the tiny leaves with my Stampin’ Blends, I wasn’t sure about leaving the background white. It would have been fine, but my love of coloring with the Blends kept me coloring!! I used Light Pool Party to just kind of scribble in the white space, without trying to be heavy-handed or perfect. Pool Party is a good color for this because it is light enough that the omitted white spaces don’t show up strongly. You might think it would be a big job to color all that space, but since I was just kind of scribbling and not worrying about perfection it went very quickly. I even colored in between some of the tiny flowers in that grid to make it all fit in together.

I’m probably the least satisfied with the greeting. The card was really pretty enough to leave it plain without a greeting and sometimes, like on this card, it’s a little difficult to find the space for a greeting! This greeting is from the Lovely You Stamp Set, with lots of greetings and a pretty font. I punched the one end with the new Lovely Labels Pick a Punch and even made a layer with a slightly wider strip of cardstock. You can use three widths of paper in this punch – 1″, 3/4″, and 1/2″. At the last minute,

I added a small Gold Glimmer Enamel Dot to the greeting for just a little something to finish it off without taking away from the rest of the card.

So there is a card that takes a little bit of time for coloring, but is also one of the best ways to relax and de-stress, I find! There are lots of creative possibilities with these two stamp sets! I hope you will be inspired to create a card or project using this Tasteful Touches Flowers Card.

Shop Stampin’ Up! Online HERE!

Stay In Touch With the Stamping With Karen Mailing List!

Email Newsletter

It’s time to be a part of the Stamping With Karen Mailing List since it is the new Stampin’ Up! Catalog time, with new products, things to learn about, and not to mention the Holiday Mini Catalog will be coming out sooner than we can imagine! Keep up with news about the new Paper Pumpkin Kit every month and what is new with Stampin’ Up! each week!

If you are on my blog, you will see a red sign-up box in the top right corner where you can simply put your name (or first name) and best email. If you are on your phone, you probably need to scroll way down to get to the sidebar things. OR you can go to my sign up page HERE.

You will receive an email with a link to your free gift from me.

I send out a weekly email every Tuesday afternoon with the latest Stampin’ Up! news and offers plus stamping ideas with a supply list and directions. Even if you never make the project, maybe just seeing ideas will do your crafty heart good! I know it does mine! I’m all about the ideas!!

While we are still somewhat quarantined during this virus and just trying to be careful in our daily lives, relieve the stress and worry with stamping, cardmaking, and papercrafting! Let’s stay connected and in touch with each other over our favorite thing to talk about…..stamping with Stampin’ Up!

Flowers For Every Season Thinking of You Tag Card

Flowers For Every Season Thinking of You Tag Card

Originally I intended to exactly copy a very bright and “happy” card I saw on Instagram by someone whose cards I always like, @leannecreates, but as so often happens, after I got started the design changed and I ended up with this Flowers For Every Season Thinking of You Tag Card.

The Flowers For Every Season 6″ x 6″ Designer Series Paper has so many pretty floral patterns in it, some very bright like this one I used on this card. I used Whisper White Cardstock for the card base with a layer of Daffodil Delight Cardstock for a layer under the designer paper. After I got to this point, I noticed an already punched tag in my bag of cardstock, so I decided to see if I could use that.

The tag was punched with the Scalloped Tag Topper Punch. I added a Whisper White layer stamped with a greeting from the Many Mates Stamp Set, a great set of greetings in the new Stampin’ Up! catalog. To help the tag stand out a little bit better, I used the green side of a scrap of the same floral designer paper to go underneath the tag. It helps the tag stand out against the floral background and it adds a little more interest to the whole card.

To decorate the tag I cut out some flowers from the same designer paper, the scraps from the layer on the card, using my Paper Snips. It’s pretty easy and you don’t have to be perfect in cutting out a few flowers. For a finishing touch I added a bow tied with the Magenta Madness 1/4″ In Color Ribbon. Since I was putting the bow right over the opening at the top of the tag, I stuck a Stampin’ Dimensional underneath that opening since the whole tag was popped up on Dimensionals. That gave a good sticky area on which to adhere the bow!

Flowers For Every Season Thinking of You Tag Card Closeup

On the inside of the card, I added a strip of the designer paper along the left side, it didn’t even reach the full length but added a little bit of design inside the card. I could have also stamped a flower inside.

Be sure to check out the Flowers For Every Season Designer Paper in the new catalog when you get ready to order. It’s the 6″ x 6″ size which is easy to work with. Even if you find some of the colors or patterns pretty bright, you can tone them down with the other colors that you use with those. But these are really pretty papers and flowers can be used for so many kinds of cards! Here is another card I made recently with a pattern of designer paper that I wasn’t all that thrilled with, but once I used it, especially using a smaller piece of the paper, I really loved the card!

You will be able to make tons of pretty cards similar to my Flowers For Every Season Thinking of You Tag Card with this pretty designer series paper!

SHOP STAMPIN’ UP! ONLINE HERE!