Tag Archives: scalloped tag topper punch

Reindeer Candy Cane Treat

Reindeer Candy Cane Treat

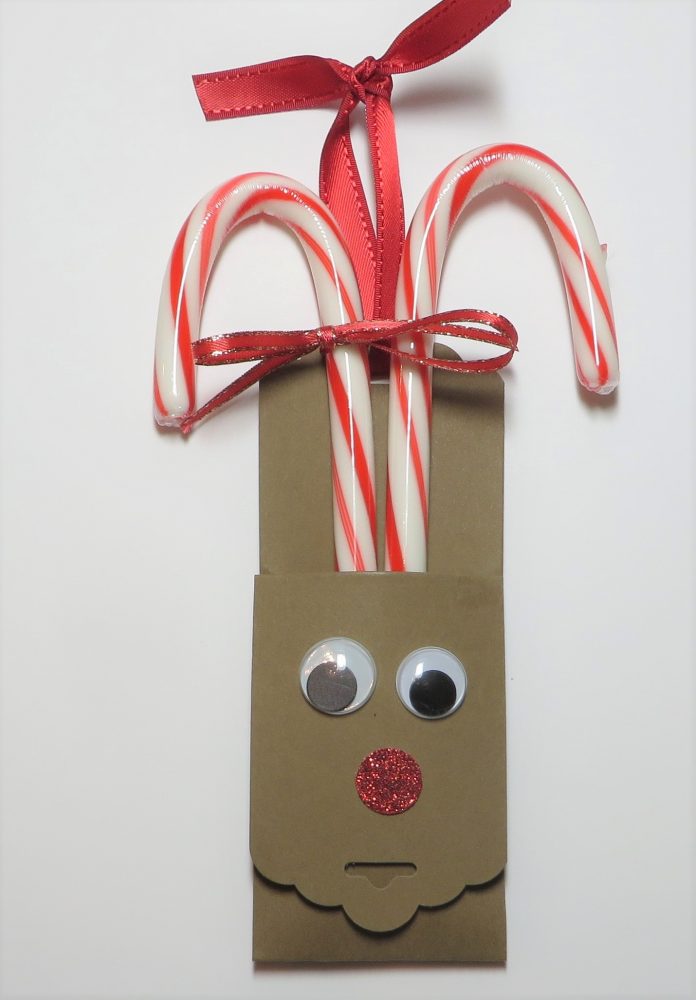
Here’s a cute Reindeer Candy Cane Treat I found online looking for candy treat ideas. This isn’t what I intended to make at all, but once I saw it I had to make it since I did have a box of candy canes! I did see lots of different versions, this one I believe was made by a Demonstrator in the UK. She used a 12″ x 12″ piece of cardstock whereas I used a regular size of cardstock, forgetting that hers was larger! But it all turned out all right in the end!

To make the Reindeer Candy Cane Treat, cut a strip of cardstock 11″ x 2″ (just a smidge under 2″ so it fits in the punch!). Each end is punched with the Scalloped Tag Topper Punch. Score at 2 3/4″ and 5 3/4″. Add strips of Tear & Tape to form the pocket to hold the candy canes.

Reindeer Candy Cane Treat Assembly

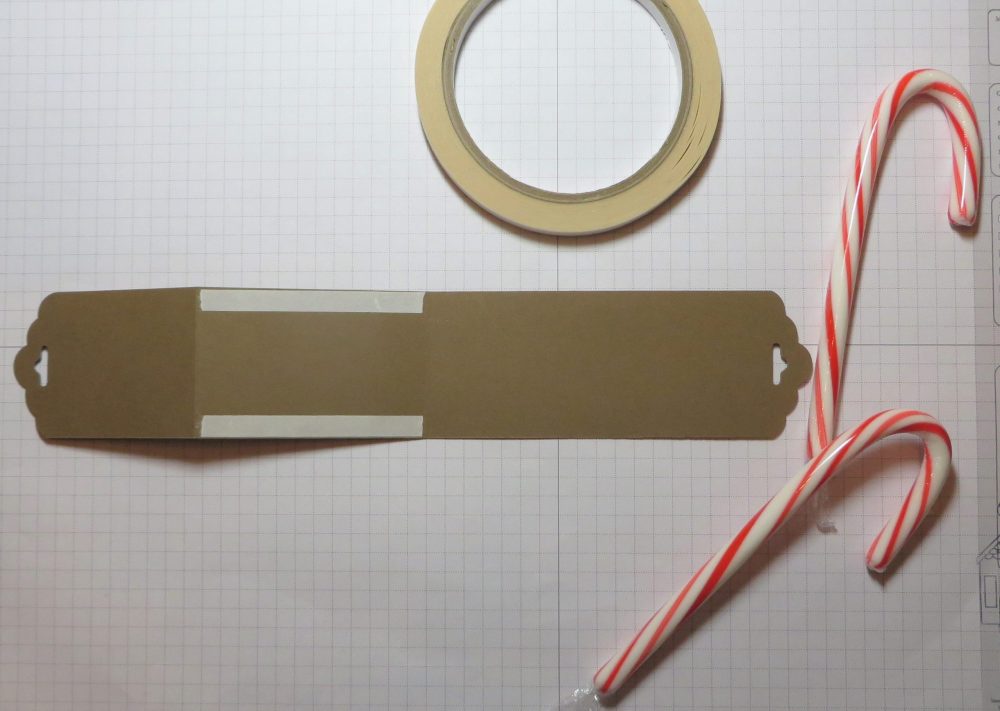
Fold on the score lines in a zig zag fashion.

Reindeer Candy Treat Side View

Fold the bottom portion up to form the pocket. The front tag punched end will become the reindeer face!

I punched a 1/2″ circle out of retired Red Glimmer Paper. You could use any red cardstock, foil paper, or the velveteen paper. Use whatever you have. For the eyes, I used some googly eyes I had in my drawer. Of course you can use small circles of white and black for the eyes.

Insert the two candy canes into the pocket. Tie a red ribbon in the punched hole at the top. I also added a bow around one candy cane just for fun.

Just play with this idea and see what you come up with! Use what colors and materials you have. I think it makes a really cute and quick and easy reindeer candy cane treat!

Frosty the Snowman Christmas Tag

There is a fun stamp set in the August-December 2020 Mini Catalog that I just had to order and enjoyed making this Frosty the Snowman Christmas Tag for you. I think a lot of people might overlook this stamp set just paging through the catalog. I certainly did until I noticed it in a video. When I went back and looked at it closely, I saw it had funny and cute sayings for the holidays. There was even a saying I had seen at a craft show years ago, wrote down, and still have on a small piece of paper in my stash! So how could I resist this stamp set?!

Just to give you a sneak peek before the mini catalog goes live on Tuesday, August 4th, I made this little tag with one of the funny sayings from the Don’t Stop Believin’ Stamp Set (153332). It would also make a cute card, of course!

The tag is made of Crumb Cake Cardstock since we are talking about hot cocoa. The top is punched with the Scalloped Tag Topper Punch. The Frosty the Snowman image is stamped on Whisper White Cardstock along with the saying. I colored the melted snowman with just a few Stampin’ Blends in the tiny spaces. For a little extra, I added some Snowflake Sequins (150443) with tiny dots of Multipurpose Liquid Glue. You may remember the Snowflake Sequins from last year’s Holiday Catalog and if you already have them from last year you are ahead of the game. It’s great that they are returning to this year’s holiday catalog because you can re-stock for this year’s fun projects!

August 4th is coming soon, next week! In the meantime, I want to remind you that we are in the last few days of July Bonus Days! With every $50 you spend on a Stampin’ Up! order until July 31, you will receive by email a coupon code to spend in August. These will significantly help with the cost of your holiday order in August! Stock up in July on some essentials or new products from the Annual Catalog and then you’ll have coupons to spend in August! The Holiday Catalog is jam-packed with products and a few returning favorites from last year.

I just got some more copies of the Holiday Catalog so if you are in need of either the Stampin’ Up! Annual Catalog and/or the August-December 2020 Mini Catalog (Holiday Mini), send me your contact information if you are interested in being a Stampin’ Up! customer and I’ll mail you complimentary copies.

Perhaps this Frosty the Snowman Christmas Tag will tickle your funny bone a little and also cause you to look closely at all the stamp sets in the catalog because you never know what you might find!

SHOP STAMPIN’ UP! ONLINE!

Stampin' Up! Bonus Days 2020 Ad

Flowers For Every Season Thinking of You Tag Card

Flowers For Every Season Thinking of You Tag Card

Originally I intended to exactly copy a very bright and “happy” card I saw on Instagram by someone whose cards I always like, @leannecreates, but as so often happens, after I got started the design changed and I ended up with this Flowers For Every Season Thinking of You Tag Card.

The Flowers For Every Season 6″ x 6″ Designer Series Paper has so many pretty floral patterns in it, some very bright like this one I used on this card. I used Whisper White Cardstock for the card base with a layer of Daffodil Delight Cardstock for a layer under the designer paper. After I got to this point, I noticed an already punched tag in my bag of cardstock, so I decided to see if I could use that.

The tag was punched with the Scalloped Tag Topper Punch. I added a Whisper White layer stamped with a greeting from the Many Mates Stamp Set, a great set of greetings in the new Stampin’ Up! catalog. To help the tag stand out a little bit better, I used the green side of a scrap of the same floral designer paper to go underneath the tag. It helps the tag stand out against the floral background and it adds a little more interest to the whole card.

To decorate the tag I cut out some flowers from the same designer paper, the scraps from the layer on the card, using my Paper Snips. It’s pretty easy and you don’t have to be perfect in cutting out a few flowers. For a finishing touch I added a bow tied with the Magenta Madness 1/4″ In Color Ribbon. Since I was putting the bow right over the opening at the top of the tag, I stuck a Stampin’ Dimensional underneath that opening since the whole tag was popped up on Dimensionals. That gave a good sticky area on which to adhere the bow!

Flowers For Every Season Thinking of You Tag Card Closeup

On the inside of the card, I added a strip of the designer paper along the left side, it didn’t even reach the full length but added a little bit of design inside the card. I could have also stamped a flower inside.

Be sure to check out the Flowers For Every Season Designer Paper in the new catalog when you get ready to order. It’s the 6″ x 6″ size which is easy to work with. Even if you find some of the colors or patterns pretty bright, you can tone them down with the other colors that you use with those. But these are really pretty papers and flowers can be used for so many kinds of cards! Here is another card I made recently with a pattern of designer paper that I wasn’t all that thrilled with, but once I used it, especially using a smaller piece of the paper, I really loved the card!

You will be able to make tons of pretty cards similar to my Flowers For Every Season Thinking of You Tag Card with this pretty designer series paper!

SHOP STAMPIN’ UP! ONLINE HERE!

Small Easter Basket With Scalloped Tag Punch

Small Easter Basket With Scalloped Tag Punch

If you are looking for a fun and easy little basket, try this Small Easter Basket with the Scalloped Tag Punch. It is really easy to make and you can decorate it however you like. The Scalloped Tag Topper Punch makes cute sides with an opening for the handle, but if you didn’t have this punch, you could just leave the side as is, unpunched. I just love this cute little Easter candy I found! It looks so cute in a little basket! Some chocolate eggs would be nice, too!

It’s very easy to make this little basket! I used Calypso Coral Cardstock with a layer of Happiness Blooms Designer Series Paper on the front and back sides. You could use whatever paper you like, or stamp the cardstock, heat emboss, or emboss with the Big Shot and a folder. Anything goes! To make the basket, cut two strips of cardstock 2″ x 7 1/2″ and punch one end on each strip with the Scalloped Tag Topper Punch. Score at 3″ from the scalloped top and fold. Those will be the ends of the basket and you can adhere the bottom pieces together, one on top of the other.

Also cut two pieces of cardstock 2″ x 5 1/2″.  Score 1/2″ at each end. These pieces will be the front and back sides of the basket. If you are going to adhere designer paper or stamp or decorate these two pieces, it’s a good idea to do it before you assemble the basket. The designer paper pieces are cut at 1 3/4″ x 5 1/4″. Once you have everything ready, glue all the pieces together to form the basket.

For the handle, cut a strip 1/2″ x 8 1/2″. Insert each end through the scalloped tag punch opening and glue to inside of basket. See photo of inside.

Small Easter Basket With Scalloped Tag Punch Handle

Just to decorate the basket a little, I tied around a piece of Calypso Coral 3/8″ Satin Ribbon. You could make a little paper flower or add an Easter greeting or whatever you like!

Go get your “craft supplies” (chocolate candy!) at the store and then make some Easter baskets like this Small Easter Basket With Scalloped Tag Punch.

Don’t Miss Stampin’ Up! Sale-A-Bration!