Gnome For the Holidays Christmas Card

Gnome For the Holidays Christmas Card

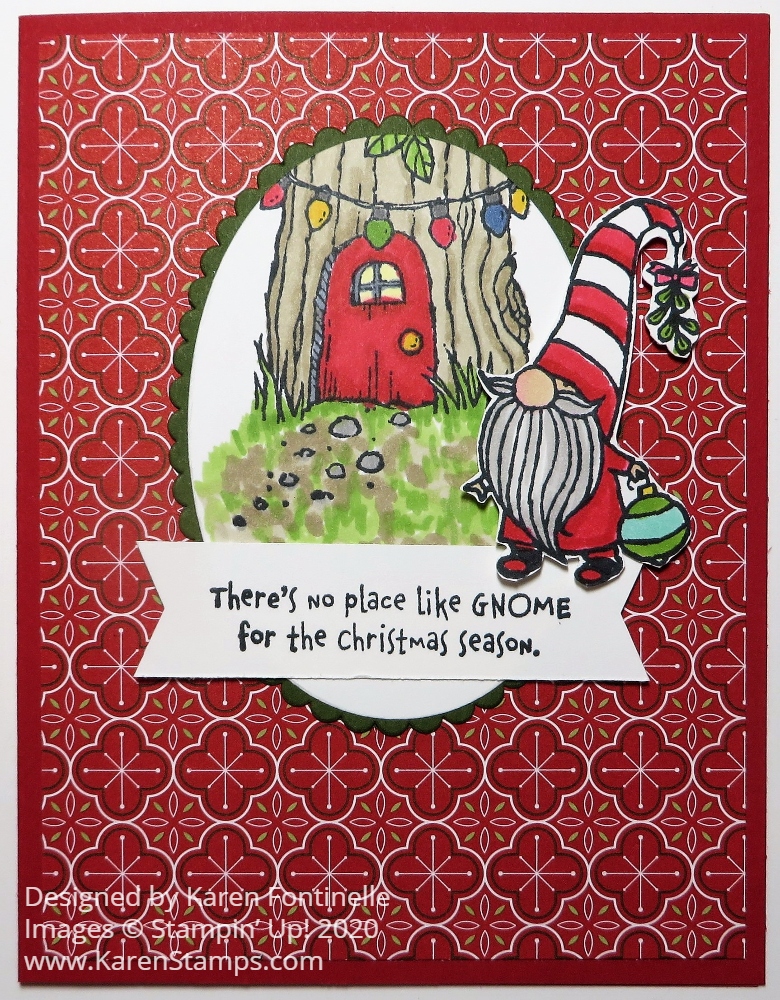
I just got my Holiday Catalog pre-order late Saturday night (love that UPS now delivers on Saturday!) so I chose this gnome stamp set for my first project with my new things, Gnome For the Holidays Christmas Card.

I never was really into gnomes and not sure I am now exactly, until last Christmas when I started following a craft lady, @thelittlegreenbean, on Instagram, who was making stuffed gnomes. Even then I wasn’t into gnomes, but I liked her and finally could resist no longer and bought myself one of her gnomes. Then another time I went back and bought two more for Christmas gifts, plus later, one for Valentine’s Day! So when I saw this gnome stamp set in the new August-December 2020 Mini Catalog (the Holiday Mini!) I decided to get it, maybe because I especially liked the little gnome house with the Christmas lights!

I also loved this Heartwarming Hugs Designer Series Paper from what I could see of it online. It belongs in a suite but it just has generic Christmasy designs in red, white, and green Christmas colors so you can use it for all kinds of cards. It doesn’t have a theme, except Christmas! And some of the papers are really generic so you could use it any time of the year.

The card base is Real Red with a layer of the top paper that was in my Heartwarming Hugs package! See what I mean about the paper….even this page you could use on a birthday card or all-occasion card!

I stamped the gnome house with Memento Ink and die cut with a Layering Ovals die with the house stamped near the top because the house is not completely drawn in at the top. Then I used Mossy Meadow are a layer underneath with one of the scalloped oval dies.

The cute little gnome is stamped and cut out by hand just because I wanted him separate and popped up on Stampin’ Dimensionals®. Of course, I colored in everything with Stampin’ Blends, my favorite method of coloring!

You can use whatever colors you like. I primarily used Real Red, Crumb Cake, Granny Apple Green, gray, Daffodil Delight, Ivory, and some others.

The greeting comes in the set and I punched it out with the new Banners Pick a Punch. This is a punch that you don’t “have” to have really, but I wanted the Banner Year Stamp Set that is in the Banner Bundle, so I figured I might as well get it!

There are some really big, beautiful suites in the holiday catalog, but sometimes it is fun to look for the stamp sets that probably won’t get as much attention. The holiday catalog is coming on Tuesday, August 4th! I think this gnome stamp set is going to be a popular one because gnomes seem to be “in” these days! I hope you enjoy my little gnome and gnome house on my Gnome For the Holidays Card!

SHOP STAMPIN’ UP! ONLINE!

Flowers For Every Season Thank You Card

Flowers For Every Season Thank You Card

If you are in need of a cheerful, bright, and happy card, you most likely will want to choose this designer paper I used on my Flowers For Every Season Thank You Card. The bright florals on this piece of designer paper goes with the new In Color, Magenta Madness and that’s about all you need!

The card base is Whisper White with a Magenta Madness layer. I added a strip of the Flowers For Every Season 6″ x 6″ Designer Series Paper just to the side. You can make it whatever width you want. Almost any of the papers in this package are sure to brighten someone’s day!

The greeting is stamped with Magenta Madness ink on a piece of Whisper White Cardstock with the So Sentimental Stamp Set. This greeting fits perfectly in this die from the Stitched So Sweetly Dies. I love the stitched border around this die!

This is such a simple card design! Anyone can make it and you can change the greeting for lots of other occasions. And for just a little embellishment, I tied a bow with the Magenta Madness 1/4″ 2020-2022 In Color Ribbon and adhered it with a couple of Mini Glue Dots.

If you like the Flowers For Every Season Designer Series Paper, here is another card I made using this paper.

When you need some quick and easy cards, this card is the way to go!

This is the last week for Bonus Days at Stampin’ Up! For every $50 you spend in July, you will earn a $5 coupon to use in August! Bonus Days ends Friday, July 31!! Don’t delay!

Shop Stampin’ Up! Online Here!

Prized Peony 3D Flower Friendship Card

Prized Peony 3D Flower Friendship Card

I finally tried out the new Peony Dies to see how difficult it would be to make this Prized Peony 3D Flower Friendship Card. And you know what? It wasn’t difficult at all! If I had just gotten the die set and hadn’t seen other videos describing how to use the dies, I don’t know what I would have thought! But really, it is extremely easy to die cut these peony petals and put them together to make a beautiful flower!

Peony Die Cut Pieces

Here are the die-cut pieces, made with the Peony Dies. The flower petals are Petal Pink and sponged with some Petal Pink Ink. The leaves were Pear Pizzazz and Granny Apple Green.

Peony Pieces Assembly on Back

To assemble the flower, use the pieces in order by size. You can start either with the largest piece or the smallest piece. Just slide them inside each other, lining up the bottom edges of each piece. Look at the photo above. This is the back side of my flower with just two pieces. I didn’t push the one piece down all the way so you could see how the bottom edges match! You can see all the curves and imagine pushing that piece down even with the other piece. The bottom edges would line up perfectly! Do that with all four pieces and you will have assembled your peony!

Leave the assembled pieces exactly how they are….flat. OR foof them up a little bit to make the flower look 3D! Use a Bone Folder or even your fingers to try to kind of lift or roll the petal edges. You can also stick some Stampin’ Dimensionals and Mini Dimensionals behind the petals to left them up.

Prized Peony 3D Flower Friendship Card Closeup

In the photo above, not only does the shading give some definition to the flower, but lifting up the petal edges really adds something!

The card base is Petal Pink with a layer of Whisper White. I used one of the Greenery Embossing Folders to emboss just the left side of the Whisper White. The peony is popped up with Stampin’ Dimensionals with the leaves underneath. Then I decided to have a ribbon tied around the lower portion of the card and attach a bow. But that seemed to take away from the flower, so I pulled off the strip of ribbon and just tied a bow to put at the base of the flower.

Then I risked everything (don’t do as I do, do as I say!) and stamped the greeting on the otherwise finished card! If I had messed up I would have just stamped the greeting on another piece of paper and made a layer and covered up my mistake. But it’s not a good idea to do the stamping when the rest of the card is finished! You can imagine why! By then it might be too late, like with this flower, to use the Stamparatus to make sure my stamping was perfect. I got lucky and stamped the greeting in the Prized Peony Stamp Set right on to the card!

You can get the Prized Peony Stamp Set and the Peony Dies together in a Bundle, the Prized Peony Bundle, and save 10%! And if you want it ALL, get the Peony Garden SUITE! Just put in the number for the Suite (154129) and get everything without having to put in all the item numbers! But if you only want some of the items, you can certainly just add those to your order as usual.

Do NOT be afraid of the Peony Dies because they are as simple as can be! Order whatever peony products you like! If you order by July 31, you will receive Bonus Coupons to use in August for every $50 you spend on an order in July! After you place your Stampin’ Up! order, watch for the email that contains your coupon codes. Make sure you get this email and keep track of it so you don’t lose those codes. So nice to get a little extra something when you order!

SHOP STAMPIN’ UP! ONLINE HERE!

Banner Blooms Colored Flowers Birthday Card

Banner Blooms Colored Flowers Birthday Card

This Banner Blooms Colored Flowers Birthday Card is another example of how I did something different than I planned to! I originally thought I would color this die-cut by sponging on some color, maybe in a very soft look. But when I went to actually color on the die-cut, I grabbed my Stampin’ Blends markers instead and went to town!

When I stamp, I am always, always, always using Grid Paper on my table. It is handy for lining things up and especially for measuring quickly and easily. When I took a decorative painting class years ago, the teacher had us put down a towel on the table and after that, I couldn’t paint unless I had a towel underneath my project! Now you can even choose from several kinds of Grid Paper from Stampin’ Up!, even colorful ones! For coloring these die-cut flowers, I needed a plain white paper underneath (and you always need a paper underneath when coloring with Stampin’ Blends because they do bleed through the paper) so I could see the die-cut well. I simply turned my Grid Paper over to the other side.

This card uses Melon Mambo Cardstock for the card base. I chose it after coloring the flowers. I used Shimmery White Cardstock, my favorite, for the die-cut and also for the card layer, because it is good to color on and it has a very subtle shimmer to it. The paper is very pretty all on its own!

I die cut the flower bouquet with the Banner Blooms Dies. This die is really different from the ones we have had. I found that it works best placing the die cutting side up with the paper on top rather than face down on the paper. I don’t know why, but it does! I also ran it through my machine three times and after that, almost all the pieces popped out on their own and the few that were left I used the Take Your Pick Die Brush Tip to roll over the die cut piece and also over the die to get out just a few pieces of paper that remain in the die.

As I said, I planned to use maybe Sponge Daubers to lightly sponge on ink colors on the flowers and leaves over the die, not really being precise, just adding color. But then I grabbed my Stampin’ Blends Markers and had fun coloring the whole thing! I didn’t try to be absolutely perfect but used mostly the brush tips of the markers to quickly color in the different areas. On the really narrow areas, I used the tip ends of the markers. I usually started with the Light color and also added the Dark for a tiny bit of shading. Since I LOVE coloring with these markers I didn’t find the coloring tedious.

To make the banners going across the bouquet, just stamp the greeting in the Hand-Drawn Blooms Stamp Set on a scrap piece of paper. Then line the die up over the stamped greeting (but you don’t need a full piece of paper or you’ll be wasting it). You will end up with the portion with the stamped banners. Then just trim these off the rest of the bouquet and adhere to the bouquet you have just colored. The greetings in the stamp set are doubled-up to fit perfectly on the banner areas. You could also cut out the banners and use stamps from other sets that would fit.

The banners are stamped in Melon Mambo ink. I popped them up on Stampin’ Dimensionals®. I added two Magenta Madness 2020-22 In Color Enamel Dots to the banners.

The whole bouquet is adhered to the card with lots of teeny tiny dots of Multipurpose Liquid Glue. I placed the bouquet on the Silicone Craft Sheet which held it steady and it didn’t matter if a little glue got on the craft sheet.

A good thing to use for delicate die-cuts like this is the Adhesive Sheets which you adhere to the paper before die-cutting and it turns the die-cut into a sticker when you remove the backing paper. I just never think ahead to use it!

Here is another card I made with the Banner Blooms Die using Rainbow Glimmer Paper, another great option if you don’t want to color in!

Remember, we only have about a week left of Bonus Days! When you spend $50 on any order, you will receive via email a $5 Bonus Coupon to use on an order in August. No limit to how many coupons you can earn with every $50 you spend! Bonus Days ends on July 31.

SHOP STAMPIN’ UP! ONLINE HERE!

In Good Taste Navy Z-Fold Thank You Card

In Good Taste Navy Z-Fold Thank You Card

I always think it is fun and impressive to make a card with a different fold and this In Good Taste Navy Z-Fold Thank You Card uses the easiest one there is! I was working on another project with this same designer paper which I really like so I used it on this card. You can use any designer paper and change the sentiment for almost any kind of card. You can even change the shape of the greeting layer on the card.

The basic z-fold card is so easy to make! The card base starts off like any card, 8 1/2″ x 5 1/2″, scored and folded at 4 1/4″. But then you will fold the card front back on itself, in half. After scoring the card normally at 4 1/4″, next score the front of the card at half of that, 2 1/8″ and fold that part back like you see in the following photos in this post.

Next, decide on what designer paper you want to use on your card or even stamp the panels you want to add. Just do whatever you like or whatever the occasion requires. This card base is Night of Navy and the designer paper is the In Good Taste Designer Series Paper. This designer paper comes in a large package with many patterns – 12 designs, 2 sheets of each! When I first saw it in the catalog, wasn’t really interested, but after I saw how many different textures were captured on this paper, I was quite intrigued. This Night of Navy print resembles tile or china I think.

Since that folded back front panel measures 2 1/8″ x 5 1/2″, you probably want your designer paper or panel to measure 2″ x 5 3/8″ for a narrow margin around the edge or 1 7/8″ x 5 1/4″ for a wider margin. Figure it just like you would for a card.

Since the cardstock is dark, I added a Whisper White layer inside the card and put a strip of the designer paper along the edge. This was just a scrap, but it is about 1/2″ wide by 5 1/4″.

For the greeting on the front of the card, I wanted to use something kind of large. I chose one from the So Sentimental Stamp Set. It is stamped in Night of Navy ink. The die-cut scalloped rectangles I used are in the Stitched So Sweetly Dies set. When you adhere it to the front of the card, remember to only add adhesive to half of the back of the greeting so it only sticks to that folded front panel and not the rest of the card. If you are going to have a greeting on the inside of the card, you probably want that front greeting to cover up what is inside the card.

For a little bling, I added some Misty Moonlight 2020-22 In Color Enamel Dots. They are not the exact same color as the Night of Navy used on the card, but I thought they were close enough.

I could have added another color with the greeting layer and the enamel dots and ink if I didn’t want it to be the monochromatic look.

Here’s another card I made with the z-fold using really pretty designer paper from 2019, some ribbon, and a different shaped greeting on the front of the card, just to give you another idea.

Here are some other views of this card so you can see how the folds go.

In Good Taste Navy Z-Fold Thank You Card Inside
In Good Taste Navy Z-Fold Thank You Card Folds

Try your hand at making an easy Z-Fold card like this In Good Taste Navy Z-Fold Thank You Card.

SHOP STAMPIN’ UP! ONLINE!

Ornate Garden So Grateful Card

Ornate Garden So Grateful Card

For this card, I was in the mood to use the paper in the Ornate Garden Suite and this Ornate Garden So Grateful Card is what turned out! This is a great all-occasion card that has a little different style than maybe you normally make. It’s also a great way to use up some smaller pieces of designer paper! Just change the greeting for a birthday or congratulations or even sympathy.

The card base is Mint Macaron, one of the coordinating colors for the Ornate Garden Specialty Designer Series Paper. Some of these sheets in this collection have gold foil accents.

At first I was going to just adhere the floral strips directly to the card base, but it’s a little easier to adhere to another piece of cardstock first, whether it shows or not. I started with a Whisper White piece under the floral strips with a narrow margin showing but I wasn’t crazy about that. Then I realized Terracotta Tile, another coordinating color, very evident in these floral strips, might be perfect!

You might want to make your card pieces slightly different sizes, but here are the sizes I used:

Floral Strips 1 1/4″ x 4″, Terracotta Tile layer under strips 3 7/8″ x 4 1/8″.

For the greeting, since I was using the Ornate Garden paper, I decided to use a greeting in the Ornate Thanks Stamp Set. First I stamped it in Terracotta Tile on Whisper White but I didn’t like it. I thought it looked too bold. I changed it to Mint Macaron and I could have changed the layer to Mint Macaron but I just used the Terracotta layer.

Before adhering the layer with the paper strips, I adhered a piece of ribbon around to the back on both sides and then added a separate bow. Just use a Mini Glue Dot or two to hold the bow on the card. Often this works easier than trying to tie the bow with the ribbon on the card. This white ribbon is in the Flowers For Every Season Ribbon Combo Pack. It looks like a linen ribbon and is very pretty with this paper.

I forgot to mention, I cut the sheet of Mint Macaron Cardstock in half lengthwise, rather than horizontally, so it is 4 1/4″ x 11″, scored at 5 1/2″. This produces a top of the card fold rather than the usual side fold. You can do it either way, it’s just something a little different!

Here’s another card I made using the Ornate Garden Suite, using one of the papers with larger flowers. You can use whichever floral pattern you are in the mood for!

Get out whatever designer paper you like or scraps you have and see if you can make a card similar to this one. Once you get started you may change the idea completely! It’s up to you! Start with my Ornate Garden So Grateful Card to possibly give you an idea and then let your own creativity take you wherever it wants to go!

SHOP STAMPIN’ UP! ONLINE!

Be Part of the Stamping With Karen Mailing List!

It’s time to be a part of the Stamping With Karen Mailing List since it is the new Stampin’ Up! Catalog time, with new products, things to learn about, and not to mention the Holiday Mini Catalog will be coming out sooner than we can imagine! Keep up with news about the new Paper Pumpkin Kit every month and what is new with Stampin’ Up! each week!

If you are on my blog, you will see a red sign-up box in the top right corner where you can simply put your name (or first name) and best email. If you are on your phone, you probably need to scroll way down to get to the sidebar things. OR you can go to my sign up page HERE.

You will receive an email with a link to your free gift from me.

I send out a weekly email every Tuesday afternoon with the latest Stampin’ Up! news and offers plus stamping ideas with a supply list and directions. Even if you never make the project, maybe just seeing ideas will do your crafty heart good! I know it does mine! I’m all about the ideas!!

Let’s stay connected and in touch with each other over our favorite thing to talk about…..stamping with Stampin’ Up!

Forever Greenery Thank You Card

Forever Greenery Thank You Card

Talk about a quick and easy card to make, this Forever Greenery Thank You Card is one! I don’t think I’d even gotten around to using this designer paper so I thought it was about time.

I think every green color Stampin’ Up! has is included in this Forever Greenery Designer Series Paper. I love the new In Color 2020-22 called Just Jade. Normally I’m not a big fan of green, but I really like this color. Just Jade is the card base with a layer of Whisper White Cardstock. Then I added the designer paper layer. Originally, I planned to just have a very thin margin of the Whisper White to kind of separate the designer paper from the Just Jade. But I liked more of the white showing so I made all the standard layers.

Before adhering the designer paper layer to the Whisper White Cardstock, I wrapped around a strip of Just Jade 1/4″ Ribbon and adhered it to the back. After the layer is adhered to the card, you can tie a separate bow and adhere it to the ribbon with a Mini Glue Dot.

The greeting is stamped with Just Jade Ink with a stamp in the So Sentimental Stamp Set. This is a great stamp set for greetings! There are large ones and very small ones! Then I cut out the greeting with a Stitched So Sweetly Die.

To set off the greeting a little bit, I punched a strip of Just Jade Cardstock with the Lovely Labels Pick A Punch. Then of a little bling, I added a Gold Glitter Enamel Dot on each end.

That’s all there is to making this card! And so many pretty patterns to choose from in the Forever Greenery Designer Series Paper!

Check out all the new Stampin’ Up! catalog items and when you place your order, remember the Bonus Days promotion going on during July! With every $50 you spend in July, you will receive a $5 coupon to spend on your order in August! Be sure to look for the email from Stampin’ Up! right after you order!

SHOP STAMPIN’ UP! ONLINE!

Pandemic Anniversary Card 2020

Pandemic Anniversary Card 2020

This isn’t my usual stamped Stampin’ Up! card but it is extra-special nonetheless as it is a Pandemic Anniversary Card handmade by my husband! Yesterday was our wedding anniversary of many years and he put his cardmaking skills to work to make me this card!

Due to the pandemic, of course, we have been staying out of stores so he hasn’t been able to buy cards for me. But he found a way to make them on the computer! As my son texted last night, “Making cards on the computer! How retro!” I know when we bought our first computer it was really cool to buy some software that had card designs you could make and print out! I don’t know that people do that any more, at least not with software, but there are online sites where you can design cards, apparently!

So the card base is computer paper, not cardstock, and the colors are whatever the printer ink colors are combined together! I think the card design is something similar to the Boho Indigo Medley in the new catalog on page 9. Maybe a little bit like the Forever Fern Bundle!

For Mother’s Day he also tried to make me a card, but it printed out on a full sheet of paper, not a card he could fold up, so this one was progress! But the Mother’s Day “card” was beautiful, the floral designs around the “Happy Mother’s Day” was similar to the florals Stampin’ Up! has been using in their new logos.

I really appreciate my husband going to all this trouble to make cards for me during the pandemic. He got lucky yesterday when I was in the bedroom having a long phone call with a girlfriend and he could work on the computer without me popping in!

I think if he were a stamper, we might have the same style! Even cards he has bought at the store in the past I always like and think I could copy it somewhat with my stamping supplies! Maybe he is subsconsciously absorbing my cardmaking style from being surrounded by Stampin’ Up! products!

Last year I had laryngitis so we didn’t go out for dinner on our anniversary! This year is the pandemic and right now with things being really bad in Houston we aren’t even picking up food right now, not to mention that he just had a partial root canal the other day so can’t chew on that side. Wouldn’t be any fun to go out to eat anyway for him! Maybe the third year will be the charm…next year! If I ever get to go back to my favorite seafood restaurant I am ordering EVERYTHING I love there!!

I hope you get to celebrate your anniversary and other occasions better than we did this year! And I hope WE get to celebrate our anniversary better NEXT year! But the important thing is we HAD an anniversary together and it doesn’t matter if we ate at home or had a card made on the computer.

Clear Tiny Treat Box With Sunflower

Clear Tiny Treat Box With Sunflower

One of my favorite extra products in the Stampin’ Up! Catalog besides stamps, paper, and ink, are the Clear Tiny Treat Boxes which can be decorated like this Clear Tiny Treat Box With Sunflower. Put a candy treat inside or a small gift and you are good to go! Just keep a package of these treat boxes in your stash for any occasion that arises.

The stamped sunflower is the smaller one in the Celebrate Sunflowers Stamp Set. This is the technique I used to stamp and color this sunflower:

  • Use Stampin’ Write Markers to color directly on the stamp in the different colors, huff on the stamp, then stamp on Whisper White Cardstock.
  • Use a Blender Pen to pick up ink from the ink pad lids of whatever colors you choose to lightly color in the white space on the stamped flower. Although I used a Crushed Curry marker to color on the stamp, I used So Saffron Ink with my Blender Pen to fill in the flower petals. I used a Granny Apple Green marker for the leaves but colored in with Mint Macaron.
  • The flower center didn’t look good filled in with Soft Suede so I went back with Cajun Craze lightly to match the markers. When it looked too solid or something, I used the small tip of the marker to fill in a lot of tiny dots around that center.
  • The very center has some yellow and a tiny bit of green.

Blender pens are good to use because you tend to get a lighter color using them but you can pick up more ink and get a darker shade. We used to use Blender Pens all the time, back in the “olden days” when I first became a Demonstrator. You can pick up ink from the ink pad or lid with them, pick up ink directly from the marker tip, blend Watercolor Pencil colors or even pick up color directly from the Watercolor Pencil tip. They are so handy and versatile. Just enough moisture to work but not enough to pill the cardstock, unless you work it too much. In that case, Shimmery White Cardstock is better than Whisper White.

The sunflower is die-cut with the Sunflowers Die. Then I wrapped a ribbon around the treat box and adhered the die-cut sunflower. This ribbon I used is the green gingham in the Flowers For Every Season Ribbon Combo Pack.

After putting your treat or gift inside, you could tie the ribbon around from the bottom to the top instead or just add a bow to the lid of the box. You could stamp a little tag to add as well.

There are so many things you can do with these Clear Tiny Treat Boxes! They are handy for so many occasions! Here is a favorite one I made at Easter.

Here is a close-up of the sunflower so you can see the coloring. You could also stamp in Memento Black ink and color with Stampin’ Blends. Or use Watercolor Pencils.

Clear Tiny Treat Box With Sunflower Closeup

Think about getting a package of these Clear Tiny Treat Boxes and also check out the other types of boxes and bags Stampin’ Up! carries for treats and gifts! There are many options!

Remember it is Bonus Days for another two weeks in July! With every $50 purchase, you will receive an email with a coupon code for $5 to use in August on your orders. No limits, so if you have a large order, you will have more coupons to use! And with the new Stampin’ Up! Catalog, a large order is pretty easy to come up with! Way too easy!!

SHOP STAMPIN’ UP! ONLINE HERE!

A Paper Pumpkin Kit For Our Everyday Heroes!

Paper Pumpkin August 2020 Banner

The August Paper Pumpkin Kit is a special one to help you express your creativity while showing some of the everyday heroes in your life how much you appreciate them!

In these recent days, we see a lot of essential people that we might not have thought of in that way.

Lately, it’s become especially clear who the everyday heroes are—they’ve always surrounded us! Teachers, doctors, hairdressers, nurses, delivery workers, cashiers, and even our friends, kids, and family members go above and beyond to enrich our lives. These people are truly the world’s greatest at what they do!

Celebrate and appreciate the everyday heroes in your life with the August Paper Pumpkin Kit. The cards included in this kit are specifically designed for celebrating life’s champions!

ABOUT THE AUGUST KIT

Name: World’s Greatest

Details:

Kit contains enough supplies to create nine cards and coordinating envelopes.
Card size: 4-1/4” x 5-1/2”
Envelope size: 4-1/2” x 5-3/4”
Coordinating Colors: Bumblebee, gold, Mint Macaron, Pacific Point, Soft Suede, white
The kit’s stamp set includes Distinktive stamps.

Be sure to get subscribed to the August 2020 Paper Pumpkin Kit from July 11 to August 10 at paperpumpkin.com! Choose my name, Karen Fontinelle.

Here is my personalized link to make it easier!

Join Paper Pumpkin!

Note: Supplies may be limited toward the end of the subscription period.

Highland Heather Sunflower Thank You Card

Highland Heather Sunflower Thank You Card

This started out not to be a card! I was going to stamp a sunflower and die cut it and decorate a glass votive candle holder. The sunflower was going to be a little large for that project and when I laid it down on the table I thought it would look pretty on a card. That is how this Highland Heather Sunflower Thank You Card came to be! Don’t be afraid t change your mind from your original idea!

I decided to make my sunflower a different color than yellow, so I happened to choose Highland Heather for the color. I stamped the largest sunflower in the Celebrate Sunflowers Stamp Set in Highland Heather Ink. I die cut that sunflower, as well as the outline, with the Sunflowers Dies also out of Highland Heather Cardstock. I didn’t know if this would be enough contrast or not, but I liked it. I added the die-cut center out of Bumblebee cardstock.

The leaves are stamped in Granny Apple Green Ink on the same color cardstock, then die cut. The leafy stems are cut out of Garden Green Cardstock. The sunflower is popped up on Stampin’ Dimensionals and then I slid the leaves partially underneath. The greeting is also in the stamp set and is stamped in Highland Heather ink. The card base is Highland Heather.

In spite of not planning to even make this card, I was really pleased with it and may even copy myself and make some more, maybe in different colors! We are artists and can be creative with whatever we make!

The sunflower’s name comes from its tendency to face toward the sun. I didn’t even think of any symbolism about the sunflower, but I’ve read that it can symbolize adoration and loyalty. And it may mean something a little different across other cultures. Apparently it is an easy plant to grow because it is heat and drought tolerant and grows in the summer. If heat is good for sunflowers, I could be growing sunflowers filling my whole backyard because it is so hot here in Houston!!

I also stamped a Whisper White layer for inside the card with the smaller sunflower in the set just with Highland Heather Ink. That makes it easier to stamp or write a message inside the card on white instead of purple. While I had the stamp and ink out, I also stamped a corner of the envelope to make it pretty as well! Hopefully the envelope will not get separated from the card and I’ll remember to use it!

If you like sunflowers, this is a popular stamp set so check it out in the Online Store. And if you like the Sunflower Dies as well, you can buy both the stamp set and dies in the Celebrate Sunflowers Bundle at a 10% discount.

SHOP STAMPIN’ UP! ONLINE HERE!

Highland Heather Sunflower Thank You Card

Prized Peony Saying Hello Card

Prized Peony Saying Hello Card

If you like to stamp and color, this Prized Peony Saying Hello Card is really an easy card to make! I did use the masking technique to cover the large peony while I stamped the smaller flowers on the side. Since I love coloring with the Stampin’ Blends markers, for me this is an easy and relaxing card to make! If you don’t like coloring, you could do the same by stamping the flowers in the same or different colors rather than black ink and then do not color them in.

The card base is Flirty Flamingo and after stamping the card, I opted to add a layer of Granny Apple Green Cardstock as a layer under the Whisper White to blend in with the card better since I had used Granny Apple Green on the card.

I stamped the large peony and then stamped it on a “sticky note” being sure to get part of the stamped flower over the sticky area on the back to help hold it over the stamped flower on the card. After stamping on the sticky note, I cut out the flower right on the lines or just barely inside to use this as a mask. After stamping the large flower on the card, I stuck this mask over the flower so I could stamp the side flowers and my stamp would land on the paper mask and not stamp over my original stamped flower.

I stamped the flowers in Memento Ink and then colored in with several Stampin’ Blends Markers. I used both the Light and Dark of Flirty Flamingo on the flower, Granny Apple Green for the few leaves, and a dab of Daffodil Delight for the flower centers. Just to fill in a little white space, I scribbled a little Granny Apple Green beyond the leaves and flowers or in between.

I wanted a large greeting on the card so I simply stamped this one directly on the card front. It is from the Tasteful Touches Stamp Set, which has several very nice greetings to use. There is enough room on this card that I could have stamped it on cardstock and layered it on another piece. I could also have added some sequins or dots so an extra little embellishment, but I kept it simple this time!

You can see how I just stamped the very large peony on THIS CARD in just a colored ink and didn’t have to color it in. It still produced a pretty card doing it this way, so if you don’t like coloring, don’t let that deter you from getting this very lovely Prized Peony Stamp Set and perhaps the Bundle. You will be able to get very creative with this stamp set and perhaps the entire Peony Garden Suite making cards similar to my Prized Peony Saying Hello Card.

SHOP STAMPIN’ UP! ONLINE HERE!

Colorful Lollipop Greeting Card

Colorful Lollipop Greeting Card

I had saved a magazine photo from YEARS ago with a card like this Colorful Lollipop Greeting Card. It has survived the purging of the file of torn out magazine pages, mostly scrapbook page ideas, several times so I finally decided to leave it out on my coffee table so maybe I would finally make it someday soon. Well, the day came and I made a card with this cute lollipop made out of circles!

There weren’t any super specific instructions on how to make this but I thought it would be easy enough to figure out. It’s a great way to use up some scraps of cardstock or even designer paper or mix the two.

You can use various sizes of circles, whatever suits your fancy and fits on your card. I used a 1″ Circle Punch (retired) but you could use something larger or larger die cuts. I just chose a bunch of colors of cardstock that looked good together.

It may seem a little difficult to get the circles placed correctly in a circle to form the lollipop. It might help you to put a pencil dot on your card where you want the center of the lollipop to be and you can kind of arrange the circles around that. When you get to the last circle in the lollipop, tuck it under the beginning circle, otherwise the two pieces on either side of that first circle will overlap it. So you want the last circle to tuck under it.

Use the Multipurpose Liquid Glue to just dab in between the circles to adhere them together into the lollipop shape. That glue gives you a little “wiggle time” to get the circles shaped the way you want them. After you get the lollipop formed, you can either glue it down directly onto the card front or pop it up with Stampin’ Dimensionals® or cut down some Foam Adhesive Strips to fit.

If you have a real lollipop stick, that would be fun to use or just cut a very thin strip of cardstock. I had a white one but of course it didn’t show up against this white cardstock so I just use a strip of Bumblebee Cardstock instead. Then I tied a bow of Bumblebee Gingham Trim and adhered it to the stick with a Mini Glue Dot.

For the greeting, I thought this one in the So Sentimental Stamp Set was perfect! I stamped it in Magenta Madness Ink and die cut with a die in the Stitched So Sweetly Dies. Then I die-cut another piece out of Magenta Madness that was smaller and I just cut it in half so I could use each end under the greeting to help it stand out from the Whisper White card layer.

I also thought it would be fun to stamp the little confetti stamp around the card in different colors to fill in all the white space. I just used some of the lollipop colors. The card base is Magenta Madness with a layer of Soft Sea Foam cardstock.

This is certainly a fun card to make and something different. It would be fun to make a few and make them into birthday cards or just “Hello” cards to send to a friend to brighten their day! Who wouldn’t be happy to receive this special Colorful Lollipop Greeting Card card?!

Colorful Lollipop Greeting Card Closeup

Prized Peony Die-Cut Flower Card

Prized Peony Die-Cut Flower

If you get some or all of this Peony Garden Suite, you will have so many ways to create that you will come up with many kinds of cards and projects like this simple Prized Peony Die-Cut Flower Card.

For this card, I wanted to stamp the flower, color in, and then die cut it! I stamped the flower from the Prized Peony Stamp Set in Memento Ink and colored in the flower and bud with Petal Pink Stampin’ Blend Markers plus Granny Apple Green Stampin’ Blend Markers for the leaves. Then I cut it out with the Peony Dies.

My original idea was to use the Peony Garden Designer Series Paper just in a basic card design way using one side of a pattern of designer paper on half the card and the other side of paper on the lower half (or so), with maybe a ribbon across the seam where the papers join or overlap a little. I thought I would use this gray pattern plus the pink floral design on the other side – but then I decided I liked using just the gray pattern for the card layer! You never know what you will really come up with once you start making a card!

The card base is Gray Granite with the designer paper adhered to the front. I had already colored and die cut the peony flower, but I thought maybe it needed some background to help it stand out. I looked through my dies and choose the largest rectangle in the Stitched So Sweetly Dies. That would have been fine as is, but I wanted to try out the Dainty Diamonds Embossing Folder so I embossed the die cut. It was very pretty!

Before adhering the embossed piece to the card, I wrapped a piece of the pretty Petal Pink 5/8″ Organdy Striped Ribbon around near the bottom. Then I adhered the peony using Stampin’ Dimensionals® and placed it underneath the ribbon. For the final touch, I tied on a small piece of ribbon just in a knot in the center. I didn’t even want to add a greeting.

Inside, since the cardstock was gray, I added a Whisper White layer inside the card, stamping and coloring one of the small flowers in the stamp set in the bottom corner. It has such a pretty vintage floral look! Now I can stamp a greeting inside the card or write my own note or personal message when I want to use the card. Be sure to check out my first card using the Prized Peony Stamp Set in this post yesterday.

Stamping and coloring the peony is another step to take but is easy enough, even the coloring, and certainly the die-cutting. Then I just used a piece behind the flower to help showcase the peony and added a ribbon to my Prized Peony Die-Cut Flower Card.

SHOP STAMPIN’ UP! ONLINE HERE!