Category Archives: Candy

From My Heart 2-4-6-8 Gift Box

From My Heart 2-4-6-8 Gift Box

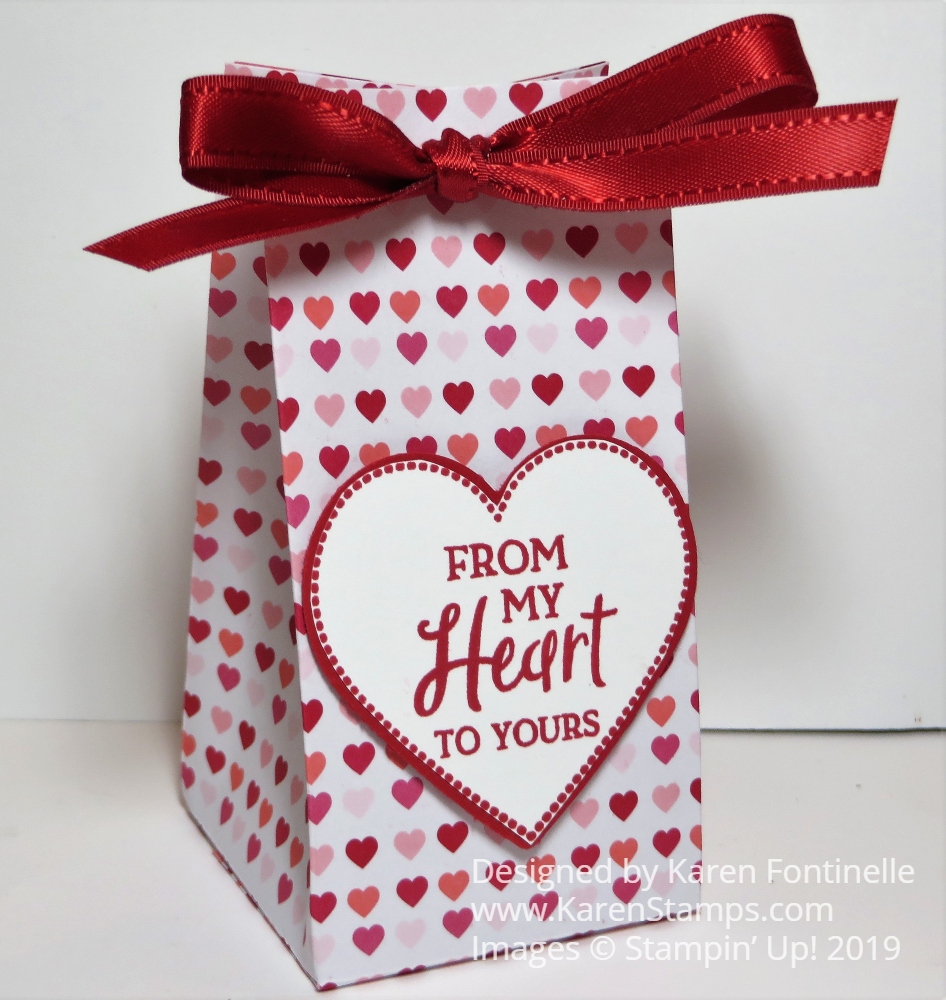
Here’s an easy and cute From My Heart 2-4-6-8 Gift Box you can use for a small gift or treat for someone, maybe for Valentine’s Day or maybe just any time. It’s made with the fun Specialty Designer Series Paper, From My Heart. It’s in the new Occasions Mini Catalog and you know Valentine’s Day is just around the corner, in spite of my Christmas tree not completely taken down yet!

You’ve probably made lots of these 2-4-6-8 boxes of various sizes, but I know I always need a little refresher. For this box, I started with a piece of the designer paper 8 1/2″ x 5 1/2″. Score at 2″, 4″, 6″ and 8″. Turn and score at 1 1/2″ (or 2″). These will be the bottom flaps so pay attention to the pattern on your paper, watching which way it is going so it doesn’t end up upside down.

Here is how my paper looked, although this was the inside of my box. You do cut off the little 1/2″ piece.

From My Heart 2-4-6-8 Box Diagram

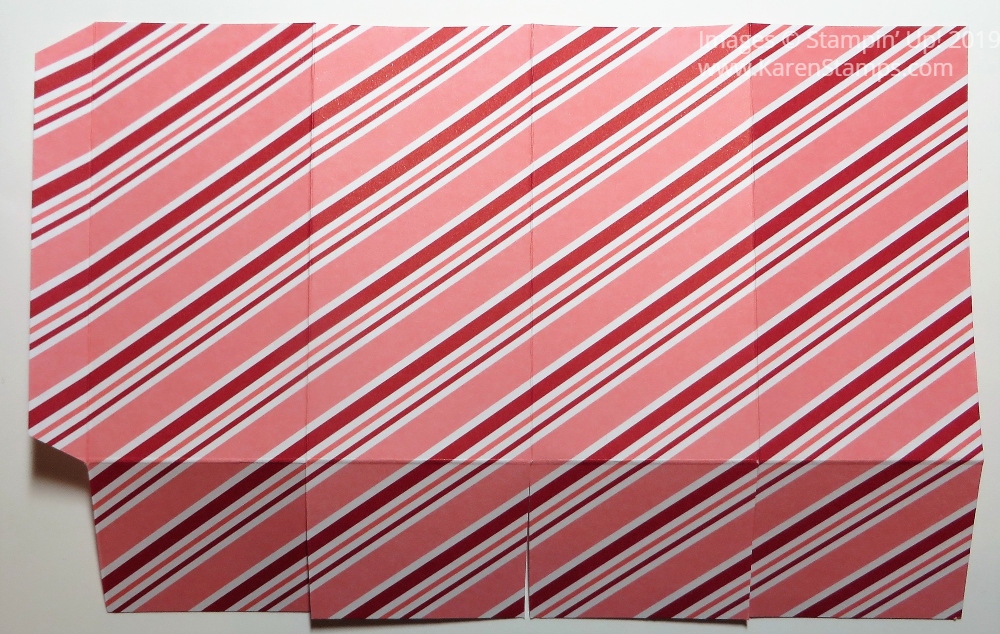
Assemble the box, putting adhesive on that 1/2″ piece on the side. Then pay attention to where the seam is and try to have that face the back. Fold in the bottom flaps, trying to make the front of the bag look nice with a flap fold, not the edge.

Decorate the front of the gift box. In some cases you might want to decorate before you assemble. I kept this one simple, but I wanted to try out the new Heart Punch Pack and the Heartfelt Stamp Set. I stamped the greeting and the heart outline in Real Red ink and then punched out the stamped heart plus one Real Red Cardstock heart. Since I wanted to layer them, I trimmed the Whisper White heart right up to the dotted outline. That made it a tiny bit smaller so I could layer it on the Real Red heart. Then I popped up the heart on the front of the box with Stampin’ Dimensionals®.

You could leave the top open or you can punch holes in the top and tie it closed with a ribbon, like this new Real Red 3/8″ Double-Stitched Satin Ribbon. Don’t forget to put your treat or gift inside before you tie it up! This would make a cute party favor bag or treat for a party.

Get the Heartfelt Bundle with the Heartfelt Stamp Set and the Heart Punch Pack and save 10%. You know you want new heart punches!

Remember, shop in $50 increments so you can choose free Sale-A-Bration products!

SHOP STAMPIN’ UP! ONLINE!

Sign Up For the January Paper Pumpkin About LOVE!

Paper Pumpkin Banner Jan 2020

Paper Pumpkin’s first kit of 2020 is all about L-O-V-E. Whether you want handmade favors for Valentine’s Day, a bridal shower, or a remarkably romantic wedding, this month’s kit has everything you need to help you celebrate your favorite friendships and love stories. So make it a “LOVE”-ly year with Paper Pumpkin!

Kit details: 

  • Makes 20 treat bags + 10 mini cards and envelopes
  • Card size: 3″ x 3″ (7.5 x 7.5 cm)
  • Envelope size: 3-1/8″ x 3-1/8″ (7.8 x 7.8 cm)
  • Bag size: 3-1/4″ x 4″ (8.2 x 10 cm)
  • Coordinating Stampin’ Up! colors: Crushed Curry, Highland Heather, Mint Macaron, and Rococo Rose

Get more from the I’ll Bee Yours Kit when you buy the Heart Punch Pack (item 151292) from the 2020 January–June Mini Catalog. Both punches coordinate with the heart stamp in the kit so you can craft for love-filled occasions now . . . and later! Think: weddings, showers, birthdays, and more! Check out the flyer advertising this super-versatile punch pack in your January kit!

Heart Punch Pack (item 151292), $34.00 USD

JOIN PAPER PUMPKIN HERE! Sign up by January 10, 2020!

Easy Rudolph the Red-Nose Reindeer Gift Bag

Easy Rudolph the Red-Nose Reindeer Gift Bag

Almost every year I have been making one variation or another of a Rudolph gift bag so here is my Easy Rudolph the Red-Nose Reindeer Gift Bag! Usually, I have decorated a kraft shopping bag like in this popular post HERE. Another year I made a smaller 2-4-6-8 bag to look like Rudolph HERE.

This is a similar bag, but a little larger that you make with half a sheet of 12″ x 12″ paper. It’s good to have at least the assortments of each color family of 12″ x 12″ paper on hand because even if we don’t use this size paper real often, sometimes you need a large piece for a project.

Start with a 6″ x 12″ piece of Soft Suede Cardstock or whatever color of brown that you like. Score at 4″, 5 3/4″, 9 3/4″, and 11 1/2″. Turn the paper so the short edge is at the top and score at 1 3/4″. This will make the bottom flaps of the bag. Cut those short bottom tabs up to the 1 3/4″ score line. Cut off the little 1/2″ tab on the bottom. Fold on all the score lines and crease well with the Bone Folder. Adhere the tab on the end to the other side to assemble the bag. Then adhere the flaps on the bottom. I used the Tear & Tape Adhesive. (There’s a piece of white cardstock underneath just for the photo.)

Gift Bag Diagram

Before you completely assemble the box, fold on all the score lines and SEE how it is going to go together. See which area will be the front. I found it was easier to glue on the pieces while the bag was still flat, but either way works since it is so simple!

I used a 2″ Circle Punch for the Red Glimmer Nose, a 1″ Circle Punch for the white part of the eyes and a 3/4″ Circle Punch (retired) for the black. You can use whatever punches or dies you have according to what sizes and look you want your Rudolph to have! Just glue them on to make your reindeer’s face.

For the antlers I used the Sprig Punch. I punched out 3 of the sprigs out of the Whisper White Thick Cardstock since I wanted them sticking up over the top of the bag and thought the Thick Cardstock would be a little stronger. One of the sprigs I cut apart and added one piece to each sprig. I colored all the sprigs with my Stampin’ Blends, two of them with the Light Crumb Cake and one with Soft Suede just to make it a little interesting and adhered the darker piece to the full sprig.

Just fill a cello bag with treats and tie with a ribbon! Put it inside the Easy Rudolph the Red-Nose Reindeer Gift Bag and you’ve got a fun gift for someone!

Christmas Mini Curvy Keepsake Boxes

Christmas Mini Curvy Keepsake Boxes

I thought it would be fun to just make some of these Christmas Mini Curvy Keepsake Boxes to have on hand for the holidays – now that the holidays are upon us!! These are just easy boxes that you have probably seen online, nothing too creative, but cute nonetheless!

All you need to make these and other cute creations is the Mini Curvy Keepsake Box Dies. The one big die cuts out the box and then you also have little tags and other pieces you can use. Very creative people make the most creative characters and designs with these boxes!

Snowman Face Mini Curvy Keepsake Box

This easy snowman is made with Whisper White Cardstock and I just drew on his face with Stampin’ Write Markers. You could alternately punch out pieces for his eyes, nose, and mouth but for me, it was easiest to draw. I used the greeting from the Itty Bitty Christmas Stamp Set. The Real Red Curly Ribbon makes a cute way to tie on the tag and add a little something to the snowman.

Santa Outfit Mini Curvy Keepsake Box

This little Santa box is easy to make with Real Red Cardstock and a bit of Basic Black scrap and Silver Glimmer Paper. Use a hole punch for a couple of buttons on Santa’s suit. To make the belt, just adhere a narrow strip of black cardstock. Add on a square of Silver Glimmer Paper and then adhere a smaller square of Basic Black on top of the glimmer paper to make it look like the belt going through the buckle! The greeting is tied on with a piece of Braided Linen.

Snowman Mini Curvy Keepsake Box

This keepsake box uses a piece of the Let It Snow Specialty Designer Series Paper with a snowman from another piece of the paper that is cut out and adhered to the side of the box. If the recipient opens up the box, they will find the cute inside pattern of lots of little snowmen. The only trouble with prints and this die is you would have to make sure the patterns and designs are going in the direction that you want. The greeting is stamped from Itty Bitty Christmas and tied on with a bit of the Silver 3/8″ Metallic-Edge Ribbon.

Rudolph the Reindeer Mini Curvy Keepsake Box

This cute little reindeer can be made various ways. He is made out of Soft Suede Cardstock for his body and a lighter color for the antlers, Crumb Cake. Of course you must you Red Glimmer Paper for Rudolph’s nose. The eyes are punched out and the black pupils colored in with a black marker. The antlers are glued on by bending back the stem of the die-cut piece and just glued on the top of the box. The tag, stamped with a greeting from Itty Bitty Christmas, is tied on with the Real Red Curly Ribbon.

As you can see, you can do a lot with these dies, much more really than these samples. But once you start making things with this box die, you can almost not stop!

if you don’t own the Mini Curvy Keepsake Box Dies, you might want to check them out in the Online Store. You can put a small gift or treat inside. Their little size makes them especially cute!

SHOP STAMPIN’ UP! ONLINE HERE!

Mini Curvy Keepsake Turkey Box Treats For Thanksgiving

Mini Curvy Keepsake Turkey Box Treats For Thanksgiving

At least these three turkeys are done for Thanksgiving (but not the real one!). These Mini Curvy Keepsake Turkey Box Treats For Thanksgiving are quick and easy to make and you could make any number of variations. There are so many cute little things you can make for lots of occasions with the Mini Curvy Keepsake Box Dies!

I always think these take two pieces to make but they do not…..just one die cut! You just need a piece of cardstock 6″ wide and turn the die so the points of the die-cut “point” to the corners of the cardstock, not straight up and down, and the die will fit. I used Crumb Cake Cardstock but Soft Suede would be another good choice for the turkey.

To make the tail feathers, I just used the oval tag die-cut in the package of the Mini Curvy Keepsake Box Dies. It does have a little hole in the tag, but I just put that at the base of the feather and it’s not seen. I started to glue the feathers right onto the body but then I thought to punch a 1 1/2″ Circle of Crumb Cake Cardstock and adhere the two rows of feathers on to that and then that onto the turkey body. You could also use colored leaves die cuts or even just strips of cardstock in various colors.

For the turkey face, I just used some stick-on googley eyes and cut a little turkey beak out of Crushed Curry. For the wattle, I punched out a sprig from the Leaf Punch and then cut off the leaves and used those for the turkey wattle. Just use and do whatever you think up or have on hand!

Don’t forget to put a little treat inside! I also tied on a piece of Lovely Lipstick 1/8″ Grosgrain Ribbon partly to hold the box closed for sure and mostly just for another little something to jazz up the turkey box!

You could make one for each of your guests at Thanksgiving and place them at their seat at the table. Or even put a little strip with the guest’s name on it at the bottom of the front of the turkey for a place card. I used to always love to make place cards for the table when I was a little girl!

If you are hosting Thanksgiving dinner, make a fun little treat or favor like these Mini Curvy Keepsake Turkey Box Treats For Thanksgiving or take a few for your hostess!

Have a Happy Thanksgiving!

Fun Halloween Treat Boxes

Happy Halloween Projects

Today is the big day for kids and also moms with little kids in school! Usually there is a run on Halloween cupcakes at the grocery store for the school parties! To celebrate, I put a few of my recent Halloween projects on this cute little cake stand my friend gave me the other day! The Clear Tiny Treat Box is easy to decorate and the Mini Curvy Keepsake Boxes are really cute. There are so many fun things to make for Halloween, just not enough time!

Halloween is such a fun holiday and one we all probably remember from our childhood – what costumes we wore, what kind of candy we got, school parties! I’m still good friends with a mom I met at my youngest son’s kindergarten class Halloween party!

These Coffin Treat Boxes were really fun this year, I thought! They were easy to put together and almost any way you decorated them they looked great! I used the Monster Bash Designer Series Paper and also the Spooktacular Bash Stamp Set, plus some leftover pieces from the September Paper Pumpkin Kit.

Coffin Treat Boxes Decorated For Halloween

After I took the photo I tied ribbon around them to hold the lid on after I put candy inside. The top decoration I popped up on two dimensionals at the top and bottom so there would be space in between to slide a ribbon. Here is a post for the first Coffin Treat Box I made and how to assemble it.

And then the other fun Halloween project was making these treat boxes with the September Paper Pumpkin Kit! “Craft supplies” (chocolate!) being put to proper use!

Paper Pumpkin treat boxes

Even though Halloween will be over after today, if there is anything in the Monster Bash Suite you loved and want more of for next year you can still order it!

Have a safe and fun Halloween Night! Don’t let the goblins get you!

Halloween Witch Boot Candy Favor

Halloween Witch Boot Candy Favor

This Halloween witch is ready with her Halloween Witch Boot Candy Favor! I’ve made these for several years now and they are very simple to make. The witch isn’t simple, just the candy treat! The witch I made (lots of them!) back in my crafting and craft show days from a pattern I probably bought at the International Quilt Show held annually in Houston back before I ever heard of Stampin’ Up!

The Witch’s Boot is easy to make. Just grab an empty toilet paper roll or cut down a paper towel roll or whatever roll you have. Wrap some designer paper around that you think looks like a sock. Then make a boot collar for the base. It just wraps around and meets in the middle. Then fold back the corners. The only thing to watch for is to make it wide enough so you can add a buckle. Then add a long strip for the base of the boot that is only as wide as the toilet paper roll. Narrow it down diagonally on each side and curl the tip if you like. No measurements, you can just do it for your size roll.

To make an easy buckle, just cut a square of some kind of foil (I used Copper on this one) and then make a smaller black piece for the center to look like it is going through the buckle.

Here is my witch’s boot with a purple striped sock and here is one with handmade stripes with cardstock! That gives you more ideas!

That’s all there is to it. Fill a cello bag with Halloween candy and put it into your Halloween Witch Boot Candy Favor!

Halloween Witch Boot Candy Favor Closeup

How to Decorate Candy Bars For Halloween Treats

How to Decorate Candy Bars For Halloween Treats

Here are some ideas on how to decorate candy bars for Halloween treats. If you happen to have a box of chocolate candy bars (I mean, craft supplies) in your pantry, you can have a good time decorating some of them (not all of them, of course!) with Halloween designer paper and embellishments. Maybe you don’t want to give out these regular size candy bars out to the trick-or-treaters but maybe it would be fun to make them for family, friends, office mates or neighbors. You could also do this with the little snack candy bars if you wanted to make a lot.

Just wrap a piece of cardstock or designer paper around the candy bar. I found that a piece of 5″ x 5″ Monster Bash Designer Series Paper worked fine. To make sure I had a good adhesive to hold the paper together after I wrapped it around, I used Tear & Tape. If you use Snail Adhesive, I would put it on both ends so the tape sticks to itself and makes the hold stronger. I do this a lot.

Decorate the candy bar however you like. On these Halloween candy bars, I used one character face from the Monster Bash Designer Paper layered on a 1 3/8″ Scallop Circle Punch. The other two have stamped greetings from the Spooktacular Bash Stamp Set. I layered each on a die-cut from the Ornate Frames Dies. Each die-cut was too big so I just cut them down in the middle and matched up the two ends underneath the greeting. It worked well enough for candy bars!

You could make these as fancy or as simple as you like, depending on who you are giving them to. Most likely you want to make them fairly simple. You could also use stamped or plain cardstock with some kind of embellishment. Here are some little candy bars I decorated several years ago! It really is fun once you get started. You may not want to stop!

Shop Stampin’ Up! Online HERE!

Mini Curvy Keepsake Halloween Boxes

Mini Curvy Keepsake Halloween Boxes

These Mini Curvy Keepsake Halloween Boxes are so easy and fun to make! We’re already through the first week in October so Halloween is approaching! It’s time to make some fun treat boxes or use them just as Halloween decorations!

The main thing you need is the Mini Curvy Keepsake Box Die to make these treat boxes. There is the one main die to make these boxes and then quite a few smaller dies for miscellaneous things plus tags. Just lay the die diagonally on a 6″ x 6″ piece of cardstock and it will fit. This die scores the lines where you need to fold.

If you want to make some Halloween treat boxes like mine, do the decorating first before you assemble the box. You might partially assemble the box by creasing all the score lines and see how the box will go together and decide which side you want to be the front of your project. The first time I used this die I had trouble getting the sides to fit over the handles. I found it useful to crease those handles on the score line first, then push down on them as you fit the side slits over them.

To make the Pumpkin Mini Curvy Keepsake Box, I just drew Pumpkin Pie Stampin’ Write Marker lines on all four sides of the box. For the nose, I just snipped a piece of Basic Black cardstock. The mouth, as you can tell, I just drew on myself with a Stampin’ Write Basic Black Marker. It is not a good mouth AT ALL, but I thought I would leave it so you can see a Demonstrator doesn’t do things perfectly either!

If you have the Harvest Hellos Stamp Set, you could stamp the pumpkin face on the box instead. However, you might like adding Googly eyes to your pumpkin. I just used some retired Stampin’ Up! eyes I already had, but you can purchase the cute colored Assorted Googly Eyes in the Holiday Catalog. I also just die cut a leaf and adhered it to the top of the pumpkin box. Any kind of leaf will do and you could also add a greeting if you liked.

For the Frankenstein Mini Curvy Keepsake Box, you can draw or make the face however you like. Look through your dies and see what little pieces you could use to embellish the face. I also added googly eyes to Frankie. You can’t see it, but I cut a piece of Basic Black Cardstock to resemble his bangs, but I made it too short and you can’t really see it on the box tucked up under the top. I just added a greeting that I made into a tag and tied it on with a double piece of the Mossy Meadow Linen Thread in the Magnolia Lane Ribbon Combo Pack. The greeting is stamped from the Itty Bitty Greetings Stamp Set (a must-have, I think!).

There are SO many creatures and critters and boxes and things you can make with these Mini Curvy Keepsake Box Dies, even ideas from back in the day when we had the larger ones. Use them for treats or small gifts for Halloween, Thanksgiving, Christmas, birthdays (like this one), Valentine’s Day…..well, all the holidays and most occasions that you can think of! But I really like these Mini Curvy Keepsake Halloween Boxes!

Shop the Stampin’ Up! Online Store!

Paper Pumpkin September 2019 Kit Halloween Treat Boxes

Paper Pumpkin Sept 2019 Kit Halloween Treat Boxes

I had so much fun making up this Paper Pumpkin September 2019 Kit with Halloween Treat Boxes yesterday while watching the Houston Texans lose another football game that they didn’t need to lose. It was good I had a distraction! I really enjoyed making this kit and not just because it was a Halloween theme!

Paper Pumpkin is a monthly papercrafting kit made by Stampin’ Up! that comes to you in the mail when you subscribe. You may think you do not want to be committed to a “subscription” but there really is no pressure or risk to a Paper Pumpkin subscription. You can go into your account at any time before the 10th of any month and “skip” a month or two if you like. If you want to cancel, just cancel. I consider it a gift to myself each month to receive this special box in my mailbox!

The presentation of the kit is wonderful, too! They don’t just throw all the materials in the box. All the materials are packaged up and wrapped in tissue paper just like a gift. There is also an exclusive stamp set and small ink spot. I think one of my favorite parts about the Paper Pumpkin Kit is opening it up and laying out all the materials provided in the kit! I love to see all the pieces I have been given!

Paper Pumpkin Sept 2019 Kit Contents

In this September Kit you can see the pamphlet with directions (there is also a helpful video online for each kit), the stamp set, the treat boxes, the various tags, the embellishments for the boxes, the bag of little black clothespins, the adhesive dots and even some black mini dimensionals to pop up some of the pieces.

I didn’t close up all my boxes yet, just some to see what they would look like and to show you in this blog post. I don’t want to have to undo all of them when I actually put candy or treats inside closer to Halloween! I got 20 boxes to make in this kit. I made 16 and am deciding if I want to make some alternative projects instead of all the boxes! Obviously it is your kit so you can use the materials however you like in any month! Sometimes I do half and half….make half as designed and make some other projects that I see online for something different!

Paper Pumpkin Halloween Treat Boxes

Here is a closeup of some of the boxes so you can see the decorated Halloween tags that are then clipped onto the handle of the box with a small black clothespin! The skeleton hand is adhered to the front of the clothespin with the glue dots. Such a cute project! Maybe you can see the clothespin clipped to the top of the box in this side view below.

Paper Pumpkin Sept 2019 Halloween Treat Box Closure

If you are interested in trying Paper Pumpkin, it is just the right time because the next two month’s kits will coordinate for the holidays! The October 2019 Kit will be 10 cards and the November Kit will be 24 holiday-themed gift tags of 4 various sizes and designs. Sounds like fun to me! I can guarantee you will be glad to have 10 extra cards, even if you are making some on your own, just in case! I know I always have a few more people I want to send cards to. And we all will need gift tags!

Paper Pumpkin Winter Wonders 2019

The cost of each monthly kit is $22 plus tax but that includes shipping. In your first kit, you will receive an acrylic block made for Paper Pumpkin with which to mount the stamps. In all the kits you will receive an exclusive stamp set, an ink spot, adhesives, and all the materials to make the project, whatever it is! No need to design something yourself or order supplies you don’t have……it’s all in the box! Just open and craft! And of course, you will have the stamp set and ink spot to use in the future. In fact, the ink spots are great to use with the Stamparatus!

October is coming up tomorrow and the important date to remember is October 10th! And then November 10th, if you don’t subscribe in October! But I suggest subscribing by October 10th so you receive both kits and will be ready for Christmas! Do it today so you don’t forget!

JOIN PAPER PUMPKIN HERE!

Monster Bash Halloween Clear Tiny Treat Box

Monster Bash Halloween Clear Tiny Treat Box

Make this Monster Bash Halloween Clear Tiny Treat Box so quickly and easily for all your Halloween ghosts and goblins! It’s practically October and you know that means it’s time to think about fun Halloween treat packaging!

This treat might be something more for family, friends, co-workers or other people, more than random trick-or-treaters since you will be using the Clear Tiny Treat Boxes. I always keep a package of these on hand for small treats or gifts. They are so easy to use and so versatile, not to mention they store flat. Just take off the bit of plastic wrap on them that protects the surface and crease the scored lines to form the treat box.

For this Halloween treat, I simply wrapped a strip, about 1 3/4″ wide, of the Monster Bash Designer Series Paper around the box. It will be longer than you need but just wrap around the box, creasing fairly lightly at each corner. Then take the paper off, trim the end to overlap the front edge just a little bit (since the decoration is going to hide where the paper overlaps) and use a Bone Folder to crease those score lines you created, keeping them straight along the edge of the strip of paper. Now put the paper back around the box and use a little adhesive to join the overlapping ends.

For this box, I wanted to just keep it super simple. I just cut out one of the Halloween character images from the Monster Bash paper with my Paper Snips and adhered him to the front of the box with two Stampin’ Dimensionals. I could have die cut a layer, maybe one of the Ornate Frames, to mount him on, but I was making it quick and easy!

After putting my candy inside (you could add some paper shred if you didn’t want so much room for candy!), I tied a Basic Black Satin Ribbon around the top to make sure the lid stays closed. The recipient can easily untie the bow to get to the candy!

Here’s another example in this post of a Halloween treat box from last year using the Clear Tiny Treat Box.

Another option would be to wrap the designer paper around the box across the top and decorate the top of the box, then wrap the ribbon around the sides of the box. Or just put some decoration on top of the box.

These would be cute party favors at a Halloween party and easy to make! The boxes are clear acetate and food safe so you don’t have to worry! And with the cute Monster Bash Designer Series Paper, you have no limit on decorating options for your treats! Try the Monster Bash Halloween Clear Tiny Treat Box for some Halloween fun!

Shop the Stampin’ Up! Holiday Catalog Here!

Last Day to Join Paper Pumpkin For This Halloween Kit!

Paper Pumpkin September 2019

Halloween is nearly here, which means that Paper Pumpkin has been busy, busy, busy. Stampin’ Up! thought you might like “a hand” with your frightful festivities, so they designed September’s kit, Bone Appétit, with YOU in mind. I can’t wait for this kit!!!

This kit includes 20 food-safe treat boxes, a unique and exclusive Halloween stamp set, and a spooky, special-edition box. September’s kit also gives new meaning to the word “handmade.” (Cue the scary laughter!)

So don’t be in the dark this Halloween. Subscribe at paperpumpkin.com by September 10 to get in on the fun. Find my name to be on my list:  Karen Fontinelle

OR My personal link! (you don’t have to search for my name!) 

JOIN PAPER PUMPKIN HERE!

(the monsters will get you if you don’t!)

Love Halloween? Be Sure to Join Paper Pumpkin For September!

Paper Pumpkin September 2019

Halloween is nearly here, which means that Paper Pumpkin has been busy, busy, busy. Stampin’ Up! thought you might like “a hand” with your frightful festivities, so they designed September’s kit, Bone Appétit, with YOU in mind. I can’t wait for this kit!!!

This kit includes 20 food-safe treat boxes, a unique and exclusive Halloween stamp set, and a spooky, special-edition box. September’s kit also gives new meaning to the word “handmade.” (Cue the scary laughter!)

So don’t be in the dark this Halloween. Subscribe at paperpumpkin.com by September 10 to get in on the fun. Find my name to be on my list:  Karen Fontinelle

OR My personal link! (you don’t have to search for my name!) 

JOIN PAPER PUMPKIN HERE!

Clear Tiny Treat Box with Pressed Petals

Clear Tiny Treat Box with Pressed Petals

I wanted a little thank you gift for someone and one of the easiest things to make is a Clear Tiny Treat Box filled with candy! Chocolate of course! This is one of the things that I LOVE to make since years ago when I saw the idea. That is, covering candy nuggets with a 1″ x 3″ strip of designer paper (being careful not to get adhesive on the actual candy, only the paper!). We used to put them in tins that had to be specially ordered, but now we have the Clear Tiny Treat Boxes that work!

The Clear Tiny Treat Boxes come sixteen to a package and come flat, so storage is no problem. They come wrapped in some plastic to protect from scratches. Just open and crease all the flaps, then assemble and decorate! These boxes are food safe and acid free. They are sized 2″ x 2″ x 2″. Perfect for a candy treat or small gift.

The fun way to decorate candy pieces like these chocolate nuggets is to cut a strip of designer paper (or stamped or decorated cardstock, but designer paper is easiest) that is 1″ x 3″. Just wrap around the candy and apply adhesive to the overlap. I like to use the Multipurpose Liquid Glue, carefully. Keep any adhesive off the candy.

To decorate this Tiny Treat Box, I wrapped a piece of Pressed Petals Specialty Designer Series Paper around the box. Make it as narrow or wide as you want, but you won’t need the full 12″ strip. Start by just wrapping around, creasing on the corners, then cut off the excess and adhere. Depending on your design, if you are putting something on the front of the box like this box, start the end on the front of the box and that junction will be covered by the flower. Otherwise, put the ends on the back of the box.

To decorate the front of the box I made a washi tape flower as I described in THIS POST. The new Pressed Petals Specialty Washi Tape comes with a roll of individual flower petals that you can peel and stick however you like or make a flower like this one! I added a few small rhinestones to the flower center. You can add one of the Perennial Essence Flower Centers if you have them.

The ribbon wrapped around the box is the Gold 3/8″ Metallic-Edge Ribbon, one of my favorites because it is so versatile. The little greeting is stamped with the Itty Bitty Greetings Stamp Set on Very Vanilla and partially layered over a piece of Merry Merlot Cardstock. You can use the Tailored Tag Punch to punch the flagged ends. Just adhere with Mini Glue Dots.

This is a fun and easy thank you gift to personalize for someone! Put the Clear Tiny Treat Boxes on your next order and keep them on hand for when you need to give a little gift like this Clear Tiny Treat Box with Pressed Petals.