
These Mini Curvy Keepsake Halloween Boxes are so easy and fun to make! We’re already through the first week in October so Halloween is approaching! It’s time to make some fun treat boxes or use them just as Halloween decorations!
The main thing you need is the Mini Curvy Keepsake Box Die to make these treat boxes. There is the one main die to make these boxes and then quite a few smaller dies for miscellaneous things plus tags. Just lay the die diagonally on a 6″ x 6″ piece of cardstock and it will fit. This die scores the lines where you need to fold.
If you want to make some Halloween treat boxes like mine, do the decorating first before you assemble the box. You might partially assemble the box by creasing all the score lines and see how the box will go together and decide which side you want to be the front of your project. The first time I used this die I had trouble getting the sides to fit over the handles. I found it useful to crease those handles on the score line first, then push down on them as you fit the side slits over them.
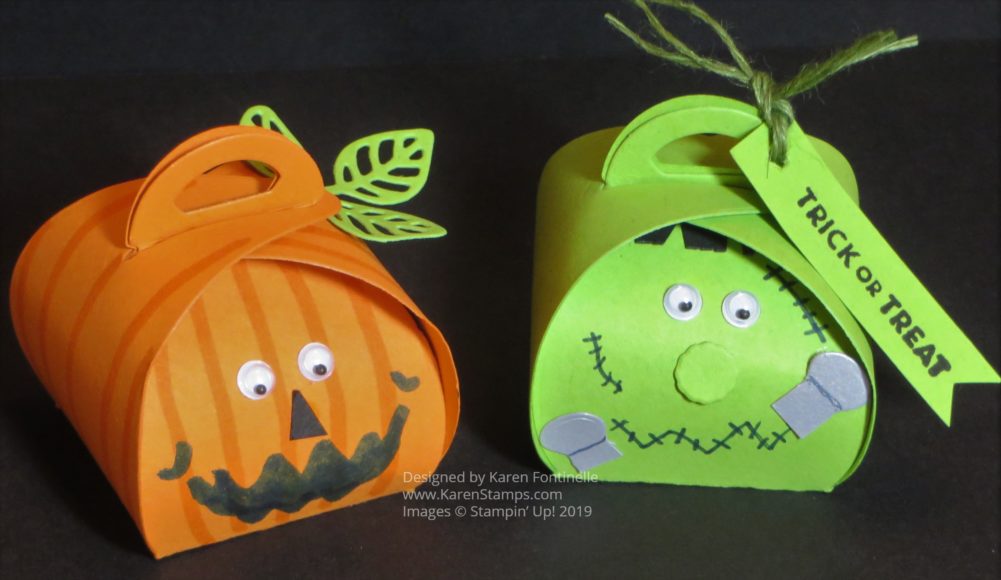
To make the Pumpkin Mini Curvy Keepsake Box, I just drew Pumpkin Pie Stampin’ Write Marker lines on all four sides of the box. For the nose, I just snipped a piece of Basic Black cardstock. The mouth, as you can tell, I just drew on myself with a Stampin’ Write Basic Black Marker. It is not a good mouth AT ALL, but I thought I would leave it so you can see a Demonstrator doesn’t do things perfectly either!
If you have the Harvest Hellos Stamp Set, you could stamp the pumpkin face on the box instead. However, you might like adding Googly eyes to your pumpkin. I just used some retired Stampin’ Up! eyes I already had, but you can purchase the cute colored Assorted Googly Eyes in the Holiday Catalog. I also just die cut a leaf and adhered it to the top of the pumpkin box. Any kind of leaf will do and you could also add a greeting if you liked.
For the Frankenstein Mini Curvy Keepsake Box, you can draw or make the face however you like. Look through your dies and see what little pieces you could use to embellish the face. I also added googly eyes to Frankie. You can’t see it, but I cut a piece of Basic Black Cardstock to resemble his bangs, but I made it too short and you can’t really see it on the box tucked up under the top. I just added a greeting that I made into a tag and tied it on with a double piece of the Mossy Meadow Linen Thread in the Magnolia Lane Ribbon Combo Pack. The greeting is stamped from the Itty Bitty Greetings Stamp Set (a must-have, I think!).
There are SO many creatures and critters and boxes and things you can make with these Mini Curvy Keepsake Box Dies, even ideas from back in the day when we had the larger ones. Use them for treats or small gifts for Halloween, Thanksgiving, Christmas, birthdays (like this one), Valentine’s Day…..well, all the holidays and most occasions that you can think of! But I really like these Mini Curvy Keepsake Halloween Boxes!