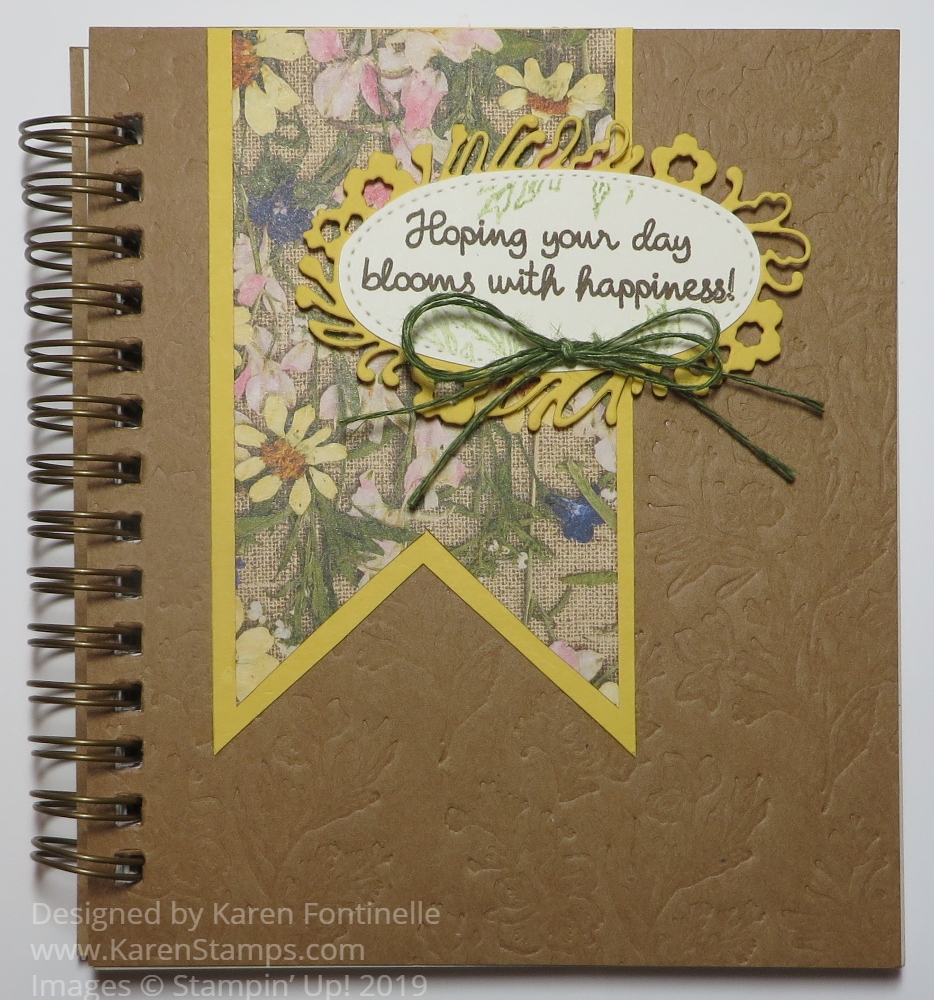
This Pressed Petals Journal With Floral Banner is just one that I have made for Christmas gifts. The Pressed Petals Journal is almost nice enough with its “debossed” cover without any other embellishment on it, but I think if you are giving it as a gift, or even just using it for yourself, it’s nice to decorate it a little bit.
This one is very simple. I just cut a piece of the Pressed Petals Specialty Designer Series Paper and flagged the end to look like a banner. Then I layered this on a piece of Daffodil Delight Cardstock.
I think if you are going to put a sentiment on the front of a journal, it should be something meaningful to the recipient or just something appropriate for the cover of a journal in which the person “might” be writing their personal thoughts or diary. I used the Petal Labels Dies for the layer behind the sentiment. The words are from the Varied Vases Stamp Set. I stamped a little greenery on the die-cut sentiment piece with some leaves in the Path of Petals Stamp Set. I might add it is best to do this before layering!! I just put down a piece of scrap paper over the layer so no ink would get on that piece. Then I added a bow tied with a double piece of green twine in the Magnolia Lane Combo Pack.
Here is a link to the first decorated Pressed Petals Journal I made. You can see in the post that the pages have several different designs and journaling prompts if you want to use them, or of course, you can just use it as any old notebook for keeping track of whatever you like!
I hope you will check out these Pressed Petals Journals in the Stampin’ Up! Annual Catalog on page 170 in the Memories & More section. Order several and you can decorate and give to your friends for gifts!
I made this Pressed Petals Journal for a gift for someone, but haven’t mailed it yet! However, it made me think, with the 2020 New Year approaching, if you were looking for just a little journal to begin the New Year, this could be perfect for you!
The Pressed Petals Journal is pretty nice just the way it comes from Stampin’ Up!. The cover is already embossed (or “debossed”) with kind of a floral design and comes spiral bound. The pages inside have some designs already printed and prompts (just several used over and over again). But then you can decorate it however you like! I tried to leave at least some of the cover showing a bit since I like that design.
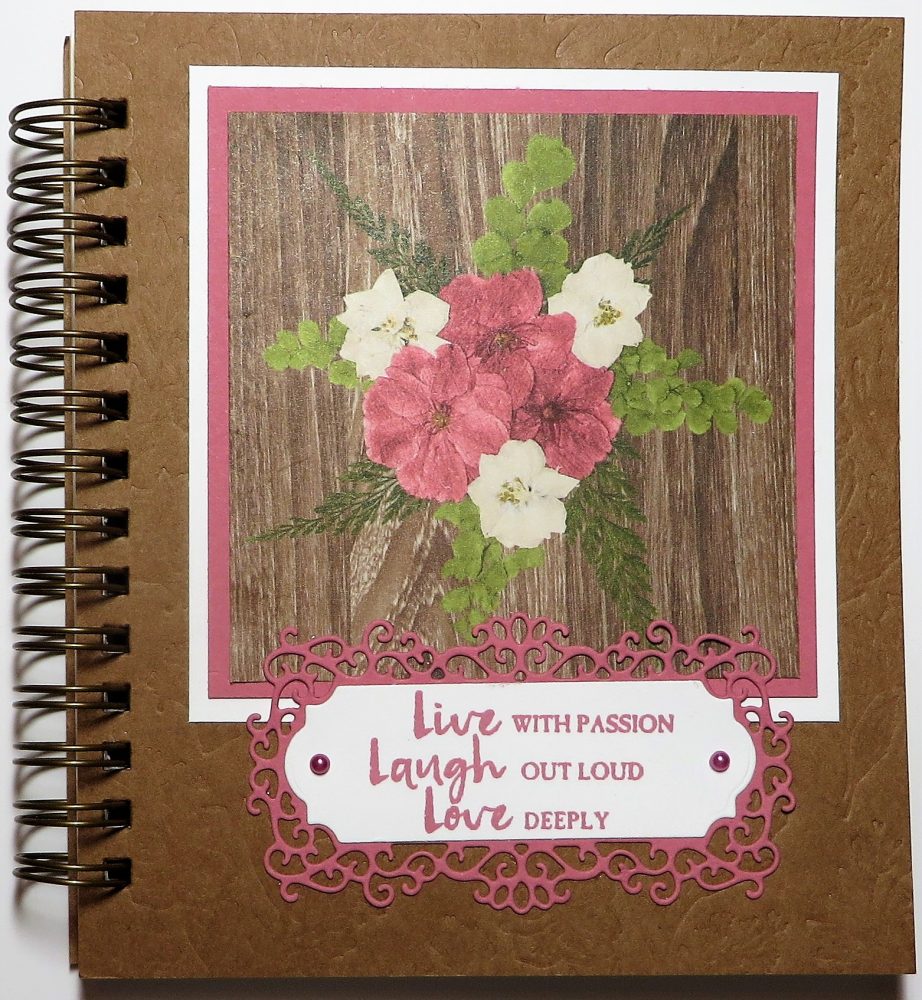
I changed my mind a few times but ultimately settled on just using the Pressed Petals Specialty Designer Series Paper because it would match the inside of the journal. I just chose one of the printed panels in the paper selection that would be small, especially after I cut it down close to the flowers. I layered it on the coordinating color of Rococo Rose Cardstock. I thought it needed a little brightening up so I added a layer of Whisper White.
The greeting is from the wonderful stamp set Beautiful You. I have always loved this saying and thought it would be a good thought to go on a journal for 2020! It is stamped in Rococo Rose Ink and die cut with a die from the Ornate Frames Dies,then layered the greeting on the frilly Ornate Frame die in Rococo Rose Cardstock. (I told you those dies weren’t just for Halloween!) And I also added a couple of little pearls that may be retired. Inside I even added a few embellishments, like a punched daisy, sequins, and other Flower Faceted Gems.
You’ll find this Pressed Petals Journal in the Memories & More section of the catalog or Online Store. One special thing about the pages in the journal is that they can be torn out and used on card fronts or memory-keeping pages, whatever you like!
At the beginning of each new year, we often feel we want to start something new or resolve to have better habits of all kinds. If you feel like to want to do some journaling in the new year, get this Pressed Petals Journal because it’s not intimidating with expectations at all. It’s small, so you barely have to write anything at all, but if you jot down some memories or thoughts, you might be very happy you did in future years to look back on!
We often say, “Stamping is therapy” and it certainly is, like with this Path of Petals Thank You Card and many other cards! Sometimes you just need to stop and sit down and stamp.
It’s been such a busy week and everywhere I went traffic, traffic, traffic! I think everybody is in town with all the schools back in session so no one is on vacation anymore. Everybody is home and going to work and on the roads! Not to mention construction everywhere which causes backups and slowdowns! I think I need to allow an hour to get anywhere I go just to keep the drive less stressful! I don’t know when it’s been quite like this in all the years I have lived here.
So what is the best thing to do to alleviate a little stress?? Stamp, of course! This card uses the Pressed Petals Specialty Designer Series Paper and stamping with the Path of Petals Stamp Set. Although I have used the Pressed Petals DSP on lots of cards, I had difficulty stamping the flowers and leaves with this stamp set so this is the first time I actually used the flowers and stems! Here is a card I made with a piece of the Pressed Petals Designer Paper. I love these dark-colored flowers so much!
The card base is Mossy Meadow, one of the coordinating colors of the Pressed Petals Designer Paper. I started with the design with the leaves and ferns (I guess!), although originally I had the top and bottom designs reversed. This is actually the same paper, the leaves on one side and the cloth-looking design on the other.
The die-cut piece going across the front of the card is from the Flourish Dies using Merry Merlot Cardstock. I like to have something, usually ribbon, where I have two different patterns of paper coming together. It just finishes off that edge nicely. But this time I thought of using some kind of border die or something and finally, I found this one. It is a little bit fancy but doesn’t overwhelm the card. The secret is that the piece is not long enough to reach all the way across the card. But since part of the die-cut was going underneath the stamped piece, I was able to cut it, leaving a space underneath the stamping making the ends reach to each side of the card, and no one will be the wiser!
Maybe you won’t have trouble stamping the flowers, but just in case, this is what I found out. I think it was easier to stamp the flower stems and leaves first. I stamped these in Pear Pizzazz Ink. Next, I stamped the flowers in Merry Merlot Ink. I think you will have to move the stamp around until you feel like the flower blossoms are fitting with the stems. Past stamps we have had had a notch on each of the stamps that were to be stamped in the same direction so you could tell how to line them up. These stamps do not, so you just have to line them up as best you can. I could not get the other leafy stamp to line up correctly, so I just stopped with what I had as you see on the card.
For a little pizzazz on the stamping, I used the Clear Wink of Stella Glitter Brush to brush on a little Merry Merlot ink from the ink pad onto each flower, trying to keep it fairly light, which also added a bit of glimmer. Then I did the same with the leaves with the Pear Pizzazz ink. As much trouble as these stamps were to line up, I really liked the stamped image after adding a little bit of color and the glimmer from the Wink of Stella brush!
The greeting is from the same stamp set. It is stamped on Very Vanilla Cardstock in Merry Merlot Ink and then punched out with the Classic Label Punch. However, I snipped off the pointy ends of the punched piece to just make it plain. I could have layered it on a piece of Merry Merlot but I liked it just adhered to the card by itself.
So there you have it! A little stress relief from the demands of the week and a simple card design that you could vary in many different ways!
This Easy Pressed Petals Thank You Card is simple to make and can be for almost any occasion, just change the greeting. Sometimes it is fun to try a more complicated technique or design in our cardmaking or make a card with lots of embellishments, but sometimes just a rather basic design is more than fine!
The Pressed Petals Specialty Designer Series Paper is an easy one to use on cards. This paper was designed by actually photographing real pressed petals for one side of the paper and vintage designs on the other side. One design is a sheet of individual blocks of flowers that can be cut apart to add to cards in different ways. We had something like that last catalog.
This card starts with a base of Pear Pizzazz Cardstock and then a piece of Pressed Petals Designer Paper with these leaves and ferns. So pretty on it’s own so you don’t need to add much to the card. I stamped a greeting and die cut it and some layers with the Layering Ovals Dies, one a Mossy Meadow Cardstock layer and one a Gold Glimmer Paper layer to match the ribbon.
The ribbon is the Gold 3/8″ Metallic-Edge Ribbon. I think this is one ribbon you should have in your stash because it goes well with so many cards and projects. I just tied a knot to keep it easy!
Inside the card, you can stamp something or write a personal note. If you find it difficult to write on the colored cardstock, just cut a layer of Whisper White or Very Vanilla Cardstock and adhere inside. You can first stamp something in the corner or add a strip of the same or coordinating designer paper. It makes for a nice surprise when the recipient opens the card!
The greeting is one in the Path of Petals Photopolymer Stamp Set which is part of the Pressed Petals Suite. I love how Stampin’ Up! has so many coordinating items to use in our projects and has put them together into these Suites. Of course you can always use any stamp set for a greeting or mix and match stamps and paper or whatever, but if you don’t want to think very hard about it, or you just like EVERYTHING that goes together, then it is easy to choose from a Suite….or order the whole Suite.
Enjoy the Stampin’ Up! Annual Catalog while you wait for the Holiday Catalog because once the Holiday Catalog goes live, we will all probably mostly be in holiday mode! I hear Holiday Catalogs are hitting some mailboxes already so be on the lookout!
Use this design that I used for this Easy Pressed Petals Thank You Card to make a batch of cards with different greetings and you will likely have a card ready to go for almost any occasion, especially when you are short on time.
I wanted a little thank you gift for someone and one of the easiest things to make is a Clear Tiny Treat Box filled with candy! Chocolate of course! This is one of the things that I LOVE to make since years ago when I saw the idea. That is, covering candy nuggets with a 1″ x 3″ strip of designer paper (being careful not to get adhesive on the actual candy, only the paper!). We used to put them in tins that had to be specially ordered, but now we have the Clear Tiny Treat Boxes that work!
The Clear Tiny Treat Boxes come sixteen to a package and come flat, so storage is no problem. They come wrapped in some plastic to protect from scratches. Just open and crease all the flaps, then assemble and decorate! These boxes are food safe and acid free. They are sized 2″ x 2″ x 2″. Perfect for a candy treat or small gift.
The fun way to decorate candy pieces like these chocolate nuggets is to cut a strip of designer paper (or stamped or decorated cardstock, but designer paper is easiest) that is 1″ x 3″. Just wrap around the candy and apply adhesive to the overlap. I like to use the Multipurpose Liquid Glue, carefully. Keep any adhesive off the candy.
To decorate this Tiny Treat Box, I wrapped a piece of Pressed Petals Specialty Designer Series Paper around the box. Make it as narrow or wide as you want, but you won’t need the full 12″ strip. Start by just wrapping around, creasing on the corners, then cut off the excess and adhere. Depending on your design, if you are putting something on the front of the box like this box, start the end on the front of the box and that junction will be covered by the flower. Otherwise, put the ends on the back of the box.
To decorate the front of the box I made a washi tape flower as I described in THIS POST. The new Pressed Petals Specialty Washi Tape comes with a roll of individual flower petals that you can peel and stick however you like or make a flower like this one! I added a few small rhinestones to the flower center. You can add one of the Perennial Essence Flower Centers if you have them.
The ribbon wrapped around the box is the Gold 3/8″ Metallic-Edge Ribbon, one of my favorites because it is so versatile. The little greeting is stamped with the Itty Bitty Greetings Stamp Set on Very Vanilla and partially layered over a piece of Merry Merlot Cardstock. You can use the Tailored Tag Punch to punch the flagged ends. Just adhere with Mini Glue Dots.
This is a fun and easy thank you gift to personalize for someone! Put the Clear Tiny Treat Boxes on your next order and keep them on hand for when you need to give a little gift like this Clear Tiny Treat Box with Pressed Petals.
I finally got the chance to try out my flower-making on this Pressed Petals Card With Washi Tape Flower. The new Pressed Petals Specialty Washi Tape comes with two rolls of washi tape and one is really unique! One roll has floral washi tape with individual flower petals that you peel and stick! And of course, it all coordinates with the Pressed Petals Specialty Designer Series Paper!
Here’s how you make the washi tape flower with the Pressed Petals flower tape. Punch out a small circle for a base, like about 3/4″ or 1″. Use a larger circle if you want a larger flower using more petals. It’s a good idea to use the Silicone Craft Sheet so that the flower tape won’t stick while you work on the flower, or maybe some wax paper. For my 1″ punched circle, I started with 6 petals. Just peel them off the roll, then stick to the circle base. I put two opposite each other, then filled in with two petals on each side. It’s easy! I wasn’t able to stop playing with the petals, so I peeled off 4 more and made a second layer! You don’t have to do this. The petals seem to naturally curl up a little bit! When you have your flower made, take your Embossing Buddy and pat the backside of the flower petals to take away the stickiness.
When you have the flower made, put some kind of center in the flower. You can use cardstock, the Perennial Essence Floral Centers, or do what I did and cut out a flower center from one of the papers. My flower is popped up on the card with Stampin’ Dimensionals.
The card itself is very easy. The card base is Crumb Cake and the beautiful paper is one from the Pressed Petals Specialty Designer Series Paper. I think this floral pattern is my favorite. Actually pressed flowers were photographed to design this paper. The ribbon isn’t one of the official coordinating colors but I liked it on the card anyway. The ribbon is the Old Olive/Pretty Peacock Reversible Ribbon. This is a very pretty ribbon with two colors and a sheen to it! It’s been very popular!
I don’t have a greeting on my card yet. Actually, I think it looks very full and pretty without a greeting, but mainly I thought I would wait and see what greeting I want when I send the card. It could be a thank you or birthday or thinking of you or almost any occasion. I could even leave it plain and just write a friendly note inside.
Inside the card I adhered a layer of Very Vanilla to make it easier to write or stamp a greeting. When I saw a strip of the same designer paper laying on the table, I cut it a little narrower and adhered it to the bottom of the Very Vanilla so there will be a little extra prettiness inside the card! Very often you might want to stamp the layer inside or add a strip of designer paper to match or coordinate with the front of the card.
Here is a different way to use another pattern of the Pressed Petals DSP, making a gift bag and small card.
This paper also comes with two sheets of a collage of smaller pieces that you can cut apart and use various ways.
Put the Pressed Petals Washi Tape on your next order so you can play with making flowers with this washi tape for your cards and projects!
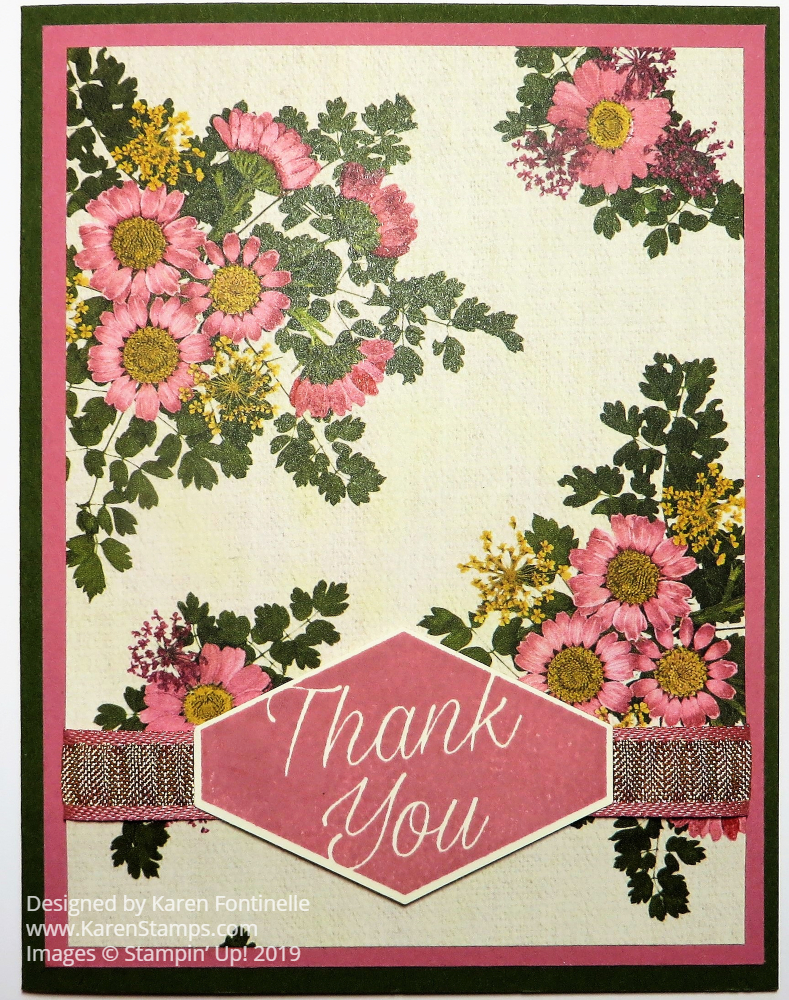
This Pressed Petals Floral Thank You Card is very simple and quick to make! This card design is certainly easy and basic and is also good to use with this beautiful Pressed Petals Specialty Designer Series Paper. The paper itself is so pretty and unusual that you want it to stand on its own. This paper was designed with actual pressed flowers that were photographed by Stampin’ Up! and then printed into paper.
The card base is Mossy Meadow Cardstock with a layer of Rococo Rose, one of the new In Colors. The ribbon adhered around the designer paper is the Rococo Rose 1/2″ Gathered Ribbon. This ribbon is two-toned, with a gold center and Rococo Rose edges.
The greeting is stamped from the Accented Blooms Stamp Set in Rococo Rose Ink. Then it is easily punched out with the Tailored Tag Punch. The greeting is then adhered to the card with Stampin’ Dimensionals at the top and bottom of the center so that it will fit on each side of the ribbon.
Since the Mossy Meadow Cardstock is so dark, I added a Very Vanilla layer inside the card and stamped a little flower in each corner to allow for stamping a sentiment inside or writing a personal note.
Any time you need a quick card, think about this simple design. You could even omit the ribbon if you didn’t have quite the right thing or wanted to make it even simpler. This Pressed Petals Floral Thank You Card is one you can easily make with any cardstock, designer paper, and a greeting! Try it!
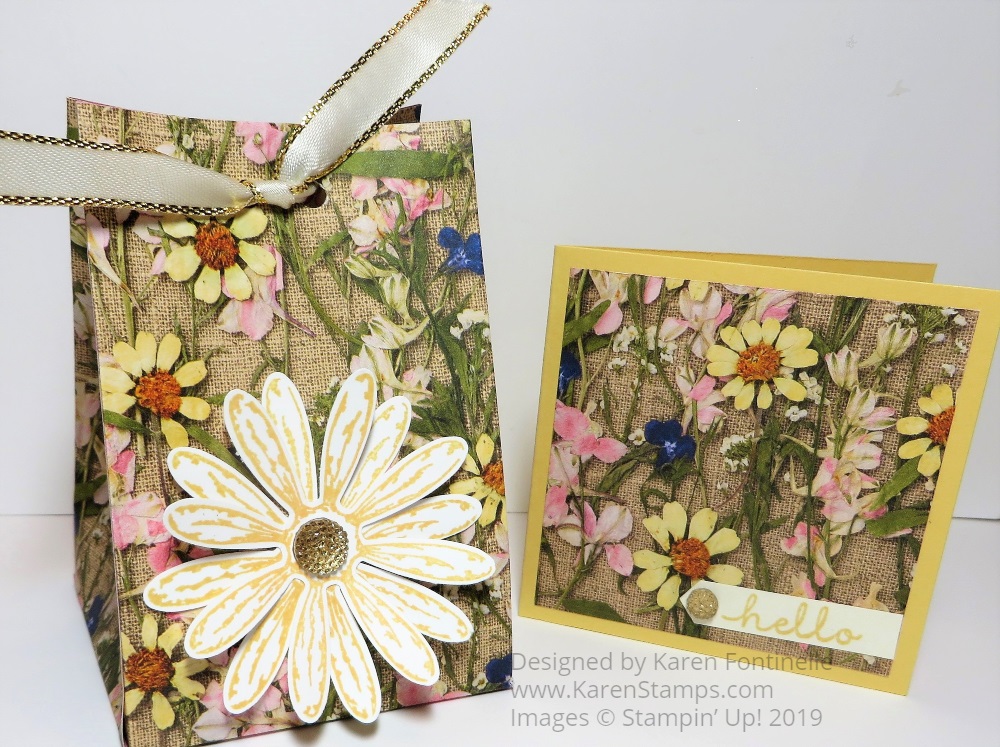
The Pressed Petals Specialty Designer Series Paper is so pretty and I thought I would make something other than a regular card with it. Here is my Pressed Petals Gift Bag and Gift Card that you could also make for just a small gift. The bag is just 6″ high and the paper is very lightweight so you could put some pieces of candy inside, a piece of jewelry, a gift card, or a diamond ring! (Might as well aim high!)
The Pressed Petals Paper is designed with photographic images of real pressed flower petals. One side of the paper has the flower images, the other side has subtle vintage designs like old sheet music, lines of script, wood grain, and vintage plant descriptions. One design has portions you can cut apart and use on cards, much like the Petal Promenade Paper we previously had.
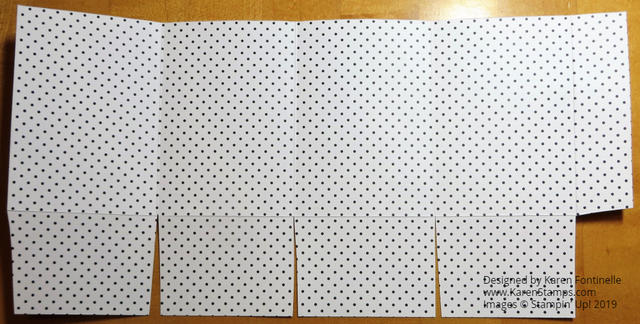
This bag is one of those easy things to make, as I have done many times before. Start with a 12″ x 6″ piece of designer paper (or cardstock). Score at 1″, 3 3/4″, 6 1/2″ and 9 1/4″. Then turn long ways and score at 2″ to make the bottom flaps. Cut off the smallest little section and cut up on the botton flap score lines to the horizontal score line. Then crease and fold to form the bag. Leave it open at the top or punch two holes and tie it closed with ribbon. Here’s a similar example.
I stamped two daisies with theDaisy Delight Stamp Set and punched out with the Daisy Punch. I like putting one of the Gold Faceted Gems in the daisy center. A new item we have now in the new Stampin’ Up! Catalog is the Perennial Essence Floral Centers, actual fuzzy embellishments to look like the center of real flowers, that you could use.
The ribbon I used is the Gold 3/8″ Metallic Edge Ribbon. Just push the sides of the bag in a little bit and pull the top edges of the bag together to close the top. If you don’t want to get punched holes on all four sides of the bag, punch the front and back holes first before you pull the bag together! You could also hold the top of the bag together with a Mini Library Clip or check the Clearance Rack for two other styles (and bargains!). Don’t forget! Some stamp sets were added to the Clearance Rack the other day you might want to check out!
And while I had the paper out, I decided to make just a cute little matching card, 3″ x 6″ folded in half with a 2 3/4″ x 2 3/4″ piece of designer paper on top. The little “hello” is found in the Bloom & Grown Stamp Set. I thought it was cute for that card and is punched out with the Classic Label Punch to make it easy. Just for a little something, I added the smallest size Gold Faceted Gem on to the greeting to match the bag. I wish it was even smaller but I think it is fine.
Use your Pressed Petals Specialty Designer Series Paper to make simple gift bags like this one plus a gift card to match!