Use a paper towel roll or something similar, maybe a tall round tin, and decorate like Uncle Sam for the 4th of July. Fill it with candies for a party favor or hostess gift!
If you have the Wood Crate Dies, you can make this easily and use the Daisy Punch, too! If you don’t own the Wood Crate Dies, just make a little box or use a little box you have. Make some patriotic flowers (and maybe add some candy!) and you are set!
These are really easy to make! You can make a small one with a piece of 6″ x 6″ piece of paper or a larger one with a 9″ square piece of paper. Decorate for a patriotic treat and add candy. You can easily change this up for any occasion!
Another crate but you could also just do a cello bag of candy or some other treat! Fill it with some red, white, and blue candies, tie on a ribbon and maybe add a 4th of July tag!
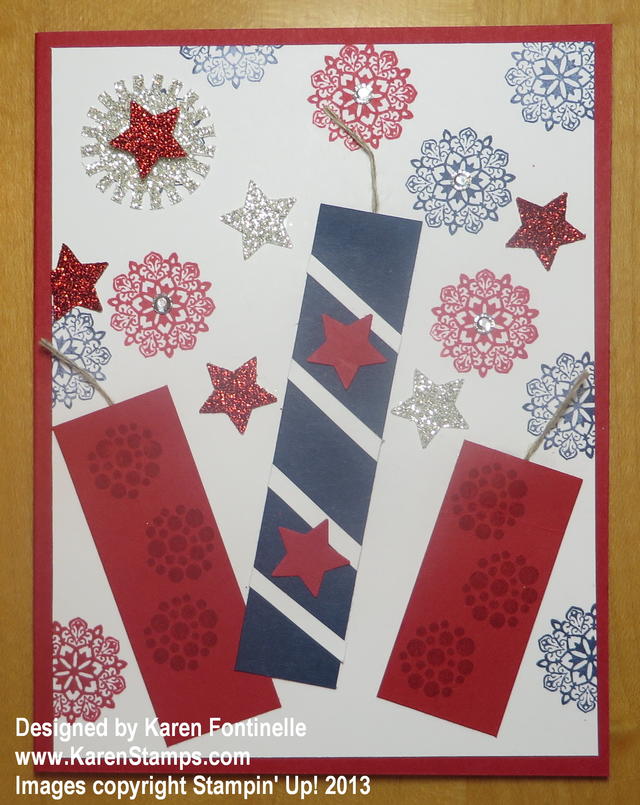
I hope these past projects give you some ideas for whatever 4th of July projects you would like to make for decorations or treats!
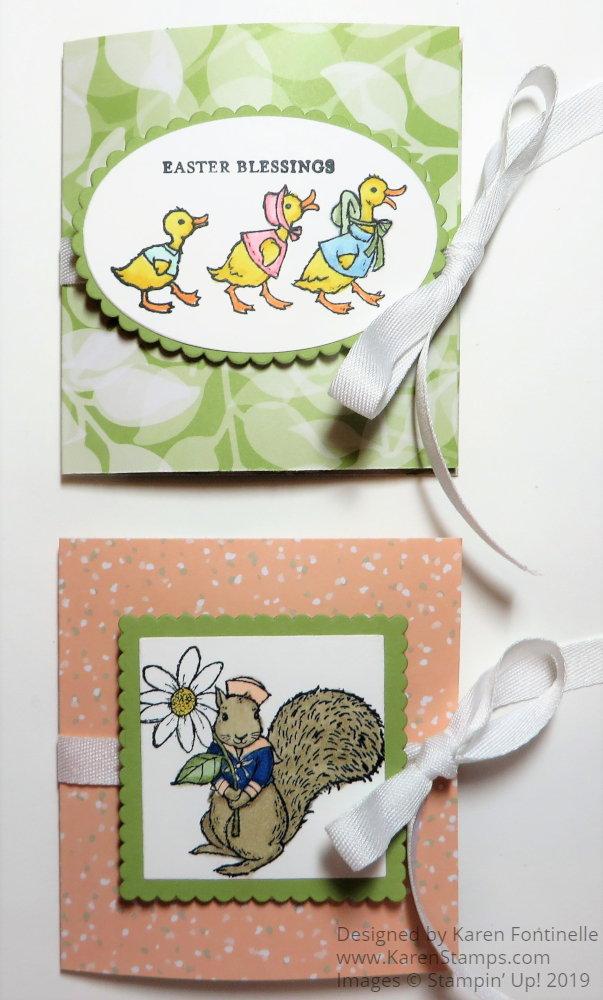
If you are looking for some easy little Easter candy treats, these Easy Easter Folded Candy Holders might be just what you are looking for! The basic holder is so simple to make and then you can add whatever you want for the front design.
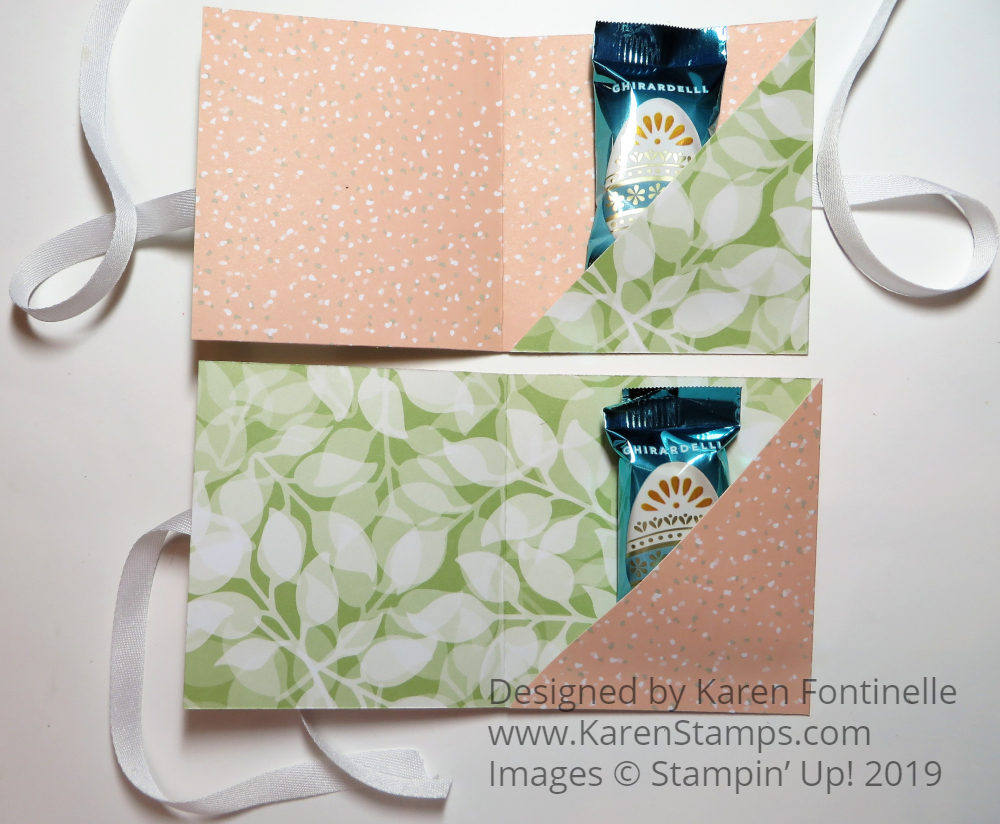
You can modify the measurements any way you like to suit what you are putting inside. Besides a piece of candy, you could put a tea bag or a small cookie or maybe even a gift card. As I said, just change up the dimensions.
My sample starts with a piece of paper 9 3/4″ x 3 1/2″. Mine uses the Floral Romance Specialty Designer Series Paper. I used the same piece of paper, just opposite sides for the front of the candy holder. When you use designer paper you get to see the opposite side of the paper on the inside. However, you could also use cardstock for the holder and use designer paper for a layer on the front or embellishment. Score the paper at 3 1/4″ from each end. This divides the paper into thirds. The end section on the right-hand side will have a diagonal cut. This piece will fold over and be adhered at the bottom to form a pocket. This is where you can put a piece of candy or tea bag or something. I used Tear & Tape Adhesive.
On my candy holders, I stamped images from theFable Friends Stamp Set. These were each colored with Stampin’ Blends markers (although I almost used Watercolor Pencils for a change!) and then die cut and layered on cardstock.
In order to have the ribbon going around to tie the candy holders closed, I popped up the images on the front of the holder withStampin’ Dimensionals at the top and bottom. That way I could run ribbon underneath, in between the Dimensionals, and around the back. I put a little bit of Snail Adhesive on the back underneath the ribbon to hold it in place. The ribbon is the Whisper White 3/8″ Classic Weave Ribbon. (One advantage of white ribbon is that you can dye it another color with reinkers or maybe markers to match something!)
If you want to see the same kind of candy holder made for Christmas one year, click HERE.
You can make these candy holders for any occasion, of course, and make them as simple or fancy as you like. These work particularly well for the square Ghirardelli chocolate candy. I had these Ghirardelli chocolate eggs, which do fit, but they are not flat like the squares. Use whatever you like or modify the measurements on the candy holder to fit your kind of candy or treat. Go have fun making a few of these easy Easter folded candy holders.
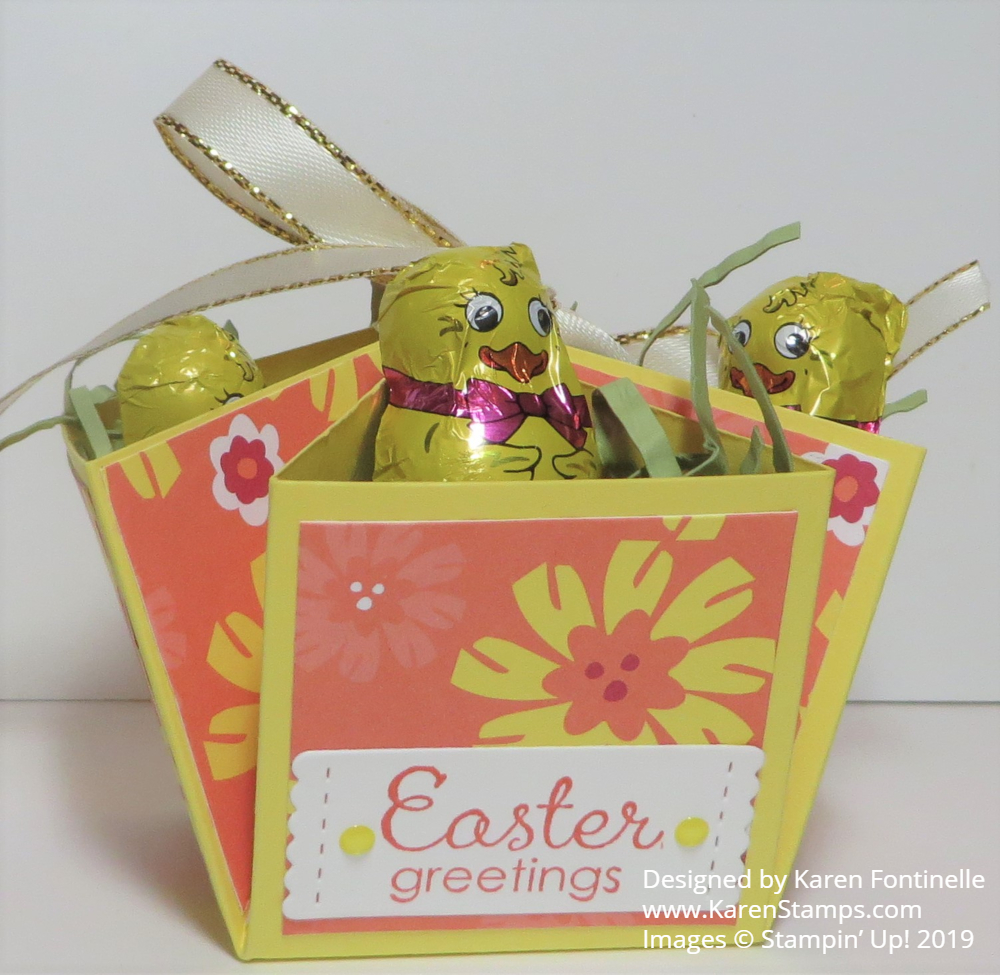
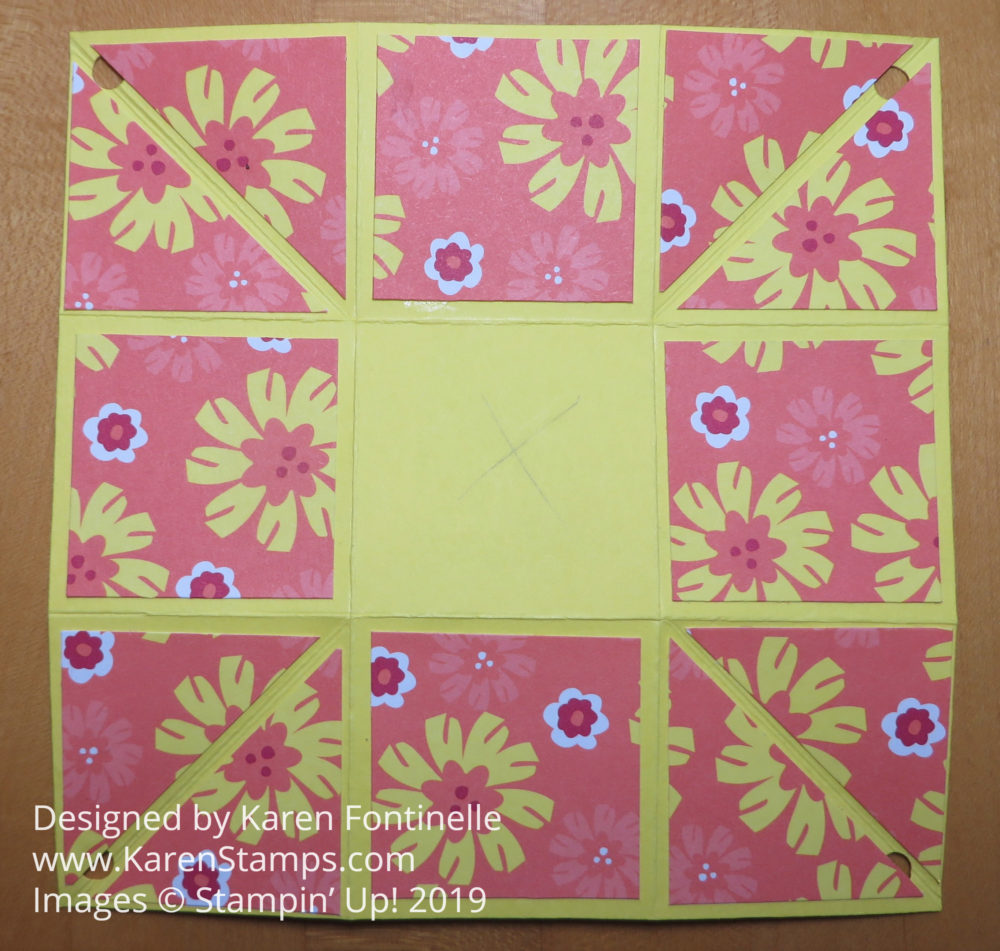
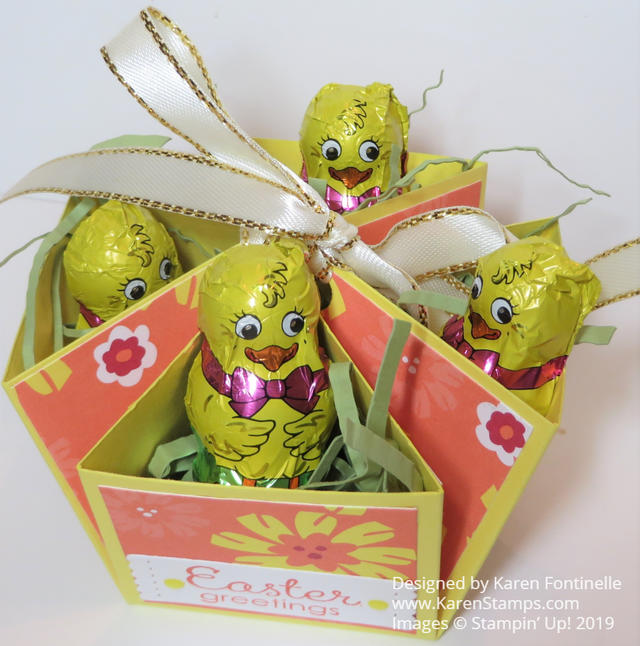
Here is a fun little Easy Candy Basket For Easter With Candy Chicks, one you may have made in the past to fill with candy. Easter is late this year, but it will still sneak up on us! Now is the time to start having fun making Easter cards to send and maybe some little projects for your Easter dinner or home decorations!
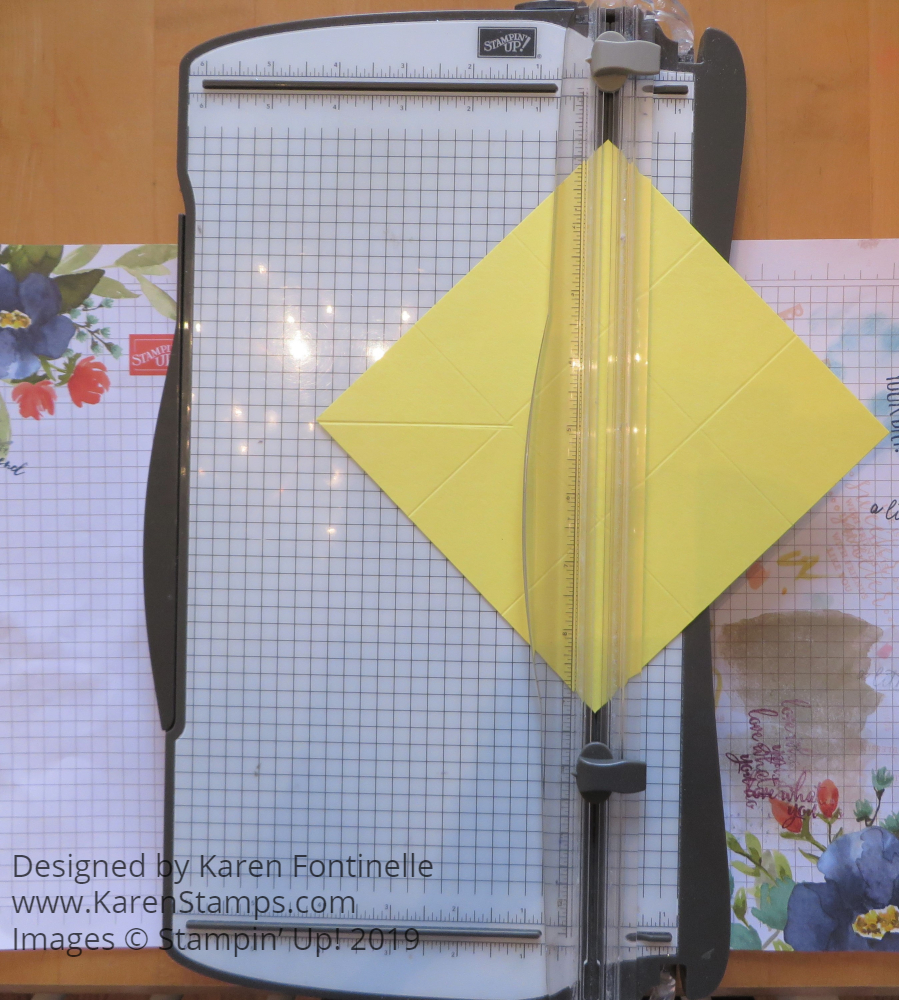
This small little basket is made with just a 6″ x 6″ piece of cardstock and pieces of designer paper. Score at 2″ and 4″ on each side so it ends up looking like a tic tac toe board with six sections. Then on each corner, score diagonally. You can do it easily with the Stampin’ Trimmer by lining up the top and bottom corners on the cutting track of the Trimmer. Don’t score all the way down the paper, just in that corner. That center piece will be the bottom of the basket. See photo below.
This is what your paper will look like when it is all scored and creased.
After the scoring is done, be sure to crease on all the score lines and just see how it is going to fold up into a basket when assembled. Note where the bottom is and put an X on the bottom with a pencil just so you know. Then cut and adhere pieces of designer series paper (or stamp on the cardstock) to each area. The squares will be 1 3/4″ x 1 3/4″. Note that for the four pieces that will go on the corners must be cut diagonally in half and adhered on each half of that scored corner. You do not need a piece of designer paper for the bottom of the basket, that you have already marked.
To assemble the basket just fold up into a container shape, folding those diagonal corners in. The way the basket will stay together is by tieing the four corners together in the center. In order to do that, you will need to punch a hole in each corner. It’s probably best to do this after you adhere the designer paper, but you can do it to the plain cardstock and then just re-punch if needed. You can see the punched holes in the corners in the photo above if you look closely. Run some ribbon around through the holes and then pull and gather the corners to the center and tie the ribbon into a bow.
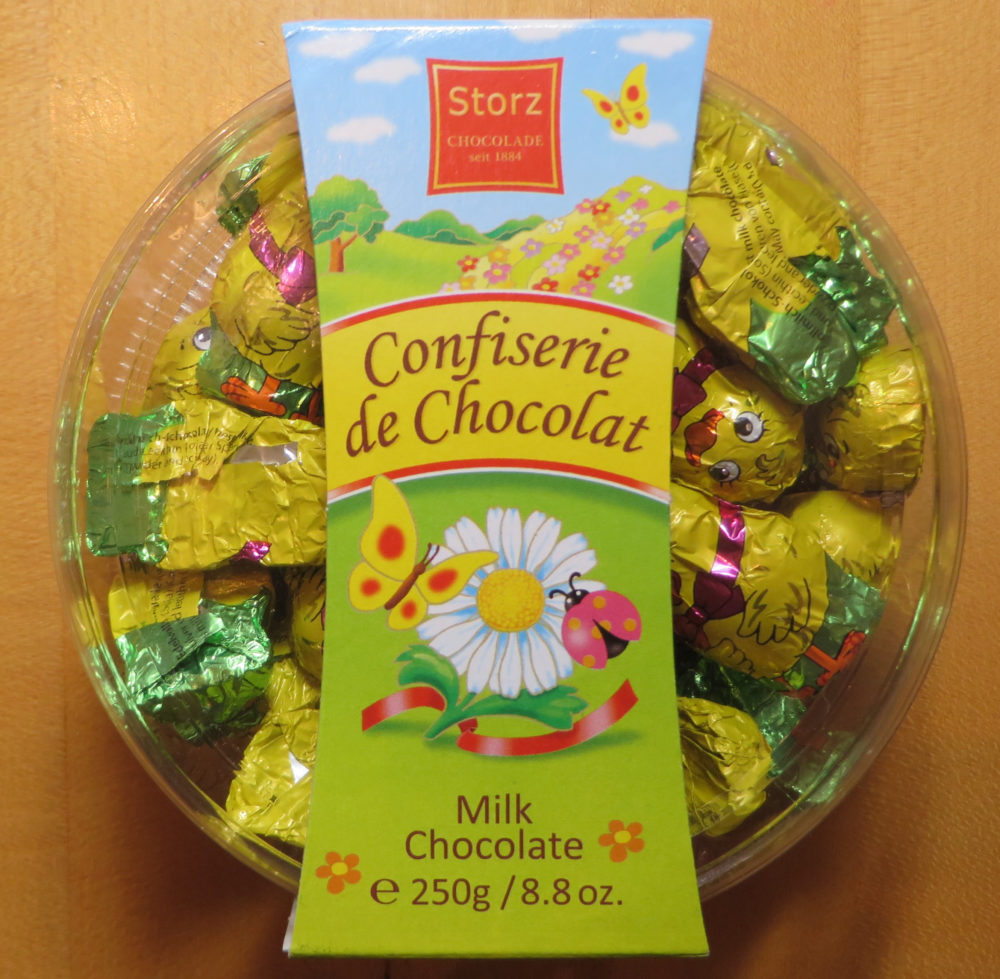
Add some shred or make your own by cutting very narrow strips of cardstock and crinkle with your hands or with a paper crimper. Then add your treats, like these chocolate Easter chicks!
I spotted this candy at Home Goods and thought it would be perfect for Easter projects…..and it tastes good too!
My basket is made with Pineapple Punch Cardstock and Happiness Blooms Designer Series Paper. If you are using a paper with a certain pattern, make sure you have each piece going the way you want it to go on the finished basket. The ribbon is the Gold 3/8″ Metallic-Edge Ribbon. The Easter greeting is stamped from the Fable Friends Stamp Set and die-cut with a die in the Stitched Labels Framelits Dies. If you didn’t have this die set you could just cut a rectangle or an oval for the front of the basket.
That’s how you make this Easy Candy Basket For Easter With Candy Chicks and anyone can do it, even with a larger piece of cardstock. Make one for a little Easter treat or decoration at your house!
If you need an easy little treat for St. Patrick’s Day, you can’t go wrong with this St. Patrick’s Day Clear Tiny Treat Box. Even if you don’t have the box or don’t want to make one out of paper, you could use a cello bag of some kinds. What is more St. Patrick’s Day than green and gold?
The Clear Tiny Treat Boxes are great to have on hand. You can put candy inside or a small gift or even just a special note. Best yet, they store flat so don’t take up space so all you have to do is crease and assemble when you need one! Just remember to remove the piece of plastic on them that protects the finish!
I think stamping is so much fun because you can use other images to make something else. If you don’t have a shamrock stamp (and most people wouldn’t!), just use hearts! You can stamp and cut out four hearts or in this project, I just stamped the Call Me Clover green hearts together in a shamrock shape. I just eyeballed it and they didn’t come out perfect meeting in the center but can you even tell? No, because I covered the center with a Gold Faceted Gem. These are sparkly and pretty. For a beginner stamper, a few of these kinds of embellishments are good to have on hand. They aren’t very expensive and serve (sometimes!) to cover up any little boo boo, stray ink, or smudge or at least direct the eye away from it! My little heart stamp is from the Meant To Be Cling Stamp Set. I told you hearts weren’t just for Valentine’s Day! The little stem is just hand cut from a scrap.
The shamrock is layered on a piece of Gold Foil, die cut from a scalloped Layering Circle Framelits Die. Lucky for me, I could fit it all on the front of the Tiny Treat Box! The greeting is from the must-have set, Itty Bitty Greetings. This set comes with 32 stamps and greetings to cover most any occasion. They are small which means they usually fit in the Classic Label Punchso they are easy to use. I cut a flagged end on the tag and stuck it under the shamrock with a little bit of glue.
After you put in your treat, green candy is good for St. Pat’s, tie a ribbon around the box to make sure the lid stays closed and mostly just to fancy it up a little bit more. This is the Gold 3/8″ Metallic-Edge Ribbon, a great all-purpose ribbon to have on hand. The gold edge makes it just a little bit fancy.
The Clear Tiny Treat Boxes are something inexpensive you can add to your order if you are trying to reach a $50 increment on your Sale-A-Bration order to earn a free product! Remember, with a $100 purchase you may choose either TWO $50 Sale-A-Bration items or ONE $100 Sale-A-Bration item. Spending $150 gets you the choices above plus another $50 choice PLUS Stampin’ Rewards (another 10% in merchandise!). And for big spenders (I mean, crafters), a $250 order gets you all the appropriate Sale-A-Bration choices plus Stampin’ Rewards, PLUS an EXTRA $25 in Stampin’ Rewards! That’s a lot of good stuff!
Make something like this St. Patrick’s Day Clear Tiny Treat Box this weekend for a little St. Pat’s fun, maybe with your kids or grandkids!
One last Valentine’s project for Valentine’s Day today, a Ghirardelli Valentine Candy Holder. This is pretty quick and easy to make and you can decorate it any way you like. In fact, it doesn’t have to only be for Valentine’s Day. This can be a little gift or favor for any occasion or just because.
This is basically just a little strip of cardstock, scored to allow room for the candy, folded up to make the candy holder, and then the front is decorated for whatever occasion. If you wanted to make it super easy, just fold over the strip of cardstock (shorter) and adhere the candy piece with a bit of adhesive and fold over the top. But this holder is easy to make with the Classic Label Punch. We used to use the Window Punch in the past, so if you have that, it will work.
Cut a strip of cardstock 9 5/8″ x 2 3/4″. I used Lovely Lipstick. Score at 2 3/4″ and 3″; 6 1/4″ and 6 1/2″. Fold and crease on the score lines then open back up. You will see above and below the score lines, one section is shorter than the other. You want the longer section to be the one that folds up to the inside (although really it doesn’t matter).
Use the Classic Label Punch on the bottom flap, inserting as far as you can, to punch the opening for the chocolate. This should be big enough for the candy. If you are using the retired Word Window Punch and need a wider opening, just punch a little bit to the side to make the opening larger. Flip the flap up and adhere, preferably with Tear & Tape Adhesive, just at the top. Check to see that the bottom fold/score lines are flat. Insert chocolate to make sure it fits.
Decorate the front flap of the candy holder however you like. For my sample, I used the fancy heart die in the Be Mine Stitched Framelits Dies. I love that heart! The front of the candy holder is 2 3/4″ x 2 3/4″ so I cut a layer of Whisper White just 1/8″ under that instead of 1/4″. You could do either. I also love the little swirly die cut in the set, so I cut that and adhered it to the bottom of the candy holder. I used the Multipurpose Adhesive Sheets for these two pieces. They are handy to use for small pieces that would be difficult to glue…..IF you remember to use them!
To hold this candy holder closed, I tied a ribbon around and the flap is just tucked under the ribbon.
Here’s a fun project for this time of year, this Tiny Treat Box So Hoppy Together Frog! Isn’t that little frog so cute? It’s part of a cute stamp set you can earn FREE during Sale-A-Bration! After you spend $50, you can choose a free product in the Sale-A-Bration Brochure. This stamp set is one you can choose and I think will be very popular!
If you have any leftover Christmas candy, it would be fun to use the green candies with this frog. If you don’t have any, go buy some Christmas candy on clearance now and stock up on green candies to use with this frog stamp set! How fun!
I started with one of the Clear Tiny Treat Boxes in the Stampin’ Up! Annual Catalog. I think everyone should have a package of these on hand because they are so easy and fun to use! They come flat so it’s easy storage. Just assemble when you are ready with a project. You can wrap paper around the box, ribbon, add stamped images or embellishments for any occasion!
Around the box, I tied the 3/16″ Braided Linen Thread.The regular Linen Threadhad always been one of my favorites to have on hand and I’m adding this Braided Linen Thread to the list. It’s useful as a neutral but lovely being braided.
Remember, the Occasions Catalog also went live yesterday so you have gorgeous new products to choose from, plus the Annual Catalog and the Clearance Rack. Just remember to try to shop in $50 increments to take advantage of FREE STUFF! Happy Shopping!
If you need one more Christmas treat idea that is easy to make, try these Santa Treats. These boxes are easy to make, much like the 2-4-6-8 box. Then just wrap the “belt” around and put a belt buckle. Fill with candy. Done and cute!
To make this Santa Treat Box, cut a sheet of Real Red Cardstock in half, at 5 1/2″ x 8 1/2″. Score at 1 1/2″, 4″, 5 1/2″ and 8″ along the long side. Turn and score at 1 1/2″ for the bottom flaps. Then, like the 2-4-6-8 box, cut up on those flaps to the horizontal score line and cut off the tiny little piece. Fold and crease all the lines and assemble the box.
The belt is a 3/4″ strip of Basic Black Cardstock. I find it easiest to wrap a long strip around the box by hand, creasing at each corner and then cutting off the excess. Make the strip meet on the front of the box because this will be covered by the belt buckle.
The belt buckle can be the retired punch that I used, the Curvy Label Punch, or just cut a square of Silver Glimmer Paper or Silver Foil. The trick is to then just cut a small square of black to glue in the center of the buckle to make it look like the belt goes through the buckle.
I found this idea on Pinterest made by Julie Davison.
Then just put candy directly into the Santa box or put in a cello bag and put that inside. Mine has various chocolate candies and after the photo, a candy cane, plus a little packet of tea for something healthy!
These are very easy to make and everyone will think you made something special!
Time is getting short for shopping for Christmas gifts, but you do have time to make fudge for Christmas, don’t you?! You will LOVE this fudge recipe! All you need is a printer, stamps and paper! Or even just a pen! Maybe you have one of those impossible to buy for people on your list, but here is a solution! Print out this poem and buy one of those gigantic candy bars (or any size candy bar) and put this poem on it! Maybe you want to update the words a little if you are creative with poetry!
Type up this poem and print out on your computer. Likely you can put a sheet of Whisper White cardstock in your printer and print it on that. Wrap the candy bar with designer paper or cardstock. If you want, do a little stamping on the poem, like these little snowflakes, then adhere to the top of the candy bar. Wrap a ribbon around or put in a cello bag and you have a fun little gift or stocking stuffer!
It’s an oldie but goodie, around as long as I can remember, but it’s still a good, creative idea! Time is of the essence right now! You will probably think of other creative things you can do with food at the grocery store to make it into a lovely gift! In the meantime, go make some “fudge” to give your neighbors or put in someone’s Christmas stocking!
You must make this Rudolph The Reindeer 2-4-6-8 Gift Bag just for fun! It wouldn’t take you long to make several of these for favors at everyone’s place setting at Christmas dinner! You could put a few pieces of candy inside or a little gift.
Just use whatever brown cardstock you have. I used Soft Suede, but Crumb Cake would be good too! Cut the paper at 6″ x 8 1/2″. Then score at 2″, 4″, 6″ and 8″ along the long side. Turn the paper and score at 2″. Cut each of the flaps and crease on all the score lines.
Your paper will look something like this, although the measurements will be different. Same idea.
Before assembling the box, figure out which panel will be the face of the reindeer and decorate with his eyes and shiny nose. Use the Sprig Punch to punch two antlers for the reindeer. Just put a tiny bit of glue on the bottom of each sprig and glue inside the bag. The eyes are punched with the 1/2″ Circle Punch in Whisper White Cardstock. The tiny black pupils are punched with the little oval on the Detailed Trio Punch. You could also just color in the eyes with a black marker! The nose is punched with the 3/4″ Circle Punch. I had some retired Red Glimmer Paper scraps that I used.
Assemble the box using some strong adhesive, like Tear & Tape or Multipurpose Liquid Glue. If you want the bag to be closed at the top, punch two holes in the top and thread some ribbon through and tie. I used the Gold 3/8″ Metallic-Edge Ribbonbut some red ribbon would be perfect, too!
The idea for the reindeer box came about after I made the little small gift bag on yesterday’s postbut I wanted the reindeer to be a little narrower. Then I remembered the 2-4-6-8 Box, an oldie but goodie! I knew it would be the right size I was looking for, but you could use any size you like.
If you wanted to leave the top open, more like a treat box, then maybe I would tie a bow with some ribbon and adhere the bow at the bottom on the reindeer.
It’s almost time to be wrapping gifts and preparing everything for Christmas (that is if you have done your shopping already!) so here is a Small Gift Bag you can make with half a sheet of designer paper. Put a small gift inside, a gift card, or some candy treats! Easy to make and a good way to use up that designer paper you are hoarding! It might save a trip to the store to buy more wrapping paper!
To begin, cut a 12″ x 12″ piece of designer paper or card stock in half at 12″ x 6″. I used the All Is Bright Designer Series Paper. You can also make the bag out of cardstock and decorate with a piece of designer paper on the front. Score the paper at 1″, 3 3/4″, 6 1/2″ and 9 1/4″. Then turn lengthwise and score at 2″. The 2″ area will be the bottom flaps, so pay attention to the pattern on your paper. If I had scored this paper at the 2″ mark on the other side, the stockings would be upside down.
Crease all the score lines and cut the flaps as shown. Rather than just cut straight up on the score lines, I cut a little bit of an angle at each score mark. It just makes it easier to fold, in certain cases, where the bulk of that score line sometimes interferes with a smooth fold and fit. Use some strong adhesive on that side flap, like Fast Fuse, Tear & Tape, or Multipurpose Liquid Glue. Fold in the bottom flaps and adhere. Stick something down inside the bag from the top, like a Bone Folder or ruler to get the flaps to stick together.
Now depending on what you want to make, you can squeeze in on the sides a little bit to bring the top of the bag together, punch holes in the top, and tie shut with ribbon. Or use a clip on the top. If you prefer, leave the top open or even make a lid. It’s very versatile!
For this gift bag, I stamped a greeting from the Sincerely Santa Stamp Set, punched a hole in the top and tied it on the bag with the Whisper White Sheer 1/8″ Ribbon. I could have made it fancier, layered it on some Real Red Cardstock, or adhered it to the front of the bag, but I liked it fine the way it was. I did add a Red Rhinestone Jewel to the bottom of the tag. (These Red Rhinestones are discounted right now in the Online Store for the Year-End Closeout Sale!)
Try your hand at making this cute little gift bag or treat holder! It’s fun, easy and cute! Once you do it, you will be able to make them over and over again when you need a small gift bag!
Paper Pumpkin has become so popular that Stampin’ Up! was not even able to offer the December papercrafting kit to new subscribers, but here is your chance for January 2019 to get the Paper Pumpkin Goes Wild Kit and make Valentines with the Cute Critters that match the Animal Expedition Suite in the Annual Catalog.
Here are some details:
Makes 24 adorable Valentine’s treat packages
Coordinating colors: Crumb Cake, Flirty Flamingo, Lemon Lime Twist, Melon Mambo, Petal Pink, and Pool Party
Remember, the kit is designed for you to make something wonderful with the directions and kit contents, but you can use the stamps, ink spot, and all the materials to make whatever you like. If you don’t want or need treats, then make cards and vice versa. Whatever is fun for you!
Stampin’ Up!/Paper Pumpkin will reveal alternate project ideas that combine the January kit with products from the coordinating suite, Animal Expedition, for even more stamping fun! Perhaps you already own some products in this suite or perhaps you will want to purchase some during Sale-A-Bration. I purchased the cute Animal Expedition Designer Series Paper after seeing some cute samples online and I have LOVED using it! This is a really cute Suite for many occasions.
Even though we are all busy with Christmas, we crafters know that Valentine’s Day is not far behind! Even if you no longer have young children around for class valentine treats, you might like some treats on hand to pass out to neighbors or friends or office mates. Paper Pumpkin Kits are just handy!
You can subscribe TODAY for the January Paper Pumpkin Kit and I would advise doing so as soon as you can just in case this kit becomes very popular as word gets out and they run out of kits to send! The link above goes directly to my Paper Pumpkin sign-up page to make it easy for you! If you are working with another Demonstrator, please just go to Paperpumpkin.com and search for their name. But I welcome any and all new subscribers because I so enjoy getting my new kit in the mail every month!
Join Paper Pumpkin NOW and get the Be Mine, Valentine Kit in mid-January. It’s just that easy! You will not be charged until your kit ships. The cost is $19.95 but that already includes the shipping so only tax is added! With your first kit you will receive an acrylic Paper Pumpkin block. Otherwise, each kit will include an exclusive stamp set that you can use any time, an ink spot for stamping, and all the materials, including adhesives and die cut papers plus any embellishments…..everything you need….to make the project. Usually it is a surprise, but sometimes, like this month, you get a hint! You can skip a month if you like after you subscribe. AND all subscribers have access to past kits and refills that may be available in the Online Store! And those little ink spots are great to use with the Stamparatus!
At Christmas time there are lots of opportunities where you might like to make some candy holders or party favors so here are two ideas for Christmas Paper Roll Candy Holder Favors. These are simple to make, especially the Santa one, and you can just use your imagination and make them however you like, no particular templates or instructions to follow.
These candy holders are made with a paper towel roll cut in half (sort of!). First I made the elf, copying a candy bar wrapper I made several years ago in THIS POST. I just wrapped the tube in Old Olive Cardstock, wrapped it in a piece of Real Red at the top with a little triangle cut out to look like short pants, and two strips of the red and white striped flocked paper from the Santa’s Workshop Designer Paper (no longer available).j You can make your own striped elf legs with Whisper White Cardstock and a Real Red Stampin’ Write Marker. The shoes I just cut by hand out of a small piece of Basic Black. You could just use a rectangle shape if you wanted to. Then there is a little Old Olive belt around his shorts with a black buckle.
Here is the secret of making buckles, as on both of these favors……. cut a square of the color for the belt buckle and adhere. Then cut a smaller square of the color of the belt to center on top of the belt buckle square. That way you are not cutting slits and sliding the “belt” through the buckle or anything! Sometimes there is a punch that is suitable for the buckle.
The Santa party favor is even easier. Just wrap the tube with Real Red Cardstock. Make some “fur” on his coat. I used the Decorative Ribbon Border Punch to decorate the edges of the Whisper White strip. Maybe it is too frilly for Santa? You could also just tear the edges to look a little furry. The black buttons are punched with the 1/2″ Circle Punch. Just wrap around a black belt and make a buckle out of Gold Foil Paper or Gold Glimmer Paper. Add that center Basic Black piece to look like a belt.
Then just add some candy or treat in a cello bag or glue on a little bottom piece of cardstock at the bottom of the tube and fill with candy. Easy and fun Christmas Paper Roll Candy Holder Favors for you to make!
When I think of Thanksgiving, I always think of these Thanksgiving Candy Turkey Cookie Favors I used to make back in the day when my kids were little……and even a few times in recent years when my kids were big! It was always an easy and fun thing to make for the Thanksgiving lunch at preschool for the whole class. Click on the link to find out how to make them!
Here are some fun Thanksgiving crafts and favors I made in past years! They may give you some ideas for things you might want to make to give away or have at each place for Thanksgiving. Just click the link below to go to that blog post with more information.
I believe “sour cream treat holders” have been a staple since I started stamping so here is my Turkey Sour Cream Treat Holder! The basic concept is that this simple little treat holder is shaped like sour cream packets come in/used to come in?? The top side is closed one direction and the bottom side is closed another direction. They are very simple to make and very popular in the papercrafting world! You can make them for lots of occasions and decorate them to look like lots of different characters like this turkey. On Pinterest (of course!) I also saw a Pilgrim and an Indian that were very cute for Thanksgiving.
Here is the turkey sour cream treat holder from the side. Just be sure to put your treat inside before you seal up each end! If you have a paper crimper like we used to sell but you can probably still buy in a craft store, it is handy to use that along with adhesive to close up those ends, and it looks very decorative. I didn’t use mine on this turkey.
Here is a diagram from a past sour cream container in this post if you need more directions:
Make a roll out of the paper and adhere along the side.
After adhering one end, pinch closed the opposite end going the other direction (after putting in your treat!).
To decorate the turkey, die cut or punch some paper feathers. I used the leaf die in the Nature’s Roots dies. You can use any left shape or punch out ovals in different colors. The beak is just a hand-cut triangle over a fold. The waddle is just a die-cut heart or you can use a punch or just cut one out! For the eyes, just punch out two circles, like with the 1/2″ Circle Punch and then two smaller circles from the Cookie Cutter Builder Punch.
So simple and yet you end up with a cute treat for Thanksgiving!
Be sure to check out the list of “Low Inventory” products from the Holiday Catalog that could potentially sell out soon.
If you are looking for a cute little favor for Thanksgiving, look no further than this Thanksgiving Pumpkin Favor. It is just a little box in between two of the largest scalloped circle die-cuts and then decorated.
I started with making the little box. This is the size that worked to fit behind the scalloped circles die cut with the Layering Circle Framelits Dies. When the Big Shot first came out, we had a BIG scalloped circle steel die, so if you used that your box would need to be larger but I think you could easily do the calculations from this template. You could also use any circle if you didn’t have these dies. Here is the template for the little box. The paper is 4 1/2″ x 4 1/4″.
With the 4 1/4″ side up at the top of your Stampin’ Trimmer or Simply Scored Tool, score at 1″ from each side. Turn the paper so the 4 1/2″ side is up at the top. Score at 1 3/4″ and 2 3/4″. Then cut those flaps just up to the score line as you see in the photo. I like to cut mine on a slight angle to that bulky scored area doesn’t interfere with how the flaps fit together.
For the pumpkin pieces, as you see in the photo, I first die cut with the largest scallop circle, then ran it through the Swirls & Curls Embossing Folder. I think you could use almost any embossing folder, just to give the paper a little texture and interest. To get the flat bottom, although perhaps you could leave the circle whole, I marked one scallop and then I counted over 14 scallops and cut from one mark to another. That made the two circles even and matching.
After assembling the box, just glue the pumpkin pieces on each side. The handle was about 7″ long. I just glued inside but it might be nicer to adhere it to the box before adhering the pumpkin sides. Or use ribbon!
To embellish, I die cut various leaves in a couple of green colors, yellow, and orange, even Gold Shimmer Paper. I used the Seasonal Layers Dies and the Rooted in Nature Dies. Use whatever you have. I cut a variety so I could play and see which leaves I wanted to put on the pumpkin. If I made another favor I can use my extra leaves. I tied a bow with the new 3/16″ Braided Linen Trim and adhered it with a Mini Glue Dot.
For a Thanksgiving greeting, I turned to the Itty Bitty Greetings Stamp Set, invaluable, in my opinion! I stamped the “gratitude” saying and cut out with the Classic Label Punch. I also made a flagged end with that punch. Then I just put some glue on the back of the one end and stuck it underneath the leaf.
I’m really happy how my Thanksgiving Pumpkin Favor turned out and I have filled it with candy and am taking it to someone this afternoon!