Yes, I know Valentine’s Day is over, but who knows, maybe you need one more valentine for someone today! I didn’t get around to posting this one and it’s one I like because it is a quick and easy valentine! And who doesn’t like quick and easy!
Even if you don’t need another valentine, think of the basic design of this card and think about how you could easily change it into a card for any other occasion.
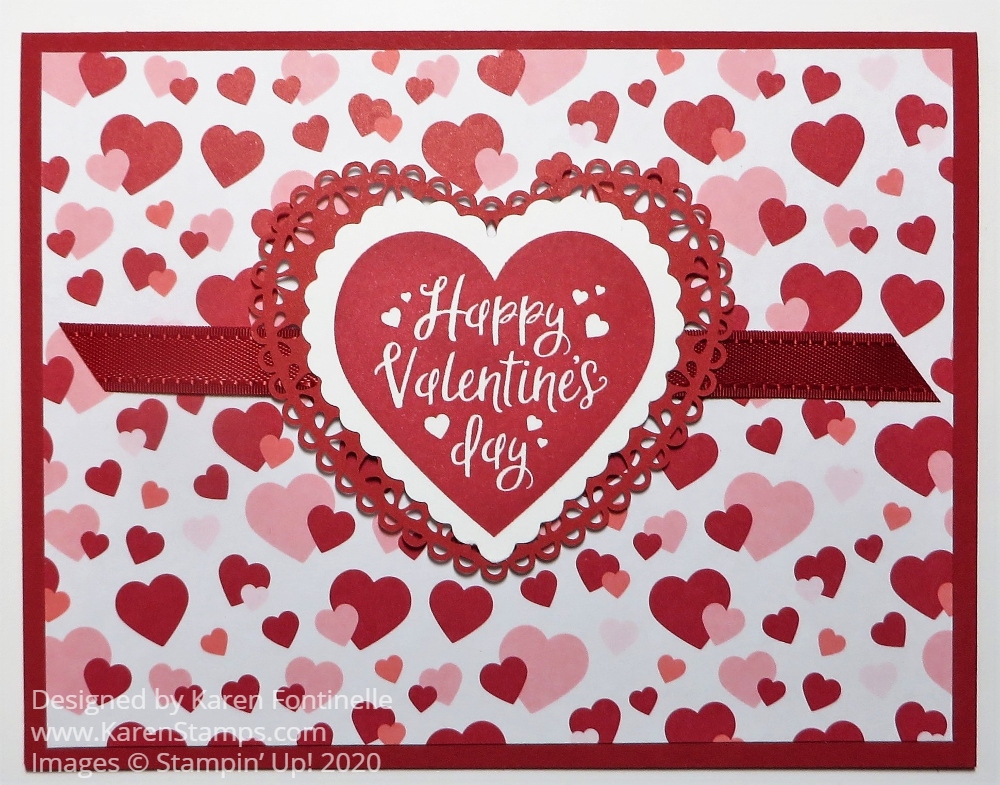
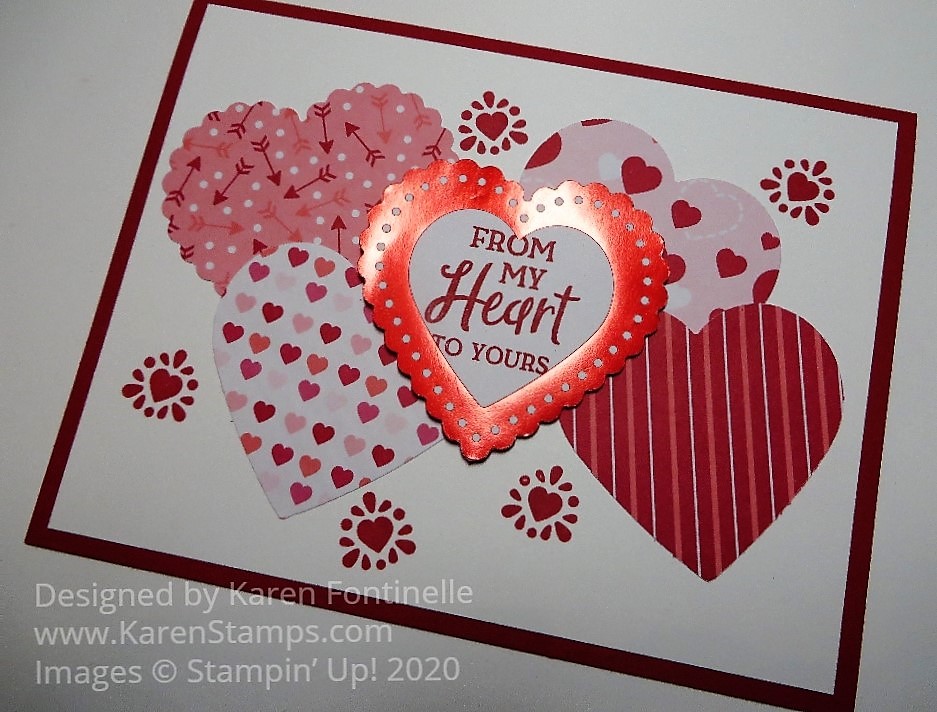
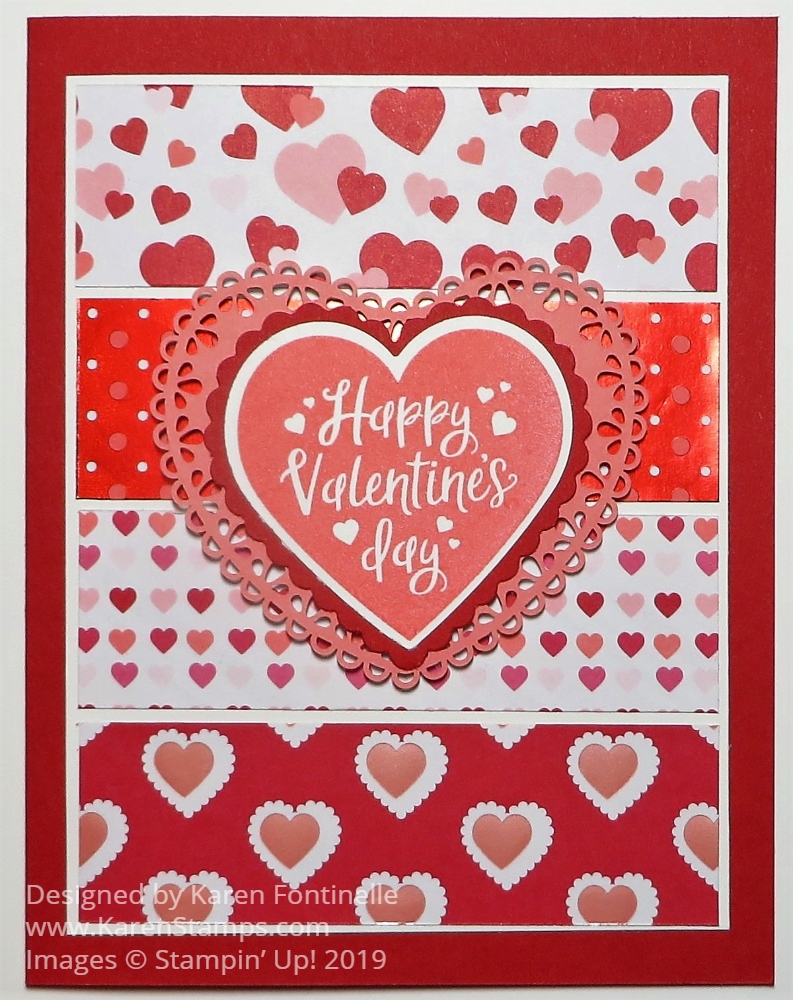
This valentine has a card base of Real Red (of course!) with a layer of the From My Heart Designer Series Paper. I thought this particular pattern looked really cute on this card! For the focal point, I just have two hearts. The frilly background heart is die-cut with the Be Mine Stitched Dies in the Stampin’ Up! Annual Catalog. The heart on the front is stamped on Whisper White with a stamp in the Heartfelt Stamp Set in Real Red Ink. Then it is punched out with the scallop-edge heart punch in the Heart Punch Pack.
Just for a little something-something, before I adhered the hearts, I used a little Snail Adhesive to hold down a strip of Real Red 3/8″ Double-Stitched Satin Ribbon, just in the center. You can either pop up the hearts with Stampin’ Dimensionals or adhere the hearts flat on the card.
Now if you don’t need a valentine today, all you need to do is change out the hearts to some other focal point whether it be an image or a greeting. You can still use designer paper as a layer and you can still add a strip of ribbon behind the center image. Just keep it simple, whatever you make!
Valentine’s Day is coming up at the end of this week so if you need more valentine ideas, here is an Easy Valentine Hearts and Ribbon Card you can try!
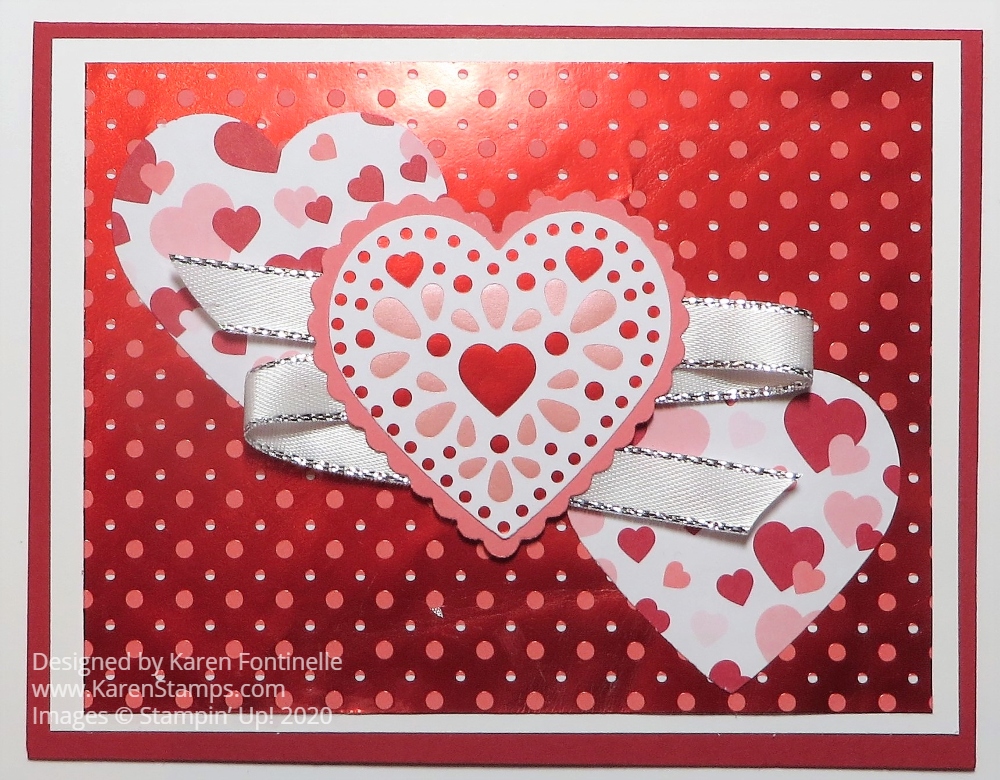
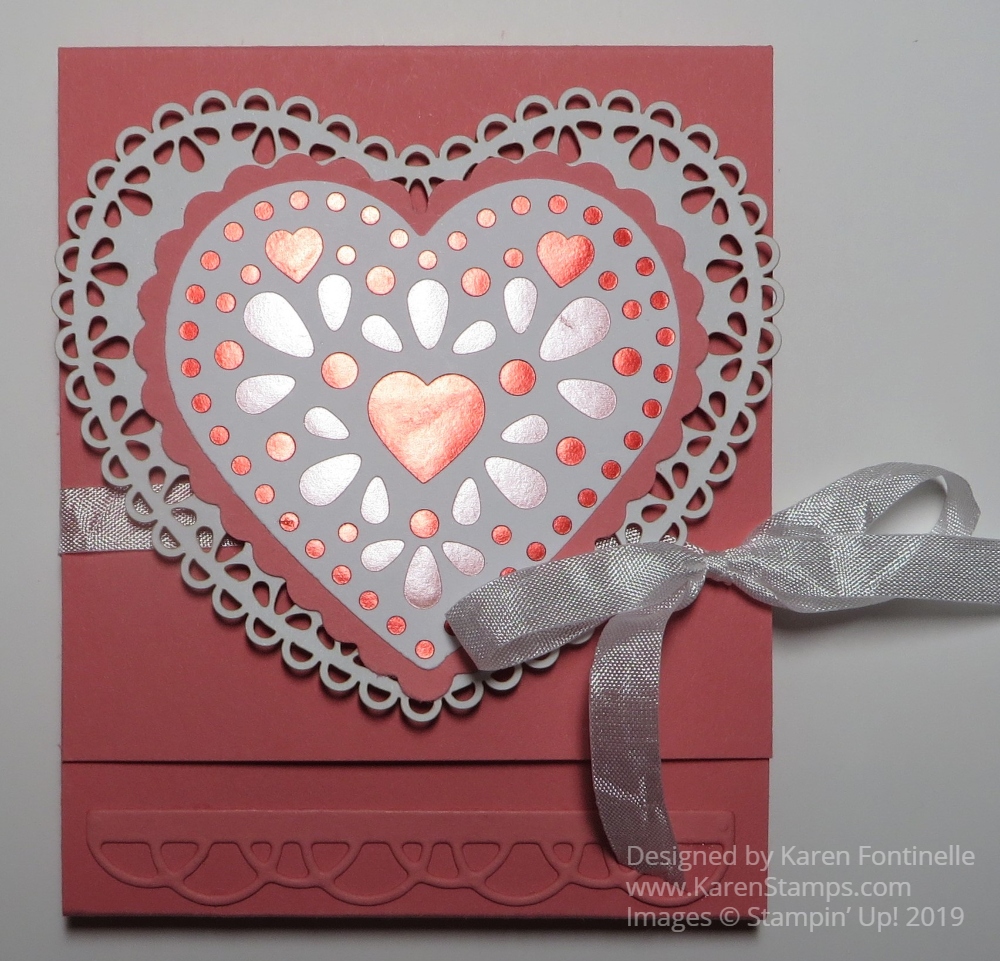
The card base is Real Red with a layer of Whisper White to help the designer paper stand out a little bit. This dotted foil layer is in the From My Heart Specialty Designer Series Paper. It really caught my eye when I was making this card!
The next step is to simply punch two hearts from another design of the From My Heart DSP. I chose the paper with the scattered hearts. I thought it stood out well against the foil DSP.
The center heart is punched from the sheet of foil hearts and then layered on a punched scallop heart from Flirty Flamingo Cardstock. You can get both these plain-edge heart punch and the scalloped edge heart punch in the Heart Punch Pack. And if you want the Heartfelt Stamp Set, too, you can purchase it with the heart punches and save 10% in the Heartfelt Bundle.
After those two hearts were layered together, I put more adhesive on the back with Snail Adhesive so I could stick the ribbon going back and forth behind the heart. Then it is popped up on Stampin’ Dimensionals® and centered on the card between the other two hearts.
Even though there is no sentiment on the front of the card, I think it is pretty enough on its own so you can just stamp a greeting inside the card on a Whisper White layer.
Don’t forget! Today is the last day tojoin Paper Pumpkin and get the February Kit in just a few days! You could also purchase a Prepaid Subscription in the Online Store and just add it to your Stampin’ Up! order! That way it might help you earn a free Sale-A-Bration item or reach Hostess Rewards!
This kit will make nine cards that will help you make cards for birthdays and other special occasions. It also coordinates with the Happy Birthday To You Sale-A-Bration stamp set!
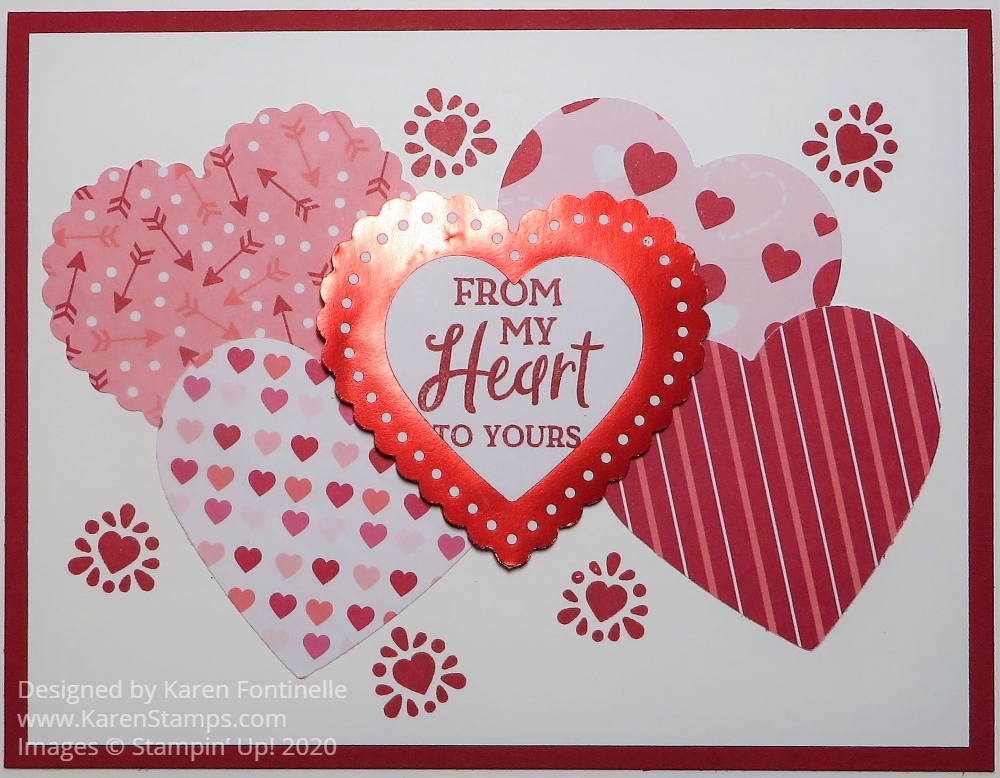
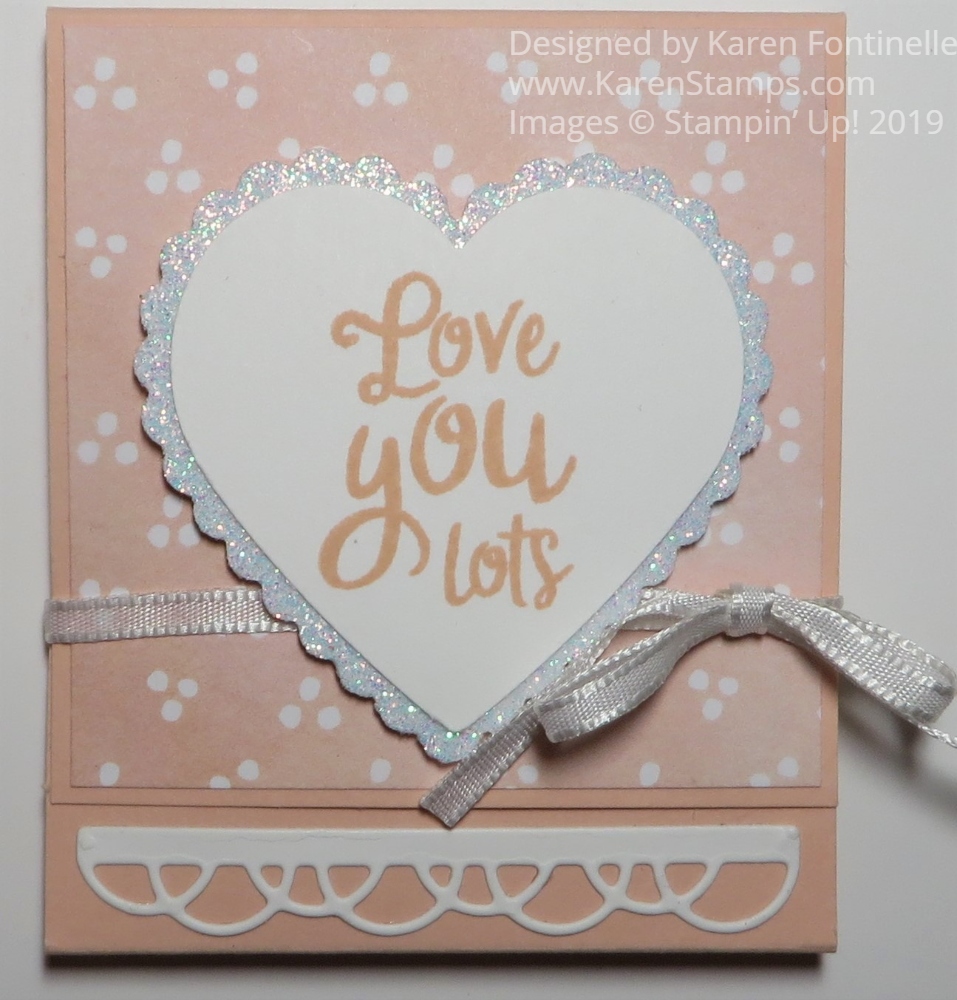
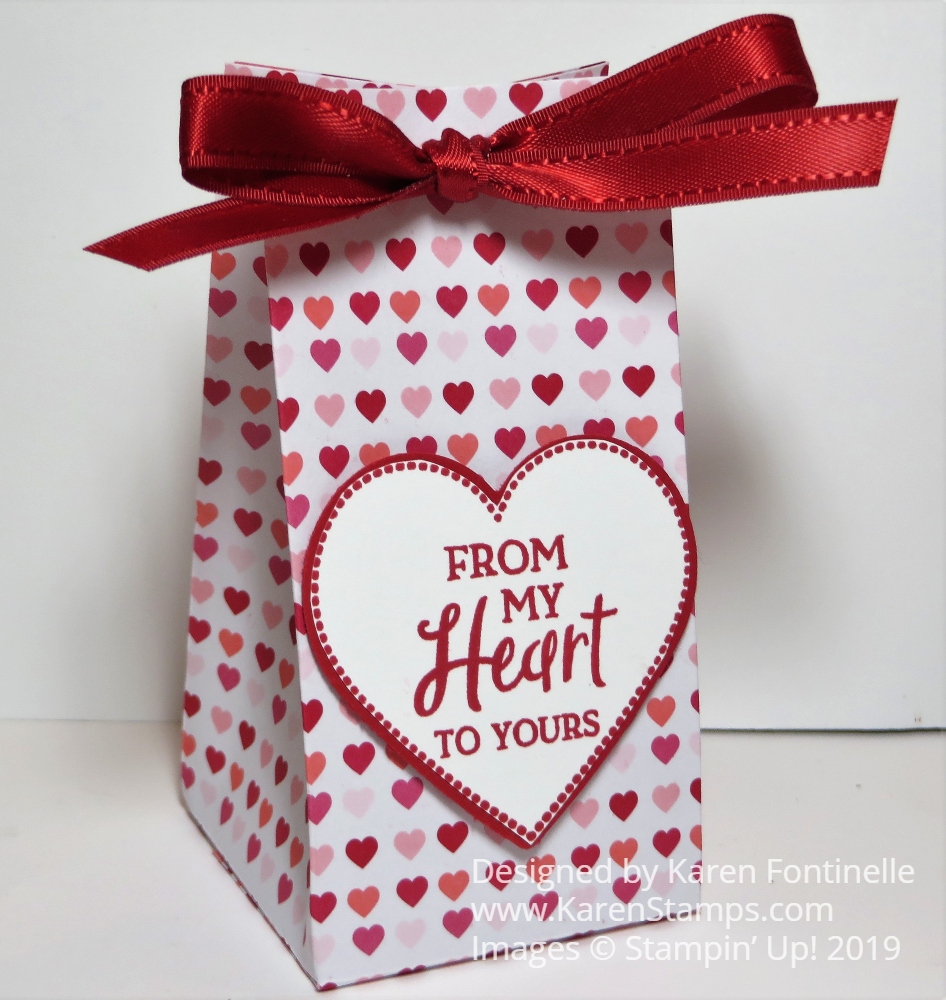
You can make this quick and easy From My Heart Valentine With Hearts by just punching out some hearts! And add a little stamping!
The card base is Real Red, although with these hearts you could use any colors, like Flirty Flamingo or a light pink, that go with the designs in the From My Heart Specialty Designer Series Paper. On a layer of Whisper White, just add a grouping of hearts punched with the Heart Punch Pack. You can even punch two hearts out of the same sheet of designer paper and use one side of one and the one side of the other design! Just check the other side of the paper to see if one side goes in a certain direction or not, if you want to use both sides. You can punch some hearts with the scalloped heart punch and some with the plain edge.
I chose one of the foil accented hearts for the focal point on my card. I punched it out with the scalloped punch, which is a perfect fit! Then I stamped a greeting from the Heartfelt Stamp Set in the center of the heart. After all the other hearts were glued down, I popped this foil heart up with Stampin’ Dimensionals® in the center of the card. Then I stamped a few hearts from the same stamp set around the paper hearts.
You could jazz up this same card a little more if you wanted to. I thought about putting a piece of ribbon behind the foil heart that went back and forth behind the heart with the loops sticking out on each side. I could have added some rhinestones or other jewels.
If you want a quick and easy card, just keep it simple and just punch out lots of hearts and see what you come up with!
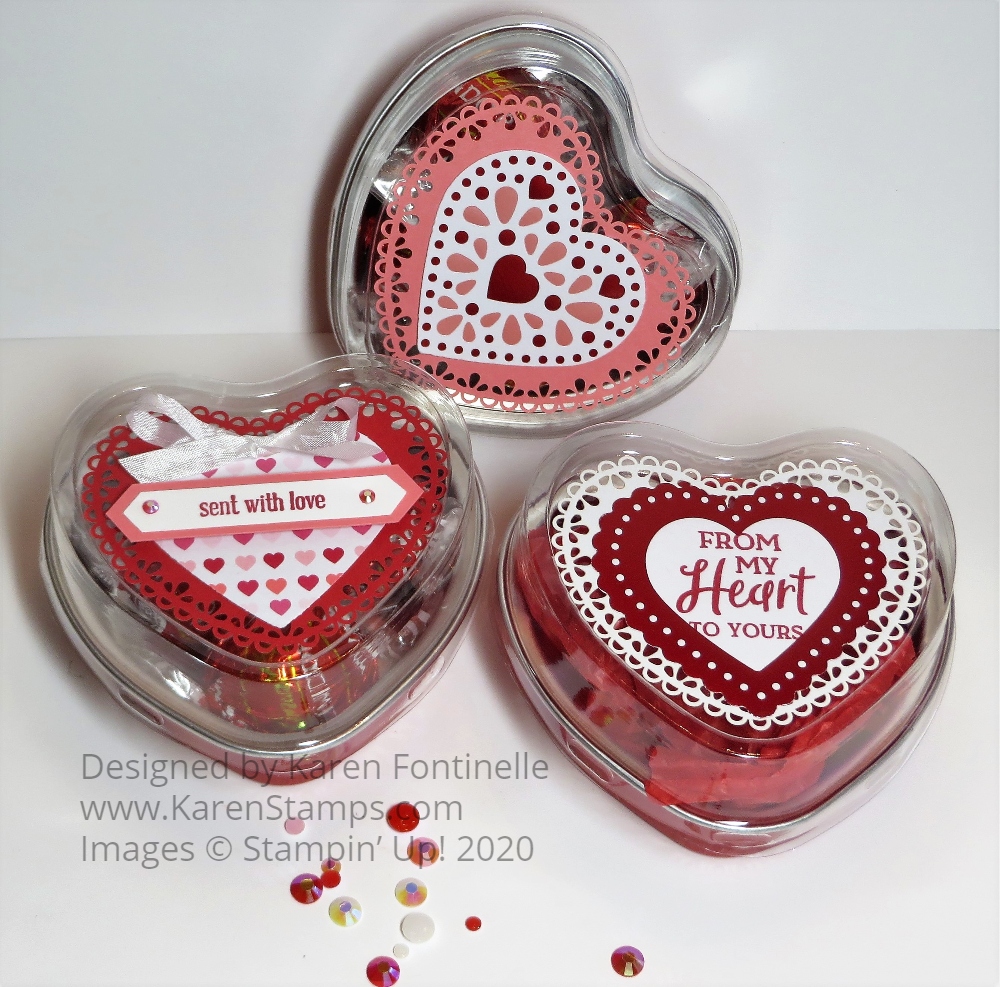
Try these Decorated Heart Foil Tins For Valentine’s Day if you want to make some quick treats! You can really decorate these heart foil tins in just a minute unless you want to add more embellishments! And if you want to really do it up right, you can bake something INSIDE the tin!
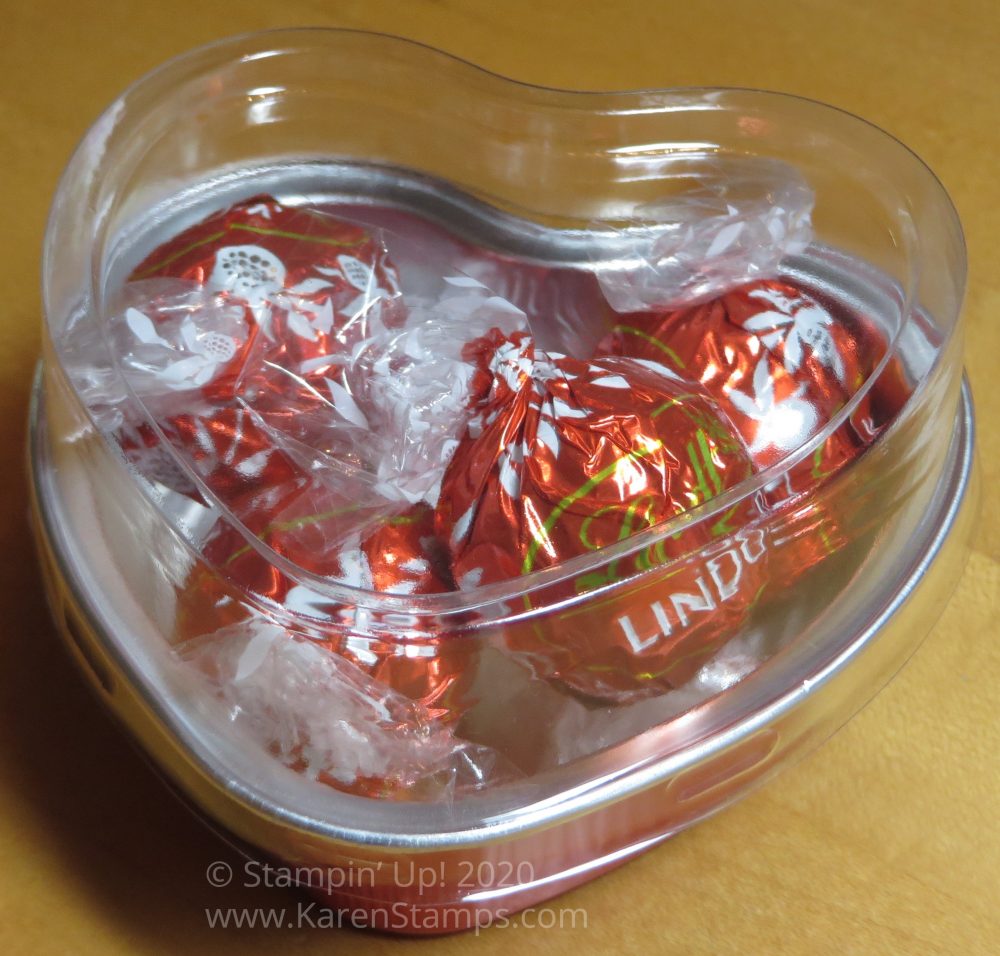
I started with the top heart tin in the photo. I just put in four chocolate candy truffles and snapped on the plastic lid. For decoration I just adhered a Flirty Flamingo Heart Doily and then punched a heart with the plain edge heart punch in the Heart Punch Pack from the From My Heart Specialty Designer Series Paper and adhered that. Done! So cute even with just gluing on two hearts! What could be easier!
Next I decorated the heart tin on the bottom right. This one was almost the same except I turned the colored heart doily over to show the white side! Did you know you could do that?! This time I used the scalloped edge heart punch to put a heart out of the same designer paper and stamped a greeting from the Heartfelt Stamp Set. You can buy both this stamp set and the Heart Punch Pack in the Heartfelt Bundle and save 10%. Just stamp a greeting on a heart, layer it on another heart and adhere to the cover of the heart tin! How easy is that?!
There you have three ideas for these fun Heart Foil Tins to decorate for Valentine’s Day, but you can really decorate them for any occasion. Think how cute these would be for a birthday party for kids with the Bonanza Buddies Stamp Set characters or lots of other choices! You might want to stock up on these tins to have on hand for other fun occasions!
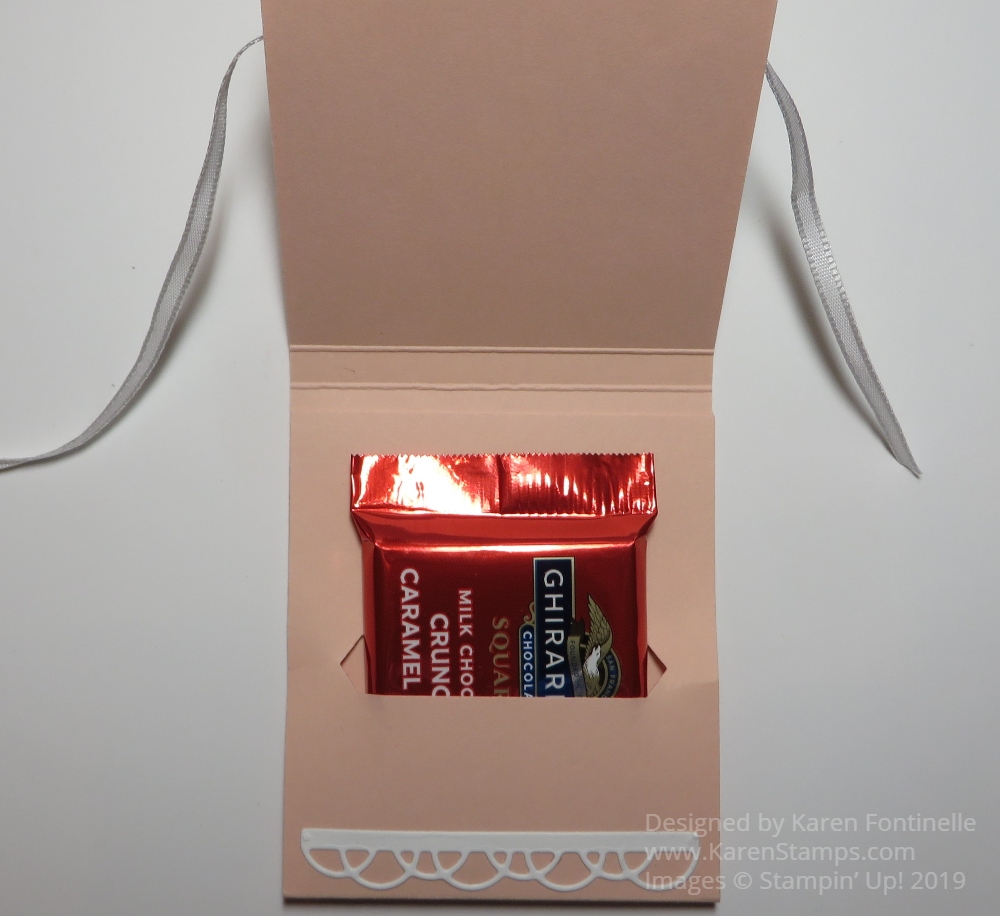
Try these Easy to Make Valentine Ghirardelli Candy Holders for Valentine’s Day or any occasion for a little gift or favor. Once you have the measurements and the piece of candy, you are ready to make a special treat!
This is basically just a strip of cardstock, scored to that it will fold over a piece of chocolate candy, like a Ghirardelli chocolate (yum!). Then you just decorate the front for whatever occasion you have.
Start with a strip of cardstock cut at 9 5/8″ x 2 3/4″. Score at 2 3/4″ and 3″; 6 1/4″ and 6 1/2″. With these measurements, you could get three strips out of one sheet of cardstock. Fold and crease on the scored lines. Open the strip back up and you will see above and below the score lines, one section is shorter than the other. You want the longer section to be the one that folds up to the inside.
Once you have identified the longer section, use the Classic Label Punch on that flap, inserting as far as you can, centered, to punch the opening for the chocolate. Put a piece of Tear & Tape as you see in the photo so you can fold up that flap and adhere to the inside, not quite up to the score line. You will want to stand the candy holder on the table making sure the bottom is flat as you adhere that flap.
Insert the chocolate candy piece to make sure everything fits right! If you do not have the Classic Label Punch, you can cut hand cut a slit or use the retired Word Window Punch.
Now you can proceed to decorating the front of the candy holder and even that little area at the bottom, where you see I put a die-cut piece.
For this candy holder, I used Petal Pink Cardstock for the base. Even though it is for Valentine’s Day, I used a piece of designer paper in the Best Dressed Designer Series Paper! It had this polka dot piece of Petal Pink designer paper so it was perfect for a little background layer. I stamped a heart with the Heartfelt Stamp Set and punched it out with the plain heart in the Heart Punch Pack. You can buy the stamp set and two punches together in a Bundle and save 10% if you wish. The plain heart is layered on a piece of Sparkle Glimmer Paper punched out with the scalloped heart punch in the punch pack. You could also use Silver Glimmer Paper. The little piece at the bottom is a die-cut from the Painted Labels Dies in the Peaceful Poppies Suite.
The hearts are popped up on Dimensionals so that I could run a piece of scrap ribbon underneath just to hold the flap closed on the candy holder.
This Valentine Ghirardelli Candy Treat Holder is made with the Flirty Flamingo Cardstock. The heart with foil accents is punched right out of the From My Heart Specialty Designer Series Paper and layered on a scalloped punched Flirty Flamingo heart. Then these were layered on a Heart Doily. But the doilies come in Real Red and Flirty Flamingo…..so just turn them over and you’ll have white! The ribbon tied around this candy holder is a new one in the Occasions Mini Catalog, the Whisper White 1/4″ Crinkled Seam Binding Ribbon. One of the great things about this white ribbon is you can dye it any color you want with ink or Stampin’ Blends markers.
These Valentine Ghirardelli Candy Holders will be fun to make if you want to take some favors to the people in your office or a little treat for your family or neighbors or friends.
Doesn’t making valentines like this From My Heart Valentine With Paper Strips just take you back to your childhood?! Maybe it’s the doily because who of us did not use that white paste and doilies to make our valentines in elementary school?
I love this new From My Heart Specialty Designer Series Paper in the new Occasions Mini Catalog on page 9. Some of the papers have foil accents which makes them especially pretty! You can’t really tell from my photo above, but the second and fourth strips on my card have the foil accents. As usual, it’s so pretty you hate to cut into the paper, but cut you must in order to make these pretty cards and projects!
This is how this valentine came about! I got out the paper, saw a rectangle scrap in the package and it popped into my head to use several paper strips for the background of the valentine. Often cardmaking ideas just pop into your head or come about after working on your idea and then changing it when something else sparks your creativity.
The card base is Real Red. Real Red has probably always been my favorite Stampin’ Up! color because they have captured such a perfect red. With the switching around of the colors in the Color Families, it seemed like I wasn’t using it as much and that was sad! With Valentine’s Day approaching, how can you not be using Real Red again?
Now I should have gotten out my calculator or pencil and paper and did the math to figure out what size the strips should be and the size paper they are mounted on. But I didn’t! I just made the card, trimmed things down once or twice and when I still had a bigger margin at the bottom of the Whisper White, I simply trimmed that off. The card looks fine to me. If it is not mathematically perfect on the strips and margins, it’s just a valentine….it doesn’t have to be perfect.
If you want some measurements, the Whisper White layer on which I adhered the paper strips is 3 3/4″ wide and 4 7/8″ long. The designer paper strips are each 1 1/8″ wide and 3 5/8″ long with about a 1/16″ space in between the layers. And there is about the same 1/16″ margin around the edge, but you could also not have any margins and totally cover the Whisper White piece. Please don’t go crazy trying to make everything exact and fit perfectly. Just get it as balanced as you can and it will be fine.
The greeting is stamped in Flirty Flamingo Ink with a heart in the Heartfelt Stamp Set in the Suite. Then that stamped heart and the Real Red heart on which it is layered were punched out with the two punches in the Heart Punch Pack. You can purchase the stamp set and punches together in the Heartfelt Bundle and save 10%. These two hearts are then adhered to the Flirty Flamingo doily in the Heart Doilies Package. This large heart is then popped up with Stampin’ Dimensionals®.
If you want EVERYTHING in thisFrom My Heart Suite (as I did, because who wouldn’t?!), just put the number #153931 on your order and you will get the coordinating selection of products on pages 8-10 without having to put in all the individual numbers. This won’t all only be good for Valentine’s Day, you will be able to use hearts on lots of occasions, the punches, the stamp set, etc.
Overall, this From My Heart Valentine With Paper Strips is fairly easy to make so give it a try with the beautiful From My Heart DSP and the Heart Punch Pack!
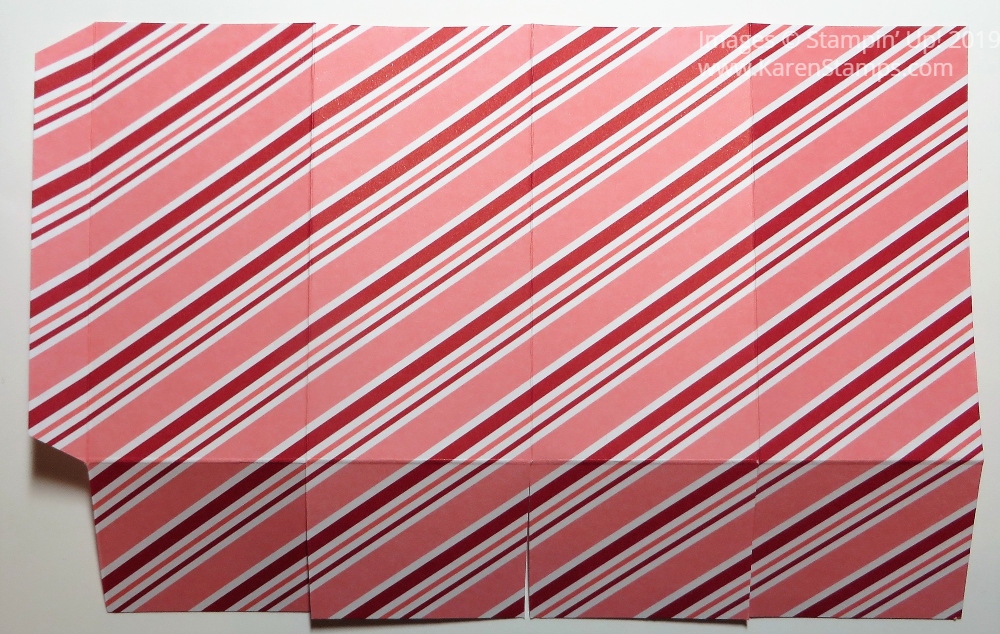
Here’s an easy and cute From My Heart 2-4-6-8 Gift Box you can use for a small gift or treat for someone, maybe for Valentine’s Day or maybe just any time. It’s made with the fun Specialty Designer Series Paper, From My Heart. It’s in the new Occasions Mini Catalog and you know Valentine’s Day is just around the corner, in spite of my Christmas tree not completely taken down yet!
You’ve probably made lots of these 2-4-6-8 boxes of various sizes, but I know I always need a little refresher. For this box, I started with a piece of the designer paper 8 1/2″ x 5 1/2″. Score at 2″, 4″, 6″ and 8″. Turn and score at 1 1/2″ (or 2″). These will be the bottom flaps so pay attention to the pattern on your paper, watching which way it is going so it doesn’t end up upside down.
Here is how my paper looked, although this was the inside of my box. You do cut off the little 1/2″ piece.
Assemble the box, putting adhesive on that 1/2″ piece on the side. Then pay attention to where the seam is and try to have that face the back. Fold in the bottom flaps, trying to make the front of the bag look nice with a flap fold, not the edge.
Decorate the front of the gift box. In some cases you might want to decorate before you assemble. I kept this one simple, but I wanted to try out the new Heart Punch Pack and the Heartfelt Stamp Set. I stamped the greeting and the heart outline in Real Red ink and then punched out the stamped heart plus one Real Red Cardstock heart. Since I wanted to layer them, I trimmed the Whisper White heart right up to the dotted outline. That made it a tiny bit smaller so I could layer it on the Real Red heart. Then I popped up the heart on the front of the box with Stampin’ Dimensionals®.
You could leave the top open or you can punch holes in the top and tie it closed with a ribbon, like this new Real Red 3/8″ Double-Stitched Satin Ribbon. Don’t forget to put your treat or gift inside before you tie it up! This would make a cute party favor bag or treat for a party.
Get the Heartfelt Bundle with the Heartfelt Stamp Set and the Heart Punch Pack and save 10%. You know you want new heart punches!
Remember, shop in $50 increments so you can choose free Sale-A-Bration products!