Check out the Stampin’ Up! Kits Collection!

Kits Collection Banner2

Stampin’ Up! has a new line of creative products called the Kits Collection by Stampin’ Up! Stampin’ Up! has taken the guesswork out of creativity and done the hard parts, and you get to do the fun stuff: craft! Each kit is all-inclusive and includes the predesigned projects, preprinted pieces, and even the adhesives you need to complete the projects. You also receive an acrylic block plus an ink spot, not to mention an exclusive stamp set with each kit!

There’s a wide variety of kits for all different occasions, and new kits are being added regularly. Some are called Card Kits because you make cards with them.

Others are called Crafting Kits because they might be packaging or home decor or a gift set of cards.

Some kits do not even require any stamping! Just put the pieces together for your project! It doesn’t get any easier than that!

You can shop the current selection at www.stampinup.com/kits. But hurry! Kits are available only while supplies last!

Pick the kit that’s right for you. The kits are designed for beginners so no worries if you are new to crafting. But stampers of any level can have fun with the kits too!

Watch the videos below to see how it all works, especially if you are new to papercrafting! It’s really fun and easy!

SHOP THE STAMPIN’ UP! KITS COLLECTION!

Heartwarming Hugs Christmas Tree Card

Heartwarming Hugs Christmas Tree Card

If you are anxious to get started on Christmas in July but you can’t order the new things yet in the Holiday Catalog, see if you still have some Heartwarming Hugs Designer Series Paper from last year’s catalog and make a card like this Heartwarming Hugs Christmas Tree Card! The paper is coming back in this current Holiday Catalog, going live August 3!

I still had some of this Heartwarming Hugs Designer Series Paper and I really like it. Lots of different plaids and stripes in traditional red, green and white! It’s just cute paper without having any special designs. Great for backgrounds on cards or other projects. Cute for making boxes and gift bags with both the inside and outside matching and looking like the holidays! Check your stash and see if you still have some.

The Pine Tree Punch is still current in the new Annual Catalog so get that out too! You can punch out lots of Christmas trees to your heart’s content!

To make this card, I started with a base of Real Red Cardstock (my favorite color!). I chose this red background paper with white dots to see what I could do with it or if it would work with the punched trees. I started with a vertical card, but when that wasn’t quite coming together, I turned it sideways and that worked, of course!

I went back to one of the first techniques I ever learned in stamping – tearing the cardstock! Hold the paper in front of you and pull down with your right hand as evenly or unevenly as you want. You want that torn edge look with kind of the underneath layer of the cardstock showing. That’s the best I can describe it. You don’t necessarily want a very straight, even, perfect edge. I used Basic White to make a snowy base for the trees.

I punched out several trees with the Pine Tree Punch and just placed them along the “snow”, popping up a few with Stampin’ Dimensionals® and some just adhered flat on the card.

The greeting is from the Perfectly Plaid Stamp Set. This is another product carried over into the new Stampin’ Up! Annual Catalog that you may already have. I think it’s been around a couple of years now, which is nice. I stamped it in Real Red Ink and then cut it out with one of the Ornate Frames Dies. It seems to fit perfectly on the card! I love the little stitching around the edge and the shape of the die is already cute.

That’s all there is to this card! I could have added some sparkle to the trees or on the background. Sometimes all I can think of is adding bling to a card, and sometimes I don’t think of it at all – until after I have taken the photo for my blog! Either way, keep it simple or jazz it up, this Heartwarming Hugs Christmas Tree Card is a fun and easy card to make.

SHOP STAMPIN’ UP! ONLINE!

Christmas 2-4-6-8 Treat Bag With Ornament

Christmas 2-4-6-8 Treat Bag With Ornament

Christmas papercrafting is more than just making cards, as you know! We all will need bags, boxes, treat bags and boxes, gift wrap, party favors, decorations, and all kinds of things like this Christmas 2-4-6-8 Treat Bag With Ornament. This is one of the easiest things you can make! A 2-4-6-8 box or bag!

You can use this little bag for a treat or a small gift. You can put candies inside or a very small gift, like a piece of jewelry. For a little party favor or a little something at each place setting at Christmas dinner, you could make any number of these which would not be too much work! Hopefully this Christmas there can be parties and family gatherings! Keeping my fingers crossed!!

This little box is made with just a half sheet of cardstock, 8 1/2″ x 5 1/2″. Just score it at 2″, 4″, 6″, and 8″ going across.  Turn the paper lengthwise and score at 2″. That short area will be the bottom of the box.  Cut on the score lines just up to the 2″ scoreline going across. Cut off the narrow little tab area. See the photo below. Apply a strong adhesive, like Multipurpose Liquid GlueTear & Tape, or Stampin’ Seal+ to the narrow tab on the end, then fold the other side of the box over to adhere.  It’s easier to do this flat than to try to hold the box. Fold in the flaps for the bottom and add a little glue to hold them in place.  Leave the top open or pinch to close, whatever you like.

2-4-6-8 Treat Bag Diagram

You can choose to leave the little bag open at the top or pinch it closed. If you pinch it closed, poke in the sides a little bit to make the top come together easier. You can tie some ribbon through at the top as I did or use some kind of clip. You could even make a lid to fit on top!

Now you are all set to decorate your bag or box! I made this one SUPER simple!! I also happened to have the ornament die cut from the Gingerbread & Peppermint Designer Paper so it was really easy! If you wanted to use another design in the paper, maybe you would want to change the color of the bag. Mine is Real Red. The ornament is popped up with Stampin’ Dimensionals. For some bling, I added some gold Gilded Gems. The ribbon is the Gold 1/4″ Shimmer Ribbon in the Stampin’ Up! Annual Catalog. You could add a little tag tied on with the ribbon if you wanted to. Or decorate with some designer series paper! So many options! Here is a little treat bag I made a few years ago.

It’s time to start making some of these fun things! Christmas comes early for crafters! The July-December 2021 Mini Catalog will be out August 3 along with Sale-A-Bration! After that it is full-steam ahead! Plan to make a few little 2-4-6-8 boxes to have on hand.

SHOP STAMPIN’ UP! ONLINE HERE!

Sweet Symmetry Thanks Card

I passed up this new paper in the Stampin’ Up! Annual Catalog at first, but decided that might have been a mistake so I ordered it recently on the Designer Series Paper Sale! Now I can use this cute paper to make cards like this Sweet Symmetry Thanks Card. The designs on the paper are really cute, I think, and fun to make cards and projects with.

The designer series paper is called Sweet Symmetry. It has traditional, symmetrical folk art images and florals in soft colors. One side has bolder floral designs and the other side has more generic designs. You can use them together or separately.

Although it looks black in the photo, the card base is Night of Navy, but you can see the dark blue background in the paper. I added a layer of Bumblebee cardstock underneath the designer paper just for fun. Since Bumblebee is one of the coordinating colors I thought it could add a little something to the card.

For an embellishment, I wrapped a piece of Bumblebee 1/4″ Gingham Ribbon around the designer paper and also adhered the separate bow. Sometimes it is easier to tie a bow separately and adhere it to the ribbon with Mini Glue Dots than to try to tie it to the base ribbon.

The greeting is from the Artistically Inked Stamp Set and stamped in Night of Navy ink. It is cut out with a Stitched Rectangle Die. I was going to cut out a layer of some kind to go underneath it without covering up too much of the paper, but in the end, I decided the greeting looked fine as is, especially with the Bumblebee Ribbon going underneath it. It is popped up with Stampin’ Dimensionals®.

This is such a basic, easy card design! It’s good for beginners as well as experienced stampers. Use just a card base, a layer of designer paper, and a greeting. That’s really all you need, but as you see, I added an extra cardstock layer and the ribbon for the embellishment.

I think the patterns on this Sweet Symmetry Paper just make you feel “happy” whether you are the cardmaker or the recipient! The Designer Series Paper Sale runs through August 2 so stock up or add to your collection of papers!

Peaceful Prints Deer and Trees Christmas Card

Peaceful Prints Deer and Trees Christmas Card

My inspiration for this Peaceful Prints Deer and Trees Christmas Card came from a sample in the Sale-A-Bration 2021 Brochure! Sale-A-Bration begins August 3 along with the Holiday Mini Catalog so it will be a great time to shop! With every $50 you spend, you can choose a free product in the Sale-A-Bration Brochure!

This card uses a really new product that we have never had before! In fact, I didn’t know it even existed! Cork Specialty Paper! I knew I was going to use the Peaceful Prints Designer Series Paper which is a product you can choose free in the Sale-A-Bration Brochure with a $50 purchase! I knew I was going to cut out two of the deer, by hand, on the paper and use the deer something like in a sample on that page. In the Holiday Mini, you can purchase a punch that I believe will cut out some of the deer on this designer paper, of course only the deer looking in one direction.

The card base is Real Red. Then I got the idea to use a piece of the Cork Paper for the first time for a background layer and I added a layer of Basic Black behind it to match the plaid on the deer. I cut the two deer out by hand from the Peaceful Prints Paper, leaving a small white margin around them. Someone said to do that at a Stampin’ Up! Convention years ago, I guess it makes cutting easier and you don’t have to be perfect! But when I flipped the paper over to put glue on it, the other side of the paper was the red and black plaid, so I just as easily could have had deer with no white margin around them! So funny! I used Stampin’ Seal to glue down the cork and the black layers onto the card. It seemed to work fine on the Cork Paper. The Cork Paper is surprisingly very thin! It’s amazing!

The trees are stamped from the Whimsical Trees Stamp Set and die cut with one of the dies in the Christmas Trees Dies. I die cut one just plain green and sponged some ink on it for interest. You can buy both the Stamp Set and Dies together in the Whimsical Trees Bundle and save 10%! (see pages 24-25 in the Holiday Catalog). I adhered two tree trees flat on the cork paper and one is popped up on Stampin’ Dimensionals. Then both deer are popped up on Dimensionals, except the one on the left overlaps the tree which is already popped up so I only put a Dimensional under his rear and the front end is glued down to the tree!

The greeting is in the Whimsical Trees Stamp Set. I stamped it in Real Red Ink and die cut with a die in the Stitched So Sweetly Dies. You might not recognize which one because I trimmed off the top and bottom rounded edges so I could layer it on a Real Red piece cut with the exact same die. Really, you can’t recognize either of them the way the top one covers up the bottom layer, but at least I got two colors for the greeting!

On the inside of the card, I added a Basic White layer, adhered a strip of the red and black plaid design at the bottom, and also adhered another die-cut tree! Then I can stamp or write a message on the inside on the white cardstock!

This was a fun card to make as I went along! I started by looking at the sample that looks like a tag in the Sale-A-Bration Brochure and came up with this card! Just play when you are stamping and see what you come up with! Maybe you will choose this Peaceful Prints DSP when you place a $50 order during Sale-A-Bration so you can make something like this Peaceful Prints Deer and Trees Christmas Card.

SHOP STAMPIN’ UP! ONLINE HERE!

Save Tax During Sales Tax Holiday!

SU Sales Tax Holiday 2021
Click on Chart to Read!

It’s that time of year again when some states have Sales Tax Holidays on school supplies in time for Back to School! Once your kids are grown and out of school, you won’t know when school starts or ends or what is happening! And certainly this past year, I didn’t know if kids here in Houston were IN school or doing virtual school or half and half or what was going on. But at least we can ALL benefit a little bit, even with our stamping supplies, if they are listed on the chart above because they really can be classified as school supplies! And you know that is true if your kids have come to you with a school project and asked if they could use your markers or glue or something else!

Eleven states will be offering a sales tax holiday for school supplies during the months of July or August. Products that are eligible according to the statute include “items normally used by students in a standard classroom for educational purposes.” To see the names of participating states, products exempted from tax, and sales tax holiday dates, click here.

Please note that you must place your order with Stampin’ Up! during the tax holiday period in order to receive these items tax-free (which is midnight on the first day to midnight on the last day of the tax holiday). Also, keep in mind that this is a state sales tax holiday; the state statute may not apply to county, city, and special jurisdiction taxes.

Note: Georgia, Louisiana, and Wisconsin have suspended the sales tax holiday for this year.

Look over the list of products that qualify and if you were going to order anyway, this will save you a few pennies, depending on your sales tax rate! Remember, the July-December 2021 Mini Catalog (Holiday Mini) and Sale-A-Bration both begin August 3, if that helps your planning!

Be sure to read at the top of the chart about the exemptions and details for your state and what the dates are.

For the clearest copy, click here: Sale Tax Holiday PDF

SHOP STAMPIN’ UP! ONLINE!

Quick & Easy Whimsy & Wonder Christmas Card

Quick & Easy Whimsy & Wonder Christmas Card

If you are looking for a simple card to make for the holidays, look no further than this Quick & Easy Whimsy & Wonder Christmas Card. It probably only took a couple of minutes to make! The paper is so pretty you don’t really need much other than a greeting.

This card starts with a base of Polished Pink, although there are many colors in the packages on the paper that you could also choose. If you were making several cards with this designer paper, you could make each one with a different color card base!

The designer paper is the Whimsy & Wonder Specialty Paper in the Stampin’ Up! Holiday Catalog, coming August 3rd! That’s not far off anymore! When I saw this paper being shown in some videos, it sold me on the whole Suite! Just looking at the catalog online, I completely dismissed this Suite! This paper has beautiful foil accents and is very Christmasy except with non-traditional colors. But I think it might be good to break out of our box and change things up a little. I still will make some red and green cards, the traditional colors of Christmas. This paper is SO pretty that I think it will be a hit as more people see it in person! This paper might even remind some people of the silver aluminum Christmas trees of years ago. I think they’ve even made a nostalgic comeback in recent years. Since you couldn’t put lights on these trees, some people had a multi-colored light that turned to give the tree different colors. Anyway, the silver in this paper reminds me of those vintage trees!

I used the In Color Polished Pink 3/8″ Open Weave Ribbon on the card. Originally, I planned to have it go vertically on the left side of the card with a bow. But after stamping the greeting from the Whimsical Trees Stamp Set in Polished Pink Ink and cutting it out with one of the new Tailor Made Tag Dies, I decided to pull the ribbon through the tag, tie a bow and secure it underneath the designer paper layer. I wish I would have popped up the greeting with Stampin’ Dimensionals, but I just adhered it flat to the card.

If you want a quick and easy card to make in multiples for Christmas, use this very basic card design of designer paper on a card base, a greeting, and a piece of ribbon and a bow for embellishment. You could add a little sparkle and bling, but really the paper with its foil accents can stand on its own. When your Holiday Mini Catalog comes in the mail, give a good look at the Whimsy & Wonder Suite.

SHOP STAMPIN’ UP! ONLINE!

Stampin’ Up! Joins Back to School Bash For the James Storehouse Organization

The other day Sara Douglass, CEO of Stampin’ Up!, did a Facebook Live video as a part of Jamie Albanese’s Heart of Stampin’ Up! Award Project along with Stacy DeWitt, Executive Director of the James Storehouse organization. Jamie is a Stampin’ Up! Demonstrator who said she was a foster child herself so she understands this situation. The James Storehouse organization is located in the Los Angeles, CA area (the area with the most foster children) and provides resources to children in foster care and those aging-out of foster care. 

Stampin’ Up! will donate backpacks and school supplies and we invite demonstrators and customers to join the fun! There are two ways to support Jamie’s project for James Storehouse. First, you can check out the Amazon Wishlists to donate backpacks or school supplies for foster children of all ages. The backpack wishlist can be found here and the wishlist for school supplies can be found here. Or second, you can send cards to add inside the filled backpacks. Please include a short, encouraging note and sign with your first name only. Send finished cards to: 

JAMES STOREHOUSE
3543 Old Conejo Road #105
Newbury Park, CA 91320
USA

The deadline for donation purchases and cards is 30 July 2021. 

I encourage you to watch the Facebook Live video Sara did, whether or not you want to make a donation. It will warm your heart that there are people out there trying to help these children, young and older, even into college age. The basic message is these foster children sometimes leave their home or school with only the clothes on their back, sometimes are moved around a lot, and all they want is to know that something belongs to them, hence the backpack. The organization will fill each backpack with school supplies, surprisingly the same items for all ages because that is what they have found kids of all ages need to do school projects. That was amazing to me.

If you want to do a little something, just mail a card you have made. Just write a brief, uplifting, encouraging, happy message. They said don’t mention their circumstances or anything like that. If you watch the video, they give some examples. Just sign your first name. No envelope, please, because obviously, they will go through the cards to make sure they are appropriate before putting them in the backpacks. I think they would rather have someone send just a single card or a few cards, not a whole box full of cards like some of us might have stored away. They aren’t equipped to handle quantities like that.

We all know the joy even we feel when we get a card in the mail or we have heard how much it means to others to receive a card we send. Imagine children in very difficult circumstances find a card or two in their new backpack wishing them well! Watch the video to understand what Stampin’ Up! is helping with and to bring joy to your heart!

Whimsy & Wonder Christmas Trees Holiday Card

There is a new Suite in the Stampin’ Up! Holiday Mini Catalog called the Whimsy & Wonder Suite which I totally passed over the first time I looked through the catalog online. When I saw some videos of the package of the designer paper and the pink color scheme for the holidays I fell in love with it although the first card I made, this Whimsy & Wonder Christmas Trees Holiday Card, doesn’t even have those colors! Go figure! But this is what I came up with at the time!

The Whimsy & Wonderful Designer Series Paper is so stunning! If you don’t mind using some non-traditional colors for Christmas, even for a few cards and projects, I think you will love the designs and colors on this paper! All the sheets have foil accents on one side of the paper. Along with the pinks, blues, light greens, and images it is beautiful! It’s probably my favorite in the Holiday Catalog and I’m usually pretty traditional.

This card starts with a Mossy Meadow Cardstock base. Then I chose the dark green side of one paper with white dots, like snowflakes. I simply turned the paper over and saw the diagonal silver foil stripes on the other side and used that for the bottom portion of the card layer.

Some of the whimsical trees on another sheet of designer paper can be cut out with the dies in the Christmas Trees Dies. Of course, you can’t run the whole 12″ x 12″ sheet of paper through the Stampin’ Cut & Emboss Machine, so you need to cut out portions of the paper to die-cut. You want to leave a generous enough margin around the tree so the die can cut it correctly without ruining too much of the rest of the paper! On my card, the middle tree in the background was actually at the bottom of the page, not the full image, but I was able to die cut what was there and still use it! Some of my trees were glued directly to the card front and some are popped up on Stampin’ Dimensionals®. Most of the trees have foil accents in tiny dots or garlands.

The greeting is in the Frosted Gingerbread Stamp Set. I either didn’t have space for this card or didn’t care for the greetings in the Whimsical Trees Stamp Set. After looking through all my dies and judging the space on my card, I finally had to just stamp the greeting on a narrow strip of Basic White Cardstock and layered it on Mint Macaron Cardstock which matches the ink color. I used the silver pieces in the Silver & Clear Epoxy Essentials on each end of the greeting.

Maybe I should have stopped myself, but I added some Subtle Shimmer Sequins on page 37 in the Holiday Catalog in the upper background of the card. I couldn’t help myself even though with the accents on the trees and the stripes on the bottom paper, there is pretty much sparkle on the card already. But can we really have too much sparkle??!

The Holiday Catalog will come out on August 3rd! The online catalog will go live on that day for you to view. August is not too soon to begin your holiday cardmaking and crafting! Then you’ll be able to start making Christmas and holiday cards like this Whimsy & Wonder Christmas Trees Holiday Card.

Here’s the New August Paper Pumpkin Kit!

Paper Pumpkin Aug 2021 Hope Box Banner Shelli dates

Here’s the new Paper Pumpkin Kit for August 2021 and for a big surprise, Shelli Gardner, the cofounder of Stampin’ Up! helped design and create this kit!. For those of us who have been around Stampin’ Up! for awhile, Shelli has been the face of Stampin’ Up! and someone we have loved and been inspired by. If you are new to Stampin’ Up! then you are more familiar, probably, with Shelli’s daughter, Sara Douglass who is the CEO now. Besides the products, the Gardner family is one of the reasons we all love Stampin’ Up! So if Shelli had a hand in designing something, you can believe it will be something special! If I were you, I would sign up for this kit today! Maybe order two – one to keep and one to give away!

Paper Pumpkin is a papercrafting kit that comes to you in the mail, mid-month with a surprise project inside. We get clues about the kit, but it’s still a surprise to actually see the kit when we get it. Inside you will find all the supplies to make the cards or different project, instructions, an exclusive stamp set, an ink spot, and information on a video to watch if you like to see how it goes together. You can make the kit as designed or you can change it up or add your own extra cardstock or embellishments to make your own creations. It’s your kit when it shows up in your mailbox and you can play with it however you like!

The Hope Box is designed to be a keepsake box—keep mementos of cherished memories or reminders of what’s yet to come. Collect treats and trinkets that represent what hope means to you in your Hope Box and look inside for inspiration or share it with a friend who could use some uplifting!

What will you put in your Hope Box? Letters, song lyrics, inspiring quotes, and photographs are powerful reminders of hope and connection—and great additions to a Hope Box. For more inspiration on how to build your Hope Box, watch Shelli herself put one together in this video.

This month’s Paper Pumpkin kit includes supplies to create nine encouraging cards and coordinating envelopes in an inspiring color palette, and a specially designed Hope Box!

Coordinating colors are Bermuda Bay, Blackberry Bliss, Bumblebee, Melon Mambo, Petal Pink, Pool Party, and Poppy Parade. Sounds lovely!

If you would like to find this treat in your mailbox in August, just click the link below to go to my personalized Paper Pumpkin page. You won’t have to look up my name. OR if you are putting in a Stampin’ Up! order, particularly if you are or trying to earn Stampin’ Rewards, maybe a Paper Pumpkin subscription on your order would earn you some rewards. This is called a Prepaid Subscription and just goes on your Stampin’ Up! order like any other product. You can choose various lengths, even if you are already paying a monthly subscription. Stampin’ Up! will send you a code to set up your account. No risk or obligation to continue for any length of time. You can even skip a month if you don’t have time or aren’t attracted to that particular kit. Then resume your subscription when the next month’s kit comes out.

JOIN PAPER PUMPKIN TODAY AND GET SHELLI’S KIT!

Gingerbread & Peppermint Christmas Ornament Card

Gingerbread & Peppermint Christmas Ornament Card

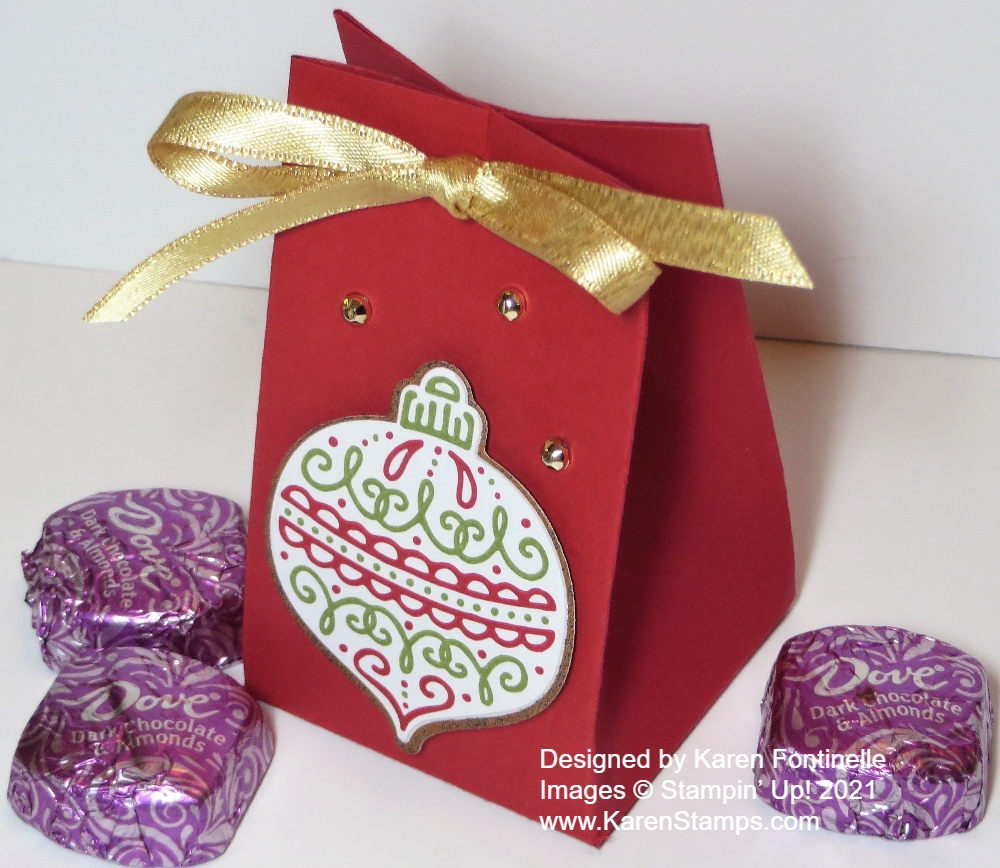
Here is my first Christmas card of the season, the Gingerbread & Peppermint Christmas Ornament Card! It doesn’t seem like it should be time to be thinking about Christmas cards, but the Holiday Catalog will be coming out in August so the fall and holiday craft season is beginning! You can see it already in the craft stores! There is no summer!

One of the sets of products I think a lot of people are going to love in the Holiday Catalog is the Gingerbread & Peppermint Suite. There are a lot of products in this grouping! You can choose stamps, dies, designer paper, ribbon, pillow box dies, Memories & More cards and envelopes, and more! This card doesn’t use all those things!

The card base is Real Red Cardstock with a layer of the Gingerbread & Peppermint 6″ x 6″ Designer Series Paper. This green design with white lines and red dots is actually the reverse side of the ornaments! I wanted a Real Red background for the ornaments I would die-cut, but I also made a layer underneath of Old Olive to help the Real Red stamp out a little more.

I used the Gingerbread Dies to cut out the ornaments, although you could do it with Paper Snips pretty easily. I popped them up with Stampin’ Dimensionals® and tied a little bow with Linen Thread on top of each ornament. You could use whatever twine or narrow ribbon you have. I might have used silver if I had some handy!

The greeting is one in the Frosted Gingerbread Stamp Set. I stamped the entire greeting a couple of times and tried different dies and ideas, but it was just a little too large for the space I had on my card. I thought about only stamping it on the inside of the card and not having any greeting on the front of the card. In the end, I used my Stampin’ Write Real Red Marker to color just the “Merry Christmas” portion of the stamp and used a small die in the Ornate Frames Dies. It just fit!

Then for a little bling, I tried out the new Subtle Shimmer Sequins on page 37 of the Holiday Catalog (when you get one!). They don’t have holes in the center so the glue doesn’t squish out when you adhere them! They come in two sizes and four colors: Matte Silver, Matte White, Metallic Silver, and Pearl White. I just used three Metallic Silver ones. I think it’s perfect!

Once you make a Christmas card design you like, make several more cards exactly the same….five, ten, whatever number depending on how many you think you will send out. That way you can have fun making cards of several different designs. That’s what I like to do. When you have the design figured out, the supplies out, you might as well make a batch of cards! Do it assembly-line style – cut everything, stamp everything, assemble everything, etc.

The July-December Mini Catalog (delayed a month due to shipping issues) will begin August 3 so get ready! It will also be Sale-A-Bration (yes, a second one this year!!) so as you purchase holiday items, you will earn free product with every $50 purchase! Something to look forward to during this hot summer!

SHOP STAMPIN’ UP! ONLINE HERE!

Expressions In Ink Hello Card

One day I made another card similar to this Expressions In Ink Hello Card and thought I might as well make another one while I had all this pretty paper out! I decided to pretty much copy the card on the front of the new Stampin’ Up! Annual Catalog except I changed the paper out to this gorgeous one with the gold foil accents!

This card starts with a base of Polished Pink Cardstock. Then I added a layer of the Expressions In Ink Specialty Designer Series Paper, one with lots of pink and Pale Papaya flowers on it with some leaves, flower centers, and small blossoms in gold foil. It’s just beautiful paper!

I die cut the long leafy piece from the Artistic Dies and colored it with different shades of green ink applied with Blending Brushes. This die-cut piece went down first on the card to go underneath all the other extra pieces. As I have said before if only I had remembered to use Adhesive Sheets when I die cut this piece so I could just pull off the backing and I’d be all set with adhesive! I never think of it ahead of time, though, so I had to use teeny tiny drops of Multipurpose Liquid Glue.

I stamped the flower in the Artistically Inked Stamp Set and die-cut it, as well as the solid leaves. Also stamped is the word “hello” and popped up over a strip of the Pale Papaya & White 1/2″ Ribbon. After that, the flower and leaves are popped up over the end of the greeting. I added extra little gold pieces from some retired product, but when it is available again, you could use something in the Expressions In Ink Ephemera Pack.

This Expressions In Ink Designer Paper is so gorgeous you almost don’t need very much else on the card. Here’s another card I made with one of the other sheets of the paper. I hope you feel very artistic when you use this lovely paper making cards of your own possibly similar to my Expressions In Ink Hello Card.

SHOP STAMPIN’ UP! ONLINE HERE!

Beauty of the Earth Friendship Card

Beauty of the Earth Friendship Card

Another beautiful paper on the Stampin’ Up! Designer Series Paper Sale is the Beauty of the Earth Paper as you see in this Beauty of the Earth Friendship Card. You have nine select papers to choose from in this sale, all 15% off! One of the packages is the In Good Taste DSP which has 24 sheets in it! There are two each of twelve designs, all great designs for texture and background for cardmaking and scrapbooking. The rest of the papers are the usual size, 12 sheets, two each of six designs.

For this card, I copied the design I saw on Instagram from an Artisan Design Team member where she used horizontal strips of designer paper for the card front. I used a different paper and greeting, but used the same strip method. This is a great way to use up scraps of designer paper or you can even use regular cardstock too. You can stamp the cardstock first and cut it into strips. Lots of possibilities

I used the Beauty of the Earth Designer Paper, on sale now, for my strips. To match, I used Mossy Meadow Cardstock for the card base and then a layer of Cajun Craze. I tried out several different colors but I liked these the best at the time. I didn’t have measurements for the card so I just played around until I got something that worked. If you want wider strips, just use five strips or even four. Here is a card I made using three vertical panels of designer paper.

My designer paper strips on this card are 3/4″ x 3 3/4″. If you only had the card base, then you might make the length of the strip 4″ wide. I just eyeballed the placement of the strips, no measuring! You could also place them touching each other, not with a space in between. Do what you like!

The greeting is in the Beauty of Friendship Stamp Set. I think it’s a great sentiment and certainly true! I stamped it in Mossy Meadow Ink and die cut with a die in the Tasteful Labels Dies. Then I played around with various dies in the same set and colors of cardstock, finally settling on Mossy Meadow diecut with one of the long dies to go behind the greeting to help it stand out. And a couple of Gilded Gems on each end for a little pizzazz!

Try your hand at this paper technique! It’s fun and easy! Just eyeball everything and make minor adjustments if needed. Have fun!

Bloom Where You’re Planted Happy Birthday Card

Bloom Where You're Planted Happy Birthday Card

If you would like to make this Bloom Where You’re Planted Happy Birthday Card, you can buy the paper with the plants and the paper with the background both on sale in the Stampin’ Up! Designer Series Paper Sale! There are nine select papers on sale right now through August 2 so you can stock up or try out new ones at a 15% discount!

To make this card, I used two of the papers on sale now – In Good Taste for the background and Bloom Where You’re Planted for the plants! In Good Taste is a giant package of paper, 24 sheets of paper, 2 papers each of 12 different designs. You are sure to find patterns for every creation in this package! Each sheet has photographic images of wood, tile, stone, and other elements to add visual textures to all kinds of projects. These would be great backgrounds for scrapbook pages as well.

For the card base, I used Early Espresso Cardstock. Since this paper is so dark, you will want to add a Basic White or lighter color layer inside the card on which to stamp or write your message. You might even stamp or add a cutout image of one of the plants to this inside layer for a fun surprise.

For the plants, I just went through the Bloom Where You’re Planted Designer Paper and chose some plants I wanted to cut out. This paper has sheets of separate plants and pots, leafy backgrounds as well as various generic backgrounds to look like walls where you might place a plant. If you have the Perfect Plant Dies, you can cut out certain pots and plants on separate papers by running them through the Stampin’ Cut & Emboss Machine. I just used my Paper Snips to cut out one separate pot and separate plant and the other two were the full pot and plant on another sheet.

The largest plant on the left is popped up on Stampin’ Dimensionals® and the other two are adhered right down on the background paper. I found a retired spool of twine and used that to tie a little bow and adhered it to the middle pot with a Mini Glue Dot.

The greeting was already die-cut in a little pile on my table from the Many Messages Stamp Set and Messages Die. This is an amazing concept! It’s like a large background stamp filled with greetings that is best to stamp with the Stamparatus so you make sure every inch is stamped fully. Then die cut with the one large die, making sure it is lined up properly, and it cuts out all the greetings in one fell swoop! You used to be able to buy both the stamp set and die in a Bundle, but that retired now so you have to buy them separately. However, they added a new stamp set, the Many Happenings Stamp Set, for even more greetings to be stamped and die-cut in the same way! If you stamp and cut out these greetings maybe in a couple of colors of ink or on different colors of cardstock, then store them in a little box or bag, you will have a whole bunch of greetings ready to go when you don’t have time to look for a specific stamp set to use!

In this previous post, you can see how I used the Stamparatus to stamp all these greetings!

Check out all the papers on sale, if you haven’t already! Maybe you have purchased one of the patterns already but used a lot of it. Now is the time to stock up on more at a discount! Every little bit helps! My Bloom Where You’re Planted Happy Birthday Card was fun to make!

SHOP STAMPIN’ UP! TODAY!

Sign Up For Paper Pumpkin by July 10th!

Paper Pumpkin Kit July 2021

Here it is! A peek at the July Paper Pumpkin Kit, coming mid-July is you sign up by Saturday, July 10th! It looks fun and perfect as we enter summer adventures and travel.

“Life is full of big adventures that are best experienced together! This month’s The Adventure Begins Paper Pumpkin Kit helps you celebrate those exciting new chapters in the most creative of ways with enough supplies to create twelve motivating cards—plus coordinating envelopes—all featuring the exciting colors of nature.

Like the still moments before a great adventure, the kit’s designs contain a quiet energy that hint at all the grand possibilities of what is yet to come. Share this kit and cards with your family and friends about to embark on a new journey and make connections while you explore and discover new levels of your creativity!”

Details about this Kit:

  • Contains enough supplies to create twelve cards and coordinating envelopes.
  • Card size: 4-1/4” x 5-1/2” (10.8 x 14cm)
  • Envelope size: 4-1/2” x 5-3/4” (11.4 x 14.6 cm)
  • Comes with a Stampin’ Spot plus an exclusive Stamp Set.
  • Includes inspirational sentiments and adventure-themed imagery featuring these nature-inspired coordinating colors: Basic Black, Basic White, Bermuda Bay, Crushed Curry, Early Espresso, Flirty Flamingo, Garden Green, Granny Apple Green, Mango Melody, Night of Navy.

Paper Pumpkin is a themed kit that comes to you in the mail once a month! All supplies you need are included, plus instructions and a website where you can watch a video. All you have to do is open the box and see what is inside! Follow the directions exactly, or if you feel like branching out and creating something different, you can do that too! No risk or obligation because you can subscribe and skip a month if you need to or even cancel if Paper Pumpkin isn’t for you. I call it a gift I give myself to get a papercrafting kit in my mailbox once a month! You deserve one, too!

You can purchase a Prepaid Kit if you are ordering other Stampin’ Up! products.

For a monthly subscription, just click the link below!

SIGN UP FOR PAPER PUMPKIN TODAY!