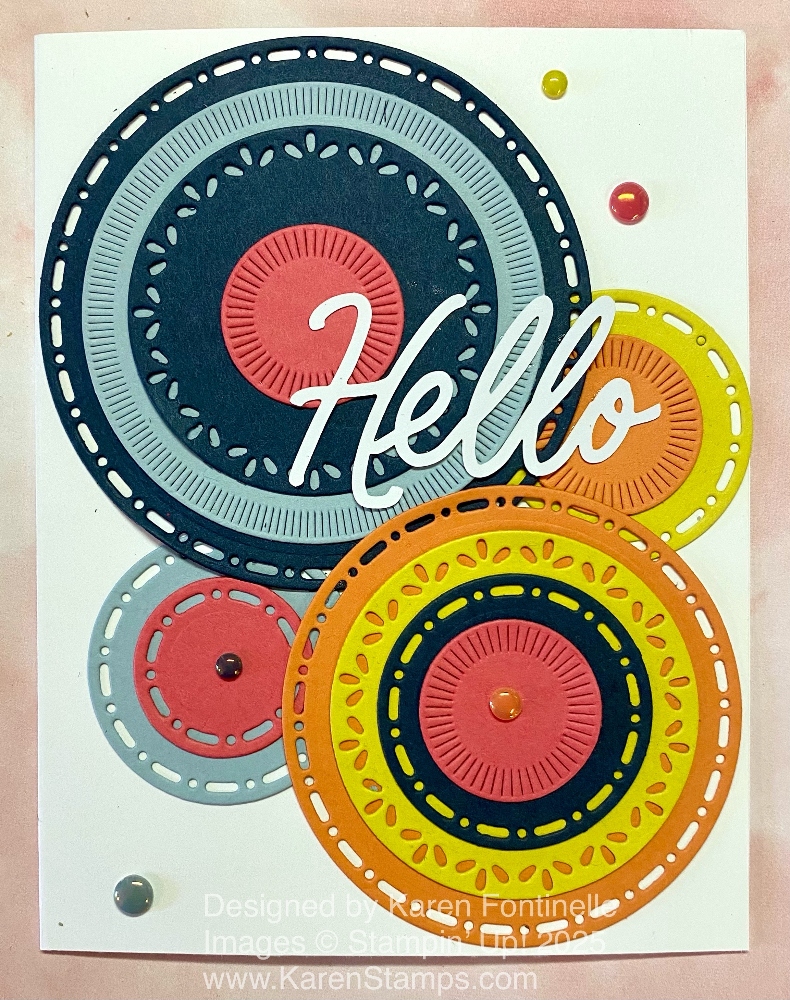
Tag Archives: Hello card

Hello, Irresistible Hello Card

Sometimes all you have to do is spy one of your scraps to get a card idea! That’s how this Hello, Irresistible Hello Card came about. I spotted a diecut scrap and was going to use the other side of this piece of designer paper, but when I turned the paper over, I decided to use this floral side instead! So you never know what you might come up with!

I used the Hello, Irresistible 6″ x 6″ Designer Series Paper on the front of this card. You might miss this paper because it is not in the new Annual Catalog. It is one of the Online Exclusives in the Online Store. The important thing is it is one of the select papers on the Stampin’ Up! Designer Paper Sale going on right now during the entire month of June! The whole package of 48 sheets of paper is very pretty. It has digitally hand drawn botanical and floral images plus color washes.

The card base is Flirty Flamingo. I decided to make the designer paper the full length of the card and center it so it is cut at 5 1/2″ x 2 3/4″. I thought it would be pretty to put a layer of Basic White cardstock behind it to accent the white images of the flowers, but I made it narrow. It is cut at 5 1/2″ x 3″.

Before adhering anything, I wrapped a piece of the pink ribbon in the Ribbon Duo Combo Pack around the bottom of the designer paper. I put it pretty low so as not to cover up the flowers. I tied a little bow separately and adhered it to the ribbon with a Mini Glue Dot. Then I assembled the card.

The greeting is stamped in Flirty Flamingo ink on Basic White from the Irresistible Blooms Stamp Set and diecut with a banner die in the Stylish Shapes Dies. Since I didn’t want the banner as long as it was, I tried an idea I saw recently. I cut off the ends of the banner and put Stampin’ Dimensionals on the back of the greeting. Don’t put them all the way to the ends so you have space. After adhering the greeting, I put Multipurpose Liquid Glue on the backs of the two end pieces I had cut off and adhered them flat on the card but slid underneath the popped-up greeting a little bit. That shortens the whole thing and just gives a little different look to your card!

Sometimes I don’t think about adding some sparkly jewels to my card until after I take the photo, but you certainly could add some Iridescent Rhinestone Basic Jewels to this card! That would be very pretty!

Don’t forget the Designer Paper Sale this month! Save 15% on select papers, and this is one of them!

SHOP STAMPIN’ UP! ONLINE HERE!

Expressions In Ink Hello Card

One day I made another card similar to this Expressions In Ink Hello Card and thought I might as well make another one while I had all this pretty paper out! I decided to pretty much copy the card on the front of the new Stampin’ Up! Annual Catalog except I changed the paper out to this gorgeous one with the gold foil accents!

This card starts with a base of Polished Pink Cardstock. Then I added a layer of the Expressions In Ink Specialty Designer Series Paper, one with lots of pink and Pale Papaya flowers on it with some leaves, flower centers, and small blossoms in gold foil. It’s just beautiful paper!

I die cut the long leafy piece from the Artistic Dies and colored it with different shades of green ink applied with Blending Brushes. This die-cut piece went down first on the card to go underneath all the other extra pieces. As I have said before if only I had remembered to use Adhesive Sheets when I die cut this piece so I could just pull off the backing and I’d be all set with adhesive! I never think of it ahead of time, though, so I had to use teeny tiny drops of Multipurpose Liquid Glue.

I stamped the flower in the Artistically Inked Stamp Set and die-cut it, as well as the solid leaves. Also stamped is the word “hello” and popped up over a strip of the Pale Papaya & White 1/2″ Ribbon. After that, the flower and leaves are popped up over the end of the greeting. I added extra little gold pieces from some retired product, but when it is available again, you could use something in the Expressions In Ink Ephemera Pack.

This Expressions In Ink Designer Paper is so gorgeous you almost don’t need very much else on the card. Here’s another card I made with one of the other sheets of the paper. I hope you feel very artistic when you use this lovely paper making cards of your own possibly similar to my Expressions In Ink Hello Card.

SHOP STAMPIN’ UP! ONLINE HERE!

Prized Peony Saying Hello Card

Prized Peony Saying Hello Card

If you like to stamp and color, this Prized Peony Saying Hello Card is really an easy card to make! I did use the masking technique to cover the large peony while I stamped the smaller flowers on the side. Since I love coloring with the Stampin’ Blends markers, for me this is an easy and relaxing card to make! If you don’t like coloring, you could do the same by stamping the flowers in the same or different colors rather than black ink and then do not color them in.

The card base is Flirty Flamingo and after stamping the card, I opted to add a layer of Granny Apple Green Cardstock as a layer under the Whisper White to blend in with the card better since I had used Granny Apple Green on the card.

I stamped the large peony and then stamped it on a “sticky note” being sure to get part of the stamped flower over the sticky area on the back to help hold it over the stamped flower on the card. After stamping on the sticky note, I cut out the flower right on the lines or just barely inside to use this as a mask. After stamping the large flower on the card, I stuck this mask over the flower so I could stamp the side flowers and my stamp would land on the paper mask and not stamp over my original stamped flower.

I stamped the flowers in Memento Ink and then colored in with several Stampin’ Blends Markers. I used both the Light and Dark of Flirty Flamingo on the flower, Granny Apple Green for the few leaves, and a dab of Daffodil Delight for the flower centers. Just to fill in a little white space, I scribbled a little Granny Apple Green beyond the leaves and flowers or in between.

I wanted a large greeting on the card so I simply stamped this one directly on the card front. It is from the Tasteful Touches Stamp Set, which has several very nice greetings to use. There is enough room on this card that I could have stamped it on cardstock and layered it on another piece. I could also have added some sequins or dots so an extra little embellishment, but I kept it simple this time!

You can see how I just stamped the very large peony on THIS CARD in just a colored ink and didn’t have to color it in. It still produced a pretty card doing it this way, so if you don’t like coloring, don’t let that deter you from getting this very lovely Prized Peony Stamp Set and perhaps the Bundle. You will be able to get very creative with this stamp set and perhaps the entire Peony Garden Suite making cards similar to my Prized Peony Saying Hello Card.

SHOP STAMPIN’ UP! ONLINE HERE!

Hello Card with Magnolia Lane

Hello Card with Magnolia Lane

Here is a “Hello” card made with Magnolia Lane paper and a stamp! Wouldn’t someone you know love to receive this card in the mail?!

This is a sneak peek of a couple of the new products coming in the new Stampin’ Up! Annual Catalog on June 4, 2019. I used the Magnolia Lane Designer Series Paper and a greeting in the Good Morning Magnolia Stamp Set.

The card base is Petal Pink Cardstock layered with a striped pattern from the Magnolia Lane DSP. I also used a little strip of the brown pattern with leaves as a little layer for interest near the top of the card under the greeting. The greeting is stamped and then die cut with one of the new Stitched Nested Labels Dies. I wrapped a piece of the Braided Linen Trim around this brown piece.

For the focal point of the card, I just cut out a flower from the designer paper and popped it up with Stampin’ Dimensionals. Paper Snips are great for this kind of cutting. We don’t always have a die for everything so you need a good pair of scissors! Before I adhered it to the card, however, I die cut a large Vellum Cardstock circle to place underneath the flower. For this, I used one of the Layering Circles Dies. I could have stopped at this point, but I added some of the Heart Epoxy Droplets to the card. You don’t have to have them, I just thought I wanted to fill up a little space with them.

You might not guess but I got inspiration for this card from the cover of the new catalog. Actually the card I was sort of copying was a smaller one, not this regular size. But I like my card just fine!

I think this Magnolia Lane Suite of products is going to go like hotcakes when the catalog goes live so I would urge you to order right away if you like the main items in this Suite. There are also dies in a Bundle with the stamp set to save 10%. All will become known on June 4th at Noon MT! Just a day over two weeks away! Get ready!

Hello Card Magnolia Lane Closeup