Tag Archives: 2-4-6-8 Gift Bag

Rudolph the Reindeer Gift Bag

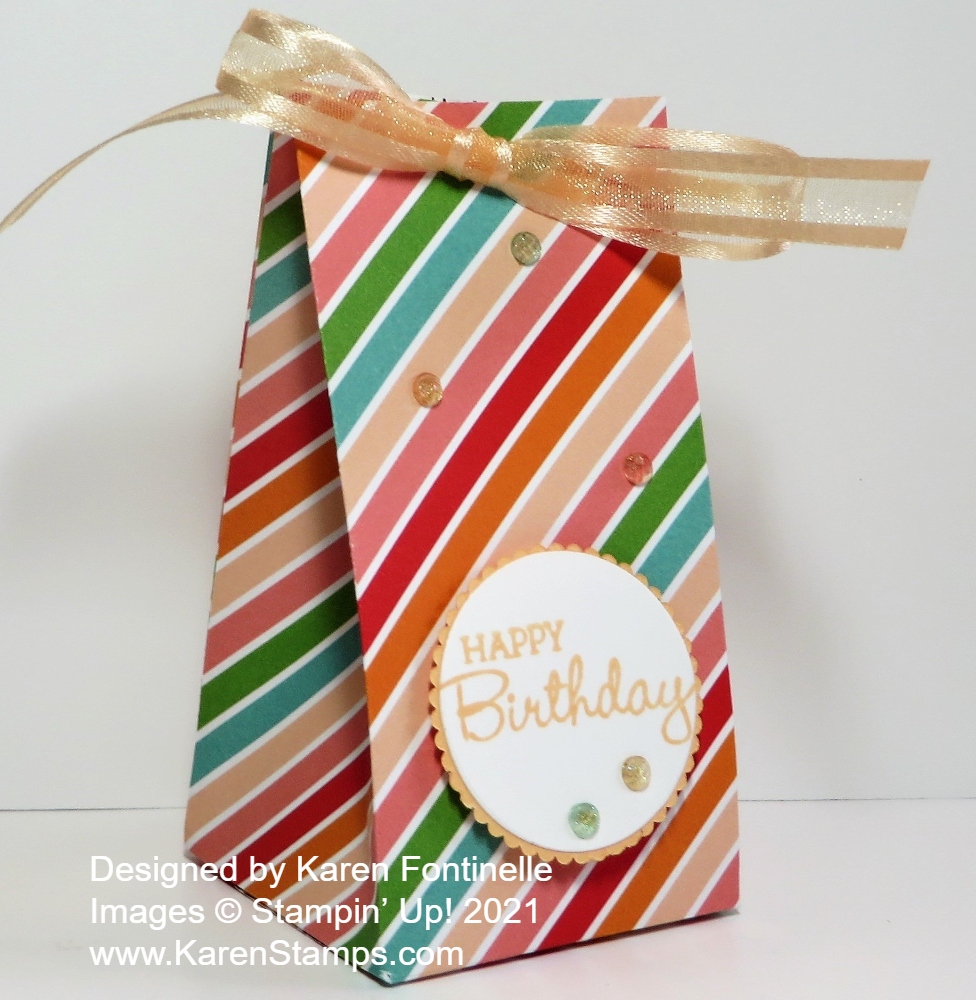
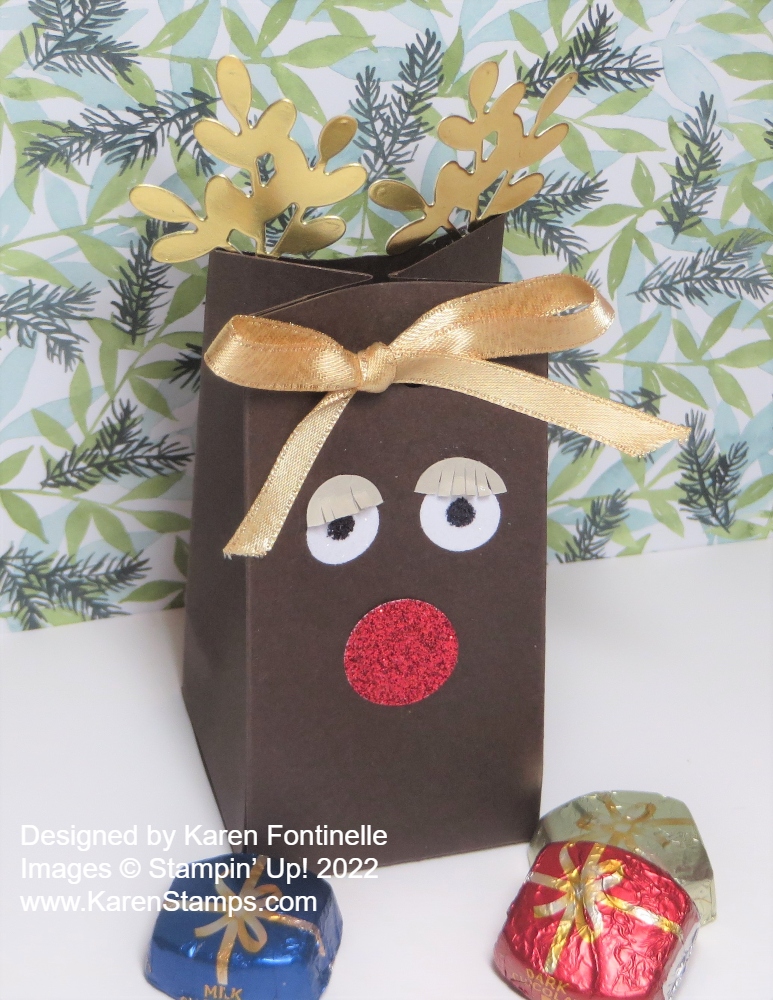
I think every year I make some kind of Rudolph Gift Bag so here is one for 2022. It’s so quick and easy to make, not to mention fun to see Rudolph develop right before your eyes!

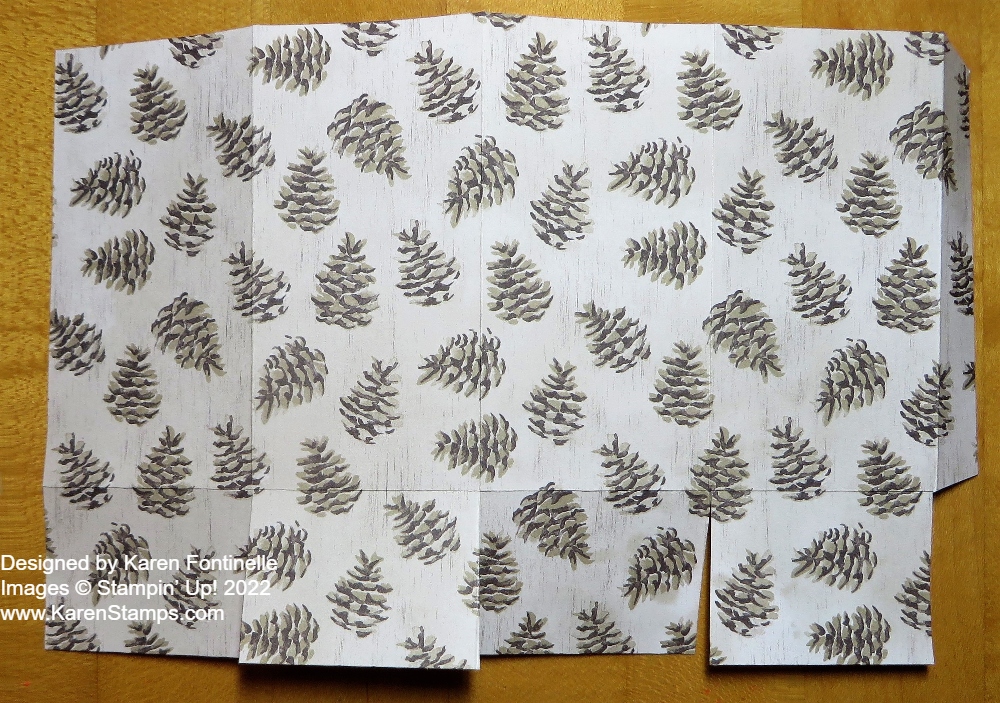
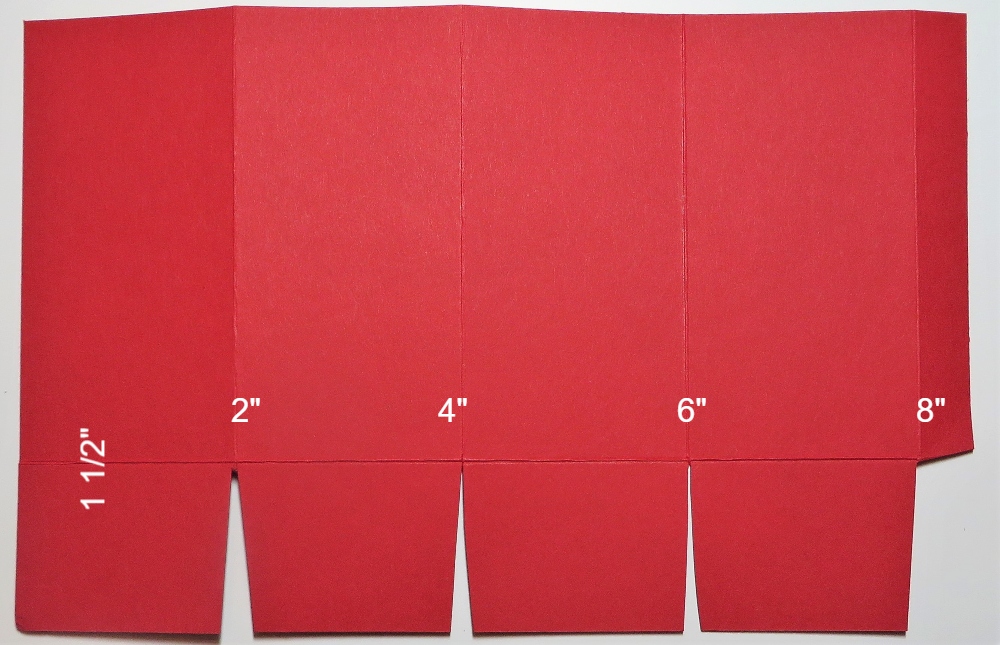
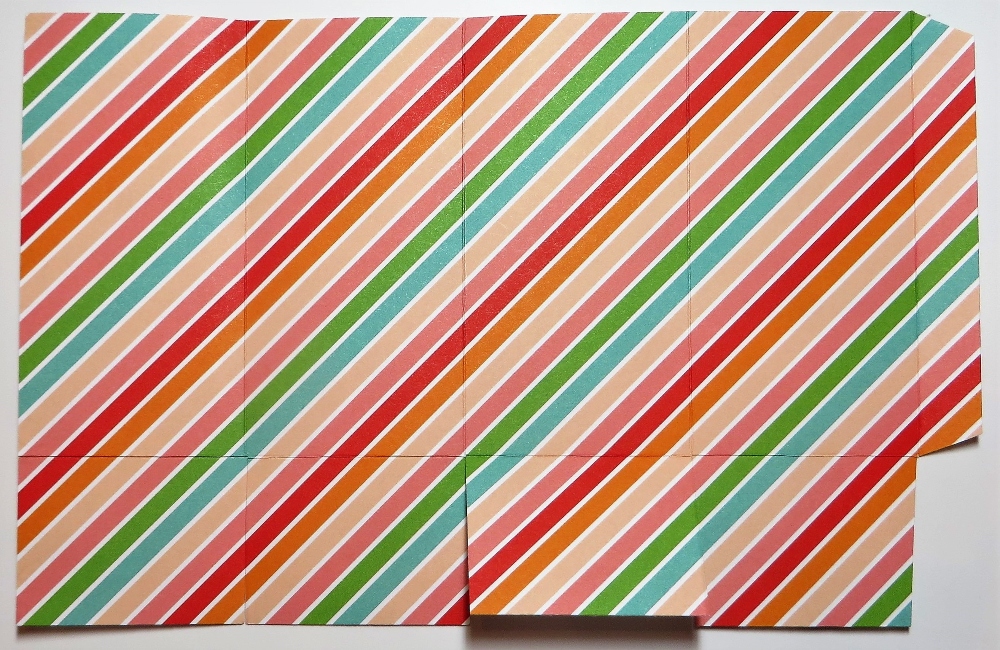
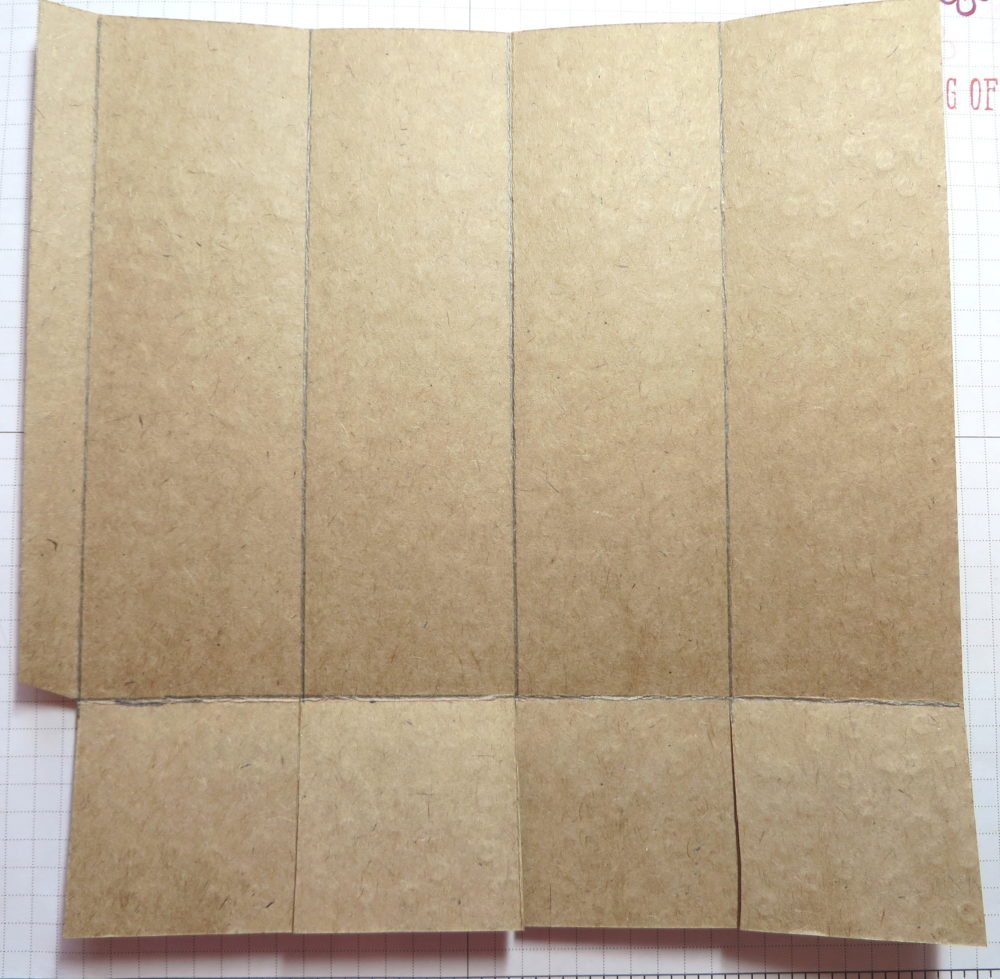
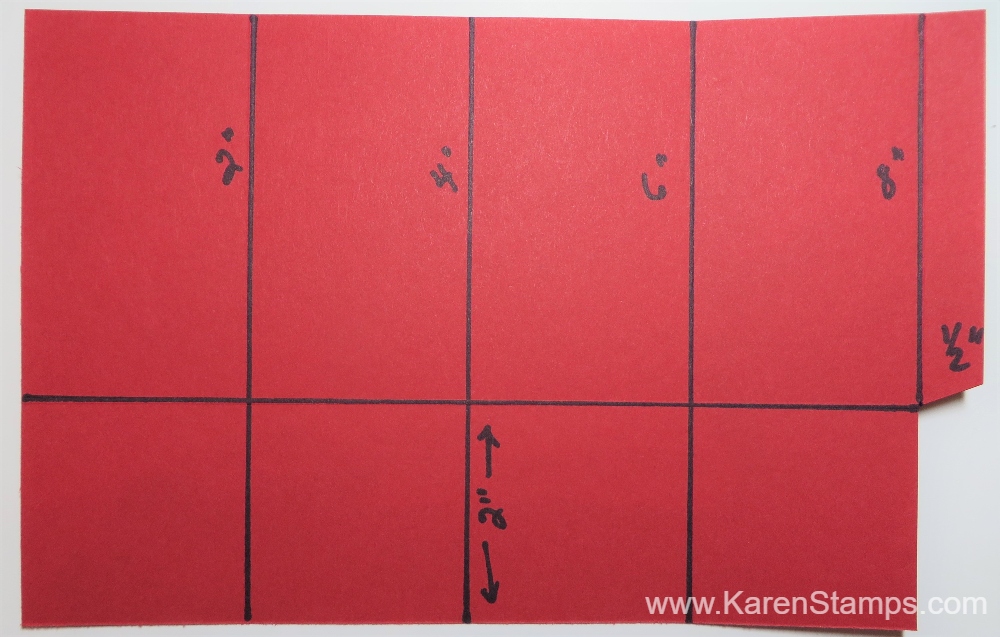
This is a typical 2-4-6-8 bag (or box, however you want it to end up!) that we all know how to make. I used a piece of Early Espresso Cardstock since in previous years I usually use Soft Suede. This reindeer has darker fur! Start with a piece of cardstock cut at 6″ x 8 1/2″. Score at 2″, 4″, 6″, and 8″, then turn the paper lengthwise and score at 2″. Cut on the score lines of those small squares which will be the bottom of the bag, up to the 2″ score line. Cut off the tiny 1/2″ piece in the bottom corner. See diagram below.

2-4-6-8 Treat Bag Diagram

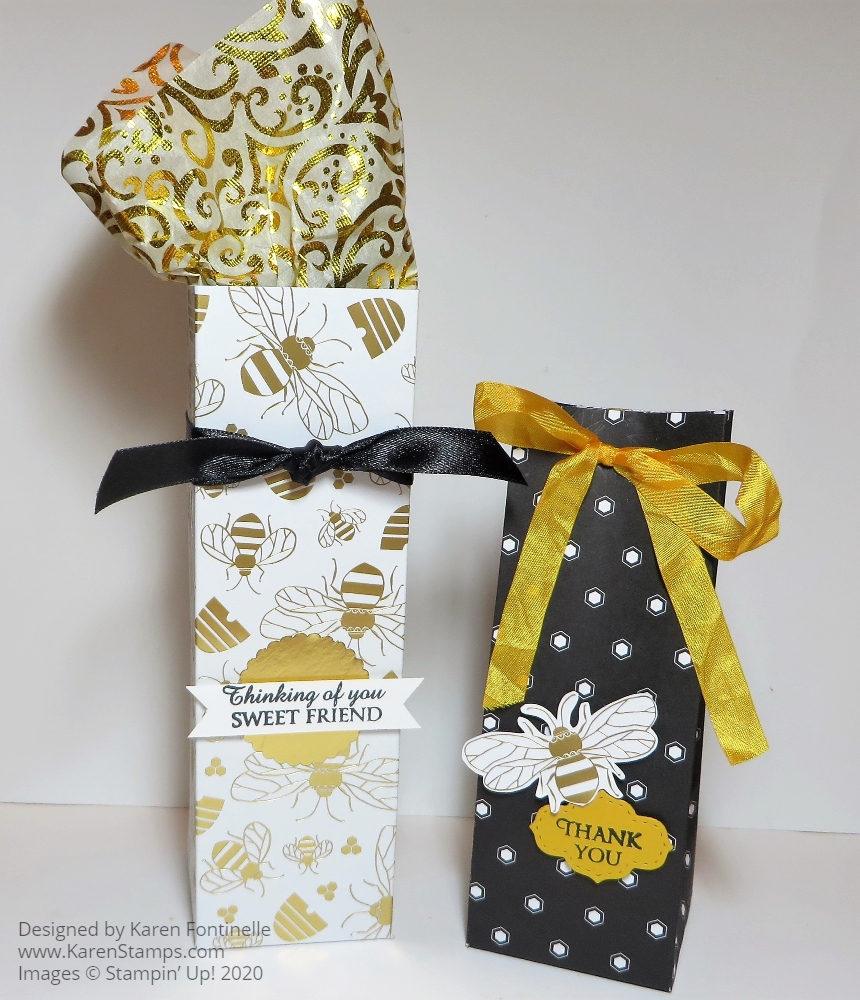
Apply adhesive to that 1/2″ flap and fold over to adhere to opposite side. Fold in the bottom flaps and use adhesive to hold them closed. Pinch the sides and the top of the bag to close. Before closing the bag for good, adhere the gold foil diecut antlers to the inside of the bag . I used a leafy die in the Christmas Banners Dies. I thought this reindeer should be spiffy with golden antlers!

For the eyes, use any white paper, but since I had scraps of the Real Red & White Glimmer Paper handy, I thought Rudolph might look good with glimmery eyes! I colored in the center of the eye with a Sharpie. I used a retired 1/2″ Circle Punch to make the eyes but you could just cut them out by hand.

Rudolph’s red nose is the Red Glimmer Paper. If you don’t have red glimmer paper, color some other glimmer paper with a red marker or red ink. I used a retired 3/4″ Circle Punch for his nose.

I thought maybe Rudolph, for something different, should have some fancy eyelashes! To make them show up, I used Sahara Sand cardstock and punched half circles with the 1/2″ Circle Punch and cut the little lashes by hand. Not sure I think they look that great but maybe it’s ok! Gotta try new things!

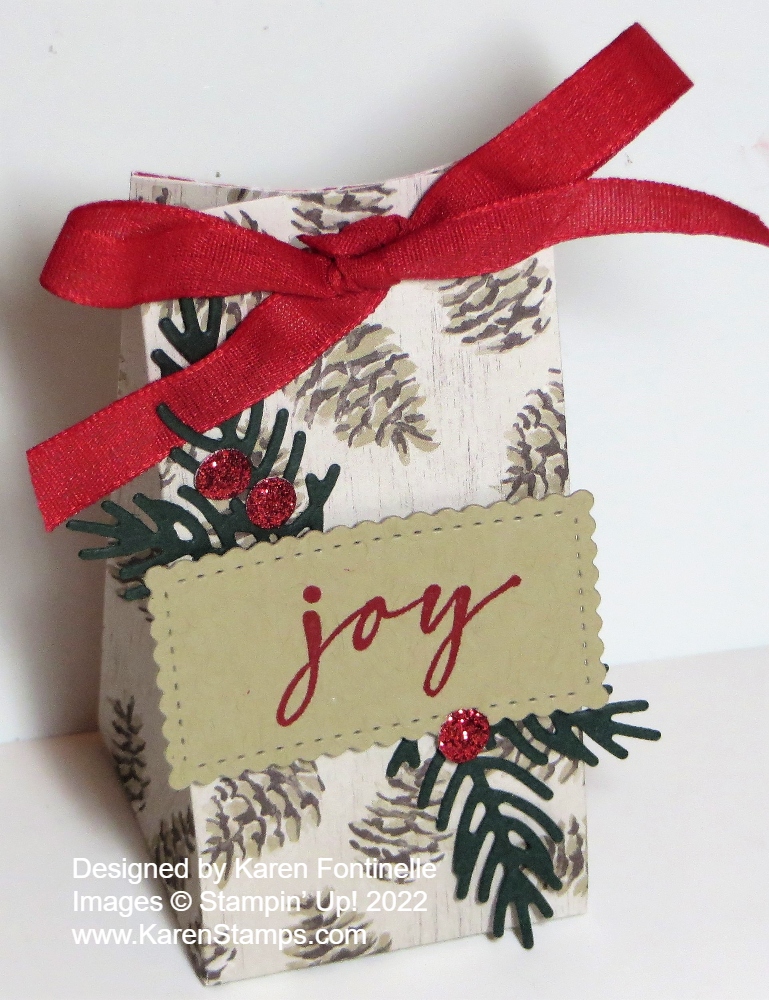
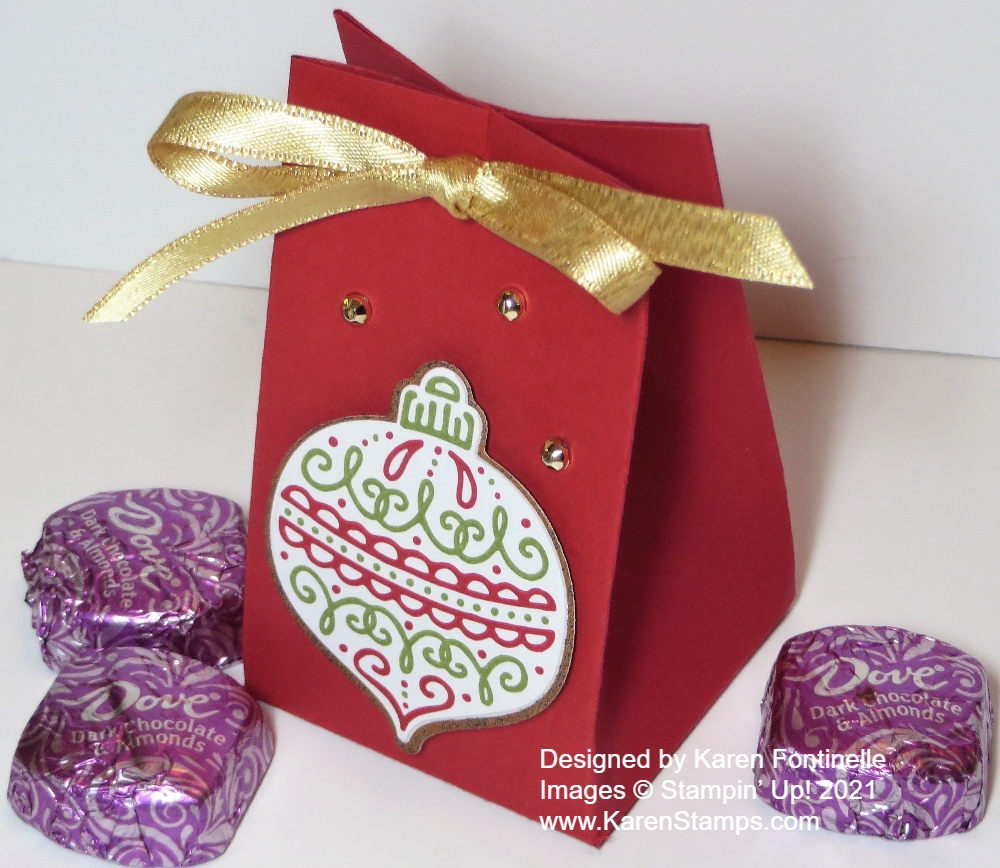
If you want to close up the top of the box, just punch a couple of holes and thread some ribbon through to tie a bow. I used the Gold Shimmer Ribbon to match the gold antlers.

Use the gift bag for a small gift or candy or anything that will fit! Modify the measurements if you want it a little taller or shorter. It’s such an easy thing to make, but you might not know that until you make one!

Check out the Last Chance Sale in the Stampin’ Up! store plus the Clearance Rack! Some items went fast yesterday!

Painted Christmas 2-4-6-8 Gift Bag

Painted Christmas Gift Bag

I was inspired to make something different than a card so I looked through my designer paper and this pinecone paper is what jumped out at me! I thought it would be perfect for an easy little gift bag for the holidays, like this Painted Christmas 2-4-6-8 Gift Bag. You know the holidays will be here before we know it!

There’s almost nothing easier to make than a 2-4-6-8 gift bag! And so versatile! you can leave the top open or you can pinch it closed, as I did. Make a lid if you like. All this one takes is a piece of paper – cardstock or designer series paper – cut at 5 1/2″ x 8 1/2″. I used the Painted Christmas Designer Series Paper which was around last year and has returned this year in the Holiday Mini Catalog so you may have some! Put it in your Paper Trimmer or Simply Scored board to score at 2″, 4″, 6″, and 8″. Make sure you pay attention if there is a pattern so you have the design going the right way and not upside down or something. Then turn the paper lengthwise and score at 1 1/2″ or 2″ to make the bottom flaps of the bag. You can vary the height of the bag if you make it wider than 5 1/2″. Then cut those score lines for the flaps up to the horizontal score line. Also, cut off the tiny little 1/2″ piece at the end. Check out the paper below.

Painted Christmas 2-4-6-8 Gift Bag

To assemble, crease all the score lines with a Bone Folder for a good fold, and then see how the bag is going to go together. Apply adhesive (Multipurpose Liquid Glue gives you some wiggle room to get the paper lined up but Tear & Tape or Stampin’ Seal+ is good, too!) to that narrow 1/2″ piece on the end. You don’t really have to hold the bag up in the air to adhere the other side to that 1/2″ side. Just lay it flat on the table and carefully fold over the opposite side to adhere to that 1/2″ side. Then just fold in the flaps, trying to not have seams showing on the front side of the bag. Apply some adhesive to the flaps and always stick your Bone Folder or something down inside the bag to put pressure on all those flaps and make sure they have fully adhered together. If you want the top of the bag closed AFTER you put your gift or treat inside, just pinch in on the sides and then close the top with ribbon through some punched holes, a staple, or some kind of clip. Whatever you like!

To decorate the bag, I used a little diecut rectangle out of Crumb Cake Cardstock and die-cut some evergreen branches out of Evening Evergreen Cardstock using the Christmas Banner Dies. I had a scrap of the Real Red Glimmer Paper in the 6″ x 6″ Pack so I diecut some red berries just in case I wanted to use them. The “joy” is stamped in Real Red ink from the Brightest Glow Stamp Set. You can purchase the whole Brightest Glow Bundle with the stamp set and some fancy dies, but if you just need some more or some Christmas greetings, you can just get the stamp set.

This little Painted Christmas 2-4-6-8 Gift Bag started out with some not real exciting pinecone paper and got turned into a real Christmasy bag for a small gift or treat! Time to get ready for the holidays!

Painted Christmas 2-4-6-8 Gift Bag

Painted Christmas 2-4-6-8 Gift Bag

The time is rapidly approaching when we will need all shapes and sizes of gift bags and boxes so here is a basic, quick, and easy Painted Christmas 2-4-6-8 Gift Bag. You can vary the measurements if you need something taller or larger. But learning how to make a 2-4-6-8 box (or bag) is a basic every stamper should know!

Here’s how to score your paper. This paper is 8 1/2″ x 5 1/2″. Just score at 2″, 4″, 6″, and 8″ which leaves the narrow little 1/2″ strip on the end which will be the tab to glue the box together. Then turn the paper and score at 1 1/2″ to form the bottom flaps. Cut off that smallest little section on the 1/2″ flap and cut up on the score lines to the 1 1/2″ score line to make the flaps at the bottom.

Diagram 2-4-6-8 Box

I used Real Red Cardstock because I wanted to use designer series paper on the side panels for decoration. I used the Painted Christmas Paper to cover each panel. Since each panel is 2″ wide by 4″ long, I cut the designer paper at 1 3/4″ x 3 3/4″. It’s easiest if you adhere the DSP pieces to the bag panels while the paper is flat before assembly.

Just crease and fold all the score lines to make it easy to assemble. If you are using patterned designer series paper with a pattern, be sure to think about the direction of the paper before you score and cut.

You have the choice of leaving the top open if you like or pinch it closed like I did, pushing in on the sides to indent a little. Punch holes in the top for ribbon or use some kind of clip instead to hold the top closed.

Here is another bag I made recently in THIS POST.

Just add a tag or adhere a greeting and decorate additionally however you like!

Don’t forget today is FREE SHIPPING at Stampin’ Up! all day with a $50 minimum order!

GO SHOP!

Christmas 2-4-6-8 Treat Bag With Ornament

Christmas 2-4-6-8 Treat Bag With Ornament

Christmas papercrafting is more than just making cards, as you know! We all will need bags, boxes, treat bags and boxes, gift wrap, party favors, decorations, and all kinds of things like this Christmas 2-4-6-8 Treat Bag With Ornament. This is one of the easiest things you can make! A 2-4-6-8 box or bag!

You can use this little bag for a treat or a small gift. You can put candies inside or a very small gift, like a piece of jewelry. For a little party favor or a little something at each place setting at Christmas dinner, you could make any number of these which would not be too much work! Hopefully this Christmas there can be parties and family gatherings! Keeping my fingers crossed!!

This little box is made with just a half sheet of cardstock, 8 1/2″ x 5 1/2″. Just score it at 2″, 4″, 6″, and 8″ going across.  Turn the paper lengthwise and score at 2″. That short area will be the bottom of the box.  Cut on the score lines just up to the 2″ scoreline going across. Cut off the narrow little tab area. See the photo below. Apply a strong adhesive, like Multipurpose Liquid GlueTear & Tape, or Stampin’ Seal+ to the narrow tab on the end, then fold the other side of the box over to adhere.  It’s easier to do this flat than to try to hold the box. Fold in the flaps for the bottom and add a little glue to hold them in place.  Leave the top open or pinch to close, whatever you like.

2-4-6-8 Treat Bag Diagram

You can choose to leave the little bag open at the top or pinch it closed. If you pinch it closed, poke in the sides a little bit to make the top come together easier. You can tie some ribbon through at the top as I did or use some kind of clip. You could even make a lid to fit on top!

Now you are all set to decorate your bag or box! I made this one SUPER simple!! I also happened to have the ornament die cut from the Gingerbread & Peppermint Designer Paper so it was really easy! If you wanted to use another design in the paper, maybe you would want to change the color of the bag. Mine is Real Red. The ornament is popped up with Stampin’ Dimensionals. For some bling, I added some gold Gilded Gems. The ribbon is the Gold 1/4″ Shimmer Ribbon in the Stampin’ Up! Annual Catalog. You could add a little tag tied on with the ribbon if you wanted to. Or decorate with some designer series paper! So many options! Here is a little treat bag I made a few years ago.

It’s time to start making some of these fun things! Christmas comes early for crafters! The July-December 2021 Mini Catalog will be out August 3 along with Sale-A-Bration! After that it is full-steam ahead! Plan to make a few little 2-4-6-8 boxes to have on hand.

SHOP STAMPIN’ UP! ONLINE HERE!

Pattern Party 2-4-6-8 Birthday Gift Bag

If you are able to get this Pattern Party Designer Series Paper, I think you will really enjoy using it as I did making this Pattern Party 2-4-6-8 Birthday Gift Bag! I thought this festive diagonal stripe would make a fun gift bag, at least for a small gift or treat, and certainly a 2-4-6-8 gift bag (or box) is easy enough to make!

The Pattern Party Designer Series Paper is an item you can choose as one of your Stampin’ Rewards with an order of $150 or more. That’s a big order but maybe some friends would like to go in on the order with you and you could divide up the paper because it’s a big package! Twelve different designs and four pages of each!

We’ve made this bag a bunch of times before but even I have to go back and review the directions. It is very easy though! Once you know how to do it, you can vary the size by using a larger or smaller piece of paper. Always be sure the pattern of the paper is going in the direction you want it to go in so you don’t end up with upside down flowers or animals or a stripe going sideways when you wanted it to go up and down.

For this gift bag, I started with a piece of paper 8 1/2″ x 5 1/2″. I just scored it at 2″, 4″, 6″ and 8″ going across the paper. Then I turned it and scored at 1 1/2″ for the bottom tabs of the bag. Trim off the little 1/2″ bottom piece and cut on the 2″, 4″, 6″, and 8″ score lines for the bottom flaps up to the 1 1/2″ score line. Difficult to see in the photo below but you can get the idea.

Pattern Party Small 2-4-6-8 Birthday Gift Bag scoring

Assemble the box, putting adhesive on that 1/2″ piece on the side. You can just fold over the other side of the bag with it laying flat on the table. You don’t have to try to maneuver it in your hands! Apply adhesive to the bottom flaps, first doing a “test” to see which way you want the flaps to go in before you glue. Then pay attention to where the seam is and try to have that face the back. Fold in the bottom flaps, trying to make the front of the bag look nice.

To decorate this bag, I stamped “Happy Birthday” in the Pansy Patch Stamp Set in Pale Papaya Ink. Then I die cut it with one of the Layering Circles Dies and layered it on a scalloped circle die in Pale Papaya Cardstock. It’s perfect fit! I needed something big enough to fit the greeting but not too big for the bag! I popped that up with two Stampin’ Dimensionals.

For the top of the bag, you can leave it open, or kind of squeeze in the sides and pinch the top together. Punch or poke some holes in the top for ribbon. I used the Pale Papaya 3/8″ Open Weave Ribbon to tie the top closed in a bow. Have I said how much I love that ribbon?! Then for a little extra, I added some of the Genial Gems on the greeting and on the bag. These come in two colors, Pale Papaya and Mint Macaron but I think you can use them even without matching colors.

Knowing how to make a 2-4-6-8 bag is something you should know how to do as a papercrafter! They are fun to make, not to mention useful when you need some cute packaging for a small gift or treat! Here’s a very similar one made for Valentine’s Day. Being able to make an easy gift bag just might save you a trip to the store!

SHOP STAMPIN’ UP! ONLINE!

Golden Honey Bees 2-4-6-8 Gift Boxes

Golden Honey Bees 2-4-6-8 Gift Boxes

Make these easy Golden Honey Bees 2-4-6-8 Gift Boxes using the Golden Honey Specialty Designer Series Paper available during Stampin’ Up! Sale-A-Bration 2020! You never know when you might need a little gift bag or box at the last minute so make up a few of these or learn how to make them quickly and easily so you can personalize your gift!

Although I am not a fan of bees and bugs and insects because heaven knows, we have way too many of everything down here in the tropics of Houston, Texas in the summertime! But I liked this designer paper with its gold foil accents and it’s black, white, and gold stripes and prints. You can make lots of pretty things with this paper even if you are not into bees!

I first chose the paper pattern with the gold foil bees on it to make a box. The opposite side of the paper was a black and white dotted pattern so I decided to make a box with each side of the paper. They are both the 2-4-6-8 box but one is shorter.

Here are the basic instructions on how to make the 2-4-6-8 box:  It’s very easy and has been around a long time. No pattern required!

  • The first box on the left with the gold foil bees and hives is made with an 8 1/2″ x 8 1/2″ piece of paper.  You can vary the measurements depending on the size you want your box. If your paper has a pattern, decide where the bottom of the box is. Score at 2″ on one side which will become the bottom tabs.
  • Turn the paper the other way and score at 2″, 4″, 6″ and 8″……hence, the 2-4-6-8 box! That will leave a 1/2″ edge on one side of the paper. This is where you will put a strong adhesive later on.
  •  Now that the box is scored, hold the paper with the bottom portion at the bottom and cut up to the horizontal score line on each score line to make the bottom tabs. That little 1/2″ piece on the bottom should just be cut off.
  • Crease all the score lines and see how the box will go together.
  • Apply a strong adhesive along that 1/2″ edge, preferably Tear & Tape or Multipurpose Liquid Glue. If you lay the box flat on the table, you can just fold the other side over to adhere.
  • Figure out where the backside of the box will be so the seam doesn’t show from the front. Fold the back tab at the bottom in and fold the other tabs in as well. If they don’t line up perfectly, just trim with scissors. Use a little bit of glue to hold the tabs in place for the bottom of the box.
  • Put your gift inside, punch holes in the top for ribbon to tie shut or leave open, add a handle, whatever you like. Embellish the box if you like.
  • You can vary the measurements, making the box shorter or taller.  The bottom tabs need to be the same width as the side panels of the box. Then you need that little 1/2″ strip at the edge of the paper so you have to consider that math as you figure out the sizes.

Here is a diagram of the scored and cut paper:

2 4 6 8 Box Inside Scoring

For the second box, I decided to make it a little shorter. The paper is still 8 1/2″ wide but I cut it down a little to 7 1/2″. The bottom is still scored at 2″ and then you turn the paper and score at 2″, 4″, 6″, and 8″. So the box is the same, just shorter.

You can close up the top of the box by punching holes in the top and tying closed with ribbon. I used the Crushed Curry 3/8″ Crinkled Seam Binding Ribbon. For the greeting, I stamped “Thank You” on Crushed Curry Cardstock from the Honey Bee Stamp Set and die cut it with the smallest die in the Stitched So Sweetly Dies. In keeping with the bee theme, I simply cut out a gold foil bee from the designer paper. If you like the Honey Bee Stamp Set and the Detailed Bee Dies, you can order the Honey Bee Bundle and save 10%! Spend $50 on your order and get the Golden Honey Specialty Designer Series Paper FREE during Sale-A-Bration.

For the taller box with the gold foil bee pattern, I left it open and happened to find some pretty gold foil tissue paper to put inside! I simply tied a Black Satin Ribbon around the top portion and tied a knot, but you could do a bow. The greeting is stamped from the Honey Bee Stamp Set on a narrow strip of Whisper White and layered over a Gold Foil circle punched with the 1 3/8″ Scallop Circle Punch.

Have fun trying your hand at making these Golden Honey Bees 2-4-6-8 Gift Boxes and other variations!