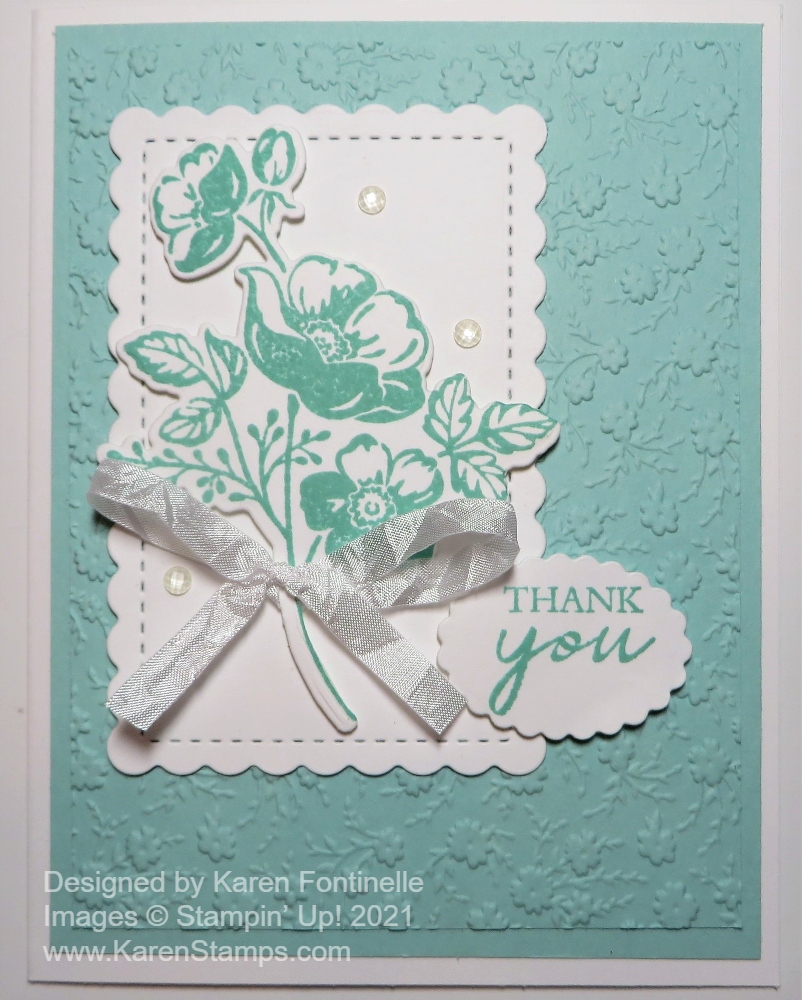
This Delicate Dahlias Thank You Card is one that you can make if you earn the Delicate Dahlias Stamp Set during these last two weeks of Sale-A-Bration at Stampin’ Up! During Sale-A-Bration you can qualify for a FREE product in the Sale-A-Bration Brochure with every $50 purchase, or with a $100 purchase, you can earn an extra special $100 Level product such as this Delicate Dahlias Stamp Set. This stamp set has been quite popular because the flowers are so beautiful! As I write this, it is still available, but I wouldn’t wait until the last minute! Sale-A-Bration ends on Thursday, September 30. Don’t miss the fun!
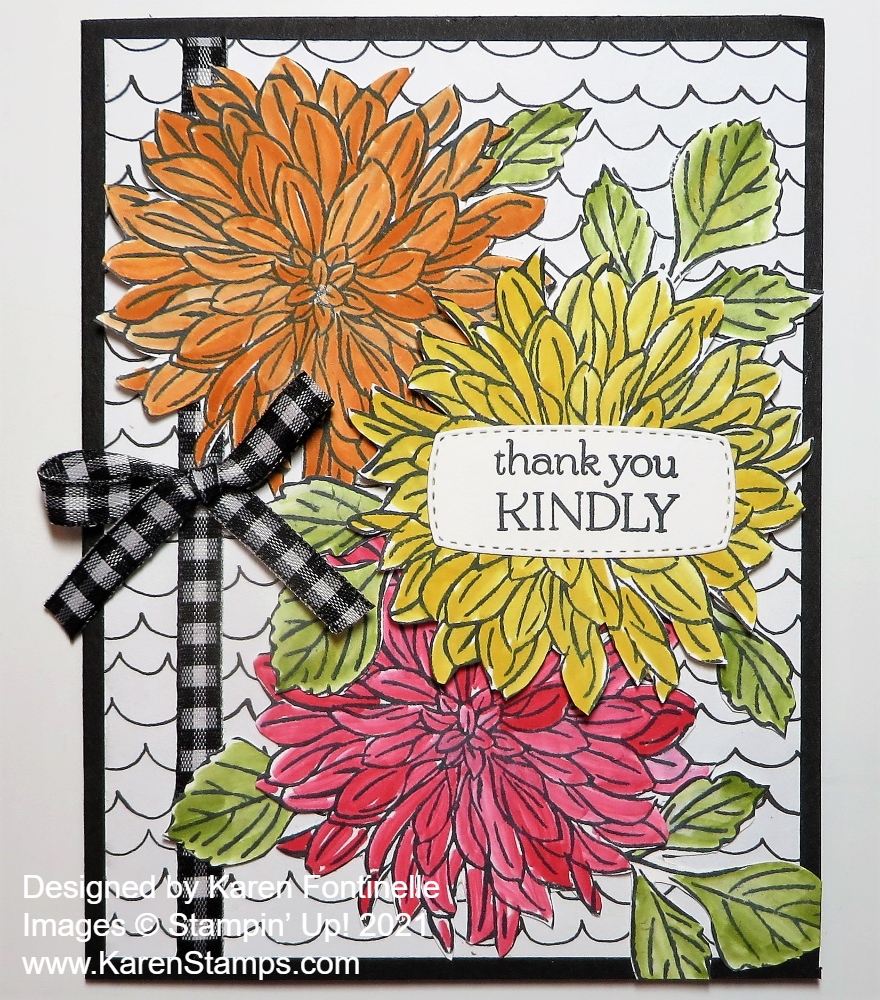
I envisioned this card having a background of a black and white stripe with bright colored flowers to contrast. As I started looking through my designer paper, I found this paper in the Beautifully Penned Designer Series Paper, one of the $50 Level products you can earn for FREE during Sale-A-Bration. This paper coordinates with the Hand-Penned Designer Series Paper in the Stampin’ Up! Annual Catalog except it is in black and white! Sometimes it is fun to leave it as is and sometimes it is fun to color in or use any of various coloring techniques. The card base is Basic Black with this scalloped pattern paper as a layer,
The dahlias were all stamped in Memento Black although perhaps Stazon would have been the better ink choice with watercoloring. It wasn’t exactly watercoloring but I used a Blender Pen and added ink from an ink refill bottle in the lid of the ink pad. The colors I used were Real Red, Pumpkin Pie, and Daffodil Delight. I didn’t worry about proper shading or anything like that! I just colored in with the ink letting some areas be lighter if I was running low on ink on the Blender Pen and darker if I just touched it to the ink. There are no dies so I just cut the flowers out by hand using my Paper Snips! The trick is to just relax and enjoy the experience! Don’t try to cut perfectly because there are lots of ins and outs with these flowers. A little white showing on the edges of the petals is no big deal. Same way with the coloring. If you leave some white spaces, don’t worry about it! I also stamped and colored the leaves in the set.
Before adhering the designer paper to the card base, I wrapped the Black & White 1/4″ Gingham Ribbon around to the backside of the paper. Then I tied a separate bow and adhered it to the ribbon with Mini Glue Dots.
Two of the flowers are glued right on the designer paper using Multipurpose Liquid Glue. The yellow dahlia is popped up on Stampin’ Dimensionals®. I just placed the leaves around randomly.
The greeting is in the stamp set and I cut it out with the Messages Die. You can just cut one greeting using the die, you don’t have to stamp and die cut the whole sheet!
On the inside of the card, I stamped a partial dahlia in Daffodil Delight in the lower right-hand corner on a layer of Basic White. You have to have a white or light-colored card layer inside with a black card base!
If you wanted to make this card a little easier, you could just stamp the flower outline in whatever color(s) you wanted and then not color them in. You can also stamp with the two-step stamp. Lots of choices!
So if you want to earn this FREE Delicate Dahlias Stamp set, you must place a $100 Stampin’ Up! order and then you can choose this stamp set as your Sale-A-Bration choice. Or you can choose 2 $50 Level products. You will get a reminder to choose the free Sale-A-Bration items you are entitled to as you place your order online. Then you can have fun making a card like this Delicate Dahlias Thank You Card or use one of the other greetings for another occasion.