
I just had to make another fun Halloween card, this Cute Halloween Trick or Treat Ghosts Card. I started by picking out the designer paper and played around from there! I have a trick for how I made one ghost go in a different direction from the one stamp!
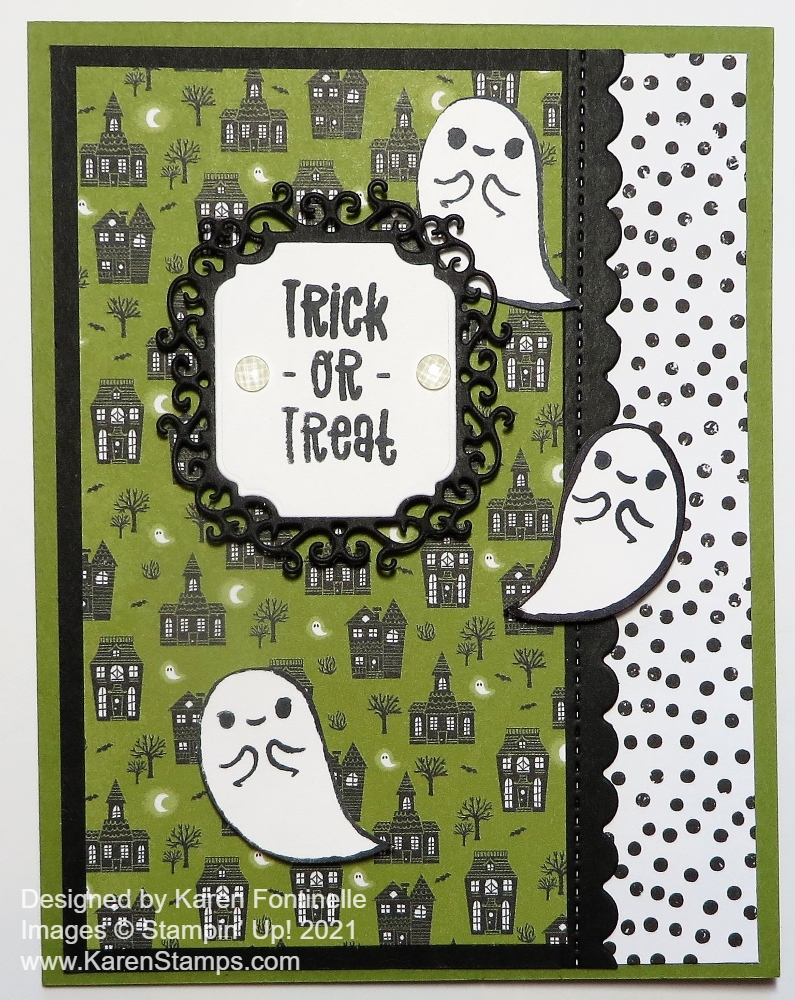
This card base is Old Olive Cardstock with a layer of basic black. I chose the designer paper with the little houses and tiny moons and ghosts! This is the Cute Halloween 6″ x 6″ Designer Series Paper. So many cute patterns to choose from! I decided to make the designer paper narrower than the card front and have the ghosts floating along the edge. Then I decided to cut a decorative edge with a scallop die in the Penned Flowers Dies. Next, I selected another designer paper, the one with black dots, to go along the edge, after considering several options. This card opens from the top but it would be the same if it opened from the side.
The greeting is stamped from the Cutest Halloween Stamp Set on Basic White and then die cut with a die that fits inside the Basic Black die-cut, both of which are in the Ornate Frames Dies. I popped up the greeting on Stampin’ Dimensionals® and added two Elegant Faceted Gems.
For the ghosts, I stamped two ghost shapes in the Cutest Halloween Stamp Set on Basic White and then turned over the cardstock and stamped one ghost on the back where it didn’t overlap the ghosts stamped on the front. I also added the faces and little arms just on the ones on the front of the cardstock! So cute!! I cute out the ghosts by hand with my Paper Snips. Now you can purchase the Halloween Punch and get both the stamp set and punch in the Cutest Halloween Bundle and save 10%. So I cut out the two ghosts on the front of the white cardstock who were both facing the same direction. I cut them out with a bit of the black ink outline showing as it would if I had used the punch. Then I turned the paper over and cut out the ghost outline. But here’s the trick… after cutting out the ghost shape, I turned it over so it would be facing the opposite direction from the other two ghosts and stamped the face on it. Now, this ghost doesn’t have the black ink outline on it since I am using the unstamped side. But if you want that black ink outline, just take a black marker and run it around the ghost along the edge to get some black marking along the outline. Or, maybe it doesn’t really matter to you and you can skip that step! Out of the three ghosts, I wanted one facing the other direction.
I originally planned to adhere the ghosts right along the edge of the green designer paper, but in the end, I liked the placement you see better. I also turned the Ornate Frame die in portrait position and stamped the greeting in that direction which I think fits better than landscape position. Either way would be fine, though! Just play and see what looks good to your eye! Here is another Halloween card using the Cute Halloween DSP except with the sheet with ghosts! Order the Cute Halloween Paper on your next order so you have plenty of time to create “cute” Halloween cards and projects to send out, like this Cute Halloween Trick or Treat Ghosts Card.