Category Archives: Cards

Halloween Ghosts Boo Card

Halloween Ghosts Boo Card

I was so thrilled with this Halloween Ghosts Boo Card after I made it! It’s all because of a creative idea I learned right before I signed up to be a Demonstrator. It was such an incredible idea I could hardly stand it! And I’ve been copying that idea ever since!

This Them Bones Designer Series Paper for Halloween has two sheets of this paper that have multiple panels on it that you can cut apart. One of them has the word “Boo” on the panel and that is what I used on this card. The background paper is also in the package, with a slight diagonal stripe. Behind the Boo panel, at the top and bottom, I added narrow pieces of the More Dazzle Specialty Paper. They are about 1/2″ wide. The card base is Basic Black.

This is how I made the ghosts, the focal part of the card. I punched out two hearts. That’s it! And then you cut the heart in half right up the middle. Then place the ghosts at an angle (or in this case, tucked under the Boo panel). Draw on some eyes, maybe a mouth if you want. So simple and isn’t it so creative?! I used a retired heart punch to make the ghosts. You probably have one or some heart dies, and if you don’t have one of those you can just cut out hearts like you did when you were a kid.

That’s how easy it is to make this card. If you don’t have the Boo panel to use, just adhere any paper you like and add a greeting from another stamp set or spell out Boo with an alphabet set you may have.

In case you haven’t heard, the Stampin’ Up! Holiday Mini Catalog went live yesterday so you can start your holiday stamping shopping spree!

SHOP STAMPIN’ UP! HERE!

Holiday Products at Stampin’ Up! Today!

Holiday Mini Catalog 2023 Cover

Finally, the day has arrived when everyone can order to their heart’s content from the new Stampin’ Up! September-December 2023 Mini Catalog, otherwise known as the Holiday Mini! It’s the second-best catalog next to the Stampin’ Up! Annual Catalog if you ask me!

Here are some products that are currently unavailable and dates when they will be back in stock. But you can always check back earlier and see!

The Stars At Night Hybrid Embossing Folder: Week of October 2

Adhesive Backed Star Trinkets: Week of October 25

Shining Brightly Designer Series Paper: Week of September 11

Copper & Natural Ribbon Combo Pack: Week of October 23

Bag of Bones Dies: Week of September 11

All About Autumn Designer Series Paper: September 11

***If a Suite or Bundle is unavailable, it means one or more of the products in the Suite are unavailable but you can still order the products separately that are available. And probably a good idea to do that!

SHOP HERE!

And there’s MORE!!

In the Online Exclusives, Stampin’ Up! is offering a special release of five beautiful new Designer Series Paper options! These papers include fabulous holiday prints, gorgeous seasonal styles, and some spectacular timeless designs. These papers are available while supplies last! Check out the interesting and fun new designs to add to your collection! They’re not just for Christmas! Watch the video below.

SHOP HERE!

AND a new Kit in the Kits Collection available today!

Christmas Everywhere Kit Collection

“Celebrate Christmas with everyone, everywhere with the Christmas Everywhere Kit by Stampin’ Up! It comes with everything you need to create 9 Christmas cards in 3 festive designs featuring trees from around the world. Get an early start on your Christmas crafting and send some holiday cheer to friends and loved ones wherever they are!”

This kit includes:

-Enough supplies to create 9 cards—3 each of 3 designs
-9 coordinating envelopes
-Christmas Everywhere photopolymer stamp set
-One Lost Lagoon Ink Spot
-Printed card bases, printed die-cut labels and images with red glitter, adhesive, and a clear block
-Finished card size: 5-1/2″ x 4-1/4″ (14 x 10.8 cm)
-Coordinating colors: Granny Apple Green, Lost Lagoon, Pecan Pie, Pretty Peacock, Real Red

Christmas Everywhere Kit Collection Supplies

SHOP KITS COLLECTION HERE!

One more surprise Bundle released today for World Card Making Day October 7! You can register for the FREE Stampin’ Up! event! It’s the Heartfelt Hexagon Bundle!

Heartfelt Hexagon Bundle

HAPPY SHOPPING!

Beary Cute Polar Bear Christmas Card

Beary Cute Polar Bear Christmas Card

This Beary Cute Polar Bear Christmas Card is made with one of the new designer papers coming TOMORROW in the new September – December 2023 Mini Catalog. The more I use it the more taken I am with it! You can do so many fun things with these cute polar bears of all sizes! I knew the paper was cute when I saw it in the catalog, but it could possibly be my favorite paper in the Mini.

I can guarantee that you will hate to cut into this paper with all the bears and the other forest creatures. But cut into it you must! You can use the Beary Cute Punch to punch out certain of the bears but to really have fun with the paper you can “fussy-cut” the images or diecut some.

To make this card, I simply cut out an area of the Beary Cute Designer Series Paper and adhered it to the card. Now it may not seem simple to do. You just have to figure out an area that can be cut out, either with a die or using the Paper Trimmer, that won’t cut off anything that you really want or won’t include something you don’t want from a neighboring image. You may have to cut it smaller than a normal layer on a card but that will work out. I used a ruler to help me see what part of the paper would work. Just kind of measure the piece you want. You may even initially cut it larger than you want so then you can carefully trim down the piece to have the images you want that will fit on your card or project.

Beary Cute DSP

I liked having the Real Red layer underneath the designer paper for this card to bring out the red on the bears. The card base is Misty Moonlight but Night of Navy looks good, too. You might notice that Very Vanilla is one of the coordinating colors for the designer paper, not Basic White. Most people wouldn’t notice if you sent a card with this paper with Basic White, but officially I guess the color to use for a neutral is Very Vanilla.

For the greeting, I embossed this one with white embossing powder on a scrap of Real Red cardstock. The greeting is in the Brightest Glow Stamp Set. It is carried over so you will find it online if you search but it is not in the Annual Catalog. To add a little accent to the greeting I simply stuck a folded piece of Gold Trim underneath the edge. And you won’t be able to resist using the Glitter Sequins on page 23 in the Holiday Mini! I stuck a few on the Christmas tree on the paper for a little sparkle!

The area I cut out of the designer paper is a little larger than I used for just the front of the card. After I finished the front of the card I decided I would like a strip of the designer paper on the inside layer of the card. When I looked back at the paper, it looked like a perfect strip of paper just to the side of what I had already cut out for the front of the card. It has a small tree and a small bear! You can see the photo below.

Beary Cute Polar Bear Christmas Card Inside

Get ready with your Shopping List for tomorrow when the Holiday Mini goes live! Remember, the website could be busy but hopefully you won’t have any problems!

SHOP HERE!

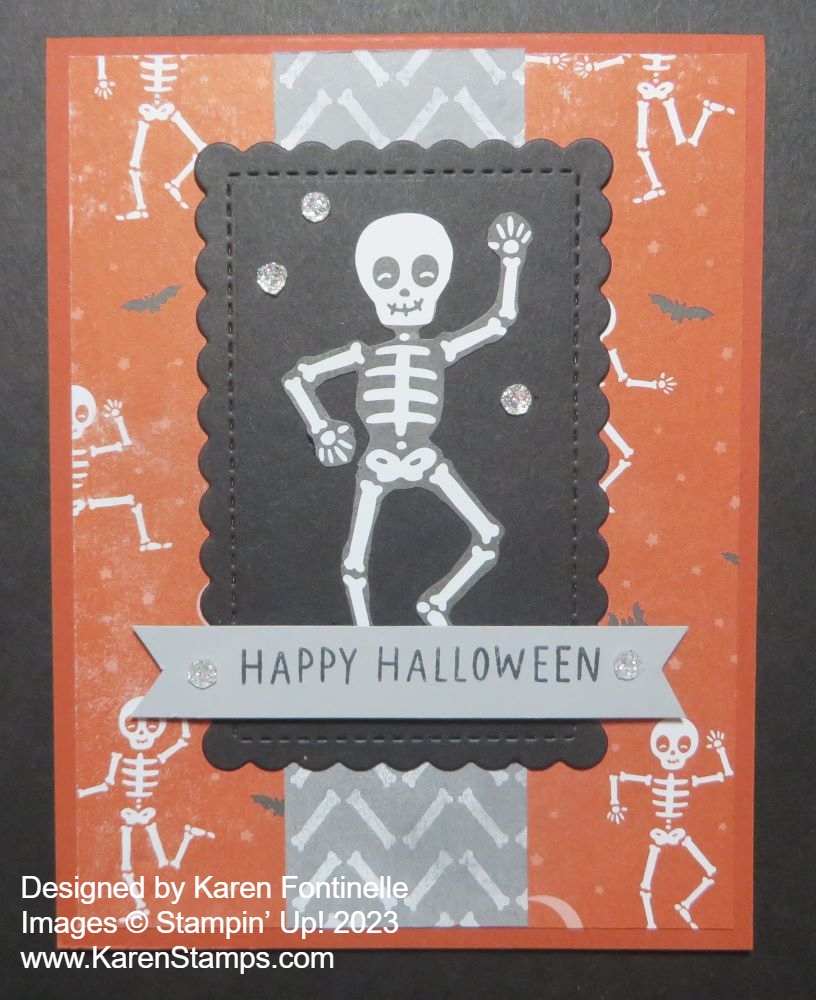
Them Bones Easy Halloween Card

Them Bones Easy Halloween Card

If it is September, then we who love Halloween start thinking ahead! If you want to send out a Halloween card or two you probably want some easy ideas, like this Them Bones Easy Halloween Card.

Two of the sheets in the pack of Them Bones Designer Series Paper (162215) have different Halloween scenes printed on smaller panels. You can cut these apart and use them for cards or other projects. My card today is one of those panels. You can see the paper below. You can see that this card came from the panel on the bottom row.

When you cut these panels apart, as you can probably tell by looking at the paper, they aren’t all a standard size. You will have to work with the panel a little if you put it on a card to maybe add a layer underneath or add a little something to the side. This panel that I cut off the big sheet of paper measures 3″ x 4 7/8″ so I had to work with that a little.

The card base is Cajun Craze with a layer of Basic Black. Then I cut a strip of paper from another pattern in the Them Bones Designer Paper. One side has all these bones in a herringbone pattern and the other side is orange with small skeletons and bats. I cut a strip 5 1/4″ x 3/4″ to fill up that space since the main image is narrow.

I wanted some ribbon or twine to tie around the bones paper and I ended up pulling out some retired Halloween Night Baker’s Twine, maybe from quite a few years ago! It was perfect! It was black and gray. If you have this twine, the other roll is orange and black. Plain black twine would be fine, too. If you need some twine, you can purchase the Baker’s Twine Essentials Pack with five colors – black, white, Gray Granite, Crumb Cake, and Very Vanilla. That will cover you for most anything! I just chose to use something I already had that went well with the card.

For a little embellishing, I added three Adhesive-Backed Glitter Sequins (162029) on page 23 in the Holiday Mini Catalog. You want to get these for sure! Even though they are on a Christmas page, you can see you can even use them for Halloween! I thought they looked like little stars in the sky or even something spooky!

If you like Halloween, you will enjoy the Them Bones Suite Collection in the Holiday Mini! Be sure to notice the Glow-in-the-Dark Bats & Ghosts and the Glow-In-the-Dark 6″ x 6″ Specialty Paper if you want to make some diecuts of skeletons of anything!

The September-December 2023 Mini Catalog, or Holiday Mini, goes live on Wednesday, September 6th! Be sure to get some of the things you really, really want as soon as you can because no telling what will be super popular early on when the catalog comes out!

SHOP STAMPIN’ UP! ONLINE HERE!

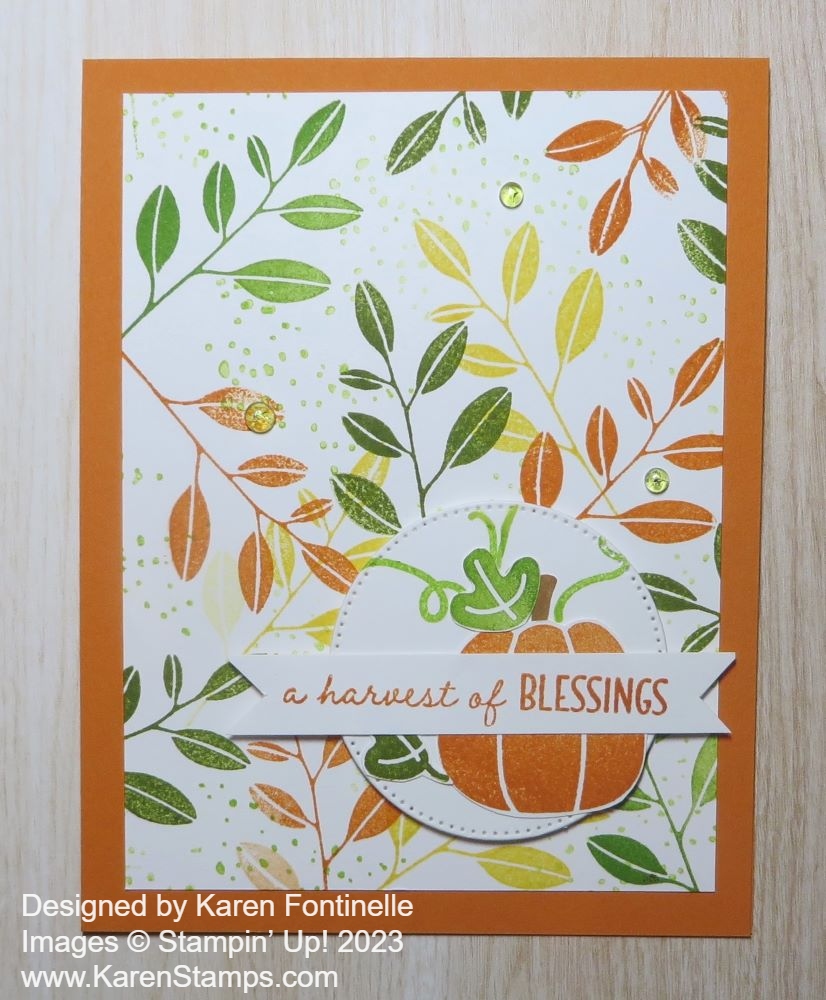
Layering Leaves Fall Card

Layering Leaves Fall Card

It’s September so it’s time for a fall card like this Layering Leaves Fall Card. Except it’s not really fall yet, certainly not where I live! It’s still very much summer, but at least September sounds better than August. September “sounds” like fall, cool weather, and colored leaves.

This card is made with the Layering Leaves Stamp Set in the Stampin’ Up! Annual Catalog. I did one of my favorite things with this card. I stamped the leaves randomly around on the card and used that for my card front. It feels so good to just stamp multiple images on a piece of cardstock instead of just stamping one thing. The ink colors I used are Old Olive, Granny Apple Green, Crushed Curry, and Pecan Pie for the little dots.

The stamp with the little dots was good for filling in some empty space in between the leaves. If I wanted to do it properly, I would have made masks for the two different kinds of leaves so I could place the mask over a leaf and not stamp over it with the dots. But without going to that trouble, I was able to fit the dots in between the leaves pretty well!

When you are doing random stamping like this, make sure to turn your stamp in different directions so they all aren’t pointing the same way. Also, be sure to partially stamp along the edges and in the corners. You can stamp without having the entire stamp on the page. Just have scrap paper underneath the edges.

The card base is Pecan Pie cardstock. The greeting is in the Layering Leaves Stamp Set and is stamped in Granny Apple Green ink on Basic White. I used circle dies in the Stylish Shapes Dies to cut out the greeting and to add the Crushed Curry stitched circle for the border around the greeting.

I thought the card front needed something else for a contrast, so I die cut a banner with Pecan Pie cardstock from the same set of dies. Then I cut that banner in half so I could extend it a little longer out to each side under the greeting. The banner and the greeting are popped up on Stampin’ Dimensionals.

Next, I stamped and cut out some leaves to stick underneath the greeting. There is a Bough Punch that will be back in stock the week of October 2. Since I didn’t have the punch, I just used my Paper Snips to cut the leaves by hand. I could have left off the leaves and the card would be much simpler, but sometimes I don’t know when to stop! It’s not that unpleasant to cut out images by hand so I don’t mind doing it. At least the Paper Snips make it fairly easy to do.

Finally, I added some Brushed Metallic Adhesive-Backed Dots to the greeting for a little embellishment.

You can make this card using other colors for the leaves, making it look more “fallish”, or more summery. This stamp set will be good for almost any season. And the greetings and font in the set are really nice and useful!

SHOP STAMPIN’ UP! HERE!

Merriest Trees Stenciled Christmas Card

Merriest Trees Stenciled Christmas Card

You’ll find many ways to work with the Merriest Trees Bundle in the Stampin’ Up! Holiday Mini Catalog. This Merriest Trees Stenciled Christmas Card was inspired by a scrap piece of cardstock from which I had diecut a tree for another card I made. That scrap laid around here and every time I saw it I thought of using it as a stencil.

Merriest Trees Stencil

My intention was to use several colors to give the tree kind of an ombre effect. I used Parakeet Party, Lemon Lime Twist, and Granny Apple Green. The Granny Apple Green stood out a little more against the other two and I also used it as a little bit of shading on each side. But in the end, it seemed all three colors blended together and the tree looked like one green! But it was still fun doing it. I used one of the Small Blending Brushes to add the color, starting with the lightest color. When I was finished, I just rinsed the Blending Brush under the faucet to rinse out the ink. Let it dry before you use that brush again. After you are finished with the stenciling, you can stamp with the detailed branch stamp in the Merriest Trees Stamp Set to add some interest to the tree. I stamped that using Granny Apple Green Ink.

To decorate the tree, I used the More Dazzle 6″ x 6″ Specialty Paper (or you may have some left of the Champagne color from Sale-A-Bration a little while ago). There is a die in the Merriest Trees Dies in the Bundle that cuts out these cute little chains. There are also several stars you can choose from for the top of the tree. The little red starry images are stamped with Real Red ink with one of the small Merriest Trees stamps. The gifts under the tree are cut from the Beary Christmas Designer Series Paper. I actually trimmed some of them smaller to make them fit under the tree better.

The colored circles on the tree that look like decorations are actually punched out pieces from the Festive Tags Kit in the Kits Collection after I made all the tags. They looked too cute to just trash so I saved them. Gluing a few to the tree seemed like a perfect idea!

For the greeting, I needed to choose something small. In fact, I considered not even adding a greeting to the front of the card since the card is pretty busy already. But the smallest die in the Countryside Corners Dies was the perfect size to make this little banner with the greeting that fit on the tree without being too big or distracting.

Here is the other card I made with the Merriest Tree Bundle.

Today is the last day to purchase on sale any of the kits in the Stampin’ Up! Kits Collection! If there is one you like be sure to get it and save a little bit of money. I especially like the Festive Tags Kit, as I have said before. It will be so useful in a couple of months!

SHOP STAMPIN’ UP! ONLINE HERE!

New Designer Papers Coming Sept. 6th!

Special Release Papers Sept 2023 Online Exclusives Banner

Not only do we have the new Stampin’ Up! Holiday Mini Catalog to look forward to on September 6th, but Stampin’ Up! just announced some new designer papers they are releasing on that date! They will be in the Online Exclusives category online and will only be available “while supplies last”.

These five new papers include fabulous holiday prints, gorgeous seasonal styles, and some spectacular timeless designs. Some you can use for the holidays and some you can save to use all year long. The Silver and Gold Glimmer Paper is even adhesive-backed so will be quick and easy to use!

Watch the video below to get a good overview of all the papers and see some sample projects!

If you like these papers, put them on your shopping list along with your Holiday Mini new products! Get your favorites as soon as you can to avoid any backorders!

Remember, all the new things begin Wednesday, September 6!

SHOP STAMPIN’ UP! ONLINE HERE!

Fa La La La La Christmas Card

Fa La La La La Christmas Card

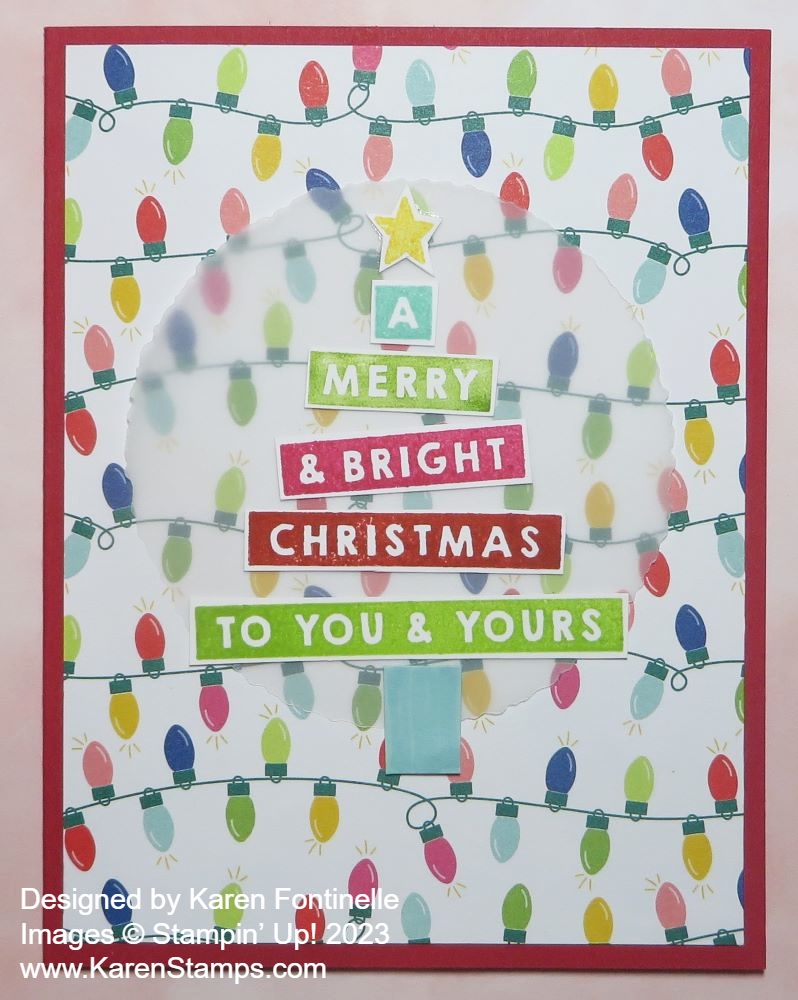
I often say sometimes all you have to do is get out your designer papers and you will be inspired with at least one idea for making a card. That’s what happened with this Fa La La La La Christmas Card. In just a little over a week, you will be able to order this Merry Bold & Bright Designer Series Paper (161945) in the September-December 2023 Mini Catalog, or the Holiday Mini as I prefer to call it (and type it!).

So far (so far!!) I have only ordered the paper in this cute Merry Bold & Bright Suite and I really love it! When you spread those papers out with their bold & bright colors and designs, it just brings joy to your heart! Except for the Christmas lights, it’s not exactly your traditional Christmas designs, but it’s fresh and new! I love working with it!

For this card, I chose a card base of Shady Spruce and the Fa La La La La pattern in the package of designer paper. I thought a layer of Basic White underneath helped it stand out a little bit. I made the Basic White layer a little smaller for a slightly wider card base margin. The designer paper piece is 3 1/2″ x 4 3/4″.

The greeting is stamped with Poppy Parade Ink on Basic White and then diecut with this label in the Something Fancy Dies. I used a larger die to cut out a piece of Shaded Spruce for a layer. The greeting is from the Brightest Glow Stamp Set, a carry-over set from last year’s holiday mini. You can find it online, still available, but not in a catalog. It’s a perfect set for holiday greetings.

To jazz things up, I added two folded bits of the White Iridescent Ribbon (161955) which you will find on page 9 of the Holiday Mini, and adhered them under the greeting on each side, then popped up the greeting on Stampin’ Dimensionals. And I love the Iridescent Adhesive-Backed Discs (161954) in the Holiday Mini. I added three of the different colors to the greeting. They’re very cute and shiny.

Turn that Christmas paper pattern over to the other side and see what you can make! I’ll have an example in my Tuesday newsletter later today! If you want to see it, sign up in the red box here on my blog! You’ll be glad you did because before we know it, I’ll be sending out my exclusive 12 Weeks of Christmas newsletter with a holiday idea every week.

SHOP STAMPIN’ UP! HERE!

Last Days of the Kits Collection Sale!

Kits Collection Sale Aug 2023 Pink Sq Ad info

This is the last four days of the Stampin’ Up! Kits Collection Sale! Order your kit(s) in the Stampin’ Up! Online Store by Thursday, August 31 to get in on the discount! These are not subscriptions like Paper Pumpkin. This is just a one-time purchase like anything else you buy at Stampin’ Up!

Customers find these kits easy to make with all the supplies they need, except maybe scissors, right there in the box. It’s fun to order several of the same kits and then share them with family or friends. Or you can ask your friends to choose their own and then get together for a stamping party with your kits!

These come in Card Kits or a few Craft Kits. You can choose what you like best! I particularly recommend the Christmas tag kits because you will need those before we know it!

Hurry up and go shop now before more sell out! Remember, the last day is August 31. You can purchase other things, too, along with the Kits!

SHOP STAMPIN’ UP! KITS COLLECTION HERE!

Penguin Punch Christmas Gift Tags

Penguin Punch Christmas Gift Tags

If you don’t already own the Penguin Builder Punch, run and get it on the Stampin’ Up! Clearance Rack so you can make these Penguin Punch Christmas Gift Tags! I can’t believe it is still available but it is marked down to $4.50 instead of $19.00! You may as well buy one for that price! Or you may already have one from a previous catalog so dig it out and make something fun for Christmas!

I thought it would be fun to make a couple of gift tags using the Penguin Punch and some new designer series paper. You can use a tag die that you have or cut your own rectangle and then cut the top corners at an angle. I intended to use the tag die in the new Merriest Trees Dies (coming soon!) but then I came across the Tailor Made Tags Dies. If you have those, just use either of the die shapes.

I cut out a piece of designer series paper and cardstock for each of the tags. That makes them both the same size so you can’t layer them, but I just trimmed off inside the stitched marks on the designer paper, which made it fit just inside the stitched lines of the cardstock tag.

The Penguin tag on the left is made with Poppy Parade Cardstock and the Fa La La La La pattern in the Merry Bold & Bright Designer Series Paper (161945). This paper is so bright and happy, you will love it! I adhered the designer paper onto the cardstock tag and popped the penguin up with Stampin’ Dimensionals. For a finishing touch, I got the idea to just cut out a short strand of the Christmas lights on another of the papers and put it on the tag up at the top. If you want, you can put a piece of Basic White on the back of the tag if you think you need something to write your “To & From” on or a personal message.

The penguin tag on the right is made with Misty Moonlight cardstock and the snowflake paper in the Beary Christmas Designer Series Paper (162015). Before I adhered the penguin with Stampin’ Dimensionals, I got the idea to cut out some trees from the A Walk in the Forest Designer Series Paper (162377). It’s the paper at the top of page 5 in the Holiday Mini so don’t miss it. Maybe some dies would have cut out some of these little trees but I didn’t look! (Actually, some dies will cut out the fuller trees, not the skinny straight ones.) For a greeting, I used one in the Brightest Glow Stamp Set but cut the words apart and cut them smaller so they would fit on the tag.

The penguins are super easy to make with the punch. Just cut the two pieces out of black and white and the little feet out of Pumpkin Pie cardstock or something similar. I do not have the coordinating stamp set so I just drew in the little black eyes with a marker and the little beak with a Pumpkin Pie Stampin’ Write Marker. If you want, you could add a scarf around his neck or make a little hat.

The die punches out the hole in the tag so you don’t have to do that. Just pick a ribbon you like to tie through the hole so your tag is ready to go when you start wrapping gifts!

Remember to check out the Clearance Rack and see what other bargains you need plus the Penguin Punch!

SHOP STAMPIN’ UP! HERE!

Beary Christmas Spirit of the Season Card

Beary Christmas Spirit of the Season Card

I didn’t even know what card I was going to make when I started, but when I saw my package of this designer paper, I had an idea right away. I decided to use this bear and Christmas tree and came up with this Beary Christmas Spirit of the Season Card.

This Beary Christmas Designer Series Paper (162015) is a fun one for holiday cards with all the cute polar bears and other animals! For this card, I chose to use this one piece with the bear and bunny decorating the Christmas tree in the forest. If you want to cut out just a piece of this designer paper, you will have to figure out how to cut out that area properly. I used a ruler to see about how wide and tall the bear and tree were. Then I used my Paper Trimmer to cut out that image while trying not to get any neighboring images. I had to cut it down pretty close.

After I had my image cut out of the designer paper, I layered it on a piece of Real Red and then on a larger layer of Balmy Blue.

The card base is Balmy Blue with a layer of Basic White. It almost looked fine and simple with just the plain white layer, but I decided to emboss it with the Quatrefoil Tile Embossing Folder. Another good choice would be the Snowflake Sky 3D Embossing Folder.

The greeting is in the Merriest Trees Stamp Set and is stamped in Real Red ink just on a narrow strip of Basic White. I added two Iridescent Adhesive-Backed Discs (161954). They are red (really Poppy Parade) but they appear very dark in the photo. You definitely want this Discs for fun additions to your cards!

The Holiday Mini Catalog is coming next week! Woohoo!

Zoo Crew Fun Birthday Card

Zoo Crew Fun Birthday Card

I was in the mood for an easy and fun card and when you want that, you just might turn to the Zoo Crew Designer Series Paper! What turned out was this Zoo Crew Fun Birthday Card. There is no denying how cute and fun this designer paper is along with the stamp set and all the whimsical characters you can create with!

The card base is Basic White with a layer of Soft Sea Foam cardstock. I felt it needed something so I looked through my embossing folders. I chose the Painted Texture 3D Embossing Folder because it has that texture but nothing that competes with the rest of the card.

In my package of Basic White, I found one of these Radiating Stitches die-cuts in the bag so I tried that out to see if it would work on this card and I liked it! It provided a backdrop for my characters to help them show up better but wasn’t distracting. When I saw a narrow strip of a black and white scallop pattern in the designer paper, I stuck that underneath the die-cut just for a little interest there.

The characters on the card front are simply cut out of the Zoo Crew Designer Series Paper. This is just some of the cutest paper that Stampin’ Up! has carried. What is fun about it is all the different characters doing all sorts of different things – knitting, camping, singing, playing musical instruments, dancing, even doing yoga! The characters are partially colored in and look fine as is, but if you want to, you can add more color with whatever coloring technique you like. I chose three characters who were celebratory – one singing, one juggling cupcakes, and one bringing a gift. I did add some extra color with my Stampin’ Blends because I like doing that! There are some dies that fit with some of the characters, but I just cut them out with Paper Snips.

The greeting is in the Zany Zoo Stamp Set. I stamped it with Memento Ink and die-cut it with one of the center dies in the Countryside Corners Dies. It was a good fit! I layered it on a strip of Pool Party cardstock and flagged each end. It is popped up on Stampin’ Dimensionals, as are the three characters. Remember, we have Mini Dimensionals for those little spaces.

For a final touch, I added a bunch of Pastel Adhesive-Backed Sequins in pink, gold, and blue all around the card. Can you ever have too many sequins??!

Here’s another card, sort of a similar design, except with three dancers, that I made previously with the Zoo Crew Designer Series Paper.

The holidays and Holiday Mini are approaching, but don’t forget to enjoy the other great products we have in the Annual Catalog!

Be sure to redeem your July coupons if you have them!

Redeem Bonus Coupons

Joy of Christmas Merry & Bright Christmas Card

Joy of Christmas Merry & Bright Christmas Card

This Joy of Christmas Merry & Bright Christmas Card idea came to me and I followed through on it and made the card. Something about this designer paper made me think of wrapping paper, and I got the idea to make the card front look like a wrapped package for Christmas. It’s an easy card to create so it might be good if you are looking for ideas for making multiple Christmas cards to send.

The card base is Real Red cardstock. The layer is one of the patterns in the Joy of Christmas Designer Series Paper (161958). You’ll find it in the Stampin’ Up! Holiday Mini Catalog on page 29 in the Joy of Christmas Suite. This whole Suite is beautiful and you get two different stamp sets and two sets of dies plus the paper and embellishments. I only bought the paper and ribbon at this point, but we’ll see how long I can resist the rest!

The ribbon I used is one of the Online Exclusives that you will find in the online store. It is the Real Red & Gold 3/8″ Dotted Ribbon. It is a very nice ribbon, a little heavier and stiffer than some, but it worked fine on this card. Since I love red, I had to have it and I really like the gold dots on it for something different. I added two pieces of ribbon, one horizontal and one vertical. I even applied a little Stampin’ Seal to the back of the pieces so it would lay flat and stay in place. The bow is tied separately and adhered with a few Glue Dots. To make sure the bow stayed on, I even added a glue dot under each loop of the bow and under each tail. Since the ribbon is a little heavy, the glue dots don’t show at all.

The greeting is in the Brightest Glow Stamp Set (159542), which was carried over from last year’s Holiday Mini catalog. This is a great stamp set for holiday greetings. I stamped this sentiment in Real Red ink and die-cut it with the new Deckled Circles Dies. I also cut a larger Deckled Circle out of Real Red for the layer. You will be AMAZED to open this package of Deckled Circle Dies and see the size and the number of dies you get! They are in the Holiday Mini on page 63 in the upper right corner. It’s not a small picture but I think it’s not very noticeable. I didn’t notice it until I heard about “Deckled Circles” from other Demonstrators! Of course, with so many new beautiful products it’s hard to take it all in!

You could add a little bling to the greeting or on the card if you wanted, maybe some Iridescent Rhinestones or sequins, but I left this card as is. I’m pretty sure I will be making more of this card to send in December! Once you have the idea, it’s easy to make more cards assembly-line style. Get an early start!

Remember to spend your July Bonus Coupons if you have some. Check your email for the codes if you ordered $50 or more in one order in July. The codes expire August 31 and that is coming up soon!

The September-December 2023 Mini Catalog (the Holiday Mini) goes LIVE on Wednesday, September 6th! Make your Shopping List!

Merriest Trees Decorated Christmas Card

Merriest Trees Decorated Christmas Card

This Merriest Trees Decorated Christmas Card is the first card I’ve made with this Merriest Trees Bundle (162048) in the upcoming Stampin’ Up! Holiday Mini Catalog! You can make all kinds of cards with this Bundle from simple to fancy. I think I started with fancy on this one! This card is for someone who likes “little bitty” things. I’ll explain as I go along in this blog post!

This Merriest Trees Bundle comes with the Merriest Trees Stamp Set and the Merriest Trees Dies. (Do you like how they are now naming the stamp set and dies the SAME?!) If you buy them both together in the Bundle, you will save 10% on the price. The stamp set has a tree that you can ink up and stamp as is, or you can use the second tree stamp for some added highlights on that tree. There are some nice sentiments to use and several accessories. There is a tree trunk, gifts, bows, ornaments, a star, and some little twinkles I suppose you would call them! The trees are actually pretty large so you will need Clear Block E for sure!

Merriest Trees Bundle

As you can see in the set of dies, there are LOTS of extra pieces! On the one hand, that is extra-fun and on the other hand, there are some LITTLE pieces there to work with! One great thing is that when you stamp the little ornaments, they are on one stamp and there is a die that matches that arrangement so the die will cut out all three ornaments at one time! The other great thing is that there are THREE ornament dies so you can stamp three sets of three ornaments and die-cut them all in one fell swoop with your machine! You can cut out chains or garlands for the tree with the one die that makes all the different lengths of garlands from that one die. It would be good if you used Adhesive Sheets on the back of the paper before you cut those out! I don’t know how you would get glue on the back of those except with the teeniest drop of glue. Even with the Adhesive Sheets on the back to turn them into stickers, they are very fragile although even if you accidentally tear them apart you can match the ends back up again.

If you stamp the solid tree, it may work better to lay the stamp and block face up on the table and then apply the ink rather than try to ink up the tree by patting it on the ink pad. Even better if you have the retired Stamparatus. Be sure to use a cushion underneath your stamp. It’s often a little difficult to get a perfect impression the first time with a large solid image like this tree.

This card has a card base of Shaded Spruce. I added a layer of Gold Foil underneath this interesting red pattern of designer paper in the Joy of Christmas Designer Series Paper (161958). This designer paper has all kinds of different patterns that can be for Christmas or for other occasions.

The Christmas tree is die-cut from Shaded Spruce. I used the other tree piece with Versamark Ink to stamp and embossed with white embossing powder using a Heat Tool. This makes it look like a little bit of snow on the Christmas tree! Then I used Adhesive Sheets on the back of a small piece of gold More Dazzle 6″ x 6″ Specialty Paper. It’s in the Annual Catalog but you may already have some from a previous catalog. Then I used the die to cut out several different lengths of garlands. If you have the Take a Pick Tool or some other piercing tool it makes it easier to pry off the backing sheet. As I said before, these little diecut garlands are very delicate and fragile.

The little ornaments are stamped in Real Red on Basic White and then diecut. They just need a tiny drop of glue on the back to adhere to the tree however you would like to place them. Use different colors of ornaments if you like. There are two different styles of stars to choose from to put at the top of the tree.

No Christmas tree would be complete without packages! You can stamp little gift boxes and bows and die-cut them, or you could die-cut the presents out of solid cardstock or scraps of designer paper.

The greeting is one in the Merriest Trees Stamp Set. It is stamped in Real Red Ink and die cut with a small banner in the Stylish Shapes Dies. I cut off the banner end on the right so it would line up with the edge of the designer paper background. Once again I will point out that this greeting is very small.

If you like lots of detail when you make a card, this card might be for you. If you want to make a few of these cards to send for Christmas, I say go for it! Once you have your design and make everything in an assembly-line fashion it will be easier than it looks. But if you are making 50 Christmas cards to send, maybe you want a simpler design with fewer little pieces! This exact card takes more than a few minutes to make, so plan ahead!

SHOP STAMPIN’ UP! ONLINE HERE!

Them Bones Halloween Card

Them Bones Halloween Card

It may be the middle of August, but here is my first Halloween card for the season, Them Bones Halloween Card. It was so fun to make a Halloween card, especially with this paper! It’s the Them Bones Designer Series Paper and is coming in the Holiday Mini Catalog on September 6th!

This designer series paper has all sorts of Halloween patterns and colors in it! You can choose from skeletons, bats, gravestones/mausoleums?, Halloween words, and all sorts of other generic patterns you can use on non-Halloween projects.

For this card, I used this sheet of paper that has all the different patterns on this one paper! The Fresh As a Daisy Designer Series Paper had the same thing, which was fun to use. Here is a photo of the whole sheet of paper.

You can see this sheet has all kinds of interesting designs to use on your card or another project. I chose the top right corner image. It has to be trimmed a little to fit on the Pumpkin Pie card base. Then I cut out one of the many skeletons on another sheet of paper plus one of the skeleton dogs to decorate my card.

There is a Bundle of the Bag of Bones Stamp Set and Bag of Bones Dies. If you have the dies, you can diecut some of the skeletons and animals and other images, stamped and printed on the paper. But I just used my Paper Snips for a little detailed cutting to cut out this skeleton from the designer paper and the dog skeleton. I used tiny bits of Multipurpose Liquid Glue to adhere them to the card front to create a little scene.

For the greeting, after looking through my current stamp sets, I got the idea to use the Alphabest Stamp Set and Best Label Punch. I stamped the little outline in black ink and then the letters in Pumpkin Pie ink to spell “boo!” Then I punched out those letters with the Best Label Punch. They are popped up on Stampin’ Dimensionals.

For a finishing touch, I tried to splatter some Wink of Stella around on the card. I used Gold (retired) but I don’t think it showed up well enough.

When you are ready to order some products for Halloween, if you like whimsical and spooky, try the Them Bones Designer Series Paper and maybe the Bag of Bones Bundle with the stamp set and dies. You can also purchase Glow in the Dark 6″ x 6″ Specialty Paper or Glow in the Dark adhesive bats and ghosts to decorate your cards and projects!

SHOP THE HOLIDAY MINI SEPTEMBER 6!