Category Archives: Cards

Two Bee Mine Cards After OnStage 2023

Bee Mine I Love You Card

On Saturday Stampin’ Up! held a virtual event called Onstage 2023 for Demonstrators, somewhat like a mini-convention, to introduce upcoming Spring Mini Catalog products as well as the big promotion called Sale-A-Bration. One of the fun Suites they showed, stamped with, and allowed us to purchase ahead of the event is the Bee Mine Suite, coming in the January-April 2024 Mini Catalog. I hadn’t had a chance to use it beforehand, but after watching the event I opened the package and got stamping!

Here are some of the Bee Mine Designer Series Papers, the Sweet Sorbet 1/4″ Bordered Ribbon, the Bee My Valentine Stamp Set, and the Bee Builder Punch. There are also adorable Adhesive-Backed Hearts & Flowers (you’ll probably want more than one package!) and Square Pillow Boxes that I forgot to put in the photo. If you like bees, and they are popular these days, you will want this Suite! And if you are not “into” bees, you will find these papers and stamp set so cute you will love them anyway!
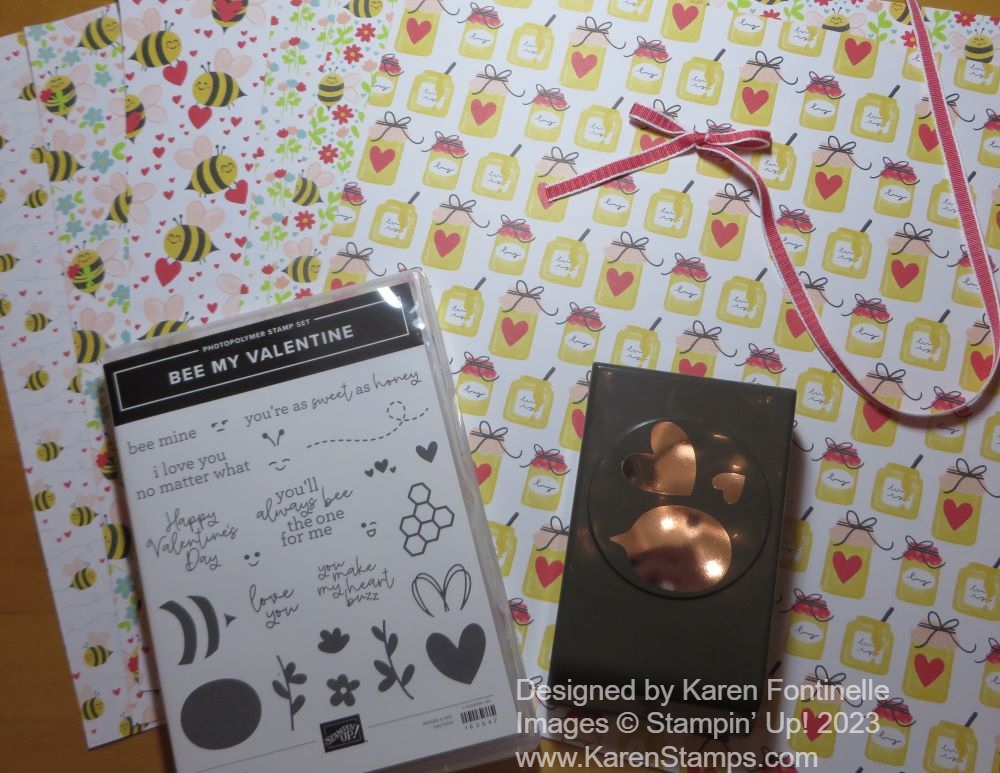
Bee Mine Suite

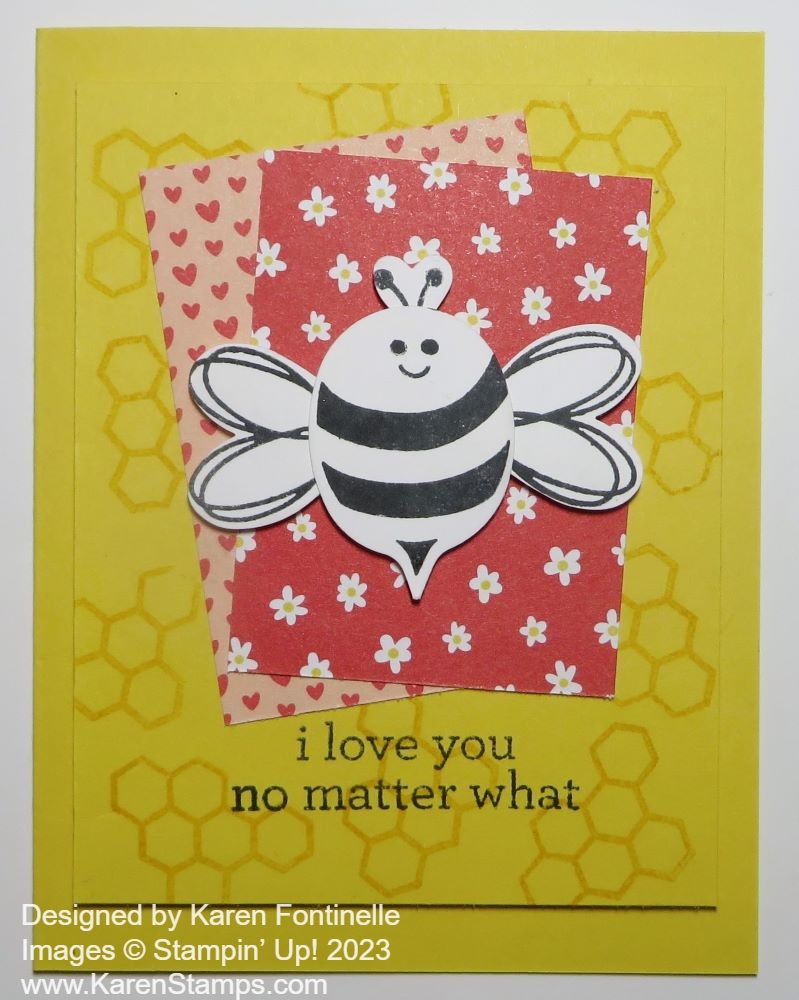
The card I posted was one that Shannon made during the online event yesterday. The card base is Daffodil Delight as is the first layer which is stamped randomly with the honeycomb stamp in Daffodil Delight ink. This layer is cut at 3 3/4″ x 4 3/4″. Be sure to stamp the greeting at the bottom before adhering that top layer. It is stamped in Memento ink and is in the Bee My Valentine Stamp Set.

The two layers of designer paper, the little hearts and the little white flowers, are cut at 2 1/4″ x 3 1/4″ and 2 1/4″ x 3″. They are both placed on angles and staggered, not lined up straight.

The bee is made by stamping on Basic White with Memento Ink and then punched out with the Bee Builder Punch. If you look at the bottom of the punch and line up your images somewhat in the same direction as they are arranged in the punch (and allow space in between images!) you will find punching them out a little easier. Or you can punch a template and then use that to place the stamps when you are stamping the images. You could color the bee or use yellow cardstock, but I was copying the card as Shannon made it. Then just put a drop of glue to adhere the wings to the body and the antennae to the top of his head. You can pop up the bee with Stampin’ Dimensionals and even place them on the back where the wings and antennae meet on the bee’s body to hold them in place perfectly.

Once you have everything adhered, use Stampin’ Dimensionals to pop up the Daffodil Delight finished layer on the card base. On the inside of the card, you could use a strip of designer paper or cut out a small bee from the paper to decorate the inside of the card.

Then I had to make another card right away because I just loved the designer paper! It is all so cute!
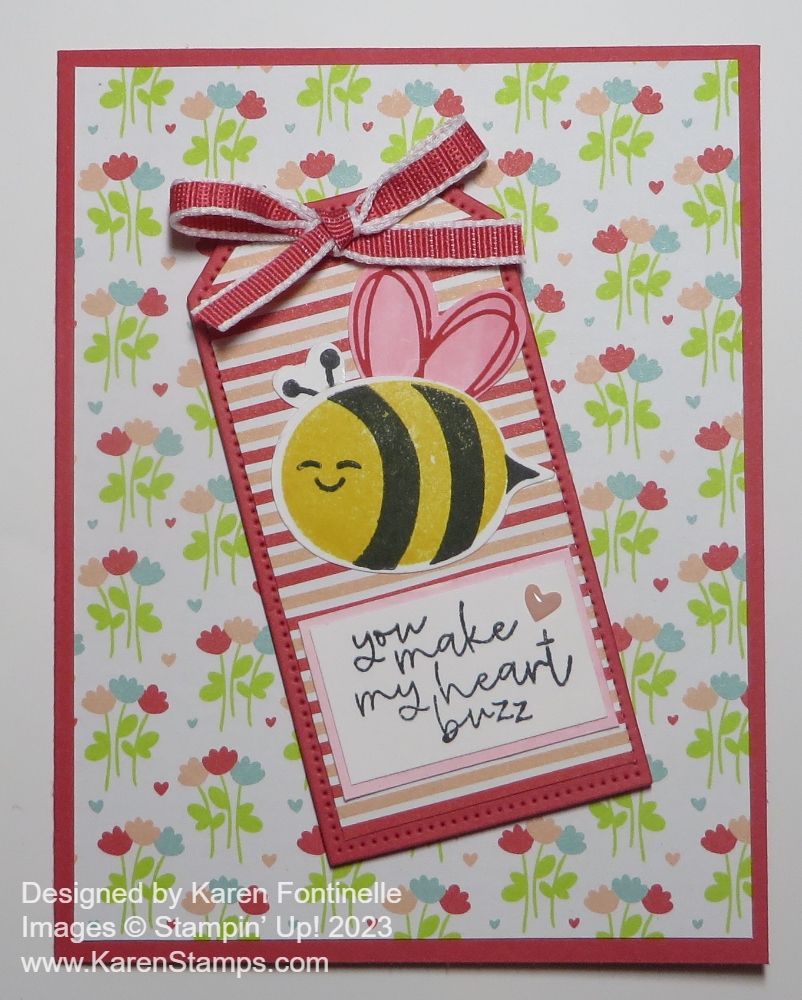
Bee Mine You Make My Heart Buzz Card

I love that Sweet Sorbet is one of the coordinating colors with the designer series paper because I haven’t used it in a while and I love that color! It is one of the In Colors from last year but on its second year right now in the Annual Catalog. I used Sweet Sorbet for the card base. Next, I chose this flowered pattern in the Bee Mine Designer Series Paper for the background.

For the focal part of the card, I decided to diecut the largest tag in the Tailor Made Tags Dies out of Sweet Sorbet. Then I cut another tag, the same size, out of the same paper but used the striped side. This striped pattern I trimmed down with my Paper Trimmer just inside the stitched perforations to make it a layer on the Sweet Sorbet.

The bee body is stamped with Daffodil Delight ink on Basic White (or you could just use Daffodil Delight cardstock) and then the stripes and antennae are stamped in Memento ink. The face is another tiny stamp. There are several faces to choose from!

I stamped the wing in Sweet Sorbet for something fun, but first I watercolored a piece of Basic White with Sweet Sorbet ink and one of the Water Painters. Then it was punched out with the Bee Builder Punch and adhered to the top of the bee body along with the antennae. The bee was adhered flat to the tag along with the stamped greeting. I felt like the greeting needed a little layer, so I watercolored another little piece of Basic White with the Sweet Sorbet ink and trimmed a tiny layer behind the greeting. The whole tag is popped up on Stampin’ Dimensionals.

To embellish the tag, I tied a bow with the Sweet Sorbet 1/4″ Bordered Ribbon and adhered it on the top of the tag over the hole (I didn’t thread it through) with Mini Glue Dots. I also used just one tiny Petal Pink heart in the Hearts & Flowers embellishments to the greeting.

There you have two card ideas you can make with the Bee Mine Suite when it becomes available in January! If you want it sooner, sign up to be a Demonstrator and be able to preorder select products before January! And remember, Sale-A-Bration will be coming up in January at the same time. When you spend $50 you get to choose one FREE Sale-A-Bration product! With a $100 purchase, you can choose a Level 2 item or two Level 1 products. Your choice! It’s a VERY popular promotion Stampin’ Up! has been doing almost forever! Lots to look forward to in January!
Country Wreath Christmas Card

Country Wreath Christmas Card

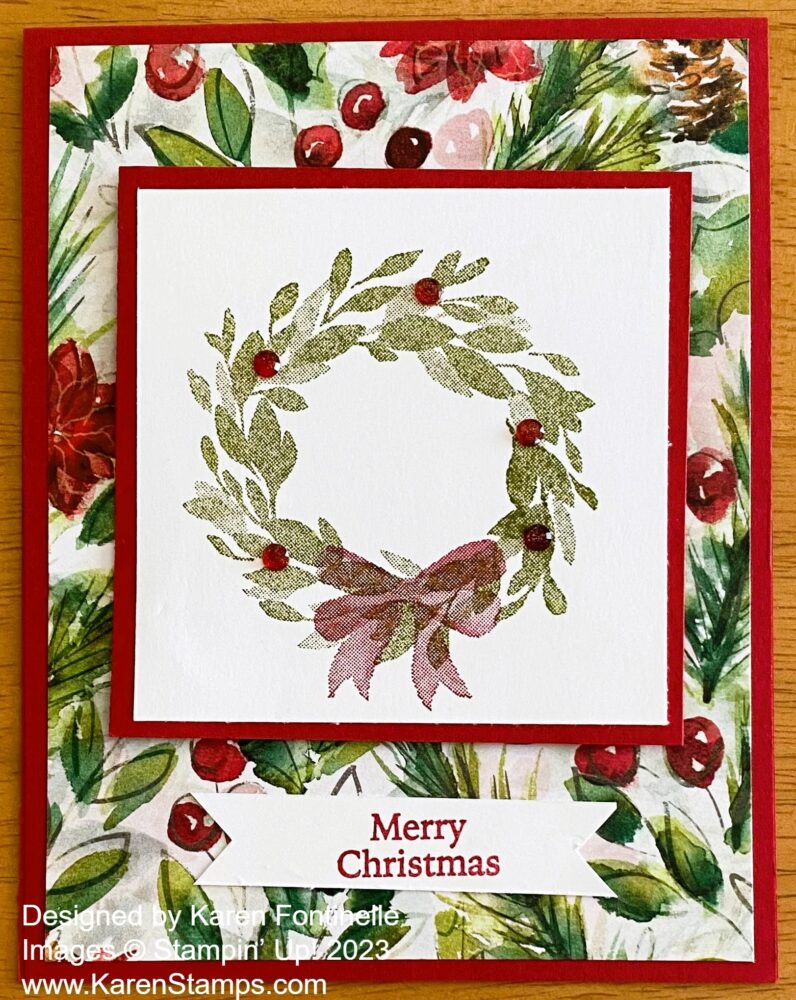
If you want a pretty easy Christmas card idea, I recently made this Country Wreath Christmas Card with an up-and-coming young stamper! The beautiful designer paper in the background makes it, I think!

The card base is Real Red and has a top fold, so if you want that, cut the cardstock at 4 1/4″ x 11″. Score at 5 1/2″. Or you can make it a sidefold card as we most often do. The paper is in the Joy of Christmas Designer Series Paper in the Holiday Mini Catalog. I think it is a beautiful pattern with the holly and other leaves and red berries! It is cut at 4″ x 5 1/4″.

The wreath in the Country Wreaths Stamp Set is stamped in Old Olive ink and the bow in Real Red ink. These stamps have the Distinktive texture that Stampin’ Up! designed for some of their stamps. If I were going it over I would stamp and diecut the bow and adhere it to the stamped wreath. If you wanted another upgrade to your card you could also stamp and diecut the wreath. But if you were making a lot of cards just stamping is a lot quicker and easier!

After stamping the wreath, you can cut the Basic White cardstock with the Paper Trimmer or diecut it with any of the stitched shapes. Then layer on a piece of Real Red. The greeting is stamped from the same Country Wreaths Stamp Set. It’s a great stamp set that we have had for at least a year I think, that covers several seasons.

You can stamp red berries from the stamp set on the wreath, but it’s more fun to add some red rhinestones or other red gems! If you don’t have any, use the Stampin’ Blends markers to color the Iridescent Rhinestone Jewels, for example, before putting them on the card. Just color on the sheet they are adhered to, let the ink dry for a second, and you are good to go with whatever color gems you want. I used Stampin’ Dimensionals to pop up the wreath on the card front.

On the inside of the card, add a layer of Basic White to stamp or write your personal greeting. You may want to add a strip of the same or coordinating designer series paper to add some interest inside!

New Online Exclusive Products Today!

New Online Exclusives Nov 7 2023 Ad Online

There are new Online Exclusives available today in the Stampin’ Up! Online Store!  This is a way for Stampin’ Up! to release new products without waiting for the next catalog so we get a wider choice of new things! You can always check under “Online Exclusives” under Products to see what is available!

MEANDERING MEADOW SUITE COLLECTION 162745 $82.50

***Currently Unavailable because of the Adhesive-Backed Dragonflies and Birds not being available, but you can order the Bundle and other pieces separately.

FLUFFIEST FRIENDS BUNDLE 162850 $54.00

THREE COLOR GLIMMER 12″ x 12″ SPECIALTY PAPER 162813 $10.50 USD
6 Sheets. 2 each of 3 colors. 
Petal Pink, Pretty Peacock, Highland Heather 

SIMPLY SPARKLING BUNDLE 162871 $43.00

SOFTLY SAID CLING STAMP SET 162906 $25.00

FEATHERED FLIGHT CLING STAMP SET 162726 $24.00

OF ART & TEXTURE PHOTOPOLYMER STAMP SET  162687 $24.00

Check them ALL out on the Online Exclusives!

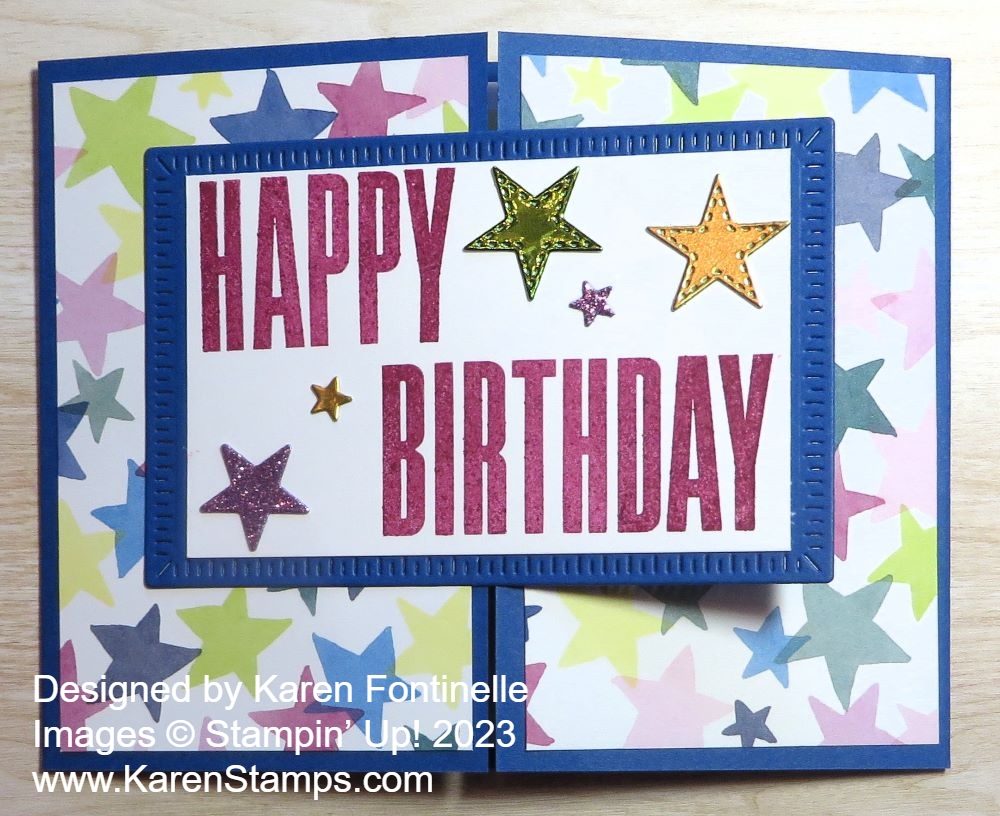
Bright & Beautiful Gate Fold Birthday Card

Bright & Beautiful Gatefold Birthday Card

It has been a while since I have thought of using this Bright & Beautiful 6″ x 6″ Designer Series Paper! But when I got the idea of this Bright & Beautiful Gate Fold Birthday Card I was so happy to get this paper back out and pick which papers I wanted to use on this card! We get so caught up in the newest products that we sometimes forget what we already have!

This birthday card is easy and can be for many other occasions with just a change of greeting and maybe colors or papers. To make this gatefold card, start with a card base of 11″ x 4″. Cut a sheet of cardstock lengthwise instead of horizontally the way we usually do it. I used Blueberry Bushel for this card.

Score the card at 2 3/4″ from each end. Or you can score at 2 3/4″ and then 8 1/4″. Crease and fold the score lines, making sure the flaps meet evenly in the center.

To decorate, cut two panels of designer paper for the front that are 2 1/2″ x 4″. Adhere to each of the two front panels. Or you can stamp on the panels.

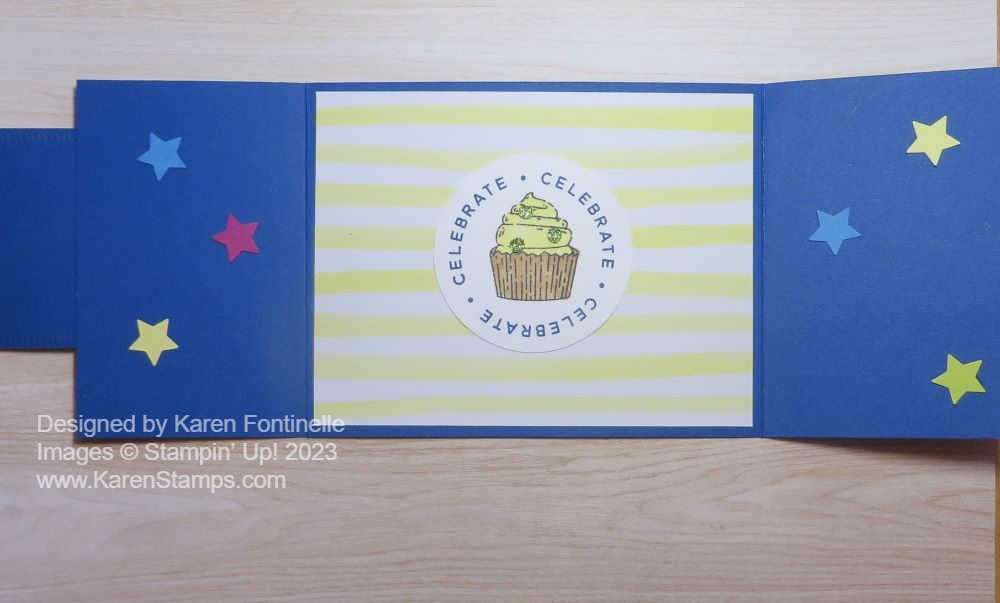
On the inside, you could just put a Basic White layer of cardstock to stamp or write a greeting or message, but I decided to use another pattern in the same designer paper that has yellow stripes. I also stamped the circle greeting and cupcake in the Circle Sayings Bundle. I colored in the cupcake with Stampin’ Blends and stamped “Celebrate” in Blueberry Bushel ink and then punched it out with the circle punch. On the cupcake, I added some Adhesive-Backed Glitter Sequins in Old Olive. I also added some punched stars to the inside after I finally found my little retired star punch!

On the front of the card, I die-cut a Blueberry Bushel rectangle with the Radiating Stitches Die. For the center, I just measured and cut out a rectangle to fit inside out of Basic White cardstock with my Paper Trimmer. The birthday greeting is from the Biggest Wish Stamp Set and is stamped in Berry Burst ink.

To go along with the star paper, I dug out some retired dies, So Many Stars to diecut some interesting stars to use on this card. There is also a star die in the Merriest Trees Dies that I used. Use whatever you have!

When you adhere this greeting piece to the front of the gatefold card, find the midpoint and make sure you only apply adhesive to the side that attaches to the left side of the card. It, of course, does not get glued down all the way across so make sure you don’t have any glue in the wrong place that is going to make something else sticky!

This is the kind of easy card that you can change up in different ways and make something that looks completely new!

SHOP STAMPIN’ UP! ONLINE HERE!

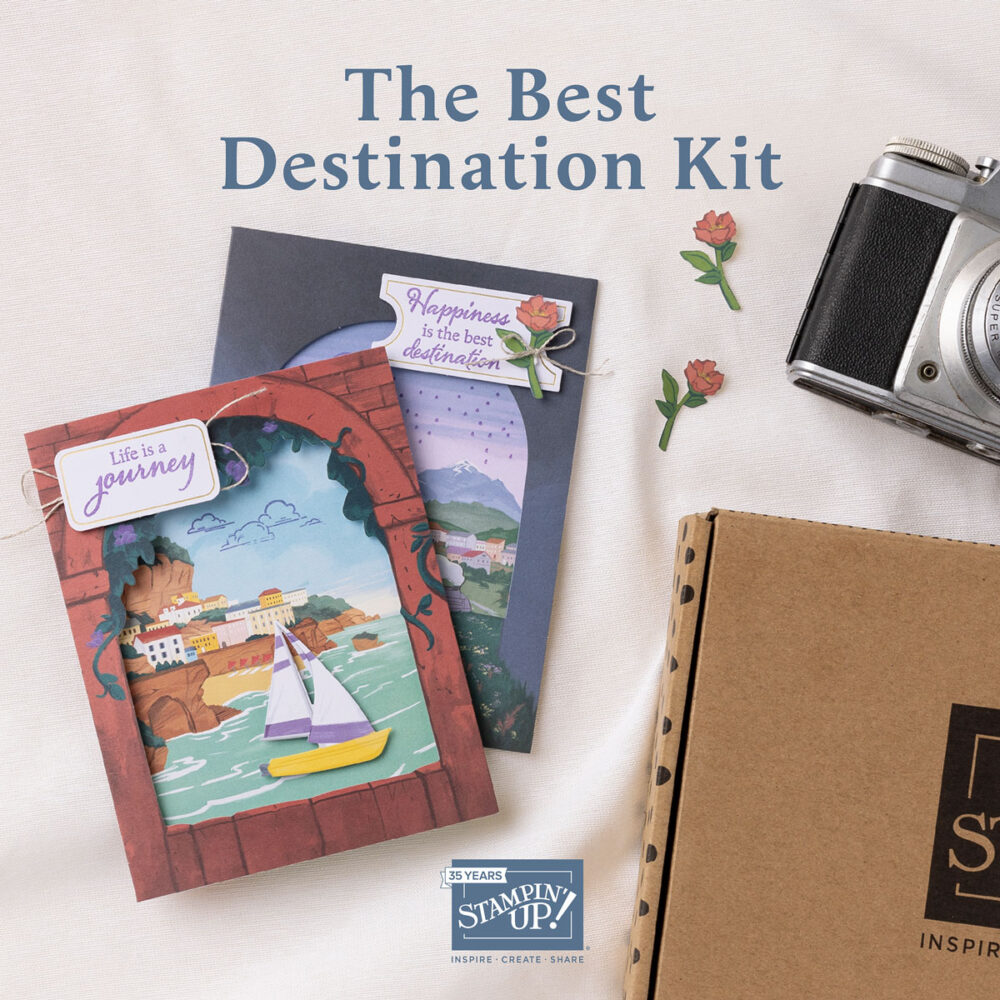
New Kit! The Best Destination Kit!

The Best Destination Kit Ad

Stampin’ Up! just added a new Kit to the Kits Collection in the Online Store. This new kit is called the Best Destination Kit! The Kits Collection provides a selection of different crafting experiences for everyone from cards to other kinds of projects. New kits are added frequently and provide an easy way for you and your friends or family to order kits and get together for some crafting fun!

Plan a crafting getaway today with the Best Destination Kit! This kit lets you make nine peek-a-boo tri-fold cards with a colorful, nostalgic, travel vibe—perfect for friends who might be embarking on a fun adventure, setting new goals, or maybe just need a vision of a picture-perfect day. Some trips are worth the splurge—especially if they come in a box!

The Best Destination Kit

DETAILS
This month’s kit includes:

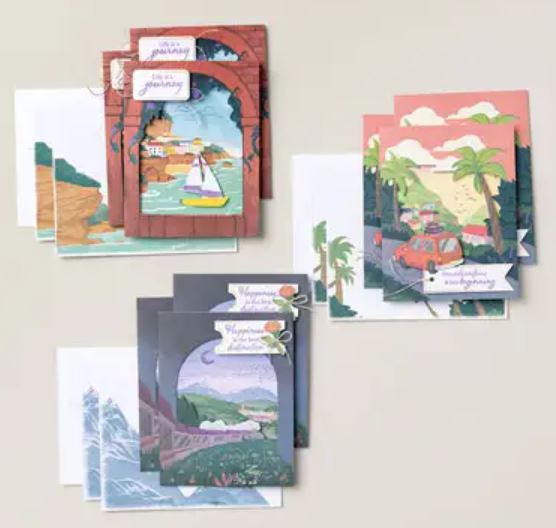
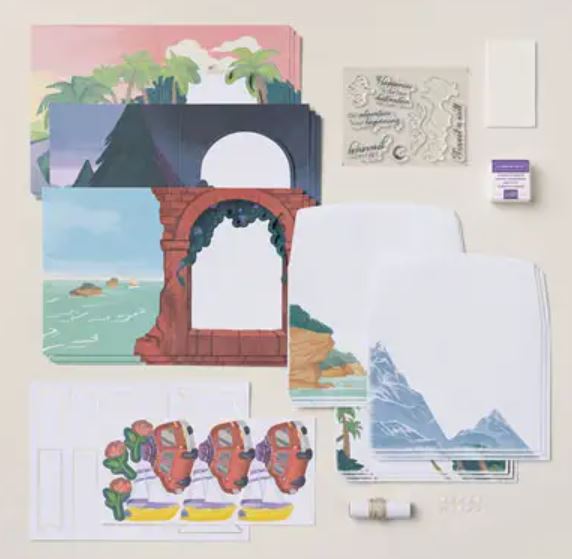
Enough supplies to create 9 cards—3 each of 3 designs
9 coordinating envelopes
Best Destination Photopolymer Stamp Set
One Gorgeous Grape Ink Spot
Printed card bases, printed die cuts, adhesive, embellishments, and a clear block
Finished card size: 5-1/2″ x 4-1/4″
Coordinating colors: Balmy Blue, Boho Blue, Cajun Craze, Calypso Coral, Coastal Cabana, Crushed Curry, Daffodil Delight, Early Espresso, Flirty Flamingo, Fresh Freesia, Gorgeous Grape, Granny Apple Green, Misty Moonlight, Pecan Pie, Petal Pink, Pretty Peacock, and Shaded Spruce

Here are the contents. Besides the cards and envelopes, you get an ink spot and exclusive stamp set plus adhesive.

The Best Destination Kit Contents

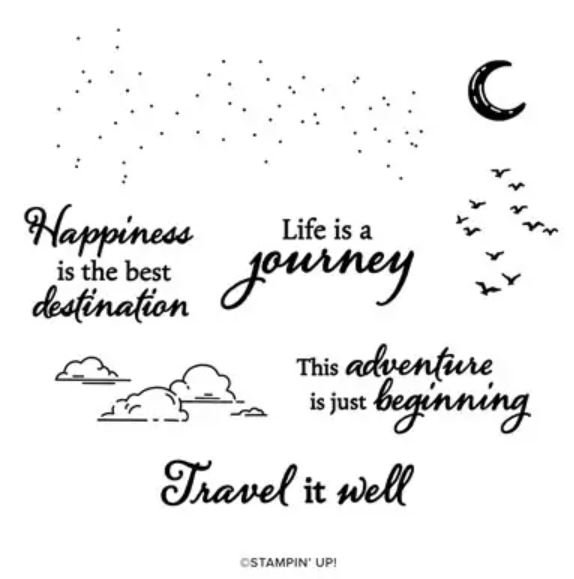
Here is the exclusive stamp set in the kit.

The Best Destination Kit Stamps

Maybe you know someone who is going on a special trip soon or in the new year. These cards might be a fun gift for you to give to them, all made up, so they can send out notes about their great trip to their family or friends. Or maybe you have your own trip coming up….or you can dream about a trip as you make these cards! Enjoy the creative experience

SHOP THE STAMPIN’ UP! KITS COLLECTION!

THE BEST DESTINATION KIT 163186

$20.00 USD

Get the 12 Weeks of Christmas Today!

Christmas Truck

Every year I send out the 12 Weeks of Christmas holiday emails only to my Mailing List subscribers as a thank you for following me on this stamping journey! They also get a newsletter every Tuesday with Stampin’ Up! news and offers plus at least one stamping project idea or tip. But when we start counting down to Christmas, I send out a special email on Wednesdays with an exclusive holiday project that I don’t post anywhere else!

We are already on Week 5 of the 12 Weeks of Christmas!! You missed the first four weeks, but you can still get the rest of the holiday emails if you sign up right now before 1:00 PM CT today!

Here’s how to get on my Mailing List! If you are on a computer, you probably will see a red box on the right side at the top. Just fill in your name and best email address.

If you are on your phone, you may have to scroll to the bottom of the screen.

Or just click here to go to my Mailing List Sign Up page!

More Last Minute Them Bones Halloween Cards!

Them Bones Halloween Cards

The other day I made a few more Halloween cards, partly to use up as much of the Them Bones Designer Series Paper by Halloween as I can! Some of the patterns I can use for Thanksgiving and beyond, but the skeletons and tombstones, not so much! It’s also about trying not to hoard all the beautiful Stampin’ Up! paper that takes up space in my house after all these years!

I’ll just give a general description of each card.

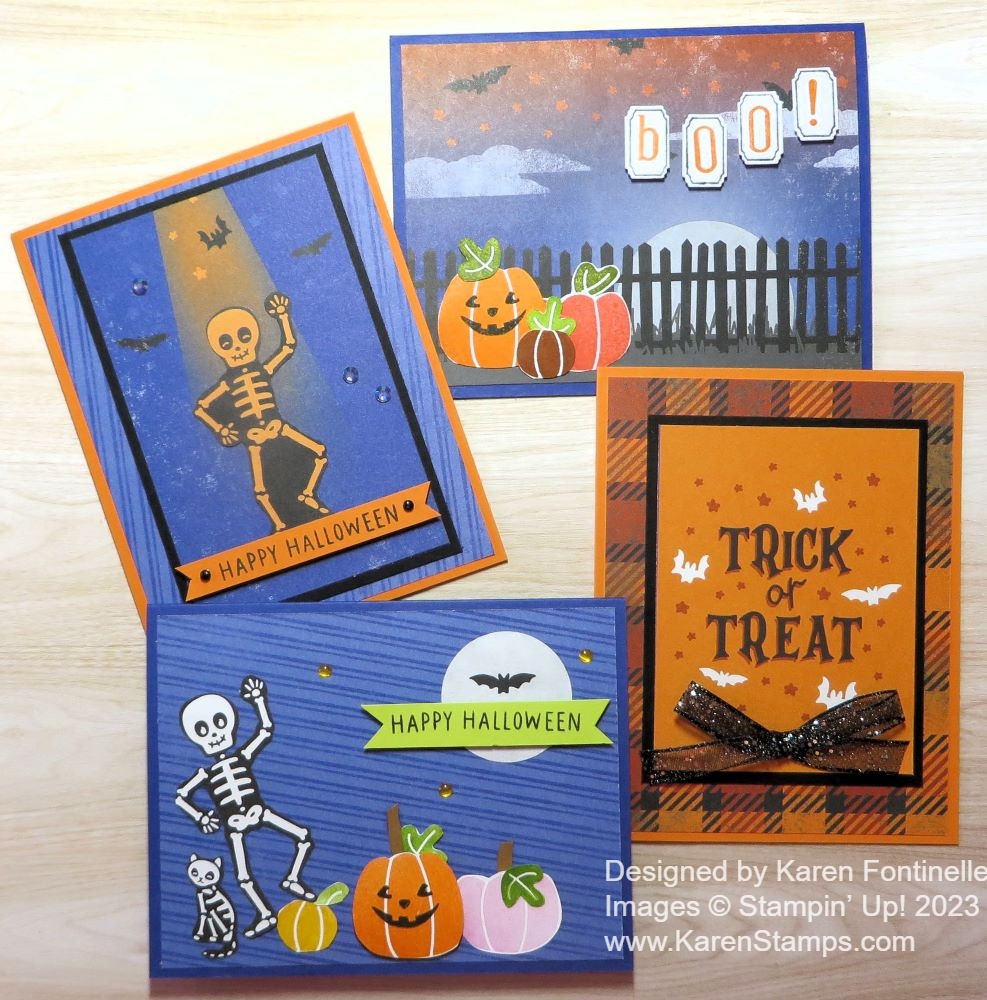
Top left: This card uses the diagonal striped blue paper on “the other side” of the pattern with the little bats flying around. Layered on that is the spotlight panel (with a layer of Basic Black) that is part of the one sheet with a lot of different scenes that you cut apart. I cut out one of the skeletons and adhered him in the spotlight, from the moon I suppose, as if he is dancing. The “Happy Halloween” greeting is from a past Paper Pumpkin Kit stamp set. You can use what you have. I added some Black Classic Matte Dots to the greeting and some Iridescent Rhinestone Gems.

Top Right: This card uses one of those panels on a big sheet, plus I added pumpkins from the Pick of the Patch Stamp Set. The greeting is stamped with the Alphabest Stamp Set and punched out with the Best Label Punch.

Bottom Left: This card also uses that blue striped paper for the background. I added pumpkins, a skeleton, and a punched out moon from the large paper with tombstone scenes that can be cut apart.

Bottom Right: A super easy card to make by just cutting out the Trick or Treat panel on the sheet with all the different panels. It is layered on a piece of the orange plaid designer paper. I just added a bow made from Glittered Organdy Black Ribbon (retired). You could use the Black and White Gingham Ribbon or anything else you like.

If I have time I may even make some Halloween cards to hand out to the Trick or Treaters along with their candy!

I hope these ideas help you if you are still making Halloween cards or if you, too, want to use up your Halloween Them Bones paper!

Home For the Holidays Refill Kit Available!

Home For the Holidays Refill Kit

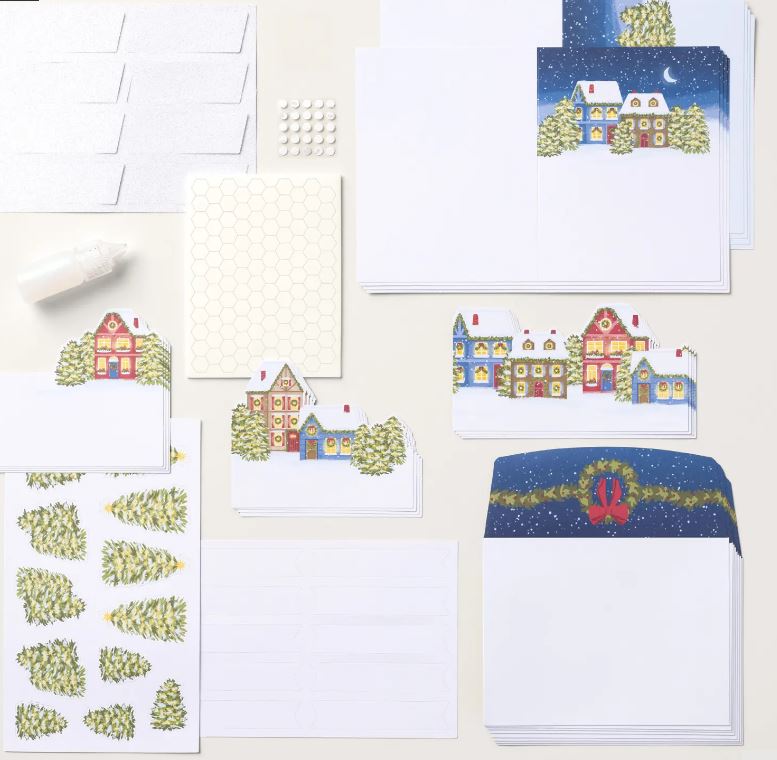
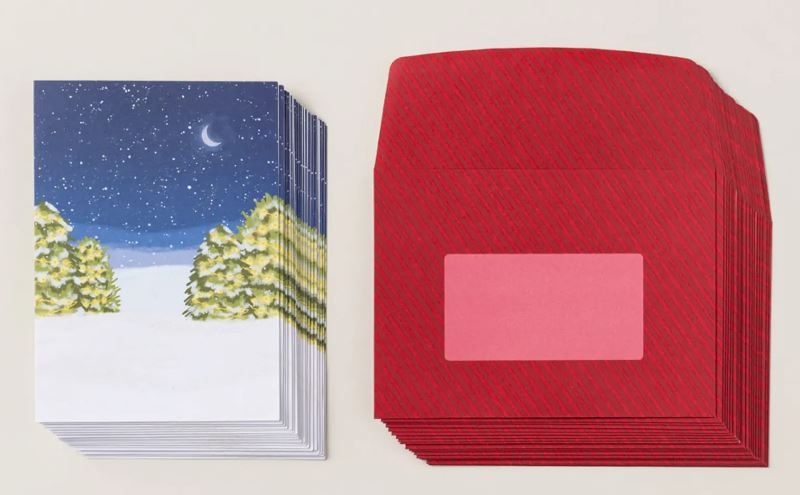
If you missed the October Paper Pumpkin Kit, Home For the Holidays, you can order it in the Stampin’ Up! Online Store! You must be a subscriber, though! OR maybe you just want more cards to make if eight weren’t enough! This is the Refill Kit which means you get all the materials you need to make the cards except for the ink spot and the stamp set. But you won’t need the stamp set if you have any Christmas greetings. You can use what you have or write it out on the greeting piece.

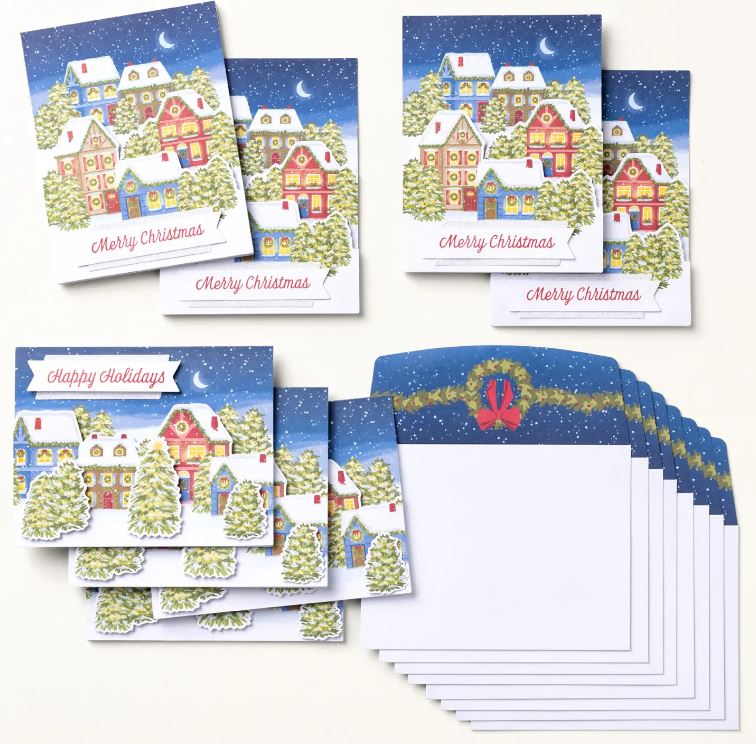
This card kit is beautiful and comes with layers of houses and trees to adhere on to the card base popped up with included dimensionals. It’s an easy kit to make! You will end up with eight cards, four cards each of two designs plus matching envelopes. As a bonus, the kit contains a bottle of glitter glue to use on the snow on the cards!

CLICK HERE to see my blog post when I spent a relaxing afternoon making up this Paper Pumpkin Kit!

Home For the Holidays Refill Kit Contents

If you are interested in this kit, order it soon while it is available! It will certainly speed up your holiday cardmaking!

SHOP STAMPIN’ UP!

A Trio of Ghosts Halloween Card

Trio of Ghosts Halloween Card

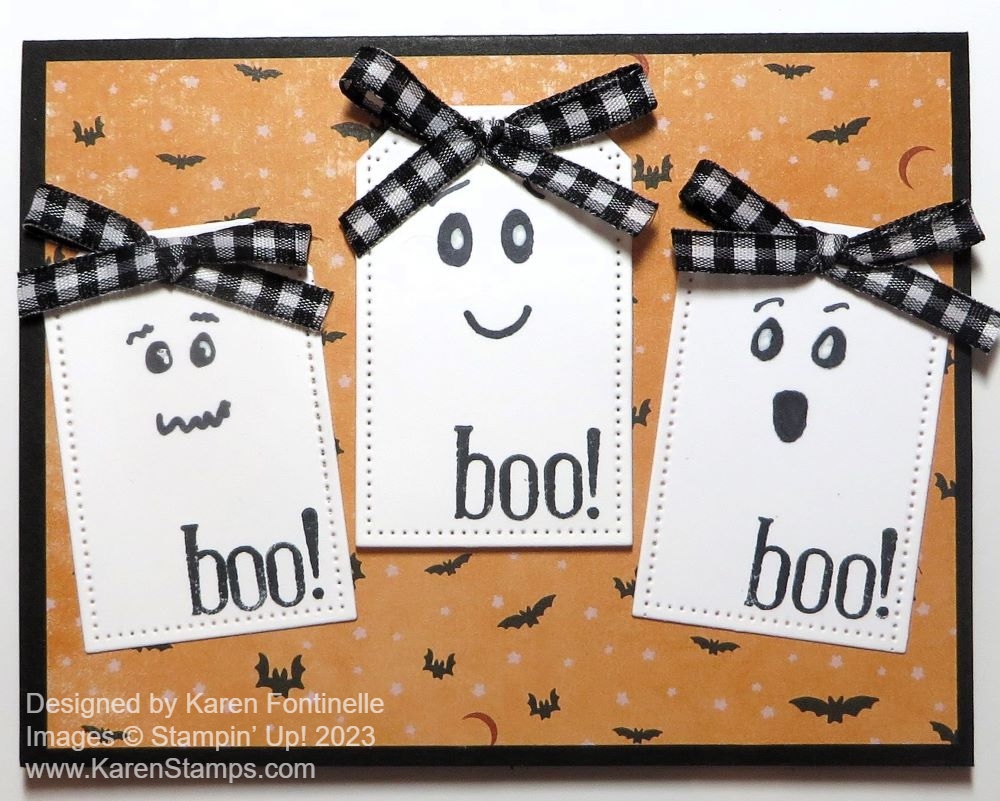
I got the idea for this Trio of Ghosts Halloween Card from something I saw online, probably on Pinterest. It was a group of little tags that looked like ghosts! That gave me the idea to make tags that looked like ghosts but put them on a card! Why not have fun making a Halloween card?!

This card base is Basic Black with a layer of the Them Bones Designer Series Paper. I chose the pattern with the tiny bats because they are flying with the ghosts! You could make similar ghosts in any number of ways depending on what you have on hand to use. For my ghosts, I used the Tailor Made Tags Dies but I made them shorter than the die. If the die is longer than you want, roll the die through as far as you want it, then take it out of the machine. Scoot the die up so it is where you want the bottom of the tag to be but align it with what is already diecut. You will be able to feel it when it fits perfectly. Just try it and you will figure it out!

I drew on faces with a Stampin’ Blends Black marker. If you have a small hole punch you could punch out the black eyes to adhere instead of drawing and add that little white highlight with a gel pen.

The “boo” is stamped with the Alphabest Stamp Set and Memento ink. You wouldn’t have to add that but I thought it was cute! The center ghost is popped up with Stampin’ Dimensionals.

At the top of each ghost, I tied a little bow with the Black & White 1/4″ Gingham Ribbon and adhered it with a Mini Glue Dot. Each bow covers up the little tag hole but you could also tie ribbon through the hole instead of a bow.

If you had “googlie eyes” you could adhere those on the ghosts instead of drawing on the eyes.

There you have another idea for a Halloween card! We are almost out of time!

A Walk in the Forest Merry Christmas Card

A Walk in the Forest Merry Christmas Card

I had a different idea for this A Walk in the Forest Merry Christmas Card, but I like how it turned out. In fact, I liked it so much that as long as I had all the materials out, I made several more cards just like this one for my Christmas card stash. I modified it a little bit which I’ll tell you about later.

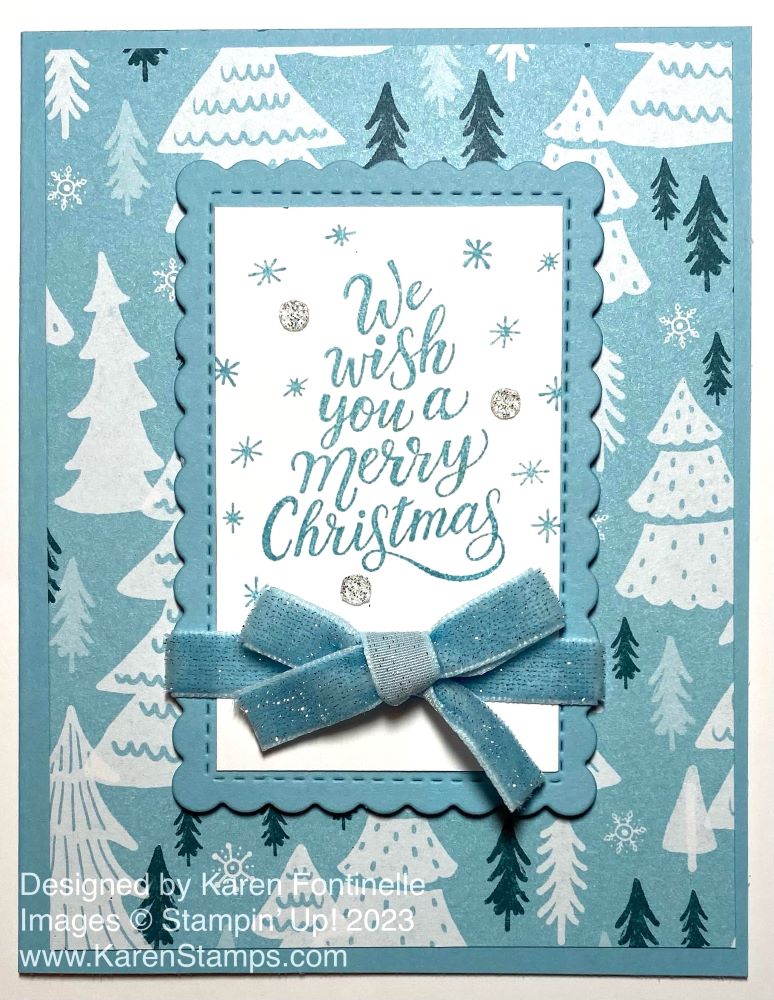
The card base is Balmy Blue and the designer paper layer is in the A Walk In the Forest Designer Series Paper. You’ve probably seen this paper used in cards online but you may have missed it in the Stampin’ Up! Holiday Mini Catalog. You’ll find the description of this paper at the top of page 5. If you stop and read the “Making a Difference” paragraph on that page, you’ll see that Stampin’ Up! will donate $3 for every package sold to support organizations dedicated to spreading cheer and providing support to those in need.

In the center, I used a Scalloped Contours die to cut a scalloped rectangle and also cut a piece of Basic White to fit inside the rectangle. I just measured and cut it with my Paper Trimmer. I stamped the greeting and some tiny snowflakes that are in the Merriest Trees Stamp Set in Balmy Blue ink. On this card, I wrapped around a piece of Balmy Blue 3/8″ Sparkle Ribbon and added a bow separately, adhered with Glue Dots. The whole greeting piece is popped up on Stampin’ Dimensionals. Then I added some white Adhesive-Backed Glitter Sequins.

On the extra cards I made, I decided to adhere the center piece flat on the card since they will be mailed. If your card gets too thick, that’s a problem when you mail it. These cards still have some bulk with the bow because the ribbon is velvety with sparkles! Beautiful but a little thicker! On these extra cards, instead of the Glitter Sequins, I added the Balmy Blue sequins in the Pastel Adhesive-Backed Sequins. They look pretty as well!

Hope you have an early start on your Christmas cards! If you need more holiday ideas, sign up for my Mailing List in the red box here on my blog to get my 12 Weeks of Christmas emails every Wednesday with an exclusive idea each week!

SHOP STAMPIN’ UP! ONLINE HERE!

Love the Paper Pumpkin October 2023 Kit!

Paper Pumpkin Oct 2023 Cards & Envelopes

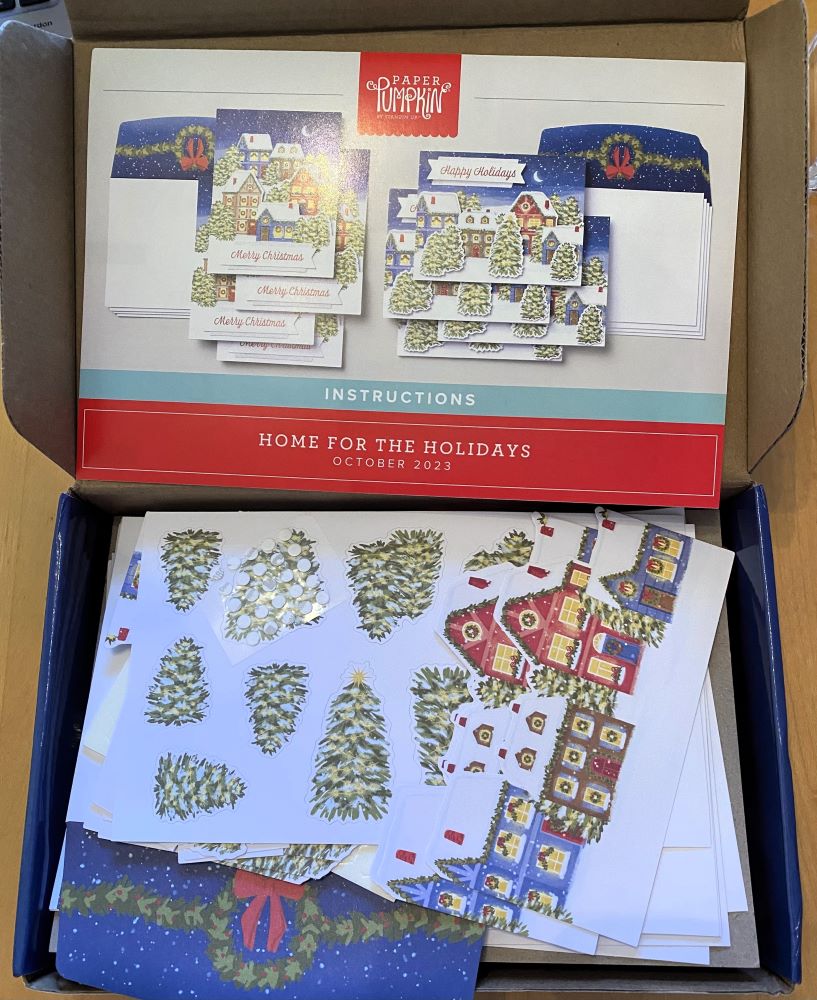
I always love the Paper Pumpkin holiday kits and this Paper Pumpkin Home For the Holidays Kit is no exception! It all starts with the beautiful box that you can save and use for packing away some Christmas items after the holidays and know that it will be easily recognizable! The contents of the box were all wrapped up in red tissue paper. I like to say that getting a Paper Pumpkin Kit in the mail is a gift you give yourself and each kit is certainly made to look like a gift that you will enjoy opening!

Paper Pumpkin Oct 2023 Contents

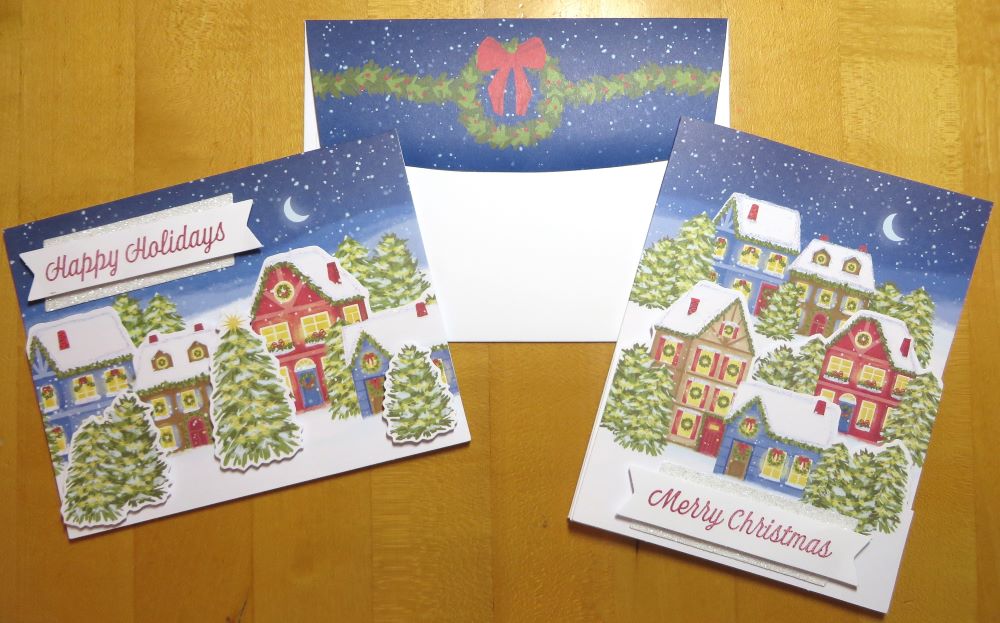
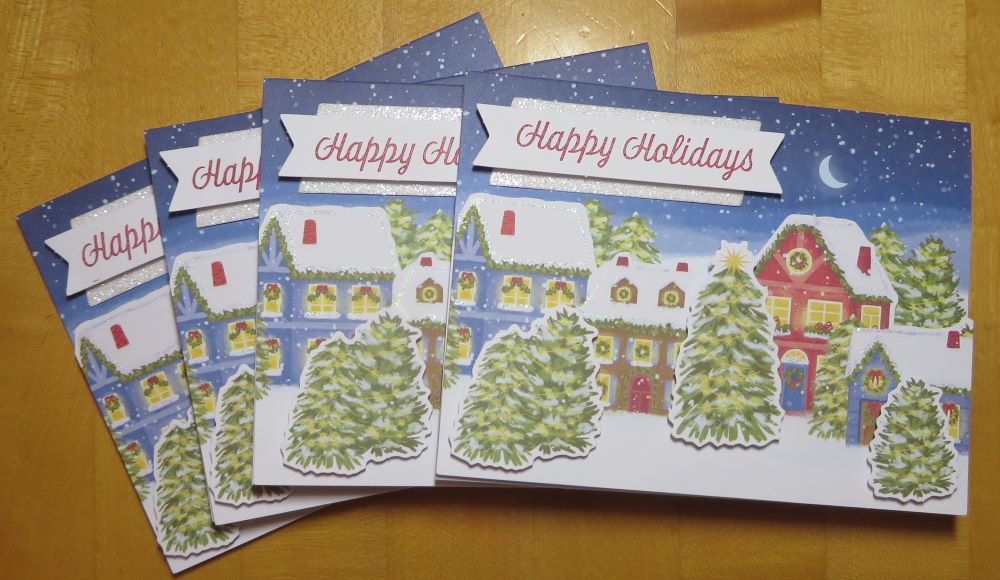
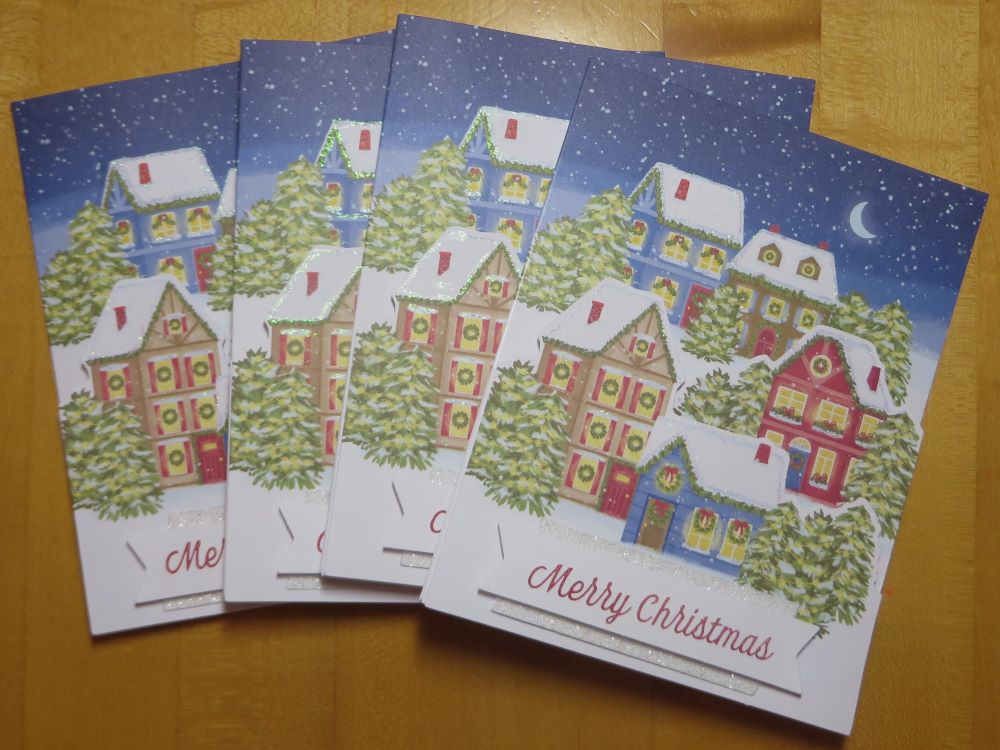
This kit made eight Christmas cards, four of each of two designs. The only stamping was for the greeting which was popped up over a piece of glitter paper. There were extra cutouts of houses to layer on the card front, plus some evergreen trees. For a special bonus, there was a bottle of glitter glue to apply along the roof lines of the houses and on the windows. The scenes are really beautiful and easy to put together. If you hate using dimensionals and peeling off those little backing papers, this kit might not be for you! There are a lot of “popped up” things on these cards! There is also a nice sentiment to stamp inside the cards.

Here is one card design. The houses are the layer that you add with dimensionals, which are provided in the kit. Then you add the trees popped up as well, plus the greeting at the top.

Paper Pumpkin Oct 2023 Cards1

Here is the second card design. This one has two separate pieces to adhere with dimensional to create layers of the decorated houses. The greeting is placed at the bottom of the card. And then the extra-fun part of outlining the houses wit the glitter glue.

Paper Pumpkin Oct 2023 Cards2

Possibly Stampin’ Up! will find they have extra Paper Pumpkin Kits and will add them to the Online Store. If you would like one, just sign up for a Paper Pumpkin subscription first and then purchase your kit plus maybe the add-on Cards & Envelopes.

Click HERE to JOIN PAPER PUMPKIN!

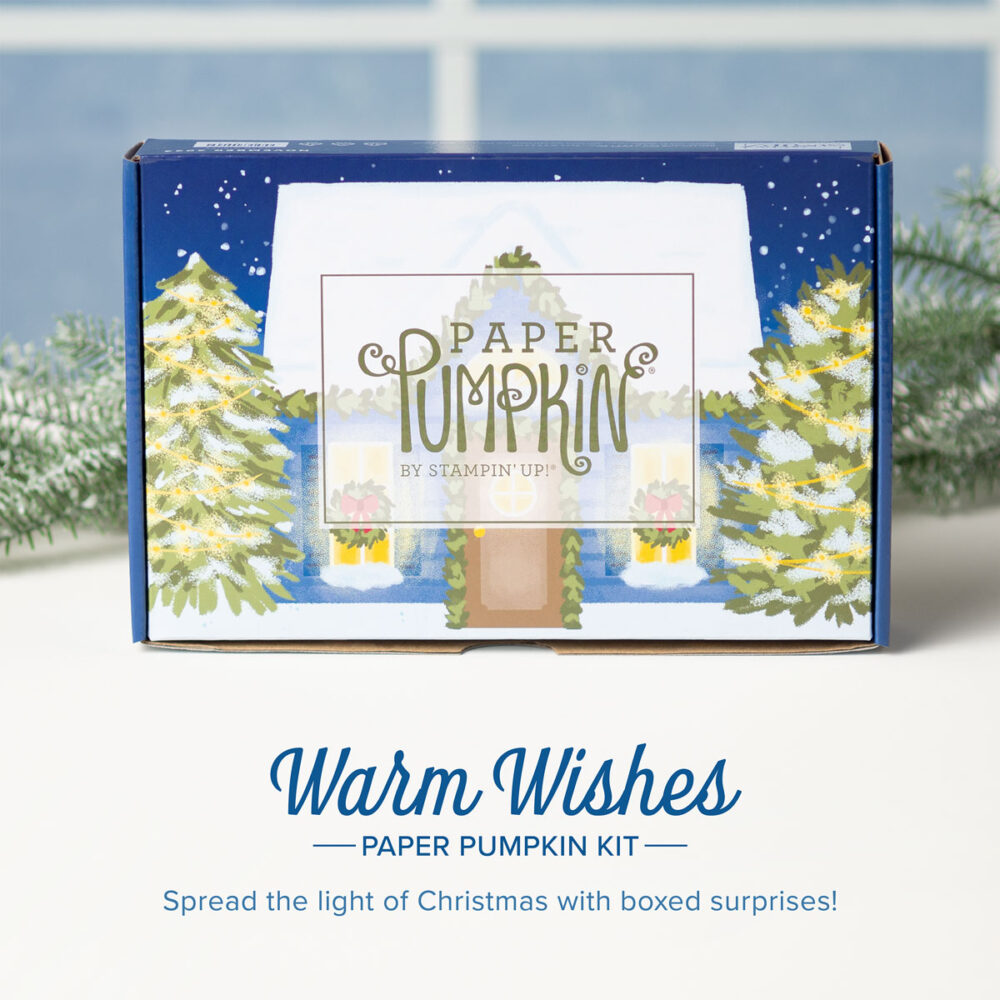
The November Paper Pumpkin Kit (sign up by November 10th to get this kit!) looks like it continues the same beautiful theme but this time you make small gift boxes for a little treat, gift or whatever you want to enclose.

Paper Pumpkin November 2023 Sq Ad2

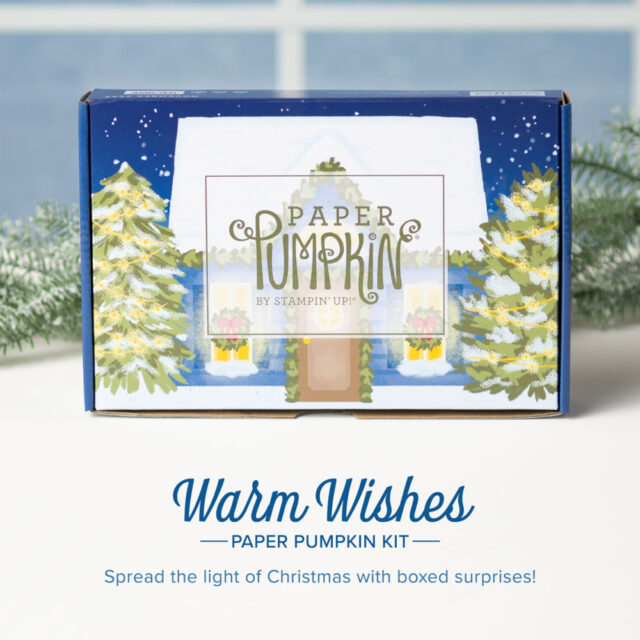
This next Paper Pumpkin kit, for November 2023, is called Warm Wishes and comes in a decorative box very similar to the October kit.

Here are the details of the Warm Wishes Paper Pumpin Kit:

-8 boxes; 4 each of 2 designs
-1 Mossy Meadow Stampin’ Spot
-Iridescent glitter accents on paper
-Precut paper pieces
-Linen thread
-Treat bags
-Warm Wishes photopolymer stamp set
-Completed box size: 4-1/4″ x 4-1/2″ x 1-1/2″ and 4/1/4″ x 3-3/4″ x 1-1/2″
-Coordinating Stampin’ Up! colors: Balmy Blue, Blueberry Bushel, Cherry Cobbler, Crushed Curry, Daffodil Delight, Lemon Lolly, Mossy Meadow, Night of Navy, Old Olive, Pecan Pie, Real Red

This kit even has an add-on of extra cards and decorated envelopes, the Warm Wishes Cards & Envelopes, which you can purchase only if you are a Paper Pumpkin subscriber. The card bases have iridescent glitter accents. All you have to do is add a stamped greeting if you want to keep it simple!

The week after the 20th of the month, after they try to process any credit cards that didn’t go through the first time around the 10th of the month if they have any extra kits or refills, they will post them in the Online Store. So if you have to have this easy Christmas card kit, sign up for Paper Pumpkin to get the November Kit (by November 10th), and then you can purchase any of the available Kits or Refills. Refills typically only contain the package of materials, not the stamp set or ink spot.

No risk, no obligation to continue your subscription for any certain length of time! Try it now and get in on at least one of the holiday kits to help with your Christmas wrapping! You can always skip a month if you want to or cancel. Just go into your account by the 10th of any month if you want to make any changes.

JOIN PAPER PUMPKIN!

Merry Bold & Bright Christmas Tree Card

Merry Bold & Bright Christmas Tree Card

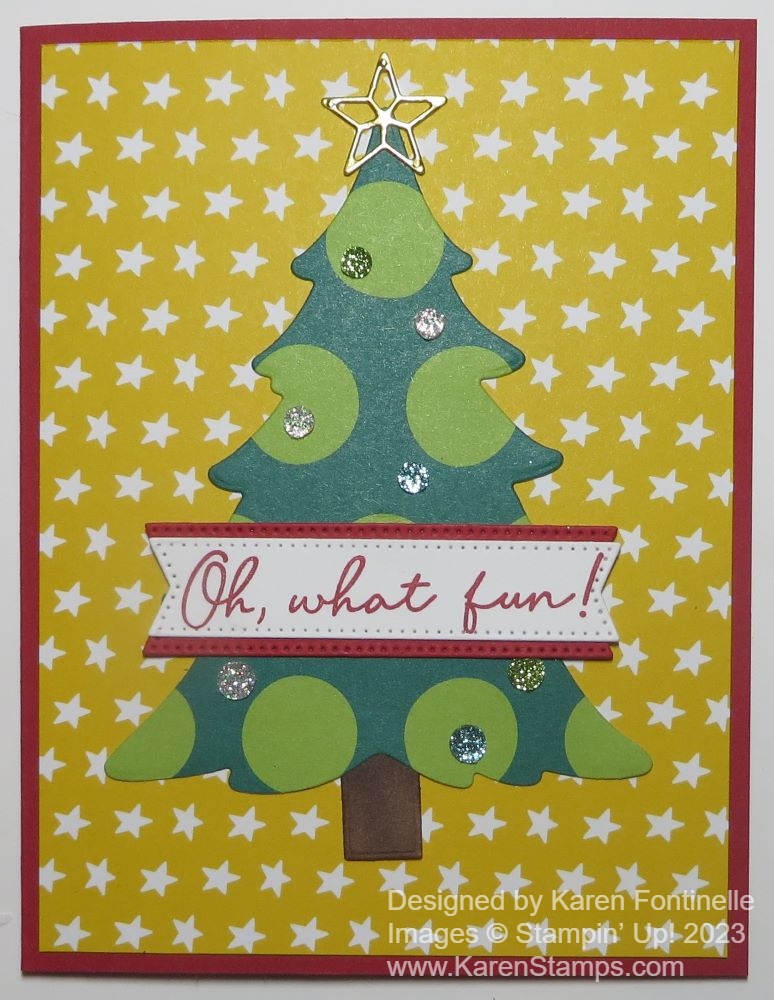
The other day when I was making a Christmas card for my 12 Weeks of Christmas email, I had planned to use this star pattern in Crushed Curry that you see on this Merry Bold & Bright Christmas Tree Card. You’ll find it in the Merry Bold & Bright Designer Series Paper. I was going to use it for the background of my card. But when I flipped it over to apply adhesive, I saw the colorful diagonal stripes and couldn’t resist. I applied the adhesive to the star pattern and used the striped side on my card. So this card makes up for not using the star pattern the other day! Also, this pattern could be used at any time during the year! Perfect for birthdays and other happy cards, kids or adults!

I could have used Crushed Curry for the card base, but I really wanted to use Real Red cardstock for the card. I planned to diecut a Christmas tree with the Merriest Trees Dies but then I spied this dotted paper in the Merry Bold & Bright Designer Series Paper. I diecut it to see how it would look and I liked it!

The greeting is in the Merry & Bright Stamp Set. I stamped it in Real Red ink on Basic White and diecut it with a banner shape in the Stylish Shapes Dies. Just to set it off a little bit, I also diecut a Real Red banner of the same size and cut it in half horizontally so I could adhere the halves to the top and bottom of the greeting.

To embellish the tree I die cut a star out of the Merriest Trees Dies and adhered it with tiny drops of Multipurpose Liquid Glue. You could use Adhesive Sheets before diecutting if you think of it! I also used the Adhesive-Backed Glitter Sequins to decorate the tree.

As I write this, the Merriest Trees Dies are unavailable but due back in stock the week of November 6th. The Glitter Sequins are also unavailable but due back in stock the week of November 13th. I love these Glitter Sequins but there are many other gems and jewels you probably have in your collection that you can use instead. I looked through my pile a couple of times before I decided. If there is an out-of-stock item you are waiting on, be sure to keep checking ahead of schedule (or ask me for any updates) because frequently products come back in stock early and sometimes even sell out again.

Here is another Christmas card I made using another pattern in the Merry Bold & Bright Designer Paper.

Maybe this card is a little less traditional for Christmas but I think I like it and maybe will make more for my holiday cards! I really do love this Merry Bold & Bright Designer Series Paper, probably mostly because I love Christmas lights so I love the Christmas lights on the designer paper!

SHOP STAMPIN’ UP! ONLINE HERE!

Halloween Ghost Wreath Card

Halloween Ghost Wreath

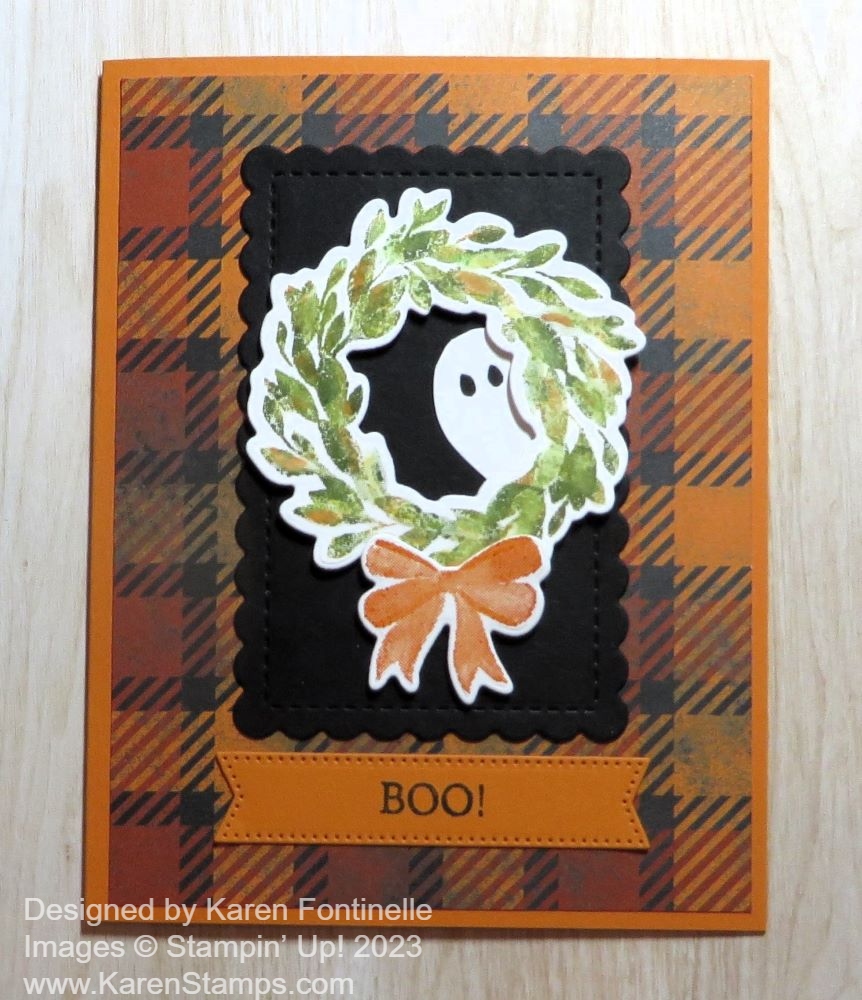
For this Halloween Ghost Wreath Card, I chose a stamp set you might already own that you can use for Halloween. It’s the Cottage Wreaths Stamp Set that can be used for many occasions. Along with the greetings in the stamp set and the extra stamps, you can use this stamp set for Thanksgiving, Halloween, and Christmas. Or make the wreaths generic and use them for any occasion year-round.

I used a Pumpkin Pie cardstock card base for this card to go with the plaid pattern in the Them Bones Designer Series Paper. Sometimes we overlook the generic patterns in a themed designer paper package that can be used in many other ways.

For the wreath, I colored on the entire wreath stamp using Stampin’ Write Markers (not Blends) to get the multicolored look. I used a couple of different greens, a yellow, and an orange. Start with the lightest color because the markers will overlap; that way, you won’t get other colors on your markers. If you do, just scribble on scrap paper to get back to the original color. This stamp set is one of the “Distinktive” stamp sets that Stampin’ Up! developed to add a special texture to the stamped image. That’s why it doesn’t look totally flat and solid as we are used to, it looks more shaded just by stamping, not just by coloring. I used one of the Country Wreath Dies to cut out the wreath and the stamped bow.

For a little background to help the wreath stand out, I cut out a scalloped rectangle of Basic Black using the Scalloped Contours Dies. This is glued down flat on the card and the wreath is popped up on Stampin’ Dimensionals. The greeting is in the same stamp set and is stamped on Pumpkin Pie, then die cut with a banner in the Stylish Shapes Dies. I originally planned to place it across the middle of the wreath but changed my mind.

To make the wreath perfect for Halloween on this card, I folded a small piece of Basic White cardstock in half and cut out half a heart shape like you did when you were a kid! You could use a small heart punch or die as well. Cutting it myself was quicker! Then I cut the heart shape in half and put eyes on the ghost. I placed the ghost inside the wreath, just peeking out a bit!

Sometimes you make a card and you’re especially happy with it even if you didn’t have a great plan starting out! This card is one of those! I really like the colors of the paper and how the wreath turned out, and of course, especially the peeking ghost!

There are less than two weeks to make and send or give Halloween cards and treats so we have to get busy! Hope this idea helps!

SHOP STAMPIN’ UP! ONLINE HERE!

Paper Pumpkin and the Annular Eclipse 2023

Eclipse 2023 Paper Pumpkin Box

Yesterday was an exciting morning in Texas and many other places and surprisingly, Paper Pumpkin helped us see the Eclipse 2023. We had beautiful, perfect weather (after a long, very hot summer!) with clear blue skies. If you had rain or clouds you probably didn’t get to see it.

This was an annular eclipse where the moon blocks the view of the sun from the earth. In a total eclipse, the moon entirely blocks the sun. In this annular eclipse the moon is farther away from the earth so it appears smaller and when it blocks the sun, it doesn’t completely cover the sun which leaves a “ring of fire” around the edge. We didn’t see that here in Houston, but we had about 85% coverage. We could have driven a few hours farther southwest and had better coverage.

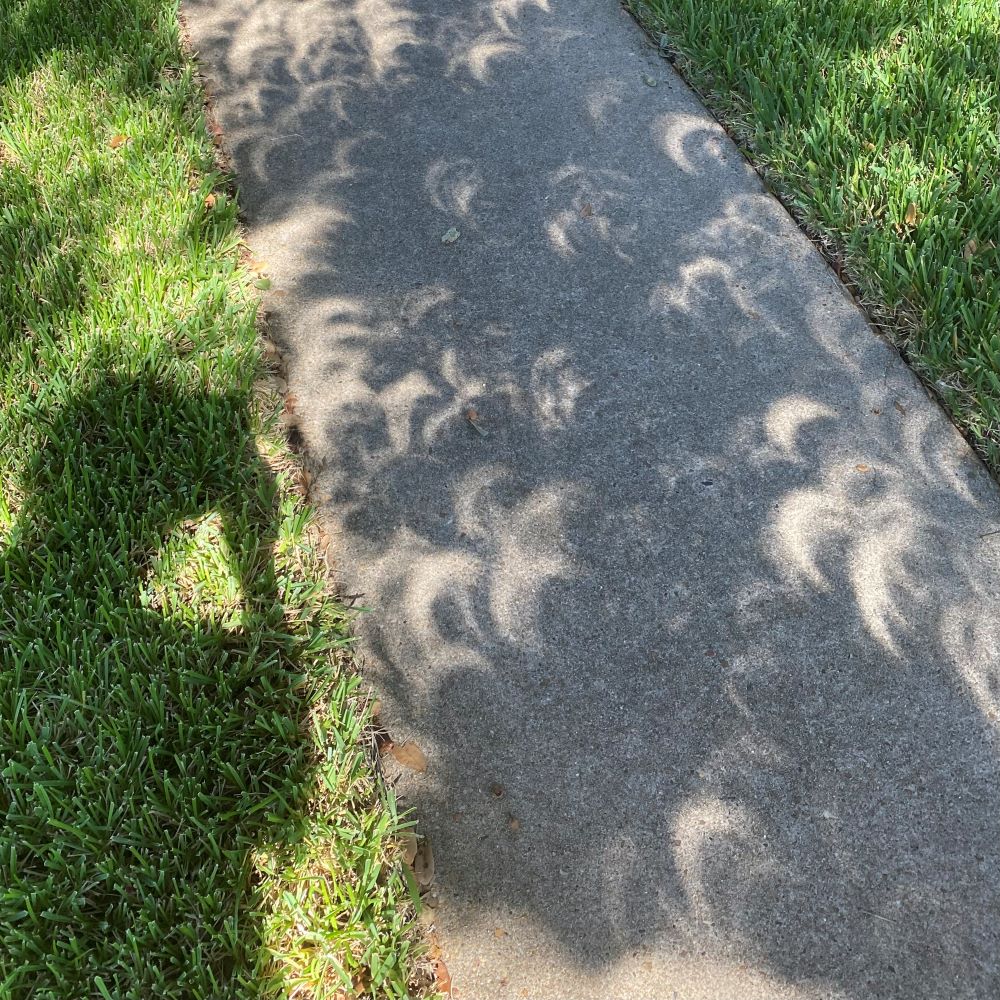
Of course we all know you shouldn’t look directly at the sun during an eclipse. We didn’t have the special glasses so we had to use other methods to see the eclipse. First of all, the easiest thing is to look at the sidewalk at the shadows of the leaves from the trees. You can very clearly see the shape of the eclipse.

Eclipse 2023 sidewalk

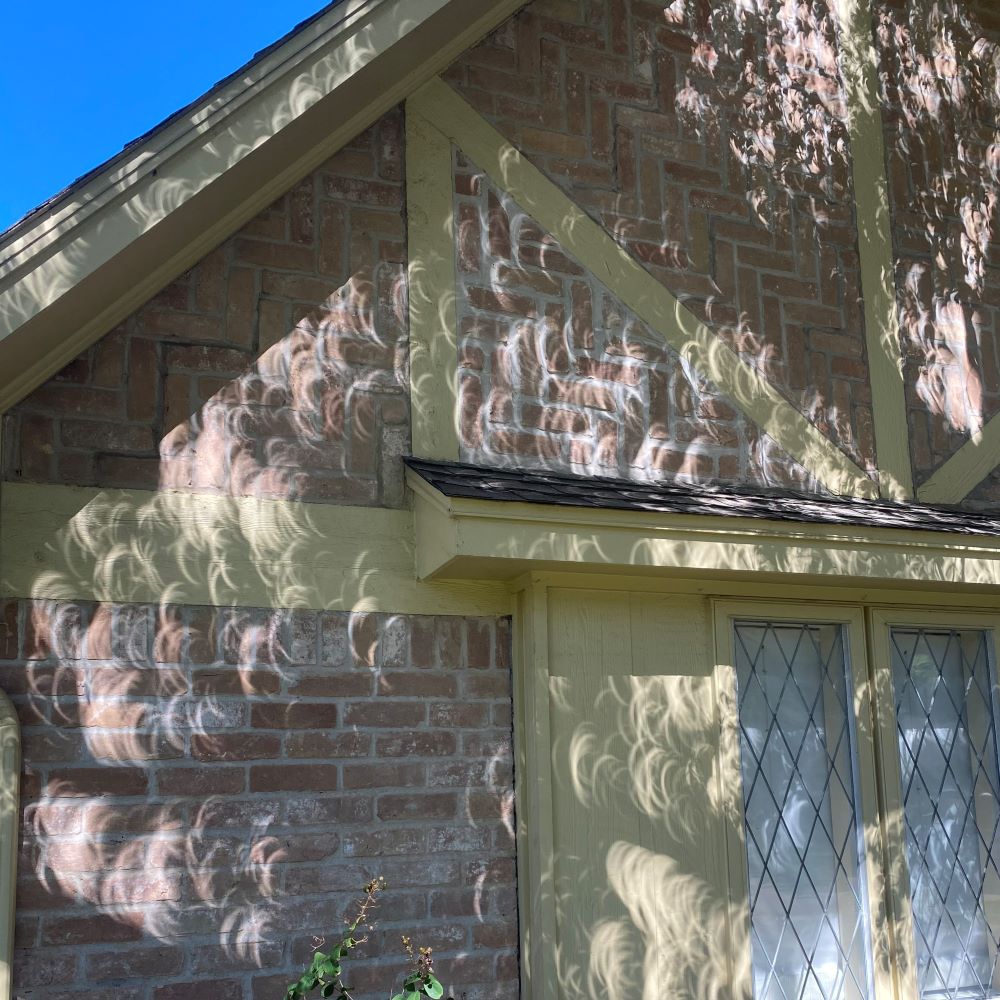
As time went on there were more and more shadow, in the street, up to our front porch, everywhere! Probably our favorite one was the shadows on the front of the house and the roof.

Eclipse 2023 House

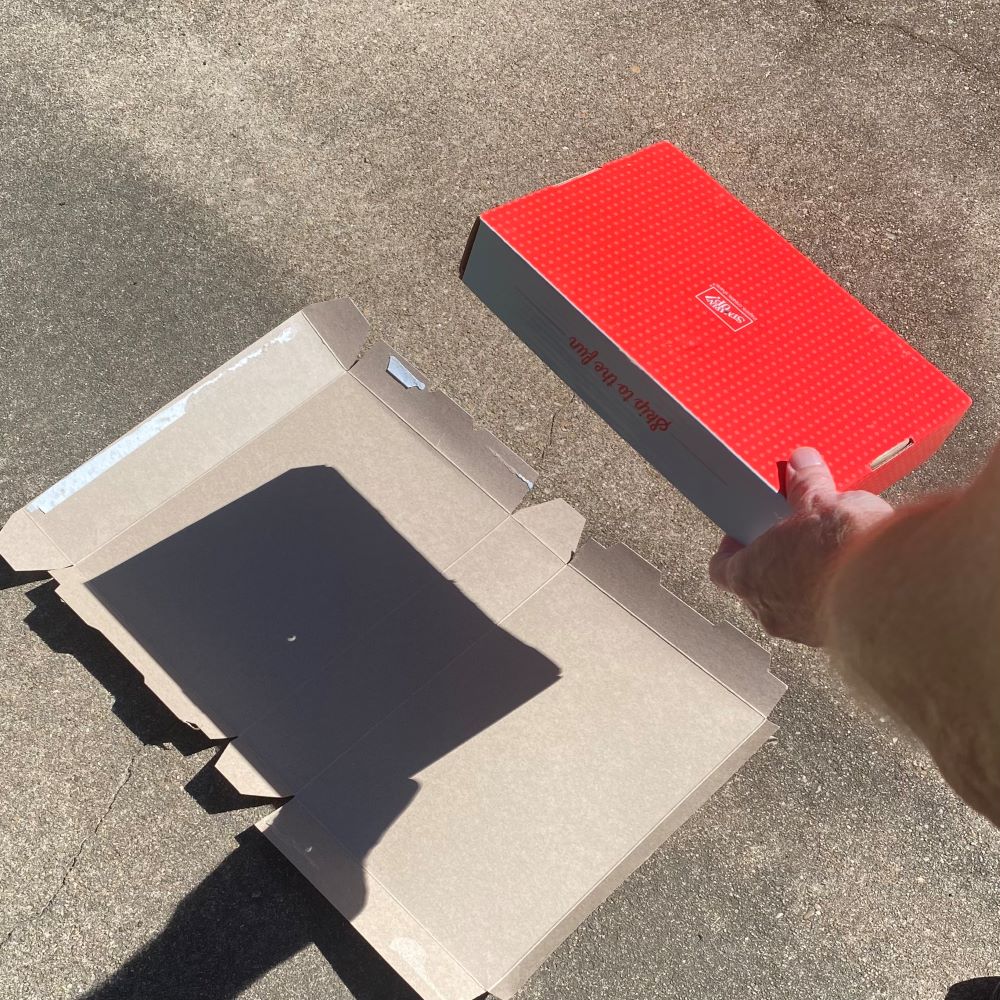
Then my husband was playing around out on the patio in the backyard. I had been working on finishing up some old Paper Pumpkin kits so I had some empty boxes on the dryer inside the box door ready to go out in the recycle bin. My husband grabbed one and did the old pinhole trick of punched a small hole in the box and focusing it on a box on the ground. I realized he was using a Paper Pumpkin box so I got the idea to post it on my blog!

Eclipse 2023 Paper Pumpkin Box

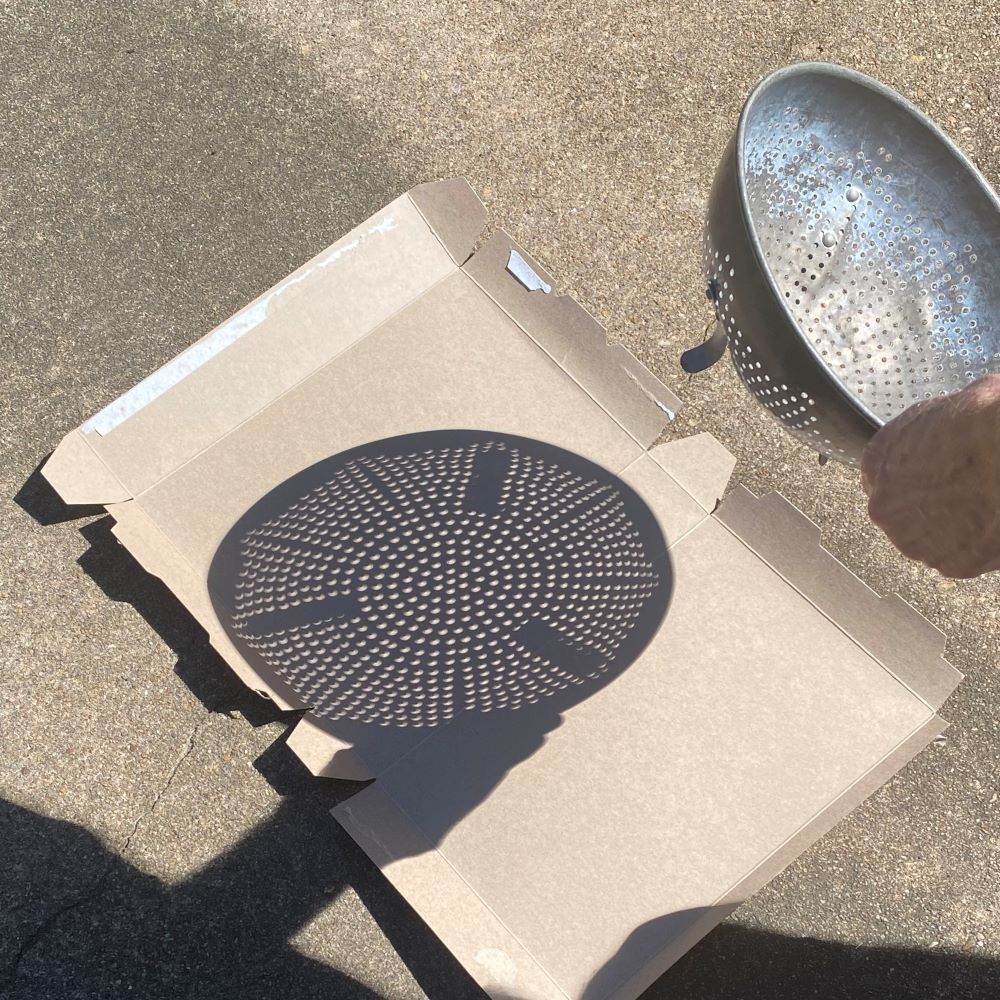
Then he also brought out my mother’s old colander that I still use and that made a fantastic artistic pattern!

Eclipse 2023 Colander

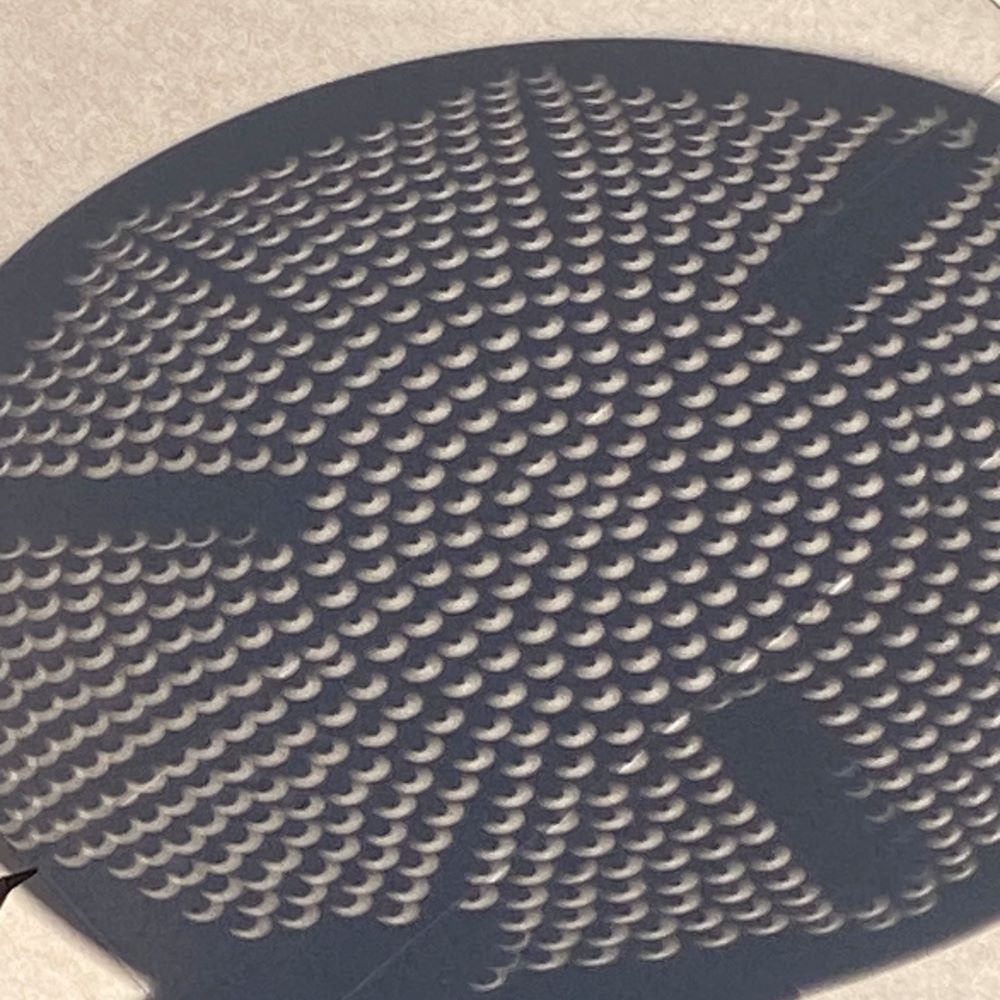
I think this is really cool! Of course, the photo isn’t as sharp as it was seeing it in person but you get the idea!

Eclipse 2023 Colander Art

That was our exciting morning of tracking the eclipse from around 10:30 am to the maximum eclipse around noon, and then ending around 1:30 pm. Besides viewing the eclipse, it was fun to see other neighbors outside and get to chat with them! Usually we are inside our airconditioned houses, but as I said the weather yesterday was perfect for being outside!

So next time there is an eclipse, grab an empty Paper Pumpkin box and let it help you see the shapes of the eclipse without endangering your eyes!

Get your Paper Pumpkin box HERE with a fun papercrafting project inside. All the materials you need are included except scissors. No risk, no obligation! Try it out for at least one month and see if you enjoy it! It’s fun to get a Paper Pumpkin Kit in your mailbox once a month!

Here is the November Paper Pumpkin Kit! Make treat boxes for the holidays! Or use the materials to design your own projects! Sign up by November 10th!

Paper Pumpkin November 2023 Sq Ad2

Heartfelt Hexagon For You Card

Hearfelt Hexagon For You Card

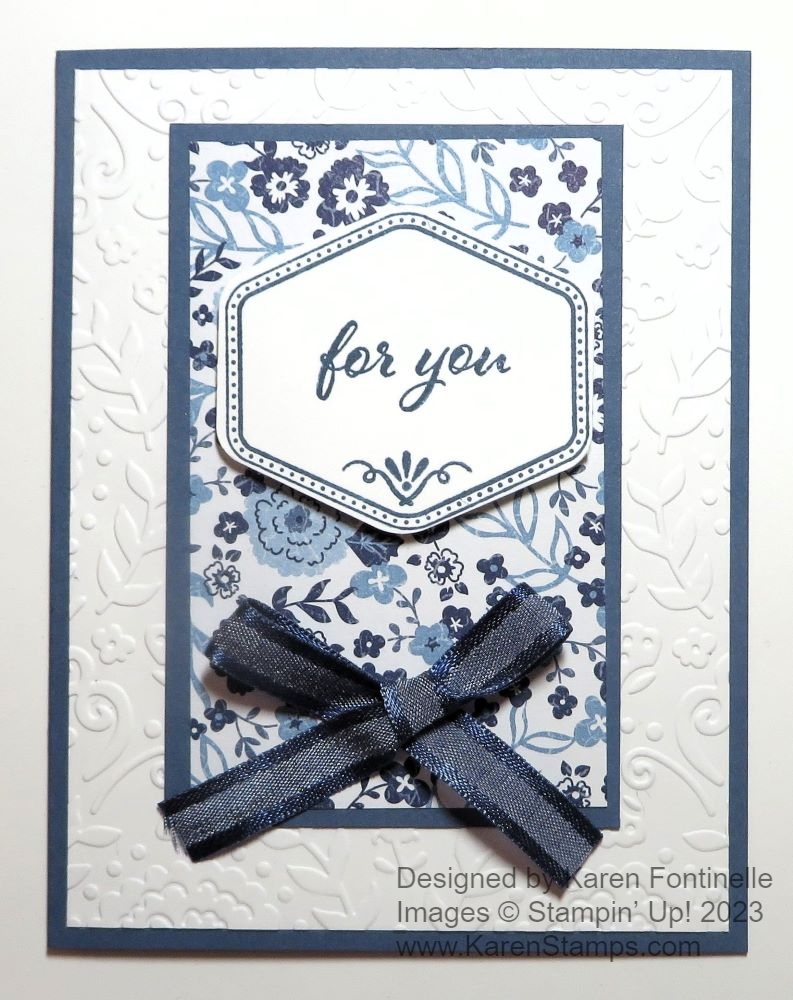
The idea for this Heartfelt Hexagon For You Card came from copying my own card from a while back! I was looking through my stash of cards and found this one I’d made before and thought I’d just copy it using a new punch!

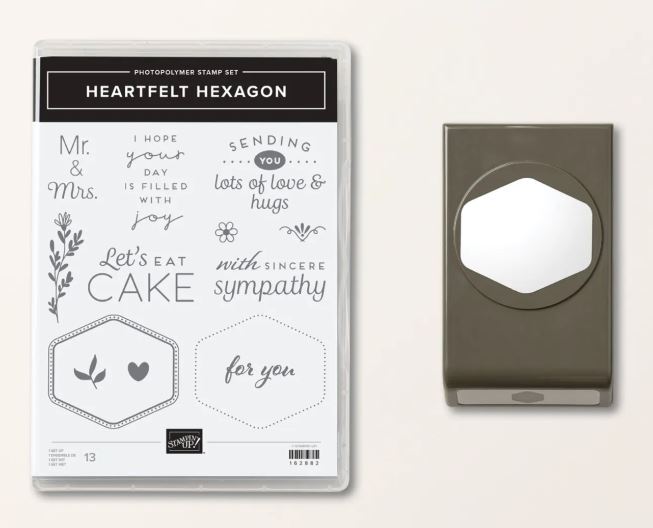
The punch came from the fairly new Bundle, the Heartfelt Hexagon Bundle.

Heartfelt Hexagon Bundle

Stampin’ Up! released this Bundle ahead of World Card Making Day last weekend. It was one of the sets they used during the virtual event to make a card. My order didn’t come in time for that so this is the first time I’ve played with the stamp set and punch.

It looks like a great stamp set to use with a punch you can use a lot! The punch can be used without the stamp set in many ways. You can punch out other images, words, or just paper shapes. Choose from a simple dotted border or one with a little more fancier border. Here is my first tip – when stamping the simple dotted border, just use a light touch. Stamp it and get out! Don’t keep pressing on the stamp because you will automatically wobble it and the dots will be blurry! When I looked closely at my stamped image the first time I realized my little dots were not perfectly shaped anymore. Then I remember hearing another Demonstrator give that tip…or maybe it was on the virtual event.

The next tip is to be cautious when you pull the hexagon outline off the case or off the stamping block. You don’t want it to get out of shape. If it does, you can lay it stamping image down on the table, let it settle for a moment, and then place the block on it to pick it up. That way it will be in its natural shape. My stamp really played games with my eyes or my brain! If I laid it down on the table not in the same position as the punch, it looked all wonky to me and I thought I’d stretched it completely out of shape. It was the weirdest thing! All I had to do was turn it a bit and it was correct!

The card base is Midnight Muse with a layer of Basic White. I embossed the Basic White with the Countryside Blossoms Embossing Folder. Most of the design doesn’t show but I like the little leaves along the side plus just a peak at the rest of the folder’s design.

The center layer is Midnight Muse measuring 2 3/4″ x 4 1/4″ I used the Countryside Inn Designer Series Paper for the layer. It measures 2 1/2″ x 4″. All of that is adhered flat on the card.

I stamped the fancier border on Basic White with Misty Moonlight ink and punched it with the Heartfelt Hexagon Punch. It is stamped with a greeting in the same stamp set along with the little design. Just that little design adds so much, I think! I popped up the hexagon with Stampin’ Dimensionals.

For a finishing touch, I tied a bow with the Night of Navy 3/8″ Bordered Ribbon and adhered it on the card with Mini Glue Dots. If I made the same card again, I might move the ribbon up to the bottom of the hexagon, but it’s okay as is. This is really a pretty basic card without frills but still looks nice. You could add some jewels or gems or sequins if you wanted to. Certainly you can change the greeting for other occasions.

Just search for Heartfelt Hexagon Bundle or the Item number 162889 and it will come up. Or just search for hexagon. I think it is just listed under Products, no special category. This is a Bundle that I think you want. The stamp set is versatile and useful and so is the punch so you will get a lot of use out of both!

SHOP STAMPIN’ UP! HERE!