Tag Archives: Bright & Beautiful Designer Series Paper

Bright & Beautiful Gate Fold Birthday Card

Bright & Beautiful Gatefold Birthday Card

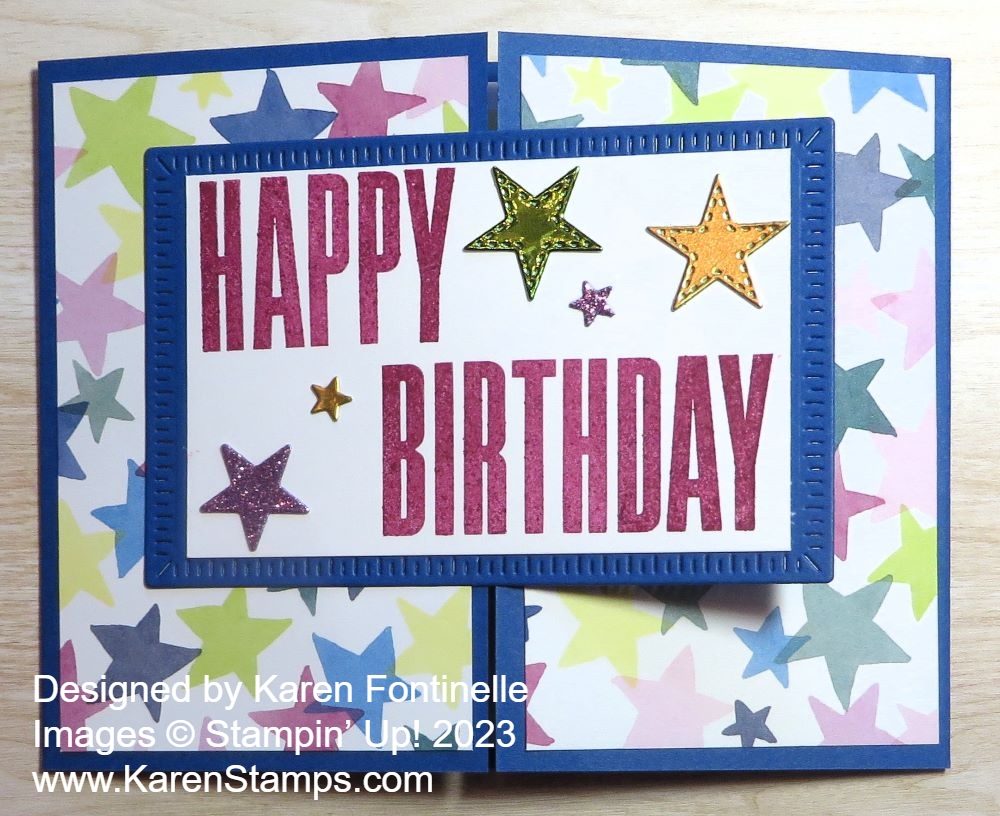
It has been a while since I have thought of using this Bright & Beautiful 6″ x 6″ Designer Series Paper! But when I got the idea of this Bright & Beautiful Gate Fold Birthday Card I was so happy to get this paper back out and pick which papers I wanted to use on this card! We get so caught up in the newest products that we sometimes forget what we already have!

This birthday card is easy and can be for many other occasions with just a change of greeting and maybe colors or papers. To make this gatefold card, start with a card base of 11″ x 4″. Cut a sheet of cardstock lengthwise instead of horizontally the way we usually do it. I used Blueberry Bushel for this card.

Score the card at 2 3/4″ from each end. Or you can score at 2 3/4″ and then 8 1/4″. Crease and fold the score lines, making sure the flaps meet evenly in the center.

To decorate, cut two panels of designer paper for the front that are 2 1/2″ x 4″. Adhere to each of the two front panels. Or you can stamp on the panels.

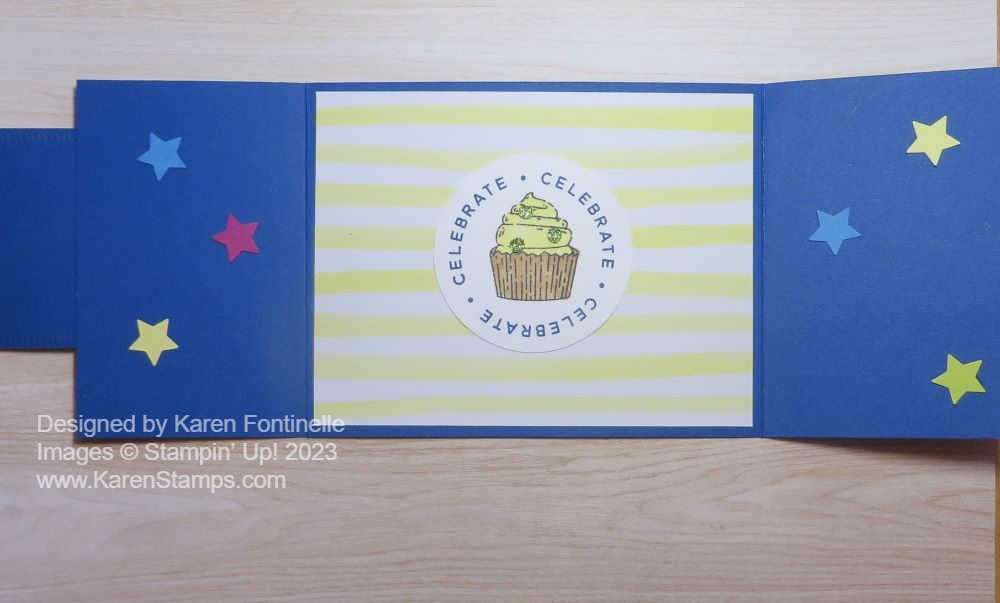
On the inside, you could just put a Basic White layer of cardstock to stamp or write a greeting or message, but I decided to use another pattern in the same designer paper that has yellow stripes. I also stamped the circle greeting and cupcake in the Circle Sayings Bundle. I colored in the cupcake with Stampin’ Blends and stamped “Celebrate” in Blueberry Bushel ink and then punched it out with the circle punch. On the cupcake, I added some Adhesive-Backed Glitter Sequins in Old Olive. I also added some punched stars to the inside after I finally found my little retired star punch!

On the front of the card, I die-cut a Blueberry Bushel rectangle with the Radiating Stitches Die. For the center, I just measured and cut out a rectangle to fit inside out of Basic White cardstock with my Paper Trimmer. The birthday greeting is from the Biggest Wish Stamp Set and is stamped in Berry Burst ink.

To go along with the star paper, I dug out some retired dies, So Many Stars to diecut some interesting stars to use on this card. There is also a star die in the Merriest Trees Dies that I used. Use whatever you have!

When you adhere this greeting piece to the front of the gatefold card, find the midpoint and make sure you only apply adhesive to the side that attaches to the left side of the card. It, of course, does not get glued down all the way across so make sure you don’t have any glue in the wrong place that is going to make something else sticky!

This is the kind of easy card that you can change up in different ways and make something that looks completely new!

SHOP STAMPIN’ UP! ONLINE HERE!

Bright & Beautiful Just For You Card

Bright & Beautiful Just For You Card

This Bright & Beautiful Just For You Card is just kind of a simple one, but jazzed up with the colorful designer paper! And a few sequins!

The Bright & Beautiful 6″ x 6″ Designer Series Paper is one that you want for making lots of fun and happy cards! It has festive patterns like confetti, stars, squiggly lines, stripes, and circles, but it also has ombre patterns and washes for softer colors. I chose this colorful pattern on the designer paper with all the different colors of these little diagonal markings. I cut it 5 1/2″, the length of the card, instead of 5 1/4″ and 3 3/4″ wide, just for something different with a little bit of margins on both sides to see the Azure Afternoon color. Looking through the scraps, I decided to cut a strip of designer paper in Azure Afternoon just to go across the middle of the card. Before adhering the designer paper to the card base, I wrapped around a piece of the Petal Pink ribbon in the Ribbon Duo Pack.

I used one of the new colors in the Stampin’ Up! Color Refresh, Azure Afternoon, for the card base after I had chosen which designer paper pattern I liked. So many colors to choose from! You’ll find the Azure Afternoon Cardstock in the Brights Family.

For the greeting, I decided to use designer paper for the tag, so I chose a Lemon Lime Twist colored paper on which I stamped the greeting in Azure Afternoon from the Sentimental Park Stamp Set. Then I diecut it with one of the tag dies in the Something Fancy Dies. I thought it needed to stand out a bit more so I die-cut a larger tag in Bubble Bath Cardstock. The greeting tag is popped up with Stampin’ Dimensionals. The bow on the tag is the Lemon Lime ribbon in the Ribbon Duo Combo Pack.

I almost always need some sparkle and pizzazz, so I added some of the Pastel Adhesive-Backed Sequins to the tag and to the card front. I’ve been using these quite often because the colors and sparkle are good!

Don’t forget, the Designer Series Paper Sale has begun at Stampin’ Up! and runs through the whole month of June! This Bright & Beautiful Designer Series Paper is one of the select papers on sale, discounted by 15%. If you already own it, maybe you need more! Check your stash!

SHOP STAMPIN’ UP! ONLINE HERE!

Bright & Beautiful Just For You Card closeup

Bright & Beautiful Circle Sayings Birthday Card

Bright & Beautiful Circle Sayings Birthday Card

Here’s a quick and easy birthday card to make, the Bright & Beautiful Circle Sayings Birthday Card. I just chose a soft, ombre designer paper for the card layer and added one of the Circle Sayings.

The card base is one of the new colors, Bubble Bath. The designer paper is the Bright & Beautiful 6″ x 6″ Designer Series Paper. This pack of paper has all kinds of colors and patterns that will make lovely and bright & happy cards and projects for you. This particular pattern I chose has ombre shades of Bubble Bath. You almost can’t tell it very well in the photo. It’s like a dip-dye where each dip gets lighter and lighter at the top and darker at the bottom.

For the greeting, I used the Circle Sayings Stamp Set and the 2 3/8″ Circle Punch. You can purchase both together in the Circle Sayings Bundle and save 10%. I simply stamped the circular greeting in Bubble Bath ink on Basic White cardstock and then the cupcake in the center also in Bubble Bath. At first I wished the circle punch was a bit smaller so I could make a layer with the 2 3/8″ Punch, but the 2″ Circle Punch seemed a bit too small. I think it turned out okay the way it is.

To jazz it up a bit, I put some ribbon, back and forth behind the circle. This is the White 3/8″ Glittered Organdy Ribbon, which is still available in the Online Exclusives. Just put “organdy ribbon” in the Search box and it will come up. It is soft enough to go along with the soft colors of the card, but you can see the bits of glitter embedded in the ribbon for a little sparkle. As I got out some Iridescent Rhinestone Basic Jewels, I decided to color one with the Dark Bubble Bath Stampin’ Blend Marker and put it on top of the cupcake! I was going to put more rhinestones on the card but changed my mind to the Pastel Adhesive-Backed Sequins. I just chose three of them and placed them on the card. It adds a little bling but not too much.

This Bright & Beautiful Designer Paper will be on the Designer Series Paper Sale on June 1st at 15% off, so put it on your list if you don’t own it already!

Shop Stampin’ Up! Online!