Tag Archives: Joy of Christmas Designer Series Paper

Easy Joy of Christmas Card

Easy Joy of Christmas Card

I love this patterned paper with poinsettias, evergreen foliage, pinecones, and berries so I thought I would just make an easy card. This Easy Joy of Christmas Card is made with the Joy of Christmas Designer Series Paper (retired). It didn’t photograph very well in trying to get the embossed greeting to show up, too, but it’s a classic Christmas paper to use.

The card base is Old Olive and I added a layer of Real Red because I love Real Red and it looks good with the red on the paper. Before adhering the designer paper to the card, I added a strip of the Real Red & Gold 3/8″ Dotted Ribbon down the side of the card and tied on a knot.

For the greeting, I stamped one from the Brightest Glow Stamp Set in Versamark, then embossed it in Gold with a Heat Tool on Real Red cardstock.

Just some designer paper on a card with some ribbon and a greeting is all you need!

Joy of Christmas Noel Christmas Card

Joy of Christmas Noel Christmas Card

While I had this paper out making another project, two of the papers just looked so good together in the package that I had to make this Joy of Christmas Noel Christmas Card while I had the inspiration! In the package of the Joy of Christmas Designer Series Paper, a large piece of green checked paper was behind a narrow piece of the paper with the holly leaves and berries and I loved the way the two looked together. Of course, making a card, everything had to be on a smaller scale. And then I changed it up a bit with the gold accent!

The card base is Real Red. You could choose a Cherry Cobbler or a green, but I love the brightness of Real Red for Christmas most of the time. I didn’t add a full layer of the green plaid paper but just cut small strips so as not to waste any that wouldn’t show on the card. After all, I still have Christmas cards to make and I might want more of this paper! The green plaid strips are 5 1/4″ x 3/4″. The holly and berries paper is 5 1/4″ x 3 1/2″. While deciding on a greeting and if I wanted a gold layer behind it, I decided to use narrow strips of the More Dazzle 6″ x 6″ Specialty Paper. They are only 1/4″ wide and 5 1/4″ long. I just adhered them to each side of the holly paper

The greeting is in the Joy of Noel Stamp Set. It is stamped in Real Red on Basic White and then diecut with a stitched circle in the Stylish Shapes Dies. (Do I say I used those dies almost every day??) I popped up that greeting with Stampin’ Dimensionals. I thought it still needed “something” and I finally decided to adhere a couple of holly leaves and a red berry from the Loose Holly Gems & Sequins. These are really pretty on my card although you have to be careful to adhere them with a tiny amount of Multipurpose Liquid Glue or Mini Glue Dots.

This is a relatively easy Christmas card to make and a good way to use up some small pieces and scraps of paper. I love this Joy of Christmas Designer Paper!

The Joy of Christmas Suite products will be retiring with the end of the Holiday Mini, if not before. You’ll be seeing the products in the Online Store marked “Retiring Soon”. If you want any of these I would order them before the Last Chance Sale begins next week. I don’t think too many products are discounted. Hard to think of the Last Chance List when we are still buying holiday products to use! But get them while you can!

SHOP STAMPIN’ UP!

Country Wreath Christmas Card

Country Wreath Christmas Card

If you want a pretty easy Christmas card idea, I recently made this Country Wreath Christmas Card with an up-and-coming young stamper! The beautiful designer paper in the background makes it, I think!

The card base is Real Red and has a top fold, so if you want that, cut the cardstock at 4 1/4″ x 11″. Score at 5 1/2″. Or you can make it a sidefold card as we most often do. The paper is in the Joy of Christmas Designer Series Paper in the Holiday Mini Catalog. I think it is a beautiful pattern with the holly and other leaves and red berries! It is cut at 4″ x 5 1/4″.

The wreath in the Country Wreaths Stamp Set is stamped in Old Olive ink and the bow in Real Red ink. These stamps have the Distinktive texture that Stampin’ Up! designed for some of their stamps. If I were going it over I would stamp and diecut the bow and adhere it to the stamped wreath. If you wanted another upgrade to your card you could also stamp and diecut the wreath. But if you were making a lot of cards just stamping is a lot quicker and easier!

After stamping the wreath, you can cut the Basic White cardstock with the Paper Trimmer or diecut it with any of the stitched shapes. Then layer on a piece of Real Red. The greeting is stamped from the same Country Wreaths Stamp Set. It’s a great stamp set that we have had for at least a year I think, that covers several seasons.

You can stamp red berries from the stamp set on the wreath, but it’s more fun to add some red rhinestones or other red gems! If you don’t have any, use the Stampin’ Blends markers to color the Iridescent Rhinestone Jewels, for example, before putting them on the card. Just color on the sheet they are adhered to, let the ink dry for a second, and you are good to go with whatever color gems you want. I used Stampin’ Dimensionals to pop up the wreath on the card front.

On the inside of the card, add a layer of Basic White to stamp or write your personal greeting. You may want to add a strip of the same or coordinating designer series paper to add some interest inside!

Joy of Noel Foliage Christmas Card

Joy of Noel Foliage Christmas Card

The way this Joy of Noel Foliage Christmas Card turned out was a surprise to me! I really wasn’t sure what kind of card I was going to make but it wasn’t this one! I was reminded of this red and black plaid paper in the Joy of Christmas Designer Series Paper and after that I knew I had to use it!

First I stamped the image of the holly leaves and berries in Memento Ink and then had some fun with my Stampin’ Blends coloring them in. I hadn’t done any coloring in a little while. I used the Old Olive Combo, Granny Apple Green Combo, Mossy Meadow Combo, and the Real Red Combo for the berries. I used the die in the Joy of Noel Dies to cut out this piece.

The card base is Garden Green. One of the main things that interested me in this Joy of Noel Bundle was the stamp for “NOEL” and the die that would cut out the letters individually. I stamped the letters in Real Red and then diecut them. With the white border around the letters, I thought they showed up fine against the red plaid so I didn’t have to layer them on anything.

I also diecut some other foliage pieces to slip underneath my holly leaves piece. The holly leaves are popped up on Dimensionals and everything else is glued down flat on the card. I resisted the urge to add some kind of jewels or sparkle but I did add a red bow to the base of the holly leaves bouquet. I used the Real Red Ribbon in the Combo Pack with the Burlap ribbon. You can use whatever ribbon you have. This one was good because it was narrower than some other Real Red ribbon I had.

Be sure to check out the entire Joy of Christmas Suite and choose all or some of it!

SHOP STAMPIN’ UP! HERE!

Joy of Christmas Merry & Bright Christmas Card

Joy of Christmas Merry & Bright Christmas Card

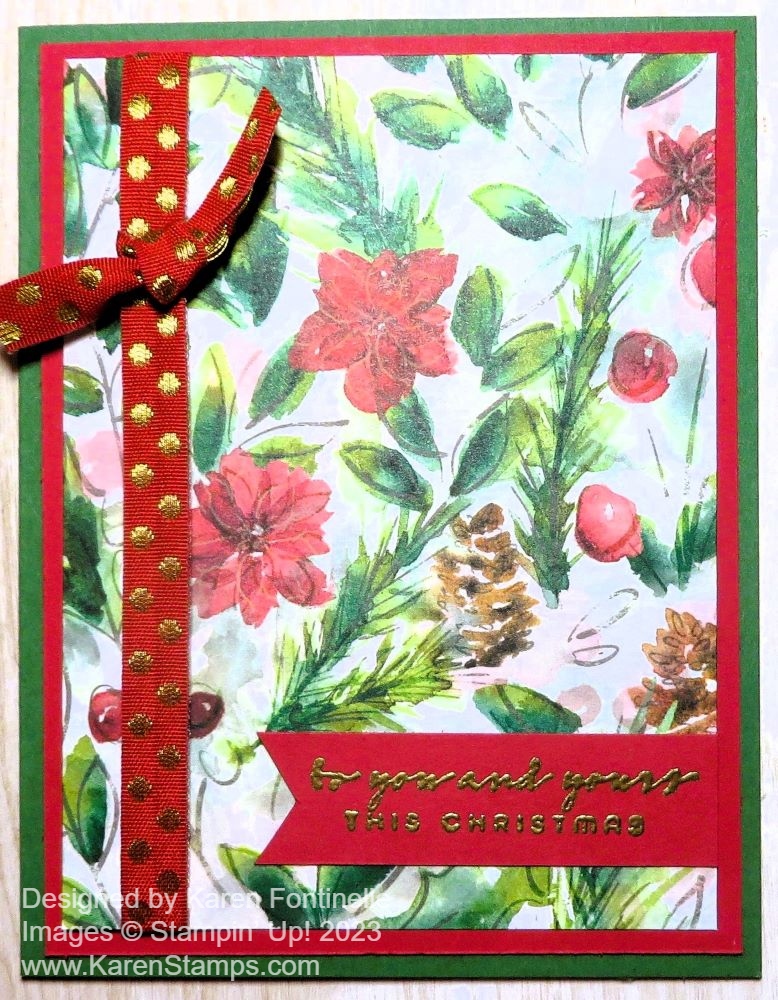
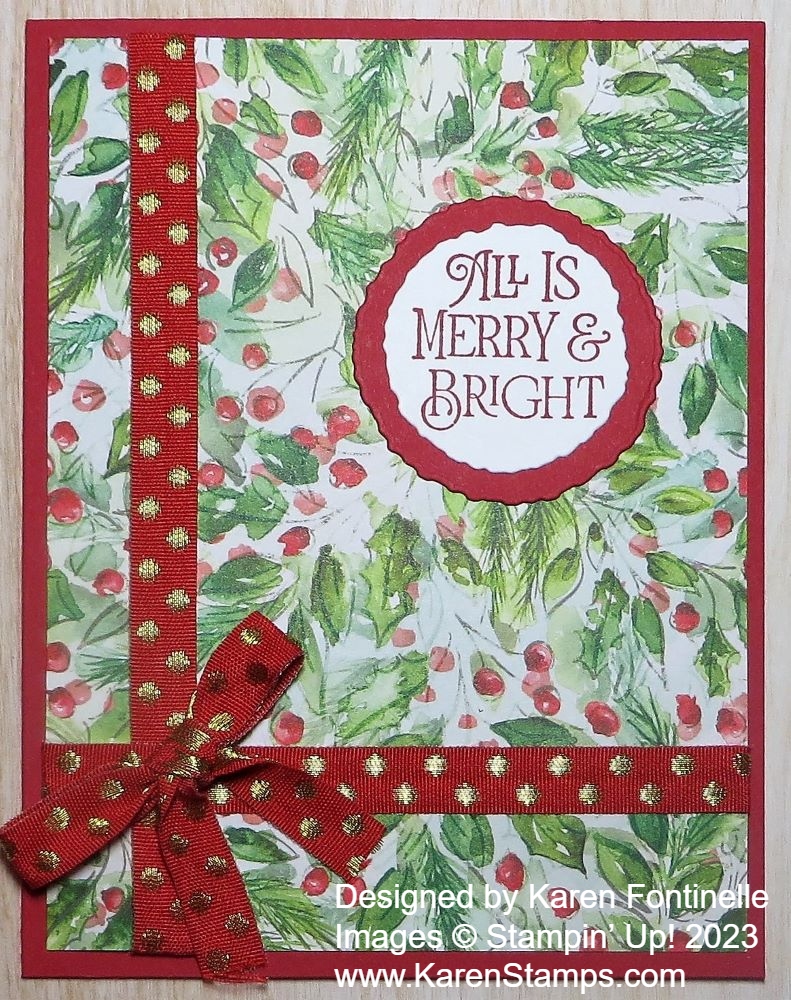
This Joy of Christmas Merry & Bright Christmas Card idea came to me and I followed through on it and made the card. Something about this designer paper made me think of wrapping paper, and I got the idea to make the card front look like a wrapped package for Christmas. It’s an easy card to create so it might be good if you are looking for ideas for making multiple Christmas cards to send.

The card base is Real Red cardstock. The layer is one of the patterns in the Joy of Christmas Designer Series Paper (161958). You’ll find it in the Stampin’ Up! Holiday Mini Catalog on page 29 in the Joy of Christmas Suite. This whole Suite is beautiful and you get two different stamp sets and two sets of dies plus the paper and embellishments. I only bought the paper and ribbon at this point, but we’ll see how long I can resist the rest!

The ribbon I used is one of the Online Exclusives that you will find in the online store. It is the Real Red & Gold 3/8″ Dotted Ribbon. It is a very nice ribbon, a little heavier and stiffer than some, but it worked fine on this card. Since I love red, I had to have it and I really like the gold dots on it for something different. I added two pieces of ribbon, one horizontal and one vertical. I even applied a little Stampin’ Seal to the back of the pieces so it would lay flat and stay in place. The bow is tied separately and adhered with a few Glue Dots. To make sure the bow stayed on, I even added a glue dot under each loop of the bow and under each tail. Since the ribbon is a little heavy, the glue dots don’t show at all.

The greeting is in the Brightest Glow Stamp Set (159542), which was carried over from last year’s Holiday Mini catalog. This is a great stamp set for holiday greetings. I stamped this sentiment in Real Red ink and die-cut it with the new Deckled Circles Dies. I also cut a larger Deckled Circle out of Real Red for the layer. You will be AMAZED to open this package of Deckled Circle Dies and see the size and the number of dies you get! They are in the Holiday Mini on page 63 in the upper right corner. It’s not a small picture but I think it’s not very noticeable. I didn’t notice it until I heard about “Deckled Circles” from other Demonstrators! Of course, with so many new beautiful products it’s hard to take it all in!

You could add a little bling to the greeting or on the card if you wanted, maybe some Iridescent Rhinestones or sequins, but I left this card as is. I’m pretty sure I will be making more of this card to send in December! Once you have the idea, it’s easy to make more cards assembly-line style. Get an early start!

Remember to spend your July Bonus Coupons if you have some. Check your email for the codes if you ordered $50 or more in one order in July. The codes expire August 31 and that is coming up soon!

The September-December 2023 Mini Catalog (the Holiday Mini) goes LIVE on Wednesday, September 6th! Make your Shopping List!