Tag Archives: Heartfelt Hexagon Stamp Set

Heartfelt Hexagon St. Patrick’s Day Card

Heartfelt Hexagon St. Patrick's Day Card

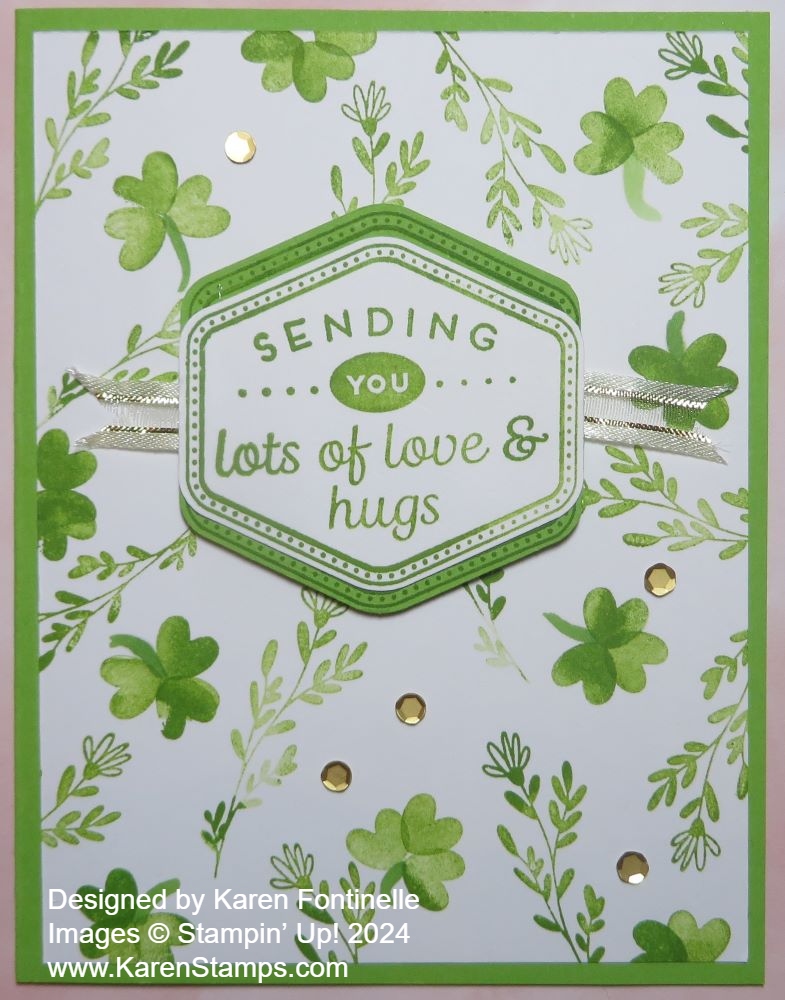
If you want to make a St. Patrick’s Day card for someone, this Heartfelt Hexagon St. Patrick’s Day Card shows you how to make one with what you have! I wanted to make a St. Patrick’s Day card but wasn’t quite sure what to use. I knew hearts made good shamrocks. One of the first stamp sets I came across was the Heartfelt Hexagon, and it had a little heart stamp in it! At that point, I decided to make my own designer series paper for the card!

The card base is Granny Apple Green cardstock. The “designer paper” layer is Basic White stamped randomly all over with hearts and pretty foliage! First I used the little hearts to stamp with Granny Apple Green ink all over the card, going in different directions. I left some spaces because I knew the greeting would cover up some space anyway. When you are doing random stamping like this, be sure you stamp off the edges and maybe the corners. You don’t usually need every image to be fully on the card. To make the shamrock after stamping the hearts, I just drew in a little stem with the Dark Granny Apple Green Stampin’ Blend Marker.

Then I took a chance and stamped the foliage sprig in the Heartfelt Hexagon Stamp Set as best I could fit it in between all the hearts. I think it’s because the foliage stamp is so delicate it fits in fine and adds more green for St. Patrick’s Day!

The greeting is stamped from the Heartfelt Hexagon Stamp Set. I stamped the border first on both Basic White and Granny Apple Green, and then the greeting in the center of the Basic White. I punched out both with the Heartfelt Hexagon Punch. If you don’t have this punch, just use whatever punch or die works for you. Or just cut out your own square or rectangle. I cut the Granny Apple Green hexagon piece in half horizontally to place under the top and bottom of the greeting piece to look like a layer to set it off a little from the rest of the card. After that was all layered, I popped up the greeting with Dimensionals.

After gluing everything down, I got the idea to use the Gold & Vanilla 3/8″ Satin Edged Ribbon underneath the greeting. Luckily the greeting was already popped up so I could slide a piece of ribbon underneath and flagged the ends. I was able to stick a Dimensional under each side to hold the ribbon down.

Since gold goes with St. Patrick’s Day, besides the ribbon, I also added some Pastel Adhesive-Backed Sequins in gold around the card.

Here’s another way to make a St. Patrick’s Day card with hearts from a little while back!

Happy St. Patrick’s Day March 17th!

Heartfelt Hexagon For You Card

Hearfelt Hexagon For You Card

The idea for this Heartfelt Hexagon For You Card came from copying my own card from a while back! I was looking through my stash of cards and found this one I’d made before and thought I’d just copy it using a new punch!

The punch came from the fairly new Bundle, the Heartfelt Hexagon Bundle.

Heartfelt Hexagon Bundle

Stampin’ Up! released this Bundle ahead of World Card Making Day last weekend. It was one of the sets they used during the virtual event to make a card. My order didn’t come in time for that so this is the first time I’ve played with the stamp set and punch.

It looks like a great stamp set to use with a punch you can use a lot! The punch can be used without the stamp set in many ways. You can punch out other images, words, or just paper shapes. Choose from a simple dotted border or one with a little more fancier border. Here is my first tip – when stamping the simple dotted border, just use a light touch. Stamp it and get out! Don’t keep pressing on the stamp because you will automatically wobble it and the dots will be blurry! When I looked closely at my stamped image the first time I realized my little dots were not perfectly shaped anymore. Then I remember hearing another Demonstrator give that tip…or maybe it was on the virtual event.

The next tip is to be cautious when you pull the hexagon outline off the case or off the stamping block. You don’t want it to get out of shape. If it does, you can lay it stamping image down on the table, let it settle for a moment, and then place the block on it to pick it up. That way it will be in its natural shape. My stamp really played games with my eyes or my brain! If I laid it down on the table not in the same position as the punch, it looked all wonky to me and I thought I’d stretched it completely out of shape. It was the weirdest thing! All I had to do was turn it a bit and it was correct!

The card base is Midnight Muse with a layer of Basic White. I embossed the Basic White with the Countryside Blossoms Embossing Folder. Most of the design doesn’t show but I like the little leaves along the side plus just a peak at the rest of the folder’s design.

The center layer is Midnight Muse measuring 2 3/4″ x 4 1/4″ I used the Countryside Inn Designer Series Paper for the layer. It measures 2 1/2″ x 4″. All of that is adhered flat on the card.

I stamped the fancier border on Basic White with Misty Moonlight ink and punched it with the Heartfelt Hexagon Punch. It is stamped with a greeting in the same stamp set along with the little design. Just that little design adds so much, I think! I popped up the hexagon with Stampin’ Dimensionals.

For a finishing touch, I tied a bow with the Night of Navy 3/8″ Bordered Ribbon and adhered it on the card with Mini Glue Dots. If I made the same card again, I might move the ribbon up to the bottom of the hexagon, but it’s okay as is. This is really a pretty basic card without frills but still looks nice. You could add some jewels or gems or sequins if you wanted to. Certainly you can change the greeting for other occasions.

Just search for Heartfelt Hexagon Bundle or the Item number 162889 and it will come up. Or just search for hexagon. I think it is just listed under Products, no special category. This is a Bundle that I think you want. The stamp set is versatile and useful and so is the punch so you will get a lot of use out of both!

SHOP STAMPIN’ UP! HERE!