Tag Archives: Merry Bold & Bright Designer Series Paper

Merry and Bright Light Bulb Christmas Card

Merry and Bright Light Bulb Christmas Card

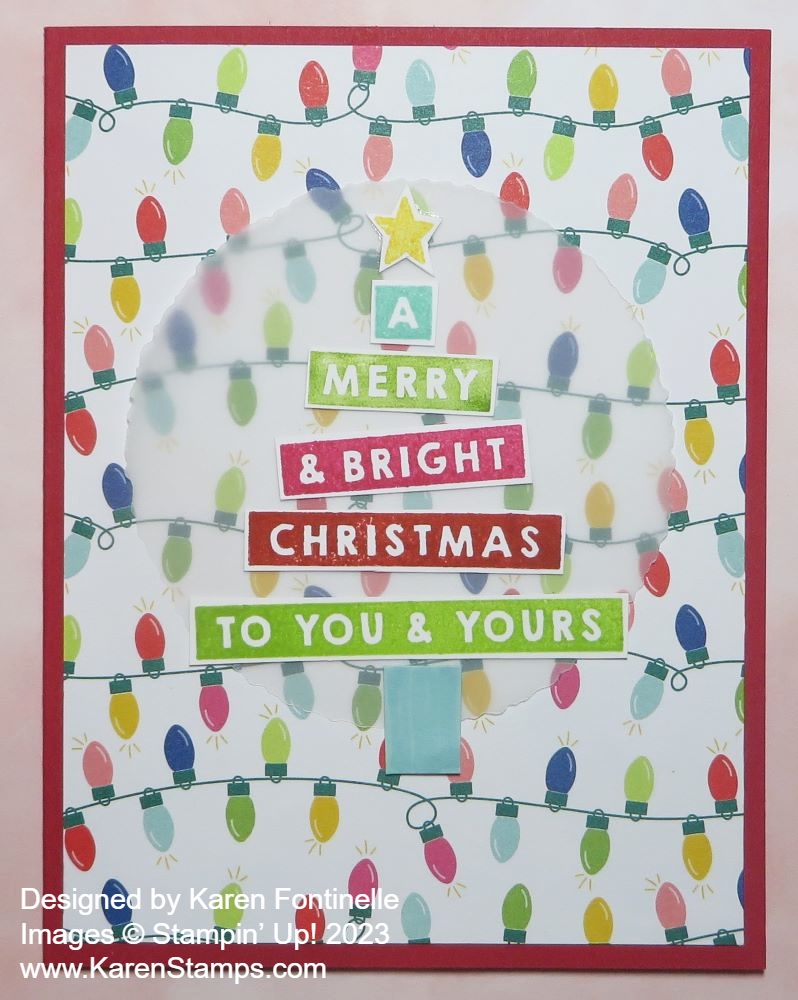
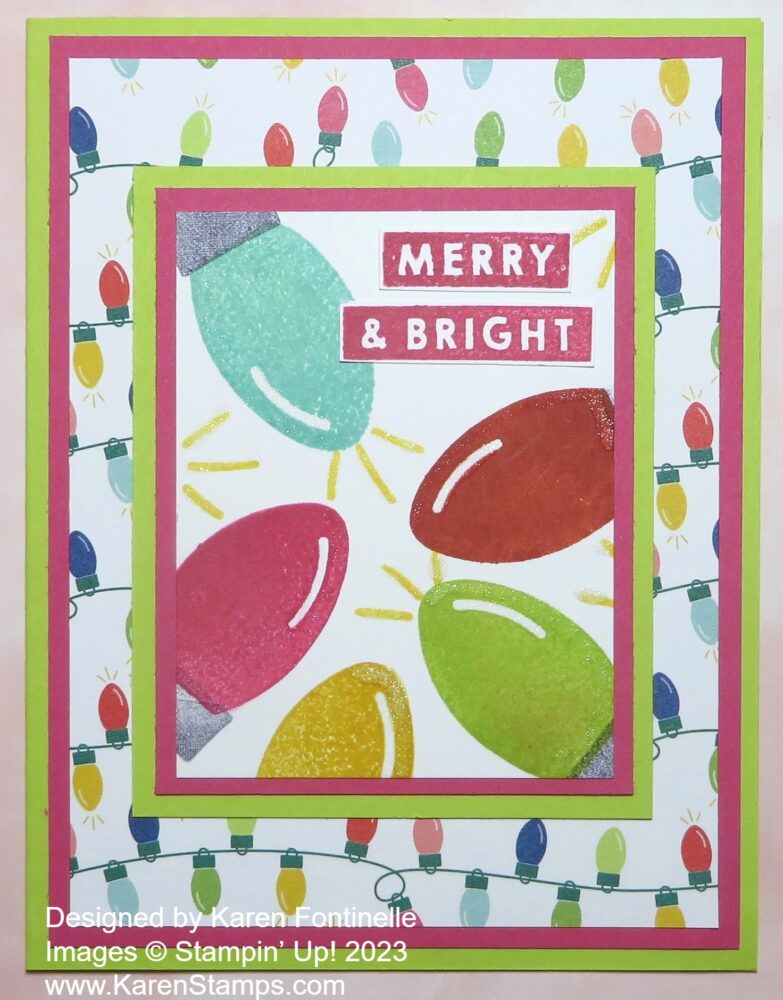
One of my favorite things about Christmas is Christmas lights on decorated houses. These large bulbs made a comeback several years ago but they always remind me of my childhood when Christmas trees had these large bulbs on them. It was fun to make this Merry and Bright Light Bulb Christmas Card using the Merry & Bright Stamp Set and the Merry Bold & Bright Designer Series Paper (no longer available)!

The card base is Lemon Lime Twist with a layer of Melon Mambo. Who can pass up using Melon Mambo when you have the chance to use it?! And this designer series paper has so many fun colors to use with it. I used a piece of the Christmas light bulb paper for the background. I hated to cover up very much of it.

On Basic White, I stamped several Christmas bulbs in different colors. It worked best to stamp them slightly off the edges of the paper (or they wouldn’t all fit!). I stamped the bulbs in Real Red, Melon Mambo, Crushed Curry, Pool Party, and Lemon Lime Twist. The bulb socket is Basic Gray. I also stamped the little image of “brightness” in Daffodil Delight ink. Then I used Wink of Stella to put a little sparkle on the bulbs and the “brightness” lines.

The greeting is stamped from the Merry & Bright Stamp Set in Melon Mambo on a scrap of Basic White. Those words in the color blocks are easy to trim down with just a tiny border of white around them. Then I glued them down. Those center pieces are 2 1/2″ x 3 1/4″ layered on Melon Mambo cut at 2 3/4″ x 3 1/2″ and finally Lemon Lime Twist cut at 3″ x 3 3/4″. I think you can still see a lot of the background bulbs. I really like the way this card turned out! Another good idea would be to clear emboss the bulbs to make them shiny.

Remember, Stampin’ Up! just refreshed the Clearance Rack yesterday so be sure to check it out. I haven’t kept track of what was on there and what sold out early. I wish they would leave the product up and just mark it “Sold Out” so we could see what we missed! Everything on there is “while supplies last”.

Watch for my 12 Week of Christmas newsletter for Week 10 coming this afternoon at 1:00 PM if you are one of my Mailing List subscribers!

Merry Bold & Bright Merry Christmas Card

It’s time for quick and easy Christmas cards like this Merry Bold & Bright Merry Christmas Card. I love this Merry Bold & Bright Designer Series Paper so I thought I would use it with this fun red Christmas tree pattern to make an easy card.

This is just a basic card design, easy for a beginner stamper! The card base is Real Red although maybe the proper coordinating color is Poppy Parade. But my favorite color, especially for Christmas is Real Red. The designer paper is cut at 4″ x 5 1/4″. I debated whether I wanted to use a layer of Basic White under it which sometimes highlights the design a little more, but I wanted to keep it super simple.

The greeting is stamped from the Brightest Glow Stamp Set in Real Red ink on Basic White and die cut with a label shape in the Something Fancy Dies, then layered on a Real Red larger die-cut label in the set.

Before adhering anything, I added a piece of Real Red ribbon from the Real Red & Burlap Ribbon Combo across the middle of the card and adhered it underneath on both sides of the designer paper. Then I adhered the designer paper to the card base. The greeting is popped up on Stampin’ Dimensionals®. On each side of the greeting, I tied just a piece of ribbon in a knot for a little decoration. And for a little sparkle, I added three Adhesive-Backed Glitter Sequins in Old Olive.

On the inside of the card, I will add a Basic White layer with a stamped greeting or a personal note. I could add a strip of the matching designer paper along the bottom or on the side of that white inside layer.

Several of these products will retire at the end of the Holiday Mini and are on the Last Chance List. Be sure to check that out, especially this Merry Bold & Bright paper since it has so many bright and happy patterns to use for birthdays, thinking of you, and many other occasions when you make cards or even scrapbook pages.

SHOP THE LAST CHANCE LIST!

Christmas Ornaments Holiday Card

Christmas Ornaments Holiday Card

After making a card with an ornament made just out of a circle die and designer paper, I thought why not make another card the same way except make three ornaments? That was the inspiration for the Christmas Ornaments Holiday Card. You never know where your inspiration will come from. Sometimes it just comes from looking at a card already on your table!

This card starts with a base of Melon Mambo. It’s one of the coordinating colors of the Merry Bold & Bright Designer Series Paper. I love the bright colors and patterns of this paper besides the Christmas lights patterns. We can use these generic patterns long after Christmas.

To make the ornaments I used two different sizes of stitched circle dies in the Stylish Shapes Dies. You could use three different sizes if you wanted to. Or make a bunch of really small ornaments! I used three different patterns of the designer paper to look like bright and merry ornaments hanging from the evergreen bough. It could be from a tree or from a garland!

For the greenery, I had another idea at first, but I changed my mind and decided on the die cuts of Old Olive cardstock from the die in the Joy of Noel Dies. I cut out three of the branches going across the top of the card. You can let the ends extend over the edge of the card at first while placing them, then trim off the overlap before gluing down the card layer. I used Basic White for the layer thinking everything would show up better on plain white.

I just drew a straight line down from the evergreen bough to the ornament. I used a strip of cardstock as a straight guide. The large striped ornament is popped up on Stampin’ Dimensionals as is the small polka dot ornament. The ornament with the stars is glued down flat. I just tied gold bows and adhered those with Mini Glue Dots.

The greeting is in the Joy of Noel Stamp Set. I stamped it in Melon Mambo, but I wasn’t happy with its size for the small space I had to place it. So I cut around the greeting with my Paper Snips and thought it fit perfectly! I used Mini Dimensionals to adhere the side that was not over the ornament, which I had to do because the ornament was popped up. Therefore, the part of the greeting over the ornament only got glue on the back portion, not a dimensional.

For some finishing touches, I added some Melon Mambo Iridescent Adhesive-Backed Discs to the foliage to look a little like berries. And whatever image that tiny little leafy-looking stamp is in the Joy of Noel Stamp Set I stamped along the strings of the ornaments. I’m not sure why except I had envisioned stamping some small Christmas words in the background of the card layer, but I didn’t see anything quite like what I was looking for. But whatever they are, I really like that touch of Melon Mambo with the ornaments!

Here is the card I made a short time ago with the Shining Christmas Designer Series Paper. That’s why I say I took inspiration from another card I had made recently!

Remember, the Last Chance List for the Holiday Mini Catalog is out if you want to know which products are retiring from the Holiday Mini at the end of the season. A few products are discounted.

SHOP STAMPIN’ UP! ONLINE HERE!

Merry Bold & Bright Christmas Tree Card

Merry Bold & Bright Christmas Tree Card

The other day when I was making a Christmas card for my 12 Weeks of Christmas email, I had planned to use this star pattern in Crushed Curry that you see on this Merry Bold & Bright Christmas Tree Card. You’ll find it in the Merry Bold & Bright Designer Series Paper. I was going to use it for the background of my card. But when I flipped it over to apply adhesive, I saw the colorful diagonal stripes and couldn’t resist. I applied the adhesive to the star pattern and used the striped side on my card. So this card makes up for not using the star pattern the other day! Also, this pattern could be used at any time during the year! Perfect for birthdays and other happy cards, kids or adults!

I could have used Crushed Curry for the card base, but I really wanted to use Real Red cardstock for the card. I planned to diecut a Christmas tree with the Merriest Trees Dies but then I spied this dotted paper in the Merry Bold & Bright Designer Series Paper. I diecut it to see how it would look and I liked it!

The greeting is in the Merry & Bright Stamp Set. I stamped it in Real Red ink on Basic White and diecut it with a banner shape in the Stylish Shapes Dies. Just to set it off a little bit, I also diecut a Real Red banner of the same size and cut it in half horizontally so I could adhere the halves to the top and bottom of the greeting.

To embellish the tree I die cut a star out of the Merriest Trees Dies and adhered it with tiny drops of Multipurpose Liquid Glue. You could use Adhesive Sheets before diecutting if you think of it! I also used the Adhesive-Backed Glitter Sequins to decorate the tree.

As I write this, the Merriest Trees Dies are unavailable but due back in stock the week of November 6th. The Glitter Sequins are also unavailable but due back in stock the week of November 13th. I love these Glitter Sequins but there are many other gems and jewels you probably have in your collection that you can use instead. I looked through my pile a couple of times before I decided. If there is an out-of-stock item you are waiting on, be sure to keep checking ahead of schedule (or ask me for any updates) because frequently products come back in stock early and sometimes even sell out again.

Here is another Christmas card I made using another pattern in the Merry Bold & Bright Designer Paper.

Maybe this card is a little less traditional for Christmas but I think I like it and maybe will make more for my holiday cards! I really do love this Merry Bold & Bright Designer Series Paper, probably mostly because I love Christmas lights so I love the Christmas lights on the designer paper!

SHOP STAMPIN’ UP! ONLINE HERE!

Merry & Bright Christmas Bulbs Card

Merry & Bright Christmas Bulbs Card

Here’s a fun Christmas card to make if you like those old-fashioned Christmas light bulbs! This Merry & Bright Christmas Bulbs Card takes me back to my childhood! If you are old enough to remember, many years ago Christmas trees were decorated with these big bulbs, not the tiny ones we have been using for a lot of recent years. I remember my dad putting up outdoor lights with all these colored bulbs. The Christmas tree also was decorated with these large-sized bulbs. After many years of using the small Christmas lights, I think some of the big bulbs have come back in style!

This card has a card base of Granny Apple Green. You could choose any of three colors of green that would coordinate with this Christmas tree pattern in the designer paper. The designer paper is the Merry Bold & Bright Designer Series Paper in the Holiday Mini Catalog. I love this paper! Not only does it have bright and bold colors, but some of the patterns you can use year round! They aren’t all for the holidays. Many of the patterns would be great for birthday cards or scrapbook pages, wherever you want a bright and happy look to your project!

The Christmas bulbs can be stamped and diecut using the Merry & Bright Bundle, the stamp set, and dies. Or maybe you just want to diecut the bulbs out of paper, such as the Melon Mambo and Granny Apple Green Foil Sheets, which is what I used on this card. That’s why there is such a glare in the photo! I used two Melon Mambo bulbs and a Granny Apple Green one in the center. For the bulb holder, I used the Online Exclusive Silver & Gold Adhesive-Backed Glimmer Paper in silver. I intended to peel off the backing and not have to worry about adhesive, but when I put them on the card, I used Stampin’ Dimensionals to pop them up so I didn’t need the adhesive backing. But when you want it, it is great to have! To make the lights look like they are on a string, I used a piece of the Silver Trim in the Combo Pack with gold trim. I just wound it through each hole, left it a little loose, and tied the ends in a little knot but kept it looking loose and free. I like the way that turned out.

The greeting is stamped from the Merry & Bright Stamp Set. I used Melon Mambo and Granny Apple Green ink and just cut the words out by hand.

To showcase the Christmas lights, I diecut a piece of Granny Apple Green using the Scalloped Contours Dies. I opted to cut another plain rectangle to fit just inside the stitching of the diecut piece to help the bulbs show off better. But the plain white seemed a little stark, so I stamped a bunch of the little stars in the same stamp set using Daffodil Delight in. First I stamped only a few but that wasn’t enough so I stamped as many as I could fit in and I liked that look. I think the stars make the bulbs look like they are shining brightly! The scalloped piece is adhered flat on the card and the bulbs are popped up, as I mentioned.

This is actually an easy card to make, now that you have the idea to copy! And you can change it up with different paper, maybe just stamped bulbs or bulbs diecut from cardstock in different colors. Turn the card in the sideways landscape position and you can add more Christmas bulbs! It’s a fun set and Bundle to play with! If you don’t want to purchase the dies, you can do some fussy cutting.

SHOP STAMPIN’ UP! ONLINE HERE!

A Merry & Bright Christmas Card

A Merry & Bright Christmas Card

I had purchased this designer paper knowing I could make plenty of Christmas cards with just the paper and not the stamp set. But at some point, I could no longer resist the stamp set! Being able to stamp the words and make a little tree or being able to stamp several different styles of Christmas light bulbs was just too fun to pass up!

The card base is Real Red card stock, but you could choose from a lot of different colors because of all the colors of the Christmas light bulbs in the paper! This Merry Bold & Bright Designer Series Paper is wonderful! It has bright colors, Christmas patterns, and generic bold colorful patterns that can be used at other times of the year.

On top of the designer paper is a circle of vellum to soften the little light bulbs a bit so the tree with the greeting would show up. I used one of the Deckled Circles Dies to cut a circle out of Vellum Cardstock. I stamped all the words in the Merry & Bright Stamp Set in various colors – Pool Party, Granny Apple Green, Melon Mambo, Poppy Parade, Lemon Lime Twist. The little star at the top of the tree is stamped in Daffodil Delight Ink. The little trunk of the tree is a scrap of Pool Party cardstock.

The good thing about this card is that I could use Multipurpose Liquid Glue on the back of all the words on the back of the vellum that I glued flat on the card, and of course, none of the glue showed through the vellum. Sometimes it is difficult to hide adhesive under vellum. I placed some of the words (cut out by hand) a little crooked so it wouldn’t matter if they weren’t perfectly straight. But you could place them as straight as possible too!

I thought about using some bling on the card, but I resisted and stopped where I was! I think this paper and stamp set is going to be fun to work with. It would be nice to have the dies as well, the Merry & Bright Dies. Get the Merry & Bright Stamp Set and the Dies together in a Bundle and save 10%. It’s a fun change of pace to use these bright, non-traditional colors for the holidays!

SHOP STAMPIN’ UP! ONLINE HERE!

Fa La La La La Christmas Card

Fa La La La La Christmas Card

I often say sometimes all you have to do is get out your designer papers and you will be inspired with at least one idea for making a card. That’s what happened with this Fa La La La La Christmas Card. In just a little over a week, you will be able to order this Merry Bold & Bright Designer Series Paper (161945) in the September-December 2023 Mini Catalog, or the Holiday Mini as I prefer to call it (and type it!).

So far (so far!!) I have only ordered the paper in this cute Merry Bold & Bright Suite and I really love it! When you spread those papers out with their bold & bright colors and designs, it just brings joy to your heart! Except for the Christmas lights, it’s not exactly your traditional Christmas designs, but it’s fresh and new! I love working with it!

For this card, I chose a card base of Shady Spruce and the Fa La La La La pattern in the package of designer paper. I thought a layer of Basic White underneath helped it stand out a little bit. I made the Basic White layer a little smaller for a slightly wider card base margin. The designer paper piece is 3 1/2″ x 4 3/4″.

The greeting is stamped with Poppy Parade Ink on Basic White and then diecut with this label in the Something Fancy Dies. I used a larger die to cut out a piece of Shaded Spruce for a layer. The greeting is from the Brightest Glow Stamp Set, a carry-over set from last year’s holiday mini. You can find it online, still available, but not in a catalog. It’s a perfect set for holiday greetings.

To jazz things up, I added two folded bits of the White Iridescent Ribbon (161955) which you will find on page 9 of the Holiday Mini, and adhered them under the greeting on each side, then popped up the greeting on Stampin’ Dimensionals. And I love the Iridescent Adhesive-Backed Discs (161954) in the Holiday Mini. I added three of the different colors to the greeting. They’re very cute and shiny.

Turn that Christmas paper pattern over to the other side and see what you can make! I’ll have an example in my Tuesday newsletter later today! If you want to see it, sign up in the red box here on my blog! You’ll be glad you did because before we know it, I’ll be sending out my exclusive 12 Weeks of Christmas newsletter with a holiday idea every week.

SHOP STAMPIN’ UP! HERE!

Penguin Punch Christmas Gift Tags

Penguin Punch Christmas Gift Tags

If you don’t already own the Penguin Builder Punch, run and get it on the Stampin’ Up! Clearance Rack so you can make these Penguin Punch Christmas Gift Tags! I can’t believe it is still available but it is marked down to $4.50 instead of $19.00! You may as well buy one for that price! Or you may already have one from a previous catalog so dig it out and make something fun for Christmas!

I thought it would be fun to make a couple of gift tags using the Penguin Punch and some new designer series paper. You can use a tag die that you have or cut your own rectangle and then cut the top corners at an angle. I intended to use the tag die in the new Merriest Trees Dies (coming soon!) but then I came across the Tailor Made Tags Dies. If you have those, just use either of the die shapes.

I cut out a piece of designer series paper and cardstock for each of the tags. That makes them both the same size so you can’t layer them, but I just trimmed off inside the stitched marks on the designer paper, which made it fit just inside the stitched lines of the cardstock tag.

The Penguin tag on the left is made with Poppy Parade Cardstock and the Fa La La La La pattern in the Merry Bold & Bright Designer Series Paper (161945). This paper is so bright and happy, you will love it! I adhered the designer paper onto the cardstock tag and popped the penguin up with Stampin’ Dimensionals. For a finishing touch, I got the idea to just cut out a short strand of the Christmas lights on another of the papers and put it on the tag up at the top. If you want, you can put a piece of Basic White on the back of the tag if you think you need something to write your “To & From” on or a personal message.

The penguin tag on the right is made with Misty Moonlight cardstock and the snowflake paper in the Beary Christmas Designer Series Paper (162015). Before I adhered the penguin with Stampin’ Dimensionals, I got the idea to cut out some trees from the A Walk in the Forest Designer Series Paper (162377). It’s the paper at the top of page 5 in the Holiday Mini so don’t miss it. Maybe some dies would have cut out some of these little trees but I didn’t look! (Actually, some dies will cut out the fuller trees, not the skinny straight ones.) For a greeting, I used one in the Brightest Glow Stamp Set but cut the words apart and cut them smaller so they would fit on the tag.

The penguins are super easy to make with the punch. Just cut the two pieces out of black and white and the little feet out of Pumpkin Pie cardstock or something similar. I do not have the coordinating stamp set so I just drew in the little black eyes with a marker and the little beak with a Pumpkin Pie Stampin’ Write Marker. If you want, you could add a scarf around his neck or make a little hat.

The die punches out the hole in the tag so you don’t have to do that. Just pick a ribbon you like to tie through the hole so your tag is ready to go when you start wrapping gifts!

Remember to check out the Clearance Rack and see what other bargains you need plus the Penguin Punch!

SHOP STAMPIN’ UP! HERE!