Tag Archives: Them Bones Designer Series Paper

More Last Minute Them Bones Halloween Cards!

Them Bones Halloween Cards

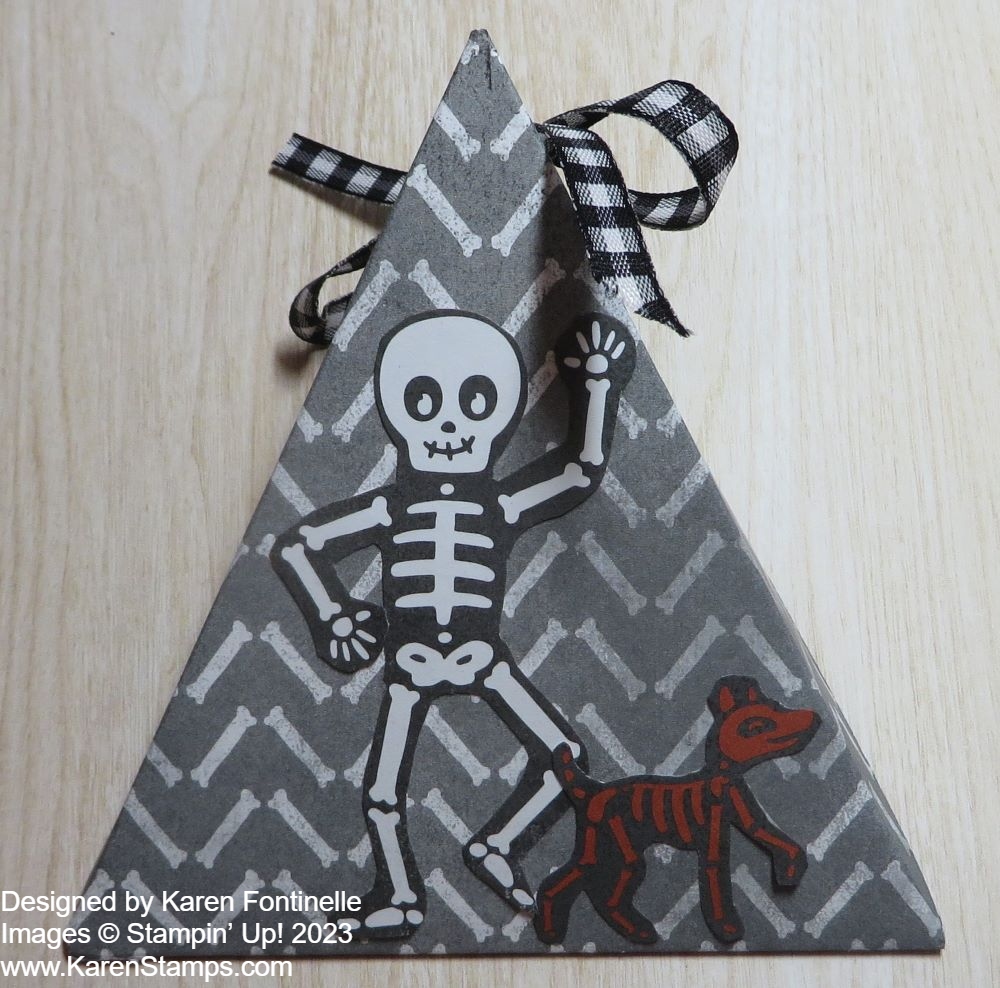
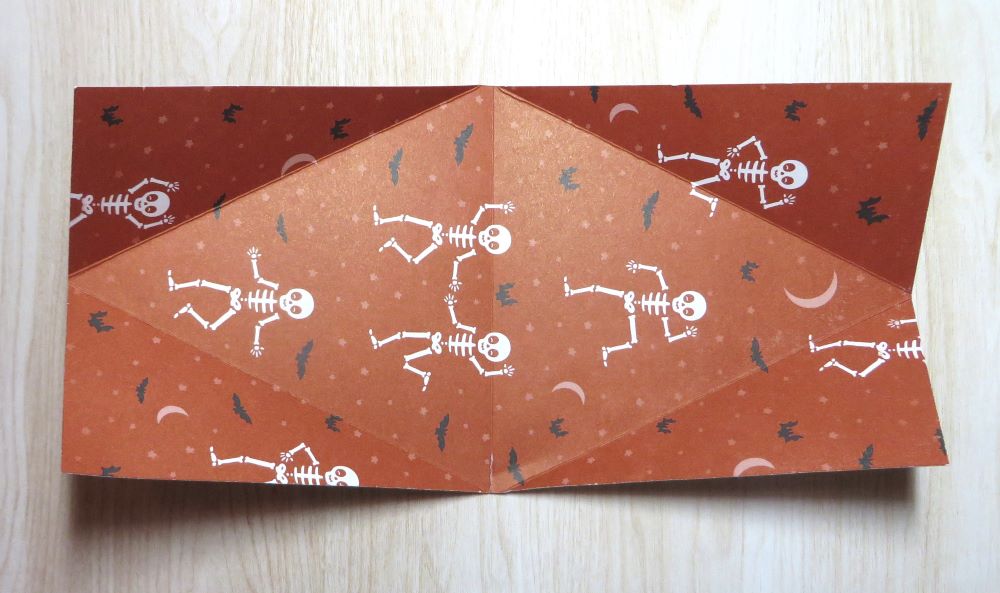
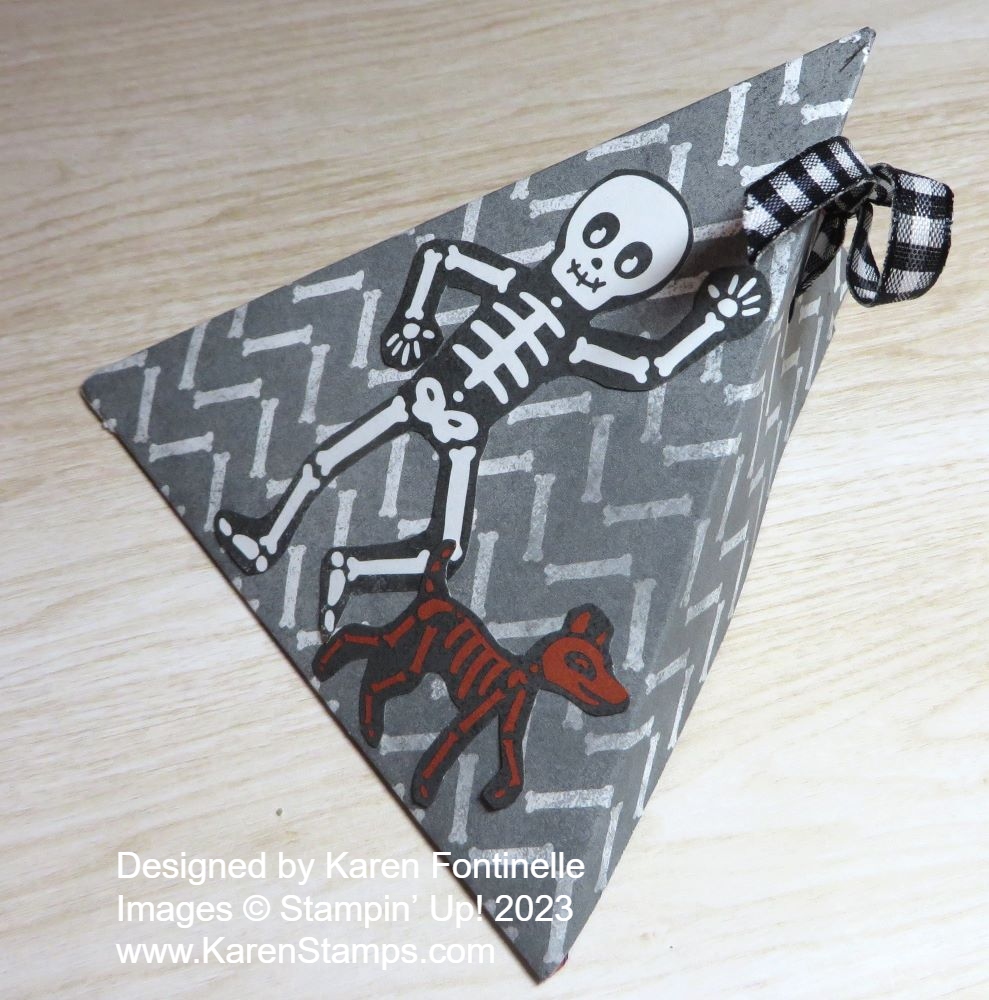
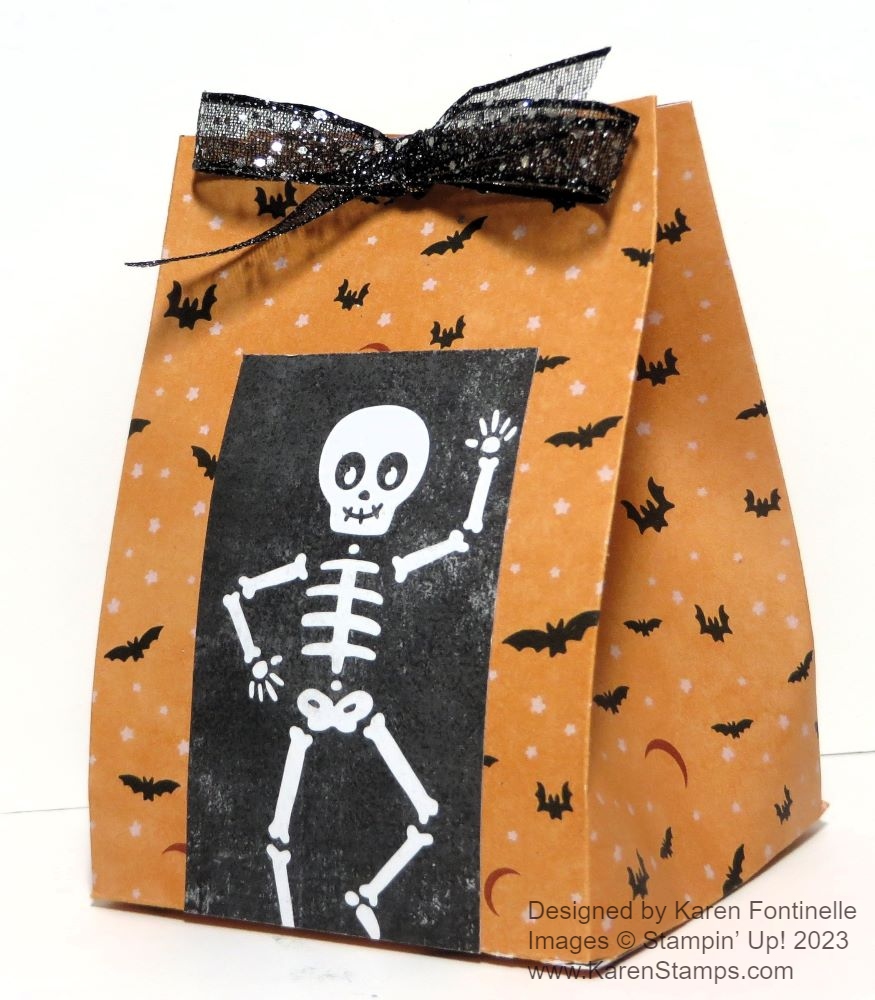
The other day I made a few more Halloween cards, partly to use up as much of the Them Bones Designer Series Paper by Halloween as I can! Some of the patterns I can use for Thanksgiving and beyond, but the skeletons and tombstones, not so much! It’s also about trying not to hoard all the beautiful Stampin’ Up! paper that takes up space in my house after all these years!

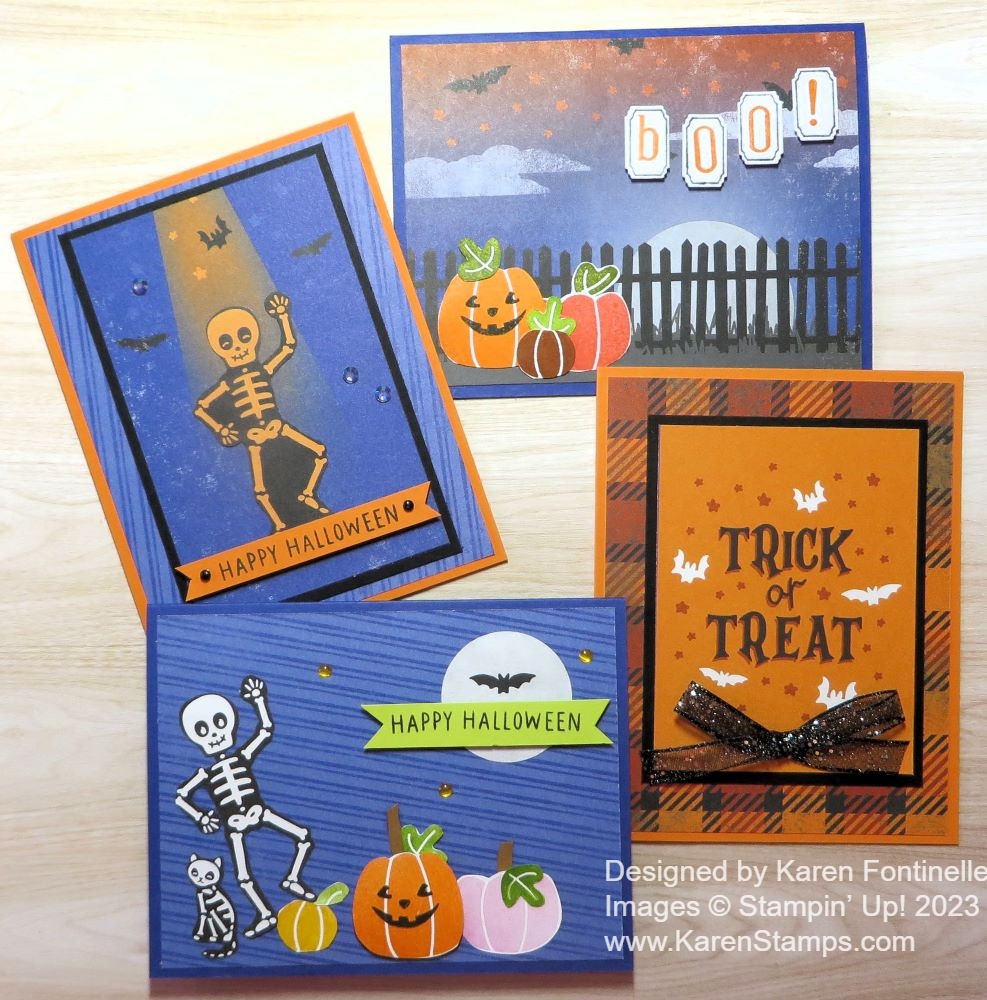
I’ll just give a general description of each card.

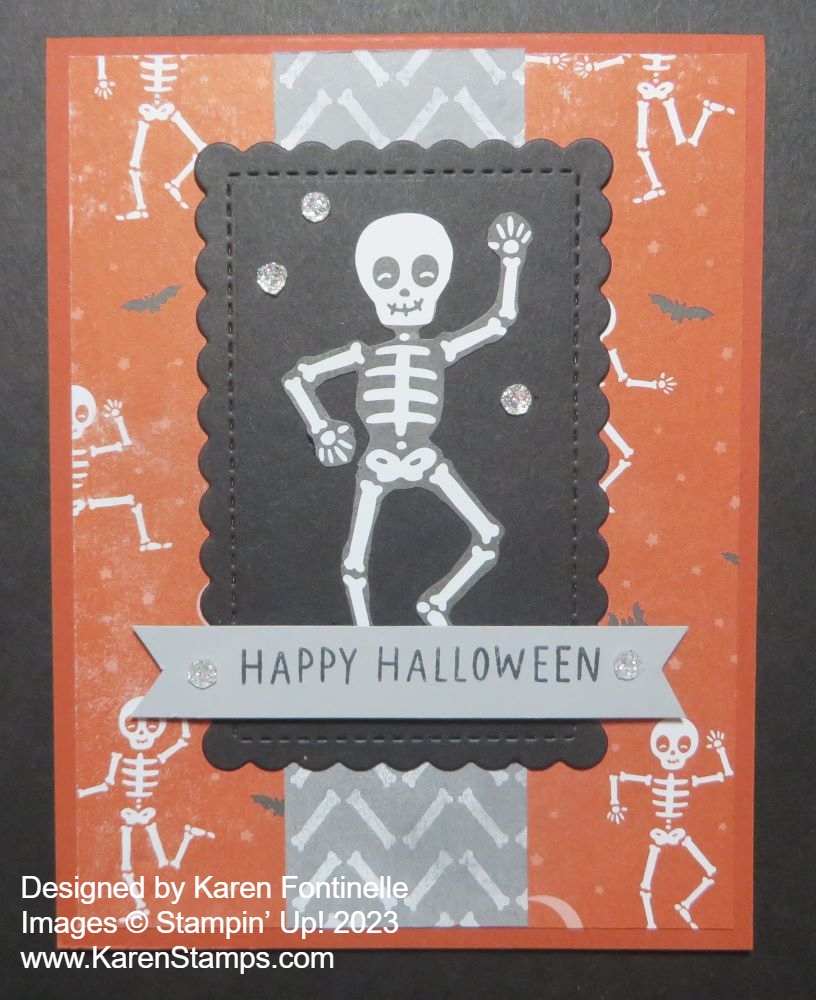
Top left: This card uses the diagonal striped blue paper on “the other side” of the pattern with the little bats flying around. Layered on that is the spotlight panel (with a layer of Basic Black) that is part of the one sheet with a lot of different scenes that you cut apart. I cut out one of the skeletons and adhered him in the spotlight, from the moon I suppose, as if he is dancing. The “Happy Halloween” greeting is from a past Paper Pumpkin Kit stamp set. You can use what you have. I added some Black Classic Matte Dots to the greeting and some Iridescent Rhinestone Gems.

Top Right: This card uses one of those panels on a big sheet, plus I added pumpkins from the Pick of the Patch Stamp Set. The greeting is stamped with the Alphabest Stamp Set and punched out with the Best Label Punch.

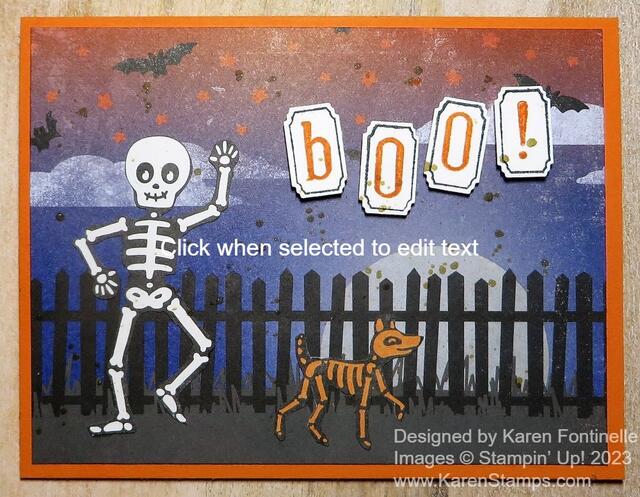
Bottom Left: This card also uses that blue striped paper for the background. I added pumpkins, a skeleton, and a punched out moon from the large paper with tombstone scenes that can be cut apart.

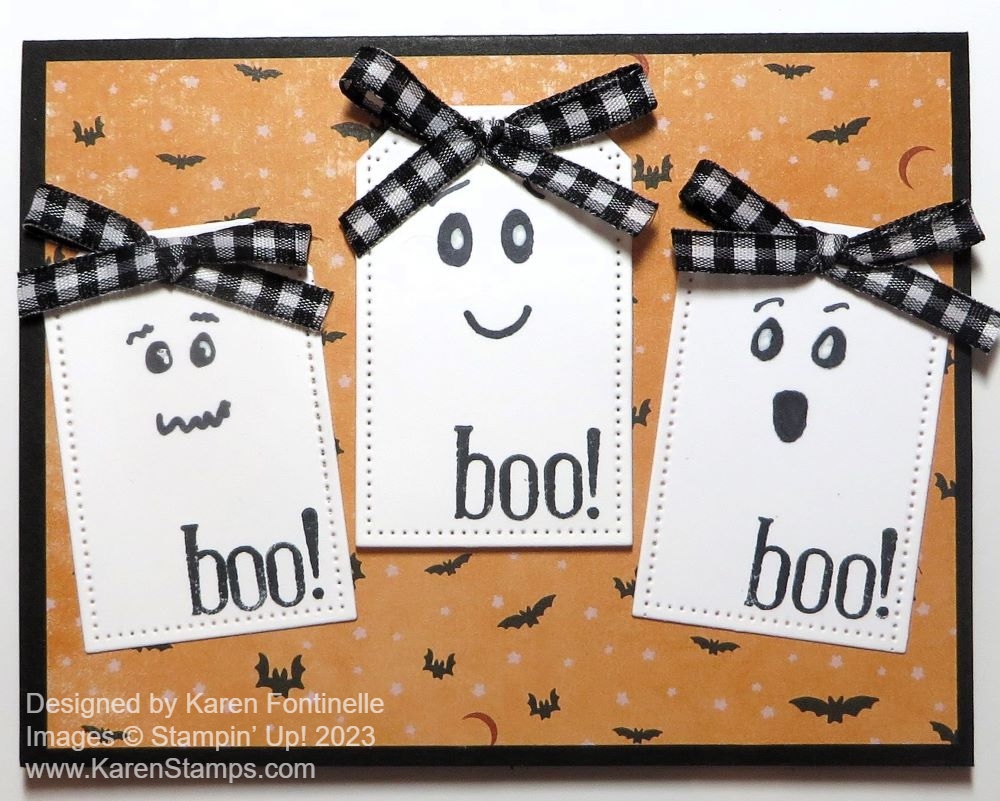
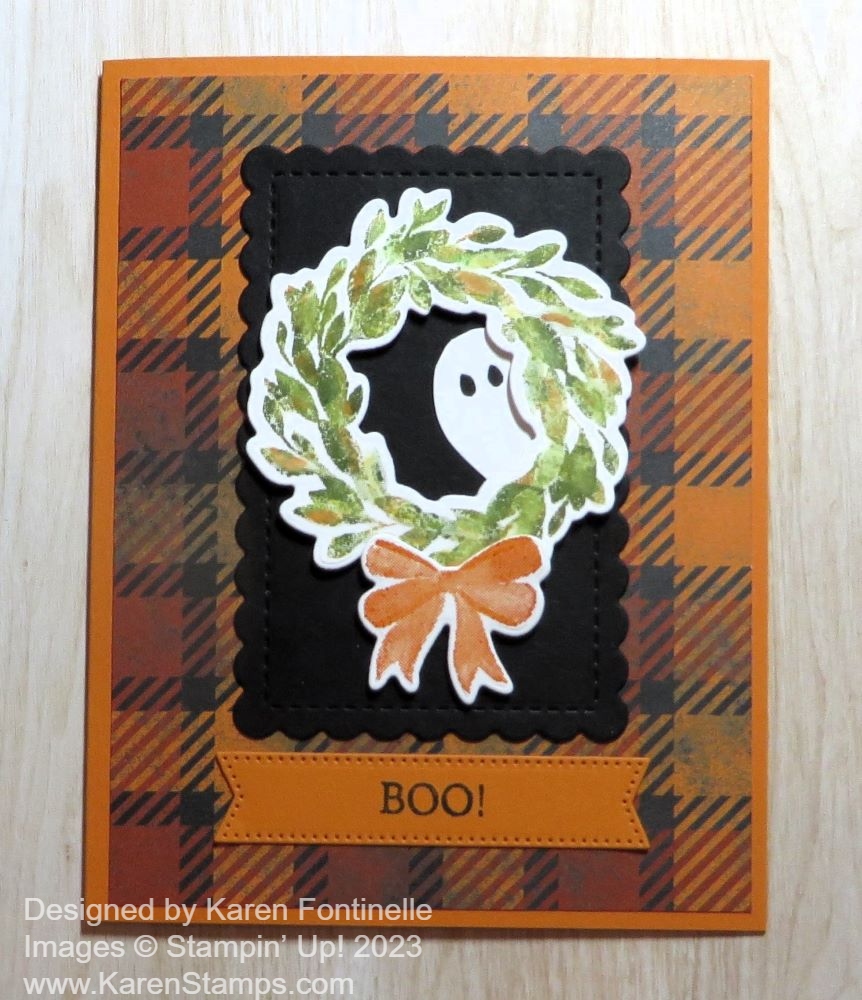
Bottom Right: A super easy card to make by just cutting out the Trick or Treat panel on the sheet with all the different panels. It is layered on a piece of the orange plaid designer paper. I just added a bow made from Glittered Organdy Black Ribbon (retired). You could use the Black and White Gingham Ribbon or anything else you like.

If I have time I may even make some Halloween cards to hand out to the Trick or Treaters along with their candy!

I hope these ideas help you if you are still making Halloween cards or if you, too, want to use up your Halloween Them Bones paper!

Them Bones Skeleton Triangle Treat Box For Halloween

Them Bones Skeleton Triangle Treat Box

One of my favorite types of treat boxes is this triangle treat box. You can make them for any occasion such as this Them Bones Skeleton Triangle Treat Box For Halloween. This kind of treat box is really so easy to make! You will be surprised if you haven’t made one yet!

You can vary the size of these triangle boxes. All you have to do is follow the basic pattern. You can use cardstock or designer paper. You can leave the cardstock plain, stamp on it, or add designer paper or embellishments. And these boxes aren’t just for candy or food. They can hold a small gift, or even money or a gift card.

Here is the basic pattern and the size I used for this Halloween Triangle Box. I used a piece of Them Bones Designer Series Paper to make this box. Obviously, cardstock would be a little bit sturdier if you needed that. My paper is cut at 4″ x 8″. If your paper has a pattern you need to pay attention to which way you cut the paper so the pattern won’t be sideways or something.

Triangle Box Drawing

After cutting the paper to the size you want, the rest is scoring. The blue lines on the diagram above are the score lines. Score the length of the paper in half, so if your paper is 4″ x 8″, score at 4″ in the middle. Measure the mid-point on the ends (2″) and lightly mark with a pencil.

The “tricky” part is scoring on the diagonal but it is easy. In that awkward position with your Paper Trimmer, score from that 2″ middle point at one end down to the middle score line which will be on a diagonal. Do that on both sides of one end, then turn the paper and score at the other end in the same way. When you do it, you’ll see how it goes. Here you can see the other side of the paper, which I could have used instead of the bones pattern. You can see what the score lines look like, really from midline to midline. Then you’ll punch holes in each corner, preferably holding the ends together when you do it so they match up.

Triangle Treat Box Scored

After you do the scoring, crease all the score lines and fold the box together to see how it goes. Then hold the ends together on each side and use a hole punch of whatever size you like to punch holes through the two papers on each side. After you decorate your box and put the treat inside, you can tie the box together with ribbon or twine.

This box is simply decorated by cutting out the skeletons from another sheet of paper in the Them Bones DSP and adhering them to the box. You could also add a greeting or some other embellishments. I tied my box closed with the Black & White 1/4″ Gingham Ribbon.

Here is what the box looks like from the side:

Them Bones Skeleton Triangle Treat Box Side

Here’s a triangle box I turned into a Witch’s Hat for Halloween….nine years ago! Wow!

Try one and you will see how easy it is to make a triangle treat box. And you just might need one or more for Halloween night maybe for family treats or for a few special trick-or-treaters!

Happy Halloween in a few days!

A Trio of Ghosts Halloween Card

Trio of Ghosts Halloween Card

I got the idea for this Trio of Ghosts Halloween Card from something I saw online, probably on Pinterest. It was a group of little tags that looked like ghosts! That gave me the idea to make tags that looked like ghosts but put them on a card! Why not have fun making a Halloween card?!

This card base is Basic Black with a layer of the Them Bones Designer Series Paper. I chose the pattern with the tiny bats because they are flying with the ghosts! You could make similar ghosts in any number of ways depending on what you have on hand to use. For my ghosts, I used the Tailor Made Tags Dies but I made them shorter than the die. If the die is longer than you want, roll the die through as far as you want it, then take it out of the machine. Scoot the die up so it is where you want the bottom of the tag to be but align it with what is already diecut. You will be able to feel it when it fits perfectly. Just try it and you will figure it out!

I drew on faces with a Stampin’ Blends Black marker. If you have a small hole punch you could punch out the black eyes to adhere instead of drawing and add that little white highlight with a gel pen.

The “boo” is stamped with the Alphabest Stamp Set and Memento ink. You wouldn’t have to add that but I thought it was cute! The center ghost is popped up with Stampin’ Dimensionals.

At the top of each ghost, I tied a little bow with the Black & White 1/4″ Gingham Ribbon and adhered it with a Mini Glue Dot. Each bow covers up the little tag hole but you could also tie ribbon through the hole instead of a bow.

If you had “googlie eyes” you could adhere those on the ghosts instead of drawing on the eyes.

There you have another idea for a Halloween card! We are almost out of time!

Halloween Ghost Wreath Card

Halloween Ghost Wreath

For this Halloween Ghost Wreath Card, I chose a stamp set you might already own that you can use for Halloween. It’s the Cottage Wreaths Stamp Set that can be used for many occasions. Along with the greetings in the stamp set and the extra stamps, you can use this stamp set for Thanksgiving, Halloween, and Christmas. Or make the wreaths generic and use them for any occasion year-round.

I used a Pumpkin Pie cardstock card base for this card to go with the plaid pattern in the Them Bones Designer Series Paper. Sometimes we overlook the generic patterns in a themed designer paper package that can be used in many other ways.

For the wreath, I colored on the entire wreath stamp using Stampin’ Write Markers (not Blends) to get the multicolored look. I used a couple of different greens, a yellow, and an orange. Start with the lightest color because the markers will overlap; that way, you won’t get other colors on your markers. If you do, just scribble on scrap paper to get back to the original color. This stamp set is one of the “Distinktive” stamp sets that Stampin’ Up! developed to add a special texture to the stamped image. That’s why it doesn’t look totally flat and solid as we are used to, it looks more shaded just by stamping, not just by coloring. I used one of the Country Wreath Dies to cut out the wreath and the stamped bow.

For a little background to help the wreath stand out, I cut out a scalloped rectangle of Basic Black using the Scalloped Contours Dies. This is glued down flat on the card and the wreath is popped up on Stampin’ Dimensionals. The greeting is in the same stamp set and is stamped on Pumpkin Pie, then die cut with a banner in the Stylish Shapes Dies. I originally planned to place it across the middle of the wreath but changed my mind.

To make the wreath perfect for Halloween on this card, I folded a small piece of Basic White cardstock in half and cut out half a heart shape like you did when you were a kid! You could use a small heart punch or die as well. Cutting it myself was quicker! Then I cut the heart shape in half and put eyes on the ghost. I placed the ghost inside the wreath, just peeking out a bit!

Sometimes you make a card and you’re especially happy with it even if you didn’t have a great plan starting out! This card is one of those! I really like the colors of the paper and how the wreath turned out, and of course, especially the peeking ghost!

There are less than two weeks to make and send or give Halloween cards and treats so we have to get busy! Hope this idea helps!

SHOP STAMPIN’ UP! ONLINE HERE!

Them Bones Halloween Treat Bag

Them Bones Halloween Treat Bag

Here is a quick and easy candy or treat holder you can make! It’s the Them Bones Halloween Treat Bag and you can copy this exactly or make it and decorate it however you like! It only took a few minutes to make!

Start with a piece of cardstock or designer paper that is 12″ x 6″. Keep in mind that 2″ of that will be the bottom flaps, so if you want your treat bag taller, you need to add more height so maybe you would want to cut the paper 12″ x 8″. I used the batty pattern in the Them Bones Designer Series Paper in the Stampin’ Up! Holiday Catalog.

Using the Paper Trimmer or Scoring Tool you will score the paper so it can be folded into the bag shape. Pay attention if your paper has a pattern so you don’t end up with it upside down! Place the paper vertically so you can score the bottom flaps at 2″. Then turn the paper so the 12″ length goes across the top, horizontally. Score at 1″ 3 3/4″, 6 1/2″, and 9 1/4″.

Box Diagram

Crease and fold all the score lines and use a Bone Folder to get a sharp crease. Cut out the small section at the bottom as you see in the diagram above (the light blue area). Cut up on all the bottom score lines for the flaps just up to the 2″ score line.

Them Bones Treat Bag Scored

You can pretty well see from my paper above how it is scored, creased, and the bottom flaps cut apart. If you flipped the designer paper over, you would put adhesive on that narrow strip on one side and it adheres to the straight side on the other end of the paper.

Fold everything to form into the treat bag. Make sure you see how it all goes together before you start glueing! Add some strong Seal+ or Tear n Tape on that narrow section above the cut off piece. Then just fold the other end over flat on the table so it all lines up. This is easier than trying to hold it in your hands! Next, glue the bottom flaps together. Push your Bone Folder or something down inside the bag so you can push those bottom flaps together after they have been adhered to get a strong bond.

Before you decorate the bag, look and see where the paper is adhered together to form the bag shape so that you can put that in the back so it’s not so visible. Then decorate the front of the bag however you like. I cut out a rectangle with a skeleton on it that fit perfectly on the front of the bag. You could add a greeting or some jewels. I decided I liked it as is.

With this pattern, you can leave the top of the bag open if you like. Before adhering anything, you could even fold the top edge of the bag down if you wanted to show the inside design of the paper. I didn’t want my bag to be much shorter than it is so I didn’t do that. But if you want to put your treat inside and then close it up, you can add some kind of clip or punch two holes in the top with a punch and put a ribbon through. I used this Black Glittered Organdy Ribbon (retired) but the gingham ribbons we sell now would be cute also. To close the top of this bag, just push in the sides and work with it until you get the top edges even and the sides and bottom how you want them.

As I said before, you could use any paper and decorations to make these little bags for any occasions to hold treats or a small gift! Once you get the hang of making these little bags and boxes with your stamping supplies, you will open up another way to be creative!

SHOP STAMPIN’ UP! ONLINE HERE!

Them Bones Skeleton Happy Halloween Card

Them Bones Skeleton Happy Halloween Card

Here’s a fun Halloween card, the Them Bones Skeleton Happy Halloween Card, that I came up with playing around with the Them Bones Designer Series Paper. This paper has cute skeletons to use one way or another on Halloween projects. There is even the paper I used that has a design made of bones!

The card base is made with Cajun Craze cardstock. I cut it at 4 1/4″ x 11″ and scored at 5 1/2″ with the fold at the top. Then I added a layer of the Them Bones Paper with a bunch of little skeletons dancing around!

I cut a 1 3/4″ x 5 1/4″ strip of designer paper with the bones pattern to use somewhere on the card, likely on the side. But I tried it down the center of the card, and I liked that. By chance, there was already a black cardstock scalloped rectangle just the right size, cut with the Scalloped Contours Dies, in my package of cardstock so I just used it!

Since I don’t own the Bag of Bones Dies in the Them Bones Suite, I simply cut out the skeleton from another piece of the Them Bones Designer Paper with my Paper Snips. If you hate fussy cutting, then you need the dies and there are lots of fun dies to use in this set!

The greeting is stamped on Smoky Slate cardstock with Memento Black ink. The greeting is from the Paper Pumpkin Kit from September 2022 that happened to be lying on my table. I liked the one line that I could stamp on a narrow strip with flagged ends to pop up over the bottom of the skeleton’s legs. There is also a “Happy Halloween” greeting in the Pick of the Patch Stamp Set.

I added some Adhesive-Backed Glitter Sequins in white around the skeleton and on the ends of the greeting banner. You’ll find these in the Beary Christmas Suite but you can use them in lots of places, not just Christmas.

This card design could also be used on the front of a treat bag for Halloween or even as part of a scrapbook page. There are so many options with this Them Bones Designer Series Paper in the Holiday Mini Catalog! I think it was backordered recently but it is back in stock as I write this so grab it soon if you would like it!

SHOP STAMPIN’ UP! ONLINE HERE!

Halloween Ghosts Boo Card

Halloween Ghosts Boo Card

I was so thrilled with this Halloween Ghosts Boo Card after I made it! It’s all because of a creative idea I learned right before I signed up to be a Demonstrator. It was such an incredible idea I could hardly stand it! And I’ve been copying that idea ever since!

This Them Bones Designer Series Paper for Halloween has two sheets of this paper that have multiple panels on it that you can cut apart. One of them has the word “Boo” on the panel and that is what I used on this card. The background paper is also in the package, with a slight diagonal stripe. Behind the Boo panel, at the top and bottom, I added narrow pieces of the More Dazzle Specialty Paper. They are about 1/2″ wide. The card base is Basic Black.

This is how I made the ghosts, the focal part of the card. I punched out two hearts. That’s it! And then you cut the heart in half right up the middle. Then place the ghosts at an angle (or in this case, tucked under the Boo panel). Draw on some eyes, maybe a mouth if you want. So simple and isn’t it so creative?! I used a retired heart punch to make the ghosts. You probably have one or some heart dies, and if you don’t have one of those you can just cut out hearts like you did when you were a kid.

That’s how easy it is to make this card. If you don’t have the Boo panel to use, just adhere any paper you like and add a greeting from another stamp set or spell out Boo with an alphabet set you may have.

In case you haven’t heard, the Stampin’ Up! Holiday Mini Catalog went live yesterday so you can start your holiday stamping shopping spree!

SHOP STAMPIN’ UP! HERE!

Them Bones Easy Halloween Card

Them Bones Easy Halloween Card

If it is September, then we who love Halloween start thinking ahead! If you want to send out a Halloween card or two you probably want some easy ideas, like this Them Bones Easy Halloween Card.

Two of the sheets in the pack of Them Bones Designer Series Paper (162215) have different Halloween scenes printed on smaller panels. You can cut these apart and use them for cards or other projects. My card today is one of those panels. You can see the paper below. You can see that this card came from the panel on the bottom row.

When you cut these panels apart, as you can probably tell by looking at the paper, they aren’t all a standard size. You will have to work with the panel a little if you put it on a card to maybe add a layer underneath or add a little something to the side. This panel that I cut off the big sheet of paper measures 3″ x 4 7/8″ so I had to work with that a little.

The card base is Cajun Craze with a layer of Basic Black. Then I cut a strip of paper from another pattern in the Them Bones Designer Paper. One side has all these bones in a herringbone pattern and the other side is orange with small skeletons and bats. I cut a strip 5 1/4″ x 3/4″ to fill up that space since the main image is narrow.

I wanted some ribbon or twine to tie around the bones paper and I ended up pulling out some retired Halloween Night Baker’s Twine, maybe from quite a few years ago! It was perfect! It was black and gray. If you have this twine, the other roll is orange and black. Plain black twine would be fine, too. If you need some twine, you can purchase the Baker’s Twine Essentials Pack with five colors – black, white, Gray Granite, Crumb Cake, and Very Vanilla. That will cover you for most anything! I just chose to use something I already had that went well with the card.

For a little embellishing, I added three Adhesive-Backed Glitter Sequins (162029) on page 23 in the Holiday Mini Catalog. You want to get these for sure! Even though they are on a Christmas page, you can see you can even use them for Halloween! I thought they looked like little stars in the sky or even something spooky!

If you like Halloween, you will enjoy the Them Bones Suite Collection in the Holiday Mini! Be sure to notice the Glow-in-the-Dark Bats & Ghosts and the Glow-In-the-Dark 6″ x 6″ Specialty Paper if you want to make some diecuts of skeletons of anything!

The September-December 2023 Mini Catalog, or Holiday Mini, goes live on Wednesday, September 6th! Be sure to get some of the things you really, really want as soon as you can because no telling what will be super popular early on when the catalog comes out!

SHOP STAMPIN’ UP! ONLINE HERE!

Them Bones Halloween Card

Them Bones Halloween Card

It may be the middle of August, but here is my first Halloween card for the season, Them Bones Halloween Card. It was so fun to make a Halloween card, especially with this paper! It’s the Them Bones Designer Series Paper and is coming in the Holiday Mini Catalog on September 6th!

This designer series paper has all sorts of Halloween patterns and colors in it! You can choose from skeletons, bats, gravestones/mausoleums?, Halloween words, and all sorts of other generic patterns you can use on non-Halloween projects.

For this card, I used this sheet of paper that has all the different patterns on this one paper! The Fresh As a Daisy Designer Series Paper had the same thing, which was fun to use. Here is a photo of the whole sheet of paper.

You can see this sheet has all kinds of interesting designs to use on your card or another project. I chose the top right corner image. It has to be trimmed a little to fit on the Pumpkin Pie card base. Then I cut out one of the many skeletons on another sheet of paper plus one of the skeleton dogs to decorate my card.

There is a Bundle of the Bag of Bones Stamp Set and Bag of Bones Dies. If you have the dies, you can diecut some of the skeletons and animals and other images, stamped and printed on the paper. But I just used my Paper Snips for a little detailed cutting to cut out this skeleton from the designer paper and the dog skeleton. I used tiny bits of Multipurpose Liquid Glue to adhere them to the card front to create a little scene.

For the greeting, after looking through my current stamp sets, I got the idea to use the Alphabest Stamp Set and Best Label Punch. I stamped the little outline in black ink and then the letters in Pumpkin Pie ink to spell “boo!” Then I punched out those letters with the Best Label Punch. They are popped up on Stampin’ Dimensionals.

For a finishing touch, I tried to splatter some Wink of Stella around on the card. I used Gold (retired) but I don’t think it showed up well enough.

When you are ready to order some products for Halloween, if you like whimsical and spooky, try the Them Bones Designer Series Paper and maybe the Bag of Bones Bundle with the stamp set and dies. You can also purchase Glow in the Dark 6″ x 6″ Specialty Paper or Glow in the Dark adhesive bats and ghosts to decorate your cards and projects!

SHOP THE HOLIDAY MINI SEPTEMBER 6!