Category Archives: Big Shot

A Recycled & Decorated Shopping Bag For Valentine’s Day

A Recycled & Decorated Shopping Bag For Valentine's Day

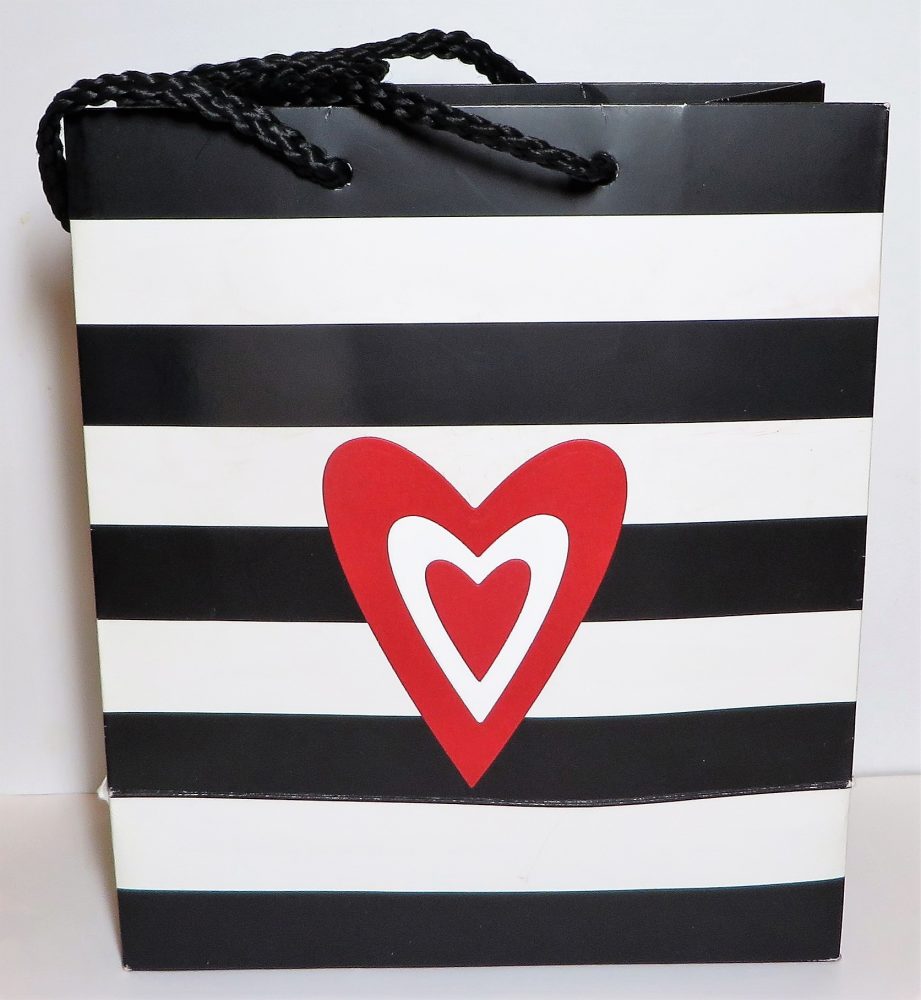
Now and then good things come from cleaning and organizing like this Recycled & Decorated Shopping Bag For Valentine’s Day. As I went through my overflowing “bag of bags” the other day, I found this cute black and white striped shopping bag from Sephora. It has the printed name on the front and the back so I needed to decorate both sides. I love to do this with any decent small shopping bags that I get at a store, but you can also buy kraft or colored bags at any craft store. I think it is fun to decorate and embellish a shopping bag and turn it into a personalized gift bag!

Here is a bag I changed into a birthday gift bag with some stamping and die cuts! The possibilities are endless!

Since Valentine’s Day is coming up, you might have a gift you need a gift bag for so perhaps this will give you some ideas. You, too, can look through your stash of bags and see what you find! Remember, hearts can be for any time so you can use this idea past Valentine’s Day!

To decorate this bag, I simply used a piece of Gold Glimmer Paper for the background and die cut a Real Red heart with one of the hearts in the Stitched Be Mine Dies in the Stampin’ Up! Annual Catalog.

The two center hearts are punched with the Heart Punch Pack. I stamped a greeting from the Heartfelt Stamp Set on Whisper White and punched with the plain-edge heart, then layered it on a Gold Glimmer scalloped-edge heart. You get both punches in the Heart Punch Pack. I usually find it’s best to use the Multipurpose Liquid Glue when adhering something to the glimmer paper.

A Recycled & Decorated Shopping Bag For Valentine's Day on Back

For the back of the bag, I just die-cut three different sized hearts using the same Stitched Be Mine Dies. I just adhered them together and then adhered them to the bag.

It’s so easy to make your own gift bags by recycling bags you probably already have in your home! Go find one and make a gift bag out of it! Make the gift extra-special by doing something creative with the bag!

Pressed Petals Journal With Poppies

Pressed Petals Journal With Poppies

If you want a gift for someone, you might consider ordering a Pressed Petals Journal and then personalizing it by decorating the front cover, like this Pressed Petals Journal With Poppies.

If this journal looks familiar, it might be because you saw something almost like it in the Occasions Mini Catalog on page 27. I intentionally copied it as closely as I could because I really liked the look of it with the poppies. I even called Stampin’ Up! to see if I could find out what colors were used on the sample, but the lady helping me wasn’t sure and the supply list for the catalog samples listed the wrong thing. As soon as I got off the phone, I figured it out for myself.

I made the poppies with the Poppy Moments Dies. They cut out one solid background flower, then the detailed outline overlay to make it look like a poppy, and then the black flower center. The mystery color I had a difficult time trying to identify was Grapefruit Grove for the overlay, one of the In Colors! The flower color underneath is Calypso Coral (if I remember correctly). Of course, you can use any color combinations you like. The smaller flower is Grapefruit Grove for the base and a bright color for the overlay (maybe Poppy Parade). I’ve already sent this as a gift! All the leaf die-cuts used about three different shades of green.

For the sentiment, I needed something rather small. I decided on the words in the Honey Bee Stamp Set. The phrase is stamped on Whisper White and die cut with one of the Ornate Frames Dies. You’ll still find these dies under Holiday Favorites.

The catalog sample of this journal uses a different ribbon on the coils, but I used the Very Vanilla 3/8″ Scalloped Lace Trim. I used two or three strands of ribbon, held them together, and tied them on to the journal binding. I tied them on like you put ribbon through a hole on a tag, whatever that is called! And of course, for a little bling, I had to add a few Peaceful Poppies Sequins.

One extra-nice thing about these Pressed Petals Journals is that the pages are decorated inside and have some prompts if you would like to use them for writing. This post shows the first journal I decorated and gave to my daughter. I used an idea for a card that I saw in the Annual Catalog to decorate the cover. You can make it as simple or fancy as you like.

Add a couple Pressed Petals Journals to your order and keep them on hand for when you need a little gift for someone.

Shop Stampin’ Up! Online!

Happy Birthday To You Decorated Cake Card

Happy Birthday To You Decorated Cake Card

If you are looking for a perfect birthday card, you can’t do much better than this Happy Birthday To You Decorated Cake Card. You can even earn the Happy Birthday To You Stamp Set FREE during Sale-A-Bration! Who wouldn’t like to receive a card with a beautiful birthday cake stamped on the front and decorated with flowers?! I’d like to have a real birthday cake that looks like that (with lots of icing!).

Stampin’ Up! released new Coordination Products yesterday and one of them is the set of Birthday Dies. You can stamp the cake and then die-cut it or die-cut just the flowers and pop those up on the stamped cake.

Change the look a little by die-cutting the cake stand. It doesn’t “fit” over the stamped cake pedestal so you will have to do a little adjusting or embellishing. But I think it is a very pretty die and is one we will all enjoy using.

For my card, I started with a card base of Pool Party and a layer of Whisper White. I embossed this white cardstock with the Scripty 3D Embossing Folder. I wanted just a little texture to the background layer.

I stamped the cake on another piece of Whisper White Cardstock and die cut it with the Birthday Dies, plus stamped it again on another piece of Whisper White and die cut the flowers only. As I mentioned, I wanted to use the die-cut cake stand so I just cut off the stamped cake stand to it would not show. The cake stand then fits perfectly! I die cut it out of Silver Foil Paper. The flowers were then popped up over the stamped flowers on the cake with Stampin’ Dimensionals®. Everything is colored with Stampin’ Blends markers. I also used Wink of Stella on the flowers to add some glimmer. You can see a little of the sparkle in the close-up photo below.

Happy Birthday To You Decorated Cake Card Closeup

The greeting is from another stamp set, Itty Bitty Birthday Greetings, because I needed an itty bitty greeting to fit below the cake stand! The Happy Birthday To You Stamp Set has two greetings but the size was too large for my card. It’s okay to mix and match stamp sets! Here’s another card I made with just the Happy Birthday To You Stamp Set and the greeting fit right underneath the cake on this card, so you can do it either way.

Be sure to check out the new Coordination Products (dies and a package of designer series paper) and add them to your order.

Shop Online at Stampin’ Up!

New Coordination Products Coming Tomorrow!

Tomorrow, February 4th, is the day some new Coordinating Products will be released! It’s always fun to have new things available at Stampin’ Up! Click any or all the photos below to go to a full view of the flyer of the Coordination Product Releases! Add to your Occasions and Sale-A-Bration collection!

Get ready to order Tuesday, February 4 if you are interested in any of these products!

SHOP STAMPIN’ UP! TUESDAY, FEB. 4th!

Peaceful Poppies Multicolor Thinking of You Card

Peaceful Poppies Multicolor Thinking of You Card

If you want to brighten up someone’s day, make and send them this Peaceful Poppies Multicolor Thinking of You Card! Even though I’ve looked through the beautiful poppy designer paper, this particular design jumped out at me today and I set it aside to make a card! You could put many different greetings on this card if you wanted to.

The card base is Rich Razzleberry Cardstock, which is a color I probably don’t use often enough. My original intent was just to layer the piece of Peaceful Poppies Designer Series Paper on top of the cardstock. This particular design with the purple poppies really caught my eye and I wanted to use it right away! All of this beautiful designer paper has handpainted blooms and watercolor washes.

When I first layered the designer paper on the Rich Razzleberry, I thought maybe it needed another layer of color to really make it pop, so I chose Poppy Parade. There were a few Poppy Parade poppies on the paper, although I may have covered one up with the greeting.

The greeting is from the Peaceful Moments Stamp Set, but I only wanted the “Thinking of You” so I colored just that portion of the stamp with my Poppy Parade Stampin’ Write Marker. I used the die in the Petal Labels Dies for the greeting on Whisper White and the fancy layer in Poppy Parade.

The ribbon I tied around the designer paper is the new Whisper White 1/4″ Crinkled Seam Binding Ribbon. I was planning to tie a bow and adhere it to the left of the greeting, but instead, I tied on three knotted pieces of ribbon, just for something different!

If you don’t own the Peaceful Poppies Designer Series Paper, you are missing out on a pretty paper collection in your stash! You can check out the whole Peaceful Poppies Suite of lovely products on page 24 in the Occasions Mini Catalog!

Make Six Cards Out of One Sheet of Designer Paper

Poppy Designer Paper Cutting

I’ve seen posts by other Demonstrators showing ways to use your designer paper to make lots of cards at one time so I thought I would try to make six cards out of one sheet of designer paper. I decided to use just this one design in the Peaceful Poppies Designer Series Paper. It is the sheet that has poppies on each side with a rather plain area running through the center of the paper.

With this, or any, 12″ x 12″ paper, you can cut three 4″ wide strips out of the paper. Then turn each strip and cut at 5 1/4″, the perfect size for a layer on a card. If you do the math, that will use up 10 1/2″ of the paper and you will have pieces left that are 1 1/2″ wide. If you plan ahead, you could cut off a strip 12″ x 1 1/2″ wide and then cut the strips. It probably all depends on the pattern of your paper and how you intend to use it, whether you want longer or shorter scraps of paper leftover.

This particular sheet of paper is different, with the plainer area in the middle. If you cut it as I show in the photos, you can basically cut out the plain area and just get maximum use out of the poppies! Then you can either use the center area for the colored side on the opposite side of the paper or the white side.

I might say that if you are not happy with your paper trimmer, the new Stampin’ Up! Paper Trimmer is really nice! I believe it makes much closer to perfect cuts than the previous one did. I am enjoying mine and do recommend it!

Poppy Designer Paper Cut Up

Another alternative would be to cut some or all strips at 3″ wide and get 4 strips out of the designer paper. In this way, you will not completely cover the card base, which is fine, too. I did some cards like this and added a little accent strip of cardstock along the side of the designer paper. This Peaceful Poppies paper is so pretty, no matter what you do with it, you will make a beautiful card!

Peaceful Poppies Designer Paper Easy Cards

I used several different colors of cardstock that coordinate with the designer paper – Rich Razzleberry, Flirty Flamingo, Old Olive, Calypso Coral, and Poppy Parade. Then just add a greeting, maybe layered on something else and maybe with some embellishments. You can make the card as fancy or as simple as you like at this point.

On the cards above, I used the “Thank You” from the Peaceful Moments Stamp Set and the other greeting from the Little Ladybug Host Stamp Set. On the thank you cards I used die-cuts from the Painted Labels Dies. (I love that little scallop die-cut!) On the other card, I used the 1 3/8″ Scallop Circle Punch for the layer.

Peaceful Poppies Designer More Easy Cards

On these cards, I used another die in the Painted Labels Dies and the Pretty Label Punch. You can see I used two of the excess strips, one green and one the white side behind the greetings, plus some embellishments. You will notice two of the cards in the two photos have the narrower strip of designer paper, cut at 3″x 5 1/2″ with a narrow accent strip of cardstock.

If you want to see what you can do with the inside of the card, I added Whisper White layers to all and stamped a flower from the Painted Poppies Stamp Set in Memento Black Ink. Then I colored in the flower with some Stampin’ Blends markers.

Peaceful Poppies Designer Easy Cards Inside

And there you have it! Ideas for six cards from one sheet of the Peaceful Poppies Designer Series Paper!

SHOP STAMPIN’ UP! DURING SALE-A-BRATION AND EARN FREE PRODUCTS WITH EVERY $50 PURCHASE!

Making a Purse With the All Dressed Up Dies

All Dressed Up Floral Bag

You are going to enjoy, in the Best Dressed Suite in the new Occasions Mini Catalog, making a purse with the All Dressed Up Dies. If you like creating 3D items, little gift bags, party favors, treat holders and more, I think you will have fun with all the possibilities of the Dressed Up Dies!

The Best Dressed Suite is cute enough as it is, with designer paper printed with feminine images….high-heeled shoes, purses, perfume bottles, lipstick…and we will all find so many ideas for making cards and other projects with this Suite. Then add in the All Dressed Up Dies that can die-cut little purses or backpacks or tote bags or whatever you like to call them or design them as.

I just got these dies the other day and was excited to try out these dies to make one of the bags… I used a pattern in the Best Dressed 6″ x 6″ Designer Series Paper. You do need to use two sheets of the 6″ x 6″ paper for the two sides of the bag. The die will cut out the bag shape, score the fold lines and even make a decorative stitching line all around.

You do need to be careful when you begin to crease the score lines. They are a little difficult to see compared to the stitch lines. Sometimes the score lines are in between the stitching lines and you are tempted to fold on the stitching line! Put on your reading glasses if you need to and make sure you are creasing the correct lines! You probably won’t have any trouble after you make the first one! You may be able to see some of the stitch lines on the photo above.

You have options when you make this bag. You can “push in” the sides or let them stick out. You can attach the straps in different ways. You can make it look like a purse or a backpack with longer straps in the back. You can emboss the paper. You can stamp it. You can add different embellishments on the front. The dies come with various pieces to help you customize the bag. Be sure to notice that the dies are on two papers in the package… I missed the die-cut for the straps at first!!

This set even comes with dies to make the little buckles, which I made out of Gold Foil. I also die cut the little button on the front pocket on the front of the bag. There are so many options!

Even though the Best Dressed Suite and designer paper is very girly, you can use these All Dressed Up Dies even for making boyish backpacks, maybe for favors at their birthday party with a little gift inside. Or some of both or something neutral if you are having both boys and girls. If I had known about Stampin’ Up! when my kids were young and having all these parties and activities at school, I would have been in heaven having all kinds of easy ideas to make!

All Dressed Up Floral Bag Back

Check out the Best Dressed Suite in the Occasions Mini Catalog! Maybe you want all of it, maybe just some of the products, but give it a second look if you skimmed over it the first time! Think of the fun you can have with the All Dressed Up Dies!

All About the Peaceful Poppies Suite

I think this Peaceful Poppies Suite is one of the most beautiful and has so much creative possibility! While I don’t have the whole suite yet, I have one Bundle and can tell you there are lots of ways to use just that bundle to make wonderful cards and things.

Watch this Stampin’ Up! video and you’ll find out all kinds of things about the Suite, like how they named everything! I watched it twice because there was so much information in it!

You’ll find out how the beautiful Peaceful Poppies Designer Series Paper was designed and that will make you want it even more. Although I have a sample, I can’t wait to get the whole package.

Check out this quick video as they show each paper in the collection:

Check out this post and this post about two cards I have put on my blog if you would like to see a couple of easy cards to make with these poppies!

Shop Stampin’ Up! Online During Sale-A-Bration!

Peaceful Poppies Happiness Card

Peaceful Poppies Happiness Card

This Peaceful Poppies Happiness Card is another fairly simple card to make! This card opens at the top instead of the side just for something different. It uses a strip of the beautiful Peaceful Poppies Designer Series Paper. Just wait until you get your hands on this beautiful designer paper!

To make this card, the card base is 11 1/2″ x 4 1/2″, folded in half with the fold at the top. I chose Real Red Cardstockalthough I don’t think that’s actually a coordinating color with the designer paper, but I think it looks fine together.

For a little extra interest, I stamped a poppy and stem from the Painted Poppies Stamp Set on the Real Red cardstock that isn’t covered by the designer paper. I inked it up and stamped off before stamping on the card. I could also have used Versamark Ink for that watermark look. If you had ribbon, you could wrap some ribbon around the designer paper before adhering it to the front of the card.

The greeting is from the Sending You Thoughts Stamp Set, one you can get FREE during Sale-A-Bration with a $50 purchase. I stamped it on Whisper White with Real Red ink and then die cut it with a label die in the Painted Labels Dies. Then I used Flirty Flamingo Cardstock and die cut another label in the same set, cut it in half and used it under the top and bottom of the greeting. It just adds a little something although just the greeting die cut with that label die with a little embossed border around the edge was just fine by itself.

You will probably want to get the Painted Poppies Stamp Set and the Painted Labels Dies together in the Painted Poppies Bundle and save 10%!

Check out the whole Peaceful Poppies Suite and see what you’ve GOT to put on your next Stampin’ Up! order! Remember about Sale-A-Bration and getting a free SAB item with every $50 you spend!

SHOP STAMPIN’ UP! ONLINE!

Pressed Petals Journal For the New Year 2020

Pressed Petals Journal For the New Year 2020

I made this Pressed Petals Journal for a gift for someone, but haven’t mailed it yet! However, it made me think, with the 2020 New Year approaching, if you were looking for just a little journal to begin the New Year, this could be perfect for you!

The Pressed Petals Journal is pretty nice just the way it comes from Stampin’ Up!. The cover is already embossed (or “debossed”) with kind of a floral design and comes spiral bound. The pages inside have some designs already printed and prompts (just several used over and over again). But then you can decorate it however you like! I tried to leave at least some of the cover showing a bit since I like that design.

I changed my mind a few times but ultimately settled on just using the Pressed Petals Specialty Designer Series Paper because it would match the inside of the journal. I just chose one of the printed panels in the paper selection that would be small, especially after I cut it down close to the flowers. I layered it on the coordinating color of Rococo Rose Cardstock. I thought it needed a little brightening up so I added a layer of Whisper White.

The greeting is from the wonderful stamp set Beautiful You. I have always loved this saying and thought it would be a good thought to go on a journal for 2020! It is stamped in Rococo Rose Ink and die cut with a die from the Ornate Frames Dies, then layered the greeting on the frilly Ornate Frame die in Rococo Rose Cardstock. (I told you those dies weren’t just for Halloween!) And I also added a couple of little pearls that may be retired. Inside I even added a few embellishments, like a punched daisy, sequins, and other Flower Faceted Gems.

You’ll find this Pressed Petals Journal in the Memories & More section of the catalog or Online Store. One special thing about the pages in the journal is that they can be torn out and used on card fronts or memory-keeping pages, whatever you like!

Here’s another journal that I decorated last fall.

At the beginning of each new year, we often feel we want to start something new or resolve to have better habits of all kinds. If you feel like to want to do some journaling in the new year, get this Pressed Petals Journal because it’s not intimidating with expectations at all. It’s small, so you barely have to write anything at all, but if you jot down some memories or thoughts, you might be very happy you did in future years to look back on!

Have a Safe & Happy New Year’s Eve!

Stampin’ Up! Clearance Rack Updated Today! Get Shopping!

Clearance Rack Sign
Click to shop the Clearance Rack and more!

The Stampin’ Up! Clearance Rack was updated overnight! Just in time to buy some stocking stuffers for YOURSELF!

I see lots of dies available, lots of pretty ribbon, some designer paper, various embellishments, embossing folders…and more!

But don’t read about it here!

GO SHOP!

You know the best things will go fast! Well, it’s all the best stuff, just depends on what YOU want! And even if it arrives after Christmas, if it is for YOU, it doesn’t matter, right?! Your treat, either way!

Have a Happy Shopping Day at Stampin’ Up!

Christmas Mini Curvy Keepsake Boxes

Christmas Mini Curvy Keepsake Boxes

I thought it would be fun to just make some of these Christmas Mini Curvy Keepsake Boxes to have on hand for the holidays – now that the holidays are upon us!! These are just easy boxes that you have probably seen online, nothing too creative, but cute nonetheless!

All you need to make these and other cute creations is the Mini Curvy Keepsake Box Dies. The one big die cuts out the box and then you also have little tags and other pieces you can use. Very creative people make the most creative characters and designs with these boxes!

Snowman Face Mini Curvy Keepsake Box

This easy snowman is made with Whisper White Cardstock and I just drew on his face with Stampin’ Write Markers. You could alternately punch out pieces for his eyes, nose, and mouth but for me, it was easiest to draw. I used the greeting from the Itty Bitty Christmas Stamp Set. The Real Red Curly Ribbon makes a cute way to tie on the tag and add a little something to the snowman.

Santa Outfit Mini Curvy Keepsake Box

This little Santa box is easy to make with Real Red Cardstock and a bit of Basic Black scrap and Silver Glimmer Paper. Use a hole punch for a couple of buttons on Santa’s suit. To make the belt, just adhere a narrow strip of black cardstock. Add on a square of Silver Glimmer Paper and then adhere a smaller square of Basic Black on top of the glimmer paper to make it look like the belt going through the buckle! The greeting is tied on with a piece of Braided Linen.

Snowman Mini Curvy Keepsake Box

This keepsake box uses a piece of the Let It Snow Specialty Designer Series Paper with a snowman from another piece of the paper that is cut out and adhered to the side of the box. If the recipient opens up the box, they will find the cute inside pattern of lots of little snowmen. The only trouble with prints and this die is you would have to make sure the patterns and designs are going in the direction that you want. The greeting is stamped from Itty Bitty Christmas and tied on with a bit of the Silver 3/8″ Metallic-Edge Ribbon.

Rudolph the Reindeer Mini Curvy Keepsake Box

This cute little reindeer can be made various ways. He is made out of Soft Suede Cardstock for his body and a lighter color for the antlers, Crumb Cake. Of course you must you Red Glimmer Paper for Rudolph’s nose. The eyes are punched out and the black pupils colored in with a black marker. The antlers are glued on by bending back the stem of the die-cut piece and just glued on the top of the box. The tag, stamped with a greeting from Itty Bitty Christmas, is tied on with the Real Red Curly Ribbon.

As you can see, you can do a lot with these dies, much more really than these samples. But once you start making things with this box die, you can almost not stop!

if you don’t own the Mini Curvy Keepsake Box Dies, you might want to check them out in the Online Store. You can put a small gift or treat inside. Their little size makes them especially cute!

SHOP STAMPIN’ UP! ONLINE HERE!

Monochromatic Real Red Holly Jolly Santa Christmas Card

Monochromatic Real Red Holly Jolly Santa Christmas Card

If you love this Santa, but don’t want to color him in, monochromatic is the way to go for this card, the Monochromatic Real Red Holly Jolly Santa Christmas Card. After making several other Christmas cards with this Santa and taking time to stamp in black and then color in all the areas with Stampin’ Blends, I would say, even though I LOVE coloring with my Stampin’ Blends, that it can take a fairly long time to color the Santa. So if you want to make a lot of cards in a hurry, just stamp Santa in Real Red Ink and call it a day!

This is a really simple card. The card base is Real Red and the designer paper layered on the base is the red stripe pattern in the Toile Tidings Designer Series Paper in the Holiday Catalog.

The Santa is from the Holly Jolly Christmas Stamp Set. He is just stamped in Real Red on Very Vanilla Cardstock. I have made several cards with this Santa and coloring him in with Stampin’ Blends and as much as I like coloring, it takes a while to do several Santas for several cards! This is super easy, just stamping him in red ink and die-cutting with a Layering Ovals Die. He is layered on a piece of Real Red Cardstock. I was going to stop there but I thought having a layer of Very Vanilla underneath made it stand out just a bit more.

The greeting is stamped in Real Red ink on Very Vanilla from the Itty Bitty Christmas Stamp Set. I keep turning to all these “Itty Bitty” stamp sets for greetings since they have so many choices and don’t take up much room on a card if you don’t have much room for a greeting! The greeting is then die-cut with a small Layering Ovals Die and layered on a scalloped oval die in the same set. You could also have the greeting be just a straight strip of paper too.

I suppose you could even add some rhinestones or sequins to this card, but I liked it just the simple, basic way it turned out. I didn’t even pop anything up on Dimensionals but you could. If you weren’t making a bunch of these cards, you could also stamp the Santa in Memento ink and color in with Stampin’ Blends or whatever color medium you liked. This is just a time-saving method that still delivers a very nice card! Here is a card I previously stamped and colored the Santa. I loved this card, too, and looked forward to making several more to send out, and I did, but it took time.

It’s not too late to get this stamp set or Bundle with the dies and whatever paper you need for Christmas cards! Just go shop at Stampin’ Up! and find what you need!

Brightly Gleaming Stitched Star Christmas Card

Brightly Gleaming Stitched Star Christmas Card

This Brightly Gleaming Stitched Star Christmas Card was very difficult to photograph without a giant glare of the Copper Foil, but I think I got it pretty well now on an angle! I’m feeling like I haven’t had enough time to play with all my Christmas stamp sets and accessories and time is getting short! Panic is setting in! And a sore throat that slowed me down this past week!

However, I did fit in some stamping time and here is one example! It seemed like a lot of samples I was seeing used the Night of Navy designer paper in the Brightly Gleaming Specialty Designer Series Paper. I thought I would change things up a bit and use the Mossy Meadow color.

The card base is Mossy Meadow and the Mossy Meadow patterned designer paper just comes down partway on the card base. Be sure to adhere some of the Very Vanilla/Copper 1/2″ Classic Weave Ribbon around the bottom of the designer paper before adhering the designer paper to the card base! And before you do any of that, if you want to emboss a greeting at the bottom of the card, do it before you have ribbon hanging in the way with the potential to ruin the card! I got lucky and could have covered it up with an embossed greeting on a different paper. But it’s better if you plan your card and space first and stamp or emboss before you get everything adhered to the cad!

The star is die cut with the largest star in the Stitched Stars Dies. I just love that we have star dies again because I think stars are SO useful in designing cards and projects. Just think about how many things you can use stars for besides Christmas! Birthdays, congratulations, babies, retirement, everything! These stars are beautiful dies and certainly not just for the holidays.

The star is cut from Copper Foil. Then that Copper Foil star is overlaid with the large star in the Brightly Gleaming Foil Elements. I used the Multipurpose Liquid Glue in teeny tiny dots on the back of the foil element to adhere to the die-cut star. I got lucky and didn’t make a mess with the glue so it worked fine. On this card, I popped up the foil star with Stampin’ Dimensionals, but you can also adhere it flat on the card.

The ribbon is really beautiful. I need to learn how to tie a bow with the words all going in the same direction if that’s possible! I passed it up on one of my first Holiday Catalog orders, but then added it later because it is something different!

For the greeting on the card front, I chose one from the Itty Bitty Christmas Stamp Set because I knew I needed something small. I stamped it with Versamark and heat embossed with Copper Stampin’ Emboss Powder and my Heat Tool. Heat embossing is magical, if you haven’t tried it yet!

For the inside of the card, I added a Very Vanilla layer of cardstock, stamped with a greeting in Mossy Meadow Ink and with a strip of the same Brightly Gleaming DSP along the inside edge of the Vanilla layer. The greeting used inside the card says “Hoping all your Christmas wishes come true.” in the So Many Stars Stamp Set. Save 10% by purchasing the So Many Stars Stamp Set and Stitched Stars Dies in a Bundle.

Thanksgiving is coming up so make those cards first if you are mailing a few cards to friends and family. But then it’s really time to get serious about Christmas cards!! You’ve probably paged through the Holiday Catalog a bunch of times, but maybe you need another few run-throughs before it gets too close to the holidays!

SHOP STAMPIN’ UP! ONLINE HERE!

Christmastime Is Here Z Fold Rose Birthday Card

Christmastime Is Here Z Fold Birthday Card Open

I think these Z-Fold cards, such as this Christmastime Is Here Z Fold Rose Birthday Card, just look impressive and yet they are perfectly easy to make! This is a birthday card, in spite of the fact that the designer paper and suite of products is called “Christmastime Is Here”. Just think of the people with December birthdays that maybe get tired of their birthdays being completely tied in with holiday designs. This paper, while recognizing the season, can be used for birthdays or other occasions. And some of the patterns have no hint of any season so you can use them at any time.

This card base is Cherry Cobber Cardstock, folded in half as usual. To make it a z-fold card, just score the front of the card in half (so half of 4 1/4″ would be 2 1/8″). Basically, you fold half of the front of the card back on itself. This makes the “z”.

For the front panel of the card, I cut a piece of the Christmastime Is Here Specialty Designer Series Paper at 5 1/4″ x 1 7/8″. The inside of the card is Whisper White 5 1/4″ x 4″ with a 3/4″ x 5 1/4″ strip of the designer paper down the side. Stamp the greeting inside the card if you are putting one inside and then adhere the layer inside the card. (If you mess up with the stamping, you haven’t ruined the card!)

For the front of the card, I die-cut a portion of the floral paper with the Layering Circles Dies which was then layered on a Cherry Cobbler die cut circle layered on a die-cut circle scalloped circle of Gold Foil to match the gold accents on the designer paper.

Christmastime Is Here Z Fold Rose Birthday Card

To finish the card, I added a few Gold Glitter Enamel Dots and that was it! As you can see in the photos and in the Online Store, this Christmastime Is Here Specialty Paper is just gorgeous with its gold foil accents on many of the sheets. I added the Gold Glitter Enamel Dots and the Gold Shimmer Ribbon to my order even though I did not purchase the stamp set and dies. The good part about this Christmastime Is Here Suite is that you can get it all or pick and choose what you like or need.

If you are still considering choices for Christmas cards and projects, I would remind you to check out this Christmastime Is Here Suite. It only came out in November, is not in the Holiday Catalog, and is available while supplies last.

SHOP THE CHRISTMASTIME IS HERE SUITE IN THE ONLINE STORE!