There are even Poppies Bundles available, and unlike most Bundles that are retiring with the current catalog, these Poppies Bundles are carried over into the new catalog! That is good news so you can still save 10% on stamp sets and dies together. There is the Painted Poppies Bundle and the Peaceful Moments Bundle. Order them now or later if you don’t already own them! I would recommend ordering them with the new catalog actually.
Today and tomorrow, June 1 and 2, are the last two days to order any retiring Last-Chance products from the current catalog.
The new catalog begins around Noon (Mountain Time) on Wednesday, June 3. Keep in mind the website will probably be quite busy that day so if you have trouble getting in just keep trying.
Some new products might not be available due to the problems of shipping and keeping inventory supplied so there may be backorders or even products that will be unorderable perhaps. However, I recommend ordering things that are your first choices as soon as you can and try to beat the backorders! I always recommend going ahead and ordering something that is backordered if you want it because Stampin’ Up! will send that item out to you as soon as they are resupplied and that will be faster than waiting to order it for the first time yourself.
***There will be a special for placing a $250 order or more during June in the NEW CATALOG, June 3-30. Orders of at least $250 in merchandise will receive an EXTRA $25 in Stampin’ Rewards! Prepaid Paper Pumpkin subscriptions can count toward that amount if you need something extra to reach $250.
Hopefully my regular customers have received their new catalogs that I mailed out to them so you can be making out your Wish List of new products that you would like! If you are new to Stampin’ Up! and looking for a Demonstrator to assist you and are interested in Stampin’ Up! products, I would be happy to send you a complimentary catalog if you send me your contact information.
So today and tomorrow check the Last-Chance Products and Clearance Rack and see what you need to order today and tomorrow before the current catalog ends at midnight (MT) on June 2.
The first time I saw one of these face mask cards online I thought it was so clever and I have been anxious to make one since then so here are my Facemask Cards with Peaceful Poppies Paper. Not all face masks have to be those medical blue ones! Some are getting quite creative! A famous furniture store owner here in Houston is wearing a face mask with a face printed on it when he does his commercials on TV!
These face mask cards are relatively easy to make. You just take a small scrap of paper, preferably designer series paper because it will fold easier than cardstock, score and fold, then tape. If you want, you can then pop up the mask from the underside by pushing out those pleats you folded, just like a real mask. I don’t think this would be workable for mailing but it is fun that you can make the mask look so realistic.
To make the mask, use a piece of designer paper 2 3/4″ x 2 1/8″. Then putting the short end at the top of your Paper Trimmer or Simply Scored scoring tool, score at 1/2″, 5/8″, 1″, 1 1/8″, 1 1/2″ and 1 5/8″. Normally I score most things with my Paper Trimmer because it’s right there, but I think for this little bitty piece of paper it is easier and better to use the scoring board. You want the score lines to go horizontally across the paper, just like a real mask would look.
I used some scraps of Peaceful Poppies Designer Series Paper to make the masks. Why not use some pretty paper?! After scoring the little scrap of designer paper, fold and crease back and forth just like pleats on a real mask. It’s a little tricky to get those narrow folds but just make the paper do what you want! It helps to use the Bone Folder to really give those folds good creases. If you don’t have a Bone Folder, use a spoon or acrylic block or whatever you have.
After you have the paper folded, the sides need to be taped down to hold them in place. Make sure you have everything as straight and lined up and folded down as possible. It might end up slightly off so don’t worry about that. It might not be perfect, just like the masks I sewed, but it doesn’t matter! Try to get it as good as you can.
Cut a strip of Whisper White cardstock 11″ x 1/4″. Apply Tear & Tapealong this piece of 1/4″ cardstock all the way down. The width of the tape fits perfectly if you apply it straight. Then pull back just a portion of the adhesive tape so you can adhere the thin strip of cardstock to each side of the mask on the back then cut off the excess. After you tape the sides of the back of the mask do the same on the front on each side. This strip of Whisper White looks like the white borders you often see on masks, so it works great and the Tear & Tape holds it well.
To put a very thin strip of white cardstock on the top and bottom of the front of the mask, lay the strip of Whisper White Cardstock on your table, adhesive side up. Adhere the top of the mask to just half that width (1/8″) of the white cardstock, then cut off the excess. Now you have the other side of that adhesive piece, 1/8″ wide, to adhere to the bottom edge of the mask.
If you want to pop up the mask to make it 3D, push out from the back side to push the pleats open. Then take another piece of the Whisper White strip with Tear & Tape adhesive and adhere it to the inside of the mask down the center to hold the pleats open.
I used 2 3/4″ pieces of the Whisper White 1/4″ Crinkled Seam Binding Ribbon for the ear loops of the mask. Just adhere with Mini Glue Dots. You could use whatever other ribbon you have that would work.
That’s it for making the little mask! For making each card, I just used Whisper White Cardstock for the card base and adhered a narrow strip of the Peaceful Poppies DSP along the side. The mask is adhered with Mini Glue Dots in each corner of the mask. The greeting is layered on a piece of Poppy Parade Cardstock. The measurements depend on the size of the greeting that you cut out.
The greeting comes from the Share Sunshine PDF download that you can get with a $12 donation to organizations that are helping during the pandemic. The full $12 goes to the donation, none is kept by Stampin’ Up!. For your donation, you get 15 pages of light-hearted sayings about the pandemic and quarantine, things we all talk about every day in this situation. You can print out all the pages or just the ones you choose and then cut, die-cut, or punch out the sentiments you want to use and use them on cards. The last day this Share Sunshine download will be available is June 2nd. Get it HERE.
If you want to watch some videos with Sara Douglass on Facebook explaining how she planned out cards to make with the sayings and designer paper and see her family’s craft party that they did virtually along with the Stampin’ Up! employees for their Day of Service, just watch HERE or HERE. I made some cards as I watched and made more the rest of the afternoon. Then my daughter saw them and asked me to make cards for her so I made more! And then I made the mask cards because I liked the saying that went with the face mask!
I hope you will try one of these Facemask Cards and send it to someone who might feel a bit of “sunshine” from receiving a card from you!
As I was looking through what is left of my Peaceful Poppies Designer Series Paper, I had a full sheet of this poppy floral pattern and thought it looked so pretty and that it would make a lovely Peaceful Poppies Gift Bag With Poppies. You could use this gift bag for a small gift for Mother’s Day or a birthday or any special occasion. There will be graduations coming up even, perhaps, without graduation ceremonies this year. Making your own gift bag out of pretty Stampin’ Up! designer paper would make a very special gift presentation!
You can make this gift bag with just half a sheet of designer paper, whichever one you choose to use. I used the Peaceful Poppies Designer Series Paper to make the bag. Start with the paper cut to 6″ x 11 3/4″. Using the Paper Trimmer or the Simply Scored scoring tool, score along the long side at 1 1/4″, 5 1/4″ 6 1/2″ and 10 1/2″. Turn the paper so the short end is at the top of the board and score at 1/4″ on one side, then at 1 1/4″ on the other side. Pay attention to the pattern on the designer paper so the bag will have the design going the correct way. The narrow 1/4″ scored area will be the part you will fold over to make a smooth top edge. The other long scored 1 1/4″ area will be the flaps at the bottom of the bag.
Crease all the score lines and fold over the narrow 1/4″ piece at the top of the bag. If you prefer you could fold it to the outside if you’d like that side to show as a contrast. OR don’t score that 1/4″ line and have your bag be 1/4″ taller. Use some adhesive of choice to adhere that to the inside of the bag.
Use the Classic Label Punch to punch a handle at the top of the bag. You can squish the front and back sides together and try to center the punch to make the handle opening or you can do one side at a time.
Assemble the bag folding on all the scored lines and flaps. Then decorate for the occasion.
To decorate my gift bag, I die cut two large poppies using Poppy Parade for the body of the flower and Flirty Flamingo for the outline, plus Basic Black for the center. The leaves are Old Olive and Pear Pizzazz. I tied a bow of Poppy Parade 1/2″ Textured Weave Ribbon separately (after trying to tie it onto the handle unsuccessfully!) and adhered it to the handle with Mini Glue Dots.
In this photo you can see the actual designer paper better from the back of the bag and how pretty it is:
Add some tissue paper and a gift inside, maybe make a matching gift card and you’ll have a charming gift to give someone special! Here’s a matching card idea you could even use to go with the bag! Just cut half a sheet of designer paper and make a gift bag with the basics of this Peaceful Poppies Gift Bag With Poppies.
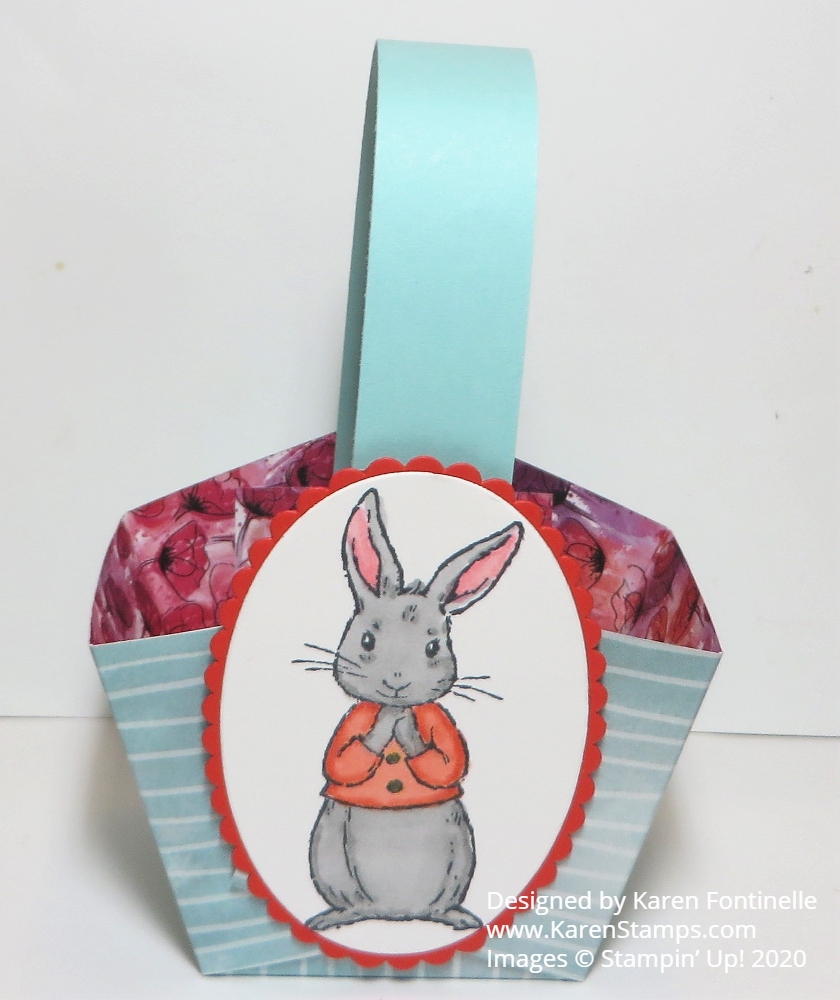
Today is the first day of spring, the earliest first day of spring since 1896, so here is a Fable Friends Easter Basket to celebrate! These are so easy to make you could make a ton now in your “free time”!
This is the Peaceful Poppies Designer Series Paper and I liked the Pool Party stripe paper for the basket. And then you can see the floral pattern on the inside of the basket.
The bunny is stamped from the Fable Friends Stamp Set in the Annual Catalog. I love that bunny! I colored his fur and jacket with Stampin’ Blends and then die cut him with a Layering Oval die, then layered on a scalloped oval die. Don’t think I picked the correct color for the scalloped oval to match the inside of the basket but it’s fine!
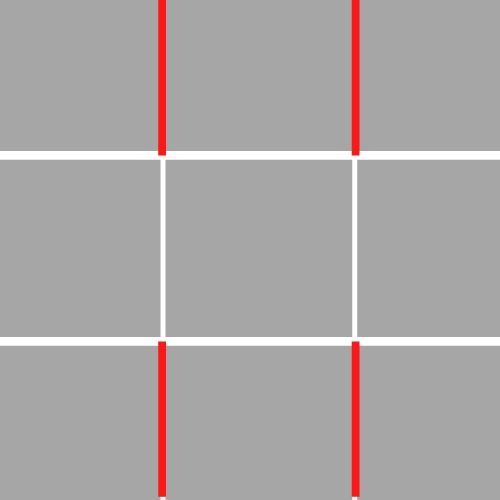
Just use a 6″ x 6″ square of paper and score at 2″ and 4″. Turn the paper and score again at 2″ and 4″. Then on opposite sides, cut up to the scored horizontal line. Round the four corners if you wish with the Detailed Trio Punch. In the rough (?) diagram below, you can see how you score all the lines like a “tic tac toe”, then cut on the red lines up to that horizontal score line. Then crease and fold on all the lines and begin assembling the basket.
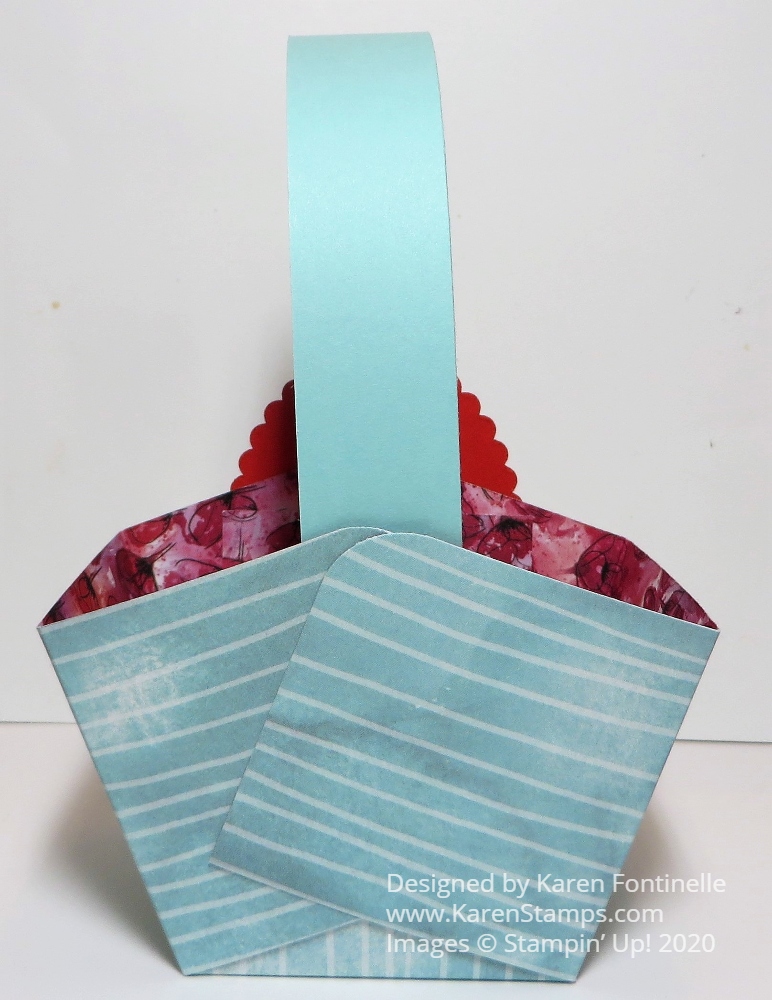
Fold on the score lines and overlap the sides of the basket. You don’t have to be exact on the placement, just try to have both sides pretty much the side. Either adhere with strong glue or use Metallic Brads. Back in the day we were really into brads of all kinds so you probably have some in your stash, but Stampin’ Up! does also carry the Metallic Brads. You can see the sides of my basket in the photo below and I did not put a lot of effort into getting them into some perfect shape!
Last year I made several baskets in one post and you can see those ideas and directions HERE.
I think it just feels better to know that it is spring now! Spring is a happier season, things start growing and blooming, the weather is nicer, we are outdoors more. Look through your designer paper and make a few spring or Easter baskets to brighten up your home. You couldn’t have to put a bunny or anything on the side. You could use cardstock to make the basket and add designer paper on some of the squares. You could just tie on a tag or put a pretty bow on the handle. The handle, by the way, is just a strip of cardstock, probably cut about 1/2″ or 3/4″ wide and however long you would like it. It’s a simple project and would be fun and easy to make if you have kids at home now! Or just make it for yourself! Use larger paper for a larger basket! Maybe I will try that myself! Try your hand at a spring basket like my Fable Friends Bunny Easter Basket!
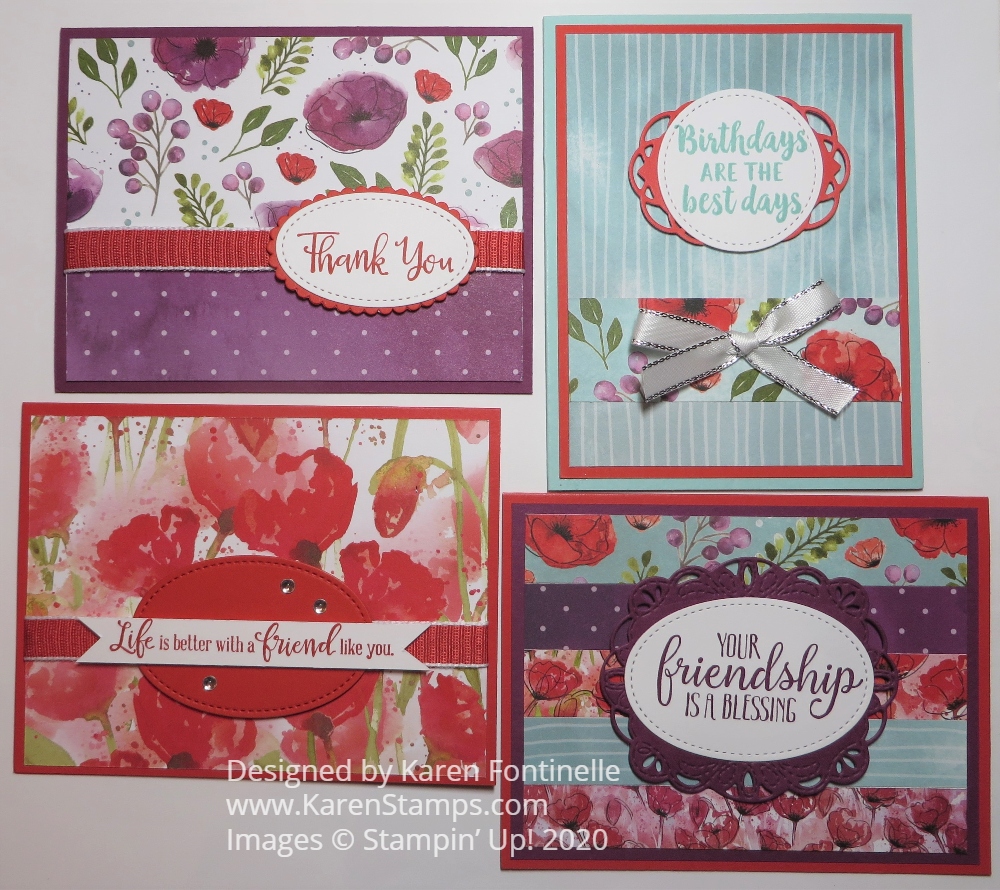
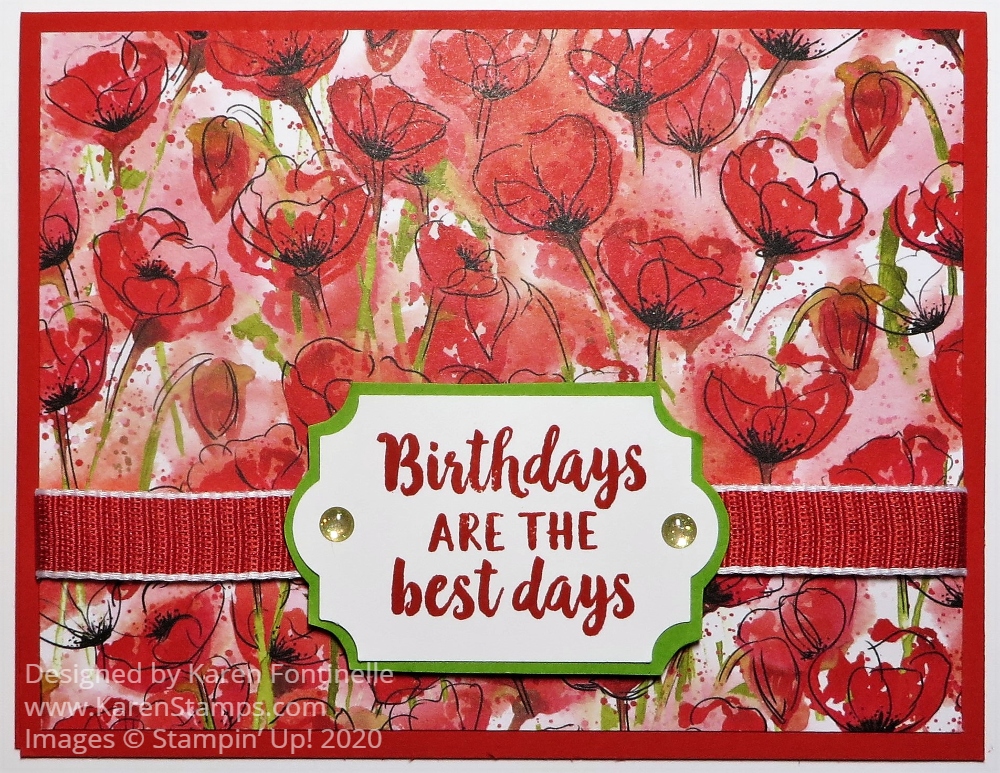
Make this easy and bright Peaceful Poppies Birthday Card in Poppy Parade with this great floral paper! It’s sure to brighten someone’s day and all you have to do is change the greeting for the occasion.
It’s funny sometimes how a card comes to be. I was making another project which I will show another day and in my package of Poppy Parade paper, I already had a folded card base. ThePeaceful Poppies Designer Series Paperwas also on my table that I had used on the other project and this particular paper jumped out at me. So I thought why not just go ahead and make another card and make it rather quick and easy!
All I had to do was cut a 4″ x 5 1/4″ piece of the designer paper I liked and wrap a piece of ribbon around it before adhering to the card base. The ribbon I used is the Poppy Parade 1/2″ Textured Weave Ribbon which is a really nice, soft ribbon that is easy to use even though it is wide and looks like it would be heavy.
The greeting is stamped in Poppy Parade Ink and is from the Beautiful Friendship Stamp Set. I made a card with that stamp set recently because sometimes we forget about the great stamp sets and products in the Stampin’ Up! Annual Catalog when we are glued to the extra Mini Catalogs of the season. I punched it out with the Everyday Label Punch. The problem then is what to layer it on! I tried various die cuts and things and finally settled on just adhered the punched piece to a piece of Granny Apple Green Cardstock and then just cut around it with Paper Snips! It’s not perfect but you can do it and it doesn’t have to be perfect. What person who gets the card is going to say, “I wish she had cut that curve better!”?
For a bit of embellishment I added two Gold Glitter Enamel Dots on the greeting. You could also add some sequins to the card or tie on ribbon on each side of the greeting.
If you are staying at home to avoid getting sick, this is a good time to make a stash of cards to keep on hand, but also to send! Just think how anxious we all are and how receiving a card in the mail will brighten someone’s day like nothing else will. And if it comes from YOU, that makes it the most special! Use this design of my Peaceful Poppies Birthday Card in Poppy Parade in the same colors or change the colors or change the greeting or the ribbon and then mail it!
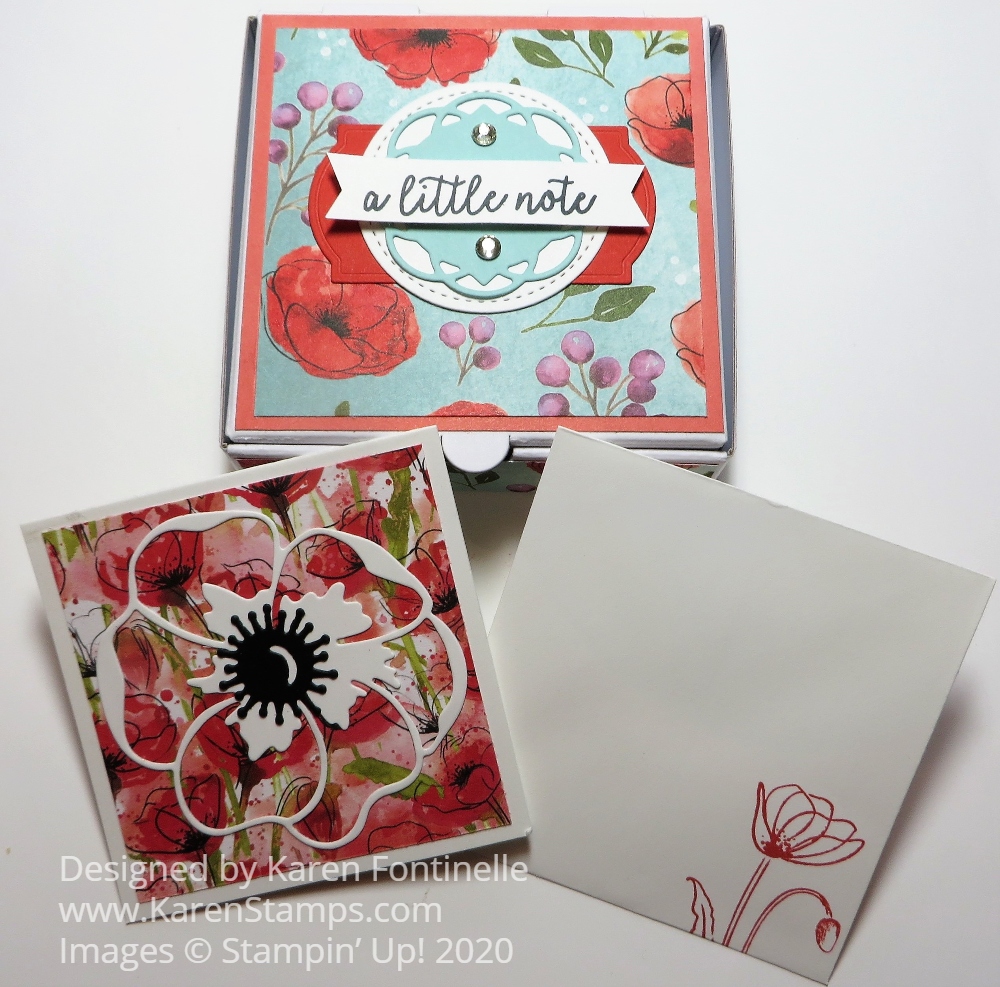
The other day I posted about decorating one of the Stampin’ Up! Mini Pizza Boxes and today I am showing you the Peaceful Poppies Pizza Box 3″ x 3″ Notecards I made to go with the box! There were really so many choices of how I could have decorated the notecards, but using a Whisper White poppy die-cut was what I ended up with.
You can make your own 3″ x 3″ cards (or you may have some old ones in your stash!) by cutting 6″ x 3″ cardstock, folded in half. You can purchase envelopes at Stampin’ Up! in the Online Store.
To make these little cards, I just cut different patterns of the Peaceful Poppies Designer Series Paper into layering pieces of 2 3/4″ x 2 3/4″. I wanted that pretty paper to show through, so I cut the large poppy die from the Poppy Moments Dies, plus the small black center die-cut for the flower. I just used tiny dots of Liquid Multipurpose Glue (I mean TINY!) to adhere the white poppies. You could even add some Peaceful Poppies Sequins if you wanted to.
For fun, I also stamped the inside of the little notecards with a stamp in the Painted Poppies Stamp Set.
And of course the envelopes!
You could even make up a few sets of these Mini Pizza Boxes and notecards and have them on hand for gifts. Who wouldn’t love to receive this little gift?!
If you want details on how I decorated the Mini Pizza Box, check out my blog post HERE from the other day. You can also purchase Gold Mini Pizza Boxes. Both kinds of boxes are food safe so you can even put a cookie or brownie or candy inside! These boxes are great to have on hand. They store flat so they don’t take up any space. All you have to do it pull one out and decorate it for whatever occasion and put something inside. Use this Peaceful Poppies Pizza Box 3 x 3 Notecards idea and use it for your inspiration!
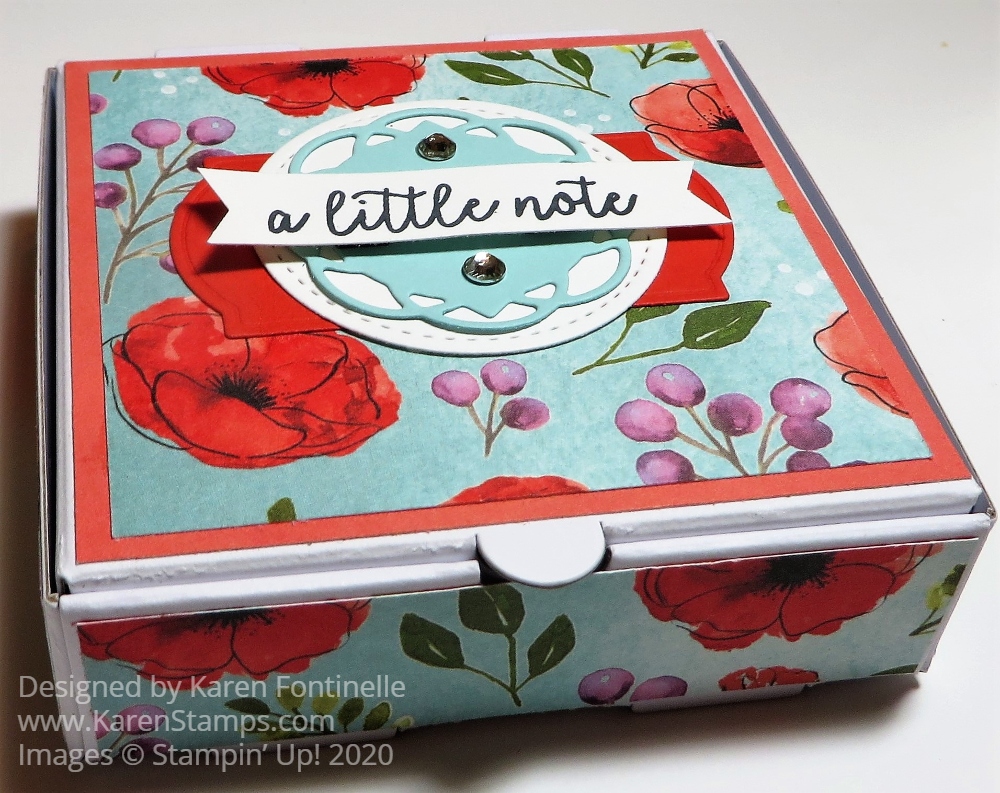
Peaceful Poppies Pizza Box! Say that ten times fast! If you are looking for a little gift idea, look no further than the Stampin’ Up! Mini Pizza Boxes! These boxes will be so cute for you to decorate, whether you are putting a set of 3″ x 3″ notecards inside, a small gift, or a cookie! They are even food safe so no worries there!
These boxes come to you flat, 8 in a package, so you don’t have to worry about a pile of boxes to store! Just take one out when you need one and fold on the scored lines and assemble it into a pizza box shape. Then the fun begins! Decorate for whatever occasion you have or personalize for the recipient of your gift.
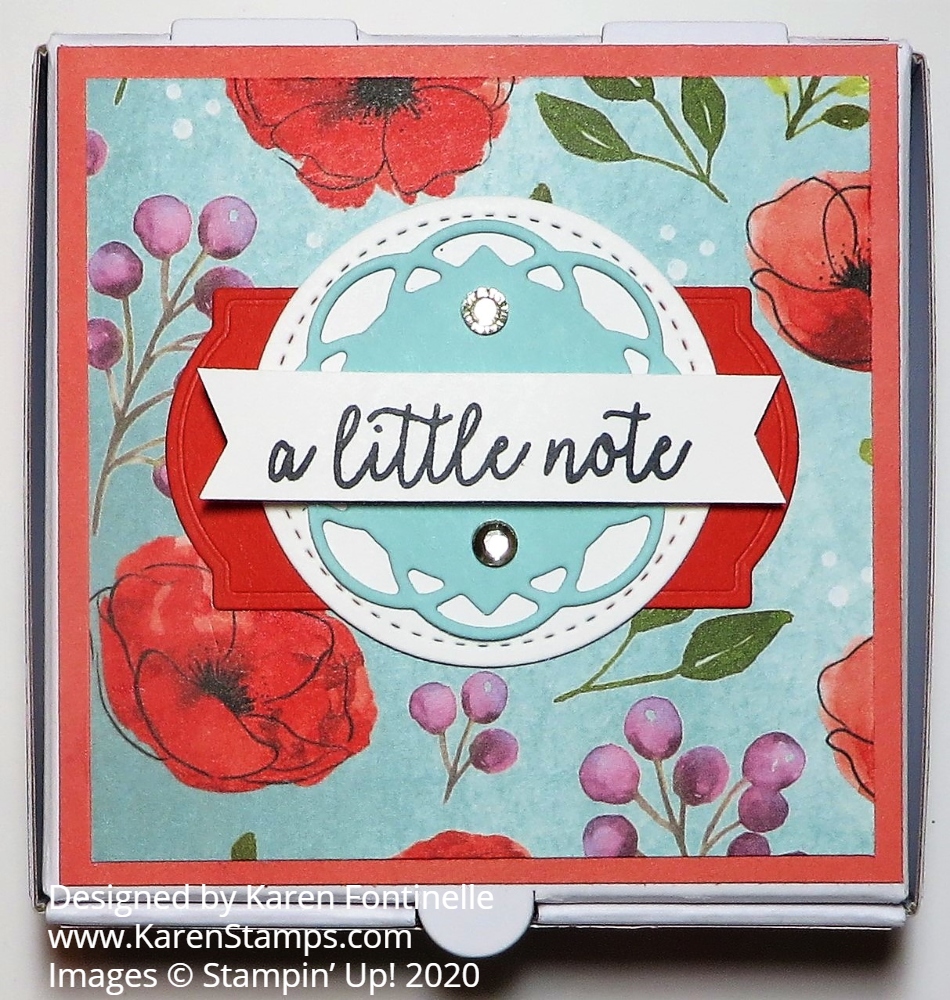
For this pizza box, I decided to use the beautiful Peaceful Poppies Designer Paper. I absolutely love the pattern that I chose on top with the poppies against that Pool Party blue color. As a layer underneath this designer paper, I used another piece of designer paper, the solid watercolor Poppy Parade color. I cut a piece 3 3/8″ square to fit the top of the box and then 3 1/8″ square of the layering designer paper.
For all four sides of the box, I used strips of the Peaceful Poppies DSP, cut 7/8″ wide and just under 3 1/2″ long. You may need to trim your papers slightly differently than mine depending on your box. You could also wrap a ribbon around the box or use a solid color of cardstock. Whatever you like!
I tried several ideas for the top of the box before settling on what you see that I came up with! I used dies from the Painted Labels Dies, the Poppy Parade Cardstock bottom layer and the Pool Party circular diecut. The Whisper White circle I felt was needed to help everything stand out. It is die cut with one of the Stitched Shapes Dies. The greeting is from the Butterfly Gala Stamp Set. It’s a small box and I didn’t want to cover up too much of the lid because I wanted the designer paper to show as much as possible. Since I am putting small notecards inside the box, I thought the greeting was perfect! You wouldn’t have to have it though or you could change it for a birthday or congratulations. The greeting is popped up on Stampin’ Dimensionals and little Basic Rhinestone Jewels added for some bling!
Put someMini Pizza Boxeson your next order so you have them handy for a last-minute or just an extra little gift that you can quickly decorate for someone, like this Peaceful Poppies Pizza Box!
It’s even cold in Houston today and you may have snow where you live so here is a Thoughtful Blooms Floral Card to brighten our day! This is a stamp set you can earn FREE during Sale-A-Bration through March 31 with a $50 purchase of Stampin’ Up! products.
I was inspired by a card sample I saw in the Sale-A-Bration Brochure on page 12 for this stamp set, although mine turned out to be a fairly different design. It was fun to do some actual STAMPING on this card like in the “olden days” when we didn’t have so many die cuts and great designer paper.
This card has a base of Mossy Meadow, one of the coordinating colors in the Peaceful Poppies Designer Series Paper. Although the sample in the SAB Brochure has blues and greens, I thought brighter colors were going to be what I was going to use. That led to looking at the coordinating colors of the poppy paper. Here is a card I made using the bright poppies in this designer paper that made me think of using bright colors of the stamped flowers on this card. I used the green striped designer paper as a layer on the card and I wanted a wider margin on it under the Whisper White layer.
I stamped the Whisper White layer, starting with Calypso Coral ink for the main flowers and Old Olive for the flower stems stamp surrounding the Calypso Coral flower. This stamp set, Thoughtful Blooms, is one you can earn free with a $50 purchase, as I mentioned before. AND with a $100 purchase, you can earn the coordinating Small Bloom Punch free also! I didn’t use this punch on this card but I could have! Next time!
The tiny flowers on the card are stamped with Daffodil Delight ink and the extra little dots, another stamp in the set, are stamped in Granny Apple Green for just a little texture on the card in the blank spaces. The flower centers in the large flowers are stamped in Memento Black ink.
The “Thank You” stamp is included in the Thoughtful Blooms Stamp Set and is stamped on Whisper White in Memento Ink. I die cut that with the smallest die in the Stitched So Sweetly Dies and then that was layered on a Calypso Coral die cut rectangle in the same set.
I thought the stamped layer needed a little boost in color so I found that the backside of one of the floral sheets in the Peaceful Poppies DSP in Calypso Coral would be perfect. You could also use cardstock for this as you can barely tell this is designer paper. I don’t usually like to use paper at an angle, but today I thought it suited this card. I think the Whisper White layer is fairly straight but the designer paper is on an angle. For one more pop of color, I used the Daffodil Delight 1/4″ Ruched Ribbon underneath the greeting with a little knot off to the side.
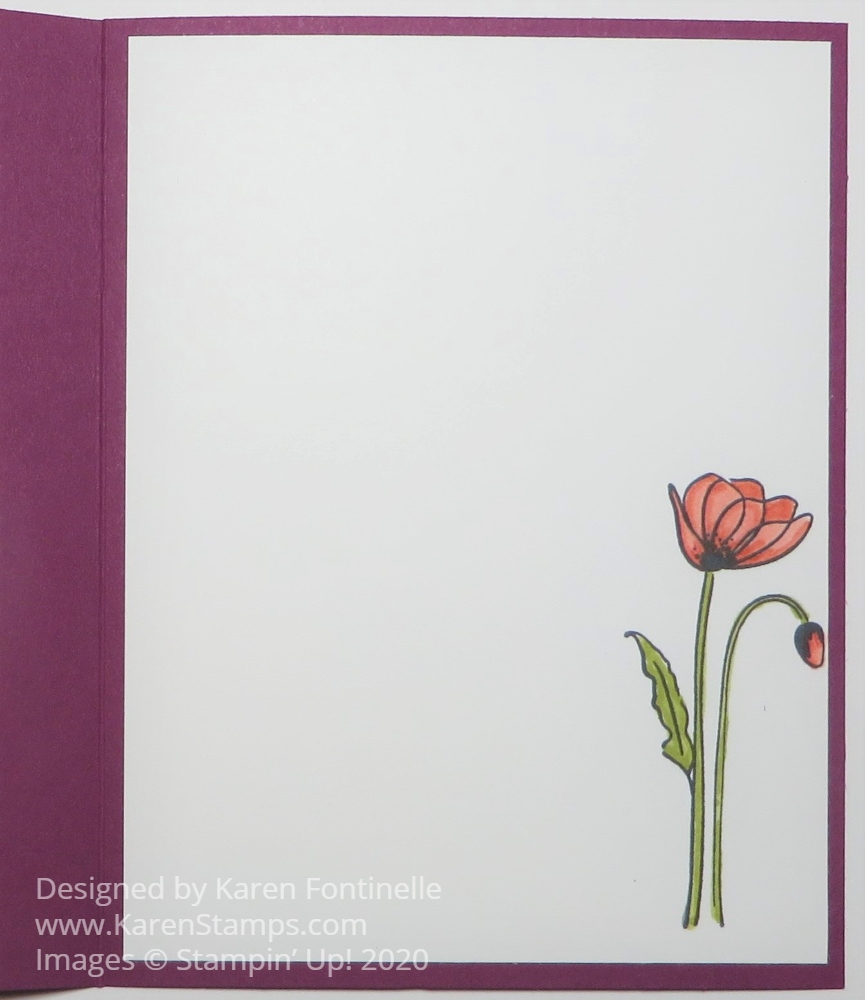
For the inside of the card, I will add a layer of Whisper White for another greeting or personal message, probably with some little flower stamped in the corner.
Be sure to take advantage of Sale-A-Bration because we are already halfway through this promotion! Can you believe it?! Time flies when you are having fun stamping! Remember that one of the stamp sets you can earn FREE with a $50 purchase is this Thoughtful Blooms Stamp Set with which you can make this easy Thoughtful Blooms Floral Card.
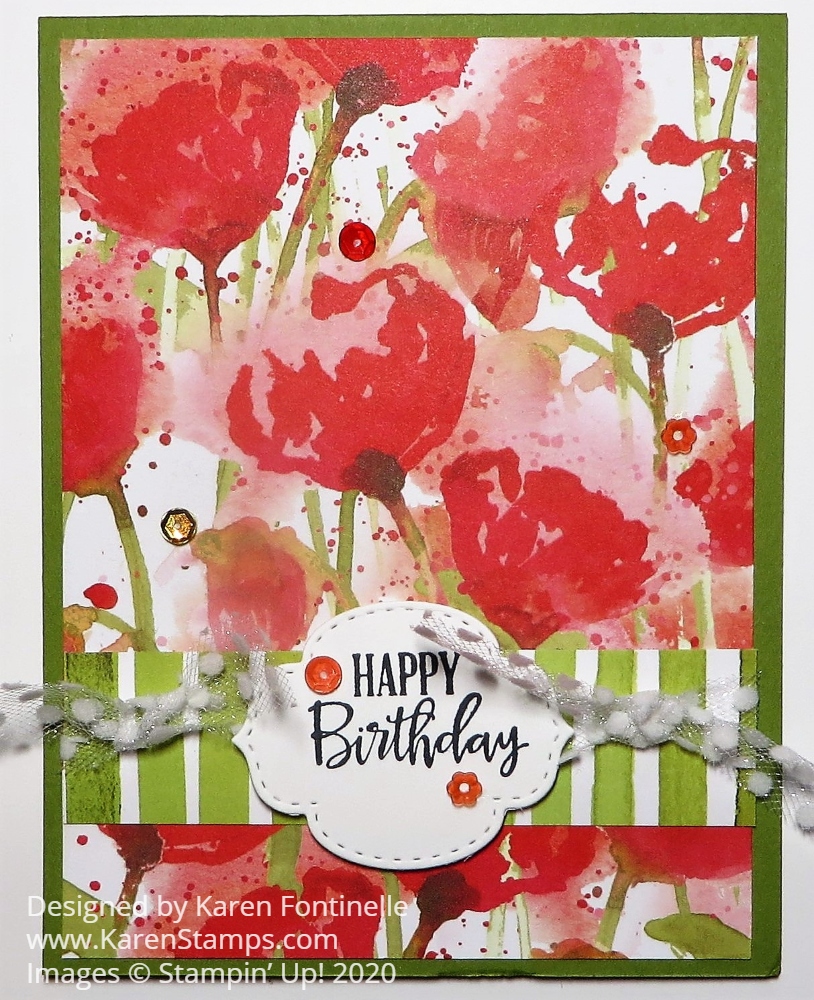
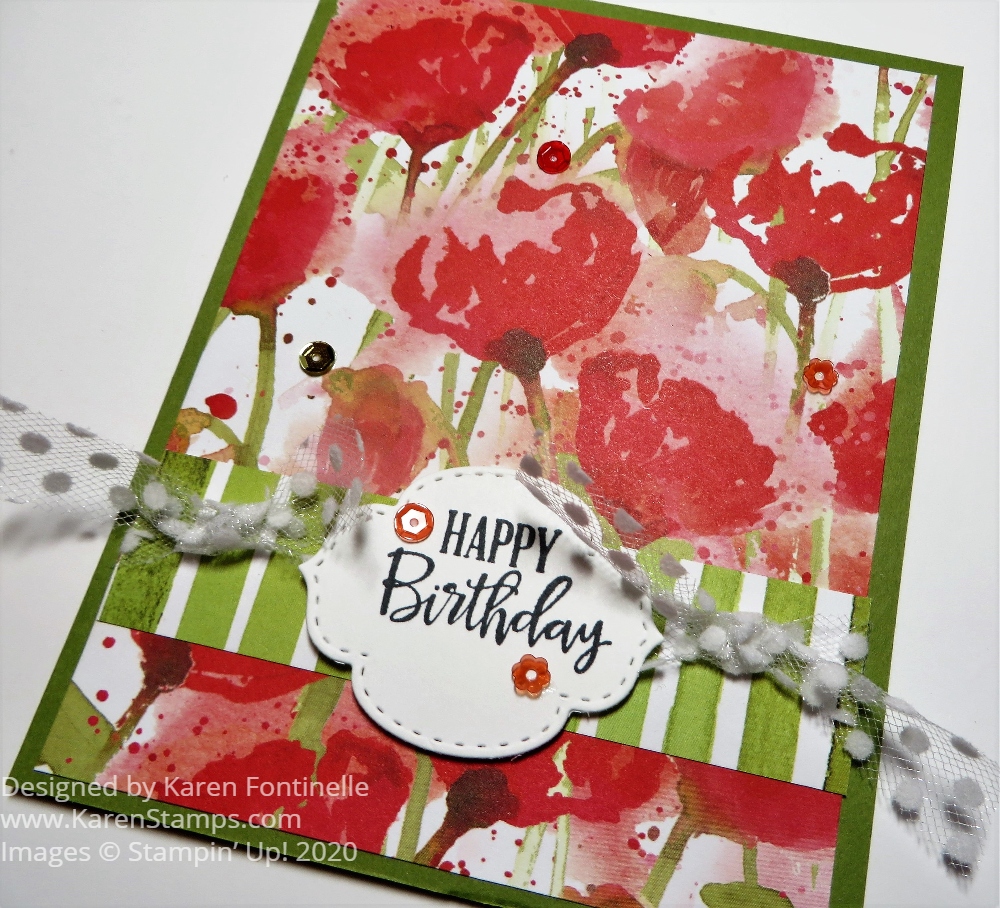
This Peaceful Poppies Watercolor-Look Birthday Card is just so bright and happy, I think it would brighten anyone’s day even if it was already that person’s birthday! This card is an example of how the beautiful designer paper does all the work of making a card!
The Peaceful Poppies Designer Series Paper was designed from actual watercolored images. One side of the paper has the floral images and the other side has watercolor washes in stripes, polka dots, and solids. Don’t think your designer paper is printed badly, the watercolor washes have different shadings in them like a watercolor painting would have than just a regular solid color.
Sometimes when you page through a package of designer paper, no matter what you were planning to use, one design jumps out at you. This time it was this particular poppy design! Then I also chose this little piece of green stripe design from another page with a gorgeous floral design on the other side that I hated to cut into!
The card base is Old Olive with the fold at the top. Just cut your cardstock in half lengthwise and score in half at 5 1/2″. The green stripe piece is adhered to the poppy paper and then the Whisper White Polka Dot Tulle Ribbon (one of my favorites!) is wrapped around the two layers of designer paper and adhered on the back. Next, the designer paper layer is adhered to the card base. I also tied on a knot on with the ribbon on each side of the greeting.
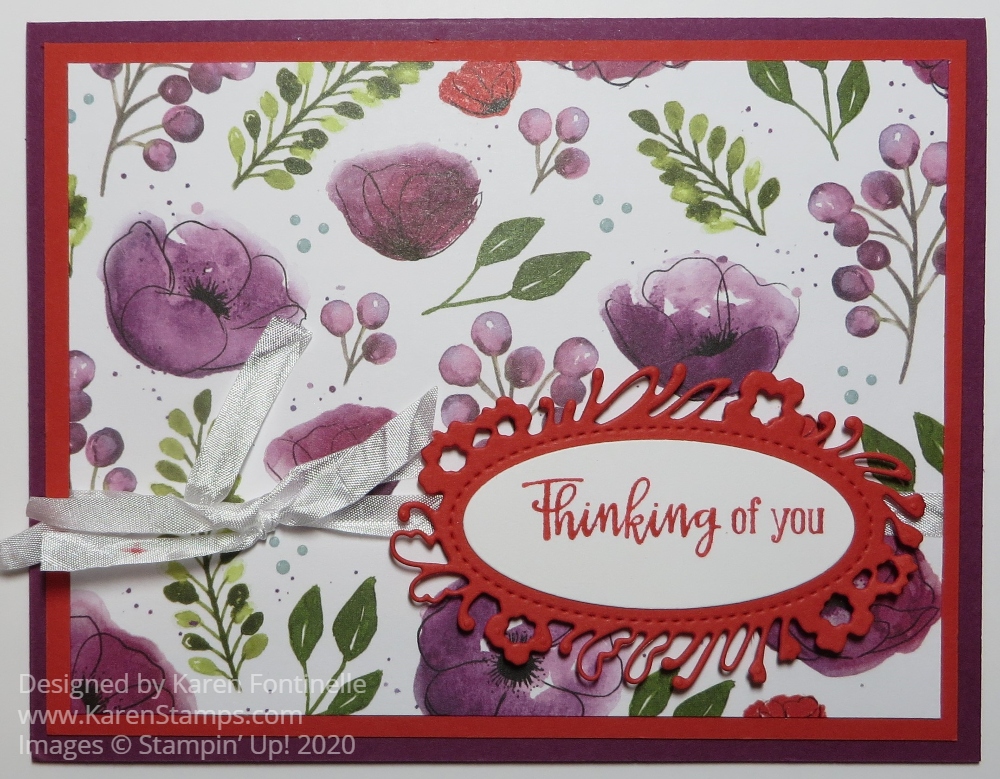
If you want to brighten up someone’s day, make and send them this Peaceful Poppies Multicolor Thinking of You Card! Even though I’ve looked through the beautiful poppy designer paper, this particular design jumped out at me today and I set it aside to make a card! You could put many different greetings on this card if you wanted to.
The card base is Rich Razzleberry Cardstock, which is a color I probably don’t use often enough. My original intent was just to layer the piece of Peaceful Poppies Designer Series Paper on top of the cardstock. This particular design with the purple poppies really caught my eye and I wanted to use it right away! All of this beautiful designer paper has handpainted blooms and watercolor washes.
When I first layered the designer paper on the Rich Razzleberry, I thought maybe it needed another layer of color to really make it pop, so I chose Poppy Parade. There were a few Poppy Parade poppies on the paper, although I may have covered one up with the greeting.
The greeting is from the Peaceful Moments Stamp Set, but I only wanted the “Thinking of You” so I colored just that portion of the stamp with my Poppy Parade Stampin’ Write Marker. I used the die in the Petal Labels Dies for the greeting on Whisper White and the fancy layer in Poppy Parade.
The ribbon I tied around the designer paper is the new Whisper White 1/4″ Crinkled Seam Binding Ribbon. I was planning to tie a bow and adhere it to the left of the greeting, but instead, I tied on three knotted pieces of ribbon, just for something different!
If you don’t own the Peaceful Poppies Designer Series Paper, you are missing out on a pretty paper collection in your stash! You can check out the whole Peaceful Poppies Suite of lovely products on page 24 in the Occasions Mini Catalog!
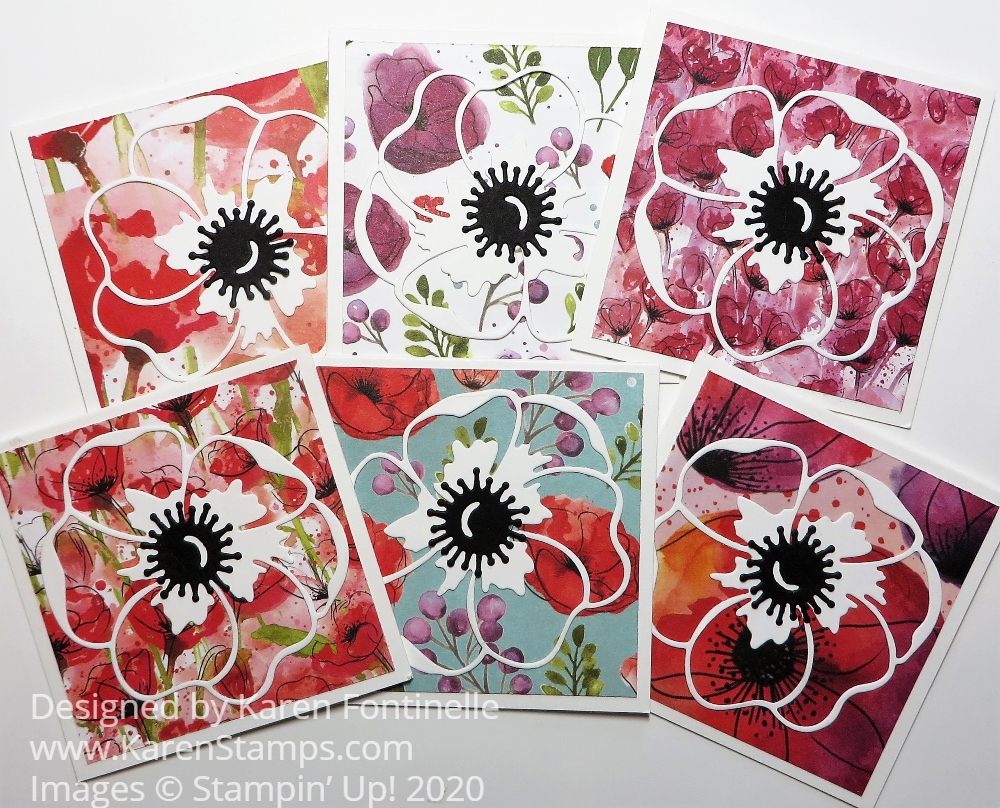
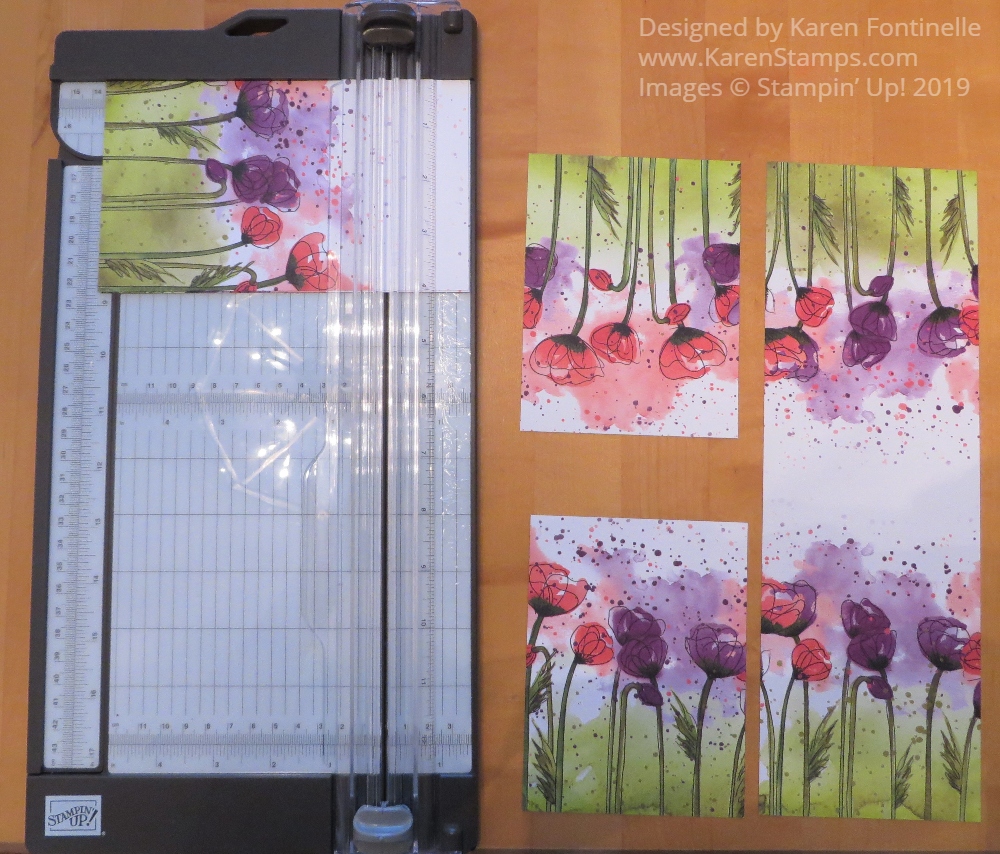
I’ve seen posts by other Demonstrators showing ways to use your designer paper to make lots of cards at one time so I thought I would try to make six cards out of one sheet of designer paper. I decided to use just this one design in the Peaceful Poppies Designer Series Paper. It is the sheet that has poppies on each side with a rather plain area running through the center of the paper.
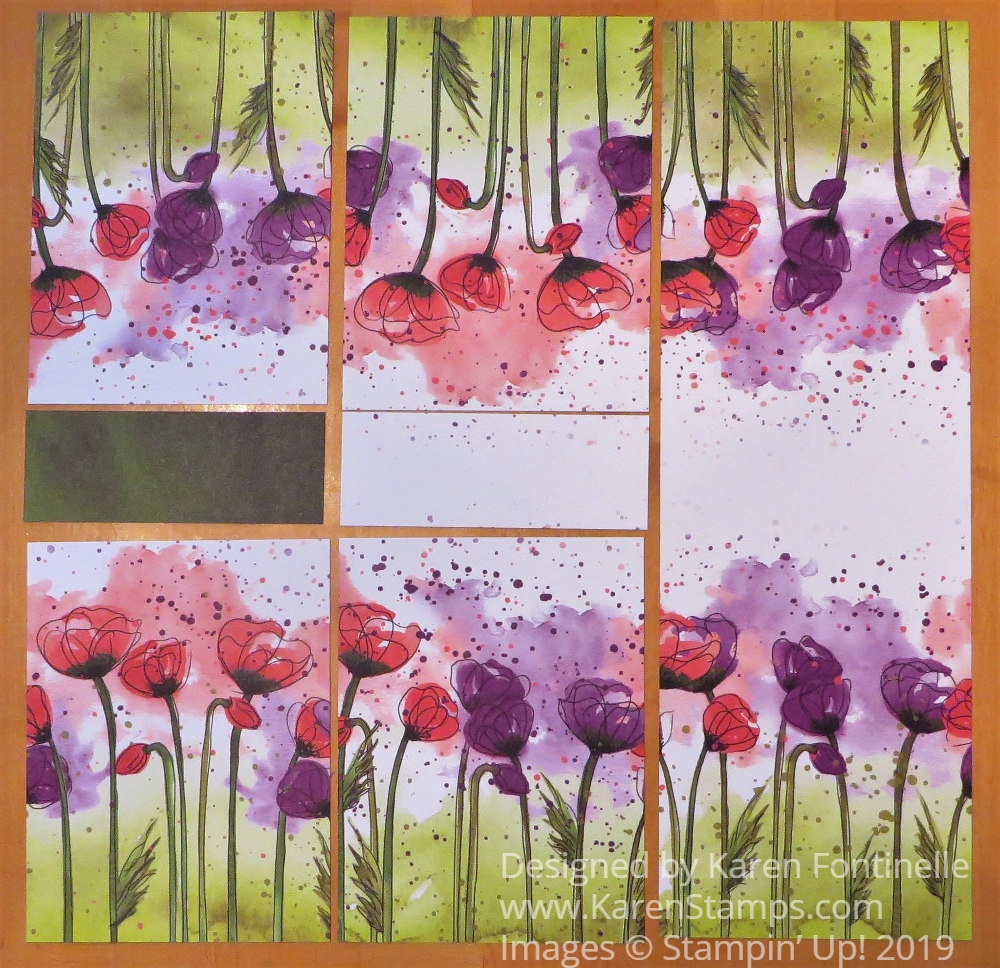
With this, or any, 12″ x 12″ paper, you can cut three 4″ wide strips out of the paper. Then turn each strip and cut at 5 1/4″, the perfect size for a layer on a card. If you do the math, that will use up 10 1/2″ of the paper and you will have pieces left that are 1 1/2″ wide. If you plan ahead, you could cut off a strip 12″ x 1 1/2″ wide and then cut the strips. It probably all depends on the pattern of your paper and how you intend to use it, whether you want longer or shorter scraps of paper leftover.
This particular sheet of paper is different, with the plainer area in the middle. If you cut it as I show in the photos, you can basically cut out the plain area and just get maximum use out of the poppies! Then you can either use the center area for the colored side on the opposite side of the paper or the white side.
I might say that if you are not happy with your paper trimmer, the new Stampin’ Up! Paper Trimmer is really nice! I believe it makes much closer to perfect cuts than the previous one did. I am enjoying mine and do recommend it!
Another alternative would be to cut some or all strips at 3″ wide and get 4 strips out of the designer paper. In this way, you will not completely cover the card base, which is fine, too. I did some cards like this and added a little accent strip of cardstock along the side of the designer paper. This Peaceful Poppies paper is so pretty, no matter what you do with it, you will make a beautiful card!
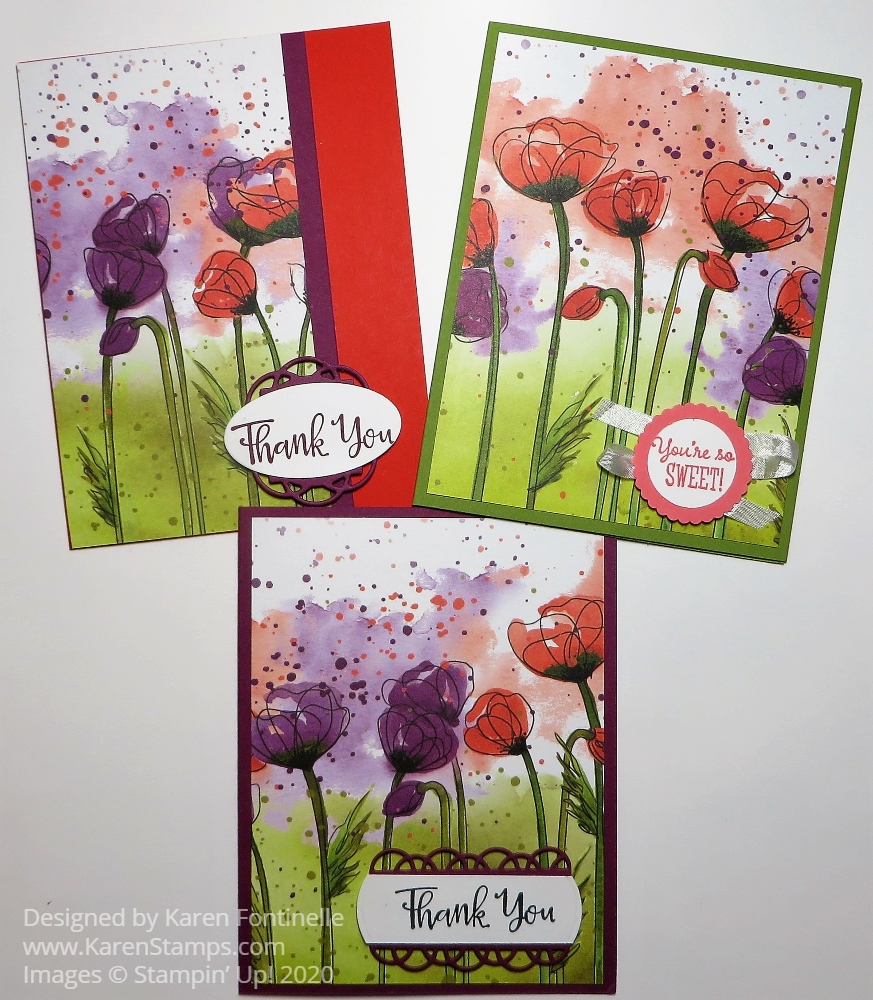
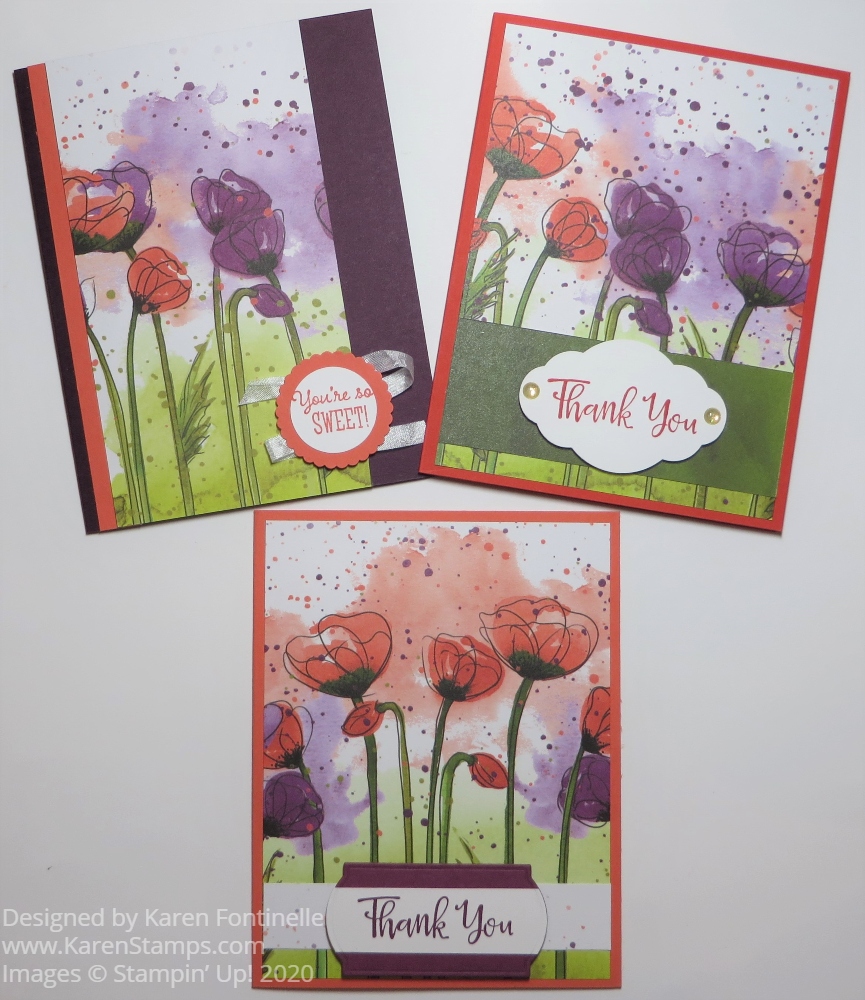
I used several different colors of cardstock that coordinate with the designer paper – Rich Razzleberry, Flirty Flamingo, Old Olive, Calypso Coral, and Poppy Parade. Then just add a greeting, maybe layered on something else and maybe with some embellishments. You can make the card as fancy or as simple as you like at this point.
On these cards, I used another die in the Painted Labels Dies and the Pretty Label Punch. You can see I used two of the excess strips, one green and one the white side behind the greetings, plus some embellishments. You will notice two of the cards in the two photos have the narrower strip of designer paper, cut at 3″x 5 1/2″ with a narrow accent strip of cardstock.
If you want to see what you can do with the inside of the card, I added Whisper White layers to all and stamped a flower from the Painted Poppies Stamp Set in Memento Black Ink. Then I colored in the flower with some Stampin’ Blends markers.
And there you have it! Ideas for six cards from one sheet of the Peaceful Poppies Designer Series Paper!
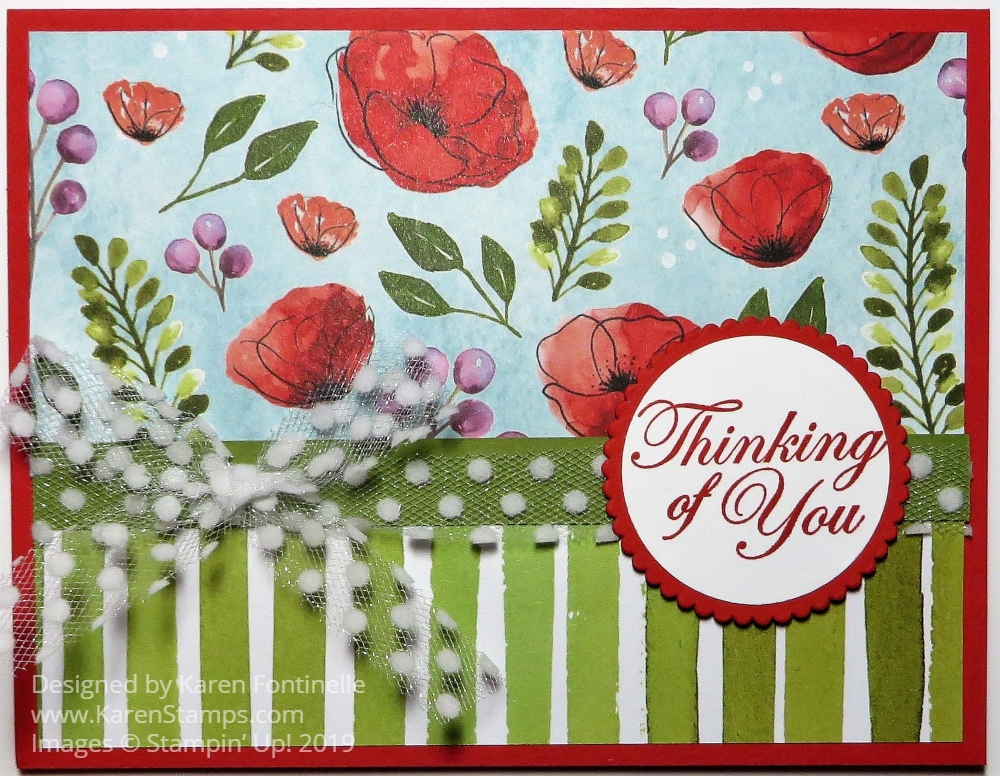
Wouldn’t someone you know just love to receive this Peaceful Poppies Thinking of You Card? I think these two patterns of paper in the Peaceful Poppies Designer Series Paper really make for a springy, happy card! The bright, colorful flowers and the light polka dot tulle ribbon just really catch my eye!
The card base is Poppy Parade, which is one of the many coordinating colors for the Peaceful Poppies DSP. I cut the two pieces of DSP to fit how I wanted them, overlapping about half an inch. Just to cover up the seam, I added a half-inch piece of Old Olive Cardstock across the card.
Before you adhere this designer paper piece to the card base, be sure to wrap the ribbon around the Old Olive strip first! I just love this Whisper White 5/8″ Polka Dot Tulle Ribbonin the Annual Catalog! Just wrap it around and then make a separate bow. Adhere the bow with a couple of Mini Glue Dots. The greeting is stamped fromMagnolia Blooms. I really liked the font and thought it would go with the flowers. I punched it out first with the 1 1/2″ Circle Punch, not yet knowing exactly what I would layer it on, but opted to go with the scalloped circle in Layering Circles Dies. Since I stamped the greeting in Poppy Parade Ink I layered it on a piece of Poppy Parade Cardstock. Then it is popped up on Stampin’ Dimensionals over the ribbon.
The Peaceful Poppies Designer Series Paper has handpainted blooms and watercolor washes. Each paper is beautiful and I think you’ll want to have that package in your collection!
I think this Peaceful Poppies Suite is one of the most beautiful and has so much creative possibility! While I don’t have the whole suite yet, I have one Bundle and can tell you there are lots of ways to use just that bundle to make wonderful cards and things.
Watch this Stampin’ Up! video and you’ll find out all kinds of things about the Suite, like how they named everything! I watched it twice because there was so much information in it!
You’ll find out how the beautiful Peaceful Poppies Designer Series Paper was designed and that will make you want it even more. Although I have a sample, I can’t wait to get the whole package.
Check out this quick video as they show each paper in the collection:
Check out this post and this post about two cards I have put on my blog if you would like to see a couple of easy cards to make with these poppies!
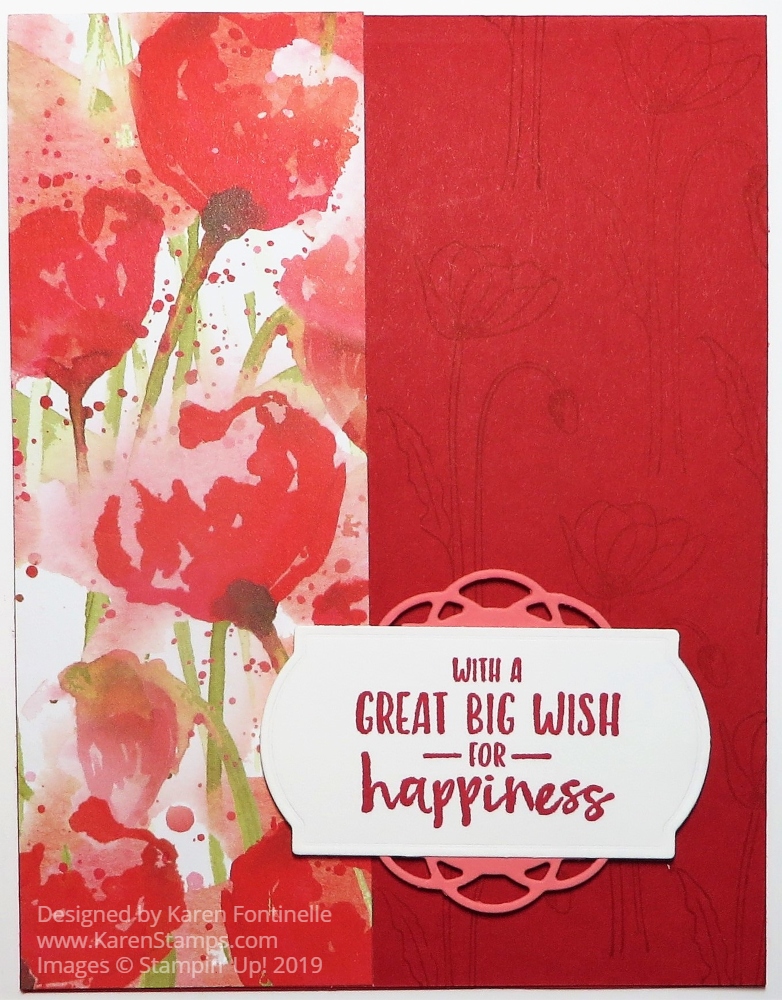
This Peaceful Poppies Happiness Card is another fairly simple card to make! This card opens at the top instead of the side just for something different. It uses a strip of the beautiful Peaceful Poppies Designer Series Paper. Just wait until you get your hands on this beautiful designer paper!
To make this card, the card base is 11 1/2″ x 4 1/2″, folded in half with the fold at the top. I chose Real Red Cardstockalthough I don’t think that’s actually a coordinating color with the designer paper, but I think it looks fine together.
For a little extra interest, I stamped a poppy and stem from the Painted Poppies Stamp Set on the Real Red cardstock that isn’t covered by the designer paper. I inked it up and stamped off before stamping on the card. I could also have used Versamark Ink for that watermark look. If you had ribbon, you could wrap some ribbon around the designer paper before adhering it to the front of the card.
The greeting is from the Sending You Thoughts Stamp Set, one you can get FREE during Sale-A-Bration with a $50 purchase. I stamped it on Whisper White with Real Red ink and then die cut it with a label die in the Painted Labels Dies. Then I used Flirty Flamingo Cardstock and die cut another label in the same set, cut it in half and used it under the top and bottom of the greeting. It just adds a little something although just the greeting die cut with that label die with a little embossed border around the edge was just fine by itself.
You will probably want to get the Painted Poppies Stamp Set and the Painted Labels Dies together in the Painted Poppies Bundle and save 10%!
Check out the whole Peaceful Poppies Suite and see what you’ve GOT to put on your next Stampin’ Up! order! Remember about Sale-A-Bration and getting a free SAB item with every $50 you spend!