Tag Archives: Welcome Easter Stamp Set

Easy Easter Candy Treats

Easy Easter Candy Treats

If you want to make some last-minute Easy Easter Candy Treats, these will work! These are quick and simple and you can vary the size according to the candy treat you have to put inside. You could even not cut an opening in the front and just decorate the front for the occasion and tuck your candy treat inside. You can make these taller or wider.

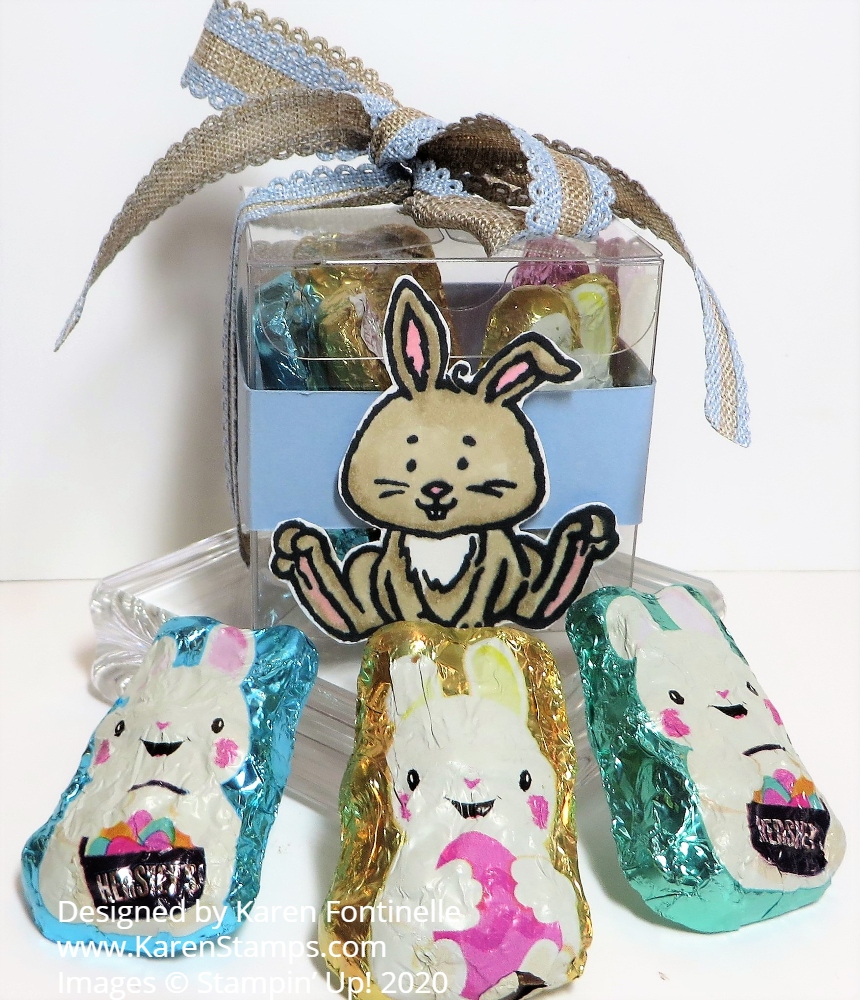
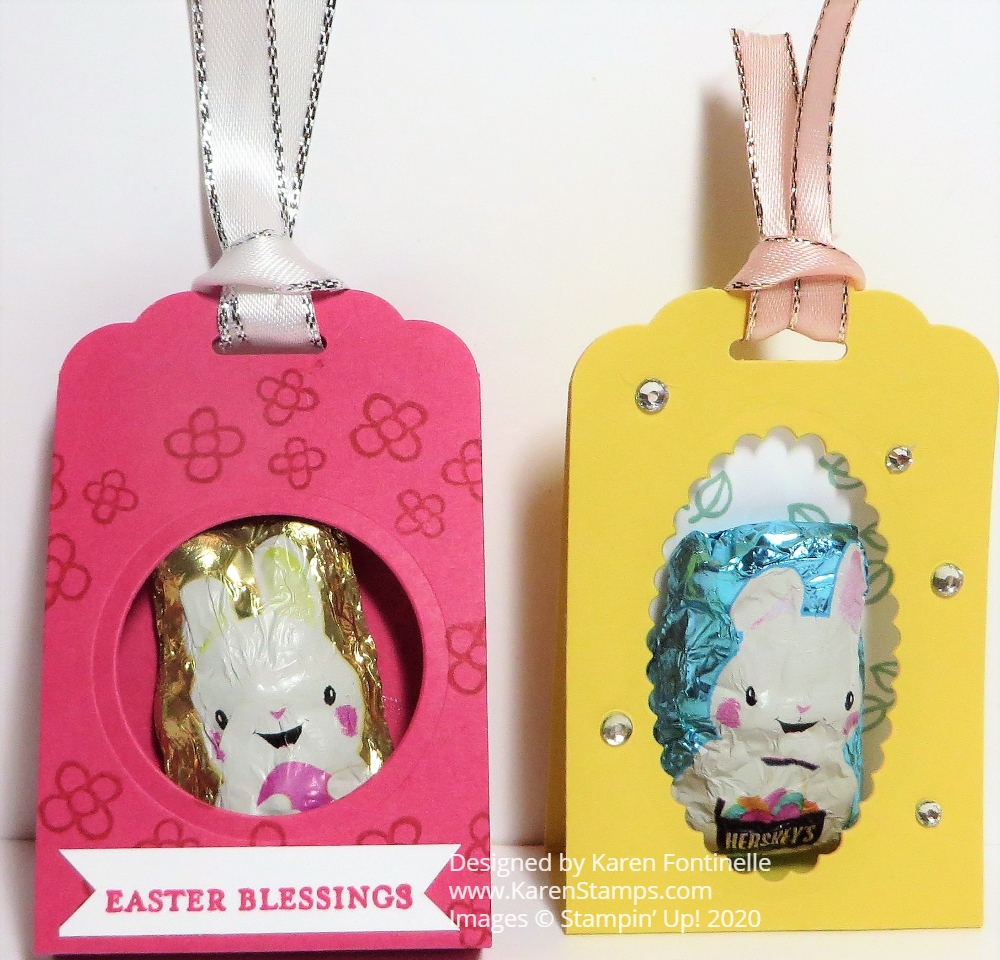
These candy treat holders are 2″ x 8 1/2″ to start with but depending on your candy, you can cut them down a little shorter. The 2″ width is so the piece of cardstock will fit into the Scalloped Tag Topper Punch. Cut the 2″ x 8 1/2″ strip of cardstock and punch each end in the Scalloped Tag Topper Punch. Then place one end at the 3 3/4″ inch mark on the Paper Trimmer and score, then turn and place the other end at the 3 3/4″ mark and score. That gives you the little space in which to place your candy treat.

Before you put the candy inside, decide if you want a different color background inside. The Daffodil Yellow treat holder has a Whisper White piece stamped with the little green leaves in Welcome Easter, although you really can’t see them! The Melon Mambo treat holder doesn’t have an inside layer. However, on that one, I stamped the little flowers in the Welcome Easter Stamp Set on the front. The greeting is stamped from the Itty Bitty Greetings Stamp Set and punched out with the handy dandy Classic Label Punch. To decorate the Daffodil Delight holder, I just added some small Rhinestone Jewels.

I didn’t have any exciting Easter candy but these little chocolate bunnies which are pretty flat fit in just fine. So if you had a larger chocolate bunny, for example, you probably would need to make the base wider and therefore the strip longer in the beginning. Then you can die-cut or punch some kind of opening in the front. Just add a ribbon to tie the top together and you’re done!

Sometimes you need to give credit where credit is due so I must give credit to myself! I made a similar Easter treat last year but I had a cuter piece of candy to put inside! You can see that post HERE.

None of us will be having big family Easter dinners this year, so it would be easy to make one of these Easter candy treats to put at each place at the table for you and your spouse, or children, or whoever you are living with during this quarantine time.

Garden Lane Easter Bunny Card

Garden Lane Easter Bunny Card

Today I needed to make an Easter card for my son that was a little less frilly than the ones I already made and I had something in mind, but not this Garden Lane Easter Bunny Card. But once I started looking at my designer papers for the one I was going to use, I saw this Garden Lane Designer Series Paper and I thought that leafy pattern would go well with a bunny!

The card base is Garden Green but there are other greens that go with the paper. For the scalloped Layering Circle Die underneath the bunny, I chose Pool Party because it looked like it matched the bluish leaves a little bit.

The bunny from the Welcome Easter Stamp Set is stamped in Memento Ink and die cut with the Stitched Shapes Die. Then I had fun coloring him in with Crumb Cake Stampin’ Blends.

The Easter greeting is from the same Welcome Easter Stamp Set and is just stamped on a strip of Whisper White. The bunny and the greeting are both popped up on Stampin’ Dimensionals.

That’s all there is to this card! The Garden Lane Easter Bunny Card is an easy and fun card to make!

Welcome Easter Bunny on Peacock Foil Paper

Welcome Easter Bunny on Peacock Foil

This Welcome Easter Bunny on Peacock Foil Paper is one of those cards for which I didn’t really have a design in mind until I made it but I knew what kind of paper I wanted to use. After it all came together I really loved it! I think I will make some more cards just like this one to send for Easter. And Easter isn’t far off!

I was seeing the Noble Peacock Specialty Designer Series Paper being used on some cards and it jogged my memory about having that paper! I have barely used it even though it is beautiful paper! I think products in the Annual Catalog get forgotten sometimes when we are mostly looking at the Mini Catalogs!

One of the coordinating colors with the Noble Peacock paper is Old Olive so I chose that for my card base. Then I just adhered the designer paper on the card base.

The bunny is from the Welcome Easter Stamp Set and is stamped in Memento Ink. Then I colored him with my Smoky Slate Stampin’ Blends and a little bit of Flirty Flamingo for his ears, nose, and bottom of his feet. I even drew in some sprigs of grass with Old Olive.

The bunny was die cut with one of my favorite dies of all time, the Stitched Shapes Dies. Then in deciding what color and size scalloped circle to use as a layer under the bunny, I die cut one in Petal Pink Cardstock and one in White Glimmer Paper. As I layered them to see what size I wanted, I saw that both layers looked good together! I love the little bit of pink around the edge and the pretty glimmer paper bringing another texture.

Since I had just received some back-ordered ribbon, the Petal Pink 1/4″Metallic Edge Ribbon, I used that underneath the bunny and popped it all up on Stampin’ Dimensionals. The greeting was stamped on a narrow scrap I had of Whisper White and I just cut the flagged ends.

Such a simple card, fun to make, and beautiful! Here is a similar card but with a monochromatic design for Easter. Try your hand at either one of these cards and send them out for Easter or just for spring or to say hello. If you have it, dig in your stash for the fancy-looking Noble Foil Paper to make this Welcome Easter Bunny on Peacock Foil Paper.

Easter Bunny Clear Tiny Treat Box

Easter Bunny Clear Tiny Treat Box

Which do you like better, the Easter Bunny Clear Tiny Treat Box or the chocolate bunnies?! Luckily, they go together so you can like both and not choose! Any time you need a quick and easy treat box, you can turn to the Clear Tiny Treat Boxes in the Stampin’ Up! Annual Catalog!

I intentionally made this Easter treat super simple. You can decorate these Clear Tiny Treat Boxes in many ways, of course. I started with the bunny in the Welcome Easter Stamp Set. It is stamped in Memento Ink and colored in with a Light Crumb Cake Stampin’ Blend marker and a bit of the Dark for shading. For the little bit of pink in his ears and bottom of his feet, I used a Light Flirty Flamingo Stampin’ Blend Marker.

Since the area on the front of the Tiny Treat Box is fairly small, I just cut out the bunny by hand. I wrapped around a 3/4″ strip of Seaside Spray Cardstock, one of the current In Colors, around the box. If you put the ends of the strip on the front of the box, the junction of those paper ends will be covered up by the image you put on the front of the box. You could also use ribbon, but since I was going to tie ribbon around the top of the box, I just used cardstock. You could also use some pretty border dies to die cut a strip going around the box. You can apply a little bit of Snail Adhesive to hold the strip in place. Then the bunny is popped up on Stampin’ Dimensionals on the center of the box front.

Be sure to fill the box first with candy treats or a small gift and then tie with a ribbon. This is decorative plus holds the lid of the box closed for sure. The ribbon I used is the Seaside Spray 1/2″ Scalloped Linen Ribbon. It is very pretty with the linen and the light blue! I just tied it around in a bow. You could also adhere just the ribbon and then tie a bow separately to adhere to the top of the box if you wanted the bow closer to perfect.

Here is a very similar design with a Clear Tiny Treat Box that I made for Halloween using a strip of designer paper around the box and a Halloween image cut out from designer paper with a ribbon tied around the box.

That’s all there is to it! You could also stamp a “Happy Easter” greeting or a “Happy Spring” greeting. Maybe it would be a party favor at a baby shower and that would be cute with the bunny! Keep a stash of these Clear Tiny Treat Boxes on hand to use for quick treats or gifts or order a quantity for a party or event. For a treat or even a little home decoration, try this Easter Bunny Clear Tiny Treat Box for this spring or Easter!

SHOP STAMPIN’ UP! ONLINE HERE!

Monochromatic Welcome Easter Bunny Card

Monochromatic Welcome Easter Bunny Card

If you want to make a pretty quick and easy Easter card, this Monochromatic Welcome Easter Bunny Card is a good one to make! I really like the way this card turned out!

For this card, I stamped the bunny in the Welcome Easter Stamp Set in the Stampin’ Up! Occasions Mini Catalog. I stamped it in Highland Heather randomly on the Whisper White card front for a background and then on another piece of Whisper White that was die cut with the Stitched Shapes Dies for the focal point of the card. The card base is Highland Heather to match the ink and the scalloped circle layer under the center bunny.

The ribbon underneath the center bunny is the pretty striped Gorgeous Grape 1/4″ Mini Striped Ribbon. Although it is a slightly different purple color, it works just fine and the recipient of your card is still going to love it! I popped up the bunny piece on Stampin’ Dimensionals® and the ribbon’s fold sticks out the top and then tail ends hang out the bottom. Easy and cute!

The greeting is from the same Welcome Easter Stamp Set and layered on a piece of Highland Heather. To add a little something on the greeting I also stamped some of the little flowers in the stamp set at the ends.

A few years ago I made a similar card with a different bunny stamp. You can see it HERE. I stamped the bunny in one color randomly in the background and then colored in just one bunny and added a greeting. That card shows how you can use a bunny stamp to make an Easter card or a Baby card! Bunnies are so versatile!

There are lots of cards you can make simply by using only one color as in my monochromatic Easter card with the Welcome Easter bunny. Try one!

SHOP STAMPIN’ UP! ONLINE!

Welcome Easter Lamb Card For a Sweet Friend

Welcome Easter Lamb Card For a Sweet Friend

I’ve seen many people coloring this Flowering Foils Specialty Designer Series Paper various ways so I finally tried it on this Welcome Easter Lamb Card For a Sweet Friend. The Flowering Foils paper is one that you can earn FREE during Sale-A-Bration with a $50 Stampin’ Up! purchase until March 31. You can tell from the glare on the photo that this paper has foil accents in Rose Gold and Silver Foil. It’s beautiful but difficult to photograph very well!

I decided to color in the background around all the flowers. You might think (and I thought!) that it would be extremely tedious and ridiculous to color around all those little flowers! Somehow it was not! I got out my Stampin’ Blends, chose Granny Apple Green, and started coloring! It really went pretty fast and I think the Blends marker made it easy. I didn’t feel I had to be absolutely exact and yet it came out just fine! After coloring the background, I decided to color the silver flowers, too! I used Dark Flirty Flamingo.

After the designer paper was colored, I layered it on a card base of Flirty Flamingo Cardstock. I tied around a piece of Whisper White 5/8″ Flax Ribbon with a knot on the side of the card. Then I stamped the lamb from the Welcome Easter Stamp Set and colored him with Stampin’ Blends, particularly with Light Gray Granite. The lamb was die cut with a Stitched Shapes Die and then layered on a scalloped Layering Circles Die in Flirty Flamingo. The greeting is in the same stamp set and is stamped in Flirty Flamingo Ink. It is punched out with the Classic Label Punch.

If you like coloring, just sit down and relax and enjoy coloring this Flowering Foils Paper. And we all need activities that help us relax right now! Here’s a card I made the other day with the Flowering Foils paper without coloring. I even used three different papers on that card! So you can do it either way! The paper is pretty as is, or you can do lots of coloring like I did on my Welcome Easter Lamb Card For a Sweet Friend, but don’t miss out on Sale-A-Bration!

Welcome Easter Yellow Chick Card

Welcome Easter Yellow Chick Card and Stamp Set

I just ordered the Welcome Easter Stamp Set recently and it is so adorable I had to make this Welcome Easter Yellow Chick Card. It’s actually a great stamp set that is not just for Easter, as you can see from the stamp set photo! It’s even got a greeting in the stamp set for a new baby and a friend. You could certainly make a lot of cute baby cards and projects with this stamp set, so don’t look at it as only for Easter.

In making this card, I wanted to use the new, beautiful vellum paper, available FREE during these last few weeks of Sale-A-Bration! It’s one of the new products available as the 2nd release during Sale-A-Bration. It is called the So Very Vellum Specialty Designer Series Paper. It comes in three colors: Pool Party, Purple Posy, and Soft Sea Foam.

I just used a card base of Whisper White and added a layer of the Pool Party vellum, sponging it on the back with Multipurpose Liquid Glue so the adhesive wouldn’t show through.

The chick is stamped in Memento Ink and colored in with Daffodil Delight Stampin’ Blends Markers and the beak and feet in Pumpkin Pie markers. It’s so fun to color with these Stampin’ Blends Markers! I just love to do it! I also colored in some green grass just for fun using the Granny Apple Green markers.

The chick was then cut out with the Stitched Shapes Dies and layered on a scalloped circle die-cut in Daffodil Delight. Then I thought it would be fun to use the Whisper White 5/8″ Polka Dot Tulle Ribbon placed back and forth on the back. I popped this piece up with Stampin’ Dimensionals.

The greeting is stamped and then layered on a Stitched Rectangle Die in Daffodil Delight. It is just glued on with Multipurpose Liquid Glue or you can use Snail Adhesive.

That’s as easy as it is to make this Welcome Easter Card with the cute yellow chick on the front! Try your hand at making this simple card!

Remember, Sale-A-Bration ends March 31 so what with all the health news out there, don’t forget if you want to treat yourself to a Sale-A-Bration product!

Shop Stampin’ Up! Online!

Welcome Easter Yellow Chick Card