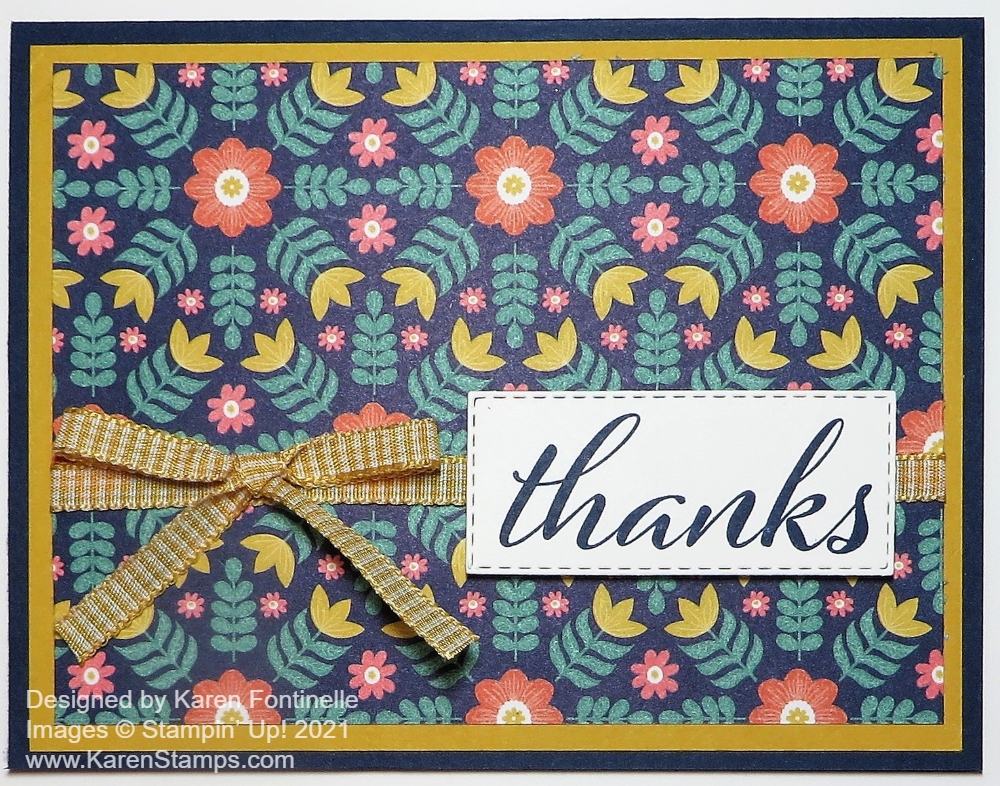
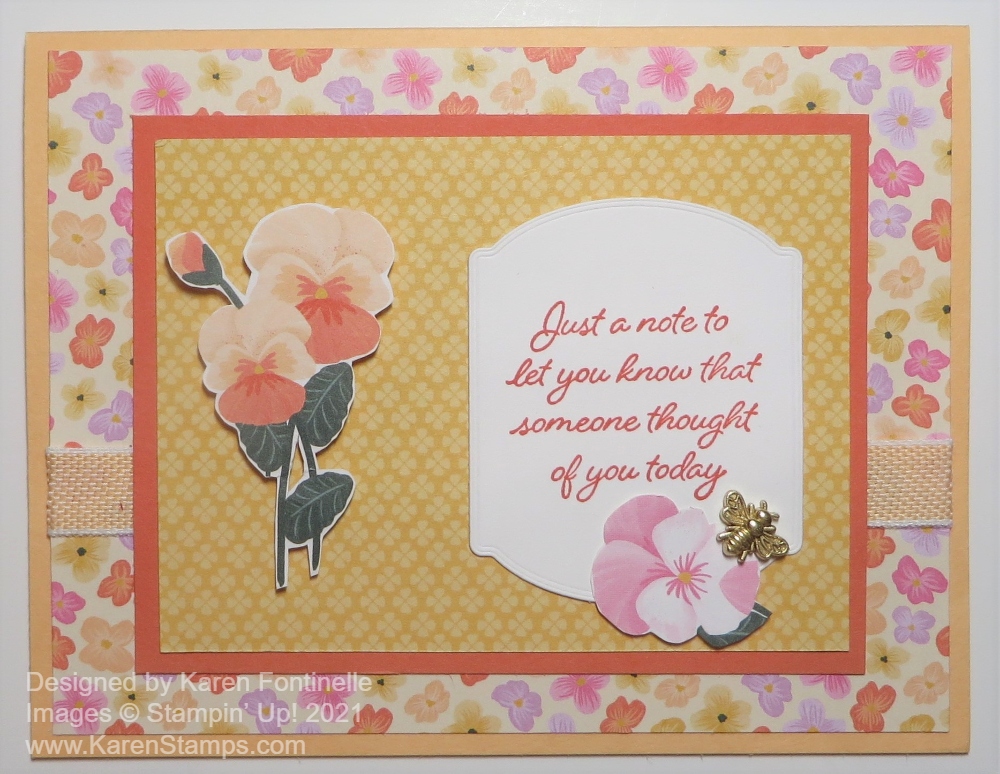
Category Archives: Cards

Prized Peony Poppin’ Pastels Friend Card

Prized Peony Poppin Pastels Friend Card

This Prized Peony Poppin Pastels Friend Card came from another opportunity of playing with the new Soft Pastels in the Stampin’ Up! Annual Catalog. I remembered an old technique that was quite popular around the time I joined Stampin’ Up! called Poppin’ Pastels! You can do a lot of different things with chalk pastels and this is just one technique.

To do the Poppin’ Pastels technique, you need Versamark Ink (the clear, watermark ink) and chalks plus a Sponge Dauber or cotton ball. You will find these new Soft Pastels Assortment in the Stampin’ Up! Annual Catalog on page 126 at the bottom of the page. We have had chalk pastels before but in little squares, in a metal tin in all the Stampin’ Up! colors so these “sticks” are a little different. They are almost like crayons. So while you can “color” with the chalk piece, you can also scrape some chalk off the side of the stick or scribble on a scrap piece of paper to get chalk dust that you can pick up to use. You can use Paper Snips that are open, just scraping the blade of the scissors along the side of the chalk onto a piece of paper or an acrylic block or whatever you have.

I stamped the Prized Peony Stamp with Versamark Ink on Basic White Cardstock. Give the ink a few minutes to dry, otherwise, you may smear the ink a bit. See the photo below on the left side of the flower!

Prized Peony Poppin Pastels closeup

Pick up some of the chalk dust with the Sponge Dauber or a cotton ball and dab on the stamped image. I think it is better to dab it on rather than rub it on. Maybe that’s why my flower above got a little smeared because I was rubbing on the chalk. The fun thing about Poppin’ Pastels is that the stamped image is invisible, but as soon as you start dabbing on the chalk, it magically appears! It is really fun! You can’t be exact in your coloring with the Sponge Daubers but that’s what makes it interesting and gives a soft “halo” around the edge of the image. Sometimes colors overlap a bit which makes it colorful and interesting as well.

The chalk in the assortment that I used is Poppy Parade, so I stamped the greeting with Poppy Parade Ink. You can see the ink is a little darker than the pastels. The greeting is also in the Prized Peony Stamp Set. Before adhering the layers together, I adhered some of the Whisper White 1/4″ Crinkled Seam Binding Ribbon and tied a bow. The card base is Poppy Parade and the layer is Granny Apple Green to match the leaves.

Easy card to make and fun to do the Poppin’ Pastels Technique! You can use less chalk for a lighter look or more for a darker color. Just experiment and see what you come up with using the new Soft Pastels Assortment! On this card, I “colored in” the stamped image a little more precisely, so you can see the difference.

While you are looking for the Soft Pastels Assortment, also check out the Last Chance products from the January-June Mini Catalog that are retiring. Some have significant discounts, some less but discounted a little bit! Before you buy a Bundle, check if the individual products are on sale, which might make the price together less than the Bundle, ie. the Kangaroo & Company Bundle is $36.75, but if you buy the stamp set and the half-price dies, your cost would be only $28.50! What a deal for such a cute set, if you don’t already own it!

SHOP STAMPIN’ UP! ONLINE HERE!

Spring Mini Catalog: Last Chance & Sales!

Last Chance Spring Mini Ad June 2021

The January–June 2021 Mini Catalog will be retiring soon! It’s always bittersweet to see a classic Stampin’ Up! catalog take a trip to retirement. But, we always look forward to all the new products on their way! (The Holiday Catalog is up next!)

With every retiring catalog comes a spectacular sale: the Last Chance Products promotion! With this sale, you can stock up on your favorite products before they’re gone for good. Save up to 50% on essential craft supplies starting today, June 1st!

NOTE THE STARTING TIME BELOW!!

SALES PERIOD

  • Starts: 1 June 2021 at 1:00 PM (MT)
  • Ends: 30 June 2021 at 11:59 PM (MT)

Check over the discounted items! I bet they might go first! Some good things at a good discount so check carefully!

READY!

SET!!

GO SHOP!!

Be Up-To-Date on Stampin’ Up! News!

Join Our Stamping With Karen Mailing List

It’s time to be a part of the Stamping With Karen Mailing List because new things are always coming up! Not only do we have a new Stampin’ Up! Annual Catalog out since May 4th, but next week the January-June 2021 Mini Catalog (Spring Mini, I call it) will be retiring. That means there will be a Last-Chance List for the Mini Catalog products with some discounted that you might want to get. And the early bird gets the worm! Keep up with all of it by being on my Stamping With Karen Mailing List!

Also, keep up with news about the new Paper Pumpkin Kit every month and any new updates with Stampin’ Up! each week!

If you are on my blog, you will see a red sign-up box in the top right corner where you can simply put your name (or first name) and best email. If you are on your phone, you probably need to scroll way down to get to the sidebar things. OR you can go to my sign up page HERE.

You will receive an email with a link to your free gift from me, as a thank you for signing up with me!

I send out a weekly email every Tuesday afternoon with the latest Stampin’ Up! news and offers plus stamping ideas with a supply list and directions. Even if you never make the project, maybe just seeing ideas will do your crafty heart good! I know it does mine! I’m all about the ideas!!

In the fall, as a thank you to my mailing list subscribers, I always send out a special email called “The 12 Weeks of Christmas” with an exclusive holiday idea for each week leading up to Christmas. You can only get these ideas if you are on my mailing list. I value my subscribers and have fun sending out these holiday ideas.

Let’s stay connected and in touch with each other over our favorite thing to talk about…..stamping with Stampin’ Up!

You are also welcome to follow me on Facebook, Twitter, Instagram, and Pinterest.

Encircled In Friendship Monochromatic Card

Encircled In Friendship Monochromatic Card

This Encircled In Friendship Monochromatic Card was my first attempt using this stamp set and dies, available as a Bundle in the new Stampin’ Up! Annual Catalog. I wasn’t coming up with good ideas of what colors I wanted to use for this card, so making a monochromatic card was the answer! Plus I saw this designer paper and loved it!

This card has the fold at the top and opens at the bottom for something different. You still come out with the same size card, you just cut the full sheet of cardstock in half lengthwise instead of horizontally. The cardstock is Blushing Bride Cardstock. The layer is a piece of designer paper from the Hand-Penned Designer Series Paper.

Next I die-cut different designs of the Encircled In Beauty Dies in both Basic White and Blushing Bride pink. I wasn’t sure what order I would like them or how they fit together but I was pretty sure I wanted to overlay one with another. I cut an assortment in both colors to be able to see in real life how they would look. The flowers in the center are stamped in Blushing Bride ink (saves from needing to color in!) and comes out of the center of one of the dies. Stamp them with the Encircled in Friendship Stamp Set. You can buy both the stamp set and dies in the Encircled in Friendship Bundle and save 10%.

The greeting is actually just a few words from a longer greeting in one of the stamp sets! I used my Blushing Bride Stampin’ Write Marker to carefully color just those words on the stamp and stamped it on a scrap piece of Basic White. Then after fiddling with a couple different dies and messing something up each time, I finally got it die cut with a small die in the Ornate Frames Dies. If you try stamping something like this with just coloring certain words with a marker and it doesn’t come out perfectly, try using the narrow tip end of the marker to very lightly and carefully go over the word or image….or use your Stamparatus in the first place!

If you wanted to embellish this card a bit, maybe you could tie a small white bow with twine or our narrow Whisper White Crinkled Ribbon and adhere it somewhere on the card, maybe just off to the side at the bottom of the circle with the stamped flowers, off to the side. Just a little something but nothing to take away from the card itself since you want to show off those diecut fancy circles.

It may be a holiday weekend, but you can shop anytime at Stampin’ Up! Online HERE!

Encircled In Friendship Monochromatic Card Closeup

Hand-Penned Petals With Soft Pastels

Hand-Penned Petals With Soft Pastels

This Hand-Penned Petals With Soft Pastels was nearly the death of me! The idea was easy enough but the execution was a mess. This wasn’t even going to be a card! I was just trying out the new coloring technique we have, but I thought it turned out okay so I went ahead and made it into a card! That was the easy part.

In the new Stampin’ Up! Annual Catalog we have the Soft Pastels Assortment! You will find these new chalk pastels on page 126 in the catalog at the bottom. You get eight colors in the box: Coastal Cabana, Daffodil Delight, Gorgeous Grape, Granny Apple Green, Mango Melody, Mossy Meadow, Night of Navy, and Poppy Parade. You can use these pastels in a variety of ways for cards and projects. Years ago Stampin’ Up! had a tin of a bunch of colors, little squares that we would pick up the chalk color with little applicators or a cotton ball. I need to refresh my memory of all the things we used to do with pastels!

To begin, I stamped this bouquet with Stazon Ink. First I tried picking up color from the end of the chalk using a Blender Pen. That worked, but on Basic White Cardstock you have to be careful not to rub too hard with any tool with water. Blender Pens barely have any moisture, but you still have to be careful. I colored in the small Daffodil Delight small flowers. Next, I used other colors and Sponge Daubers on some other flowers. I scraped some chalk dust off the side of the chalk using my open Paper Snips to get a little dab of chalk dust on an acrylic block to pick up with the Sponge Dauber. Of course you can’t color precisely with Sponge Daubers but that’s okay. With the soft look of the pastels, it gives a watercolor look to the flowers. In the end, the Basic White looked a little bare around the flowers, so I grabbed a Blending Brush and applied some Mango Melody chalk very lightly around the edges.

Hand-Penned Petals With Soft Pastels Coloring

Since Poppy Parade is one of the chalk colors, I used Poppy Parade and Granny Apple Green for the card base and the layer. But since the chalk doesn’t turn out as strong as the real colors, I think I should have chosen something different for the card base. The greeting is from the Celebrate Sunflowers Stamp Set, stamped in Poppy Parade Ink. I did cut it with a Stitched Rectangle die, but then I trimmed off the stitched edges to make it smaller to fit into the same size die cut in Poppy Parade. Otherwise, the next larger size of die cut seemed too big for this card.

Hand-Penned Petals With Soft Pastels Closeup

Of course for a final embellishment, I adhered some Genial Gems in both colors around on the card. It was fun playing with the pastels, I just had trouble assembling the card. I stuck the layers down crooked and had to redo. Then the torn paper with adhesive on it was really sticky and I couldn’t get it off my fingers easily nor pick up the other pieces off the table! Just a lot of little things were a pain making this simple card, but at least I got to play with the Soft Pastels Assortment.

Check out the Soft Pastels Assortment in the Stampin’ Up! Online Store!

Pattern Party Colored Flowers Card

Pattern Party Colored Flowers Card

Do you recognize this designer paper? It is in the Pattern Party Designer Series Paper, a product available for your Stampin’ Rewards when your order total reaches $150 or more. It’s a huge pack of paper of 48 sheets, 12 different designs with 4 sheets of each design. It’s a really fun and useful package of paper, too, so you could actually combine orders with a friend and share this large package of designer series paper!

However, if you don’t recognize this designer paper, its because it comes in black and white in the Pattern Party package! I spent some time coloring in the flowers with Stampin’ Blends just for fun! Coloring is always a good stress reliever to take your mind off everything except hearing the sound of the marker on the paper and staying in the lines!

Pattern Party Colored Flowers Card and B&W

This card was very easy. I decided to color in the flowers with the new In Color 2021-23 Stampin’ Blends, at least the Pale Papaya, Fresh Freesia, Polished Pink. I also used Daffodil Delight for the yellow flowers. If you are daring, you can also color in the background, as I did. I used Soft Succulent to color the background. It’s best to use the narrow tip of the markers to color around the individual flowers and if you want, then you can use the brush tip for the open areas. It does take a little patience to color in the background so it is up to you. It looks fine leaving it white as well!

The card base is Polished Pink Cardstock. The greeting is stamped from the Inspired Thoughts Stamp Set. I used two dies in the Ornate Frames Dies for the greeting and the fancy layer in Polished Pink. Then I added two In Color Jewels in Polished Pink to the ends of the greeting. They have been out of stock but should be back soon, I hope!

You may already have black and white designer paper from the Spring Mini, the True Love DSP, so you may have already tried this technique! Here is another card I made with just the black and white theme. Either way, colored or black and white, you will end up with a nice card! This Pattern Party Colored Flowers Card was fun to make if you want to take a little more time!

United Through Creativity FREE Digital Download

United Through Creativity Digital Download Banner

A FREE Digital Download from Stampin’ Up! for everyone!

“The first Stampin’ Up! value statement is this: we care about people first. What does that look like? Caring about people first means treating others with kindness, respect, and equal consideration. It means working together towards a common goal, helping each other through life’s challenges, and celebrating one another’s accomplishments. It means including others, even when we disagree, have contrasting life experiences, or simply see things differently. Caring about people first is our greatest strength!

In honor of this value—and in the spirit of World Diversity Day—we’d like to celebrate what makes us unique through what brings us together: creativity! The United Through Creativity Digital Download features inclusive, multicultural, and multilingual sentiments and illustrations that represent the multiple markets Stampin’ Up! engages with. And, it’s free for all!

  • The elements featured in the United Through Creativity Digital Download were created in the spirit of World Diversity Day—a day for each of us to join together and understand the value of cultural diversity throughout the world. And, to celebrate our unique community of crafters!
  • We celebrate the diversity of the Stampin’ Up! family every day! In the United Through Creativity Digital Download, you’ll see a variety of illustrations, sentiments, and other elements that represent each of our marvelous markets and more.
  • Print your favorite pieces and use them to create cards, scrapbook pages, and other paper projects! We hope you’ll enjoy celebrating diversity, connection, community, and creativity with this sweet selection of inclusive, multicultural, and multilingual elements.
  • Don’t be shy—share what you’ve made! When sharing to social media, use the hashtags #UnitedThroughCreativity and #DiversityDay. We can’t wait to see your creations!

Let’s celebrate what makes us unique through what brings us together: creativity!”

DOWNLOAD THE SENTIMENTS AND ILLUSTRATIONS HERE!

After you download this PDF, just page through all and see if something appeals to you. There is no need to print the whole thing unless you want to! You can choose certain pages to print and tell your printer to only print those. I suggest printing on cardstock (probably Basic White Cardstock) and then you can color in the images and use them however you like. And it is all FREE! Be sure to read the first page of the download for tips on using and printing.

There are many greetings, in different languages and different colors. Near the end you will even find a glass of wine and selection of cheeses! Again, this is an offering put out by Stampin’ Up! for everyone, for free. You are welcome to download the PDF and then print anything that appeals to you and use it in your cardmaking and projects.

Let me know if you have any questions!

Don’t Miss This June Paper Pumpkin Kit!

Paper Pumpkin Kit June 2021 Ad

Paper Pumpkin always looks fun, but this upcoming kit for June really got me excited for it! Paper Pumpkin is the monthly papercrafting kit that comes to you in the mail from Stampin’ Up! and this kit for June is extra special! It will introduce you to the new 2021-23 In Color collection, and you’ll also find a familiar shade from the 2020-22 In Color Collection.

The In Color Collections are new colors introduced that are new, fresh, and trendy, but they only stick around for two years! So every year it is important to get the In Colors to add to your ink, marker, and paper collection!

This Paper Pumpkin Kit will have all the supplies you need to make 9 cards, 3 each of 3 designs plus coordinating envelopes! And by coordinating, they mean “not plain white”. You will receive printed card bases, die-cut paper pieces, embellishments, adhesive, and more! The coordinating colors in June are Bumblebee, Evening Evergreen, Fresh Freesia, and Polished Pink.

As always, this month’s kit features an exclusive stamp set. But, this month’s kit also includes not one, but two Classic Stampin’ Spots! (Little ink pads!) And to top it all off, the kit comes in a cute, colorful, and collectible box.

An extra bonus is that this kit coordinates with products from the Expressions in Ink Suite (item #155459) in the new Stampin’ Up! Catalog. You will find this Suite on pages 96-97. It is also featured on the front of the new catalog! This Suite jumped right off the page at me and I absolutely love it!! The designer paper is stunning! That makes the Paper Pumpkin Kit extra exciting! And if you are not ready for the whole Suite yet, you can get a taste with the Paper Pumpkin Kit!

Get a taste of the new In Colors as well as coordination with the new Expressions In Ink Suite in the new catalog! Join Paper Pumpkin today and be assured your name is on the list for June’s Paper Pumpkin! OR add a Prepaid Kit or several months to your regular Stampin’ Up! order. Maybe it will help you reach Stampin’ Rewards!

JOIN PAPER PUMPKIN HERE AT MY LINK!

Paper Pumpkin Banner1 June 2021

Pattern Party Hello Card

Pattern Party Hello Card

After working with this Pattern Party Designer Series Paper the other day, I left these two patterns out on my table because I knew they would make a cute card like this Pattern Party Hello Card. It’s one of the easiest card designs you can make and yet it always looks good and can be for almost any occasion. Just change the greeting.

This easy card begins with a card base of Basic White Cardstock. I just cut the two patterned papers from the Pattern Party Designer Series Paper the width I liked them and so they would overlap by about 1/2″. It would be easier if you cut another piece of Basic White Cardstock on which to adhere the two designer papers for that layer on the card front. It would be easier to line them up and tie the ribbon around.

This Whisper White Faux Linen Ribbon, part of the Flowers For Every Season Ribbon Combo Pack, is rather sheer and I could see the paper seam underneath it. I didn’t like that look, so I use a scrap strip of Basic White Cardstock that was about the same width or narrower than the ribbon and adhered that over the seam of the two papers to the ribbon would look solid white without showing through to the paper. I just put the strip of ribbon across that white cardstock strip on the front and then adhered it to the back sides of the paper. This saves a couple of inches of ribbon if you were to tie ribbon all the way around the card. I tied the bow separately and adhered it with Mini Glue Dots. Now when you do that with a wide ribbon like this white one, you might want to tie a piece of twine around the ribbon right where you are going to adhere the bow. That narrows the ribbon at that point so it looks more real that the ribbon is tied onto that wide ribbon rather than just stuck on! But it’s not absolutely necessary.

You can add almost any greeting you want as long as it fits in the space. I stamped the “hello” from the Artistically Inked Stamp Set in Flirty Flamingo Ink. Then I die-cut it with the pretty scalloped circle die in the Tasteful Labels Dies. I added three 2021-23 In Color Jewels (155571) to the greeting for a little bling. These are out of stock at this moment but they will get more! They were obviously very popular! I know I have already used them a lot on cards!

Here is the other card I made with the striped pattern of the Pattern Party DSP. You can only get this paper with an order of $150 or more on which you would earn Stampin’ Rewards. Check pages 170-71 in the Stampin’ Up! Annual Catalog to read about Stampin’ Rewards.

I really like this bright, happy card made with this Pattern Party Designer Paper! You can make a card like this with whatever two patterns of designer paper you have in your stash at the moment and add a ribbon and a greeting!

SHOP STAMPIN’ UP! ONLINE HERE!

Bloom Where You’re Planted Card

Bloom Where You're Planted Card

If you like plants, you will like creating cards with lush greenery like this Bloom Where You’re Planted Card! You don’t even have to have a green thumb! Just some dies or scissors! This is a Suite in the new Stampin’ Up! Annual Catalog that just came out about two weeks ago. Almost everyone wants to have a few green plants around, but these paper ones are a lot easier to take care of!

Even Demonstrators can’t buy everything they want, so I opted, as I sometimes do, to just purchase the Bloom Where You’re Planted Designer Series Paper so I could have a little bit of fun with the plants without buying everything. I like the way this card turned out and I just used my Paper Snips scissors!

The card base is Cinnamon Cider Cardstock which goes really well with this brick wall design design in the designer paper. I decided to cut out some of the plants on one of the sheets of designer paper. One sheet has lots of images of all kinds of potted plants, some large and some smaller. Now the Perfect Plant Dies will cut out images on one or more of the designer paper sheets but not these plants, so even if you have the dies, you will still have to cut out these plants as I used on my card. You might think it is too much trouble and too tedious to cut out images from designer paper, but it really is easy enough and I would even say relaxing to do. It’s best to have some good scissors for this job like the Stampin’ Up! Paper Snips. These scissors are very sharp but you can get in and around curves and things easily. Remember to mostly hold your scissors steady and turn your paper according to how you want it cut.

The dies are really made to go with the Plentiful Plants Stamp Set. You can buy both in the Plentiful Plants Bundle and save 10%. There are also Paper Lattice Accents that will be fun to play with as you create your cards and projects. So if you want it all, just use the one order number for the Bloom Where You’re Plants Suite Collection (1556990).

After cutting out these three potted plants with my Paper Snips (even dies are not perfect always so don’t worry if your cutting is not perfect), I just adhered them to the bottom of the brick paper. The small middle plant is popped up on Stampin’ Dimensionals for fun. If you don’t like the handles on the pot, just cut them off! If you don’t want the plant that tall, cut it shorter! You have more freedom with scissors!

The greeting is from the Dragonfly Garden Stamp Set. I thought it was appropriate for this card! I stamped it in Cinnamon Cider Ink and die cut it with a die in the Tasteful Labels Dies. What would we do without this die set?! I felt like the greeting didn’t need any other layers or anything behind it. I did pop it up with Stampin’ Dimensionals as well.. And except for putting a Basic White layer inside the card, stamped with a leaf from another stamp set, that’s all there is to this card!

Even if you can’t afford everything, you can pick and choose products in an entire Suite and buy what you think you can use the most. I think it’s the colors on this Bloom Where You’re Planted Card that really appeal to me and make me really like this card!

Shop Stampin’ Up! Online HERE!

Hand-Penned Petals Hello Card

Hand-Penned Petals Hello Card

I didn’t even order this Suite when Demonstrators got to preorder select new products in the Stampin’ Up! Annual Catalog. The loosely drawn floral images really didn’t appeal to me. But I started seeing cards other Demonstrators were making and then I liked everything about this Suite! This Hand-Penned Petals Hello Card is my first attempt using the stamps and paper! I love it!

This is a very easy card to make! Just stamping and paper….well, and a few rhinestones! The card base is Blushing Bride, one of the coordinating colors of the Hand-Penned Designer Series Paper. All the sheets of this paper are beautiful to use for floral cards. It reminds me of old-fashioned wallpaper! But modern! Very pretty!

I just chose one of the papers to use as a layer on the front of the card. I didn’t want to cover it up very much, so I made just a small piece of Basic White on which to stamp the bouquet in the Hand-Penned Petals Stamp Set. I stamped it in Memento Ink, fully expecting to color in the bouquet with Stampin’ Blends. But then I saw there were stamps for two-step stamping to fill in the color! They aren’t a perfect fit because that’s not the look you want, but they are fairly close. I used Blushing Bride, Daffodil Delight, and Mint Macaron Ink to stamp the flowers.

The greeting is from the Inspired Thoughts Stamp Set because I needed something small to fit just below the flowers. It is stamped in Mint Macaron Ink also. The Inspired Thoughts Stamp Set “goes with” the Inspired Thoughts Bundle which has the stamp set and Inspiring Canopy Dies. I really like this greeting stamp set but I did not purchase the dies. However, now I have seen some cute cards using those tree dies so who knows if I can hold out on not buying!

In finishing off this card, I layered the stamped bouquet piece on Blushing Bride and popped it up with Stampin’ Dimensionals®. I forgot that in the Hand-Penned Suite Collection, there are the Genial Gems. These are faceted glitter gems in Pale Papaya and Mint Macaron. Instead, I used three Champagne Rhinestone Basic Jewels for the flower centers.

You can find these beautiful products in the Stampin’ Up! Online Store HERE!

Expressions In Ink Gatefold Thank You Card

Expressions In Ink Gatefold Thank You Card

The photo of this Expressions In Ink Gatefold Thank You Card doesn’t do this Specialty Designer Series Paper justice! Once you open the package, you cannot stop “oohing and aahing” over the beauty of it! The gold foil accents and the watercolor/alcohol ink images are just stunning.

This paper is the Expressions In Ink Specialty Designer Series Paper and I think it is some of the most striking papers we have ever had! Nothing can compare to having the paper in your hands to see how beautiful it is. No photos can come close. My post yesterday has photos of some of the sheets of paper and a card but even then, the paper is even better in person.

This card was fun to make and easy. It’s called a gatefold card because instead of the 8 1/2″ x 5 1/2″ paper that we usually start our cards with, folded in half, this card is folded in from each side which makes the “gatefold”. Start with your card base of 8 1/2″ x 5 1/2″ and score 2 1/8″ from each end (or 2 1/8″ and 6 3/8″). This gives you a standard card width of of 4 1/4″ in the center, with the two ends folding over like doors (gates) over that area.

Decorate each “gate” with a piece of designer paper cut at 5 3/8″ x 2″. This leaves just a very narrow margin of cardstock showing so you can cut it smaller at 5 1/4″ x 1 7/8″ if you like. The cardstock I used on this card is Pale Papaya, one of the new In Colors.

For a gatefold card, make a center piece with the greeting or some other image to be adhered only on the left side flap so the card can be opened. Or you can make a bellyband that goes around the card to hold it closed. On this card, I die-cut a piece of Pale Papaya with one of the Scalloped Contours Dies (the second from the smallest die). After you cut out this piece, you will notice something different about it. There are actually slits around the edges that you can use for other creative opportunities, like inserting cardstock strips or ribbons through those. But otherwise, you can just use this die-cut piece as a layer or a focal point. For the greeting, I simply cut a piece of Basic White that would fit inside the Pale Papaya piece and stamped the “thanks” on it in Pale Papaya Ink. This was adhered to the left side of the card by figuring out where the middle of that piece was (count the scallops at the bottom!) and making sure I only put glue on the left side. The greeting is from the Artistically Inked Stamp Set. You can purchase the stamp set and dies that go with the stamp set, the Artistic Dies, together in a Bundle and save 10%.

To embellish, I tied a little Pale Papaya 3/8″ Open Weave Ribbon into a bow and adhered it to the greeting. Then I also added a few of the adhesive-backed iridescent sequins that come in the Expressions in Ink Ephemera Pack.

On the inside of the card, I added a layer of Basic White, stamped with a flower and leaves from the Artistically Inked Stamp Set in Pale Papaya and Just Jade Ink. You can also see in the photo below how the greeting looks from the inside of the card.

Expressions In Ink Gatefold Thank You Card Inside

Be sure to check out the Expressions in Ink Suite or at the very least the designer paper, the Expressions In Ink Specialty Designer Series Paper! You will easily make beautiful cards and projects using this paper at a minimum, like this Expressions In Ink Gatefold Thank You Card.

SHOP STAMPIN’ UP! ONLINE HERE!

Expressions in Ink Birthday Card With Gold Foil

Expressions In Ink Birthday Card With Gold Foil

THIS PAPER!!! Expressions in Ink Specialty Designer Series Paper (155464) Order it!

Okay, that’s really all that needs to be said for this blog post! But since you probably want to know more about the card and the paper, I’ll continue.

When I first saw a Stampin’ Up! video giving us Demonstrators a sneak peek at some of the new Annual Catalog products, I fell in love with this Expressions in Ink Suite! And when I saw it online in the catalog I wanted to order it right away. But it was not on our Demonstrator pre-order so I had to wait just like everyone else. My order just came and I have to say, when I opened this package of paper and looked at the sheets, I just gasped! It is beautiful and striking with the gold foil accents on one side of the sheets. You must have it!

Here are closeups of some of the sheets of paper, but even these do not do it justice!

Expressions in Ink Specialty Paper1
Expressions in Ink Specialty Paper2
Expressions in Ink Specialty Paper3
Expressions in Ink Specialty Paper4

For the card, I started out copying the catalog sample on page 96 in the upper right of the samples. It turned out not exactly the same. I dared to cut into one of the papers, trying to match the pattern I could see on the catalog page. Then I stamped the large and small flowers from the Artistically Inked Stamp Set plus the small individual leaves. The large flower is stamped in Polished Pink Ink and the small flower in Pale Papaya. The leaves are stamped in Just Jade Ink since the card base will be Just Jade. You can choose from lots of coordinating colors!

Expressions In Ink Card Beginning

Now when I stamped these flowers and leaves, I didn’t give a lot of thought ahead of time to that gold foil piece placed over the top on the sample. In the Ephemera Pack, I was thinking that there would be individual foil cutout flowers, leaves, etc. to place over my stamped images, but there were not! The pack will still be fun to play with, it just didn’t have what I was expecting. Then I realized, I just needed to die-cut a gold foil piece from the Artistic Dies. While my flowers and leaves lined up pretty well with the die-cut, and while it doesn’t and shouldn’t be perfect because this is a watercolor look, I did add another stamped leaf and then got my foil to line up pretty well.

Expressions In Ink Birthday Card With Gold Foil

I highly recommend using Adhesive Sheets on the back of the Gold Foil Sheets before die-cutting this intricate design, which I always forget, but I did manage to use teeny tiny dots of the Multipurpose Liquid Glue on the back. The greeting comes in the stamp set and I stamped that in Polished Pink Ink and placed it in a lower position than on the catalog sample. For a little extra, I used a strip of the Just Jade & Gold 3/8″ Braided Ribbon, a little frayed on the ends, and adhered just below the greeting a tiny bit. And for a little more bling, I wanted to try out the little adhesive-backed iridescent sequins in the Ephemera Pack. You can see about five of those placed around the card.

This is a relatively easy card to make, using both stamping and designer paper, or rather stamping ON the designer paper, plus the die-cut Gold Foil accent and other embellishments. I suggest you order this paper, or the whole Suite of products sooner rather than later because once word gets out about how beautiful this Suite is, it could be backordered by the time you decide to get it. Hopefully, Stampin’ Up! anticipated how popular this Suite would be and ordered plenty!

You might also consider the June Paper Pumpkin Kit which will coordinate with this Suite! Even if you subscribed before and dropped, you may want to come back just for this kit at least if you like the style of the Expressions In Ink Suite of products!

Here’s another view of my card without so much glare from the foil! I hope you are as attracted to this Suite as I am!

Expressions In Ink Birthday Card With Gold Foil Closeup

SHOP STAMPIN’ UP! ONLINE THIS WEEKEND!

Color & Contour Pattern Party Card

Color & Contour Pattern Party Card

Once again, as I looked through the Pattern Party package of designer papers, this Flirty Flamingo stripe jumped out at me and screamed to be made into a card which resulted in this Color & Contour Pattern Party Card. I had almost forgotten this set of dies has this scalloped edge die in it which just helps to make this card! I love how this card turned out!

The card base is Flirty Flamingo Cardstock. The striped paper is from the Host Product in the new Stampin’ Up! Annual Catalog. This means that with an order of $150 or more, instead of choosing some other free merchandise in the catalog, you can go to the back of the catalog where there is this designer paper option (48 sheets!) and some other stamp sets, all that you can choose as your Stampin’ Rewards at a discounted price. I think this package of paper is going to be a hit because it’s something different (just stamp sets have been offered as Host Rewards) and you will love the paper patterns! Look for the Pattern Party Designer Series Paper on page 171.

The striped paper is die cut with a die in the Scalloped Contours Dies. You can purchase the Color & Contour Stamp Set and the dies in a Bundle and save 10%. I love the stitched look along the scalloped edge. Whether you purchase the stamp set or not, I would buy the Scalloped Contours Dies by themselves. They are that good!

I do have the Color & Contour Stamp Set and I do like the flowers in the set! You can do two-step stamping to color in rather abstractly the flowers, or you can color in the open design yourself with whatever coloring technique you like. Then you can cut them out with the dies. You can set on the set that the individual leaf has a very open design, but I just stamped it in Memento Ink, colored in with two colors of green Stampin’ Blends, and cut out the leaf itself, not the extra squiggle! The lower flower is popped up on Stampin’ Dimensionals and the other two and the leaves adhered right to the card. The flower center is stamped with Daffodil Delight Ink.

It IS a little tricky to line up the two-step stamp with the first stamped impression and then to line up the die with the flower. You could spend some time lining them up and then put a black mark on the stamp and on the die to remind you of how to line them up. But since the design is rather abstract anyway, it kind of doesn’t have to be perfect. For some of us, though, who like things “perfectly lined up”, well, we can fiddle with it and we can get it lined up!

The greeting is in the stamp set but I did use another set of dies to cut out the greeting. I used the Stitched So Sweetly Dies to get a smaller rectangle to fit at the bottom of my card. This is another set of dies that I have used a lot and recommend you have in your supplies!

Not one to leave well enough alone, I saw the “speckle” stamp in the set and thought maybe it would look interesting in the bottom portion of the card. Usually it is not a good idea to stamp something more on a card that is nearly finished and could potentially be ruined if you mess up, but I took a chance and it worked out! I inked the stamp with Flirty Flamingo Ink but stamped off before stamping on the bottom of the card.

On the inside of the card, I put a piece of Basic White for a layer and stamped one of the flowers, just the outline, in Flirty Flamingo Ink down in the right-hand corner. Later I can stamp a message on the inside of the card or write a personal note.

If you have a large order of $150 or more, remember that you can choose Stampin’ Rewards of 10% or more and remember that there are special Host choices in the back of the catalog, one being this year the Pattern Party Designer Series Paper. This is 48 sheets, 4 sheets each of 12 different designs. This card, the Color & Contour Pattern Party Card, shows off one of the pretty patterns in this package of paper! You will enjoy it I’m sure!

Shop Stampin’ Up! Online Today!

Exciting Paper Pumpkin Kit For June!

Paper Pumpkin always looks fun, but this upcoming kit for June really got me excited for it! Paper Pumpkin is the monthly papercrafting kit that comes to you in the mail from Stampin’ Up! and this kit for June is extra-special! It will introduce you to the new 2021-23 In Color collection, and you’ll also find a familiar shade from the 2020-22 In Color Collection.

The In Color Collections are new colors introduced that are new, fresh, and trendy, but they only stick around for two years! So every year it is important to get the In Colors to add to your ink, marker, and paper collection!

This Paper Pumpkin Kit will have all the supplies you need to make 9 cards, 3 each of 3 designs plus coordinating envelopes! And by coordinating, they mean “not plain white”. You will receive printed card bases, die-cut paper pieces, embellishments, adhesive, and more! The coordinating colors in June are Bumblebee, Evening Evergreen, Fresh Freesia, and Polished Pink.

As always, this month’s kit features an exclusive stamp set. But, this month’s kit also includes not one, but two Classic Stampin’ Spots! (Little ink pads!) And to top it all off, the kit comes in a cute, colorful, and collectible box.

An extra bonus is that this kit coordinates with products from the Expressions in Ink Suite (item #155459) in the new Stampin’ Up! Catalog. You will find this Suite on pages 96-97. It is also featured on the front of the new catalog! This Suite jumped right off the page at me and I can’t wait for it to arrive in my order this week!! That makes the Paper Pumpkin Kit extra exciting! And if you are not ready for the whole Suite yet, you can get a taste with the Paper Pumpkin Kit!

Get a taste of the new In Colors as well as coordination with the new Expressions In Ink Suite in the new catalog! Join Paper Pumpkin today and be assured your name is on the list for June’s Paper Pumpkin! OR add a Prepaid Kit or several months to your regular Stampin’ Up! order. Maybe it will help you reach Stampin’ Rewards!

JOIN PAPER PUMPKIN HERE AT MY LINK!

Paper Pumpkin Kit June 2021 Ad