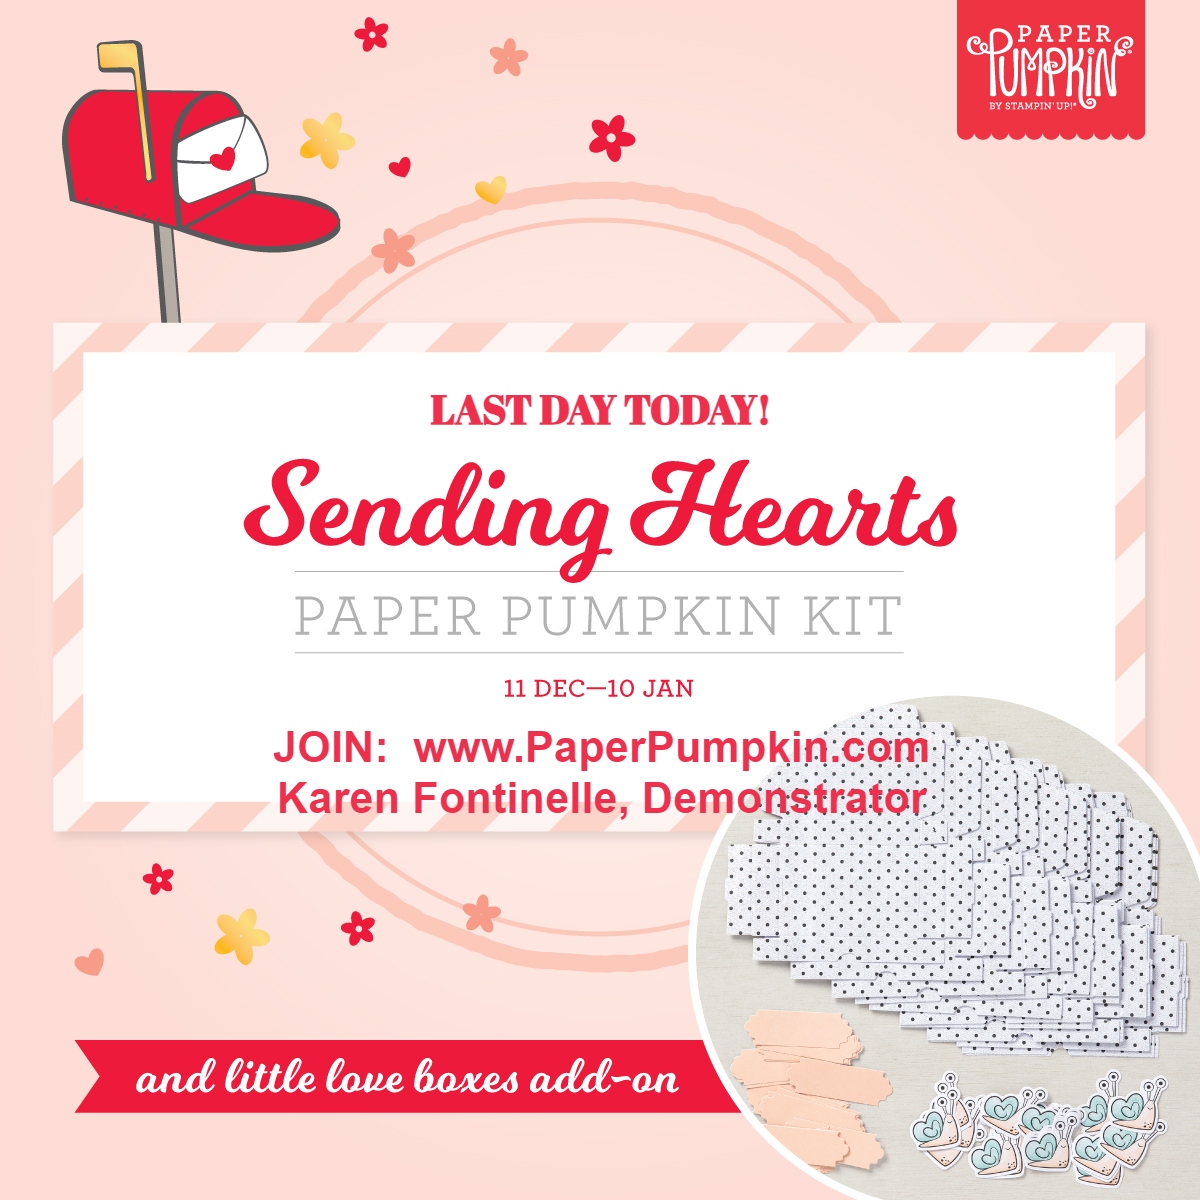
Love is in the air! Send a little love to someone special with the Sending Hearts Paper Pumpkin Kit. From heaps of heart-shaped elements to paper pieces in red and pink, this month’s kit has everything you need to create eight adorable cards—with coordinating envelopes—for Valentine’s Day, anniversaries, and every celebration of love in between!
With the add-on to January’s sweet and sentimental kit, there’s even more love to share! The add-on—called Little Love Boxes—includes 20 tiny, printed boxes and 24 die-cut, heart-shelled snails and sentiment labels. When combined with the remaining components from the Sending Hearts kit, you can create treat packaging, additional cards, and so much more! Order the Add-On from the Stampin’ Up! Online Store after becoming a Paper Pumpkin subscriber.
Who doesn’t love making Valentines and sending them? I think Valentine’s Day takes us back to our childhood, to elementary school, when we would decorate shoeboxes or lunch sacks in which to receive our valentines from our classmates!
Today is the LAST DAY to sign up for the January 2021 Paper Pumpkin Kit, Sending Hearts! Sign up TODAY or reactivate your account so you will receive this kit mid-January!
I’m not sure I would have ordered this paper and other supplies in this Dandy Garden Suite, but since I was “attending” the Stampin’ Up! OnStage Event virtually, I got it and it turns out I really like it! This paper I used on my Dandy Garden Z-Fold Card is very colorful and who can resist the little ladybugs?!
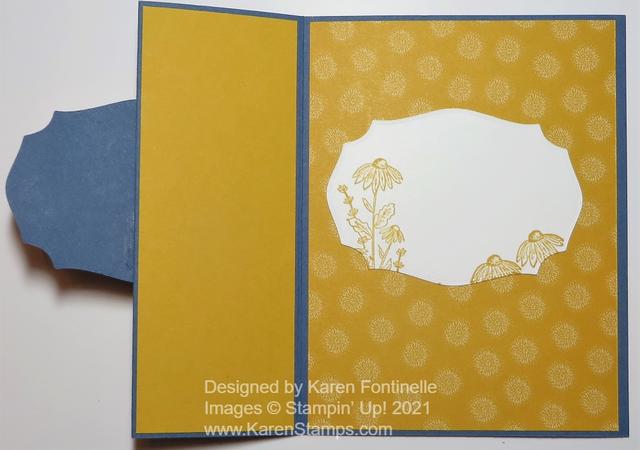
While deciding which designer papers to use out of the Dandy Garden 6″ x 6″ Designer Series Paper, I decided to make my card a z-fold design to show off the designer paper better. I love this paper with the dark blue background and bright yellow dandelions. The other designer paper on the inside of the card is the opposite side of the one with the blue and dandelions.
The card base is Misty Moonlight. To make the z-fold card, just make a regular card front but then score the front of the card base in half at 2 1/8″ and fold back. That’s all there is to it! And yet a z-fold card will look like you made something really special! I just used a piece of designer paper on this front panel.
The greeting, from the Dragonfly Garden Stamp Set, is stamped in Misty Moonlight Ink on Bumblebee Cardstock, then die-cut with one of the Tasteful Labels Dies. The greeting is then layered on a larger die from the same set in Misty Moonlight blue. Be sure you only put adhesive on the back of this label that will attach to the front panel, probably half or less of the area.
On the inside of the card, I adhered a piece of the other side of the designer paper in Bumblebee. Since it is a print, I decided to die-cut a matching label to the one on the front to adhere inside the card for stamping or writing a message. To hide it directly behind the die on the front of the card, hold it perfectly behind the one on the front after applying some adhesive on the backside, and carefully hold it there while closing the card so it will glue down right behind the front one but on the inside of the card. I had also stamped some Bumblebee flowers on the die.
The middle panel I could have left plain, but in case I wanted to write a note, I put a piece of Bumblebee cardstock.
That’s all there is to this card, except for the Ladybug Trinkets! For each one, I used two Glue Dots to attach it. I put the first one on, sort of stuffing it into the indentation on the underside of the bug, and then added another glue dot right on that first glue dot to hold it on the card.
I think the colors of the designer paper on this Dandy Garden Z-Fold Card really make it look special, along with the little ladybugs!
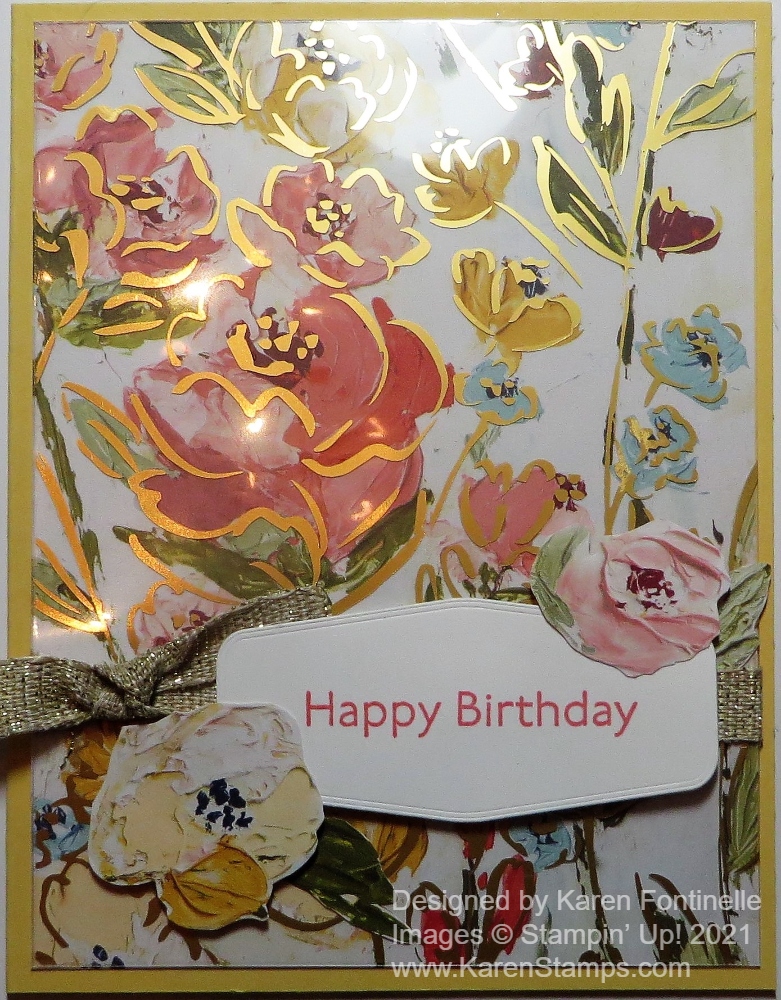
I thought I would make an easy but beautiful card for this blog post and of course that meant using the Fine Art Floral Suite to make this Fine Art Floral Golden Garden Birthday Card. I know the title is a little weird, but it’s because I used the Golden Garden Designer Specialty Acetate Sheets. I didn’t even know what they were called, just that they were in the new spring mini catalog and I had them! If you place them just right, some parts match this designer paper!
First I made the card. I wanted to use the Fine Art Floral Designer Series Paper. I chose the sheet that has one top corner bare of flowers. Actually, there is another sheet with a blue background and yellow flowers, but this one has the white background with pinkish flowers. You’ll see it in your package. You could also just frame this sheet of paper, kind of like some other designer paper we had one time! Or use it for a scrapbook page. I chose So Saffron for the card base, one of the paper’s coordinating colors….and there are a lot of coordinating colors with this paper!
Next, I got out the Golden Garden Acetate Sheets and found the portion that matched the flowers on the paper and cut it out. I just put tiny dots of Multipurpose Liquid Glue on the back of the acetate on the widest parts of the printed design in hopes of hiding the glue. Actually, when you turn the acetate over, you could use that side instead! Then I carefully overlaid the acetate on the floral paper. Be sure to adhere the ribbon around the designer paper and acetate before you adhere to the card base. I added a piece of the 3/8″ Fine Art Ribbon which is soft, pliable, and has gold in it!
The greeting is stamped in Flirty Flamingo Ink from the Art Gallery Stamp Set in the Suite. I die cut the piece with one of the Tasteful Labels Dies. Next, I cut out two flowers from a scrap of the designer paper and popped them up on the corners of the greeting. I’m not sure if I like them or not, but they are there.
That’s all there is to this card! Once again, the beautiful designer paper does most of the work to give you a lovely card! The acetate overlay is a bonus. HERE is another card I made recently with both sides of the same designer paper.
You’ll find all of these supplies in the January-June 2021 Mini Catalog. And while you are ordering, be sure to keep Sale-A-Bration in mind and order in $50 increments so you earn FREE Sale-A-Bration products! No limits!
If you want EVERYTHING, order the Fine Art Floral Suite Collection (155982) and get it all by just putting in one item number. It has been on backorder but as I write this it should be available next week. Or just order the individual products that you want, or the Bundle. I’m sure you will want these beautiful products to make a card like this Fine Art Floral Golden Garden Birthday Card!
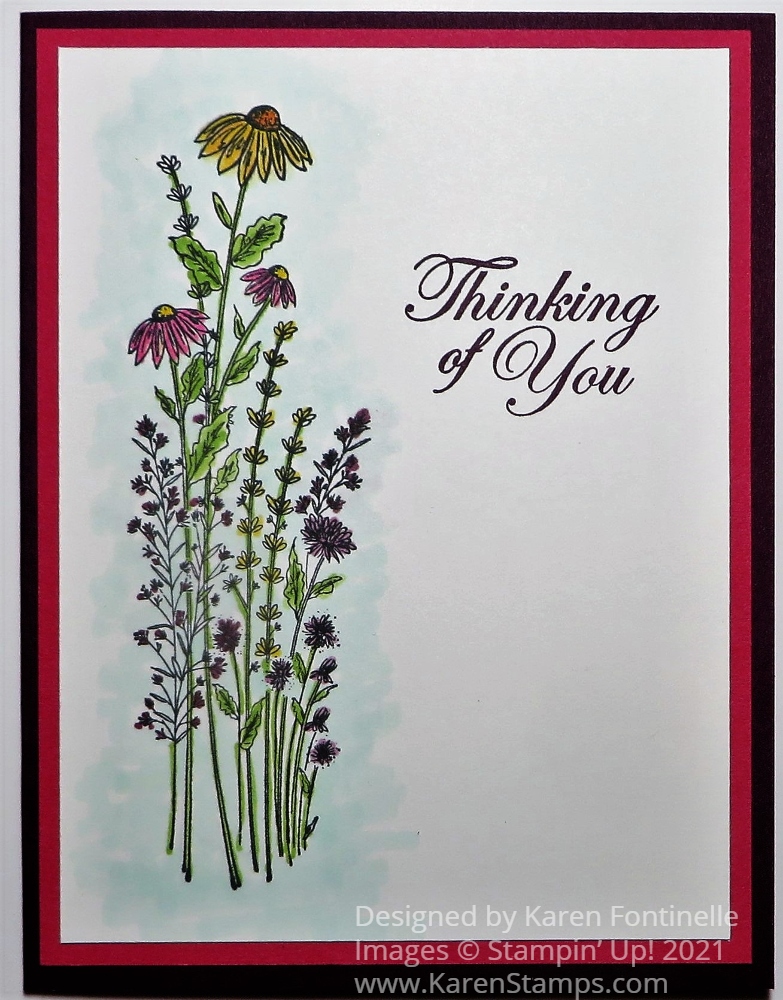
You may think this Dragonfly Garden Thinking of You Card would be difficult to make, coloring those tiny areas, but it is still relatively easy. Since the areas you probably want to color are so small, you can’t really fuss over it very much!
Just to use a color I don’t usually use, I chose Blackberry Bliss for the card base. And because I had thought about using Melon Mambo as the card base I used it as a layer underneath the Whisper White card front.
The reason I used this collection of flowers in the Dragonfly Garden Stamp Set was to see what it would be like to color and make into a card. I stamped it with Memento Ink and then colored in with Stampin’ Blends. I used some Daffodil Delight on the top flower, Melon Mambo on the next group of daisies or whatever kind of flower that is! The other flowers I used a purple color. The leaves and stems are colored with Granny Apple Green.
Most of these images are so small and tiny that you can only use the pen tip of the marker, not the brush tip. And even then, you mostly barely dot the color in, not really “color in”.
The greeting is the pretty font from the Good Morning Magnolia Stamp Set. If you aren’t sure what you will use a card for that you make, usually the “Thinking of You” sentiment is a versatile one to choose. You may be thinking of that person for many occasions!
The flowers looked a little bare over there by themselves, so to kind of ground them a bit, I colored around them with a Light Pool Party Stampin’ Blend marker. I only barely wanted it to be seen. It was nothing artistic, just some scribbling and coloring lightly with the brush tip. Nothing is right or wrong.
Since the cardstock is so dark, I adhered a layer of white cardstock on the inside to stamp or write a message. And for a little decoration, I adhered a strip of Dandy Garden Designer Paper across the bottom.
Basically, this is an easy card to make to send to someone. Just some stamping and a little bit of coloring! And if you don’t want to do the coloring, make a monochromatic card stamping the flowers in a color, and then there is no need to color the design like this card HERE that I previously made.
If you like various kinds of plants and dragonflies, you should really check out this Dragonfly Garden SuiteCollection in the new January-June 2021 Mini Catalog. Then you will have everything in this theme to make lots of beautiful cards and projects.
Today is maybe a bigger day for stampers than New Year’s Day because Stampin’ Up!’s biggest promotion of the year begins, Sale-A-Bration 2021, as well as the release of the new January-June 2021 Mini Catalog with great new products in it!
When you purchase any of these new products (or Annual Catalog products!) and your order totals $50 or more (before shipping and tax) you earn a FREE product in the Sale-A-Bration Brochure! For every $50 you spend, you earn a free Sale-A-Bration product. If you spend $100, you may choose one of the select higher-level products.
You can mix and match your free products, too. If you spend $100, you can choose two $50 level products OR you can choose one $100 level product. If you spend $150 (you get Stampin’ Rewards of 10% already!), you can choose three $50 level products OR one $100 level product and one $50 product. You get the idea! No limit! Just ask me if you have questions!
Mini Stampin’ Cut & Emboss Available Today!
Finally, this little cutie, the Mini Cut & Emboss Machine is available beginning today!! This cute machine has a compact footprint for easy storage and travel. The 3-1/2″ platform works with many of Stampin’ Up!’s smaller dies and smaller embossing folders. Dies and embossing folders that are compatible with the Mini Stampin’ Cut & Emboss Machine are indicated in the product description in our catalogs and online store. Includes 1 Mini Base Plate (Plate 1), 2 Mini Cutting Plates (Plate 2), 1 Mini Embossing Plate (Plate 3), and 1 Mini 3D Embossing Plate (Plate 4).
If you want to JOIN STAMPIN’ UP! as a Demonstrator, in your Starter Kit you will also receive a free stack of our Regals, Subtles, Neutrals, Brights, and 2020—2022 In Color Designer Series Paper. There couldn’t be a better time to join the Stampin’ Up! family. Think about it and let me know if you have questions! You’re always invited to be a Stampin’ Up! Demonstrator!
If you have a large order yourself or go in together with friends, at a $300 order you will receive an exclusive Punch Party Stamp Set for FREE!
New Mini Catalog Live Today!
The January-June 2021 Mini Catalog is ready for ordering today! You will find fresh, new products for spring. If you have not received your catalog yet from me if you are a regular customer of mine, I still hope it will come soon now that the holidays are over…but remember, you can view it online as well as just viewing the products in the Online Store.
If you are new and interested in purchasing Stampin’ Up! products, I would be happy to be your Demonstrator and send you the catalogs if you would like. Just email me at Karen@Karenstamps.com and send me your contact information.
And one more thing…..new Basic White Cardstock and other products available today! Remember, our Whisper White line was no longer being produced so Stampin’ Up! found an acceptable substitute called Basic White. Just search in the Online Store for Basic White to see all the products!
And remember, for every $50 you spend with Stampin’ Up!, you will earn a FREE Sale-A-Bration product! So when you put those two things together, what can be a better way to start off a New Year!!
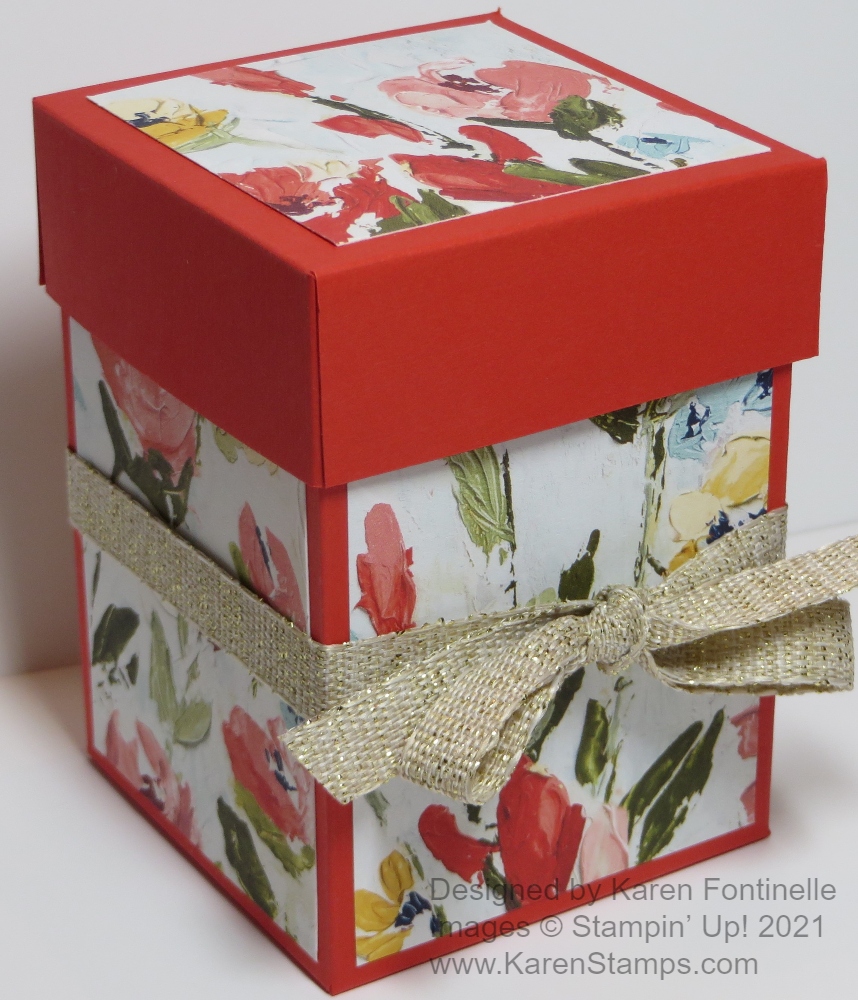
Doesn’t this Fine Art Floral Small Gift Box make you want to find a reason to give someone a gift? It’s a basic pattern to make the box and the new Fine Art Floral Designer Series Paper will make any project look gorgeous! You will be able to purchase this paper tomorrow, January 5th from the new January-June 2021 Mini Catalog with all kinds of new products for spring. Although we enjoyed the Holiday Catalog, it feels good to have a fresh start with this new Spring Mini!
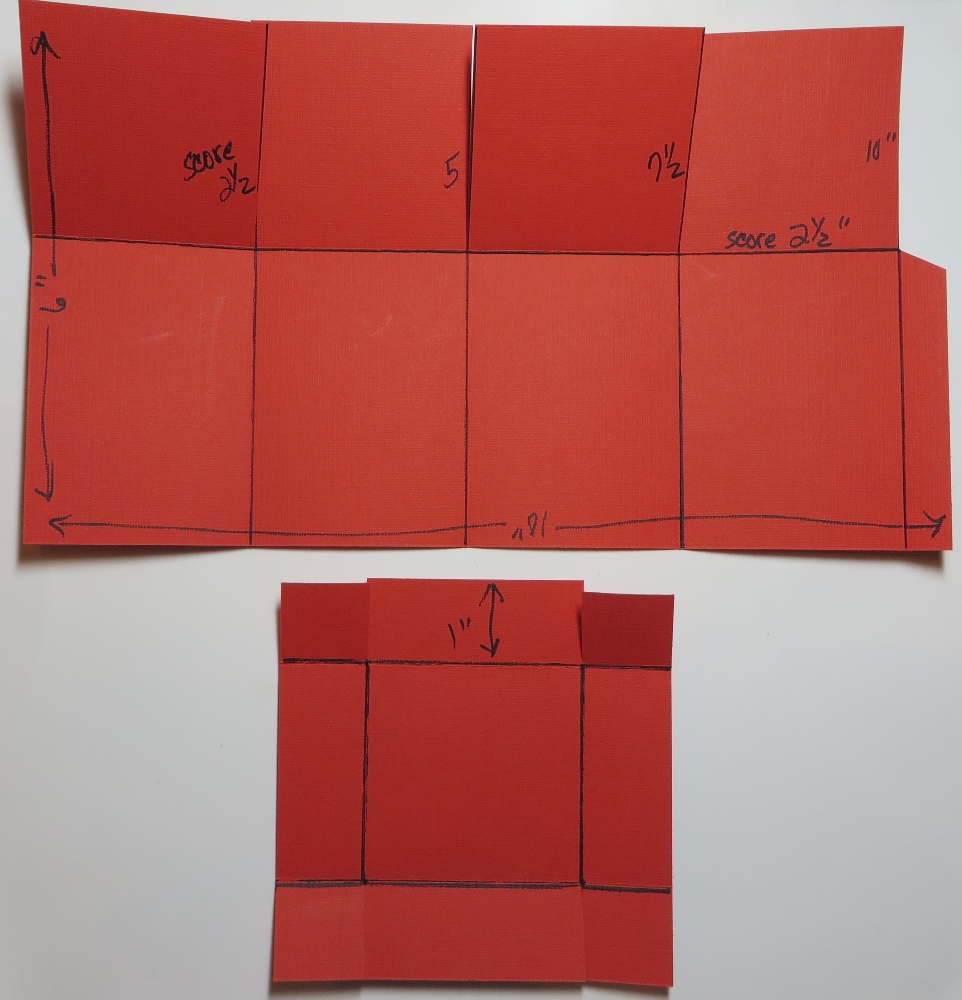
This box is easy to make and you can modify it for a shorter size or just adjust the measurements if you want it a little narrower or wider.
My drawing isn’t perfect but along with the measurements I think you can follow along.
Box piece: 10 1/2″ x 6″ (on my diagram above I wrote 10″ going all the way across the paper but it is 10 1/2″.)
Scoring across the paper in landscape position, score at 2 1/2″, 5″, 7 1/2″ and 10″. Turn the paper to portrait position (narrow edge, up and down), score at 2 1/2″ to form the bottom flaps of the box.
I used Poppy Parade Cardstock but if you happen to use designer paper to make the box itself, make sure you check if there is a pattern than needs to go a certain direction.
Cut up on all those score lines in landscape position from the bottom up to the 2 1/2″ score line going across. This makes the bottom flaps for the box. On my diagram, those are the flaps at the top of the picture. Cut off that little 1/2″ piece at the end.
For the box lid, cut a piece of cardstock 4 1/2″ x 4 1/2″. Now if you score at 1″ on all sides, you may find that the lid will be too tight to fit on the box without squishing the box inward. So what I did is I scored just a “smidge” outside the 1″ mark. So actually I scored at 15/16″ instead of exactly 1″. That gave me the tiniest bit of extra space for the lid to fit properly. Cut up to the score line as you see in the diagram.
To decorate the box, I used the new Fine Art Floral Designer Series Paper. You can modify these measurements if you want less of a margin on the box. For the sides of the box, I cut 4 pieces of designer paper at 3 1/4″ x 2 1/4″. For the lid, cut a piece at 2 1/4″ x 2 1/4″. You could also put the paper on the sides of the lid, but I wanted to let the Poppy Parade show. Remember to pay attention to the direction of the pattern.
Poppy Parade is one of the colors that coordinates with the designer paper but there are many others! Usually there are just a few colors that coordinate with the designer paper but this one has many colors! I chose this particular pattern of the paper because the flowers were a little smaller and would fit better on the box.
To finish my box, I tied a piece of the new Fine Art 3/8″ Ribbon around the middle of the box. This ribbon is gold in color and very soft. I could also have tied it up around the box so the bow would be on the top of the lid. Or I could have stamped a greeting and added it to the front of the box. Whatever you want to do to embellish your box, although with this beautiful paper, it doesn’t need much!
This paper and ribbon will be available tomorrow, Tuesday January 5 but don’t forget to check the retiring holiday products in the Year-End Giant Closeout in the Stampin’ Up! Online Store. And there are just a few things left on the Clearance Rack! Today is the LAST DAY for the Closeout!!
Make a few gift boxes here at the beginning of the year and you will have some handy for those gift-giving occasions coming up in the new year! Try this Fine Art Floral Small Gift Box just to get the idea and then you can modify it for whatever you need!
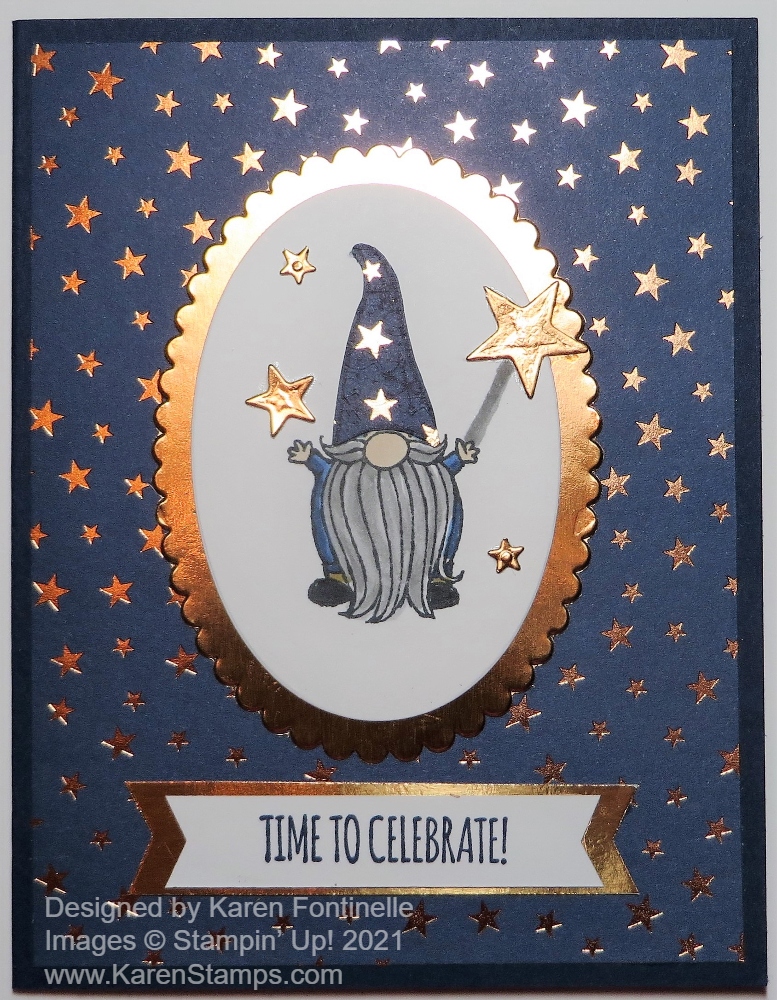
Do we really have to retire the cute Gnome For the Holidays Stamp Set and the cute little gnomes? I have come to love certain cute gnomes, in this stamp set and other handmade ones I have bought online so I hate to see this stamp set go! I made some cute Christmas cards with this stamp set, like this one and this one. These guys were so fun to stamp with!
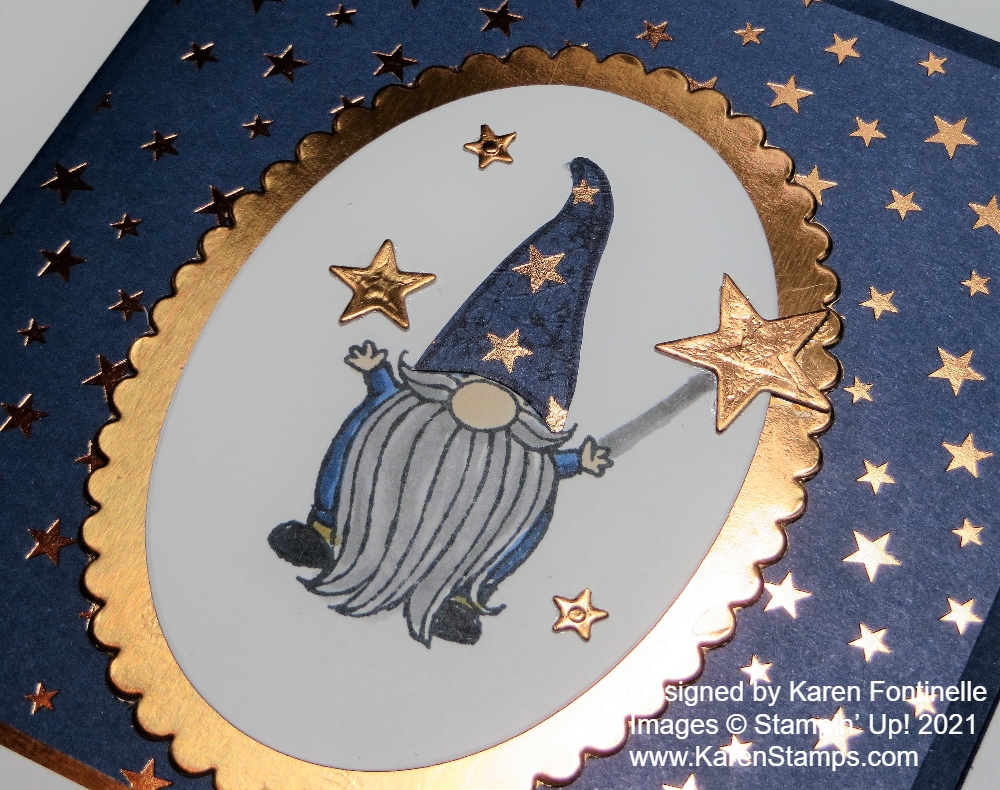
For this card, I made this one little gnome into a wizard! I started with a card base of Night of Navy Cardstock and layered with a copper star-studded designer paper. This Brightly Gleaming Specialty Designer Series Paper that has been with us for two holiday seasons but was a gorgeous one with the copper foil accents. While it has holiday images, it also has generic patterns, like this one, that you can use anytime for cards, projects, or scrapbook pages.
I inked up the gnome with Memento Ink and then wiped off the little ornament dangling from his hat with my Simply Shammy. You could also ink up the stamp with the Basic Black Marker and omit the ornament. I stamped the gnome on Whisper White and die-cut with a plain oval in the Layering Ovals Set. I used the Copper Foil for a layer underneath with a die-cut scalloped oval. The greeting is stamped in Night of Navy Ink from the Itty Bitty Birthdays Stamp Set and layered on a strip of Copper Foil.
For the gnome/wizard, I colored him with Stampin’ Blends. I decided to “paper piece” his wizard hat by stamping on a piece of the designer paper, trying to get as many stars as possible on it, and then cutting it out with Paper Snips. I just glued that over his stamped hat. I also thought he needed a wand for his wizardry so I die cut some stars from the Stitched Stars Dies for his wand and for a few others scattered around. Stars are great for lots of things!!
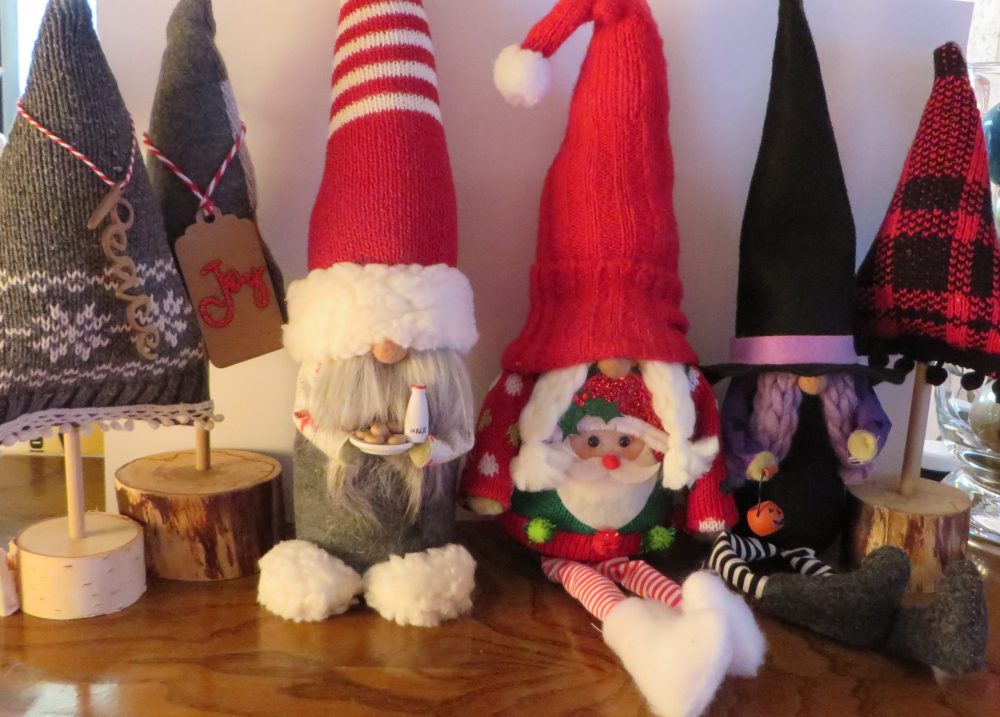
Here are my “real” gnomes that I purchased from a lady on Instagram, @thelittlegreenbean. She makes the cutest gnomes and other things. Over a year ago when I discovered her, I didn’t even like gnomes, but I fell in love with hers and bought a couple for Christmas gifts last year. I got the first one with the milk and cookies for myself, then the Halloween gnome, and this year the Ugly Christmas Sweater gnome! I love that one!
If you are interested in the Gnome For the Holidays Stamp Set, you only have today and tomorrow, Monday January 4th to get it. On the 5th, the set will be retired as the new Jan-June Mini comes out.
Be sure to check out the Year-End Giant Closeout at Stampin’ Up! before these retiring goodies are gone on Tuesday! Have fun shopping!
Well, we made it through 2020 and I dare say most of us have high hopes for 2021 being a much safer, healthier, better year! This Darling Donkey surely is planning on a happier year ahead in 2021!
This donkey is from the stamp set Darling Donkeys that is one of the Sale-A-Bration stamp sets you can earn FREE with a $50 purchase beginning January 5, 2021! At first I wasn’t too excited about donkeys, but they are pretty cute and I think this set will be pretty popular! It already is among Stampin’ Up! Demonstrators!
This card base is Mossy Meadow and coordinates with the Dandy Garden 6″ x 6″ Designer Series Paper coming in the January-June 2021 Mini Catalog. I chose the opposite side of one of the floral patterns of the paper to be on the card front.
The donkey from Darling Donkeys is stamped with Memento Ink and colored in with my favorites, Stampin’ Blends (mostly Smoky Slate but a little Crumb Cake, too!). Then I die-cut the donkey with the Layering Ovals Dies and Gold Foil with a scalloped oval die. I just wanted some gold on this festive New Year’s card!
The Gold Foil stars are from the Stitched Stars Dies. The numbers are from the Making a Difference Stamp Set. The greeting in the corner is inked up with a Mossy Meadow Marker, only the part I wanted on the stamp in the Itty Bitty Christmas Stamp Set.
Hope you enjoy the Darling Donkey welcoming in 2021 with a happy, hopeful look on his face! Have a Happy New Year all year!
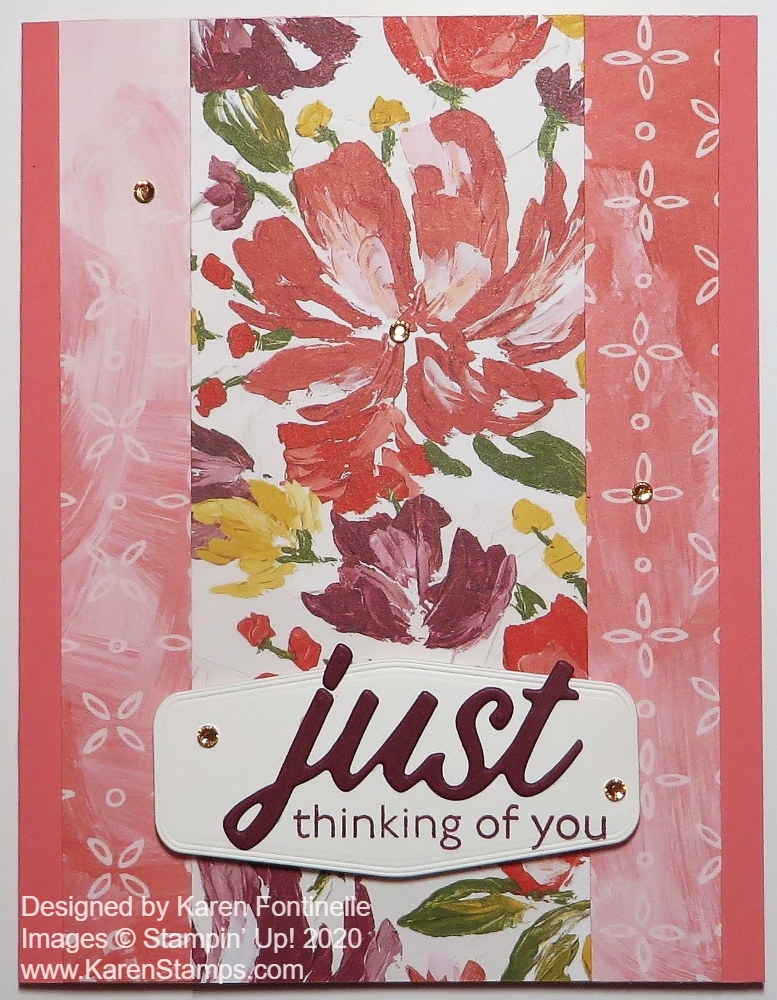
I’m finally getting a chance to play with some new things in the upcoming January – June 2021 Mini Catalog, coming January 5th and the result was this Fine Art Floral Thinking of You Card.
As you can imagine, this Fine Art Floral Designer Series Paper is gorgeous! When you get your catalog or look at it online next week, look at the back cover because you will see how the artists created the designs for this paper. One side of every sheet is a floral design and the other side is a more generic, plainer watercolor washed design.
And when you look at the back of the designer paper package, you will be amazed at how many coordinating colors go with this paper! I think there were twelve colors plus white. I always write all the colors with a marker on the back cardboard so I can read them easier than trying to squint and read Stampin’ Up!’s tiny print!
The card base is Flirty Flamingo. I cut a strip of the designer paper thinking I would put it on the side of the card, but as I turned over the floral side, I really liked the other side, too, and ended up with this design I adhered two strips of the “other side” to the sides of the card but leaving 1/4″ of Flirty Flamingo showing, and then adhered the floral side over the top and down the middle. That panel is 2 1/4″ wide. Not what I had planned at all, but it’s what it turned out to be!
For the greeting, I sort of copied a sample in the catalog. I die-cut only the word “just” from a die in the Floral Gallery Dies. The die says “just want to say” but I just laid the Merry Merlot Cardstock over the word “just” and die cut that. Don’t forget to save the dot over the J!
I die cut the label for the greeting from the Tasteful Labels Dies in the Annual Catalog. Then I stamped the “thinking of you” in the new Art Gallery Stamp Set on the label in Merry Merlot ink but did not ink up the “I’m”. I got lucky and did not mess it up! Then the die-cut word “just” is adhered to the label also. I popped this greeting up with Stampin’ Dimensionals. You can purchase the Art Gallery Stamp Set and the Floral Gallery Dies in the Art Gallery Bundle and save 10%.
I thought I was finished and was ready to photograph the card but I thought it still needed “something”. Of course that something was a little bling from the Champagne Rhinestone Jewels.
Once I had the design figured out, it was a pretty easy card to make. This is a beautiful suite that you will be attracted to when you see the new catalog!
The new January-June 2021 Mini Catalog starts Tuesday, January 5th….next week!! That will also be the first day of the biggest promotion of the year, Sale-A-Bration! What a week to look forward to!
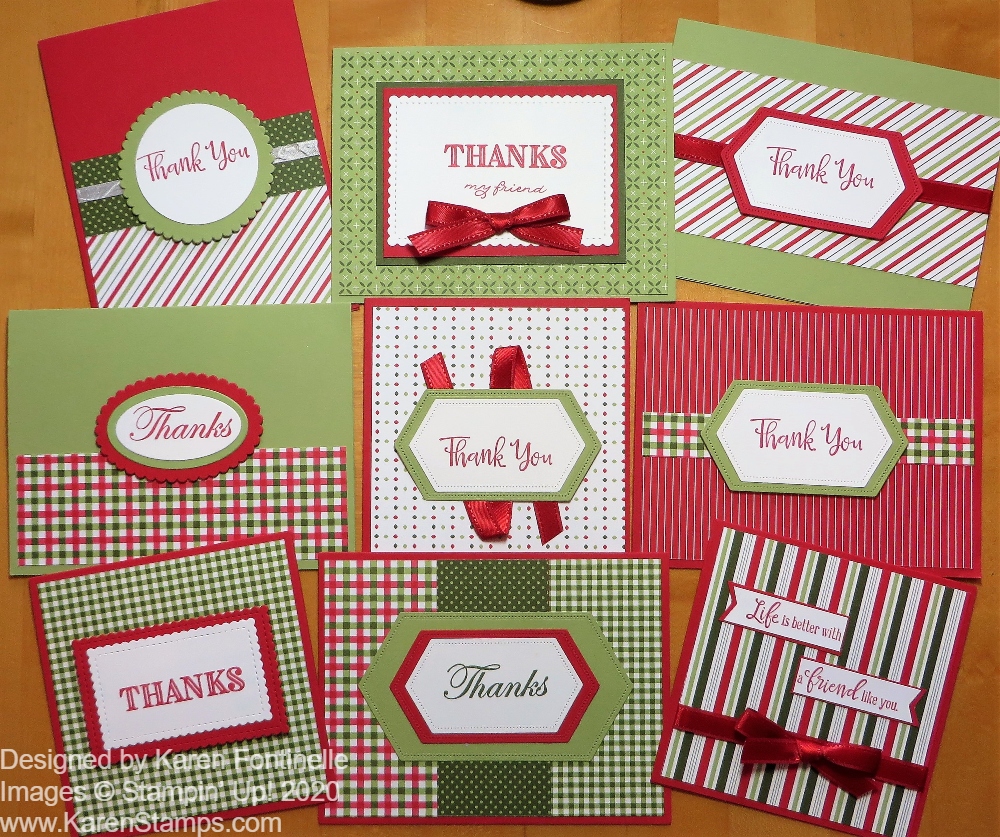
I wanted to make some thank you cards to have on hand, and while it is the Christmas season, I didn’t want them to look like Christmas cards! These thank you cards made with pieces and scraps of my Heartwarming Hugs Designer Series Paper in the August-December 2020 Mini Catalog (Holiday Mini) were easy and fun to make! I loved this designer paper, especially the red and green plaid. You may think it is Christmas paper at first glance since it was introduced in the Holiday Mini Catalog, but if you look closely the designs are generic, not Christmasy, so you can use it long past Christmas!
Just look through your stamp sets. I chose various “Thank You” stamps to use and cut or layered them on various dies and a few punches. Again, look through what you have. You will have something to use or even just cut rectangles or squares with your Paper Trimmer.
You can keep it really simple with no embellishments or you can use some ribbon, like the Real Red 3/8″ Double-Stitched Satin Ribbon I used on some of these cards. You can use something else, it doesn’t have to be exactly what I used.
These cards all have either Real Red or Pear Pizazz card bases. Then I just cut various pieces and sizes of the Heartwarming Hugs Designer Paper to add to the card base plus a greeting. I made thank you cards, but you can see you could do birthday cards or just cards to send to friends. This is “happy” paper! If you have some left after making holiday cards, use it up by making cards like these to use up your scraps so you can buy new paper next season! OR if you don’t have Heartwarming Hugs and like it, hurry up and get it on the Stampin’ Up! Giant Year-End Closeout as it is retiring Jan. 4th.
Yesterday I posted this one card but I also just made the nine extra cards you see in the photo above. Once you get going, you will find it so easy to make a whole batch of cards. You could even leave the greetings off until you know what you want to use the card for, then stamp and add the appropriate greeting. Use one side of the paper on one card, then cut another piece and use the opposite side. Make some cards square. Use two or three patterns of the paper on the same card front. Just go wild! You can do it!
It’s handy to make several cards while you have your supplies out and it is really handy when you need a card in a hurry and you already have some generic cards made ready-to-go save for adding a greeting and maybe a little extra embellishment. Get out your Heartwarming Hugs DSP and make some Thank You cards quickly and easily or add other greetings for a variety for your stash! Check that Closeout in the Stampin’ Up! Store for all the remaining retiring items from the August-December 2020 Mini Catalog!
Now that the holidays are over, it’s time to write a few thank you notes for gifts you received. At least that is the old-fashioned way of doing things and I think still the best! Which would you rather receive? An email on your computer or a handmade card in the mail with a handwritten note thanking you for a gift you gave or sent to someone?
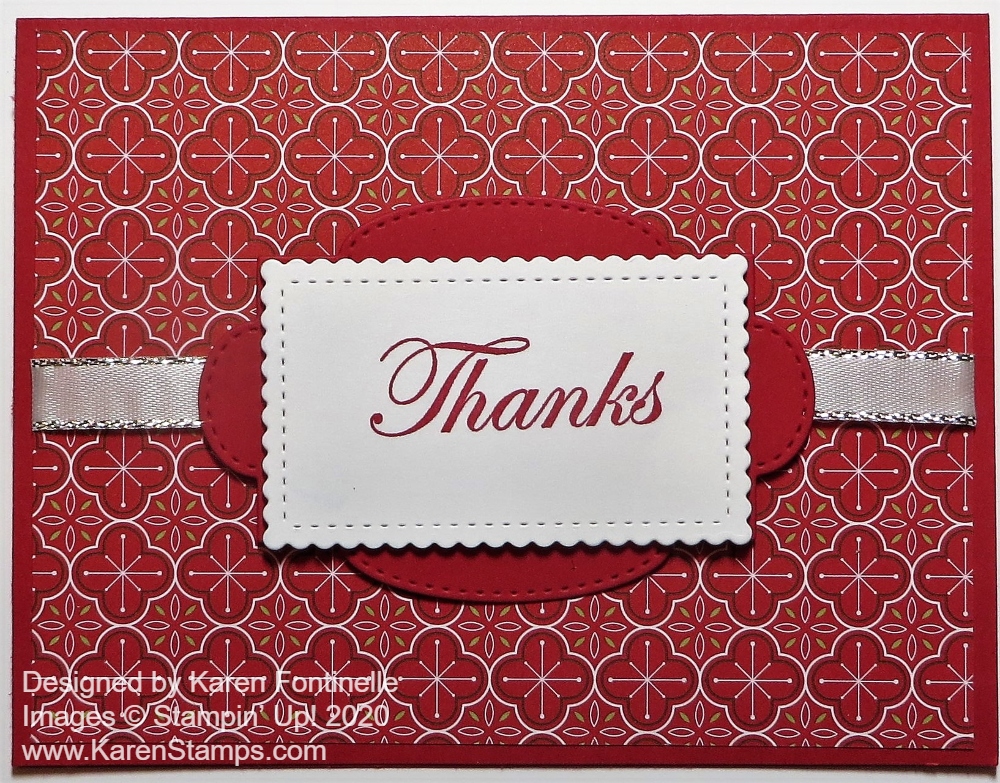
Christmas may be over but you can still get out any leftover Heartwarming Hugs Designer Series Paper that you have and make a whole assortment of cards! If you look closely at the paper, it has no Christmas or holiday designs, just reds and greens. You can still use this paper for almost anything because it is not specifically designed for Christmas!
This easy card just starts with a Real Red card base with a layer of one of the patterns in Heartwarming Hugs. This paper is on the Year-End Closeout Sale at Stampin’ Up! but the inventory is running low so if you want it, order it soon! I wrapped a piece of Silver 3/8″ Metallic Edge Ribbon around the middle of the designer paper before adhering it to the card base.
The greeting is stamped in Real Red Ink in the Good Morning Magnolia Stamp Set. I die cut the greeting with a scalloped rectangle in the Stitched So Sweetly Dies. Then this was layered on another die in the set in Real Red. If you wanted to embellish this card further, you could add one kind of jewel or another on the sides of the Real Red die-cut.
Add a Whisper White layer to the inside and write your thank you note for your lovely gift or gathering or whatever you want to write! The recipient is sure to be impressed with your manners and cardmaking skills!
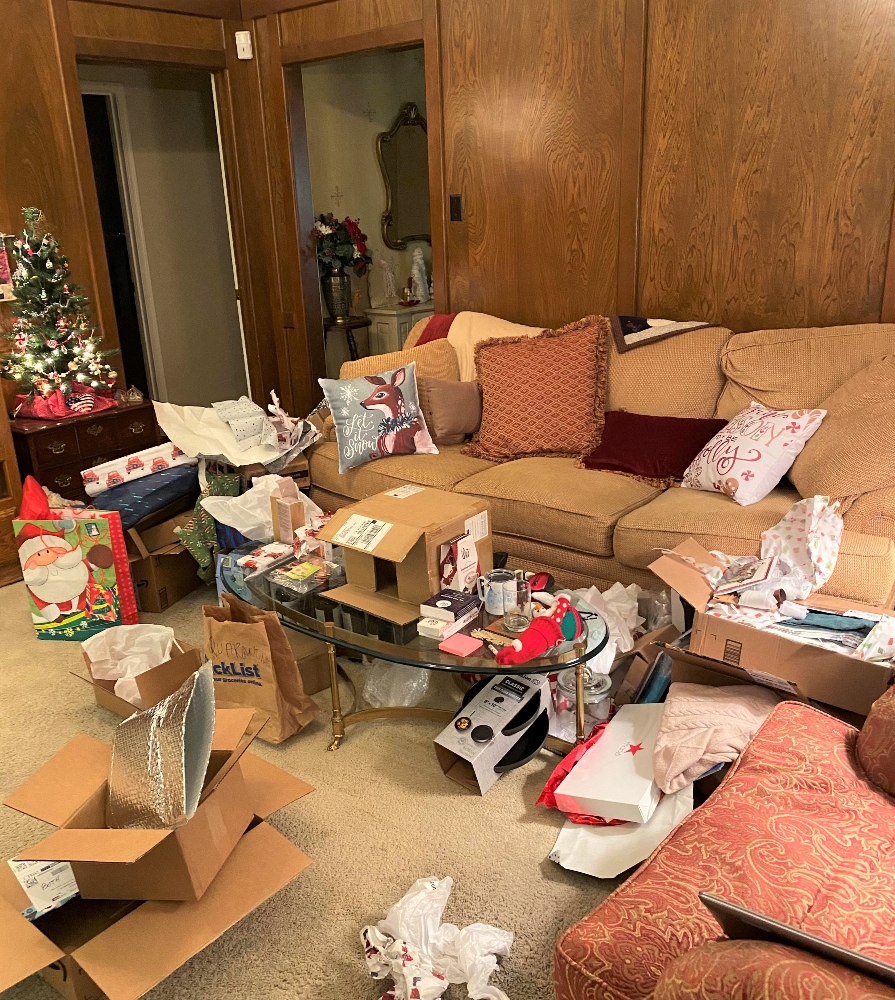
Happy Day-After-Christmas! I hope everyone had a wonderful holiday! Probably a different one for most of us, but I have to say, thank goodness for Zoom!! It’s the next best thing to being there! All our kids and spouses and girlfriends gathered on Zoom at 2 pm and opened our gifts! I didn’t know how that would work out but it was great and fun! This photo is of the aftermath!
The box in the middle of the coffee table is where I put my laptop and my husband and I sat on the sofa with our gifts nearby so we could open them. We are slow opening presents on a normal Christmas, taking all afternoon (we aren’t first-thing-in-the-morning people!) and being on Zoom was no different!
I have to say, being “with” our kids on Zoom kind of messed with our heads afterwards! I kept thinking they were around somewhere. My husband was thinking of things he wanted to say or ask them as if they were in the house. This morning when I looked out the kitchen window I wondered if they had seen the neighbor’s Christmas decorations! But really, it was a fun afternoon and now we have some nice and quite unique gifts to figure out and learn to use. USPS was only late with one gift and that has already been delivered in California very early this morning. Amazon and UPS did really well, I think, on almost all the gifts.
So if you didn’t receive everything you wanted from Santa, don’t worry! He is at Stampin’ Up! ready to pack up anything you want to order for yourself to get back at the rest of them who didn’t give you the perfect gift! Or maybe you just deserve to pick out something for yourself after taking care of everyone else! Did you see the skit on Saturday Night Live last weekend with the “family” singing about all the gifts they received and the mom says, “And I got this robe!” Then the kids say “and there are more presents!” and the mom’s face brightens in anticipation of more gifts for her besides the robe, but it’s really gifts for the dog! A rare, pretty funny SNL skit!
Go take a look around at Stampin’ Up! and see what you want for yourself! The store is always open! The Giant Year-End Closeout Sale is going on now with some bargains, plus a few things left on the Clearance Rack!
Can any of us relate to this poem?? I knew there were some stamping poems out there, from many years ago, and after searching I found this one in a forum from 2005! I don’t think the Demonstrator knew where it came from, it was shared with her from others, so I have no idea who came up with it, but they knew what they were talking about! I can think of one dear stamping friend in particular, but I think it applies to most of us! (Except for those people who had their cards done last summer! But what fun is that?!)
Enjoy! And have aHappy Christmas Eve!
The Week Before Christmas (In a Stamper’s House)
‘Twas the week before Christmas, and the house was a hush Save the stamping of rubber in a last minute rush. The cardstock was cut with precision and care In hopes that a greeting would soon be stamped there.
The children were tucked in their beds around eight, But now it’s ten-thirty… How’d it get so late? And I in my PJs with bleary red eyes Had finally arranged all the stamping supplies.
It started out simple. (It does every year.) Just make a few cards for friends who are dear. I pressed ink to paper. (It looked crisp and clean.) A sprinkle of powder, heat to a sheen.
When what on my green Christmas card should appear? Why, a tiny gold Santa with sleigh and reindeer. On pigment! On powder! On heat from a gun! Now ribbon and glitter! Can I make eighty-one?
“I can do it!” I said with all of my might And looked at the clock – ’twas well past midnight. I went straight to stamping out card after card. “This might take all night, but at least it’s not hard.”
But after I finished, they looked a bit lame. I didn’t want fancy, but these were too plain. And then in a twinkling, a thought came to mind. “I’ll just dress them up, and then they’ll be fine.”
So I went to my craft room and looked all around, Then back to the table with all that I’d found. My Fiskars I brandished (I wasn’t a quitter), And soon I was covered in EP and glitter.
The cap of a marker I held in my teeth. I’d lay in some color or maybe gold leaf. My broad little face was all beaded with sweat, But I wouldn’t give up – well, not at least yet.
There was glue on the table and ink on the floor. I laughed at the sight though my fingers were sore. I did not complain, just kept up my work. When more things went wrong, I did not go berserk.
When finally finished, one card about six, It looked pretty good after all of my tricks. I’m keeping this one. My work on it shows.” So clutching my card, up the stairs I arose.
I crawled into bed at the crack of dawn, Creativity all spent, motivation all gone. But make no mistake, I promise one thing: You’ll all get your cards, but not ’til next spring!
We’re down to the wire but you may still need some easy Christmas cards to make to put with a gift (or even mail late!) so take a look at these Brightly Gleaming Square Christmas Cards that you can make!
You can make square cards any size you like. I made these 4 1/4″ x 4 1/4″ by just cutting across a full sheet of cardstock horizontally at 4 1/4″. Since the paper is 8 1/2″ wide, when you fold it in half you have 4 1/4″ so that works out perfectly! You could also do 3″ x 3″ for a gift enclosure. Just trim your paper at 3″ x 6″.
You can make it super simple and just add a layer of designer paper, but I added some Copper Foil behind the designer paper on two of the cards. The first card has a base of Mossy Meadow Cardstock, then foil under the Mossy Meadow pattern of the paper, all just regular margins like we make on our cards.
The card on the right has a card base of Pretty Peacock Cardstock. When I went to make the foil layer underneath the Pretty Peacock pattern, all I had were scraps of the Copper Foil so I just cut two strips of foil and put them on two sides of the designer paper. It looks like I designed the card that way, not that I ran out of paper!
For the middle card, I used a card base of Very Vanilla with a layer of Night of Navy underneath the designer paper.
Each card just has a stamped greeting that is die-cut and then layered on another die-cut. You could use punches or simply cut squares or rectangles for the greetings and layers. I won’t even list the dies I used, just use what you have!
These cards I made are difficult to photograph because of the pretty foil accents on the Brightly Gleaming Specialty Designer Series Paper. This paper is, as I write this, on the Giant Year-End Closeout sale, discounted 50%! It’s very pretty so you might want to grab some if it is still available.
Square cards are quite the thing these days. The only thing is that if you mail a square card in a square envelope you are supposed to pay a surcharge. But these square cards will fit in our regular Medium Envelopes so no worries. But if you are just enclosing one with a gift or handing one to someone, you can use or make a square envelope with no issues.
These cards with just a card base, layer, and greeting are simple to make. Change up the designer paper or colors and greetings and you can make a card for a birthday or congratulations or whatever you need. Remember to check out this pretty paper in the Stampin’ Up! Online Store. It is well-worth 50% off for sure! If you need last-minute cards, try these Brightly Gleaming Square Christmas Cards!