
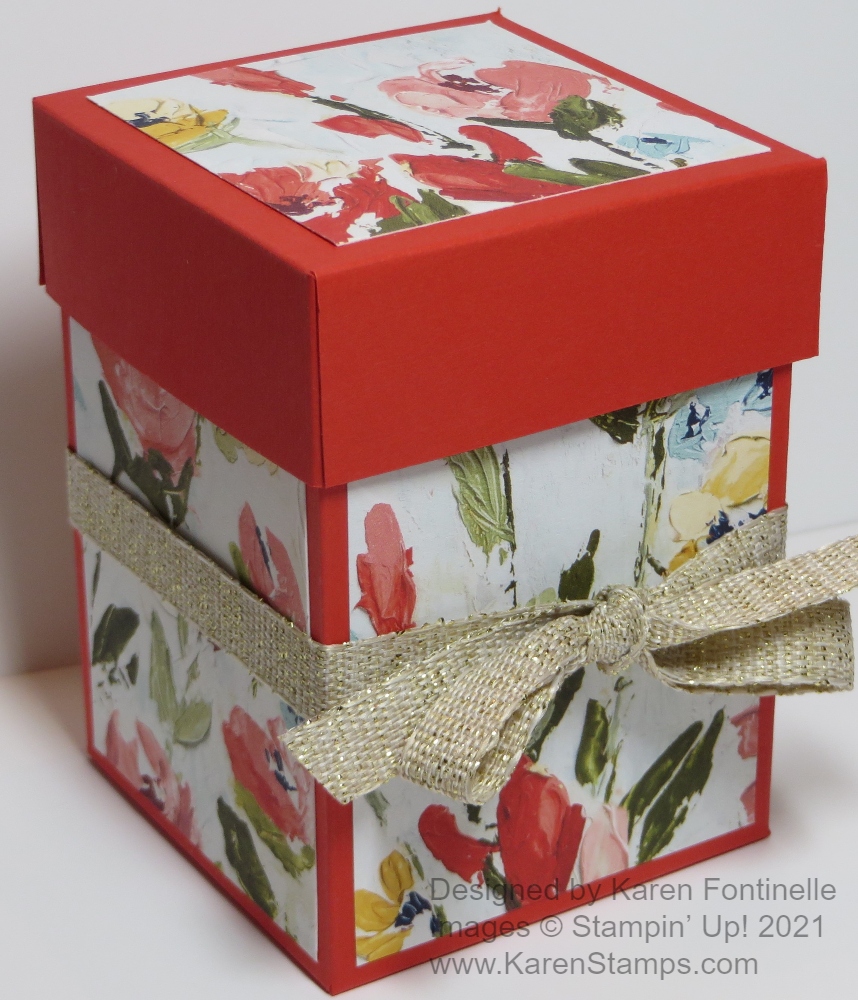
Doesn’t this Fine Art Floral Small Gift Box make you want to find a reason to give someone a gift? It’s a basic pattern to make the box and the new Fine Art Floral Designer Series Paper will make any project look gorgeous! You will be able to purchase this paper tomorrow, January 5th from the new January-June 2021 Mini Catalog with all kinds of new products for spring. Although we enjoyed the Holiday Catalog, it feels good to have a fresh start with this new Spring Mini!
This box is easy to make and you can modify it for a shorter size or just adjust the measurements if you want it a little narrower or wider.
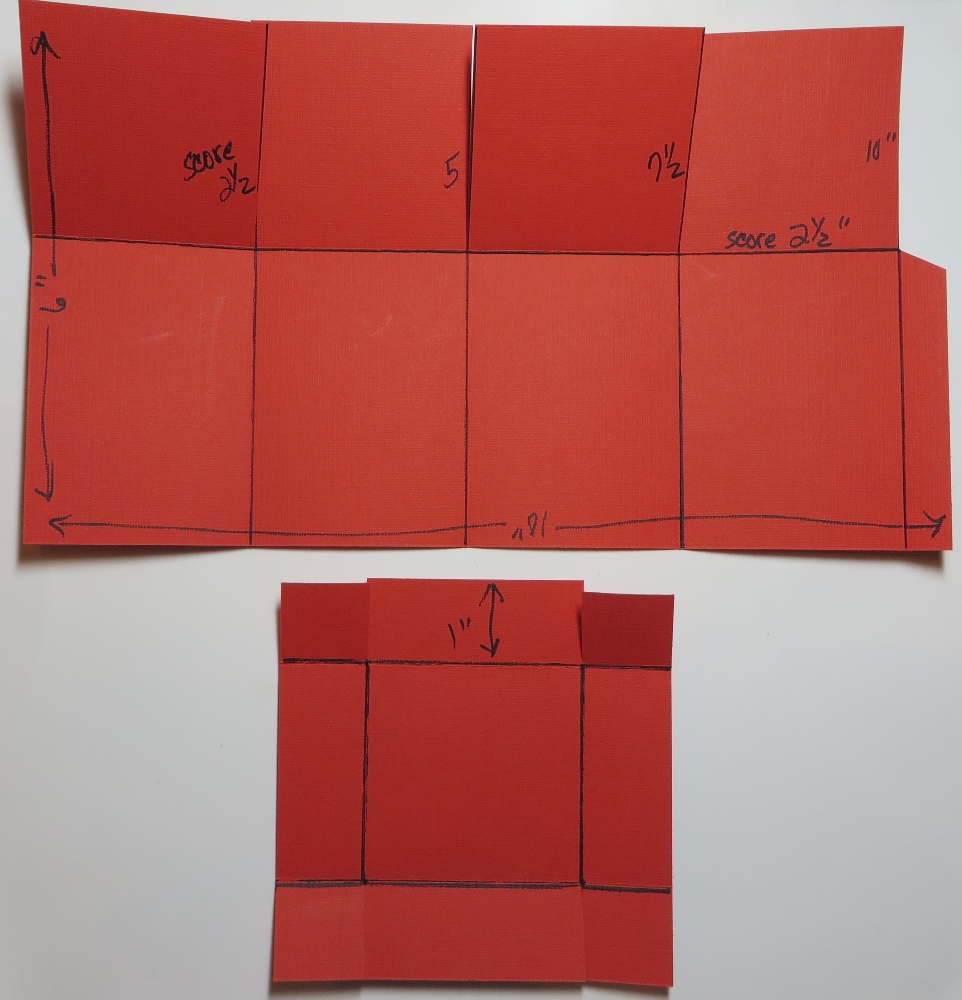
My drawing isn’t perfect but along with the measurements I think you can follow along.
Box piece: 10 1/2″ x 6″ (on my diagram above I wrote 10″ going all the way across the paper but it is 10 1/2″.)
Scoring across the paper in landscape position, score at 2 1/2″, 5″, 7 1/2″ and 10″. Turn the paper to portrait position (narrow edge, up and down), score at 2 1/2″ to form the bottom flaps of the box.
I used Poppy Parade Cardstock but if you happen to use designer paper to make the box itself, make sure you check if there is a pattern than needs to go a certain direction.
Cut up on all those score lines in landscape position from the bottom up to the 2 1/2″ score line going across. This makes the bottom flaps for the box. On my diagram, those are the flaps at the top of the picture. Cut off that little 1/2″ piece at the end.
For the box lid, cut a piece of cardstock 4 1/2″ x 4 1/2″. Now if you score at 1″ on all sides, you may find that the lid will be too tight to fit on the box without squishing the box inward. So what I did is I scored just a “smidge” outside the 1″ mark. So actually I scored at 15/16″ instead of exactly 1″. That gave me the tiniest bit of extra space for the lid to fit properly. Cut up to the score line as you see in the diagram.
To decorate the box, I used the new Fine Art Floral Designer Series Paper. You can modify these measurements if you want less of a margin on the box. For the sides of the box, I cut 4 pieces of designer paper at 3 1/4″ x 2 1/4″. For the lid, cut a piece at 2 1/4″ x 2 1/4″. You could also put the paper on the sides of the lid, but I wanted to let the Poppy Parade show. Remember to pay attention to the direction of the pattern.
Poppy Parade is one of the colors that coordinates with the designer paper but there are many others! Usually there are just a few colors that coordinate with the designer paper but this one has many colors! I chose this particular pattern of the paper because the flowers were a little smaller and would fit better on the box.
To finish my box, I tied a piece of the new Fine Art 3/8″ Ribbon around the middle of the box. This ribbon is gold in color and very soft. I could also have tied it up around the box so the bow would be on the top of the lid. Or I could have stamped a greeting and added it to the front of the box. Whatever you want to do to embellish your box, although with this beautiful paper, it doesn’t need much!
This paper and ribbon will be available tomorrow, Tuesday January 5 but don’t forget to check the retiring holiday products in the Year-End Giant Closeout in the Stampin’ Up! Online Store. And there are just a few things left on the Clearance Rack! Today is the LAST DAY for the Closeout!!
Make a few gift boxes here at the beginning of the year and you will have some handy for those gift-giving occasions coming up in the new year! Try this Fine Art Floral Small Gift Box just to get the idea and then you can modify it for whatever you need!