True Love Many Hearts Valentines and Cards

True Love Many Hearts Valentines and Cards

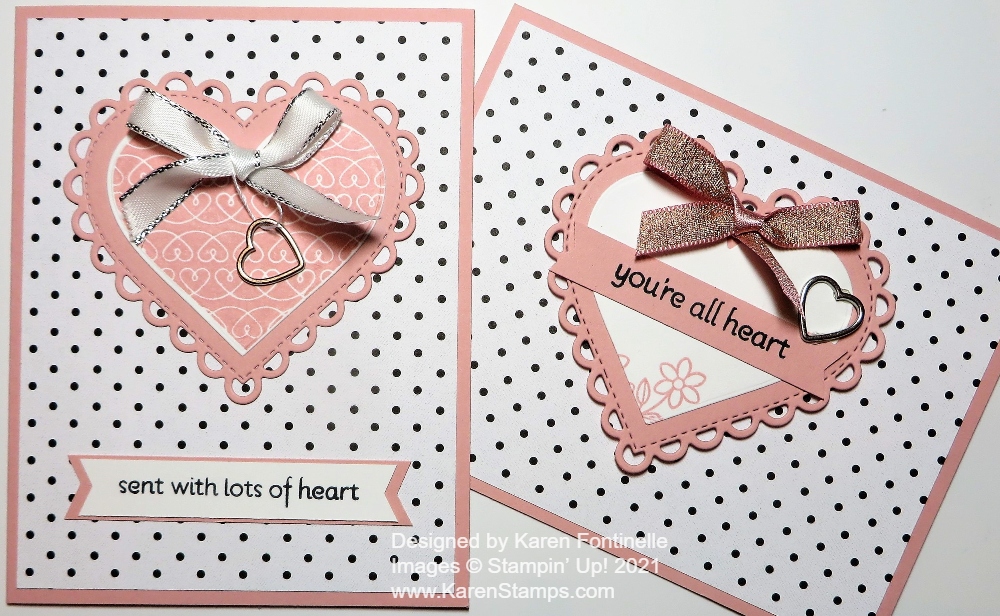
These True Love Many Hearts Valentines and Cards were really going to be two identical cards. I often have suggested while you are making one card, make two, three or four of the same card while you have decided on the design and have all your supplies out. So after I cut my cardstock in half to make a card, I thought why not go ahead and use the other half right now to make two cards. And I was going to make both cards the same!

After looking through the January-June 2021 Mini Catalog for ideas, I took my inspiration from the small square card on page 10 with the polka dot paper. Our Stampin’ Up! catalogs are great places for ideas, by the way! My two cards don’t resemble the actual sample in the catalog, but the sample gave me the idea of how I wanted to proceed.

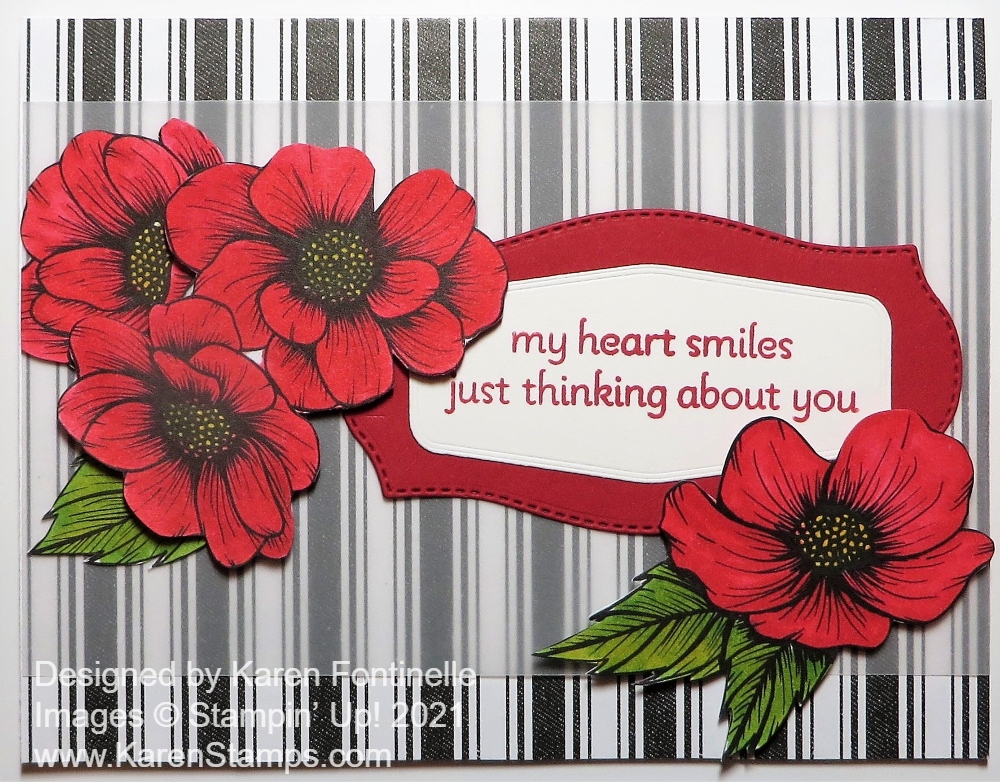
The card base is Blushing Bride and the polka dot paper is in the black and white True Love Designer Series Paper. (As I write this, this paper has been backordered but should be back in stock this week.) This True Love paper has really been interesting because you can use it as is or color it like a coloring book (maybe not the whole 12″ x 12″ page!), or just add shades of color to some of the images without really staying in the lines. Here is another card I made with a stripe pattern in this package.

I used the Many Hearts Dies for these cards to die cut the large scalloped heart out of Blushing Bride cardstock and a plain heart out of white cardstock. I wasn’t exactly sure how I was going to do the greeting or what I was going to do with the white heart, but what I really wanted to do for sure was use the silver Heart Charms. I was thinking in terms of having one dangling on the card from the top of the heart.

I decided to stamp a greeting on the heart and then also stamp the little flower in the Lots of Heart Stamp Set. With one swipe of my finger across the greeting moments later, I smeared the ink so for sure I had to go to Plan B. I stamped the greeting on a strip of Blushing Bride and adhered it over the smeary greeting!

The ribbon at the top of the heart is the Blushing Bride 3/8″ Metallic Ribbon. (As I write this, this ribbon is backordered until March!) It doesn’t photograph too well but it has one sparkling side and one satin side. I tried slipping the heart charm onto the ribbon while I was tying it but I couldn’t get it how I wanted it and I didn’t want to take a lot of time to figure it out! I just adhered the bow to the top of the heart with Mini Glue Dots and adhered the heart charm separately.

When adhering the Heart Charms you can roll up a Mini Glue Dot very small to fit on the very narrow backside of the charm and even then work with it to make it fit. I put them on two places on this heart charm. The scalloped heart is popped up with Stampin’ Dimensionals®.

As I said, I started off planning to make the two cards identical, but on the second one, I changed it up! My white heart was already die cut but I took a chance and stamped it with Blushing Bride using the Lots of Heart Stamp Set. I got it a little off, that’s why you see a white edge, especially on the left side, but that just proves it is handmade! You can get this stamp set and the Many Hearts Dies together in the Lots of Heart Bundle and save 10% (plus be on your way to spending $50 and earning a FREE Sale-A-Bration product!) (And, it’s not backordered as I write this!!)

I turned the card to a vertical position and put a greeting at the bottom. This time I tied a little piece of white twine around the heart charm and placed it around the Silver 3/8″ Metallic Edge Ribbon already tied in a bow and adhered both to the top of the heart with Mini Glue Dots. I like the way it just hangs, not even perfectly.

I really liked the black and white polka dot paper with the pink of the Blushing Bride Cardstock. While it is now February and you might want to make cards like these for Valentine’s Day, I think you could send both of these cards with the exact same design any time during the year. They don’t “scream” Valentine! They could be for a birthday, a thank you, a thinking of you-type of card. Use the catalogs for inspiration and if your creativity takes you elsewhere after you get started, like it did me with these True Love Many Hearts Valentines and Cards, just go with it!

Flower & Field Red Floral Thank You Card

Flower & Field Red Floral Thank You Card

I may have mentioned before that I LOVE this designer paper on this Flower & Field Red Floral Thank You Card. The best part is that you can earn it FREE during Sale-A-Bration! This is an easy card design, you can change it up a little bit and still use the basic design and layout.

Sale-A-Bration is a special promotion from Stampin’ Up! that happens every year! With each $50 you spend on any Stampin’ Up! products, you can choose a free product in the Sale-A-Bration brochure. If you spend $100, you can choose from special Level 2 choices, or choose two Level 1 ($50) products. No limits!

This is the Flower & Field Designer Series Paper and you’ll find it on page 10 in the Sale-A-Bration Brochure! You can choose it FREE with a $50 purchase of Stampin’ Up! products. I just love the colors of this paper on the black background! There are many colors that coordinate with this paper. It doesn’t list Real Red but I used that on another card here and liked it just fine.

For this card, I started with a card base of Poppy Parade. Before adhering the paper to the card, I added some Bumblebee 1/4″ Gingham Ribbon and tied on a bow. I think this ribbon is really cute with this paper! I stamped the greeting from the Peaceful Moments Stamp Set in Poppy Parade Ink. the greeting is then die cut with a stitched, scalloped rectangle from the Stitched So Sweetly Dies. Rather than find one to layer this diecut on, I took the easy way out and just cut a rectangle layer of So Saffron to layer behind the greeting!

That’s all there is to this card! I love to use a piece of really pretty designer paper this way, with it being the focal point of the card.

We have just one month left of Stampin’ Up! Sale-A-Bration! If you like this Flower & Field Red Floral Thank You Card, you might want to grab a package of this paper with your $50 order!

SHOP STAMPIN’ UP! ONLINE!

Join the Stamping With Karen Mailing List Today!

Email Newsletter

It’s time to be a part of the Stamping With Karen Mailing List since we have the new January-June 2021 Mini Catalog (I call it the Spring Mini!) plus it is Sale-A-Bration, the big Stampin’ Up! promotion during which you can earn free products with every $50 or $100 purchase! These catalogs, along with the Stampin’ Up! Annual Catalog, give you lots of products you will be excited about, want to learn about, and want to see all the ideas for cards and projects possible!

Keep up with news about the new Paper Pumpkin Kit every month and subscribe if you want to join in the fun of having a project already planned and prepped for you in the cute Paper Pumpkin box! Always sign up or skip a month if you want by the 10th of any month.

If you are on my blog, you will see a red sign-up box in the top right corner where you can simply put your name (or first name) and best email. If you are on your phone, you probably need to scroll way down to get to the sidebar things. OR you can go to my sign up page HERE.

You will receive an email with a link to your free gift from me.

I send out a weekly email every Tuesday afternoon with the latest Stampin’ Up! news and offers plus stamping ideas with a supply list and directions. Even if you never make the project, maybe just seeing ideas will do your crafty heart good! I know it does mine! I’m all about the ideas!!

Let’s stay connected and in touch with each other over our favorite thing to talk about…..stamping with Stampin’ Up!

Easy Sweet Strawberry Bundle Thank You Card

Easy Sweet Strawberry Bundle Thank You Card

This Easy Sweet Strawberry Bundle Thank You Card was quick and easy to make! I had just baked Blueberry Scones so when I saw this paper with blueberries plus strawberries I just had to use it!

I picked Poppy Parade for the card base because it is one of the coordinating colors for this Berry Delightful Designer Series Paper. This paper plus the Berry Blessings Stamp Set come together in the Berry Blessings Bundle. Would you believe you can get this fun paper plus a stamp set FREE during Stampin’ Up! Sale-A-Bration?! When you spend $100, instead of choosing two Level 1 free products, you can choose this Bundle!

This Berry Blessings Bundle also coordinates with the Sweet Strawberry Bundle in the Spring Mini Catalog! You’ll find it on page 44. Along with the Sweet Strawberry Stamp Set, you get a Strawberry Builder Punch in the Bundle! If you like strawberries, you’ve got to get all this good stuff!

The card base is Poppy Parade and then I just adhered a piece of the Berry Delightful Designer Paper to the front of the card. I found an already die cut piece from the Ornate Frames Dies in my package of cardstock so I just used that! That was easy! For the greeting, I stamped the “Thank You” from the Sweet Strawberry Stamp Set in Poppy Parade Ink and then cut that out with the matching die in the same Ornate Frames set.

Of course, I wanted to use my new Strawberry Punch. I stamped the strawberry in two-steps from the Sweet Strawberry Stamp Set along with the leaflet that goes on top of the strawberry. I punched out the strawberry and leaf with the punch and popped it up next to the greeting. Cute and done!

Unbelievably, Sale-A-Bration is about half over already! Be sure to make your shopping list so you don’t miss out on any products you really want! This Sweet Strawberry Bundle and the Berry Blessings Bundle are going to be fun to make cards with and other projects with spring and strawberry season coming up!

SHOP STAMPIN’ UP! ONLINE HERE!

Flower & Field Just For You Card

Flower & Field Just For You Card

I absolutely love this paper I used on this Flower & Field Just For You Card! And you can get it FREE during Sale-A-Bration 2021! Can you believe we are already half way through Sale-A-Bration?!

This is really an easy card to make. I decided I actually liked Real Red for a card base for this card, even though it’s not one of the coordinating colors. Just like my card the other day, I really like the red, black, and the tiny bit of white on this paper.

The first paper I wanted to use out of this Flower & Field Designer Series Paper was this pattern with a black background with yellow, red, and white flowers. But when I turned it over, I also loved the yellow polka dot design on the other side! So on this card, I used both sides of the same paper! I used a Real Red card base with a layer of the yellow polka dot paper. Then I added a strip of the floral side.

Before adhering the designer paper to the card base, I adhered a piece of the Bumblebee 2000-2022 In Color Ribbon around the designer paper. For something different, I tied on three knots of the ribbon instead of a bow.

The greeting is from the Sweet Strawberry Stamp Set, in the January-June 2021 Mini Catalog. If you like you can bundle the stamp set with the Strawberry Builder Punch and save 10%. I used the small circle die in the Tasteful Labels Dies. For a little embellishment, I cut out a group of the red flowers on the designer series paper by hand and adhered it behind the popped up greeting.

During Sale-A-Bration, you can choose a FREE Sale-A-Bration product with every $50 purchase during the promotion! No limit! If you have an order of $100 you can choose either two $50 Level products or one special $100 Level product. This is Stampin’ Up!’s biggest promotion of the year, so don’t miss it! Who doesn’t want free stuff?!

This Flower & Field Paper is so pretty, you could sit down and make a ton of cheerful cards to send out just to let someone know you are thinking of them or for birthdays or whatever occasion!

SHOP STAMPIN’ UP! ONLINE HERE!

True Love Red Floral Card

True Love Red Floral Card

Would you believe this True Love Red Floral Card is made from the True Love Designer Series Paper except for the vellum and the greeting? This black and white designer paper with all sorts of designs give you all sorts of opportunities to be creative!

To make this card, I decided to copy a sample card in the January-June 2021 Mini Catalog on page 10 in the Love You Always Suite. I changed the colors of the flowers and how I arranged them and I put a different greeting on my card. My greeting took up a little extended space since it was longer and narrower than the sample card, so that caused me to move the flowers around a little.

The card base is Thick Whisper White and the striped pattern of the True Love Designer Series Paper covers the whole front of the card base. I didn’t leave any margin. The piece of vellum is 5 1/2″ x 3 1/4″. You could make yours any size. Just don’t glue it down yet because glue and other adhesives show through vellum.

Then I chose another of the patterns in the designer series with these flowers. I decided which ones I wanted as close to the edge of the paper as I could get and cut those out of the sheet. I colored them in with Stampin’ Blends Markers, the Light and Dark Real Red. I wanted my card to be black, white and Real Red! The flower center is just colored with Dark Daffodil Delight. The leaves are Granny Apple Green, Light and Dark, along with a touch of Daffodil Delight. An artist friend I know always said to mix some yellow in with green, so I do!

You can leave the flowers in the group in which they appear on the designer paper or if you need to cut them apart to make them fit on your card you can do that. Some I popped up on Stampin’ Dimensionals and one flower and one leaf is adhered right on the vellum.

The greeting is stamped in Real Red Ink on Whisper White from the Lots of Heart Stamp Set. It is die-cut with a die in the Tasteful Labels Dies as is the Real Red piece behind it.

If you place and adhere everything on to the vellum before you attach it to the card, you can turn the vellum over and apply adhesive on areas that are covered by the greeting and flowers on the front. That will hold it on to the card front without showing the adhesive through the vellum. I used Stampin’ Seal.

When you are looking for card ideas, if you don’t already have one in your head, think about looking at any of your Stampin’ Up! catalogs! You can copy any of the ideas, and most likely you will come up with your own version once you start creating!

Remember, Sale-A-Bration is going on so with every $50 you spend, you earn a free product in the Sale-A-Bration Brochure! No limit!

Be sure to check out the black and white True Love Designer Series Paper so you can have fun either designing with it as is or using different methods of coloring it like on this True Love Red Floral Card.

True Love Red Floral Card Closeup

Trio of Hearts Valentine Card

You get lots of hearts in the stamp set and dies I used to make this easy slim card, Trio of Hearts Valentine Card, for Valentine’s Day or really any time! These hearts are pretty big but they still fit perfectly on this slimline card.

I just got the Lots of Heart Bundle, which has the Lots of Heart Stamp Set and the Many Hearts Dies. And there really are many heart dies in that set! In fact, I recommend making a copy of the sheet with all the dies still adhered with your printer and keep it with your dies so you can see clearly what you are supposed to have! There are 15 different dies in the set!

To make this card, I decided to make pastel-colored hearts so I started with a card base of Pool Party Cardstock. I cut the paper 6″ x 6″ so that when I folded it in half, it would be 3″ x 6″ for a slimline card. The Whisper White layer is just a tiny bit narrower than the card base, 2 7/8″ x 5 7/8″.

I stamped the hearts on another piece of Whisper White and then die cut with one of the heart dies. This heart die also cuts a narrow outline of the heart, which I didn’t notice at first so the excess paper was getting left in the die. If you have this set, make sure you check the underside of your heart die because if you cut several times, that paper still stuck in the die will prevent getting a complete cut after awhile!

The hearts are stamped in Blushing Bride, Mint Macaron, and Pool Party ink. Since the photopolymer stamps are new, even though I wiped them on my Shammy a couple of times, the ink still beaded up a tiny bit when I stamped, but I don’t think it’s anything that’s bad enough to jump out. I adhered the hearts flat on the white card layer, but I could have popped them up on Stampin’ Dimensionals. Either way is fine. I did stamp the greeting in Pool Party Ink and then popped that up on Dimensionals. The greeting is in the Lots of Heart Stamp Set.

I almost left it as is at that point, but I decided to add some Champagne Rhinestone Basic Jewels. Who can resist a few rhinestones?! And for a final touch, I just used a piece of white twine I had to make a little bow on the center heart, adhered with a rolled-up Mini Glue Dot.

This is one example of how you can make an easy Valentine using three hearts in the Lots of Heart Stamp Set in the January-June 2021 Mini Catalog on page 15.

SHOP STAMPIN’ UP! ONLINE HERE!

Hydrangea Hills Thank You Card

Hydrangea Hills Thank You Card

Do you love the look of this Hydrangea Hills Thank You Card as much as I do? I’m not bragging about my own work….it’s the PAPER!! Oh my gosh! I just got it, opened the package, didn’t even look at ALL the paper, just grabbed the top sheet, and went to work!

It was late and I just wanted to make an easy card and this card was certainly it! When I flipped the hydrangea side of the Hydrangea Hill Designer Series Paper over, I saw this green plaid on the other side and thought it would work perfectly with this card design. With the way the hydrangeas are printed on the paper, I knew a horizontal layout on the card would show the hydrangeas the best.

The mistake I made was cutting the designer paper exactly the size for a layer on the front of the card. Since I wanted to wrap some ribbon around the layer, I needed to overlap the flower part of the paper and the green plaid portion. (I could have cut out another strip of paper but I didn’t). The way to get around this is to glue the two designer paper pieces to another piece of cardstock, either covering it entirely or leaving just a tiny margin around the edge (1/8″) like I did on the white cardstock. Sometimes an extra layer like this under the designer paper helps the colors in the designer paper stand out.

Once I had the two pieces of the Hydrangea Hill DSP adhered to a piece of white cardstock, I wrapped a piece of ribbon across the front. While this Blackberry Bliss 3/8″ Striped Ribbon is a little dark, since it’s sheer I think it still works fine on this card. I tied a bow separately and adhered it with a Mini Glue Dot or two.

This whole card front is then adhered to a card base of Highland Heather. There are a lot of colors that coordinate with this designer paper so you can have lots of different looks depending on which colors you use with which papers.

For the greeting, I chose the “Thanks” from the Good Morning Magnolia Stamp Set. The font is so elegant in that set and I thought worked well on this card. The greeting is stamped in Highland Heather Ink, die-cut with the Layering Oval Dies as is the Highland Heather layer. I popped it up over the ribbon with Stampin’ Dimensionals®.

Actually, I only ordered the designer paper in the Hydrangea Hill Suite (because I can’t have everything I want!), but now that I see how pretty the Hydrangea Hill Paper is, I don’t know if I have the will power not to order more things!

I have to say just this one sheet of designer paper I have looked at is SO pretty, so be sure to check out the Hydrangea Hill Suite of products starting on page 18 of the January-June 2021 Mini Catalog. While you might want everything, you can make cards with just the paper and maybe some matching ribbon as I did with this Hydrangea Hill Thank You Card.

Hey Chick and Hey Birthday Chick Coming Soon!

Hey Chick and Hey Birthday Chick

Maybe you noticed the Hey Birthday Chick Stamp Set in the new January-June 2021 Mini Catalog on page 52 and maybe you thought it looked familiar. If you were a Stampin’ Up! customer back in 2017 during Sale-A-Bration, you may have chosen the Hey Chick Stamp Set as one of your free Sale-A-Bration products!

Apparently, it was such a popular stamp set back then that Stampin’ Up! is bringing it back in February! If you already own this stamp set, you are ahead of the game! And if you don’t, you will get a chance to own it beginning February 2. And get the new Chick Dies, too! Just look at those cute images and imagine what you could make with them!

Maybe you have already purchased the Hey Birthday Chick Stamp Set in the Mini Catalog. On February 2, you can also get a set of dies to go with it or purchase both the stamp set and dies in a Bundle.

Hey Birthday Chick Bundle

These Chick stamps and dies will be available February 2 through the end of June! If you like cute chickens, these are the stamps and dies for you!

Less than 2 weeks!!

SHOP STAMPIN’ UP! ONLINE!

Art Gallery Floral With Gilded Frame Card

Art Gallery Floral With Gilded Frame Card

I couldn’t wait to play with the new Gilded Leafing again but I wanted to try something different and I came up with this Art Gallery Floral With Gilded Frame Card.

I’ve loved the little floral stamp in the Art Gallery Stamp Set in the Fine Art Floral Suite. I got the idea to stamp the flower and then make a gilded frame around it. Instead of using Versamark Ink and Heat & Stick Powder before applying the Gilded Leafing, as I did on this card, I simply made the frame with strips of Tear & Tape Adhesive! You can either pick up pieces of the gold leaf and stick it onto the adhesive, which I started doing. But then I just plunged the piece into my container, pulled it out but still held it over the container, and simply rubbed most of the excess off with my fingers. The Gilded Leafing is so soft, you almost want to stick your hands in it! When I had most of it off, I used a soft brush I had from years ago to brush off the last little bits. You can also use one of the Stamping Sponges.

The card base is Night of Navy, and I chose that because on another card I made with the Dandy Garden DSP I really liked the yellow flowers and dark blue background of that paper. I started off coloring the stamp with Stampin’ Write Markers but since it was new and I hadn’t prepared the stamp first, the ink from the markers just beaded up. I decided to just skip to a regular ink pad, Mango Melody. I tried to mostly get it on the flowers but I knew that even if I got it on the leaves, that’s okay because they would be covered with green ink. On these I did use the Mossy Meadow Stampin’ Write Marker because it was the darkest green and it would look lighter stamped. What you see on the card is my first attempt, so it worked out great! I layered this on a piece of Mango Melody Cardstock and then added the Gilded Leafing around the sides.

Since I had used the Mango Melody under the flower piece, I decided to use it as a thin layer on top of the Night of Navy card base. The top layer is a piece of the Fine Art Floral Designer Series Paper. Instead of using the floral side, of course, I turned it over and used this light blue with a pattern on it that looks like it was painted with a paint brush! To add to that texture, I embossed the paper with the Painted Texture 3D Embossing Folder.

I adhered the floral piece to the card front with Stampin’ Dimensionals®. For the greeting, I stamped a birthday sentiment from the Art Gallery Stamp Set in Mossy Meadow Ink and then die-cut it with a die in the Floral Gallery dies. I think all of these main products are in the Fine Art Floral Suite! I’m sure it will be one of the most popular Suites in the Spring Mini Catalog! Everything in that Suite is lovely!

If it isn’t on your shopping list yet, be sure to put it on there, at least if you like florals. The paper is gorgeous. The Gilded Leafing is fun and elegant. The Fine Art Ribbon is beautiful and soft. You will want everything!

Remember, with every $50 increment you purchase, you earn a free Sale-A-Bration product! If you spend $100 or more, you can choose one of the special Level 2 products, unless you want two Level 1 products at the $50 level.

Art Gallery Floral With Gilded Frame Closeup

SHOP STAMPIN’ UP! ONLINE HERE!

Sweet Little Valentines Cards & More

Sweet Little Valentines Cards & More Kit

Here is something you might miss in the new January-June 2021 Mini Catalog – the Sweet Valentines Cards & More! I almost forget I put it on my first pre-order before Christmas and I guess it got lost in the shuffle a little bit. But don’t overlook it because I think you will enjoy making some cards with this little kit. It’s not even officially a kit, just a package of card bases, card fronts, and envelopes but there is so much possibility with these colorful pieces!

As you can see in the photo below, You get two kinds of card bases, printed on both sides front and back so you can choose whichever side you want to be the front. Or even cut them apart and adhere to your own card base for a colorful background. Make twice as many cards that way!

Sweet Little Valentines Cards & More Card Bases

To make the cards, you also get the card fronts. These are pieces almost as large as the card base itself so it’s a little bit of a shame to cover up the cute card base! But then when you look at the card fronts, there are two sides, both cute! You will hate to put glue on one side, like we do with designer paper! They also have gold foil accents!

Sweet Little Valentines Cards & More Card Fronts

Now really, if you adhere the card front with the blue hearts and one red heart onto a card base, you are DONE! You don’t need a greeting! If you wanted to, you could embellish either one with a bit of ribbon or whatever you wanted to use, whatever you have in your “stash”. And of course, the “You Are Loved” card really doesn’t need anything else! The blue hearts are the opposite side of the “You Are Loved” card and the big hearts card front has that kind of brushed look on the other side. You can add a greeting to these two plainer card fronts.

Sweet Little Valentines Cards & More Cards

Here are my first two cards, made, seriously, in like 30 seconds! I just adhered the card fronts to a card base. That’s all I made upon just opening the package, but I want to “play” with all the pieces more and make some alternative cards as well.

You might even want to order two packages of these and you will be set for Valentine’s Day or even just any occasion notecards to send. Hearts and love is good any time, not just February 14th!. Envelopes are included. The only thing, I’m not sure the envelopes are the proper size for mailing, but you can put your card in a regular size envelope and save these for something else…..like a little envelope album! I think envelopes have to be 3 1/2″ x 5″ to mail, the size of our Notecards & Envelopes.

Sweet Little Valentines Cards & More (154287) on page 16 of the Spring Mini.

Makes 10 cards
* Includes 10 scored card bases, 10 double-sided card fronts, and 10 envelopes
* 4 designed card fronts give you options
* Folded card size: 4-1/4″ x 3-1/4″(10.8 x 8.3 cm)
* Card front size: 3″ x 4″ (7.6 x 10.2 cm)

Put this on your next order! The set is only $10 and you will have fun making little love notes to have on hand or to send right away! Play with all the pieces and come up with your own creations!

Shop Stampin’ Up! Online HERE!

Mini Pizza Box and Card With Golden Garden Acetate

Golden Garden Acetate Sheet Pizza Box and Card

You can play around with the new Acetate Sheets in different ways for a different look to your cards and projects like on this Mini Pizza Box and Card With Golden Garden Acetate. These acetate sheets are in the Fine Art Floral Suite.

After making this card the other day, I used a scrap piece of the Golden Garden Specialty Designer Acetate Sheets on this small gift card. You don’t have to only use it with the Fine Art Floral Designer Series Paper. You can use it on its own over a piece of cardstock. For this card, I just used a piece of Basic White Cardstock for the card base and adhered the acetate sheet on the front. The greeting is in the Art Gallery Stamp Set in the Suite. It is just stamped on white and layered on a piece of Gold Foil. The ribbon tied around the side is the 3/8″ Fine Art Ribbon.

Here are some things to know about the acetate sheets! On the backside of sheet, the backside of the gold design is silver! So you can use whichever color you like. There is also a protective plastic sheet on the backside of the acetate, on the silver side, so be sure to remove that before using. As for how to adhere the sheets to your card or project, you may be able to hide the adhesive underneath some other element on your card, such as under the greeting or under the ribbon. Some people are using Mini Glue Dots and hiding them under whatever they can. I chose to use teeny tiny dots of the Multipurpose Liquid Glue. Have a piece of scrap nearby so you can squeeze out a bit of glue to make sure it won’t pour out when you are trying to use really small dots! I just put the tiny dots under the widest parts of the gold design to try to hide it.

For something different I put together a Mini Pizza Box and added a piece of the Golden Garden Acetate to the top of the box. I used the shiny side for the outside this time. As I was assembling the box, I thought it felt a lot thicker and harder to fold for some reason! Well, the reason was revealed when a second box fell apart from the one box I thought I was working with. I was trying to crease two boxes stuck together and thought I only had one!!

For the pizza box, after adhering the acetate to the top of the box with teeny tiny dots of Multipurpose Liquid Glue. I actually can see the glue that oozed out from under the spot when I placed it, but honestly, no one else will even notice it. I can see it because I’m looking for it, but it doesn’t really show. I also added strips of Gold Foil around all four sides. The greeting is also in the Art Gallery Stamp Set and is die-cut with a die in the Floral Gallery Dies, layered on a piece of Gold Foil. Then I just tied a piece of the 3/8″ Fine Art Ribbon around the box, which holds the lid closed and also is an embellishment. This is an easy way to make a little box for a gift, treat, or maybe some notecards or a cookie inside!

Mini Pizza Box and Card With Golden Garden Acetate

The Fine Art Floral Suite is a beautiful group of products for you to make lots of pretty things! Check them out in the Stampin’ Up! Online Store along with the other January-June 2021 Mini Catalog products.

Art Gallery Flowers With Gilded Leafing

Art Gallery Flowers With Gilded Leafing

I finally got a chance to play with some of the new products in the Fine Art Floral Suite in the January-June 2021 Mini Catalog! I almost made a giant mess but I think the card turned out pretty well for my first try!

I started with a card base of Magenta Madness, one of the current In Colors. When I looked for a piece of white cardstock for the layer, I had a shorter piece and decided to just cut it down to 4″ x 4″ instead of covering the whole front of the card.

One of the new products I have been dying to try was the Gilded Leafing! If you get this, it’s a REAL GOOD IDEA to put the whole jar in a large enough container that a card will fit into. That way you can stick the whole card into the gold leafing to apply it. I found a perfect size container in the closet but I still nearly spilled it while making this card when the attached lid pulled it backward! Yikes! What a mess that would have been! The gold leafing is very thin, light, and will go ANYWHERE if you let it! Some pieces are big, some are tiny.

I stamped two flowers with Magenta Madness Ink and then used the two-step stamping smaller image to stamp over the original flower with Versamark Ink. Then I dumped on the Heat & Stick Powder (it’s back!) and embossed it with my Heat Tool. You don’t want to overheat the Heat & Stick Powder. After I heated it, I just plunged the card face down into the Gilded Leafing! It came up looking like a mess like a kindergartner would have made. But I just rubbed off some of the big pieces of leafing and then used a retired stencil brush I had from Stampin’ Up! from many years ago I think. I just brushed and brushed the gold leafing until all the excess came off.

You should really do all your stamping before you add the gold leaf. I added two Mango Melody flowers and got the gold on my stamp where it overlapped. Luckily it did wash off my stamp at the sink.

I adhered a strip of the 3/8″ Fine Art Ribbon that has gold threads in it along the bottom of the stamped panel. I tied a separate small bow and adhered it with several Mini Glue Dots.

For the greeting I stamped the sentiment on a scrap of white cardstock and die cut with the die in the Floral Gallery Dies. You can buy the dies and the Art Gallery Stamp Set together in the Art Gallery Bundle.

To check out all these new products, especially the Gilded Leafing, check out pages 32-34 in the spring Mini and also in the Online Store!

Art Gallery Floral You Are Lovely Card

Art Gallery Floral You Are Lovely Card

Here is a quick and easy card for you to make, my Art Gallery Floral You Are Lovely Card, with new products in the Stampin’ Up! January-June 2021 Mini Catalog. This is from the Fine Art Floral Suite of products on pages 32-34.

This Suite has a lot of products in it allowing you to make the fanciest of cards and projects if you would like to. You can do two-step stamping, you can add gold leafing with the Gilded Leafing Embellishment, you can add gold foiling with the Golden Garden Designer Specialty Acetate, you can die-cut images, add texture with a dramatic embossing folder, Painted Texture. You can use all those things, but if you want a simple card you can make one like my card today. This is an easy card design all of us use a lot in various ways.

The card base is Bumblebee, one of our new In Colors, and one of the MANY coordinating colors with this designer paper. First, I randomly stamped one of the flower images from the Art Gallery Stamp Set on the card front in Versamark Ink. I also could have used Bumblebee Ink for the same type of watermark look. After using the Versamark Ink I could have used Clear Embossing Powder on the flowers if I wanted, but I was keeping this card simple.

The beautiful designer paper is the Fine Art Floral Designer Series Paper. I cut a narrow strip of it to adhere along the side of the card. My strip is 5 1/2″ x 1 1/2″. You could make the strip a little wider if you wanted to or even allowed a slight margin along the fold showing the card base rather than right up against the fold. Before adhering the designer paper to the card front, I added a bit of Mossy Meadow 3/16″ Braided Linen Trim on page 59 of the Spring catalog. I tied a separate bow and adhered it with Mini Glue Dots.

The greeting is stamped in Bumblebee Ink from the same stamp set and then die cut with the small banner die in the Tasteful Labels Dies. It is then popped up with Stampin’ Dimensionals.

That’s all there is to making this card. Randomly stamp the flowers on the card front, add a strip of designer paper along the side with some linen trim for embellishment, stamp and die-cut a greeting and you are done. You could even skip the dee-cutting, just cut a small rectangle for the greeting.

It’s fine and it’s fun to make more involved, fancier cards and projects, but if you are in a hurry or you are a beginner with not as many supplies, it is perfectly fine to go simple with a card design like this Art Gallery Floral You Are Lovely Card.

SHOP STAMPIN’ UP! ONLINE HERE!

Mini Coffee Carrier Christmas Gifts

Coffee Carrier Trim the Town

I wished as hard as I could yesterday, but none of the rare Texas snow reached down to my part of the state, or even city! Outside of Houston, to the north and to the west got a few inches of snow which looked beautiful but it just didn’t come my way. Just rain ALL day and cold. Just not cold enough for snow! It’s been three years since we have seen snow, and I can tell you even a few flakes can be quite exciting here!

The cold and the snow reminded me of Christmas gifts I made using the Mini Coffee Carrier (retired) and the Mini Coffee Cups. Inside the cups I put a package of hot cocoa mix and plenty of candies (and maybe even a little cello bag of marshmallows). When I ran out of cups, I improvised with some retired bags from last year.

I decorated each Mini Coffee Carrier differently and decorated the cups as well. I didn’t own the dies to wrap paper around the cups so I had to decorate them some other ways because it is next to impossible to just wrap paper around a cup like that!

In the top photo, I used some Heartwarming Hugs Designer Series Paper (retired) to decorate the Mini Coffee Carrier and cut out some houses from the Trimming the Town Designer Paper (retired) plus a stamped and colored tree with some red enamel dots for the decoration. In my gift wrap I found tags I made last year from a Stampin’ Up! kit. How great was that to pull out some cute tags I had already made and were ready to use!

Coffee Carrier Gnome Victor

Here’s one made with the cute Gnome For the Holidays Stamp Set (retired) and colored with Stampin’ Blends! You can use lots of different shapes and sizes of die cuts for the focal point on these carriers.

Here’s how I decorated the cups to go with the gnomes. I used the Stitched Stars Dies in Gold Foil.

Coffee Carrier Snowman Kelly Full

I’ll miss this Snowman Season Stamp Set! I used some adhesive Snowflake Sequins (retired) around him. I also used the Glitter Star Ornaments (retired) on each Mini Coffee Carrier, just tied around the handle. I decorated the cup with a big die-cut snowflake from the So Many Snowflakes Dies. I ran out of cups so I just put the treats in a retired gift bag and tied some retired Christmas ribbon from last year around the package to make it look festive.

Coffee Carrier Snowman Kelly
Coffee Carrier Trim the Town German Eric

You might notice some German words on this one! That’s because it was for my son who took German in high school and went to Austria for his semester abroad back in college. One sheet of the Trimming the Town Designer Paper had all Christmas words in many languages plus English printed in thin strips so I just found a German phrase on there to use and cut out the words! He also got a package wrapped in Merry Christmas ribbon from last year instead of a cup, but I think that was cute as well!

Coffee Carrier Poinsettia Amy

This Mini Coffee Carrier with a poinsettia is one I posted HERE back in November. You can see more details about these Mini Coffee Carriers on that post, if you already purchased some and have some extras to use.

Coffee Carrier Cups Trim the Town cutouts

And here’s how I decorated some cups just by cutting out images from the large paper in the Trimming the Town DSP that had the town scene with the mountains in the background, people ice skating, etc.

If you didn’t get to use your Mini Coffee Carriers and Cups, maybe you can think about ways to decorate them for next Christmas or even during the year with other papers and decorations, maybe for a birthday or other celebration. These were fun to make and easier than I would have thought! Once you get going, the ideas start flowing!

I didn’t get my snow yesterday but I’ll keep hoping!