Tag Archives: gold foil

Mini Pizza Box and Card With Golden Garden Acetate

Golden Garden Acetate Sheet Pizza Box and Card

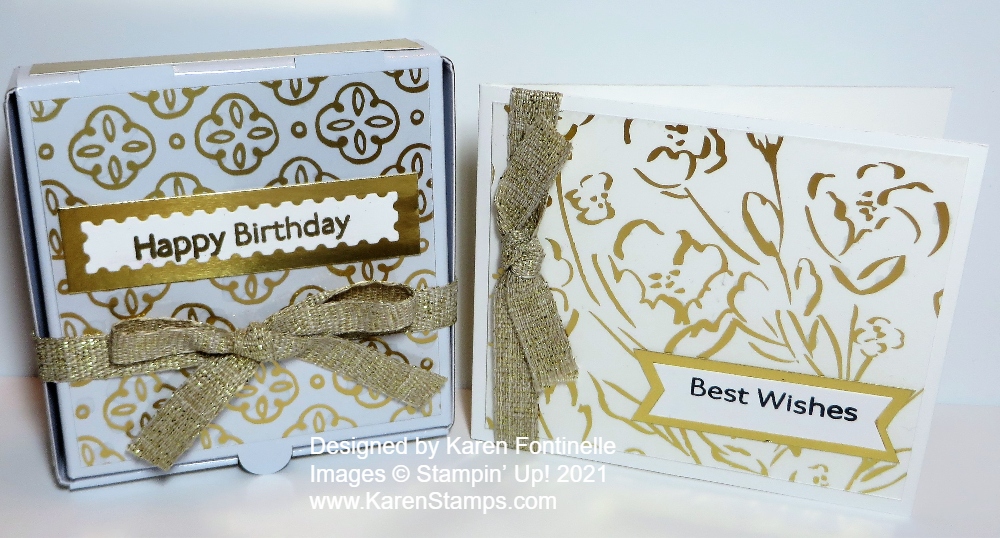
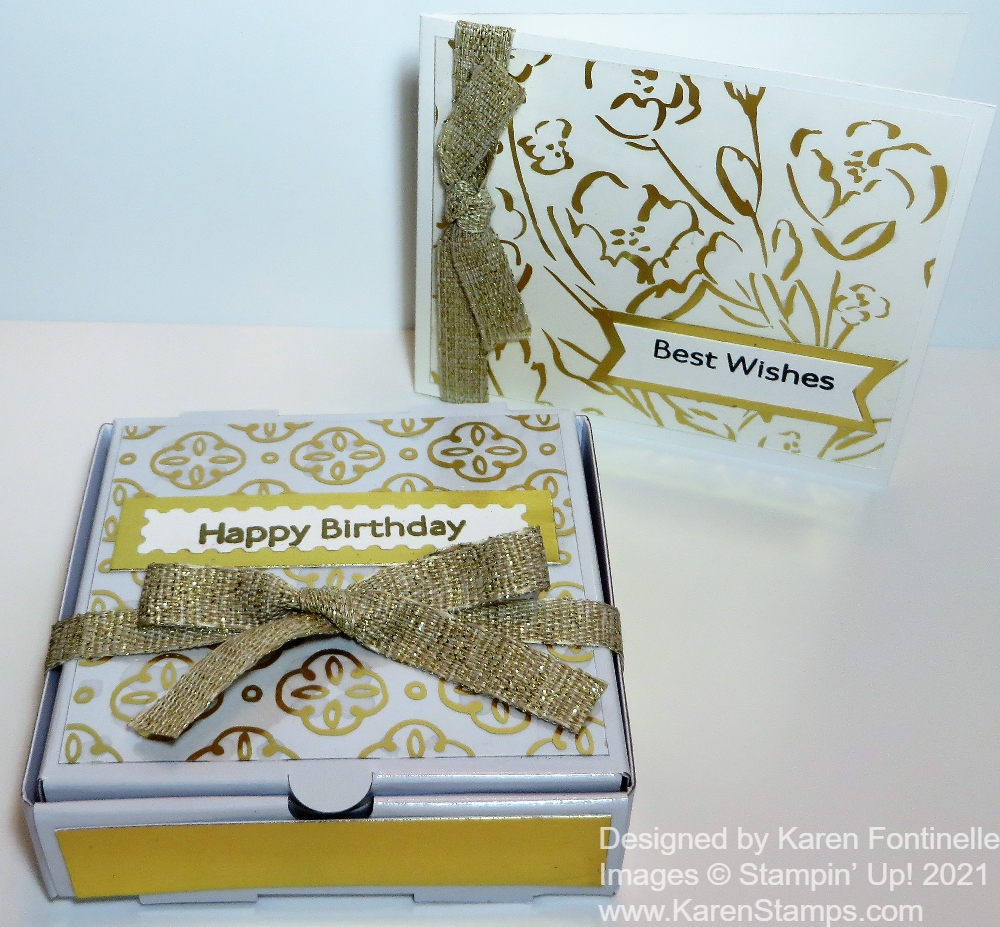
You can play around with the new Acetate Sheets in different ways for a different look to your cards and projects like on this Mini Pizza Box and Card With Golden Garden Acetate. These acetate sheets are in the Fine Art Floral Suite.

After making this card the other day, I used a scrap piece of the Golden Garden Specialty Designer Acetate Sheets on this small gift card. You don’t have to only use it with the Fine Art Floral Designer Series Paper. You can use it on its own over a piece of cardstock. For this card, I just used a piece of Basic White Cardstock for the card base and adhered the acetate sheet on the front. The greeting is in the Art Gallery Stamp Set in the Suite. It is just stamped on white and layered on a piece of Gold Foil. The ribbon tied around the side is the 3/8″ Fine Art Ribbon.

Here are some things to know about the acetate sheets! On the backside of sheet, the backside of the gold design is silver! So you can use whichever color you like. There is also a protective plastic sheet on the backside of the acetate, on the silver side, so be sure to remove that before using. As for how to adhere the sheets to your card or project, you may be able to hide the adhesive underneath some other element on your card, such as under the greeting or under the ribbon. Some people are using Mini Glue Dots and hiding them under whatever they can. I chose to use teeny tiny dots of the Multipurpose Liquid Glue. Have a piece of scrap nearby so you can squeeze out a bit of glue to make sure it won’t pour out when you are trying to use really small dots! I just put the tiny dots under the widest parts of the gold design to try to hide it.

For something different I put together a Mini Pizza Box and added a piece of the Golden Garden Acetate to the top of the box. I used the shiny side for the outside this time. As I was assembling the box, I thought it felt a lot thicker and harder to fold for some reason! Well, the reason was revealed when a second box fell apart from the one box I thought I was working with. I was trying to crease two boxes stuck together and thought I only had one!!

For the pizza box, after adhering the acetate to the top of the box with teeny tiny dots of Multipurpose Liquid Glue. I actually can see the glue that oozed out from under the spot when I placed it, but honestly, no one else will even notice it. I can see it because I’m looking for it, but it doesn’t really show. I also added strips of Gold Foil around all four sides. The greeting is also in the Art Gallery Stamp Set and is die-cut with a die in the Floral Gallery Dies, layered on a piece of Gold Foil. Then I just tied a piece of the 3/8″ Fine Art Ribbon around the box, which holds the lid closed and also is an embellishment. This is an easy way to make a little box for a gift, treat, or maybe some notecards or a cookie inside!

Mini Pizza Box and Card With Golden Garden Acetate

The Fine Art Floral Suite is a beautiful group of products for you to make lots of pretty things! Check them out in the Stampin’ Up! Online Store along with the other January-June 2021 Mini Catalog products.

Sympathy Card With Gold Foil Cross

Sympathy Card With Gold Foil Cross

Three weeks ago today I had a need for a special sympathy card so I created this Sympathy Card With Gold Foil Cross. A dear friend with whom I’d grown up since 4th grade lost her husband to the coronavirus. While I saw lots of pretty ideas for sympathy cards online and almost chose one of those, I ended up somewhat copying a card I’d made myself several years ago.

Around Easter I had posted some past cards I had made and I noticed my friend commented on a card like this one. She’s also has a strong religious faith so I thought a card with a cross would be appropriate.

I first thought of making an all-white card but in the end, I used Gold Foil for the cross and the scalloped layer. The card base is Whisper White with a layer that is embossed with the Tin Tile 3D Embossing Folder.

The cross is made with two die-cut pieces from the Flourish Dies. It is the long piece that is not a leaf or flower! I cut two but then cut each down according to the size I wanted. Just use Paper Snips to cut carefully either with a straight line or perhaps following the curve, depending on where that end is going to end up.

I had to put a lot of thought into layering the cross, whether to emboss that background piece, what shape, what color, etc. Finally, I settled on using the Layering Ovals Dies because I needed something large. I chose to use one of the scalloped ovals for the gold foil layer under the white oval. To glue the cross together and to adhere it to the oval, I used the teeniest drops of Multipurpose Liquid Glue. It IS possible to get teeny drops out of the bottle but if that doesn’t work for you, put a small puddle of glue on some scrap paper or wax paper or your Silicone Craft Sheet and dip something like a toothpick or corner of a scrap of cardstock in it to pick up the glue.

Last, but not least, I had a difficult time deciding on a flower. Whether to stamp a flower and punch it out with either a current punch or retired punch and what flower stamp to use, etc. etc. Finally, I settled on this flower, stamped in Memento Ink and colored with Stampin’ Blends. The stamp is in the Ornate Style Stamp Set. I even added a little Rhinestone Jewel to the center of the flower.

This is the card I copied from. It doesn’t hurt to look back at your older creations and see if something in your own collection inspires you! I just changed up the colors to what feel I wanted this sympathy card to have and it was easy to duplicate. Of course the personal note inside a card like this is the most important part, but I know for us cardmakers, making a card for a situation like this takes some thought about the design, colors, greeting, etc. in hopes we will get the tone just right and bring comfort to the recipient. I’m afraid we could all need to have some sympathy cards on hand or ideas in our heads for one with the virus ravaging our country in this way.

Always look through your stash of cardmaking supplies, even older ones, and you will likely find something, even the perfect something, with which you can make a card like this sympathy card. It’s a shame we have to send them to people we know, but we do and we’ve been given a special opportunity with our supplies and our talent to hopefully ease someone’s sorrow with our cardmaking and papercrafting.