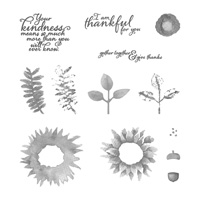
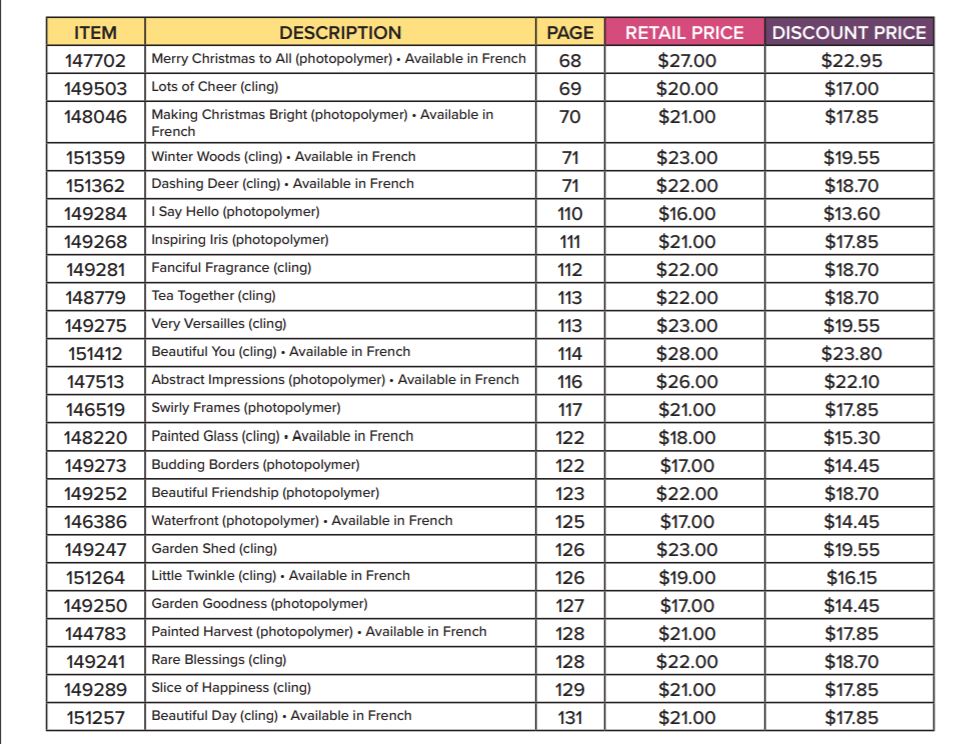
I think once the Holiday Catalog comes out, we put the Annual Catalog aside and we forget how many great stamp sets and products are in there! This is a chance to pick up that catalog again and review the stamp sets in there and see if there are any you have taken off your Wish List in the past….but maybe now you can put them back on your list at 15% off!
All selected stamp sets can be applied to Starter Kits.
Discount applies to select stamp sets only when purchased individually during the 24-hour promotion period.
Bundles featuring stamp sets from the promotion will not be discounted.
If you purchased a stamp set prior to the sale, we will not be offering exchanges or credits.
In the event that we run out of any item offered, promotional pricing will be honored on items backordered, up to the point it reaches the backorder limit. Once an item reaches the backorder limit and is not orderable, it will no longer be available during the promotion and will not be available to order until additional inventory arrives in your market.
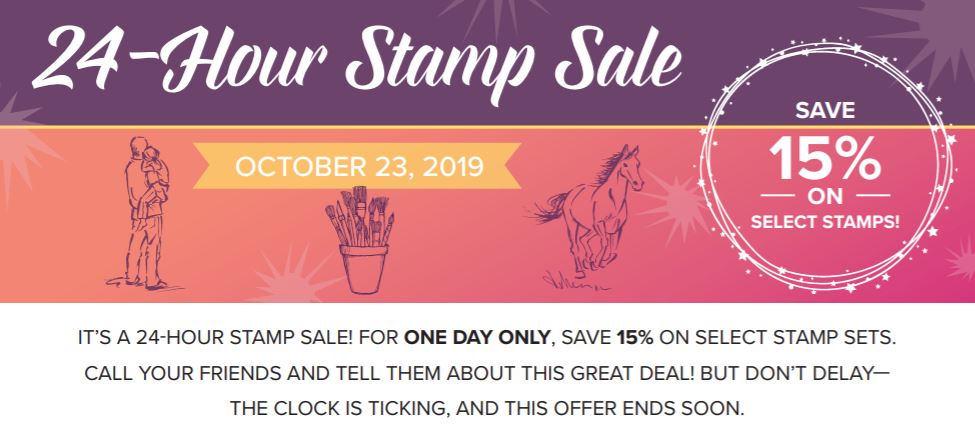
For 24-HOURS ONLY, you can save 15% on select stamp sets. This sale will be over at midnight, so don’t delay!Even some Christmas stamp sets included from the Annual Catalog!
(Stampin’ Up! rarely puts stamps on sale!)
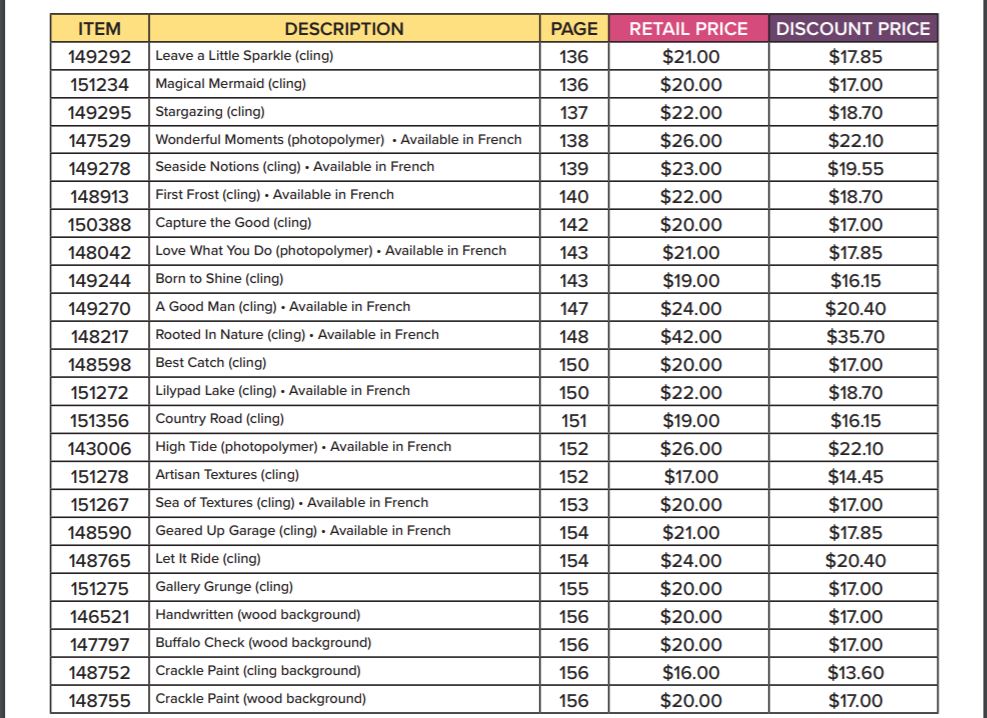
All selected stamp sets can be applied to Starter Kits.
Discount applies to select stamp sets only when purchased individually during the 24-hour promotion period.
Bundles featuring stamp sets from the promotion will not be discounted.
If you purchased a stamp set prior to the sale, we will not be offering exchanges or credits.
In the event that we run out of any item offered, promotional pricing will be honored on items backordered, up to the point it reaches the backorder limit. Once an item reaches the backorder limit and is not orderable, it will no longer be available during the promotion and will not be available to order until additional inventory arrives in your market.
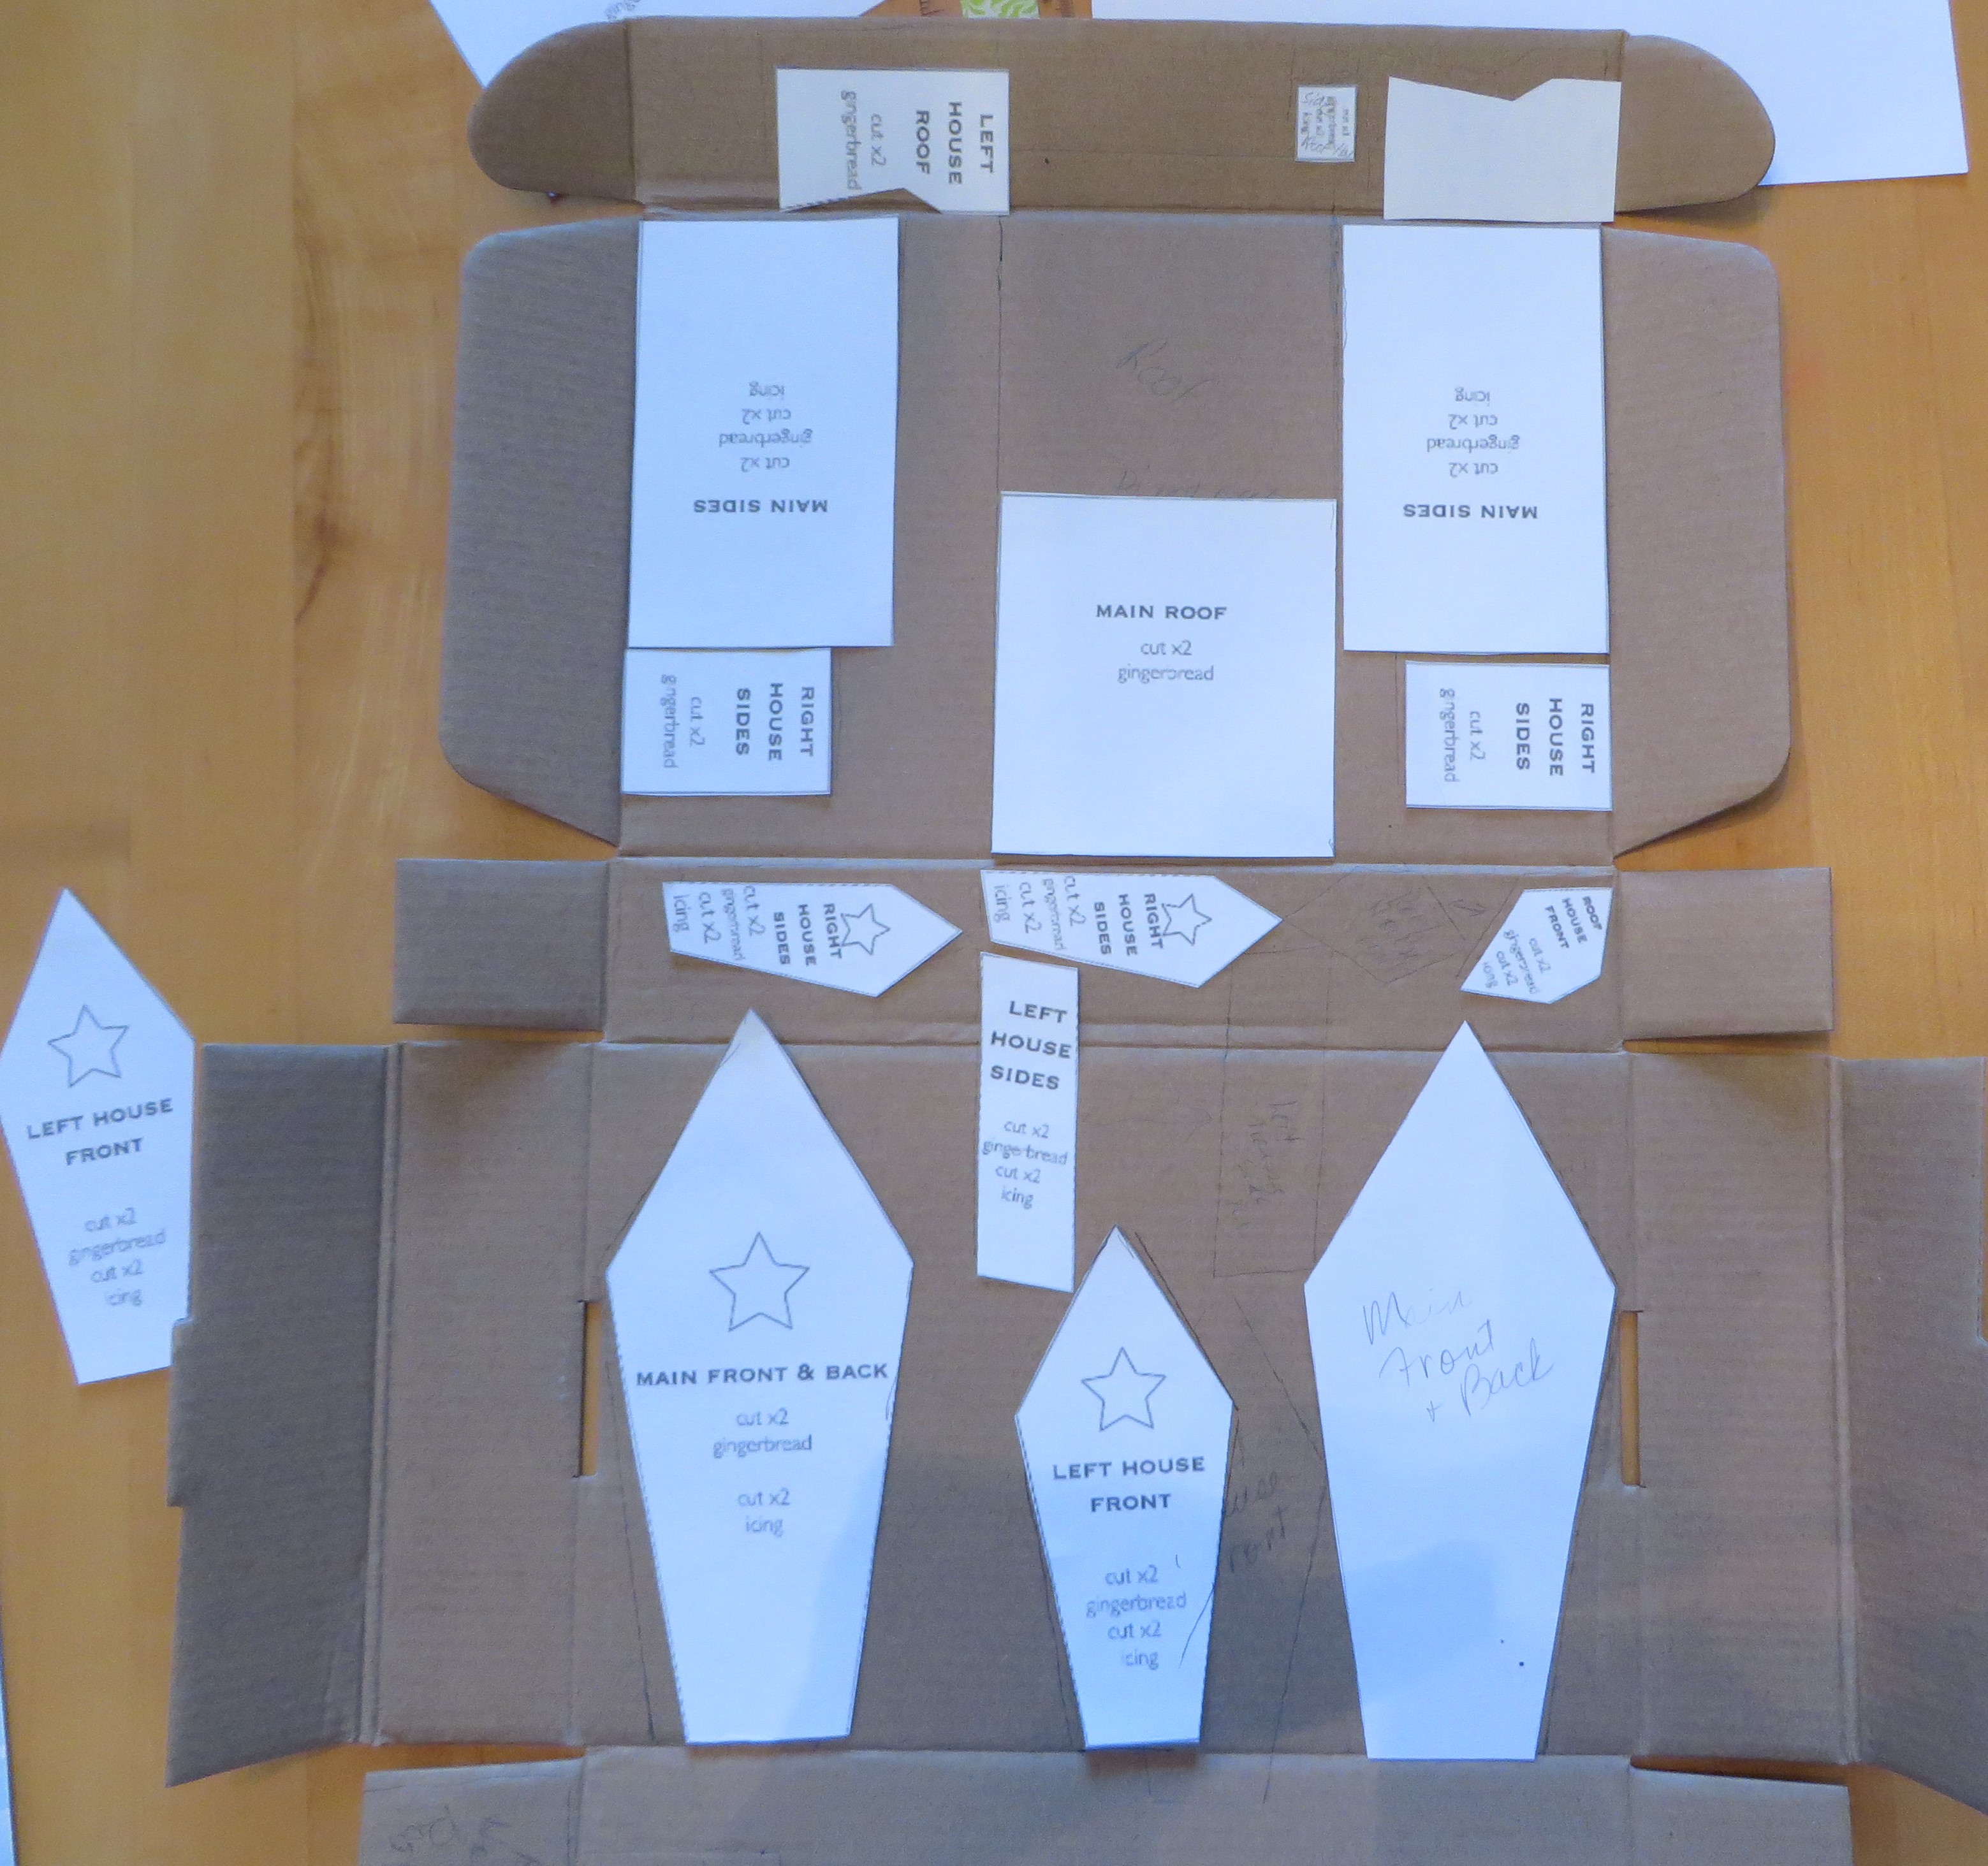
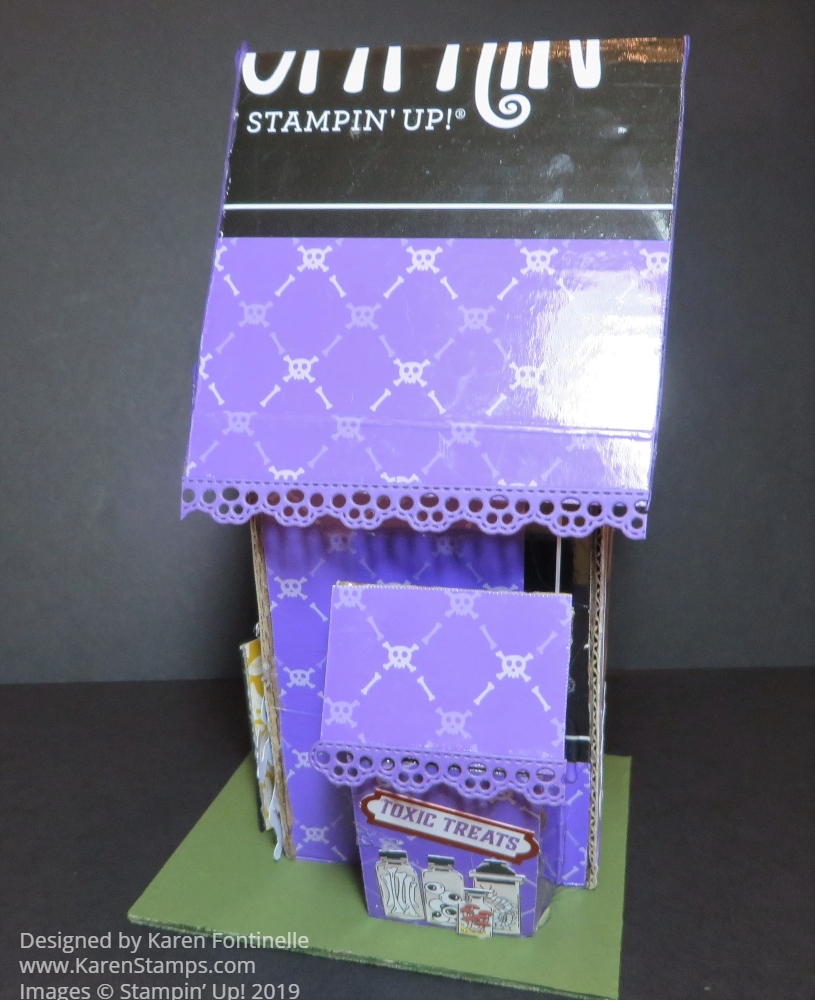
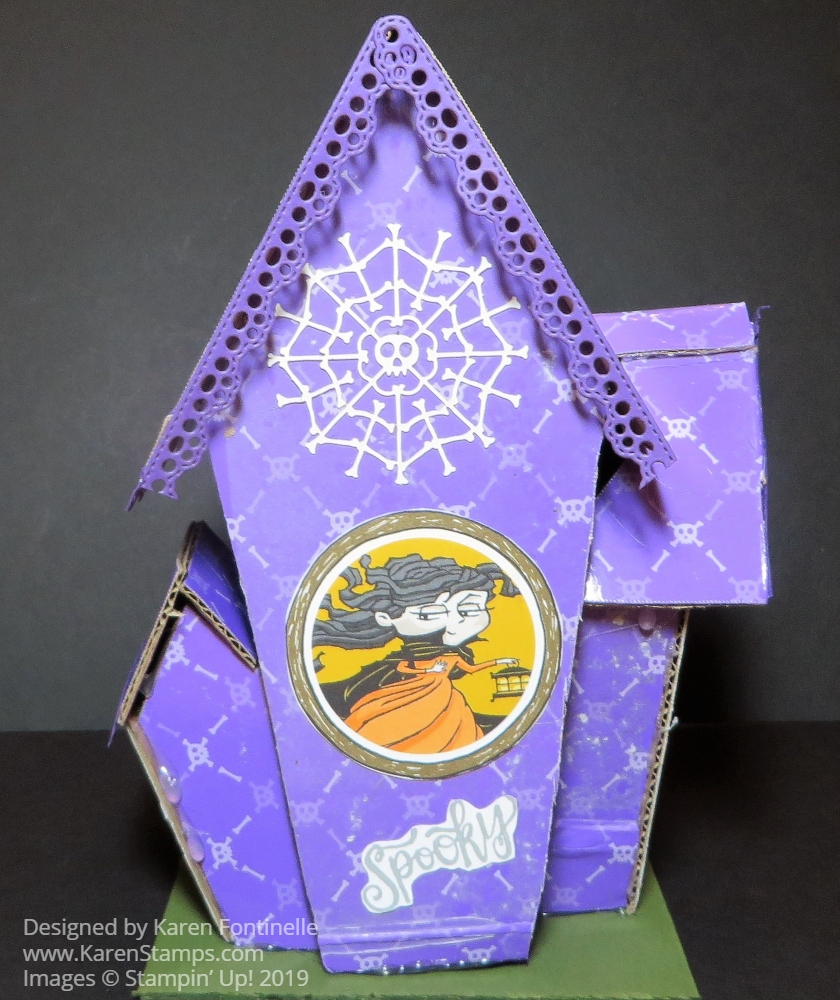
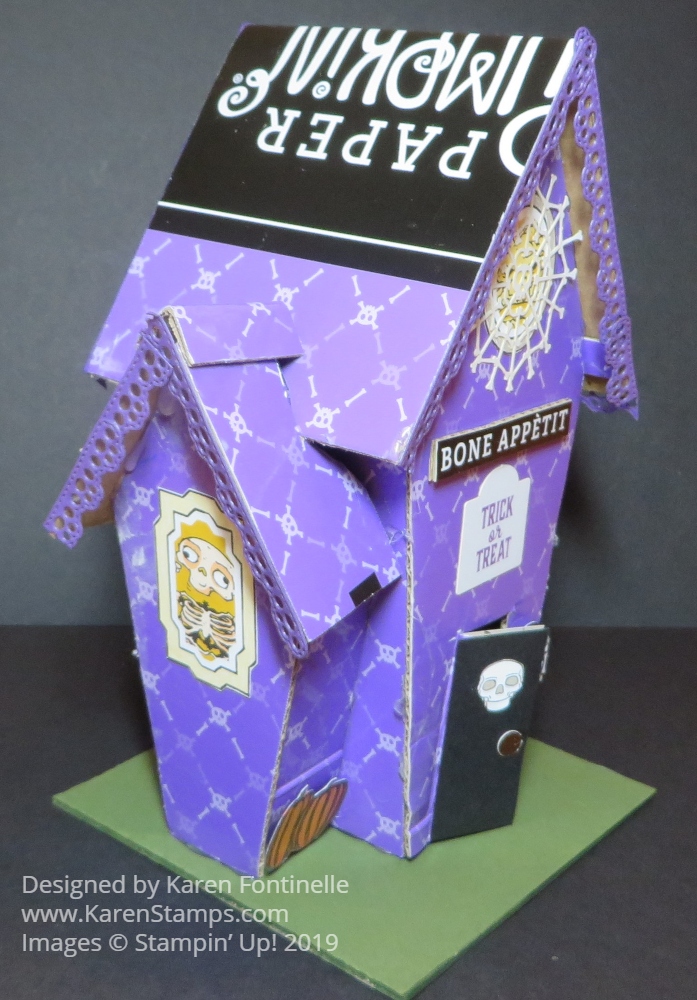
You know how they say little kids have the most fun playing with the box a gift came in? In this case, I had a lot of fun playing with the Paper Pumpkin box to make a Haunted House! I also had a lot of fun making the cute treat boxes in the Paper Pumpkin Kit! The first haunted house idea came from a Stampin’ Up! employee who then did a Facebook Live explaining his tips on making your own haunted house out of the Paper Pumpkin September Kit box. It was a special edition box in Gorgeous Grape instead of the usual red so that really lent itself to making a haunted house!
I followed the same pattern that the Stampin’ Up! employee found online. It needed to be enlarged and then printed and then placed on the opened box. A couple of pieces had to be reversed so that the outside of the box was on the outside of the house. I found a video online of a lady who made the house and showed exactly how she laid out her pieces. However, I wanted the outside of my house to have the pattern going in the correct direction so I laid my main pieces out a little differently. It all worked. You might want to make a practice house out of other cardboard or cardstock to see how it all goes together but I jumped right in!
Be sure to label the pieces as you trace them and cut them out. Use a heavy-duty scissors or utility knife of some kind. Hot glue is recommended for assembling the house. The thing is, since it is a “haunted” house, you don’t have to worry about strings of hot glue or glue that shows or house pieces that aren’t perfectly straight because any pieces that are “off” just make the house look even spookier!
After assembling the house, use whatever embellishments or pieces from the Paper Pumpkin Kit to decorate the outside of the house. I also used images from the Monster Bash Designer Paper. I didn’t decorate the roof of the house because I like the “Paper Pumpkin” showing on the top!
To get the mailing label off the outside of the box, use your heat gun and then peel it off. I don’t think you will get all the adhesive off so just pounce the Embossing Buddy all over it, which will still show the powdery effect but that’s okay because it is a haunted house! And I put that piece on the back of the house anyway!
For the base, just cut a piece of any other cardboard according to the pattern and cover with Mossy Meadow Cardstock if you like. I cut a door in mine but you could also just adhere something to look like a door. I cut out the UPC number from the box, planning to use it as the “address” on the house, but I lost it because it was so small!
This was really fun to make and easier than I thought to assemble. If you don’t have a Paper Pumpkin box, just use other cardboard and decorate. As I write this post, you CAN purchase the same Bone Appetit Kit and refill in the Stampin’ Up! Online Store but you must be a subscriber to access this category. Sign up now for Paper Pumpkin and get the Holiday Kit coming in November and possibly the past October kit for holiday cards!
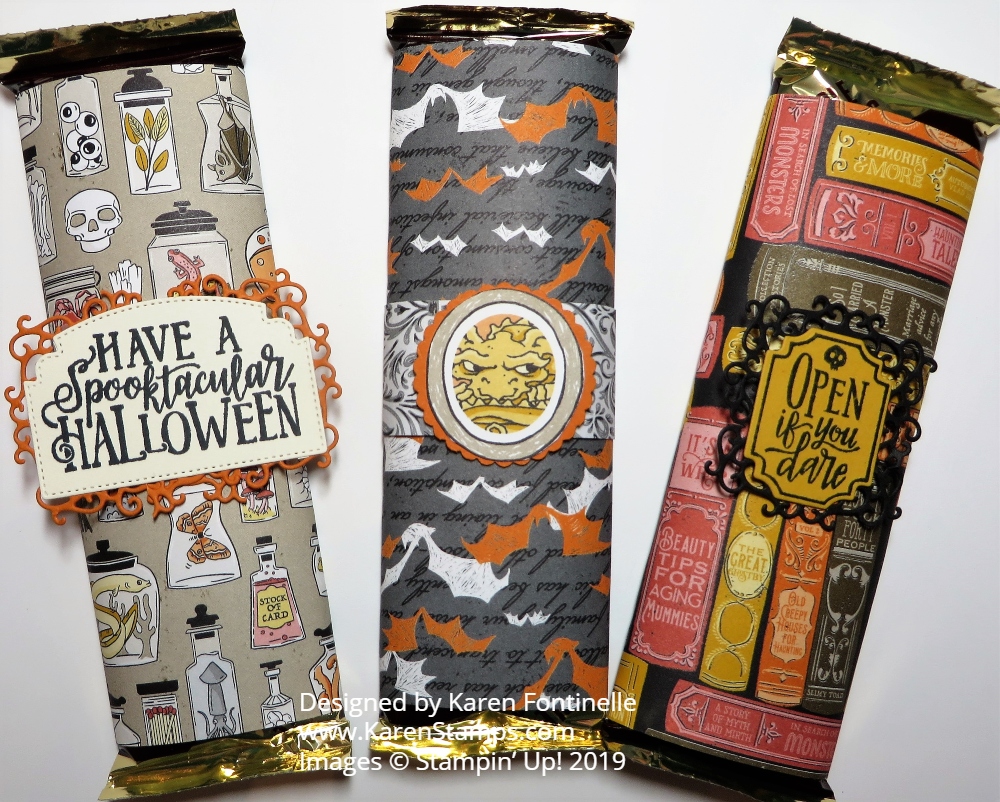
Here are some ideas on how to decorate candy bars for Halloween treats. If you happen to have a box of chocolate candy bars (I mean, craft supplies) in your pantry, you can have a good time decorating some of them (not all of them, of course!) with Halloween designer paper and embellishments. Maybe you don’t want to give out these regular size candy bars out to the trick-or-treaters but maybe it would be fun to make them for family, friends, office mates or neighbors. You could also do this with the little snack candy bars if you wanted to make a lot.
Just wrap a piece of cardstock or designer paper around the candy bar. I found that a piece of 5″ x 5″ Monster Bash Designer Series Paper worked fine. To make sure I had a good adhesive to hold the paper together after I wrapped it around, I used Tear & Tape. If you use Snail Adhesive, I would put it on both ends so the tape sticks to itself and makes the hold stronger. I do this a lot.
Decorate the candy bar however you like. On these Halloween candy bars, I used one character face from the Monster Bash Designer Paper layered on a 1 3/8″ Scallop Circle Punch. The other two have stamped greetings from the Spooktacular Bash Stamp Set. I layered each on a die-cut from the Ornate Frames Dies. Each die-cut was too big so I just cut them down in the middle and matched up the two ends underneath the greeting. It worked well enough for candy bars!
You could make these as fancy or as simple as you like, depending on who you are giving them to. Most likely you want to make them fairly simple. You could also use stamped or plain cardstock with some kind of embellishment. Here are some little candy bars I decorated several years ago! It really is fun once you get started. You may not want to stop!
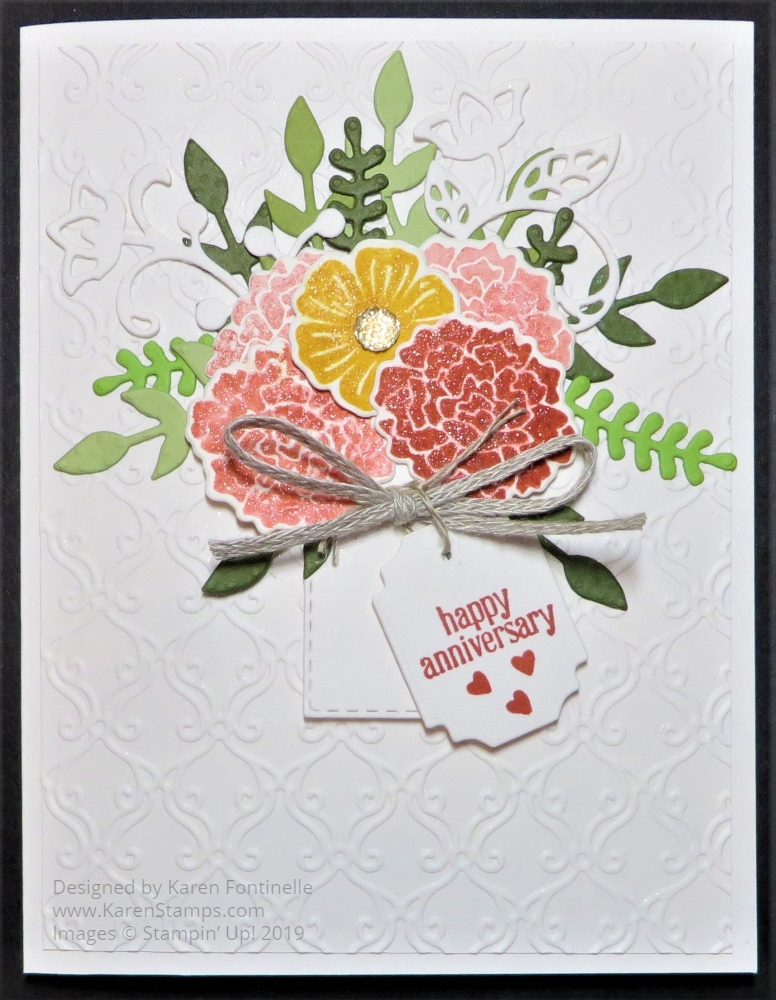
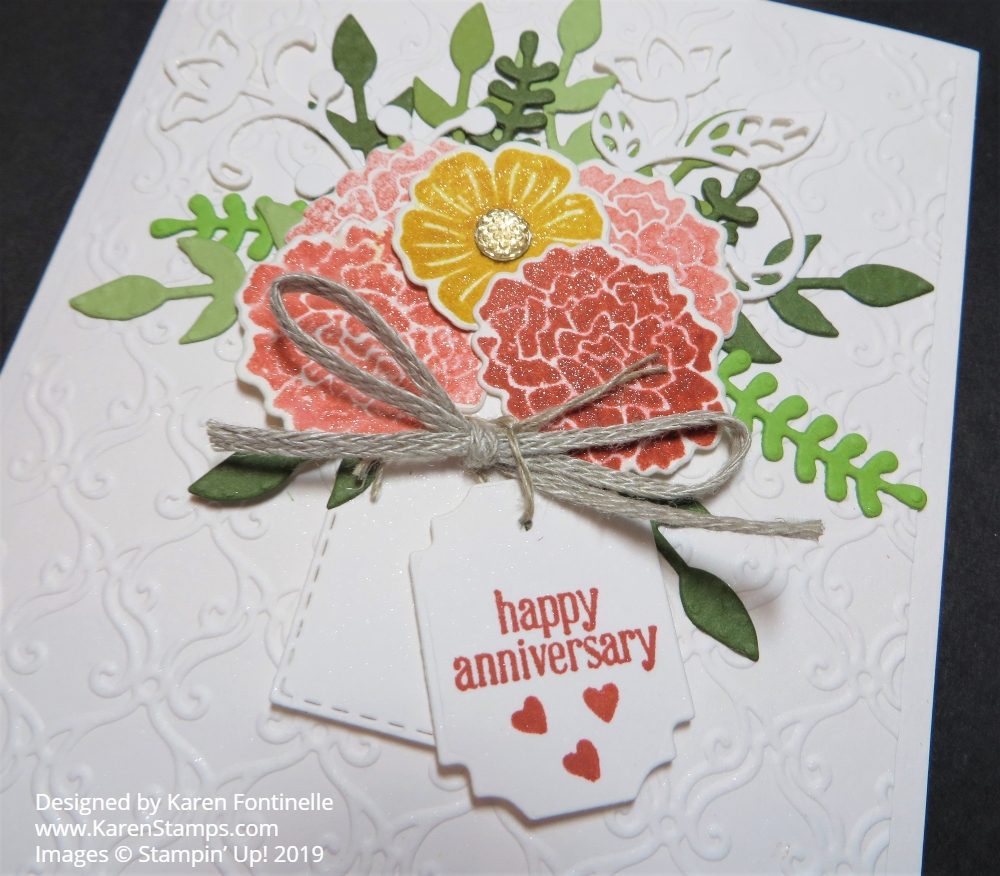
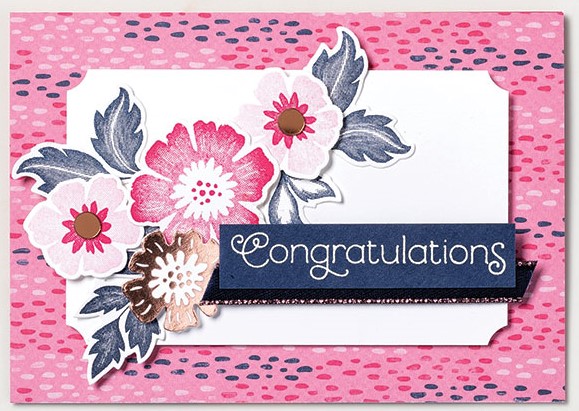
For a change from Halloween and Christmas ideas, here is the Beautiful Bouquet Floral Anniversary Card I made for my daughter and son-in-law. I can’t believe they are starting to rack up quite a few anniversaries now.
I started with one card idea and as I began putting the card together I didn’t like it. What to do?? Sometimes I can keep playing with something and it will turn out, but this time I turned to the Stampin’ Up! catalog for inspiration. I found it on page 85 up in the top corner. I already had stamped and die cut some of the Beautiful Bouquet flowers for the original card idea so that’s why I immediately went to the Beautiful Bouquet Stamp Set in the catalog.
Often you may not have the same products they used on a card or project in the catalog. It is highly likely that you can substitute something you DO have at that moment. Then if you really want that product, you can put it on your next order. But if you need something right away, just choose something in your stash!
For example, on the catalog sample on page 85, behind the bouquet of flowers is a die-cut made with the Stitched Lace Thinlits. I don’t own that so instead, I chose to emboss the entire background with the Stylish Scroll Embossing Folder. I think that works out fine even though I didn’t have the lace background.
For all the leaves, I just chose several colors of green cardstock and punched or die-cut sprigs and stems of leaves.
The flowers can either just be stamped or you can play a little in the way the sample was made and do some “faux watercoloring”. In this technique, the stamp is inked up and then spritzed with water before stamping. Just spritz lightly to barely moisten the ink and then stamp on Watercolor Paper. You probably want to make extras and then decide which ones came out the best or which ones maybe have an edge that didn’t come out well but you can stick underneath another flower! There is even a Whisper White die-cut scroll of flowers and leaves die-cut with the Flourish Dies.
For the suggestion of a vase, I die-cut a piece with the Stitched Rectangles Dies. The bow is tied with a piece of Braided Linen Trim and adhered with Mini Glue Dots. The tag in the sample is made from a punch in a kit, but I just used a die from the Ornate Frames Dies. The greeting stamped on the tag is from the Itty Bitty Greetings Stamp Set. This is a great stamp set to own! Then the tag is tied on to the bow with Linen Thread.
For some extra sparkle, I colored the flowers with some Wink of Stella and added a Gold Faceted Gem to one flower. Some of the flowers are popped up on Stampin’ Dimensionals.
I made this card for an anniversary, but of course, a bouquet of flowers whether real or on a card can be given for many occasions. This exact same card with a different greeting could be for a birthday, sympathy, congratulations, even a wedding. That’s what makes the Beautiful Bouquet Stamp Set so useful and versatile.
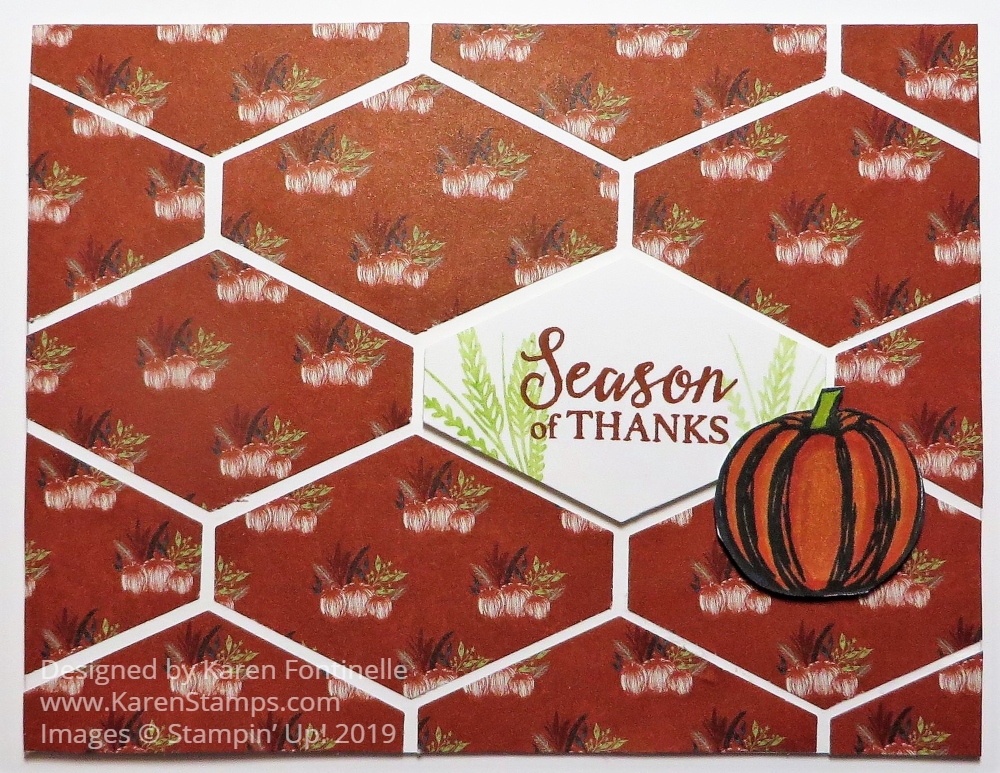
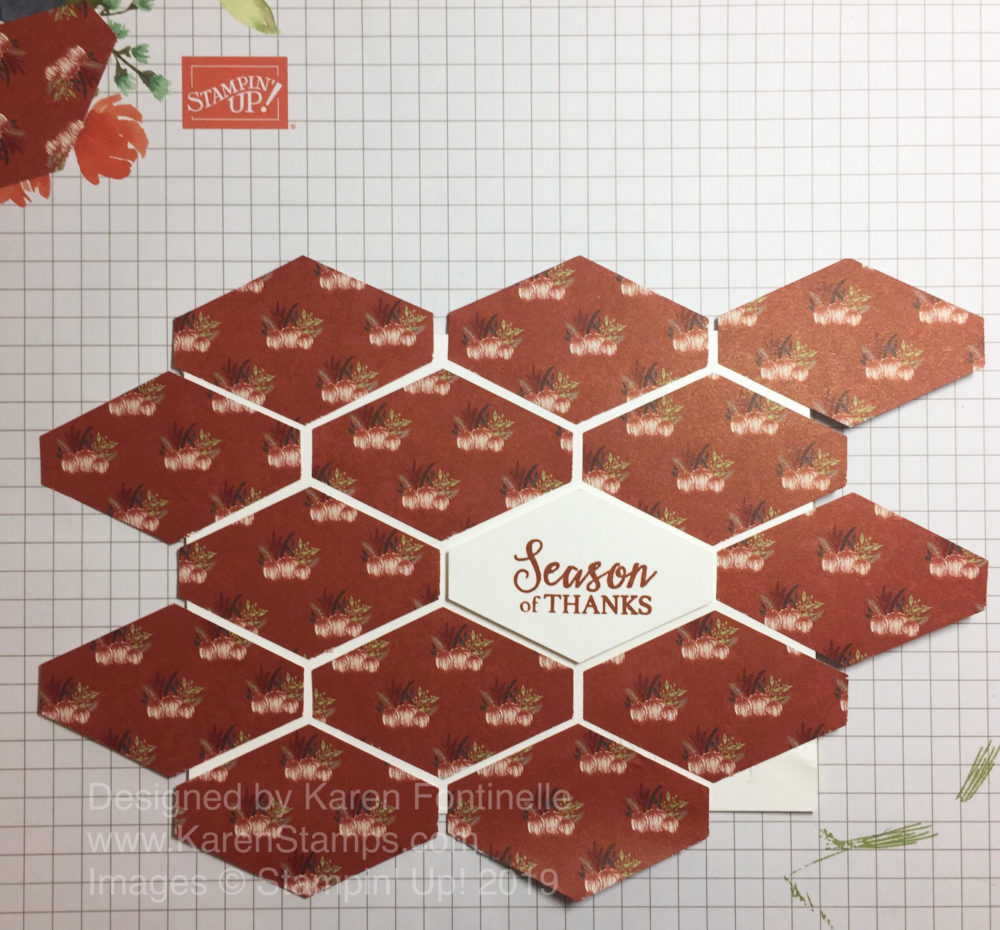
I’ve made and seen cards like this Geometric Card For Fall With the Tailored Tag Punch and saw one recently online. I changed the kind of paper to make it look like fall, added the greeting, a little stamping and of course, a pumpkin! What says fall more than a pumpkin?! You could make and send this card now just for fall, a card for someone who doesn’t celebrate Halloween, or save it for closer to Thanksgiving. You can also make this same card with different paper and a different greeting for a birthday or lots of other occasions.
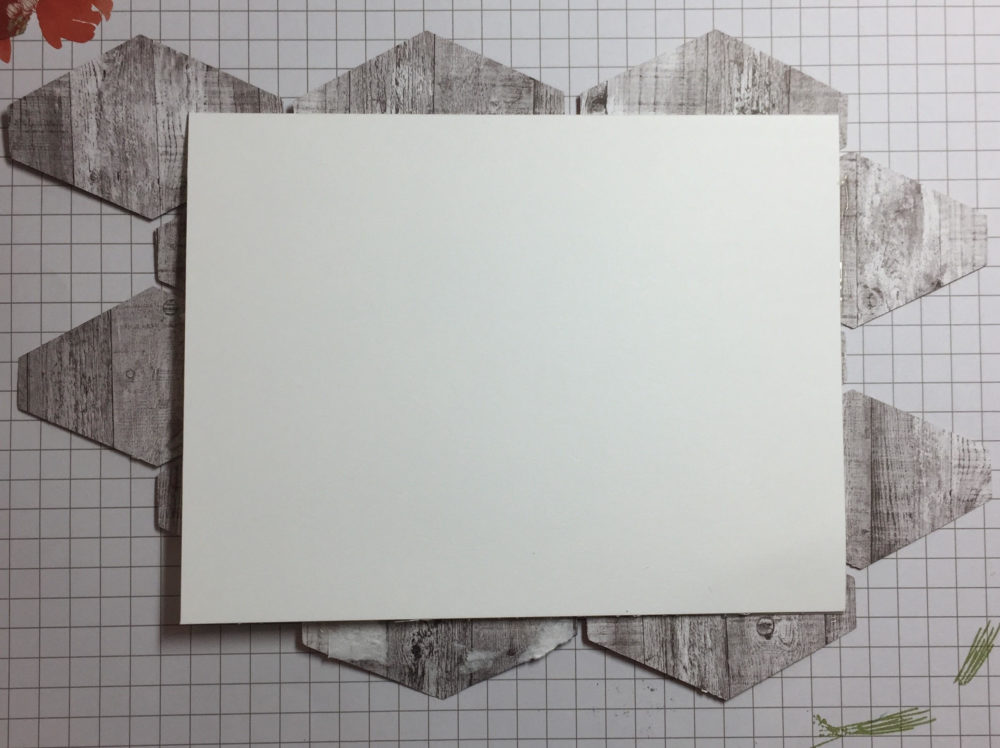
The card base is Whisper White Thick Cardstock to give it a little heft. The paper is the Come To Gather Designer Series Paper, the pattern with little groupings of pumpkins. You might think this card would be difficult to make, fitting in all those pieces like a puzzle! But no, you just start somewhere and space out the punched pieces, allowing them to hang out over the edge of the cardstock underneath. After you have them placed how you like, glue them down. Turn the paper over and trim off the excess hanging off the edges. Check out the photos below to see how I did this layout and then trimmed off the pieces hanging over on the other side.
The greeting is stamped with the Gather Together Stamp Set in Cajun Craze Ink and then punched out with the Tailored Tag Punch. I thought it looked a little too stark so I stamped the wheat stamp in Granny Apple Green Ink, stamped off once or twice. I just wanted it fairly light.
I also stamped and colored in a pumpkin from the Gather Together Stamp Set. It is colored with Stampin’ Blends Markers in various colors. You can choose whatever look you want for your pumpkin. I started with a bit of Daffodil Delight with Pumpkin Pie and then added some Cajun Craze to match the paper better with the darker shade.
The designer paper pieces are all adhered directly to the card front, but the greeting is popped up on Stampin’ Dimensionals®, as is the pumpkin. Here is a similar card made with the Wood Textures Designer Paper last year so you can see a different idea and occasion.
There are infinite possibilities for making a card like this using different papers and greetings! Try it and see what you think!
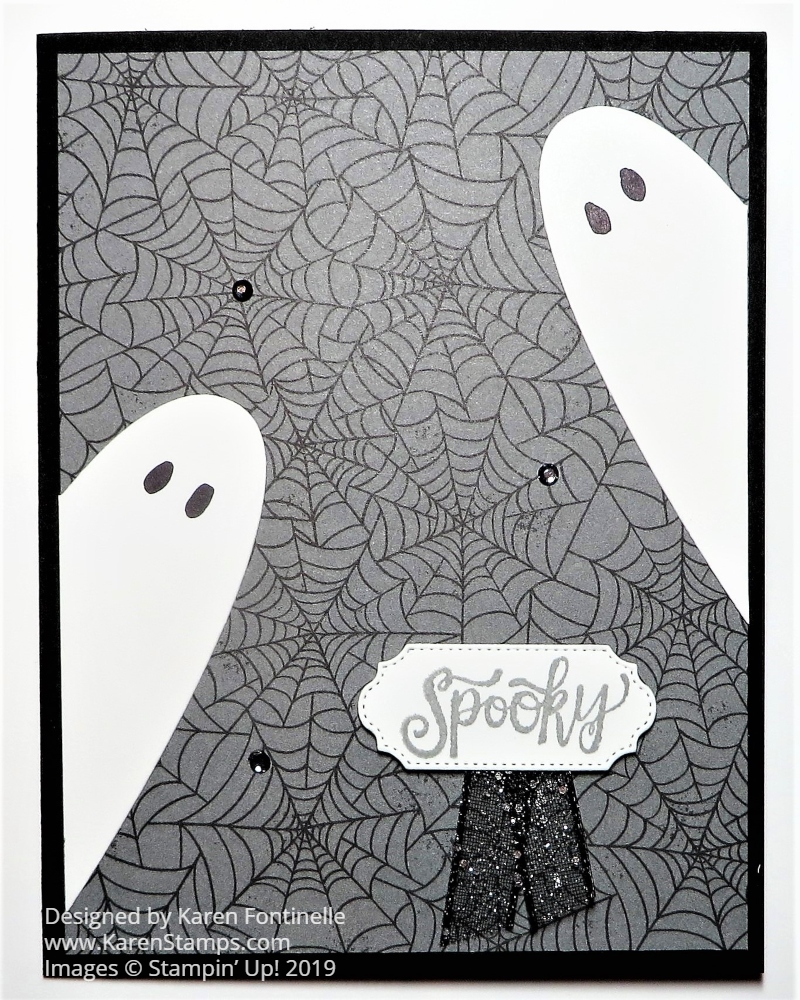
I made this Quick and Easy Ghost Card For Halloween almost in seconds! Well, a little die-cutting was involved so maybe it was a few minutes but it was very fast. And I like the card so much I plan to make more to send out!
The way I made these ghosts is a creative idea that I saw when I was first introduced to Stampin’ Up! and helped propel me to sign up as a Demonstrator. I found out that “rubber stamping” was WAY more than a stamp and ink and I was blown away by the creativity I saw with stamping and Stampin’ Up! at a little event I went to with my friend and future upline. When we started doing some stamping at this gathering, I actually had to ask what I was supposed to do with this stamp and ink pad! When I saw a ghost card similar to this one on a display board, I was hooked!
Here’s the big secret of how to make ghosts that are hanging out and peering around corners…..cut out a heart and then cut it in half! You have a ghost! You could cut out a heart by hand because, after all, a ghost doesn’t have to be made perfectly. But I used the Stitched Be Mine Dies to cut out a heart. I used one die that was large but not with the stitching. Then I simply cut the heart in half lengthwise. The eyes are just colored in by hand but you could use some kind of punch. Isn’t that clever to use a heart shape to make a ghost??! I love it!
For a little more bling on the card, I colored some Rhinestones with the Black Stampin’ Blend marker and then added three to the card. I like that touch.
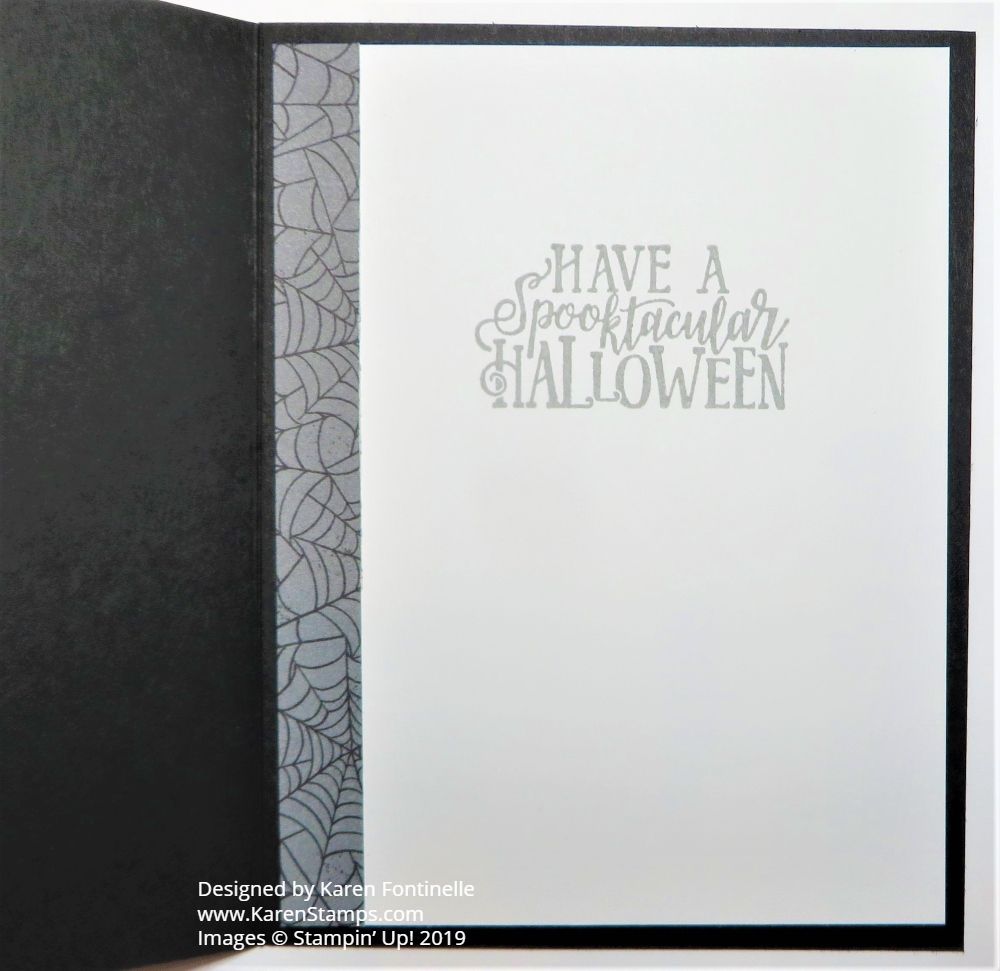
Since the inside of the card is black, unless you emboss a greeting in white on the inside, you won’t be able to write a message or note. Just add a layer of Whisper White inside and stamp a greeting. I used another greeting in the Spooktacular Bash Stamp Set and stamped it in Smoky Slate Ink. I also added a strip of the spider web designer paper inside.
That’s how easy this card is to make and it’s fun to make ghosts out of hearts! Here is another card I made with ghosts and glimmer stars. Get out your Halloween or other designer paper and make some ghosts cut from hearts! Decorate your Halloween card with ghosts and scary greetings and other things and see what you come up with, maybe something like my Quick and Easy Ghost Card For Halloween.
If you would like to do at least “a little” crafting for the holidays, the Paper Pumpkin Kit for November is your answer! Maybe you are new to crafting and stamping or maybe you only like to stamp and make things occasionally. Paper Pumpkin is for you! And for those of us who have oodles of stamps, paper, and craft supplies Paper Pumpkin is fun to have an already designed project with all supplies included that we can just sit down and make!
This November Paper Pumpkin Kit from Stampin’ Up! makes 24 holiday-themed gift tags of 4 various sizes and designs. The coordinating colors are Early Espresso, Pool Party, Poppy Parade, and Shaded Spruce.
I would hazard a guess that even if you didn’t want or need that many tags, you could make cards with the tag on the front as the focal point. Every month creative people make alternate projects with the supplies in the kit and post them on the internet so you will be able to find other ideas if that is what you want. Sometimes I do a little of both…..make the project as designed and also save some pieces to make other cards or projects.
Our family likes to have LOTS of packages under the tree and I have often found myself running out to the store to buy more tags, especially after the kids arrive and want to wrap their gifts. These are usually cheap tags to slap on in a hurry on the gift. Wouldn’t a handmade, pretty tag look a lot better on your gift?
Everything you need for the project comes in the kit! If you are a new subscriber, you will also get a clear acrylic block on which to mount your stamps. That’s why these Paper Pumpkin Kits are so good for new stampers and crafters or those who do not have many supplies….or don’t WANT many supplies!
In each Paper Pumpkin Kit you will receive an exclusive stamp set, an ink spot (1″ x 1″) (great to use on the Stamparatus to ink up stamps!), and a package of materials to make the project! And the presentation is everything of course!
Treat yourself to a present in the mail once a month! And if some months you are too busy or traveling or don’t care for that upcoming kit, just skip a month! If Paper Pumpkin really is not for you, there is no obligation to continue. Simply go into your account and cancel or ask me to take care of it for you.
Now if you missed the coordinating October Kit that had to be signed up for by Oct. 10th, if you subscribe NOW to Paper Pumpkin, there is a chance in a few days that Stampin’ Up! will have extra kits that they will put in the Online Store, only available to Paper Pumpkin subscribers. You can order whatever is in the Paper Pumpkin Past Kits category with your regular Stampin’ Up! order.
In fact, if you want toadd a Paper Pumpkin subscription to your Stampin’ Up! order(maybe to reach Hostess Rewards??), just choose which length of time is good for you and add it to your order. Stampin’ Up! will send you an email with directions on how to set up your Paper Pumpkin account and put in the special code showing that you ordered a series of kits in the Online Store. Even if you already have a monthly subscription to Paper Pumpkin, you can purchase a Paper Pumpkin subscription in the Online Store and your account will use those first and then go back to your monthly subscription. Just ask if you have any questions.
The deadline for signing up for the November kit with materials for making holiday tags is November 10, 2019. Supplies may be limited near the end of the subscription period. You may think you will remember, but it’s easier to just do it today and then look forward to mid-November when those kits go out!
(This is my personal link so you don’t have to put in my name as your Demonstrator. You can also sign up at www.paperpumpkin.com and choose me, Karen Fontinelle, as your Demonstrator.)
In between watching several baseball games and one Texans football game, I’ve spent some time making Halloween cards with the Monster Bash paper like this Spooktacular Bash Terracotta Tile Halloween Card. The Houston Astros have made their way to the American League Championship Series as have the St. Louis Cardinals (our hometown team) so we have been watching a LOT of baseball including the division games they got these two teams here. So it was fun to have some breaks stamping and making Halloween cards!
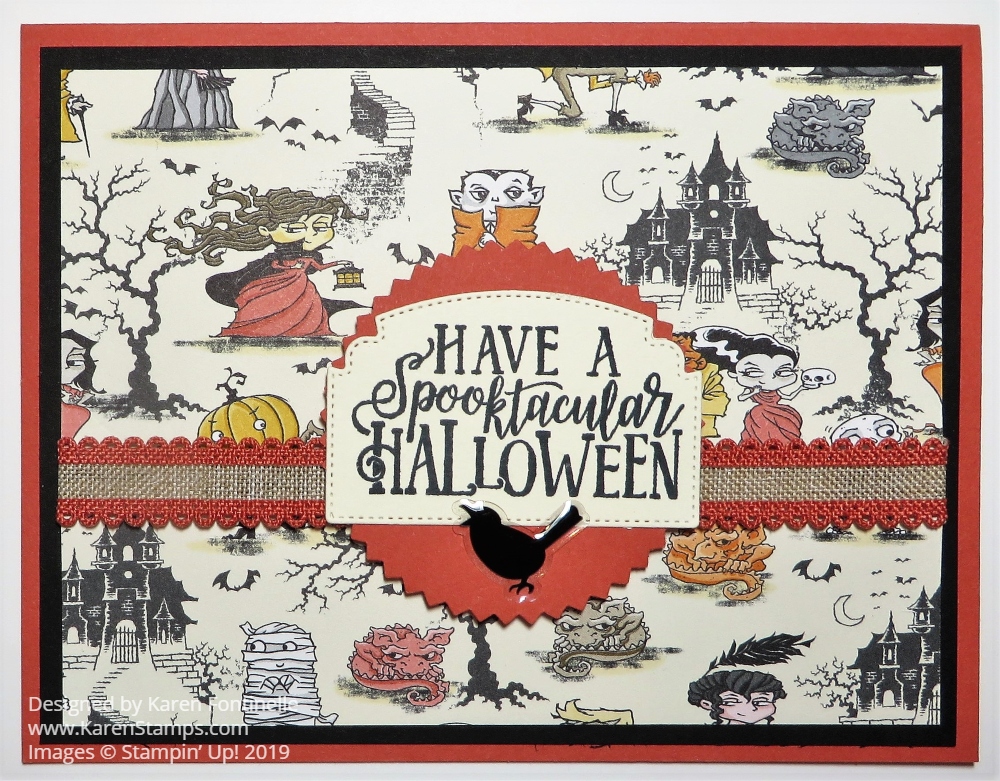
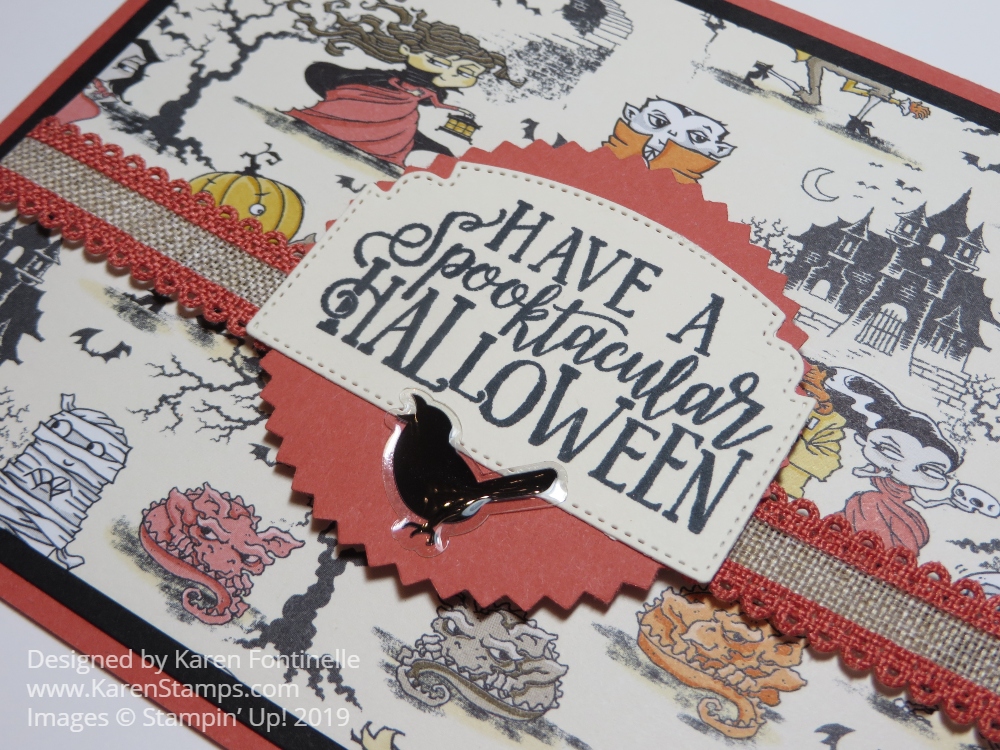
One of the coordinating colors for the Monster Bash Designer Series Paper is Terracotta Tile, one of the current In Colors. Since I haven’t used this color very much and the matching ribbon, I chose this color for the card base. The designer paper pattern is a cute one with little haunted houses and Halloween characters! I layered it on a piece of Basic Black to help it stand out.
The ribbon is wrapped around the designer paper and adhered on the back. It is the very nice Terracotta Tile 1/2″ Scalloped Linen Ribbon. You can use it to dress up a fun card like this one or use it on a fancier card. I’ve even cut it down the middle to use just the scalloped edge to decorate a card.
The greeting is stamped with the Spooktacular Bash Stamp Set. I really like this greeting and used it on a lot of cards! It is stamped on Very Vanilla cardstock which I think goes better with this card than Whisper White. Then it is die-cut with one of the Ornate Frames Dies. I love this particular shape that goes with this greeting so well!
Then I took a long time to decide how to layer the die-cut greeting on something! I just couldn’t find the right thing. Finally, I looked at my punches and chose the Starburst Punch. The greeting seemed to fit fine over the Starburst shape with a little room left for one of the blackbirds in the Monster Bash Enamel Shapes. I think the bird gives an appropriately spooky look to the card, right?! It’s fun to stick it on, anyway! A cute embellishment for a Halloween card!
All you have to do is change the designer paper pattern and the greeting if you want for another design for a Halloween card. It is fun making cards and treats with this Halloween paper and all the spooky, whimsical characters! The backside of some of the papers will also make very nice non-Halloween cards!
Make some Halloween cards this week and give them to your family or send them to friends who enjoy Halloween!
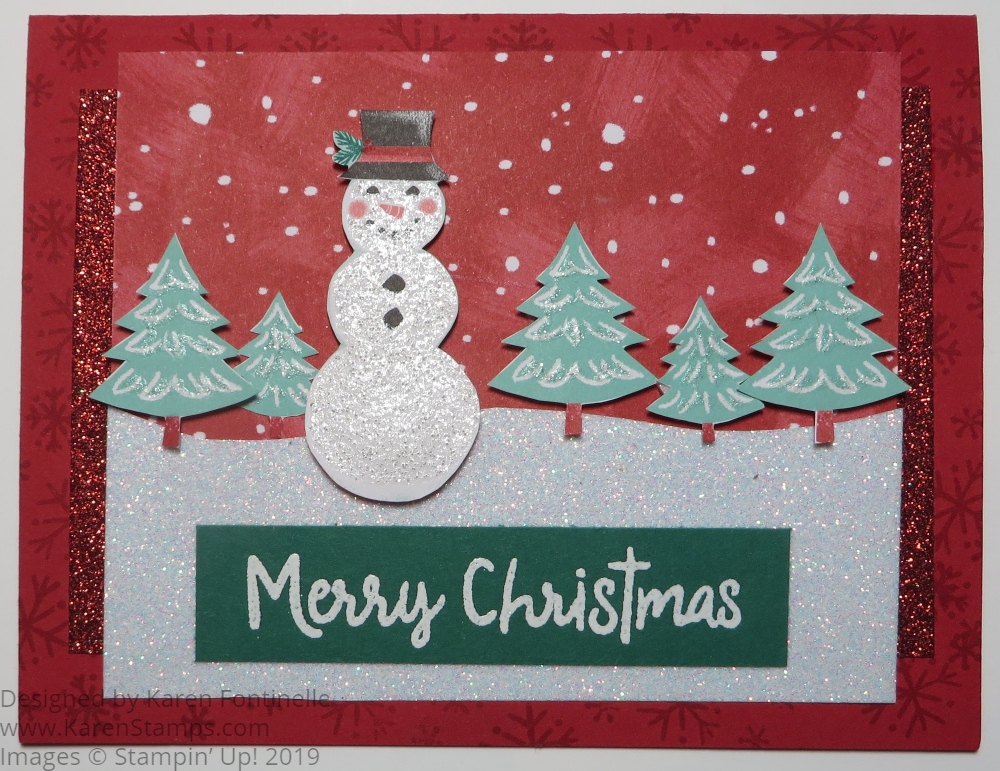
We always say if you need some inspiration, use the Stampin’ Up! catalogs, so that is what I have done with this Holiday Catalog Let It Snow Snowman Christmas Card. You will find a card on the cover of the Holiday catalog that I mostly copied except for the snow.
The Let It Snow Specialty Designer Series Paper is beautiful to use for Christmas cards and projects. This paper is 12″ x 12″ so you have plenty to use. One side has images with bits of glimmer and the other side has more generic images that you can use for non-Christmas projects or after Christmas (if you have any left after using the glimmery sides!).
This card has a Real Red base and is stamped with some Real Red snowflakes with the Snowman Season Stamp Set. Next, there is a piece of the non-glimmer side of the designer paper with the snowmen that I used for the background to look like snowflakes. On the bottom, instead of the way Stampin’ Up! did their card on the catalog cover, I cut a piece of Sparkle Glimmer Paper for the snow. Stampin’ Up! used the new Snowfall Accents Puff Paint on their card but I didn’t own that yet. (As I write this, the Puff Paint had been unorderable but it is back in stock right now so go order it while you can!) On the sides of this layer are strips of the Real Red Glimmer Paper to set off the layer.
The snowman is punched with theSnowman Builder Punch and the trees are all cut by hand with Paper Snips from the Let It Snow DSP. This is the kind of paper that you hate to cut into for any reason, even for making a great card! But it is made to be used so don’t hoard it! Except for one tree adhered directly to the layer, the rest and the snowman are all popped up with Stampin’ Dimensionals and Mini Stampin’ Dimensionals. The Minis save you from cutting the regular size Dimensionals into smaller pieces! (Did you know there are also Black Stampin’ Dimensionals Combo Packs which have both regular size and mini dimensionals in black, which for some projects “hides” them a little more on your project!)
When you use dark cardstock for the card base, you may need to put a layer of Whisper White or Very Vanilla or some coordinating lighter color inside the card so that you can stamp a greeting or write a personal note. In addition, you can also add some decorative stamping. See the inside of this card below.
It’s time to get an early start making Christmas cards so we won’t be rushed when it gets down to the wire! If you need Christmas card ideas, be sure you are signed up for my Mailing List because I will be sending out Week 3 of my 12 Weeks of Christmas holiday emails. You still have time to get another few weeks of card ideas, then we move on to gift ideas and finally gift-wrapping ideas with tags, bags, etc. Of course, I will also have Christmas card ideas on my blog and Facebook page.
As I said, one of the many places you can get ideas and inspiration for holiday cards is to look in the Stampin’ Up! Catalogs. You can copy or you can just take part of the idea and add your own elements. Lots of times, just having some idea in front of you gives you your own idea as you begin working! Be sure to order your supplies early so something you want is not out of stock.
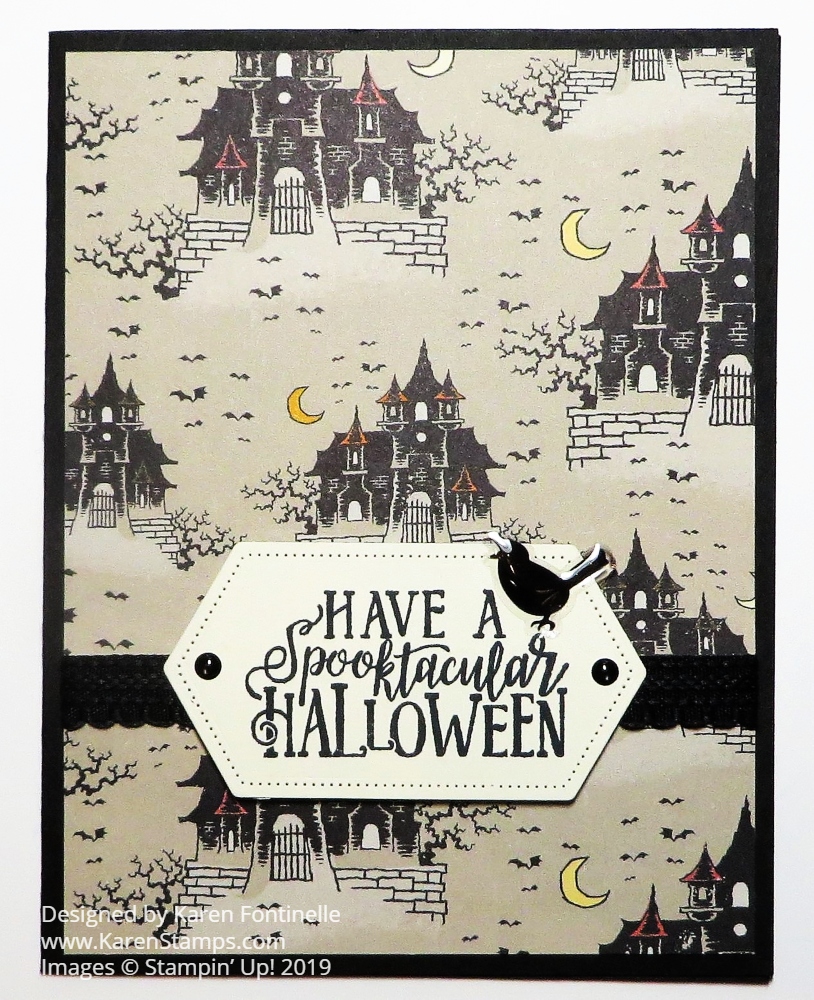
This Monster Bash Spooktacular Haunted House Halloween Card is certainly an easy card to make! And I love the paper! I had actually overlooked this pattern in the designer papers so I wanted to use it. The designer paper seemed interesting enough that all I needed on the card was a greeting…..and just a couple of easy embellishments!
The card base is Basic Black but of course, you could use any of the several coordinating colors with the Monster Bash Designer Series Paper. I chose this pattern with the haunted houses, not quite sure what else I would do with it.
Just for a little easy embellishment, I added two dots and a bird from the Monster Bash Enamel Shapes to the greeting.
Be sure to adhere a Very Vanilla layer inside the card with a stamped greeting and maybe a little Halloween stamping or strip of designer series paper since the cardstock is black. Then you can write a Halloween note or just decorate the inside of the card a little bit.
If you are making some Halloween cards, try this design that I did with my Monster Bash Spooktacular Haunted House Halloween Card and be sure to mail them to friends and family to wish them a Happy Halloween!
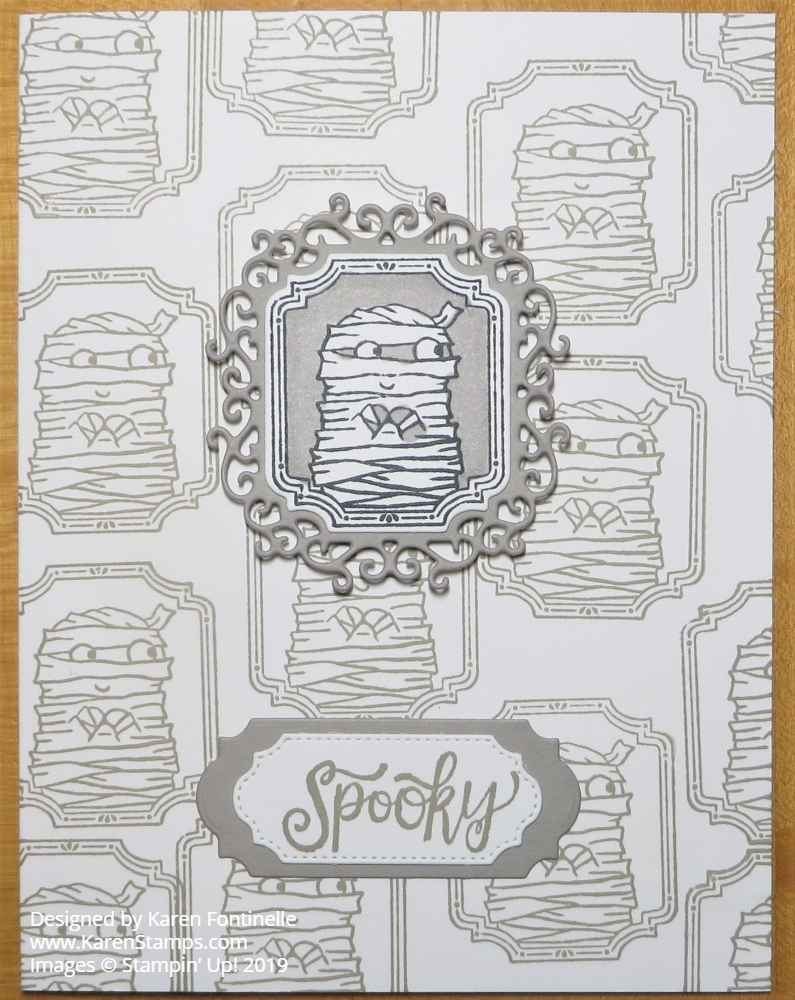
The ghouls are beginning to come out now that Halloween is getting closer as in this Monster Bash Mummy Halloween Card! It’s a monochromatic card, easy for you to copy now that I figured out the design and it’s just stamping, die-cutting and a tiny bit of coloring to make it.
I essentially made my own designer paper by stamping the front of this card with a mummy stamp from the Spooktacular Bash Stamp Set. It is just random stamping with Gray Granite Ink. I used the Whisper White Thick Cardstock so the card would not feel flimsy with no other layers or designer paper.
Next, I stamped the mummy by itself and die-cut it with the die from the Ornate Frames Dies. When I first started making this card, at this point I had some difficulty deciding on the layering of this stamped mummy. I was trying to keep the card monochromatic. Eventually, I got the idea to color the background around the mummy and with theLight Gray Granite Stampin’ Blend marker which helped it stand out. I chose the frilly frame in the Ornate Frames Dies for the background layer. Then I played around with whether or not to have something horizontal behind this frame.
In the end, I decided to use a horizontal die cut with a die-cut greeting lower on the card. Both dies are in the Ornate Frames, but after die-cutting the horizontal piece, I placed the die on it again and cut it shorter to fit the greeting better. The greeting, of course, is from the Spooktacular Bash Stamp Set.
Once I had all those elements and placed them on the card, I was pleased with the result. Sometimes, many times, you just have to play around with your card if you don’t feel it is quite right. Eventually, you will come up with something that you know is how the card design is supposed to be! Sometimes you have to change colors or stamps or layout, whatever, but it WILL come to you!
Have fun this month making some Halloween cards and treats and be sure to mail out those Halloween cards early so your recipient can enjoy them awhile before Halloween! If a friend isn’t “into” Halloween, then make them a card with pumpkins or something not “spooky” and hopefully they will like that, especially just the idea of getting a card in the mail! You never know what effect your card, that one day at that one time, will have on a person. And it will have an effect on you, just enjoying making the card, thinking of that person, and being happy that you sent them a reminder of your friendship, thoughts, or love.
Get the Spooktacular Bash Bundle and save 10%! You get the Spooktacular Bash Stamp Set together with the Ornate Frames Dies so you can make all kinds of fun Halloween cards, treats, and projects like this Monster Bash Mummy Halloween Card! Order soon because as I write this the inventory is low. Hurry!
We can do so many things with all our Stampin’ Up! products and supplies and papercrafting skills, like making a piece of home decor such as this Gather Together Fall Votive Holder. I think the colors and items of fall just inspire us so much, like pumpkins, leaves, gourds, mums, scarecrows, and more. That’s what makes it so fun, especially getting relief from the heat of summer!
You can easily make something like this, probably with something you already have in your house, or you can make it for a gift for someone. All you have to do is add a candle inside or one of the flameless ones to be extra safe. If you are using a real candle, make sure the paper is nowhere near the top of the votive holder.
It’s funny how I can start a project with one idea in mind and then come up with something totally unplanned. I almost don’t need to tell you how to make this exactly because I’m sure you have something very similar in your stash and can use what you have.
I started with a checked strip of the Come To Gather Designer Series Paper. When you are using glass, it would be nice if you can to use something that also looks good on the inside since it will be able to be seen. Although unplanned, this strip happens to have the same pumpkins on the opposite side which you can see through the inside of the glass that I used on the decoration.
I started out thinking I was just going to do something with colored leaves but it’s hard to resist the siren call of the beautiful Come To Gather Designer Series Paper. I cut out some of the pumpkins from the paper and I also found some stamped pumpkins from the Gather Together Stamp Set in my stash that I had already colored with Stampin’ Blends. I thought they still fit in with the other pumpkins even though they are more colorful. Next, I stuck in some stamped and die-cut or punched leaves I had just done or already had in my stash. The larger leaves are from the Rooted In Nature Stamp Set.
Once I decided my pumpkins and leaves needed a little background, I die cut a piece from the Ornate Frames Dies. You should really check out these dies because they are pictured in the Halloween section but they CERTAINLY can be used for other things. There is nothing “Halloween” about them. I think they will be very useful well past Halloween. I die cut a large one out of Pretty Peacock Cardstock, even though it is barely visible.
Play around with your elements before adhering and see what layout you like the best. Some of the pumpkins are popped up with Stampin’ Dimensionals® and some are flat. Then I stuck in the leaves and sprigs of greenery wherever I thought they would look good.
Votive holders like this one are fun to decorate for any holiday or occasion so stock up a few at the dollar store or wherever you find them! Here is a Christmas one I made a few years ago. You could also decorate all the way around the holder. So many possibilities!
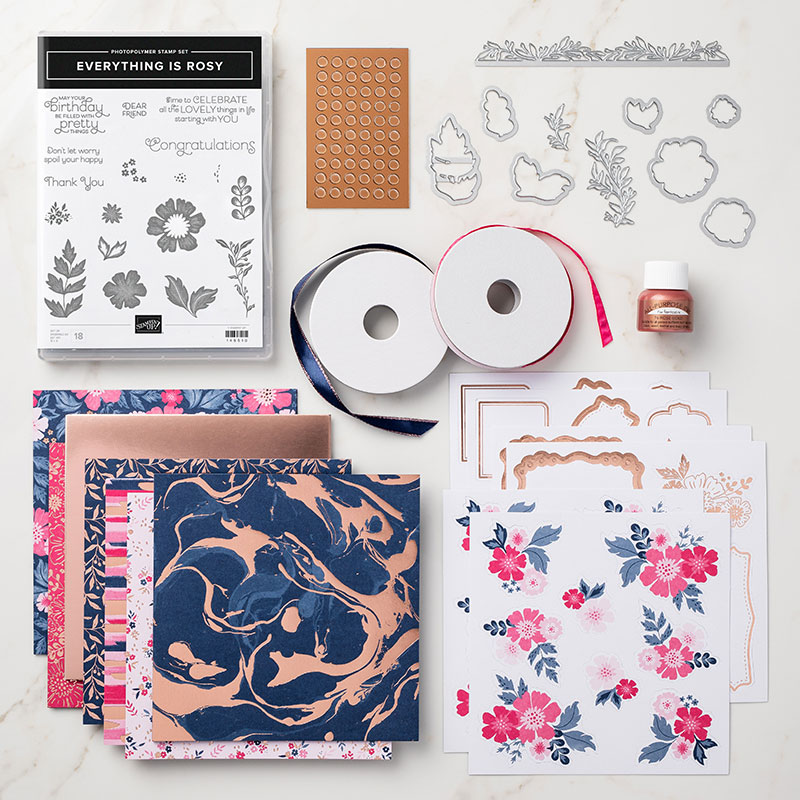
The Everything Is Rosy Product Medley is now available for 15% off through the Clearance Rack. Everything Is Rosy was the first Stampin’ Up! product medley and sold May 1–31, 2019. After the sales period ended, they found enough remaining inventory to bring this limited-time product offering back—but this is the last opportunity you will have to purchase it.
The Everything Is Rosy Product Medley includes these exclusive products:
Everything Is Rosy Photopolymer Stamp Set—18 stamps; suggested blocks: a, b, c,
Everything Is Rosy Dies—10 dies; largest die 2-7/8″ x 1″ (7.3 x 2.5 cm)
6″ x 6″ (15.2 x 15.2 cm) Designer Series Paper Stack—48 sheets; 8 each of 6 double-sided designs
6″ x 6″ (15.2 x 15.2 cm) rose gold foil paper—8 sheets
Printed die cuts—2 sheets
Rose gold die cuts—4 sheets; 2 each of 2 designs
Rose gold adhesive backed mirror embellishments—60 embellishments; 1/4″ (6.4 mm)
Melon Mambo 1/4″ (6.4 mm) Ruched Ribbon—10 yards (9.1 m)
Night of Navy/Rose Gold 3/8″ (1 cm) Metallic –Edge Ribbon—10 yards (9.1 m)
Rose Gold Shimmer Paint—1/2 oz. (15 ml)
This Medley is available beginning October 8, 2019. It is priced at 15% off the original price. Available WHILE SUPPLIES LAST!
150059 Everything Is Rosy Medley Orig. $80.00 USD. Sale $68.00
If you missed out on this Product Medley the first time, you might want to pick it up at a discount! I know the Rose Gold Shimmer Paint was a hit, but the whole group of products is beautiful!
The advantage of a Product Medley is you get a whole BUNCH of coordinating products, from stamps to dies to papers to embellishments and more. No picking and choosing what you really need and what you might be able to do without. It’s just all there for you and ready to begin creating!
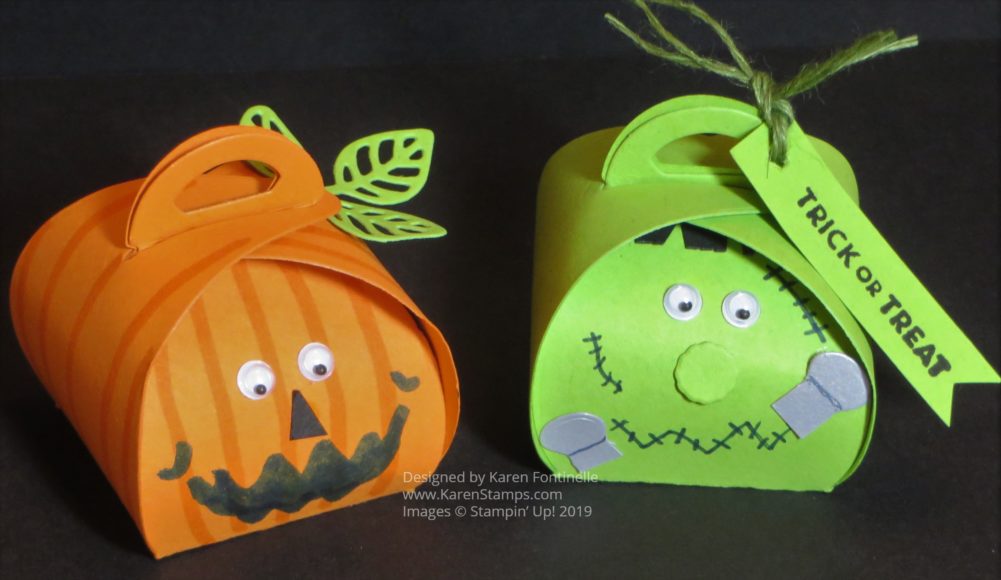
These Mini Curvy Keepsake Halloween Boxes are so easy and fun to make! We’re already through the first week in October so Halloween is approaching! It’s time to make some fun treat boxes or use them just as Halloween decorations!
The main thing you need is the Mini Curvy Keepsake Box Die to make these treat boxes. There is the one main die to make these boxes and then quite a few smaller dies for miscellaneous things plus tags. Just lay the die diagonally on a 6″ x 6″ piece of cardstock and it will fit. This die scores the lines where you need to fold.
If you want to make some Halloween treat boxes like mine, do the decorating first before you assemble the box. You might partially assemble the box by creasing all the score lines and see how the box will go together and decide which side you want to be the front of your project. The first time I used this die I had trouble getting the sides to fit over the handles. I found it useful to crease those handles on the score line first, then push down on them as you fit the side slits over them.
To make the Pumpkin Mini Curvy Keepsake Box, I just drew Pumpkin Pie Stampin’ Write Marker lines on all four sides of the box. For the nose, I just snipped a piece of Basic Black cardstock. The mouth, as you can tell, I just drew on myself with a Stampin’ Write Basic Black Marker. It is not a good mouth AT ALL, but I thought I would leave it so you can see a Demonstrator doesn’t do things perfectly either!
If you have the Harvest Hellos Stamp Set, you could stamp the pumpkin face on the box instead. However, you might like adding Googly eyes to your pumpkin. I just used some retired Stampin’ Up! eyes I already had, but you can purchase the cute colored Assorted Googly Eyes in the Holiday Catalog. I also just die cut a leaf and adhered it to the top of the pumpkin box. Any kind of leaf will do and you could also add a greeting if you liked.
For the Frankenstein Mini Curvy Keepsake Box, you can draw or make the face however you like. Look through your dies and see what little pieces you could use to embellish the face. I also added googly eyes to Frankie. You can’t see it, but I cut a piece of Basic Black Cardstock to resemble his bangs, but I made it too short and you can’t really see it on the box tucked up under the top. I just added a greeting that I made into a tag and tied it on with a double piece of the Mossy Meadow Linen Thread in the Magnolia Lane Ribbon Combo Pack. The greeting is stamped from the Itty Bitty Greetings Stamp Set (a must-have, I think!).
There are SO many creatures and critters and boxes and things you can make with these Mini Curvy Keepsake Box Dies, even ideas from back in the day when we had the larger ones. Use them for treats or small gifts for Halloween, Thanksgiving, Christmas, birthdays (like this one), Valentine’s Day…..well, all the holidays and most occasions that you can think of! But I really like these Mini Curvy Keepsake Halloween Boxes!