Tag Archives: Come to Gather Designer Series Paper

A Geometric Card For Fall With the Tailored Tag Punch

A Geometric Card For Fall With the Tailored Tag Punch

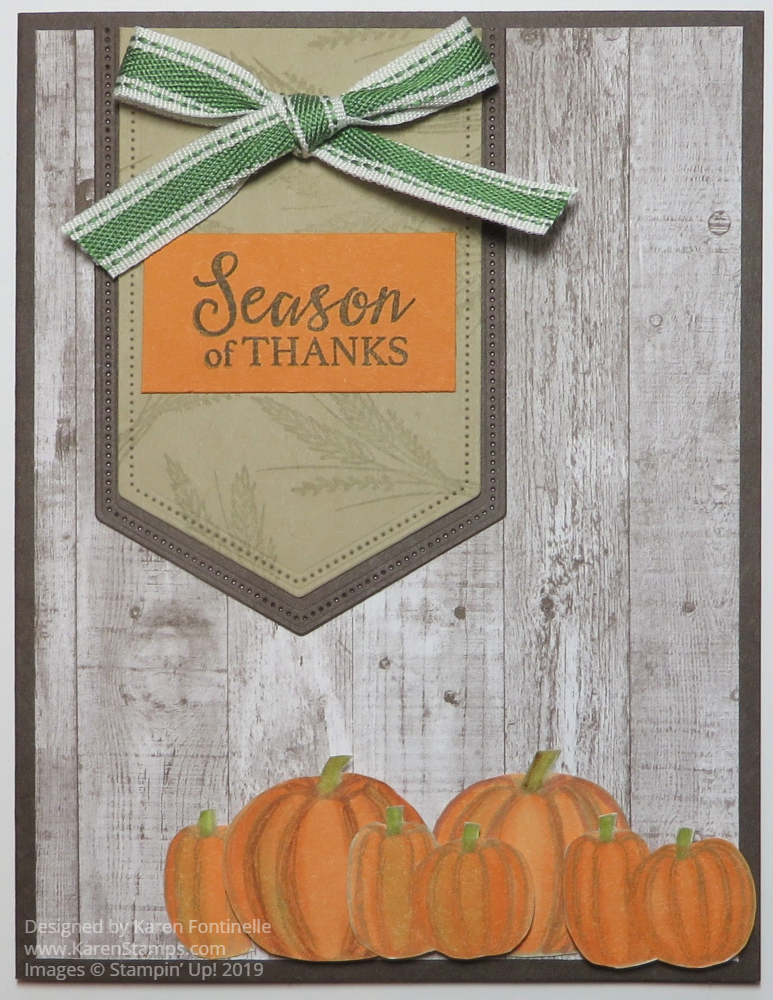
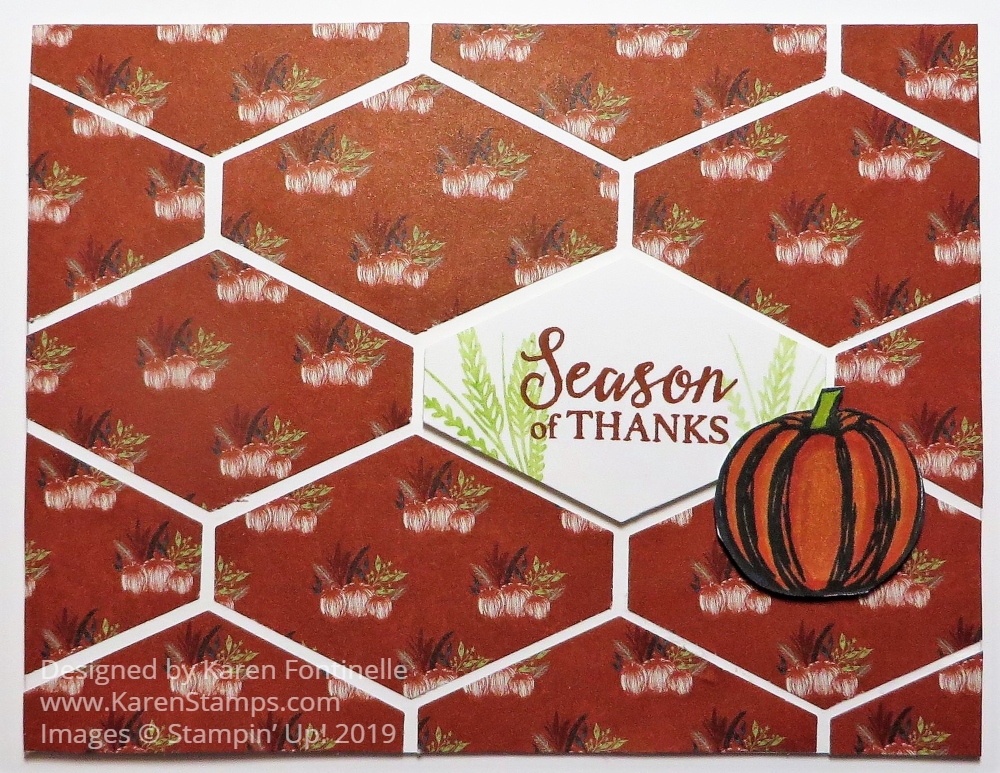
I’ve made and seen cards like this Geometric Card For Fall With the Tailored Tag Punch and saw one recently online. I changed the kind of paper to make it look like fall, added the greeting, a little stamping and of course, a pumpkin! What says fall more than a pumpkin?! You could make and send this card now just for fall, a card for someone who doesn’t celebrate Halloween, or save it for closer to Thanksgiving. You can also make this same card with different paper and a different greeting for a birthday or lots of other occasions.

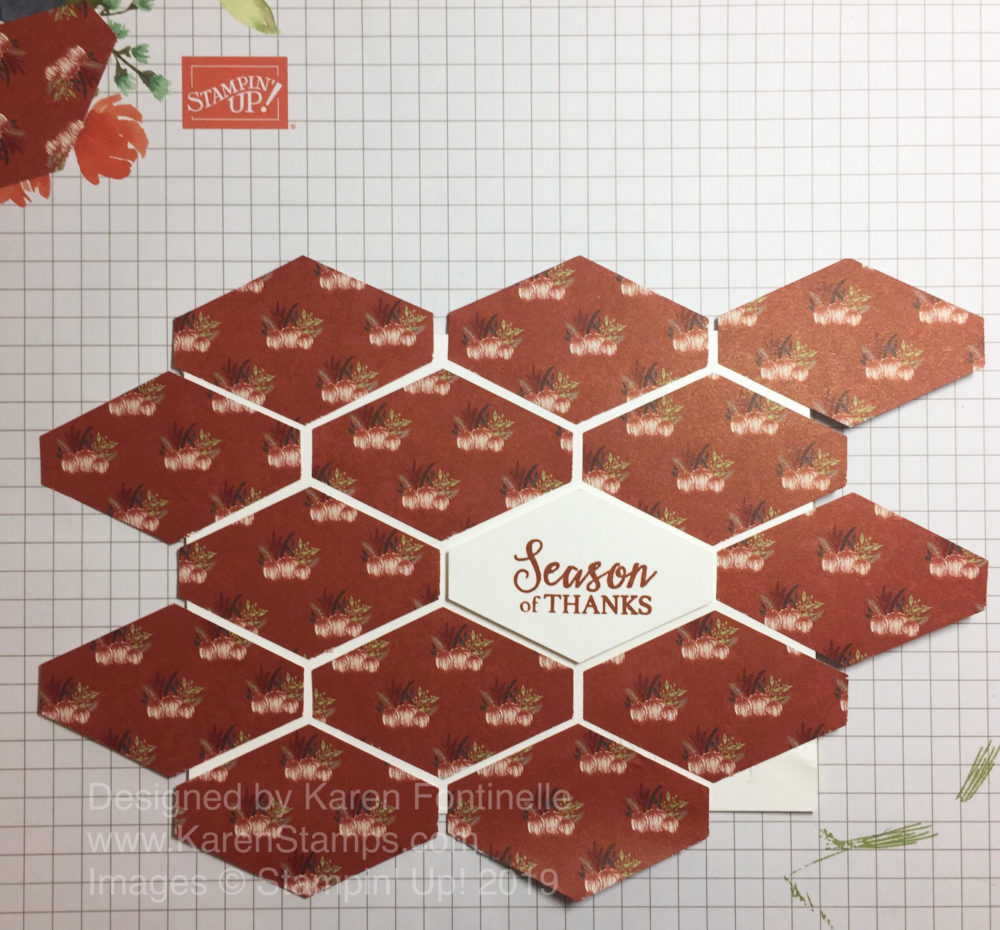
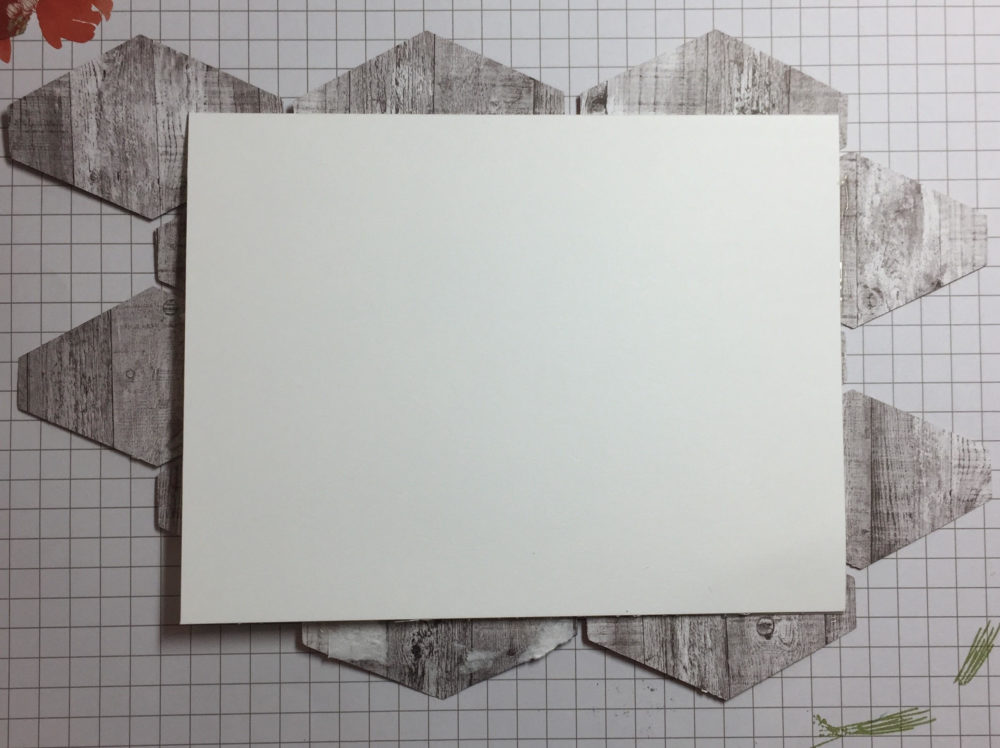
The card base is Whisper White Thick Cardstock to give it a little heft. The paper is the Come To Gather Designer Series Paper, the pattern with little groupings of pumpkins. You might think this card would be difficult to make, fitting in all those pieces like a puzzle! But no, you just start somewhere and space out the punched pieces, allowing them to hang out over the edge of the cardstock underneath. After you have them placed how you like, glue them down. Turn the paper over and trim off the excess hanging off the edges. Check out the photos below to see how I did this layout and then trimmed off the pieces hanging over on the other side.

A Geometric Card For Fall With the Tailored Tag Punch Layout
A Geometric Card For Fall With the Tailored Tag Punch Back

The greeting is stamped with the Gather Together Stamp Set in Cajun Craze Ink and then punched out with the Tailored Tag Punch. I thought it looked a little too stark so I stamped the wheat stamp in Granny Apple Green Ink, stamped off once or twice. I just wanted it fairly light.

I also stamped and colored in a pumpkin from the Gather Together Stamp Set. It is colored with Stampin’ Blends Markers in various colors. You can choose whatever look you want for your pumpkin. I started with a bit of Daffodil Delight with Pumpkin Pie and then added some Cajun Craze to match the paper better with the darker shade.

The designer paper pieces are all adhered directly to the card front, but the greeting is popped up on Stampin’ Dimensionals®, as is the pumpkin. Here is a similar card made with the Wood Textures Designer Paper last year so you can see a different idea and occasion.

There are infinite possibilities for making a card like this using different papers and greetings! Try it and see what you think!

SHOP ONLINE FOR STAMPIN’ UP!

Gather Together Fall Votive Holder

Gather Together Fall Votive Holder

We can do so many things with all our Stampin’ Up! products and supplies and papercrafting skills, like making a piece of home decor such as this Gather Together Fall Votive Holder. I think the colors and items of fall just inspire us so much, like pumpkins, leaves, gourds, mums, scarecrows, and more. That’s what makes it so fun, especially getting relief from the heat of summer!

You can easily make something like this, probably with something you already have in your house, or you can make it for a gift for someone. All you have to do is add a candle inside or one of the flameless ones to be extra safe. If you are using a real candle, make sure the paper is nowhere near the top of the votive holder.

It’s funny how I can start a project with one idea in mind and then come up with something totally unplanned. I almost don’t need to tell you how to make this exactly because I’m sure you have something very similar in your stash and can use what you have.

I started with a checked strip of the Come To Gather Designer Series Paper. When you are using glass, it would be nice if you can to use something that also looks good on the inside since it will be able to be seen. Although unplanned, this strip happens to have the same pumpkins on the opposite side which you can see through the inside of the glass that I used on the decoration.

I started out thinking I was just going to do something with colored leaves but it’s hard to resist the siren call of the beautiful Come To Gather Designer Series Paper. I cut out some of the pumpkins from the paper and I also found some stamped pumpkins from the Gather Together Stamp Set in my stash that I had already colored with Stampin’ Blends. I thought they still fit in with the other pumpkins even though they are more colorful. Next, I stuck in some stamped and die-cut or punched leaves I had just done or already had in my stash. The larger leaves are from the Rooted In Nature Stamp Set.

Once I decided my pumpkins and leaves needed a little background, I die cut a piece from the Ornate Frames Dies. You should really check out these dies because they are pictured in the Halloween section but they CERTAINLY can be used for other things. There is nothing “Halloween” about them. I think they will be very useful well past Halloween. I die cut a large one out of Pretty Peacock Cardstock, even though it is barely visible.

Play around with your elements before adhering and see what layout you like the best. Some of the pumpkins are popped up with Stampin’ Dimensionals® and some are flat. Then I stuck in the leaves and sprigs of greenery wherever I thought they would look good.

Votive holders like this one are fun to decorate for any holiday or occasion so stock up a few at the dollar store or wherever you find them! Here is a Christmas one I made a few years ago. You could also decorate all the way around the holder. So many possibilities!

Shop Stampin’ Up! Online For the Best in Papercrafting Products!

Mini Curvy Keepsake Box For A Fall Birthday

Mini Curvy Keepsake Box Fall Birthday

Yesterday was my husband’s birthday so instead of a card, I decided to make this Mini Curvy Keepsake Box For A Fall Birthday. I was looking online for ideas, thinking of something birthday-ish or fall-ish and I saw this idea of making a window in the box so you can see the candy or treat inside! I thought that looked pretty cute so that is the main idea I went with!

Instead of cardstock, I used a piece of the Come To Gather Designer Series Paper. I wanted something that would look good on the outside as well as the inside. The inside doesn’t really matter, but if you are making a fall box, you probably don’t want to use a Christmas paper with a generic pattern for the outside and some Christmasy pattern on the inside of your fall box! Depending on the pattern, pay attention to the direction of your paper. Think about which way the design will go on the outside of the box and maybe even the inside of the box.

What you need for this Mini Curvy Keepsakes Box Die is a piece of 6″ x 6″ paper. Then lay the die down with the points diagonally on the paper. If you put any point straight up on the paper, it will not fit.

Mini Curvy Keepsake Box Fall Birthday Die Cut

After die-cutting the box piece and creasing the score lines and folding, I decided on which panel I was going to put the little window. Ultimately I decided on the 1 3/8″ Scallop Circle Punch for the punched hole. Since the area was so small and narrow, I actually die cut a piece of window sheet for one panel and then trimmed that down by hand to fit the area. I just used Snail Adhesive in tiny bits around the hole to hold the window sheet in place.

Mini Curvy Keepsake Box Fall Birthday Window

I just recently made my first box with my daughter on vacation and I couldn’t figure out how to hook the top together! Luckily a video provided the answer! As you are trying to fit the side pieces with the long slits over the “handles”, PRESS DOWN! That lowers the handles, provides the curve to the box and allows the slit pieces to fit over the handles and hold everything in place! Very easy but I didn’t know to do that until I watched a video!

In order to put the candy in the box, I assembled the box except for one side. Then I could put the candy in and fill it up.

Mini Curvy Keepsake Box Fall Birthday Open

Then all was left was to decorate the box! I stamped some leaves with the Gather Together Stamp Set, die-cut some brown stems with a little die in the Mini Curvy Keepsake Box Dies, and punched some stems with the Sprig Punch out of Crushed Curry for some color. I also punched some Old Olive leaves with the Leaf Punch. Then I over-stamped those leaves with the large leaf stamp in the Gather Together Stamp Set.

My birthday greeting is stamped with Pretty Peacock Ink and a stamp from the Itty Bitty Greetings Stamp Set. Then I just die cut the greeting with a die from the Ornate Frames Dies and tied the box handles together with a piece of Crumb Cake Nature’s Twine. I just poked the twine through the hole on my greeting tag and pulled the tag up to the box.

I didn’t initially order these dies to make these Mini Curvy Keepsake Boxes but I’m glad I did as there is a LOT you can do with them! Check them out in the Stampin’ Up! Holiday Catalog!

SHOP STAMPIN’ UP! ONLINE!

Gather Together Pumpkin Card

Gather Together Pumpkin Card

Sometimes I just get out some paper and stamps and have no idea where the stamping will lead and what will turn out, but today this Gather Together Pumpkin Card is what came out of some stamping, coloring, and paper cutting!

Who doesn’t love pumpkins, especially as fall is approaching?! Nothing says fall, and eventually Halloween, like pumpkins! These pumpkin stamps are in the Gather Together Stamp Set in the Holiday Catalog. I decided to stamp the pumpkins with Sahara Sand Ink so there wouldn’t be the bold, black lines of Memento Ink that I would normally use. I did go ahead and used Stampin’ Blends to color in the pumpkins and it seemed to work okay. I started with the Pumpkin Pie Light and Dark colors but added a bit of Light Cajun Craze for some contrast. The stems I first colored with a bit of Soft Suede Blends, but I also tried to add just a bit of Old Olive green and a bit of the Light on the pumpkins. Some pumpkins are popped up with Stampin’ Dimensionals.®

There is a set of dies that go with this stamp set, Gathered Leaves Dies. I haven’t purchased these yet, but they would be great for making the embossed leaves. I wish I would have ordered them! Since I don’t have the dies, I just hand cut the pumpkins with my Paper Snips. You can, however, save 10% if you purchase the Gather Together Stamp Set and the Gathered Leaves Dies in a Bundle, the Gather Together Bundle.

The card base is Early Espresso Card Stock with a layer of the wood grain pattern in the Come To Gather Designer Series Paper. For the banner with the greeting, I die cut a piece of Sahara Sand Cardstock with the Stitched Nested Labels Dies and just cut off the top to line up with the top of the card. The Sahara Sand is layered on a die-cut of Early Espresso. The greeting is just cut to fit on the banner. By the way, the banner was first stamped with the wheat-looking stamp for a little something in the background.

Once I got the banner made with the greeting and then added the Garden Green 3/8″ Double-Stitched Ribbon tied in a bow, that’s when I was satisfied with what I was creating! Sometimes it just takes playing around and then having that “moment” when you know you have something you like. You will find this pretty ribbon in the Toile Tidings Suite, but there is no reason why you can’t use it for fall and Halloween.

There is so much to like about the Come To Gather Suite. You can make cards for fall, Thanksgiving, and even maybe Halloween! Such pretty colors in the designer paper and even some wooden elements, the Tags & Feathers Elements, that you can use for stamping or embellishing. Think of many creative projects you can use with these products as well, some pretty home decor and other things. Fall is such a great time of year! I will be glad when it feels like fall in Houston, Texas!

SHOP STAMPIN’ UP! ONLINE FOR THE COME TO GATHER SUITE!

***Check out the “refreshed” Clearance Rack today!***

Gather Together Pumpkin Card For Fall

Gather Together Pumpkin Card For Fall

I thought if I made this Gather Together Pumpkin Card For Fall it would cool me off from the very hot summer temperatures in Houston, Texas. It did bring a rainstorm which knocked a few degrees off the temperature! I love these new colors for fall, something modern and different!

This card uses the very pretty Come To Gather Designer Series Paper. I can’t wait to use all of the other designs in the package, especially the bright, modern plaid. For this card, I began with a card base of Pretty Peacock Cardstock and a layer of Pear Pizzazz. Then I chose the designer paper with the whitish pumpkins. On the opposite side was the Pretty Peacock gingham check design which I also liked so I cut a strip, turned it over and used it at the bottom of the card. To cover up the seam from the two papers, I just placed some 3/16″ Braided Linen Trim around the card.

I didn’t purchase the Gathered Leaves Dies in the Suite (because even Demonstrators can’t buy everything!) so I just stamped the pumpkins on Whisper White Cardstock with Pear Pizzazz Ink. Some I stamped with full ink and some I stamped off first and then stamped for a lighter shade with less ink. After stamping the pumpkins, I just cut them out with my Paper Snips, which as easy enough.

To make the pumpkins stand out on the card, I wanted some kind of background. I decided to try this piece die cut from the Stitched Nested Labels Dies in Pretty Peacock. To add a little interest I stamped in Pretty Peacock ink the wheat image from the Gather Together Stamp Set. Then I added two small copper brads from the Metallic Brads. It seems like years ago brads were a really big deal for embellishments, but I don’t think they are used or talked about as much these days. But I thought they seemed like the perfect little bling to add on this card! I poked a hole first with the sharp pointy end of the Take Your Pick Tool with the paper on the Stampin’ Pierce Mat, then inserted the brad into each hole. You can flatten the brads well by pushing down on the top of the brad with something heavier, like an acrylic block or the wide part of your scissors or whatever is handy.

This label piece is placed a little lower on the card because I didn’t want to cover up all the pumpkins printed on the designer paper! Then the cut out pumpkins are placed a little lower on the label so as not to cover up the stamping on the label! This whole piece is then popped up on Stampin’ Dimensionals.

The next dilemma was how to add a greeting without covering up too much of the card! I used the greeting from the Gather Together Stamp Set, stamped in Pretty Peacock and die cut with a Layering Oval Die. I ended up, as you can see, adding it right to the top of the die-cut label, overlapping a bit. It is a little different, but I think it turned out okay. In order to make it even with the Pretty Peacock label, I put dimensionals just under the top part of the greeting so it would be the same height as the label.

It was fun making a fall card even though I didn’t get to put on a sweater! It is still plenty hot, but at least this card gives the promise of fall! I just love the thought of fall colors and pumpkins and everything that goes with that theme! When you receive your Stampin’ Up! Holiday Catalog and begin to place your order(s)….and believe me, there will be orderS, plural!…..you will want to choose some of the fall-themed stamp sets and papers for a change of seasons or Thanksgiving or use some of the generic colors just for a switch in colors for your cards and projects.

Pumpkins, these days, seem to come in all colors and textures so you can be very creative! Here is a post from last year with traditional orange pumpkins but with a bright green polka dot background, but you could use the same design to make a card with these new 2019 colors! I saw some beautiful fabric pumpkins on Instagram the other day, some even embroidered, all different kinds of fabrics, not just orange. Yet they all look appropriate for fall and into Thanksgiving. So don’t be afraid to try some non-traditional colors in your pumpkins and fall cards like this Gather Together Pumpkin Card For Fall.

Use Your Bonus Coupons During August in the Stampin’ Up! Online Store!