Garden Lane Paper Strips Thank You Card

Garden Lane Paper Strips Thank You Card

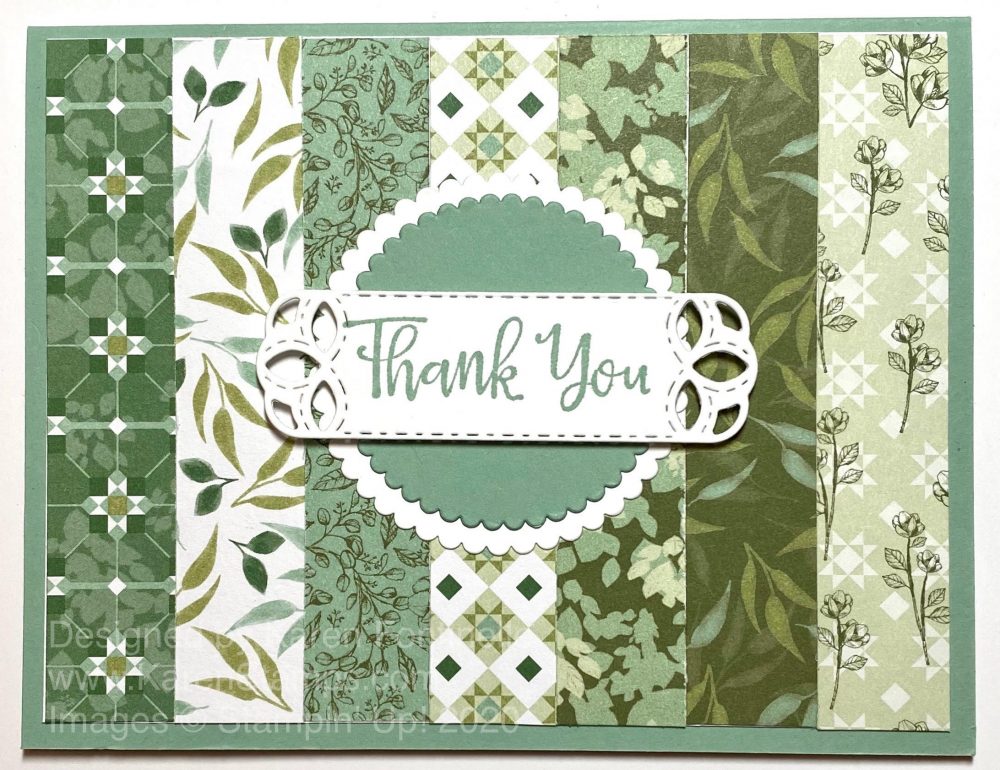
You don’t always have to know exactly what card you are going to make when you start as I didn’t know exactly when I started on this Garden Lane Paper Strips Thank You Card. I simply started looking at my designer paper choices. I had been seeing some cards made with strips of designer paper lately although they were cut on angles. I thought I would just try cutting some scrap strips and see how they would fit if I made a card.

Well, it turned out that cutting strips from the Garden Lane Designer Series Paper at 4″ x 3/4″ made a perfect fit for the top layer of the card. I chose Mint Macaron for the card base, one of the coordinating colors of the designer paper. Instead of gluing the strips right onto the Mint Macaron card base, I adhered them to a piece of Whisper White so I wouldn’t get them crooked or something! If you do this, then you can always do a little trimming if you need to before you adhere the strip piece to the card front.

Because I already had a stamped die-cut piece in my scraps I could see how it would look on the front of this card for the greeting. I played around with what to use for layers and what colors. Then I stamped “Thank You” from the Peaceful Moments Stamp Set in Mint Macaron Ink .and die-cut with a die from the Stitched Labels Dies. This greeting was then layered over Whisper White and Mint Macaron scalloped Layering Circles Dies. You could even add a bit of Whisper White ribbon or bows but I decided to stop. Sometimes you have to know when to stop when you are creating!

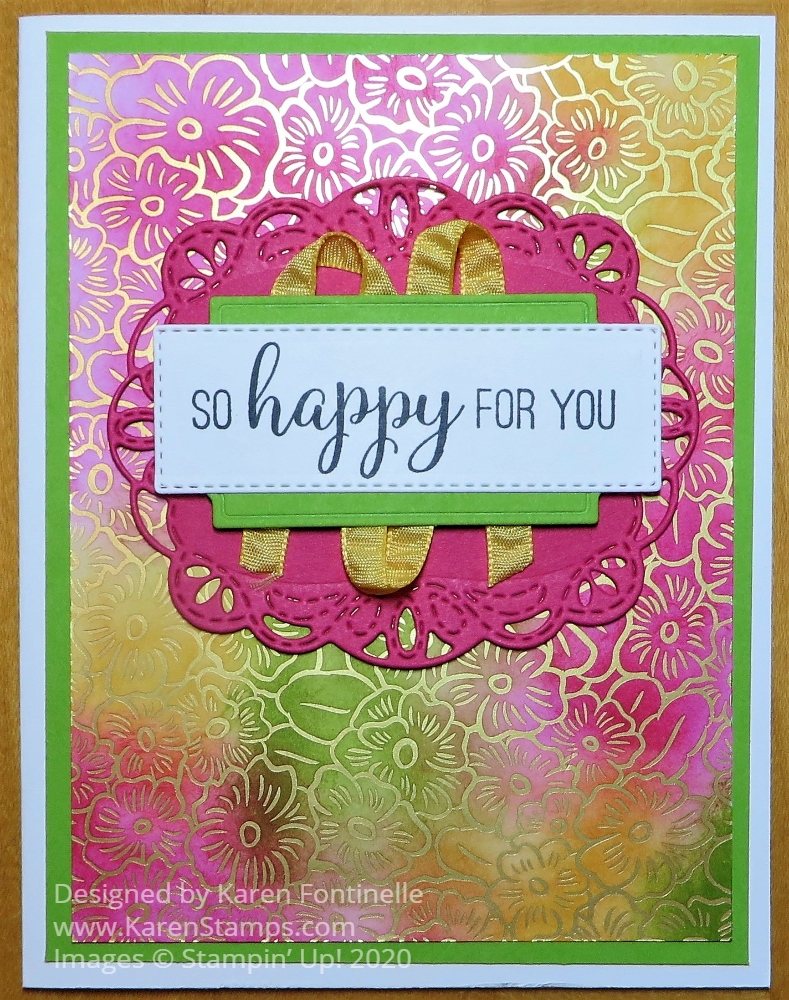
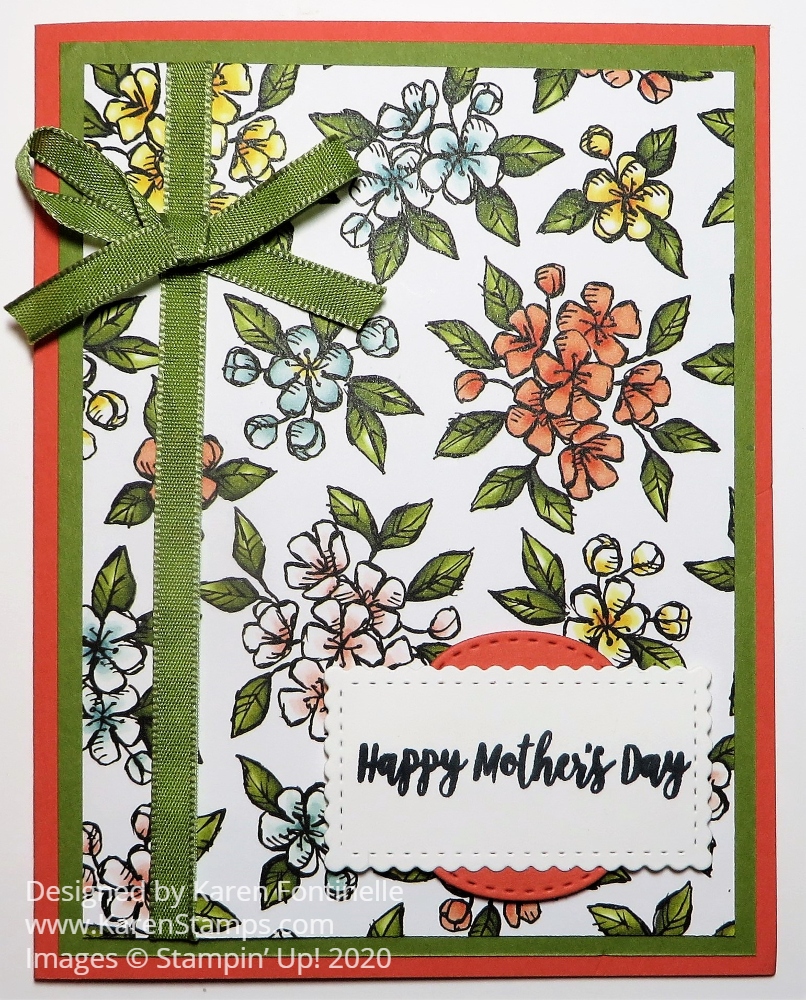
This was a fun Easter card I made wit the Garden Lane Paper in the background!

This Garden Lane Designer Series Paper is retiring on June 2 as are all the designer papers in the current catalogs. This one is discounted! Be sure to choose the ones you want to have before they sell out or are gone.

SHOP STAMPIN’ UP!

Ornate Garden Sponged Happy Card

Ornate Garden Sponged Happy Card

This Ornate Garden Sponged Happy Card came about it two ways today. First, I felt like I was either having an anxiety attack or coming down with “the virus” when one second before I was fine AND I saw a sample of a card online that was embossed but reminded me of this Ornate Garden Specialty Designer Series Paper with the gold foil accents on some sheets that made me think of sponging different colors of ink on the paper.

Here’s your anxiety tip of the day: Start looking online at cards and stamping videos and maybe better yet, force yourself to get up and start stamping! Get your mind off the news or whatever is going on in your mind that is not good for you!

Obviously I need a “Happy” card today so I chose three colors of ink from the Brights family (my favorite!)…..Melon Mambo, Daffodil Delight, and Granny Apple Green. I could have used Sponge Daubers, but I grabbed a small piece of sponge and just used a different side of it for each color of ink. Yes, you will get ink on your fingers but that’s okay. It will keep you happy all day! I just sponged around on the Ornate Garden Paper and then wiped off a bit with a tissue. Next, I just played around with those three colors of cardstock plus Whisper White to see what combination would look best, or at least that I liked, to actually assemble the card.

I finally decided on a Whisper White card base with a layer of Granny Apple Green. I found the Melon Mambo die cut from the Stitched Labels Dies in with my Melon Mambo paper but at first decided not to use it. I found the greeting I liked in the Modern Heart Stamp Set. I used a rectangular die in the Ornate Layers Dies but I used the technique of cutting it and then replacing the die over the same stitched lines to shorten the greeting piece.

I looked through my dies again to see what to layer the greeting on and found a die in the Stitched So Sweetly Dies that seemed to work. I cut that out of Granny Apple Green. As I thought about how that looked, I saw that Melon Mambo die-cut piece laying on the table and tried that behind it. I think it works! But I still felt like I wanted something else and finally adhered some Daffodil Delight 1/4″ Ruched Ribbon behind the Granny Apple Green and also popped that piece up on Stampin’ Dimensionals. I think the whole thing brings in all the colors of the ink and works out well with the sponged paper behind it and with the original intent of the card…. a Happy card!

Maybe today is the day for you to try some new technique or one like this. Remember to check the Last-Chance Products and the Clearance Rack in the Online Store! You will find some good bargains! Be sure to get what you need before it sells out!

SHOP STAMPIN’ UP! ONLINE!

Ornate Garden Gold Sympathy Card

Ornate Garden Gold Sympathy Card

We saw a story on the news the other night showing card racks at the store being sold out of sympathy cards which is so sad that people need those kind of cards, but the fact is, we all need to send them throughout the year, pandemic or not. It’s the most difficult card to make so it’s probably a good idea to make several at a time and hope that you don’t need them, but if you do, you will already have one ready to mail.

My original idea was not even to make a sympathy card but I planned to do something with the Ornate Garden Suite if only to use the dies. But when I looked through the Ornate Garden Specialty Designer Series Paper, I decided to use this floral sheet with foil accents and then use Gold Foil for the die-cut somehow. And even then, I wasn’t planning on a sympathy card. I was sort of thinking of a wedding card. When I looked through some stamp sets with sentiments, I settled on the Peaceful Moments Stamp Set. Somehow I couldn’t get past the sympathy sentiment so I went with that. Here’s another example of a sympathy card, simple but elegant with the designer paper and a nice ribbon.

To match the other gold, I felt like the greeting needed to be embossed with Gold Emboss Powder and the Heat Tool. The greeting is stamped in Versamark Ink, a clear ink that can be used for embossing or for the watermarked look in your stamping. Heat embossing is one of those things that is like magic when a new stamper sees it done for the first time. You stamp with Versamark Ink, sprinkle/dump on the embossing powder, shake off the excess, then heat with the Heat Tool and watch the magic happen! The powder melts and you watch it happen right in front of your eyes as the Heat Tool moves over it.

The very fancy die is one in the Ornate Layers Dies. Be sure to run it through your die-cutting machine three times to get the best cut. After cutting that, I measure the solid inside so I would know what size to cut my Whisper White Cardstock for the greeting.

If you would like to get your hands on brand-new product coming in the next Stampin’ Up! Catalog June 3, you can purchase any or all of the products in the Ornate Garden Suite. And if you want even more choices early, you can sign up to be a Stampin’ Up! Demonstrator and choose some of the preorder products to be in your Starter Kit or order them separately after you sign up!

I certainly hope you do not need to send a sympathy card any time soon, but they are an important part of what we do. When you make a card for someone, especially a sympathy card, you are putting your heart and soul into it with your creativity and that will mean something to the recipient. You might even consider making some cards that could be for different occasions but don’t put greetings on them yet. Then if you need one to be for sympathy, you will have a nice card ready to go when you add a greeting.

How to Make a Magnolia Lane Gift Box

Magnolia Lane Gift Box

With Mother’s Day coming up on Sunday, birthdays, and maybe graduations, even if virtual these days, you need to learn How to Make a Magnolia Lane Gift Box. It is so simple, as you will see and will make your gift extra-special, not to mention saving you a trip to the store to find a gift bag or box at the last minute!

This particular box is 7″ square and you do need two 12″ x 12″ pieces of paper. The bottom of the box is made with Petal Pink Cardstock and the top with a piece of Magnolia Lane Designer Series Paper.

To begin making the bottom of the box, you will cut the tiniest sliver off the side of two sides that share a common corner. To determine a “sliver” you can just slide your paper the teeny tiniest bit past the cutting track. It might not be even 1 1/16″ wide but you could use that measurement if you want. This makes the bottom just the tiniest bit smaller so that the box lid will fit easily over it.

Next, score at 2 1/2″ on all four sides of the box. Crease well with a Bone Folder to make the folds crisp, like a box should be. Then cut the flaps on opposite sides of the paper on the score lines. If you want, cut a small wedge off all four corners just to make the box bottom a little neater when the sides all come together. In the photo below, you can see the slivers I cut off from the two sides of the paper, so you can see how narrow they are.

Magnolia Lane Gift Box Scoring

After creasing all the folds really well, assemble the box and use a strong glue to assemble. You could use Tear & Tape but I like to use Multipurpose Liquid Glue to give me that extra few seconds to make sure everything is lined up perfectly.

Magnolia Lane Gift Box Assembly

For the top of the box, I used designer paper but you could use cardstock too. The top piece is 10 1/2″ square. Make the top in the same way (except don’t cut off a sliver!). Score 1 3/4″ all around and cut the flaps in the same way. Assemble with glue and put the lid on the box!

Tie a pretty ribbon around the gift box like this Petal Pink 5/8″ Organdy Ribbon. Add a nice card or pretty gift tag and you’ve got something special!

Here is another gift box I made a few years ago after following a video by Donna Griffith at the Stampin’ Up! Home Office. It’s what I followed to make this gift box and she also explains how to make different sizes.

Now might be a good time to use up some designer paper that will be retiring that you have left and turn it into something useful by making boxes so you will be ready for all the new products coming out in the next Stampin’ Up! Catalog on June 3rd! And your gift wrap stash will be ready for any gifts with a few boxes on hand!

SHOP STAMPIN’ UP! ONLINE HERE!

Don’t Miss Out On My Weekly Emails!

Email Newsletter

The new Stampin’ Up! Catalog is less than a month away from going live on June 3rd so there is no better time than NOW to stay in the loop and find out the latest from Stampin’ Up! To do that, sign up for my Stamping With Karen Mailing List and get an email every Tuesday with any Stampin’ Up! updates and also stamping ideas from me!

If you are on my blog, you will see a red sign-up box in the top left corner where you can simply put your name (or first name) and best email. If you are on your phone, you probably need to scroll way down to get to the sidebar things. OR you can go to my sign up page HERE.

Be sure to check your email for your FREE GIFT from me for signing up!

I send out a weekly email every Tuesday afternoon with the latest Stampin’ Up! news and offers plus stamping ideas with a supply list and directions. Even if you never make the project, maybe just seeing ideas will do your crafty heart good! I know it does mine! I’m all about the ideas!!

See you on Tuesday!

Bird Ballad Laser-Cut Mother’s Day Card

Bird Ballad Laser-Cut Mother's Day Card

Mother’s Day is coming on Sunday so if you need to make a card, you might take some inspiration from this Bird Ballad Laser-Cut Mother’s Day Card. Part of the beauty of this card is the fancy laser-cut design but all you have to do is open the pretty tin that the cards and envelopes come in! Then decorate a little bit without taking away from the beauty of the laser-cut design.

The Bird Ballad Laser-Cut Cards and Tin are on the retiring list and you will find it in the Last-Chance category of the Stampin’ Up! Online Store. It is even discounted so a great deal! Not only will you have the pretty cards ready to use plus the envelopes with a fancy flap, but you will have the tin to save for yourself or give as a gift, maybe with some laser-cut cards inside!

If you want to add color to the laser design, you can do it one of two ways. On this card, I adhered the Petal Pink cardstock to the inside of the card front. This piece is cut just a bit smaller than the card front so that I could use the Multipurpose Liquid Glue to adhere inside the narrow outer frame of the laser-cut front and a few tiny dots in the center of the card. The other easier way is to adhere the Petal Pink cardstock to the inside of the card and let the laser-cut front be completely open.

To decorate the card, I wanted to use the pretty Bird Ballad Designer Series Paper before it retires. I think this paper is so pretty, sometimes both sides of it! I used the 2 1/4″ Circle Punch to punch the little bird and branch. Then I went to my Big Shot and used the Stitched Shapes Dies to die-cut a Petal Pink layer. I think I should have just used a regular circle die-cut because the punched image didn’t fit perfectly in between the stitching, as it turned out. But that’s okay! No one will notice except you and me! For the Mint Macaron layer, I used a scalloped Layering Circles Die. I think it is just enough without covering too much of the laser-cut design.

Then choose a greeting. If you are making a Mother’s Day card, you will find this greeting in the Dressed To Impress Stamp Set. You can make this same card for a birthday, congratulations, sympathy, or thinking of you. Just change the greeting or even leave off a greeting if you just want to write a personal note inside. Not every single card has to have a greeting or sentiment on the front!

Here is an example of another card I made last summer using the laser-cut cards.

The Bird Ballad Designer Paper is on the Last-Chance List and is discounted, so get some while you can or restock your stash! While supplies last, of course! I used to hear of people who would keep three packages of the same favorite designer paper on hand…..one package to use now, one to use later, and one to hang on to so they would always have some! The more supplies I accumulate, the more I think it is better to use up what you have because there will always be MORE new things! And we always want the new things! However, I do really think this Bird Ballad Paper is very pretty, one of my favorites!

A bonus is that not only do you get the tin to save and use, but you get pretty envelopes for your laser-cut cards. One thing you can do to make an envelope even prettier is to cover the flap with designer paper! I just took a scrap that would cover the whole flap, spread the Multipurpose Liquid Glue on the outside of the flap and placed the paper on the flap, lined up with the top edge. Then I just cut off the excess from the underside of the flap.

SHOP THE LAST-CHANCE PRODUCTS BEFORE JUNE 2ND!

Dinoroar Dinosaur Birthday Card

Dinoroar Dinosaur Birthday Card

It certainly is fun to make cards with this designer paper as you can see on this Dinoroar Dinosaur Birthday Card! Perhaps you already ordered this paper from the catalog or maybe you choose it during the last part of Sale-A-Bration. If you don’t own it yet, you can purchase it as a Last-Chance product even at a discount!

The Dinoroar Designer Series Paper is a fun paper to have in your stash for children’s and baby cards…..or even for anyone else! Why not?! Some adults might enjoy getting a dinosaur card for their birthday!

This card has a card base of Pool Party and then a layer of Mango Melody underneath the designer paper. I wanted to use a pattern that had leaves and foliage to look like the dinosaur was roaming the forest! The dinosaur is even cut out from one of the patterns of designer paper!

The greeting is stamped from the Peaceful Moments Stamp Set. The greeting and the layer are cut with the Stitched Nested Label Dies. I wanted to just keep the front of the card simple since the background paper is pretty busy with rather large images and I wanted the dinosaur to stand out.

Here is another dinosaur card I made recently. Now that card you could send to almost anybody just to say “Hello” or put a smile on their face when they open the envelope!

You can still purchase the Dino Days Bundle, consisting of the Dino Days Stamp Set and the Dino Dies for 10% off. The stamp set and dies will be in the new catalog but not bundled for the 10% off price. So if you like it and want to save 10%, get it now. The little Dinoroar Enamel Shapes are on sale also right now in the Last-Chance Products at more than 50% off!

These Last-Chance retiring products are available through June 2, while supplies last, until the new Stampin’ Up! catalog comes out June 3rd! Get some bargains while you can and don’t forget to check the Clearance Rack, too!

SHOP STAMPIN’ UP! ONLINE HERE!

Happy Mother’s Day Bird Ballad Floral Card

Happy Mother's Day Bird Ballad Floral Card

Mother’s Day is coming up in just a week, on Sunday, May 10th, so it’s time to make any Mother’s Day cards that you need, like this Happy Mother’s Day Bird Ballad Floral Card. Whether you are still lucky enough to have your mother to send a card or a mother-in-law, grandmother, daughter, aunt, whomever, it’s time to make some cards!

This is a pretty simple card design so you won’t have any trouble making a card like this one. I already decided I wanted to use the Bird Ballad Designer Series Paper, which is retiring and is discounted as I write this! It’s beautiful paper, I hate to see it go, so get yours (or get more!) while you can! It will only be available until June 2, while supplies last.

The card base is Calypso Coral Cardstock and there is a layer of Old Olive underneath the Bird Ballad DSP. I thought the Old Olive helped set off the designer paper. I chose the lovely floral pattern of paper. I have always really liked this pattern! There just are lots of good papers in the Bird Ballad DSP!

The Old Olive ribbon is from the Ornate Garden Suite. It comes in a combo pack with a Terracotta Tile color. I tied the bow separately and adhered it with Mini Glue Dots.

The greeting is from the Dressed To Impress Stamp Set. This same card, colors, and paper could be used for lots of other occasions, you can just change the greeting.

I used the Stitched So Sweetly Dies to die cut the greeting and also the layer underneath the greeting. The Calypso Coral layer actually has most of it hidden, with only the top and bottom curved parts showing!

With Mother’s Day next Sunday, it’s time to make a card or more than one card, especially if you need to mail them. If the card gets there early, the recipient will just have more time to enjoy it!

Shop the Last-Chance List of Stampin’ Up! Retiring Products!

Peaceful Poppies Gift Bag With Poppies

Peaceful Poppies Gift Bag With Poppies

As I was looking through what is left of my Peaceful Poppies Designer Series Paper, I had a full sheet of this poppy floral pattern and thought it looked so pretty and that it would make a lovely Peaceful Poppies Gift Bag With Poppies. You could use this gift bag for a small gift for Mother’s Day or a birthday or any special occasion. There will be graduations coming up even, perhaps, without graduation ceremonies this year. Making your own gift bag out of pretty Stampin’ Up! designer paper would make a very special gift presentation!

You can make this gift bag with just half a sheet of designer paper, whichever one you choose to use. I used the Peaceful Poppies Designer Series Paper to make the bag. Start with the paper cut to 6″ x 11 3/4″. Using the Paper Trimmer or the Simply Scored scoring tool, score along the long side at 1 1/4″, 5 1/4″ 6 1/2″ and 10 1/2″. Turn the paper so the short end is at the top of the board and score at 1/4″ on one side, then at 1 1/4″ on the other side. Pay attention to the pattern on the designer paper so the bag will have the design going the correct way. The narrow 1/4″ scored area will be the part you will fold over to make a smooth top edge. The other long scored 1 1/4″ area will be the flaps at the bottom of the bag.

Peaceful Poppies Gift Bag Diagram

Crease all the score lines and fold over the narrow 1/4″ piece at the top of the bag. If you prefer you could fold it to the outside if you’d like that side to show as a contrast. OR don’t score that 1/4″ line and have your bag be 1/4″ taller. Use some adhesive of choice to adhere that to the inside of the bag.

Use the Classic Label Punch to punch a handle at the top of the bag. You can squish the front and back sides together and try to center the punch to make the handle opening or you can do one side at a time.

Assemble the bag folding on all the scored lines and flaps. Then decorate for the occasion.

Peaceful Poppies Gift Bag Top View

To decorate my gift bag, I die cut two large poppies using Poppy Parade for the body of the flower and Flirty Flamingo for the outline, plus Basic Black for the center. The leaves are Old Olive and Pear Pizzazz. I tied a bow of Poppy Parade 1/2″ Textured Weave Ribbon separately (after trying to tie it onto the handle unsuccessfully!) and adhered it to the handle with Mini Glue Dots.

In this photo you can see the actual designer paper better from the back of the bag and how pretty it is:

Peaceful Poppies Gift Bag Back View

While the Peaceful Poppies Designer Series Paper is going away (get it while it lasts in the Last-Chance List!), the two sets of dies that go with the Suite, the Poppy Moments Dies and Painted Labels Dies, will carry over to the new catalog!

Add some tissue paper and a gift inside, maybe make a matching gift card and you’ll have a charming gift to give someone special! Here’s a matching card idea you could even use to go with the bag! Just cut half a sheet of designer paper and make a gift bag with the basics of this Peaceful Poppies Gift Bag With Poppies.

Stampin’ Up!’s COVID-19 Giveback

Covid-19 Giveback Banner

Stampin’ Up! is committed to making a difference in our global communities and caring about people first. As part of their Making a Difference program, they are offering a product giveback opportunity to support organizations that are helping COVID-19 frontline responders and communities vulnerable to the pandemic.

These organizations are:

  • The World Health Organization’s COVID-Solidarity Response Fund
  • United Way Worldwide’s COVID-19 Community Response and Recovery Fund

You can purchase the Share Sunshine PDF Download and they will donate 100% of the proceeds to COVID-19 efforts. You choose which or both organizations you would like your donation to go to at the time of purchase.

The Share Sunshine PDF Download is a digital stamp set that’s packed with both lighthearted and heartfelt sentiments and imagery relevant to the unique COVID-19 and social distancing situation we’re currently experiencing–including many ideas that came from Demonstrators and customers! You can use the download in your cardmaking and papercrafting projects. Simply print the imagery on cardstock and cut it out using our Paper Trimmer, punches, or dies. Since we are physically distanced from each other, now is a perfect time to share sunshine with our friends and family by sending cards!

Just click HERE for more information and to purchase if you would like to.

(This is not part of the Stampin’ Up! Online Store. It is a separate checkout.)

Just scroll down on that page and click “Add To Cart”. Then on the next page, scroll down and you will see where you can designate where you want your donation to go or have it equally split. Demonstrators receive no commission, all the money goes to the organizations. ENJOY!

Thinking of You Card With Perennial Essence Paper

Thinking of You Card With Perennial Essence Paper

The other day I was looking through the Perennial Essence Designer Paper and was reminded how beautiful it is so I came up with this Thinking of You Card With Perennial Essence Paper. It’s a basic simple card design, you can make this card with an even easier look. It just depends on how you want to design your card.

The Perennial Essence Designer Series Paper is designed with handpainted impressionistic images. While you might think that isn’t your cup of tea, when you see the paper it really is beautiful and the paper has so many coordinating colors. For this card, I chose the beautiful white flowers that coordinate with Petal Pink, for one color. I used Petal Pink as the card base with a layer of Whisper White in between the colored cardstock and the designer paper.

The Perennial Essence Designer Paper is even discounted in price in the Last-Chance Products! Usually, you can count on almost all designer paper to be retired to make room for new patterns in the new catalog!

Before adhering the designer paper to the cardstock, I adhered some Petal Pink 1/4″ Metallic Edge Ribbon around the side of the designer paper. I tied the bow separately and stuck it on with Mini Glue Dots. That’s a little easier getting it oriented exactly how you want it rather than tying it onto the ribbon.

For the greeting, you can choose almost anything! If you are lucky enough to have a mother or grandmother to send a Mother’s Day card to, this card would be lovely. Actually you could even use this greeting if you didn’t have a Mother’s Day greeting. And with the world in the situation it is in right now, this card and greeting is perfect to send to almost anyone in our lives, because who are we not thinking of with all of our heart? This greeting is in the Peaceful Moments Stamp Set. I am so glad this set is carried over to the new catalog!

The greeting is stamped on Whisper White Cardstock in Petal Pink Ink and die cut with one of the rectangle dies in the Stitched So Sweetly Dies. As I write this, these dies are “Unorderable” but they should be available soon. And they will be in the new catalog! I like these dies! Then the greeting is layered on another Petal Pink die cut from the same set. And I couldn’t resist adding a little bit of bling in the empty space! I added two Petal Pink Rhinestone Jewels to the top and bottom of the die-cut. These pink rhinestones of various shapes are in the Last-Chance products at a discounted price!

Mother’s Day is coming May 10th so get ready by making a card like this Thinking of You Card With Perennial Essence Paper or change the greeting for almost any other occasion.

Are Stampin’ Blends Retiring?

Stampin' Blends Image
Image © Stampin’ Up!

One of my favorite products in the Stampin’ Up! Catalog is the Stampin’ Blends markers. So the other day when the Last-Chance List came out of retiring products I got a little concerned as I saw marker after marker on the list! You may have too! Fortunately, Stampin’ Blends ARE NOT RETIRING so no worries there if they are your favorite coloring medium!

What will be new, is that Stampin’ Blends will not be sold in singles in the new catalog. So if one marker goes bad, you will need to buy the Combo package regardless. Therefore, I suggest going through your markers and seeing particularly if you have any singles that you need to replace. Keep in mind these are a consumable product and will have to be replaced eventually. If you do need single markers, order them now during the retirement period. When the new catalog comes out you will only be able to get the Combo Pack.

I already knew I had a few markers whose tips were scraggly but I hadn’t stopped the world to go through them and make a list of them. This is what I did the other day. I went through each marker and scribbled on scraps of Whisper White Cardstock with the brush tip and made a list of any that were bad or a little bit bad or whatever. I thought it was best to color on the Whisper White cardstock to get the proper feel for how the tip was working in case it didn’t work as well on scrap computer paper. Then I placed a Stampin’ Up! order for the singles I needed or both, if that’s what I needed. It looks like Old Olive only has the Dark marker available, no Light and no Combo Pack so that will wait until later.

Stampin' Blends Singles

The single Stampin’ Blends Markers will be available until June 2 or while supplies last. If they run out of a single color during this time, the item will no longer be orderable.

Stampin’ Up! says they have quite a bit of inventory for single Stampin’ Blends Markers so they will continue to fulfill orders for the new 2020–2021 Annual Catalogue combo packs with single markers until the inventory is depleted. After that time, they will automatically start shipping Stampin’ Blends Combo Packs. So if in the new catalog you still get markers in your order in single packages that is why, but when those are gone you’ll get the combo pack. Either way, they will be only sold as Combo packs starting June 3.

Also, beginning June 3, Bronze and Ivory Stampin’ Blends Markers will be sold exclusively in a combo pack (though they may arrive in separate packaging until the single marker inventory is depleted). The Stampin’ Blends Color Lifter will be the only Stampin’ Blends Marker sold individually starting with the 2020–2021 Annual Catalogue.

So when you are going through the Last-Chance products in my Online Store and the Clearance Rack, and maybe ordering the early release Ornate Garden products, be sure to check out your Stampin’ Blends markers and see if you need maybe just a few single markers while you have your chance. Remember, everything is while supplies last!

Ornate Garden Floral Stamp With Sequins

Ornate Garden Floral Stamp With Sequins

The Ornate Garden Suite offers so many beautiful ways to make cards whether you stamp and color in the image or use the beautiful designer papers! There are two sets of die cuts you can use too, but on this card, I was going for something simpler.

A few days ago I made another card with this same floral stamp in the Ornate Style Stamp Set from the Ornate Garden Suite, but I cut it out by hand. This one is just stamped and colored in on the card front. I love coloring all the flowers with my Stampin’ Blends markers, but you can use other techniques.

The greeting on this card is from the Ornate Thanks Stamp Set. This stamp set has large greetings to pair with the smaller script greetings but you can also just use some of the script greetings alone. That’s what I did on this card.

The Whisper White cardstock front layer is adhered to an Old Olive card base with the fold at the top for something different. For a little pizzazz, I added a few sequins that kind of matched the flowers and leaves.

If you want EVERYTHING that goes together in this Ornate Garden Suite Collection, just order the whole collection with one number on your order, #154153. Or you can pick and choose exactly which products you want on this order and get more on another order! This Suite will be in the upcoming Stampin’ Up! Annual Catalog so there is no rush unless you’d like to get your hands on something brand-new while you are staying home these days!

New In Colors In the May Paper Pumpkin Kit!

Paper Pumpkin May 2020 Ad New In Colors My Info

Yes, I am sure we will all want this May 2020 Paper Pumpkin Kit with the new In Colors!! I know I can’t wait! While everyone can “see” the In Colors, coming in the new Stampin’ Up! Catalog in June, only May Paper Pumpkin subscribers can PLAY with them!!

While I wasn’t too thrilled with the In Colors we have currently that will carry over, from this photo I think I will really like these In Colors! They look bright and happy, and we sure need bright and happy about now!

JOIN PAPER PUMPKIN RIGHT NOW!

About the May Kit

A Kit In Color

Kit contains supplies for 12 cards and envelopes
8 cards are traditional size
Card size: 4-1/4″ x 5-1/2″
Envelope size: 4-1/2″ x 5-3/4″

4 cards are notecard size
Notecard size: 5″ x 3-1/2″
Envelope size: 5-1/8″ x 3-5/8″

Coordinating Colors: Four NEW In Colors plus Purple Posy from the 2019–2021 In Color collection.

I think this is one of those kits you don’t want to miss! Even for past subscribers, this might be the time to reactivate your subscription, at least to get this kit! If you are new, this will be an extra-special kit! And with your first kit, you will receive an acrylic Paper Pumpkin block on which to mount the stamps in your kit. Everything you need will be included in your kit, so if you have no craft supplies, no worries!

Although the deadline for subscribing to Paper Pumpkin is May 10, 2020, it would be a good idea to go ahead and subscribe NOW! There is always the possibility the kits could sell out closer to the date and always the possibility that if you don’t subscribe right now, you will forget! Also, once you are a subscriber, you can purchase any Past Kits or Refills that are available in the Stampin’ Up! Online Store. That inventory just depends on what is leftover and how quickly it gets purchased.

Instead of subscribing by the month, if you prefer and are putting in a Stampin’ Up! order, you can add a Prepaid Subscription to your Stampin’ Up! order for whatever time period you like. You will receive an email from Stampin’ Up! right after your order which will have a special code in it and will tell you how to set up your Paper Pumpkin account and how to add that code so you receive your kits. You must do that before the 10th of the month to get that month’s kit. So if you order a Prepaid Kit today, you must set up everything by May 10th to get that kit.

Subscribe to Paper Pumpkin Today! Don’t Miss Out!

Or go to www.PaperPumpkin.com and add my name as your Demonstrator, Karen Fontinelle.