Tag Archives: Magnolia Lane Designer Paper

Make Your Own Magnolia Designer Paper

Make Your Own Magnolia Designer Paper

When I was making a card with my Magnolia Lane Designer Series Paper and the Good Morning Magnolia Stamp Set, I decided it might be fun to just stamp a bunch of flowers on a card front. This is how I ended up making my own magnolia designer paper!

I’ve always found just doing random stamping all over a piece of paper to be a very relaxing and therapeutic experience! The block and stamp just feels good in my hand and doing the repetitive motion is calming. Then it is fun to go back over and color in the images unless you are doing just a colored outline and not coloring in.

This card wasn’t even planned! I just thought of it as I was making another card and had stamped some extra images on some scrap cardstock in case I wanted to use them somewhere somehow. I decided to stamp the flower images in Memento Ink randomly over a card front layer of Whisper White. Sometimes you have extra white space when you do random stamping as I did on this card. Since there was a single leaf in the stamp set, I just used the stamp to fill in some space in between the flowers.

To color in my card, I used my Stampin’ Blends, my favorite method of coloring right now! I used Light and Dark Petal Pink for the flower buds and Light and Dark Mossy Meadow for the leaves. The greeting is from the Good Morning Magnolia Stamp Set, stamped in Petal Pink, and then die-cut with the Stitched Nested Labels Dies. The ribbon I used across the front of the card is Old Olive and comes in the Ornate Garden Ribbon Combo Pack. It’s not a perfect match, of course, to the Mossy Meadow leaves, but I think it looks fine. It’s a pretty ribbon and makes the card look a little bit elegant.

This is basically an easy card but of course it does take time to color in the flowers. If you aren’t crazy about coloring, this might not be the card for you! But I enjoy it and love using my Stampin’ Blends.

You will see the Good Morning Magnolia Bundle on the Last-Chance retiring list but the stamp set and dies will be in the new catalog. If you want this Bundle and want to save 10%, order it now to save that 10%, otherwise in the new catalog you will purchase each for full price.

I love the Magnolia Lane Designer Series Paper and have made many cards with it. But if you want to do some random stamping and get the feel of that stamp in your hand and like the repetitiveness of stamping for a card front, try making your own “designer paper” with stamping!

How to Make a Magnolia Lane Gift Box

Magnolia Lane Gift Box

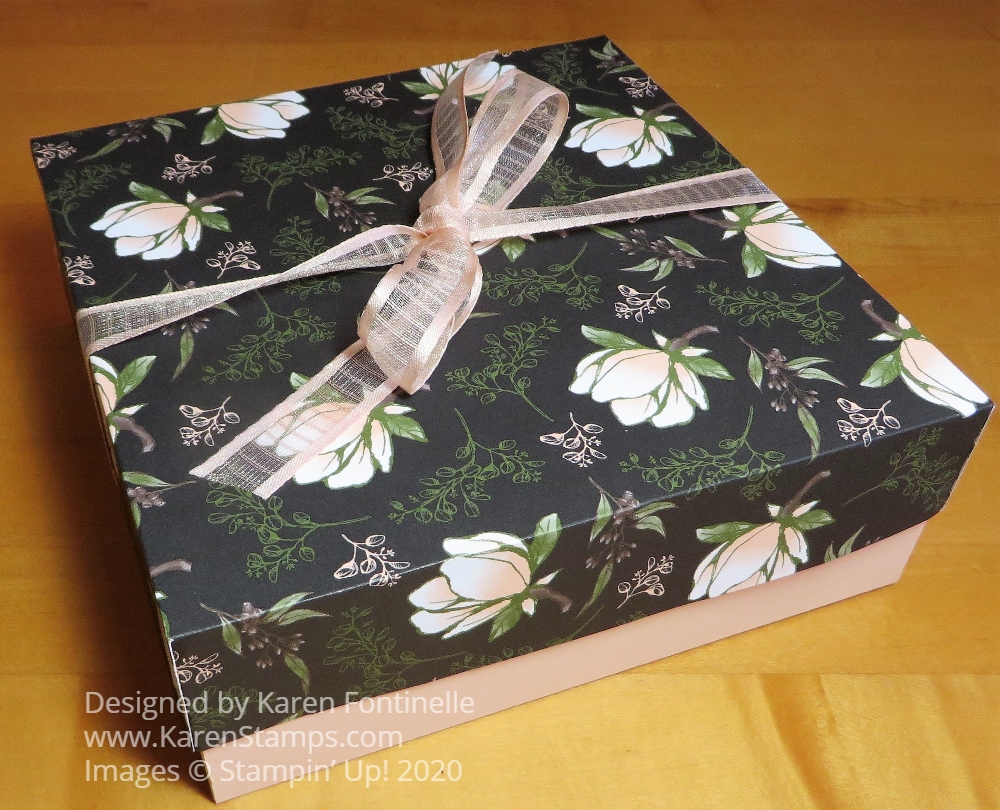
With Mother’s Day coming up on Sunday, birthdays, and maybe graduations, even if virtual these days, you need to learn How to Make a Magnolia Lane Gift Box. It is so simple, as you will see and will make your gift extra-special, not to mention saving you a trip to the store to find a gift bag or box at the last minute!

This particular box is 7″ square and you do need two 12″ x 12″ pieces of paper. The bottom of the box is made with Petal Pink Cardstock and the top with a piece of Magnolia Lane Designer Series Paper.

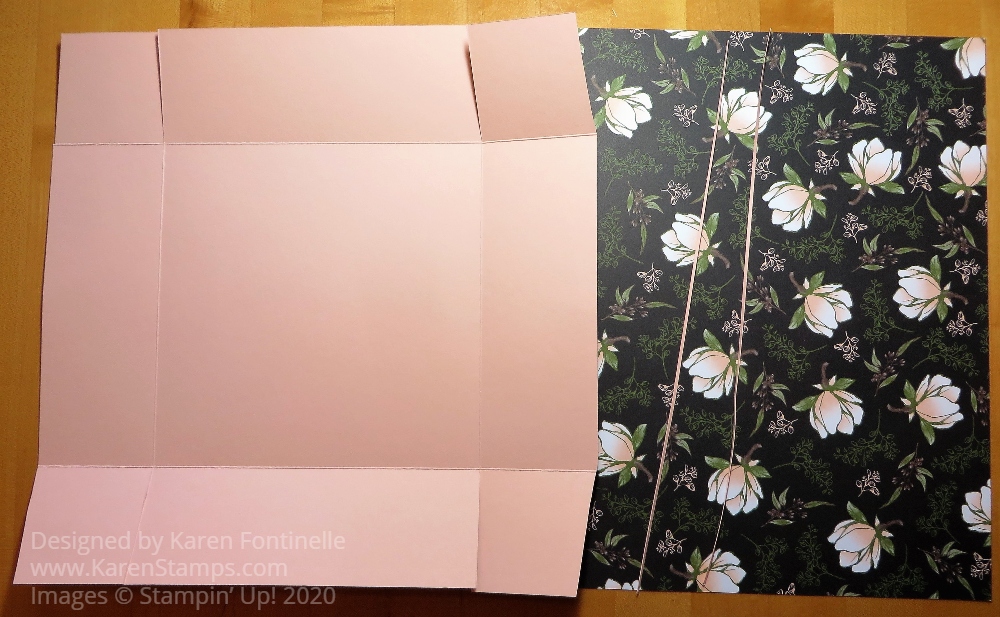
To begin making the bottom of the box, you will cut the tiniest sliver off the side of two sides that share a common corner. To determine a “sliver” you can just slide your paper the teeny tiniest bit past the cutting track. It might not be even 1 1/16″ wide but you could use that measurement if you want. This makes the bottom just the tiniest bit smaller so that the box lid will fit easily over it.

Next, score at 2 1/2″ on all four sides of the box. Crease well with a Bone Folder to make the folds crisp, like a box should be. Then cut the flaps on opposite sides of the paper on the score lines. If you want, cut a small wedge off all four corners just to make the box bottom a little neater when the sides all come together. In the photo below, you can see the slivers I cut off from the two sides of the paper, so you can see how narrow they are.

Magnolia Lane Gift Box Scoring

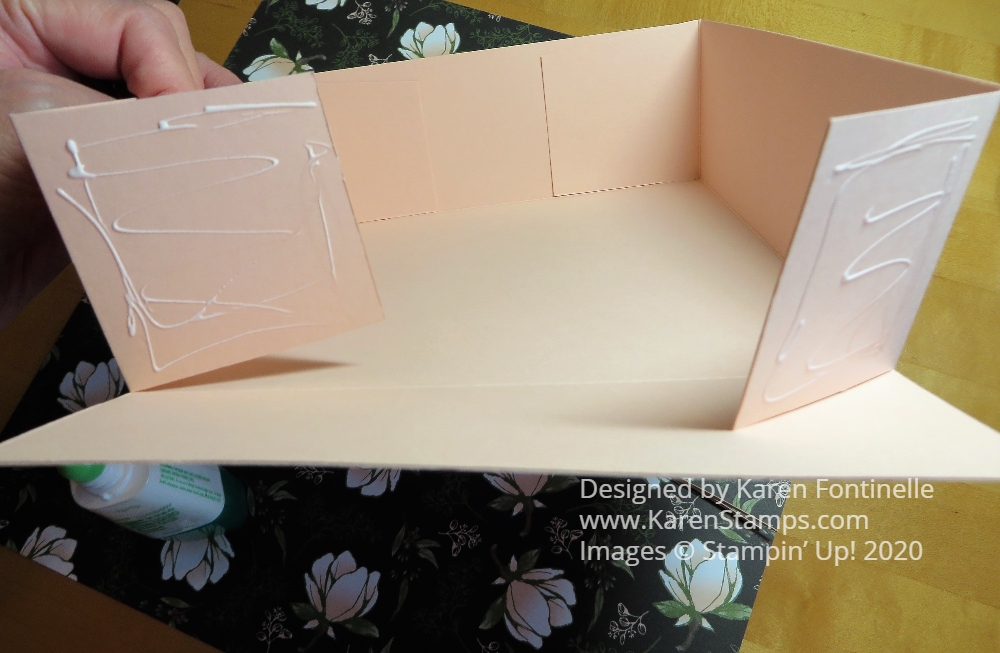
After creasing all the folds really well, assemble the box and use a strong glue to assemble. You could use Tear & Tape but I like to use Multipurpose Liquid Glue to give me that extra few seconds to make sure everything is lined up perfectly.

Magnolia Lane Gift Box Assembly

For the top of the box, I used designer paper but you could use cardstock too. The top piece is 10 1/2″ square. Make the top in the same way (except don’t cut off a sliver!). Score 1 3/4″ all around and cut the flaps in the same way. Assemble with glue and put the lid on the box!

Tie a pretty ribbon around the gift box like this Petal Pink 5/8″ Organdy Ribbon. Add a nice card or pretty gift tag and you’ve got something special!

Here is another gift box I made a few years ago after following a video by Donna Griffith at the Stampin’ Up! Home Office. It’s what I followed to make this gift box and she also explains how to make different sizes.

Now might be a good time to use up some designer paper that will be retiring that you have left and turn it into something useful by making boxes so you will be ready for all the new products coming out in the next Stampin’ Up! Catalog on June 3rd! And your gift wrap stash will be ready for any gifts with a few boxes on hand!

SHOP STAMPIN’ UP! ONLINE HERE!

World Card Making Day 2019

World Card Making Day 2019

Today is the annual World Card Making Day 2019 which those of us in the cardmaking business like to celebrate! Take some time today to make a card, any kind you want! Then, the real trick is to mail the card next week! Lots of times we make cards for fun or because we saw a cute idea and then we don’t get around to mailing our cards to someone! Don’t let your beautiful artwork go to waste! Send those cards!

Next week Stampin’ Up! has a goal of sending 50,000 cards from Demonstrators and Customers, so if you send a card let me know and I will put it in the count with Stampin’ Up! Apparently, it will be the first annual World Card Sending Week! (Isn’t every day and every week some “holiday”?!)

If you are ever stumped for a card idea, copy yourself! That’s right! Just look back at some of the cards you have made and make another version! Change the paper, the colors, the embellishments or the greeting! Use one of your own good ideas!

Here is a card I made for my niece’s birthday. I realized I hadn’t used my Magnolia Lane Designer Paper in awhile. Instead of coming up with a new design, I just made another card like one I’d made before. I just changed the greeting and the embellishments a little bit.

Magnolia Lane Birthday Card

This card uses Petal Pink Cardstock for the card base with a striped layer from the Magnolia Lane Designer Series Paper. I think this paper is one of the most beautiful Stampin’ Up! has ever had. Even the large flower and leaves are cut out from one of the sheets in the package! The flower is layered on a circle of Vellum Cardstock.

The greeting is stamped in Mossy Meadow Ink from the Itty Bitty Birthdays Stamp Set. Then it was die-cut with the Stitched Nested Labels Dies. I used a piece of Braided Linen Trim across the strip of designer paper. On the greeting, I added three Heart Epoxy Droplets. And to the area with the large magnolia, I added three Basic Adhesive-Backed Sequins.

Magnolia Lane Birthday Card closeup

I just thought I would remind all of us, myself included, that it is okay to copy ourselves! Sometimes we search and search for an idea and the best one might be one right under our noses!

Take some time on World Card Making Day to make a card for someone or anyone and then send it next week during World Card SENDING Week!

Magnolia Thinking of You Card

Magnolia Thinking of You Card

This Magnolia Thinking of You Card is easy to make and so fun to do the coloring on the magnolia! The best thing is I found my missing Magnolia Memory Dies finally! Since I was keeping “new stuff” separate from my current, at the time, products the dies didn’t make it into the other room by my Big Shot. Instead, I kept them on a desk and they got covered by a stack of cards! Who would have thought to look under the stack of cards when a couple of loose dies from the set that I had used after getting my preorder were laying uncovered in another spot?! Anyway, I found them and was able to die-cut this gorgeous magnolia after stamping it.

The magnolia is stamped in Memento Ink and then colored with Stampin’ Blends. I used the Petal Pink colors on the flower and Granny Apple Green with a touch of yellow on the leaves. I just love coloring with these alcohol markers!

The greeting is from the Good Morning Magnolia Cling Stamp Set and is stamped in Petal Pink Ink. I also thought about using Early Espresso Ink so either would work! I die cut the greeting with one of the Stitched Nested Labels Dies. I think it looks pretty as is and stands out on the white so doesn’t need any layer.

The card base is Early Espresso and the designer paper is Magnolia Lane DSP. I added a Whisper White layer underneath the designer paper to make it stand out against the Early Espresso. In fact, I die cut the greeting out of the same Whisper White piece because it is hidden underneath the designer paper! I don’t always do this but sometimes I think about it ahead of time!

The beautiful magnolia is popped up with a bunch of Stampin’ Dimensionals® and the greeting is adhered flat on the card front. Since the Early Espresso is so dark for the card base, on the inside of the card I will add a layer of Whisper White Cardstock so I can stamp a sentiment or write a note inside. I can also stamp one of the flowers in the Good Morning Magnolia stamp set on that Whisper White layer or add a piece of the beautiful Magnolia Lane Designer Paper.

Here is the first card I made with the Magnolia Lane Designer Paper and a greeting. In this case, I cut out a flower from the designer paper!

Copy this Magnolia Thinking of You Card when you get your Good Morning Magnolia Bundle. You can change the designer paper and greeting but at least you have an easy design to use!

SHOP STAMPIN’ UP! ONLINE HERE!