Tag Archives: heat embossing

Halloween Spooky Ghosts Card

Halloween Spooky Ghosts Card

A Halloween card that I saw years ago much like this Halloween Spooky Ghosts Card is one of the things that inspired me to become a Stampin’ Up Demonstrator! I was visiting my friend who first introduced me to Stampin’ Up! and we went to what was a team meeting, I guess, or some kind of gathering. I was so taken with a creative Halloween card made like this one with a ghost on it that I fell in love with stamping and eventually signed up to be a Demonstrator.

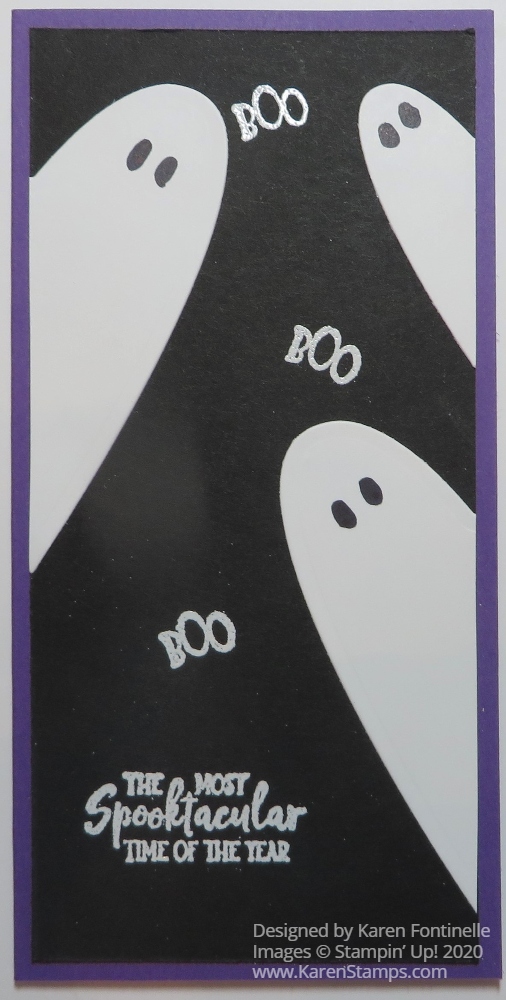
Can you guess how I made these ghosts?? They are die-cut hearts, cut in half! Sometimes it doesn’t take too much to thrill me! That card from years ago will always be one of my favorites, maybe because I like Halloween so much, too!

In addition, I decided to make this one of those new-fangled Slim-Line cards everyone is talking about. I have made others HERE and HERE. They can be made in various sizes, so you can make one longer and/or wider than mine. Just make sure it is going to fit in an envelope!

To make this card, I started with a card base of Gorgeous Grape cut at 6″ x 6″. When you fold that square piece of cardstock in half, you have a card that is 3″ x 6″. It will fit into one of those regular, but small, envelopes you likely have at home. If you make it longer and wider, then it has to fit into one of those regular longer envelopes.

I made the layer Basic Black so the ghosts would show up really well in Whisper White! I die cut several small, medium and large heart shapes with the Be Mine Stitched Dies. You could use heart punches if you don’t have the dies or even just cut out hearts by hand. Then just cut each heart you are going to use in half with scissors, from the point at the bottom right up through the middle of the heart. Then just add some eyes with a black marker. Place the heart halves along the edge of the card as if they are peeking in.

As I was looking for a greeting, I wanted to use this one from the Ghoulish Goodies Stamp Set and decided to emboss it right on the black cardstock with white embossing powder. I also noticed the tiny little “Boo” in the stamp set and thought that would be perfect also embossed on the card. I used my retired Embossing Buddy to remove some of the static on the card before stamping with Versamark Ink. Then I dumped on White Stampin’ Embossing Powder, dumped it back off, and heated the powder with my Heat Tool. I did all the embossing before I adhered the ghosts to the edges of the card. Then I adhered the black layer on to the Gorgeous Grape card base.

So there you have one of my favorite cards for Halloween! It’s so easy and fun, even if you don’t do the heat embossing. You can stamp and adhere a greeting the regular way if you like.

Have fun making a card like this Halloween Spooky Ghosts Card!

Ornate Garden Gold Sympathy Card

Ornate Garden Gold Sympathy Card

We saw a story on the news the other night showing card racks at the store being sold out of sympathy cards which is so sad that people need those kind of cards, but the fact is, we all need to send them throughout the year, pandemic or not. It’s the most difficult card to make so it’s probably a good idea to make several at a time and hope that you don’t need them, but if you do, you will already have one ready to mail.

My original idea was not even to make a sympathy card but I planned to do something with the Ornate Garden Suite if only to use the dies. But when I looked through the Ornate Garden Specialty Designer Series Paper, I decided to use this floral sheet with foil accents and then use Gold Foil for the die-cut somehow. And even then, I wasn’t planning on a sympathy card. I was sort of thinking of a wedding card. When I looked through some stamp sets with sentiments, I settled on the Peaceful Moments Stamp Set. Somehow I couldn’t get past the sympathy sentiment so I went with that. Here’s another example of a sympathy card, simple but elegant with the designer paper and a nice ribbon.

To match the other gold, I felt like the greeting needed to be embossed with Gold Emboss Powder and the Heat Tool. The greeting is stamped in Versamark Ink, a clear ink that can be used for embossing or for the watermarked look in your stamping. Heat embossing is one of those things that is like magic when a new stamper sees it done for the first time. You stamp with Versamark Ink, sprinkle/dump on the embossing powder, shake off the excess, then heat with the Heat Tool and watch the magic happen! The powder melts and you watch it happen right in front of your eyes as the Heat Tool moves over it.

The very fancy die is one in the Ornate Layers Dies. Be sure to run it through your die-cutting machine three times to get the best cut. After cutting that, I measure the solid inside so I would know what size to cut my Whisper White Cardstock for the greeting.

If you would like to get your hands on brand-new product coming in the next Stampin’ Up! Catalog June 3, you can purchase any or all of the products in the Ornate Garden Suite. And if you want even more choices early, you can sign up to be a Stampin’ Up! Demonstrator and choose some of the preorder products to be in your Starter Kit or order them separately after you sign up!

I certainly hope you do not need to send a sympathy card any time soon, but they are an important part of what we do. When you make a card for someone, especially a sympathy card, you are putting your heart and soul into it with your creativity and that will mean something to the recipient. You might even consider making some cards that could be for different occasions but don’t put greetings on them yet. Then if you need one to be for sympathy, you will have a nice card ready to go when you add a greeting.