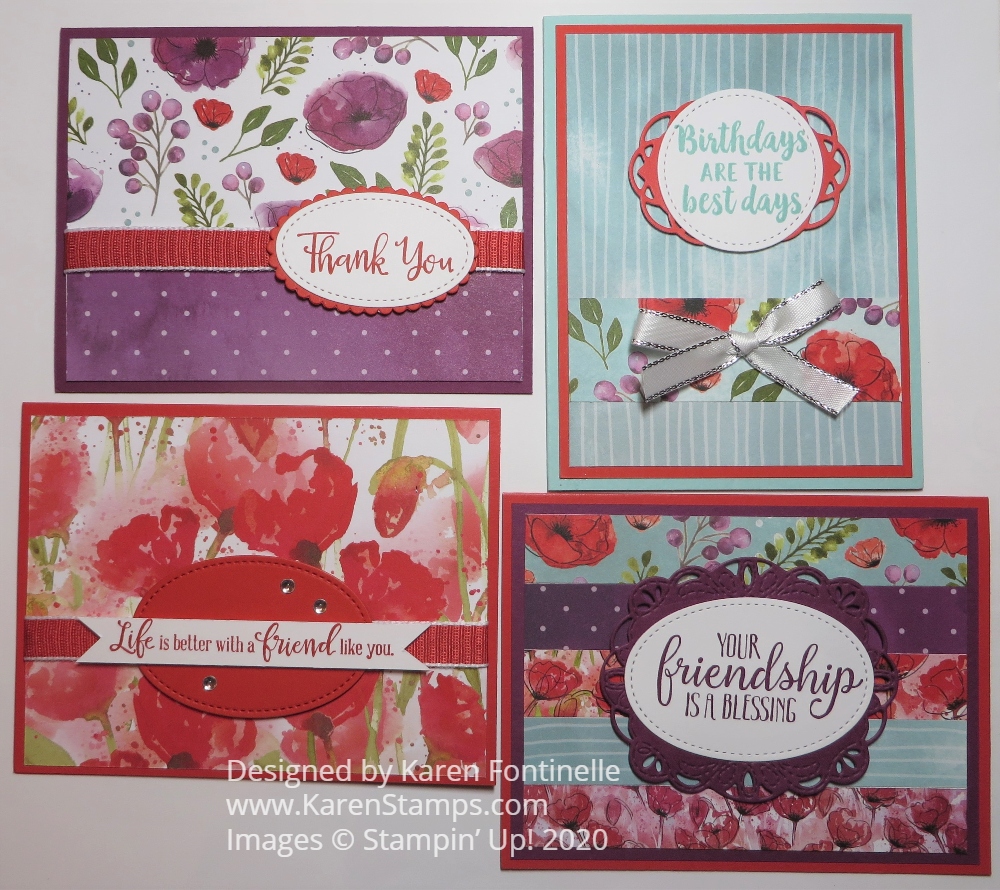
There are even Poppies Bundles available, and unlike most Bundles that are retiring with the current catalog, these Poppies Bundles are carried over into the new catalog! That is good news so you can still save 10% on stamp sets and dies together. There is the Painted Poppies Bundle and the Peaceful Moments Bundle. Order them now or later if you don’t already own them! I would recommend ordering them with the new catalog actually.
Today and tomorrow, June 1 and 2, are the last two days to order any retiring Last-Chance products from the current catalog.
The new catalog begins around Noon (Mountain Time) on Wednesday, June 3. Keep in mind the website will probably be quite busy that day so if you have trouble getting in just keep trying.
Some new products might not be available due to the problems of shipping and keeping inventory supplied so there may be backorders or even products that will be unorderable perhaps. However, I recommend ordering things that are your first choices as soon as you can and try to beat the backorders! I always recommend going ahead and ordering something that is backordered if you want it because Stampin’ Up! will send that item out to you as soon as they are resupplied and that will be faster than waiting to order it for the first time yourself.
***There will be a special for placing a $250 order or more during June in the NEW CATALOG, June 3-30. Orders of at least $250 in merchandise will receive an EXTRA $25 in Stampin’ Rewards! Prepaid Paper Pumpkin subscriptions can count toward that amount if you need something extra to reach $250.
Hopefully my regular customers have received their new catalogs that I mailed out to them so you can be making out your Wish List of new products that you would like! If you are new to Stampin’ Up! and looking for a Demonstrator to assist you and are interested in Stampin’ Up! products, I would be happy to send you a complimentary catalog if you send me your contact information.
So today and tomorrow check the Last-Chance Products and Clearance Rack and see what you need to order today and tomorrow before the current catalog ends at midnight (MT) on June 2.
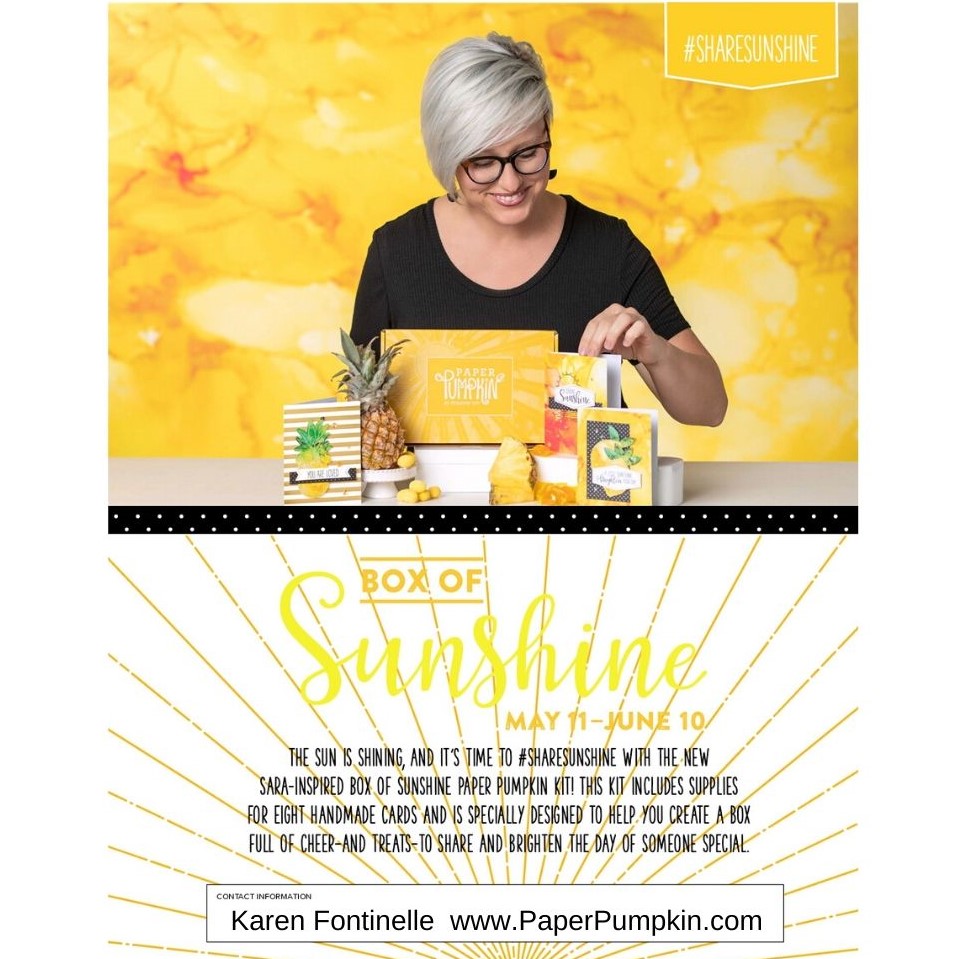
You may think it is early to subscribe or reactivate your account in order to receive the June 2020 Paper Pumpkin Kit, the Box of Sunshine, but be forewarned this kit is likely to be popular and could sell out! Get yourself signed up TODAY!
What is so special about this Paper Pumpkin Kit?
This exclusive Sara-inspired Paper Pumpkin kit is here to help you #sharesunshine. It includes supplies for eight handmade cards and is specially designed to help you create a box full of cheer. Once you’ve made all the cards, use any leftover pieces to decorate the box. Fill it with yellow goodies, add the included adhesive label, address it to someone special, and brighten their life with a little sunshine!
ABOUT THE JUNE KIT
The Box of Sunshine Kit contains supplies for 8 cards and envelopes (2 cards of 4 designs): Card size: 4-1/4″ x 5-1/2″ Envelope size: 4-1/2″ x 5-3/4″ Coordinating Colors: Basic Black, Bumblebee, Crushed Curry, Poppy Parade, Shaded Spruce, White, and Gold
Box of Sunshine Information
This kit includes extra pieces and stickers (including a sticker label) to help you create cards AND a Box of Sunshine filled with treats and goodies to send to a friend. (Treats not included.)
The May 2020 Paper Pumpkin Kit with the new In Colors inside sold out in a flash, before May 1st! Don’t delay if you want this June Paper Pumpkin Kit because I think people will order multiple kits to give with treats inside and will be popular, especially because anything Sara Douglass helps design will be something special!
The deadline for signing up or reactivating your account is June 10 but I wouldn’t wait that long! You can also add a Prepaid Subscription to your Stampin’ Up! order of one month or several months or even give this as a gift. You will receive an email with directions for setting up your account and how to input the code showing you have a Prepaid Subscription. Be sure to set this all up right away so you don’t forget or you may miss the June Kit.
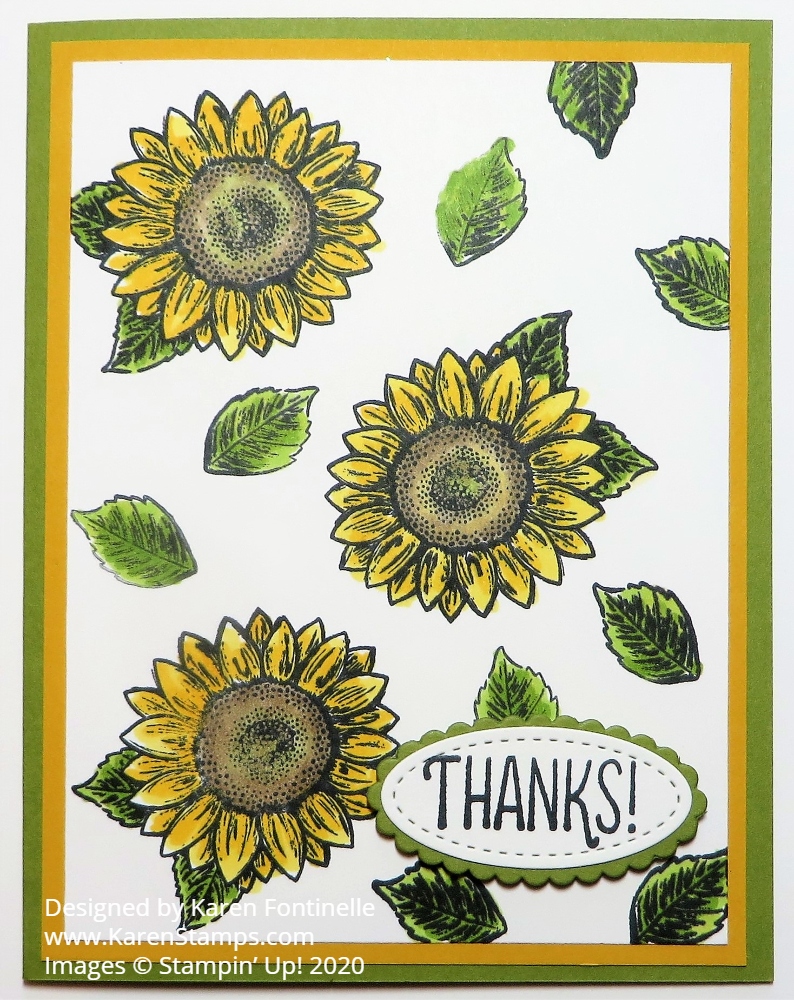
I wanted to try out this stamp set but in an easy card, so I came up with this Celebrate Sunflowers Stamped Thank You Card. Demonstrators who were able to pre-order this stamp set have been making beautiful cards with it and with the coordinating dies! So be sure to check it out when you get your catalog!
Ordering from the new Stampin’ Up! Catalog begins Wednesday, June 3, no later than Noon (Mountain Time/Stampin’ Up! Time). That’s 1:00 PM Central Time. That’s the plan anyway! Stampin’ Up! will be setting up the website with the new catalog products from midnight until Noon MT so ordering will be unavailable until it IS available again!
I wanted to try out the Celebrate Sunflowers Stamp Set but I wanted it to be easy. I chose the smaller sunflower and decided to just stamp a few randomly on the Whisper White card layer along with some leaves. I stamped all of these in Memento Ink and then colored in with Stampin’ Blends.
The card base is Old Olive and the next layer is Crushed Curry. I could have used the new Bumblebee color of cardstock but I didn’t think about it and I didn’t have a matching Stampin’ Blend marker.
After stamping with Memento Ink, I used various Stampin’ Blends to color in the sunflowers and leaves. If you aren’t sure which color to use on any project, get a piece of scrap Whisper White Cardstock and try out some colors on that. You get a better view of the actual color than if you color on Grid Paper or computer paper. Use the real cardstock!
For the flower centers, I used the Dark and Light Crumb Cake plus a touch of Old Olive. Maybe even a touch of yellow. For the petals, I used Light and Dark Daffodil Delight (I think) but I also had Mango Melody handy. Mango Melody has a little more orange in it. But just try out some colors and see what you are in the mood for!
The greeting I took from another new stamp set just because of space. This “Thank You” is in the Many Mates Stamp Set which has lots of great greetings. I used a die from the Stitched Shapes Dies (one of my favorite die sets!) and then layered it on an Old Olive scalloped oval from the Layering Ovals Dies.
This card would also be pretty made with Shimmery White Cardstock with just that faint hint of glimmer, plus if you wanted to watercolor the sunflowers, the Shimmery White paper holds up a little better to water than the regular Whisper White cardstock. Shimmery White is probably my favorite paper except for Real Red!
So, basically an easy card to make although it does take a little bit of time to color the sunflowers and leaves, but that’s good therapy and relaxation! And we all need that right now! Just take your time stamping and enjoy!
Remember, the last day for the current annual catalog is Tuesday, June 2 until around midnight (Mountain Time). If you want any SINGLE Stampin’ Blends, get them by Tuesday because in the new catalog they are only sold in the Combo sets of Light and Dark. So if you only need one of the colors, order now. Also, check the Last-Chance products and the Clearance Rack! Get all the bargains!
AND Stampin’ Up! has extended the early release ordering of the Ornate Garden Suite of products through June 2 since it has been so popular, I think it was to end May 31. It is in the new catalog so you can also order it with a new catalog order.
I hope you like these new sunflowers in the Celebrate Sunflowers Stamp Set! And if you like dies, you can get the Celebrate Sunflowers Bundle and save 10% off the total price! It’s all on page 13 of the new Stampin’ Up! Catalog.
There are just a few more days left for the retiring In Colors 2018-2020 so I thought I would make some cards with them before they are gone. I found these In Colors pretty likeable, especially the Lovely Lipstick, since I love red. But somehow I don’t use my In Colors as often as my regular colors. Maybe I will with the incoming In Colors next week!
These are the retiring In Colors that came out in 2018. In Colors are available for two years and each year a new group of five colors, colors that are the trendy, in style colors come out.
To make this card, I started with a card base of Pineapple Punch layered with Whisper White. I used the Small Bloom Punch (you may have earned it for free during Sale-A-Bration and now it is in the new Stampin’ Up! Catalog!!) to punch three flowers out of each In Color. I didn’t know how it would all work out, but somehow I got all the flowers laid out on the card so that they looked balanced and not too crowded.
I thought a regular greeting on the card would be too large, so I used my Itty Bitty Greetings Stamp Set and simply stamped in between the flowers, in the In Color Inks. It was a little risky! I should have placed, but not glued down the flowers, and then stamped so if I messed up, I wouldn’t have ruined the whole card! But sometimes you don’t know that ahead of time! It worked out with just one imperfection! (All three Itty Bitty stamp sets…Greetings, Birthday, and Christmas are carried over into the new catalog which I am very happy about! I use these a lot!)
For the flower centers I used the Happiness Blooms Enamel Dots which have three In Colors in them. They worked very well, I think!
And here is another In Color card using the retiring 2018-20 In Colors:
I made this one because I found the die cut already in the bag with the Grapefruit Grove Cardstock. The die cut is in the Stitched Labels Dieswhich are retiring now. I stamped a greeting in the Forever Lovely Stamp Set on Whisper White and die cut with an oval in the Stitched Shapes Dies.
The Whisper White layer is first embossed with the Scripty 3D Embossing Folder. I thought the white layer needed a little something so this provides just a little texture in the background.
The die cut greeting piece is popped up on Stampin’ Dimensionals and two of the flowers in the In Colors are popped up also, but the others are just glued flat onto the Whisper White layer. I also used the Happiness Blooms Enamel Dots on the centers of these flowers.
Here is another card I made using the In Colors and the Small Blooms Punch during Sale-A-Bration, for another card idea.
And that’s it! Two fun and easy cards using the last of the 2018-20 In Colors as they retire!
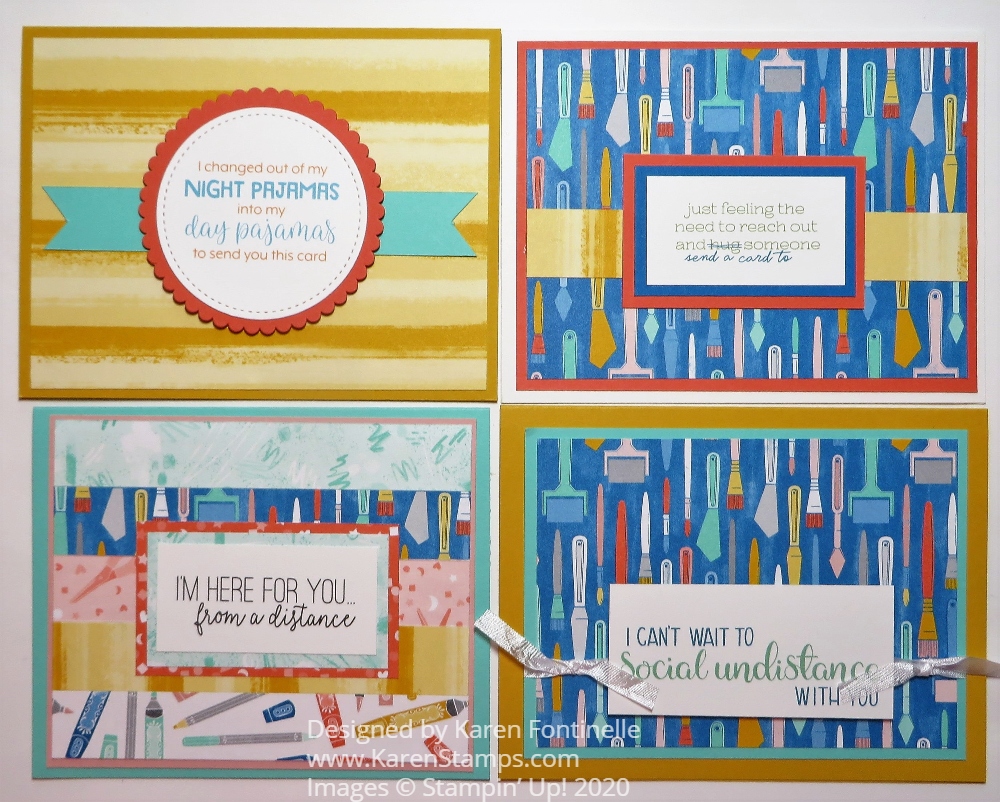
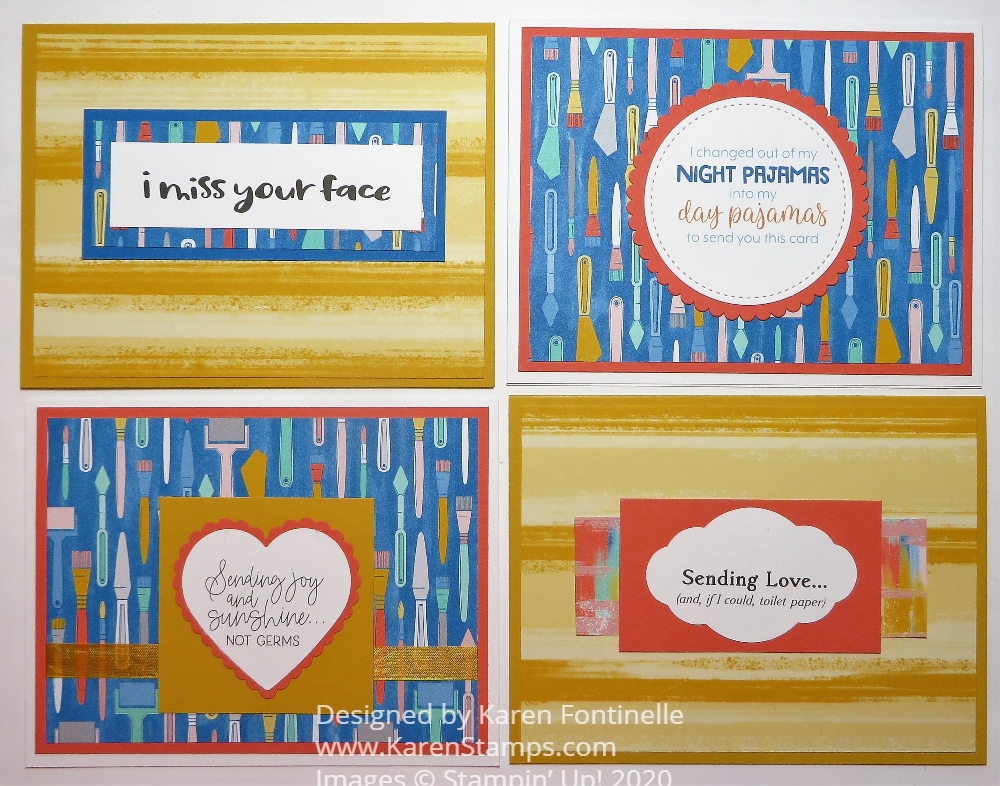
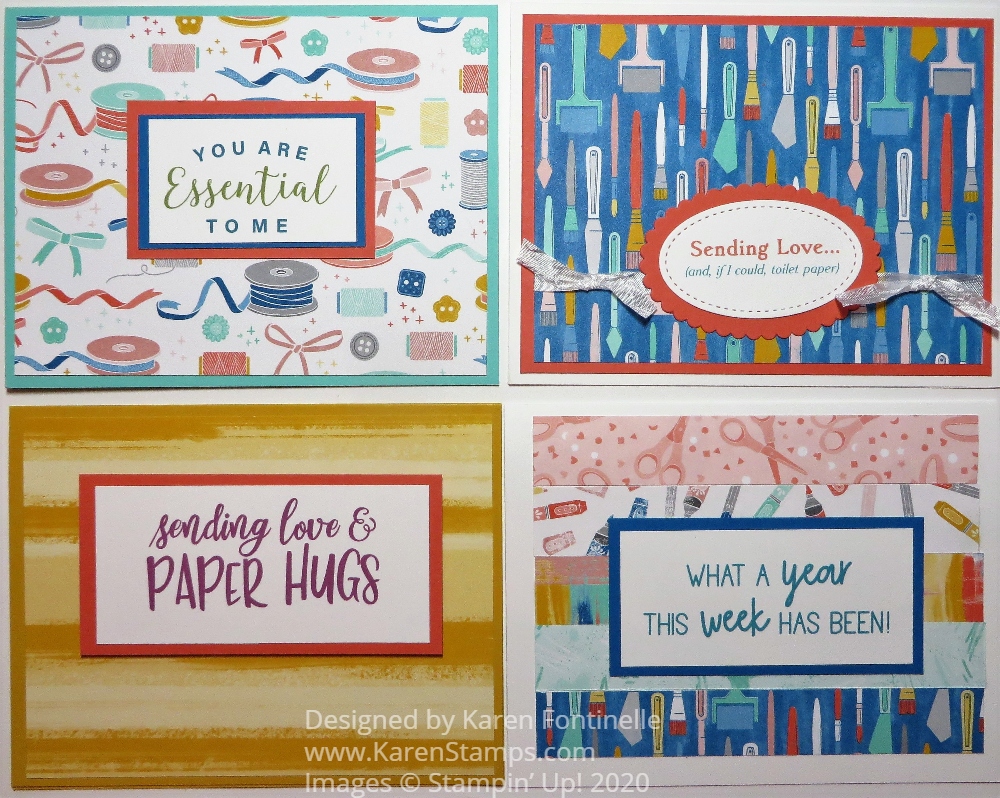
After making a bunch of cards with the Share Sunshine PDF download the other day along with Sara Douglass during the Facebook Live for the Stampin’ Up! Day of Service, my daughter asked me to make more Share Sunshine cards for her. Some I copied from what I had already made and some I had to resize or change because my designer paper was dwindling!
Sara used, and I also used, the Follow Your Art Designer Series Paper, which is cute and has great patterns for crafters! If you want it, you can still grab it in the Online Store in the Last-Chance Products for quite a discount! There are some coordinating products with the paper you also might like at a discount!
These full-size cards I was able to make while I still had some decent size designer paper pieces! I tried to copy some of the designs I had already made the other day on some. The greetings are from the Share Sunshine download, printed out on Whisper White cardstock, and you can just cut them apart with the Paper Trimmer or use punches or dies….whatever you like! You might add some embellishments like enamel dots or sequins, but I was keeping these quick and simple.
For these cards, I cut the card base at 4 1/4″ so that I could just use 4″ square pieces of designer paper. You can see on the first card I used a die from the Stitched So Sweetly Dies. Some of the rectangle and square dies are good to use, but mostly I just used my Paper Trimmer. Once you cut the greetings apart on the cardstock, you can then use dies or even trim down further with the Paper Trimmer to make it fit your card and layer.
Here’s a card I made for my son. You can see that I used the Stitched Rectangle Dies to cut out the greeting and the layer. You can reposition the dies sometimes to change the size of the die-cut you want to end up with. I’m not sure I did it exactly right but I got it.
Just for fun I cut out more of the sayings and adhered them inside the card! You can leave the inside of the card plain and stamp or write your own personal message inside. If the cardstock is too dark, add a white layer of cardstock inside, perhaps decorate with a strip of matching designer paper.
And after all that Share Sunshine cardmaking, these are the designer paper scraps I have left!
Probably just enough to make just a few more cards!
You don’t have to use this Follow Your Art DSP to make these same cards, use whatever paper looks fun for you to use! And if you make a lot of cards, it’s a great way to use smaller strips and scraps of the designer paper, even if you just use a small piece. Get creative!
If you missed it, be sure to check out my Facemask Cards I finally got to make! You might want to make some of those yourself to send to someone who might enjoy or appreciate a card! That’s what #ShareSunshine is about!
The first time I saw one of these face mask cards online I thought it was so clever and I have been anxious to make one since then so here are my Facemask Cards with Peaceful Poppies Paper. Not all face masks have to be those medical blue ones! Some are getting quite creative! A famous furniture store owner here in Houston is wearing a face mask with a face printed on it when he does his commercials on TV!
These face mask cards are relatively easy to make. You just take a small scrap of paper, preferably designer series paper because it will fold easier than cardstock, score and fold, then tape. If you want, you can then pop up the mask from the underside by pushing out those pleats you folded, just like a real mask. I don’t think this would be workable for mailing but it is fun that you can make the mask look so realistic.
To make the mask, use a piece of designer paper 2 3/4″ x 2 1/8″. Then putting the short end at the top of your Paper Trimmer or Simply Scored scoring tool, score at 1/2″, 5/8″, 1″, 1 1/8″, 1 1/2″ and 1 5/8″. Normally I score most things with my Paper Trimmer because it’s right there, but I think for this little bitty piece of paper it is easier and better to use the scoring board. You want the score lines to go horizontally across the paper, just like a real mask would look.
I used some scraps of Peaceful Poppies Designer Series Paper to make the masks. Why not use some pretty paper?! After scoring the little scrap of designer paper, fold and crease back and forth just like pleats on a real mask. It’s a little tricky to get those narrow folds but just make the paper do what you want! It helps to use the Bone Folder to really give those folds good creases. If you don’t have a Bone Folder, use a spoon or acrylic block or whatever you have.
After you have the paper folded, the sides need to be taped down to hold them in place. Make sure you have everything as straight and lined up and folded down as possible. It might end up slightly off so don’t worry about that. It might not be perfect, just like the masks I sewed, but it doesn’t matter! Try to get it as good as you can.
Cut a strip of Whisper White cardstock 11″ x 1/4″. Apply Tear & Tapealong this piece of 1/4″ cardstock all the way down. The width of the tape fits perfectly if you apply it straight. Then pull back just a portion of the adhesive tape so you can adhere the thin strip of cardstock to each side of the mask on the back then cut off the excess. After you tape the sides of the back of the mask do the same on the front on each side. This strip of Whisper White looks like the white borders you often see on masks, so it works great and the Tear & Tape holds it well.
To put a very thin strip of white cardstock on the top and bottom of the front of the mask, lay the strip of Whisper White Cardstock on your table, adhesive side up. Adhere the top of the mask to just half that width (1/8″) of the white cardstock, then cut off the excess. Now you have the other side of that adhesive piece, 1/8″ wide, to adhere to the bottom edge of the mask.
If you want to pop up the mask to make it 3D, push out from the back side to push the pleats open. Then take another piece of the Whisper White strip with Tear & Tape adhesive and adhere it to the inside of the mask down the center to hold the pleats open.
I used 2 3/4″ pieces of the Whisper White 1/4″ Crinkled Seam Binding Ribbon for the ear loops of the mask. Just adhere with Mini Glue Dots. You could use whatever other ribbon you have that would work.
That’s it for making the little mask! For making each card, I just used Whisper White Cardstock for the card base and adhered a narrow strip of the Peaceful Poppies DSP along the side. The mask is adhered with Mini Glue Dots in each corner of the mask. The greeting is layered on a piece of Poppy Parade Cardstock. The measurements depend on the size of the greeting that you cut out.
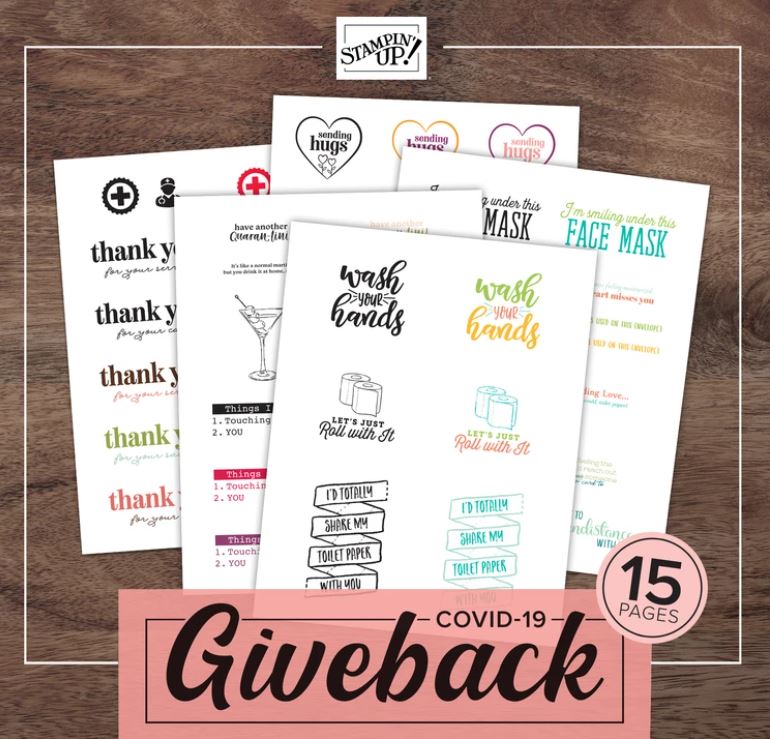
The greeting comes from the Share Sunshine PDF download that you can get with a $12 donation to organizations that are helping during the pandemic. The full $12 goes to the donation, none is kept by Stampin’ Up!. For your donation, you get 15 pages of light-hearted sayings about the pandemic and quarantine, things we all talk about every day in this situation. You can print out all the pages or just the ones you choose and then cut, die-cut, or punch out the sentiments you want to use and use them on cards. The last day this Share Sunshine download will be available is June 2nd. Get it HERE.
If you want to watch some videos with Sara Douglass on Facebook explaining how she planned out cards to make with the sayings and designer paper and see her family’s craft party that they did virtually along with the Stampin’ Up! employees for their Day of Service, just watch HERE or HERE. I made some cards as I watched and made more the rest of the afternoon. Then my daughter saw them and asked me to make cards for her so I made more! And then I made the mask cards because I liked the saying that went with the face mask!
I hope you will try one of these Facemask Cards and send it to someone who might feel a bit of “sunshine” from receiving a card from you!
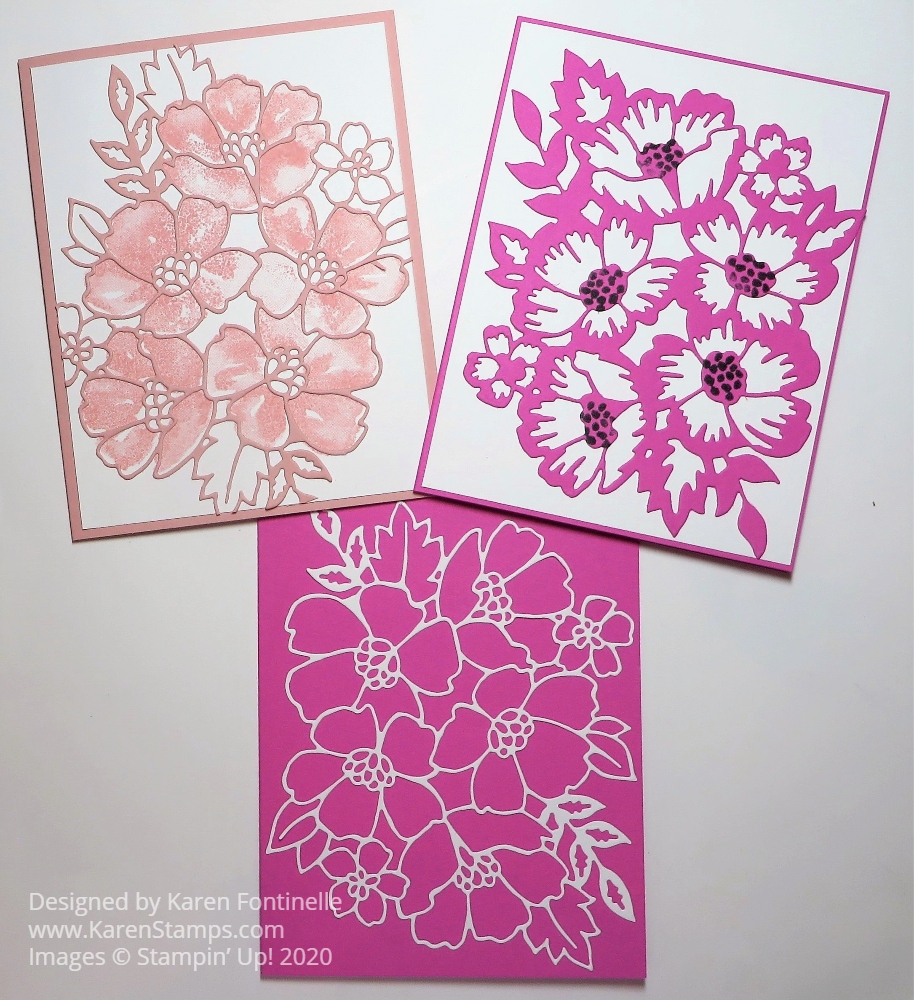
These Blossoms In Bloom sample cards are ones I made just playing around with some new Stampin’ Up! products. They are all coming soon in the new Stampin’ Up! Catalog, going live on Wednesday, June 3rd!
With these cards, I wasn’t really trying to make anything special. I just wanted to play with the stamp set and mainly the dies to see how things worked together. But I think they turned out pretty well!
The stamp set is called Blossoms In Bloom and is one of the Distinktive stamp sets. This is what Stampin’ Up! says about Distinktive Stamps:
“Get photo-realistic style images with Distinktive stamps, available only from Stampin’ Up!. Distinktive stamps have a special texture that gives added depth and dimension in a single step. They’re available in red rubber and photopolymer; look for the Distinktive icon. Distinktive patent pending.”
It may look like you didn’t ink up the stamp properly, but just stamp and try it out! If you have too much ink, you won’t see all the detail that this kind of stamp is designed to give. It should look like there were several steps involved in stamping that image but in reality you only had to stamp once!
All that being said, I first stamped the one large image of about five flowers in a bunch. I used Blushing Bride Ink on Whisper White Cardstock. Then I die cut the blossoms image out of Blushing Bride Cardstock with the thinner outline die. These dies are called the Many Layered Blossoms Dies. You will be able to purchase the Blossoms In Bloom Stamp Set and the Many Layered Blossoms Dies in a Bundle and save 10% buying them together. It might take a second to line up the die-cut over the stamped image. You just have to get all areas lined up since the die-cut is so thin and flexible. I used the teeniest dots of Multipurpose Liquid Glue to adhere the die-cut over the stamped image and I didn’t make a mess! Or you can sponge on the glue over a Silicone Craft Sheet or scrap paper. I just got lucky!
Another purpose of mine in making these cards was to try out the new In Color 2020-2022 Magenta Madness. It’s quite a color, and I kind of wanted to see what would go with it. Since this die-cut image is very large I opted to just go with Magenta Madness as the card base and no other layers. I die cut Whisper White with the thin blossom outline and adhered that to the Magenta Madness card base. I think it is rather striking and elegant looking with the white against the bold color.
On my third card, I die-cut Magenta Madness with the thicker outline die from the Many Layered Blossoms Dies. It also makes a great looking card just on it’s own with no stamping underneath. I did stamp some black dots in the center of the flowers before adhering to the card with the stamp in the set. The card base is Magenta Madness with a Whisper White layer and then the Magenta Madness blossom die cut.
I haven’t put greetings on these cards yet as my main purpose was trying out Magenta Madness as a color and trying the new dies along with the stamp set.
There are lots of creative possibilities with these stamps and dies so be sure to check it out when it is time to order from the new Stampin’ Up! Catalog June 3rd!
Yesterday was the Stampin’ Up! Day of Service and I enjoyed a fun and relaxing hour watching a Facebook Live with Sara Douglass, CEO of Stampin’ Up! and her family at home making Covid -19 cards using sayings on the Share Sunshine PDF download. I made several cards, sometimes taking inspiration from Sara’s instructions and sometimes my own, and afterwards I made more cards. And after dinner, I made even more cards!
These cards were supposed to be kept simple and since I was making a lot I just wanted to mostly make basic cards. I have a few that I may go back and put maybe a few embellishments on, but I may not!
If you missed the Facebook Live yesterday with Sara, you can still watch the replay today or at your convenience on Facebook HERE. I would suggest that you watch her previous Facebook Live where she explained how the cards are designed, how to cut your designer paper, etc. You don’t have to follow her designs, you can do your own, too. You don’t have to use these greetings on the Share Sunshine Download, you can use your own.
This is a great way to use up some of your retiring or retired designer paper before the new papers come out June 3 in the new Stampin’ Up! catalog! Sara shows an easy way to cut your paper so you can make several card designs that are simple enough for any stamper and then you can embellish if you like.
This is the Follow Your Art Designer Series Paper but other papers would be nice too. This paper has a great discount on it so go grab a package! Sara also used some embellishments in the Follow Your Art Embellishment Kit which is also discounted! The kit includes felt accents, charms, linen thread, paper clips and the cute box.
Sara’s intention was that we stampers can #SpreadSunshine with our cardmaking skills and then send them to friends, family, frontline workers, nursing homes, neighbors, wherever you like.
You might enjoy just watching the Facebook Live video from Sara and her family even if you don’t have time to make cards right then. It’s always fun to see new ideas and see what cards other people are making!
Our Stampin’ Up! Day of Service will be Thursday, May 21 at 2:00 pm MT! With current social distancing practices, employees are participating in Day of Service virtually, which provides us the opportunity to include demonstrators and customers in Stampin’ Up!’s service activity.
For this year’s Day of Service, we will use the Share Sunshine PDF Download (no longer available) to make and send cards to loved ones, frontline workers, etc. As part of our Day of Service, we will provide each employee with the Share Sunshine PDF Download and will contribute $12 USD per employee to the COVID-19 response funds, as part of our COVID-19 giveback, resulting in a company donation of $5,820 USD for Day of Service!
We invite demonstrators to participate and we encourage you to share the event with your customers so they can join the fun!
Stampin’ Up! employees, demonstrators, and customers will be gathering virtually for our Day of Service craft party on 21 May at 2:00 PM (MT) to make our cards together in a Facebook Live on Sara’s CEO Facebook page.
If you or your customers are unable to participate in the live craft party, the replay will be available to view any time on Sara’s Facebook page.
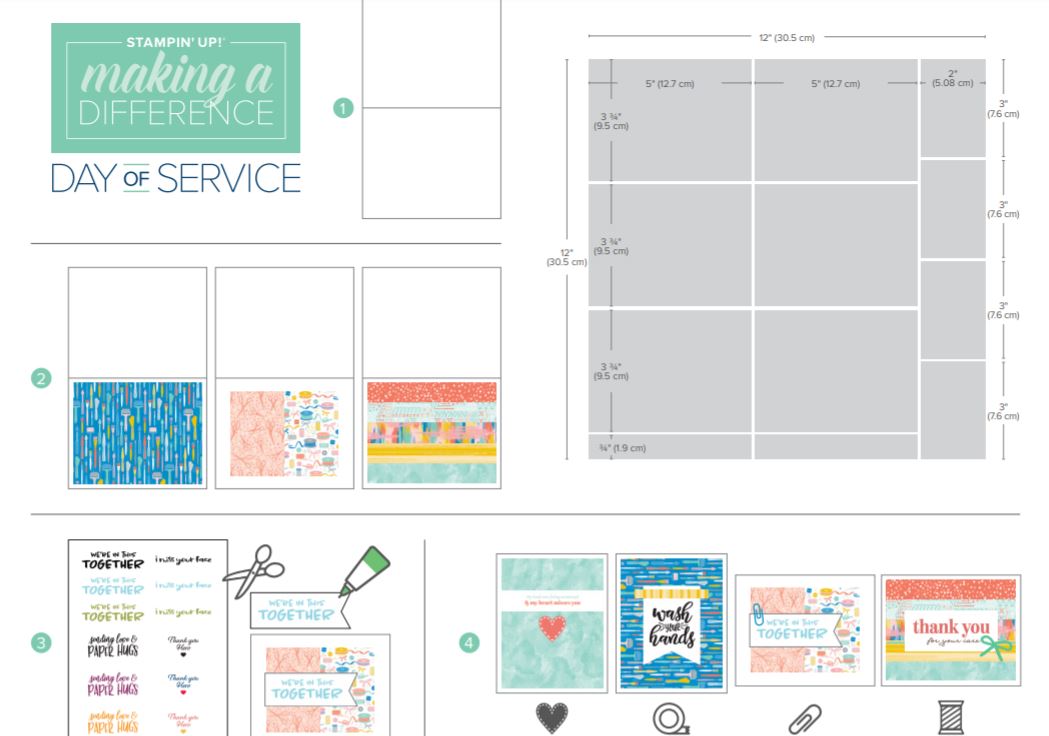
To make it easy for everyone to participate, we’ve also created an instruction sheet for Sara’s four-step cards, which includes a cut map for your Designer Series Paper (any Designer Series Paper will work). Note: A full package of 12″ x 12″ Designer Series Paper will be enough to make four kits (20 cards). You can find the instruction sheet here. We encourage you to come prepared with pre-cut Designer Series Paper!
SO….YOU are invited to participate in this Facebook Live cardmaking event along with Demonstrators and SU Employees! Feel free to just watch or follow along and copy their cards or just do your own stamping while you watch! You are not required to purchase the download. You can make the same card design and use your own greeting and your own kind of designer paper. If you miss it, like any FB Live, you can watch it later!
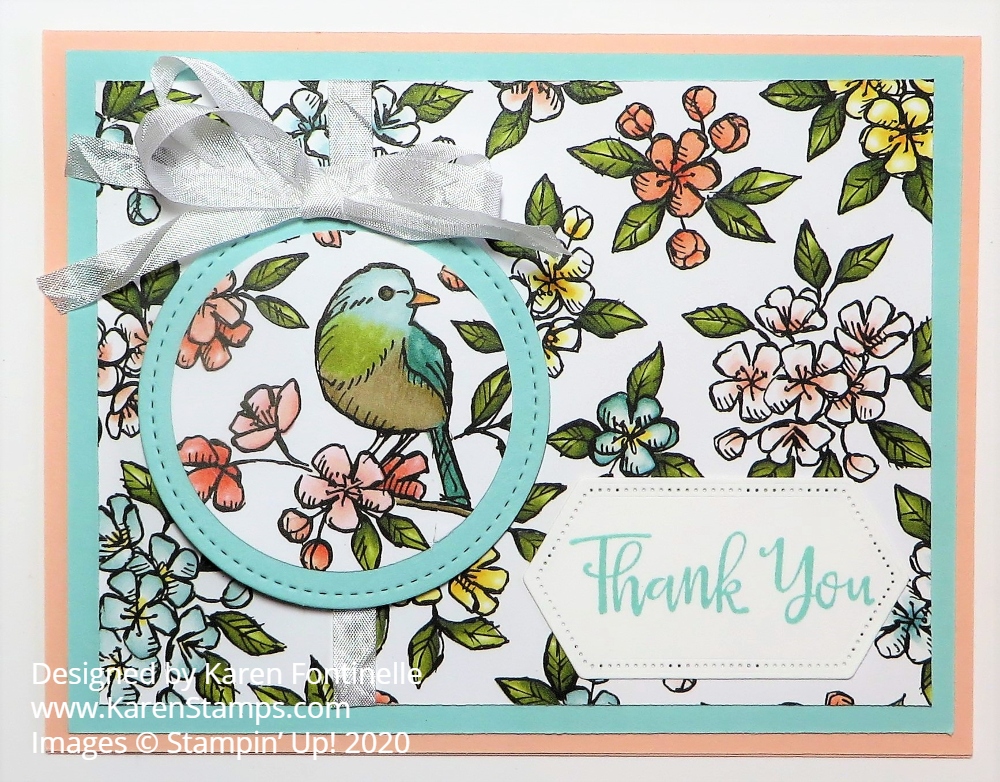
As I was using up some designer paper scraps the other day, this Bird Ballad Floral Thank You Card is one that I came up with. This floral pattern is so pretty I think and punching out one of the printed birds on another sheet of the designer paper as a focal point makes for a nice card.
I wasn’t crazy about all the sheets in the Bird Ballad Designer Series Paper, but I thought most of the patterns were really pretty. This paper, on the card front, with just colored flowers, I thought was especially pretty and easy to use on many cards. You can purchase this Bird Ballad DSP on the Last-Chance List at a discount until June 2.
The card base is Petal Pink, one of the coordinating colors of the paper. Then I added a layer of Pool Party underneath the floral designer paper. I punched out the bird from another sheet of the DSP. Then the bird is layered on a Stitched Shapes Die and popped up on Stampin’ Dimensionals®.
Before adhering the designer paper to the Pool Party layer, I adhered a short piece of Whisper White 1/4″ Crinkled Seam Binding Ribbon from the top of the bird image around to the back of the floral paper almost as if the bird image is an ornament. Then I took two strands of the same ribbon together and tied a bow which makes a fluffier bow, especially with this thin ribbon, and adhered it to the top of the die-cut with a Mini Glue Dot or two.
I’ve always found just doing random stamping all over a piece of paper to be a very relaxing and therapeutic experience! The block and stamp just feels good in my hand and doing the repetitive motion is calming. Then it is fun to go back over and color in the images unless you are doing just a colored outline and not coloring in.
This card wasn’t even planned! I just thought of it as I was making another card and had stamped some extra images on some scrap cardstock in case I wanted to use them somewhere somehow. I decided to stamp the flower images in Memento Ink randomly over a card front layer of Whisper White. Sometimes you have extra white space when you do random stamping as I did on this card. Since there was a single leaf in the stamp set, I just used the stamp to fill in some space in between the flowers.
To color in my card, I used my Stampin’ Blends, my favorite method of coloring right now! I used Light and Dark Petal Pink for the flower buds and Light and Dark Mossy Meadow for the leaves. The greeting is from the Good Morning Magnolia Stamp Set, stamped in Petal Pink, and then die-cut with the Stitched Nested Labels Dies. The ribbon I used across the front of the card is Old Olive and comes in the Ornate Garden Ribbon Combo Pack. It’s not a perfect match, of course, to the Mossy Meadow leaves, but I think it looks fine. It’s a pretty ribbon and makes the card look a little bit elegant.
This is basically an easy card but of course it does take time to color in the flowers. If you aren’t crazy about coloring, this might not be the card for you! But I enjoy it and love using my Stampin’ Blends.
You will see the Good Morning Magnolia Bundle on the Last-Chance retiring listbut the stamp set and dies will be in the new catalog. If you want this Bundle and want to save 10%, order it now to save that 10%, otherwise in the new catalog you will purchase each for full price.
I love the Magnolia Lane Designer Series Paper and have made many cards with it. But if you want to do some random stamping and get the feel of that stamp in your hand and like the repetitiveness of stamping for a card front, try making your own “designer paper” with stamping!
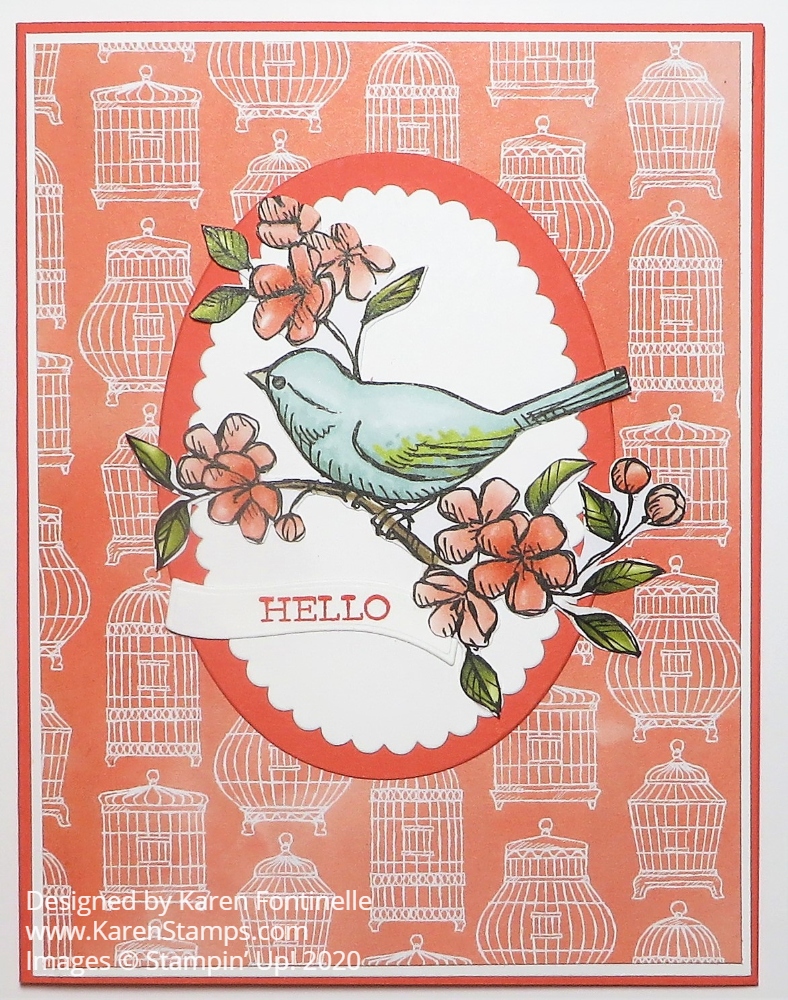
As I was looking through all my designer paper to see which one spoke to me to make a card, perhaps with scraps, it was the Bird Ballad Designer Series Paper that won out, but as I looked through my scraps, what was not a scrap was the pattern with various bird cages printed on the Calypso Coral background. I had a full sheet of this particular paper and decided to use it some way to make a card! It wasn’t a favorite of mine!
Once I cut out a piece to be a layer on a Calypso Coral card base I started liking the design better, especially after I put a thin margin of Whisper White Cardstock underneath. I even used that piece of Whisper White to cut out the Whisper White oval I used on the front of the card. Just don’t tell anyone! I don’t often do it, but it is a little trick you can use if you really want to save paper and if you are positive it will not be apparent to the look of the card.
Because of the sizes of the ovals and needing a large oval on which to layer the bird, I chose a scalloped oval from the Layering Ovals Dies and die cut that out of Whisper White and die cut a plain oval out of Calypso Coral.
Next, I chose a bird that I liked on the scraps I had of the Bird Ballad Designer Paper. I simply cut out the bird, branch, and flowers myself with my Paper Snips while watching TV! You do not have to get into every nook and cranny when you cut something out yourself and I do not find it difficult at all. One tip Stampin’ Up! gave us years ago was to cut just a tiny bit off the actual image instead of on the actual line of the image because that is a little more forgiving in your cutting if it is not exactly perfect. Just do whatever is the easiest for you.
After I cut out the bird, I really like the way it layered on the ovals and how the colors all went together well with the background of the bird cage paper.
I decided to use the “Hello” greeting in the Free As a Bird Stamp Set that coordinates with the designer paper. I was afraid to just stamp it directly in the empty space on the Whisper White lest I make some kind of mess! Maybe if I had planned ahead because you should usually do your stamping first and then other steps. But I opted to stamp and die cut with the little wavy banner in the Ornate Frames Dies. I have loved these dies since they came out in the past Holiday Catalog with a Halloween stamp set, but they are great to use in lots of other ways!
Putting a little “Hello” on a card makes it perfect for almost any reason to send a card, especially just a note to catch up with a friend or family member. On the inside of the card, I adhered a Whisper White layer either with a couple flowers stamped with Calypso Coral Ink or a strip of matching designer paper along the bottom edge of that Whisper White layer.
Here’s another card I made with a different pattern of the Bird Ballad paper. I didn’t care for every sheet in this package of designer paper but several I thought were just beautiful. So if you like this paper, be sure to get some on the Last-Chance List before it is gone. The last date to order retiring products is June 2, 2020.
Remember to do some fussy cutting with good scissors for that like the Paper Snips if you don’t want to stamp or if you like an image on the designer paper. In some cases, you might be able to punch or die-cut a circle or oval from the paper, but I find fussy cutting is a good stress reliever! And remember that sometimes a piece of designer paper that you didn’t think you cared for can really turn into a pretty card like this Bird Ballad Bird Cage Paper Card.
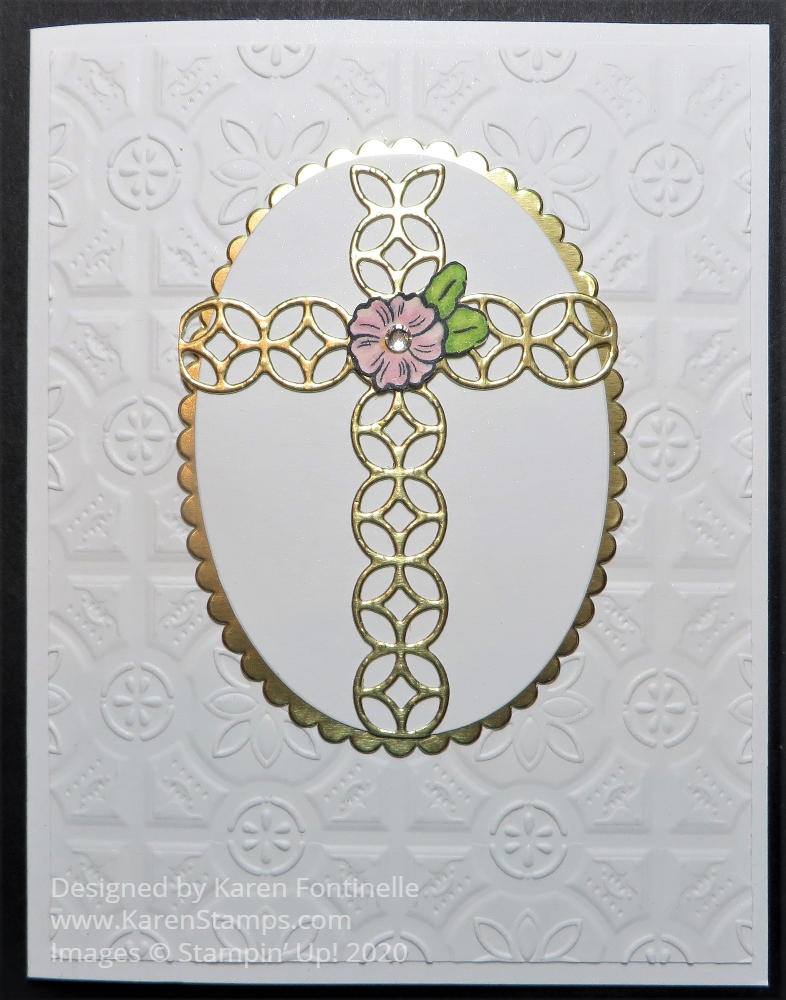
Three weeks ago today I had a need for a special sympathy card so I created this Sympathy Card With Gold Foil Cross. A dear friend with whom I’d grown up since 4th grade lost her husband to the coronavirus. While I saw lots of pretty ideas for sympathy cards online and almost chose one of those, I ended up somewhat copying a card I’d made myself several years ago.
Around Easter I had posted some past cards I had made and I noticed my friend commented on a card like this one. She’s also has a strong religious faith so I thought a card with a cross would be appropriate.
I first thought of making an all-white card but in the end, I used Gold Foil for the cross and the scalloped layer. The card base is Whisper White with a layer that is embossed with the Tin Tile 3D Embossing Folder.
The cross is made with two die-cut pieces from the Flourish Dies. It is the long piece that is not a leaf or flower! I cut two but then cut each down according to the size I wanted. Just use Paper Snips to cut carefully either with a straight line or perhaps following the curve, depending on where that end is going to end up.
I had to put a lot of thought into layering the cross, whether to emboss that background piece, what shape, what color, etc. Finally, I settled on using the Layering Ovals Dies because I needed something large. I chose to use one of the scalloped ovals for the gold foil layer under the white oval. To glue the cross together and to adhere it to the oval, I used the teeniest drops of Multipurpose Liquid Glue. It IS possible to get teeny drops out of the bottle but if that doesn’t work for you, put a small puddle of glue on some scrap paper or wax paper or your Silicone Craft Sheet and dip something like a toothpick or corner of a scrap of cardstock in it to pick up the glue.
Last, but not least, I had a difficult time deciding on a flower. Whether to stamp a flower and punch it out with either a current punch or retired punch and what flower stamp to use, etc. etc. Finally, I settled on this flower, stamped in Memento Ink and colored with Stampin’ Blends. The stamp is in the Ornate Style Stamp Set. I even added a little Rhinestone Jewel to the center of the flower.
This is the card I copied from. It doesn’t hurt to look back at your older creations and see if something in your own collection inspires you! I just changed up the colors to what feel I wanted this sympathy card to have and it was easy to duplicate. Of course the personal note inside a card like this is the most important part, but I know for us cardmakers, making a card for a situation like this takes some thought about the design, colors, greeting, etc. in hopes we will get the tone just right and bring comfort to the recipient. I’m afraid we could all need to have some sympathy cards on hand or ideas in our heads for one with the virus ravaging our country in this way.
Always look through your stash of cardmaking supplies, even older ones, and you will likely find something, even the perfect something, with which you can make a card like this sympathy card. It’s a shame we have to send them to people we know, but we do and we’ve been given a special opportunity with our supplies and our talent to hopefully ease someone’s sorrow with our cardmaking and papercrafting.
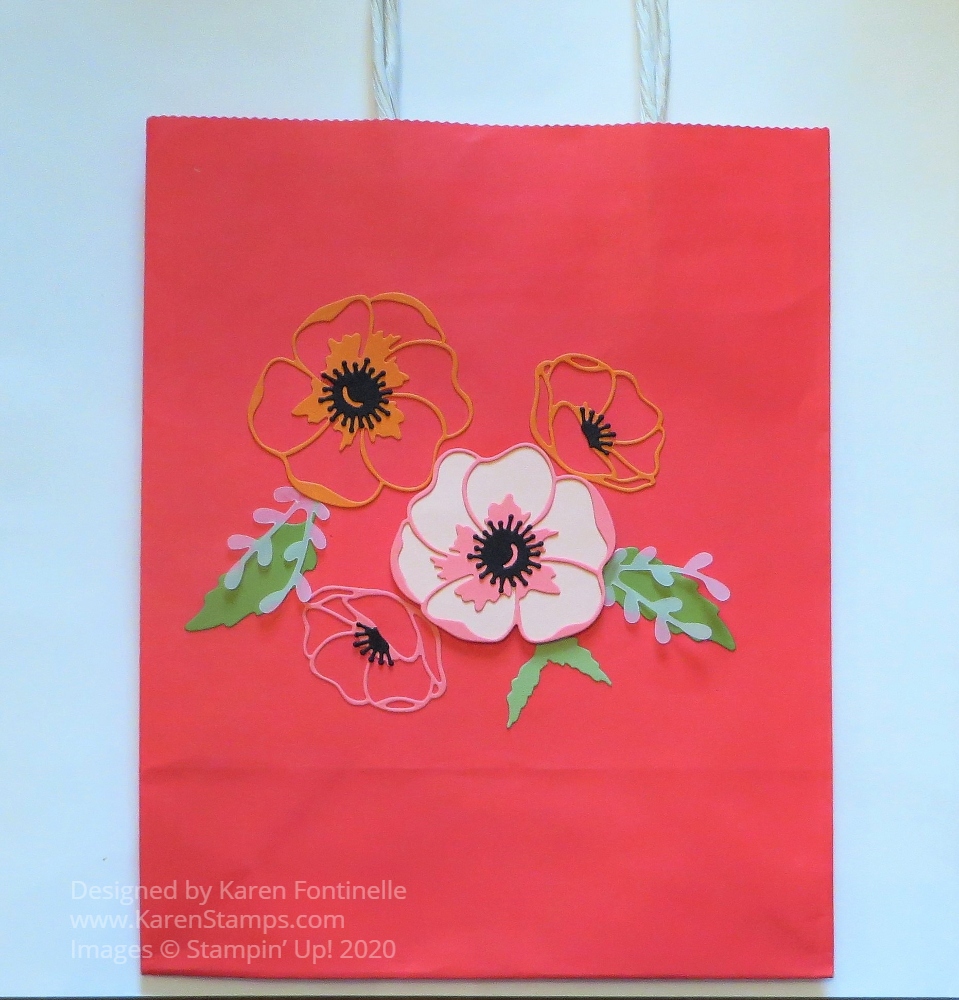
One of my favorite projects to make is to decorate a gift bag like this Poppy Moments Altered Birthday Gift Bag that I made for a friend’s birthday. Sometimes I use a bag I got out shopping and even if it has the store name on the side, I can cover the name with paper and decorate. It’s almost like making a card on the side of a bag! And if you don’t already have a cute shopping bag, you can buy a bunch at the craft store.
To decorate this shopping bag, I used thePoppy Moments Dies and just cut out a few flowers and leaves! I also used the Sprig Punch to punch a few leafy sprigs out of Vellum Cardstock. I made this bag pretty simple because there was no store printing that I had to cover up. After putting a gift inside the bag with tissue paper, you could also tie a ribbon around the bag handles. You could also attach a gift tag that you made. So many possibilities!
Here’s a birthday gift bag I decorated several years ago. The bag itself is pretty with a swirly leaf print on it, but I did need to cover the store name but that’s usually easy to do, sometimes on the front and back of the bag.
This gift bagturned out really pretty I think! I don’t remember if the bag was plain on the front or if it had printing on it, but it was easy to cover almost the whole front of the bag almost like if I had been making a card! You can see how you could make the same design for a card just by making it smaller!
If you are cleaning up closets and cabinets during the pandemic, save those small shopping bags and do something creative with them! Decorate for birthdays or Christmas or something generic and then you will have some personalized gift bags ready to go! Or maybe you can make a bag that matches your gift.
Altering or decorating bags you have around the house is something fun you can easily do and a great way to recycle! And it just might save you a trip to the store for a gift bag!
You may think it is early to subscribe or reactivate your account in order to receive the June 2020 Paper Pumpkin Kit, the Box of Sunshine, but be forewarned this kit is likely to be popular and could sell out! Get yourself signed up TODAY!
What is so special about this Paper Pumpkin Kit?
This exclusive Sara-inspired Paper Pumpkin kit is here to help you #sharesunshine. It includes supplies for eight handmade cards and is specially designed to help you create a box full of cheer. Once you’ve made all the cards, use any leftover pieces to decorate the box. Fill it with yellow goodies, add the included adhesive label, address it to someone special, and brighten their life with a little sunshine!
ABOUT THE JUNE KIT
The Box of Sunshine Kit contains supplies for 8 cards and envelopes (2 cards of 4 designs): Card size: 4-1/4″ x 5-1/2″ Envelope size: 4-1/2″ x 5-3/4″ Coordinating Colors: Basic Black, Bumblebee, Crushed Curry, Poppy Parade, Shaded Spruce, White, and Gold
Box of Sunshine Information
This kit includes extra pieces and stickers (including a sticker label) to help you create cards AND a Box of Sunshine filled with treats and goodies to send to a friend. (Treats not included.)
The May 2020 Paper Pumpkin Kit with the new In Colors inside sold out in a flash, before May 1st! Don’t delay if you want this June Paper Pumpkin Kit because I think people will order multiple kits to give with treats inside and will be popular, especially because anything Sara Douglass helps design will be something special!
The deadline for signing up or reactivating your account is June 10 but I wouldn’t wait that long!
You can also add a Prepaid Subscription to your Stampin’ Up! order of one month or several months or even give this as a gift. If you want to do this, you can combine it with your order from the new Stampin’ Up! catalog and perhaps boost your Stampin’ Rewards if you have a large enough order! You will receive an email with directions for setting up your account and how to input the code showing you have a Prepaid Subscription.