Tag Archives: Share Sunshine download

More Share Sunshine Cards

Share Sunshine Cards

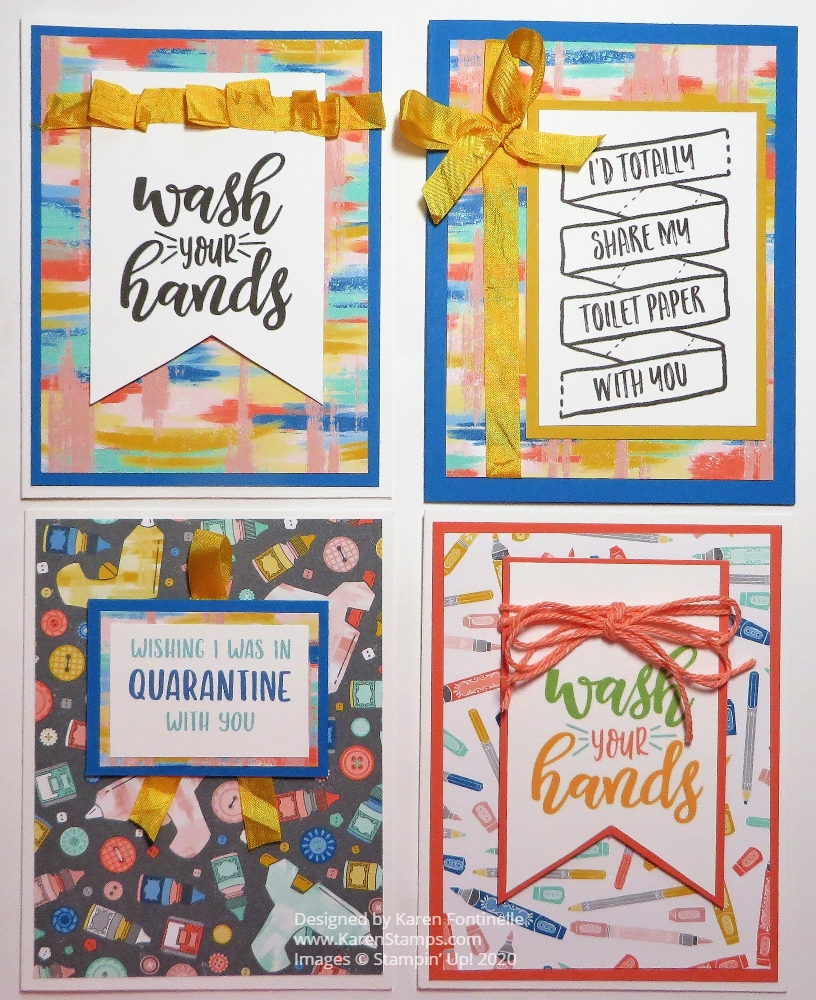
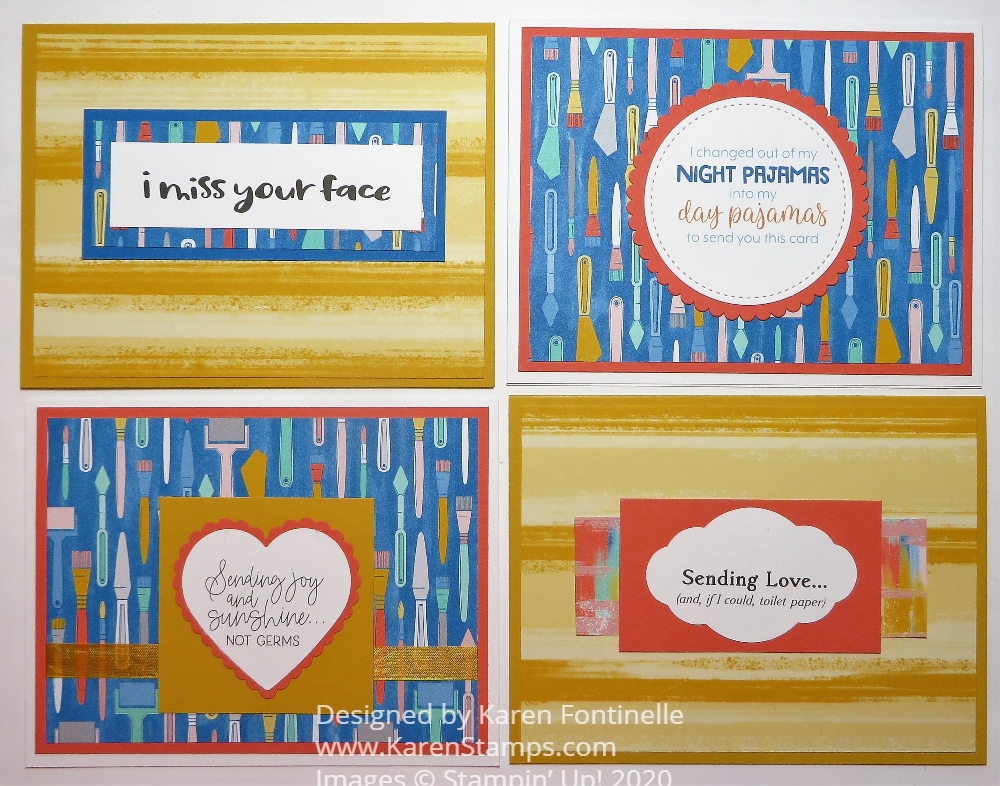
After making a bunch of cards with the Share Sunshine PDF download the other day along with Sara Douglass during the Facebook Live for the Stampin’ Up! Day of Service, my daughter asked me to make more Share Sunshine cards for her. Some I copied from what I had already made and some I had to resize or change because my designer paper was dwindling!

Sara used, and I also used, the Follow Your Art Designer Series Paper, which is cute and has great patterns for crafters! If you want it, you can still grab it in the Online Store in the Last-Chance Products for quite a discount! There are some coordinating products with the paper you also might like at a discount!

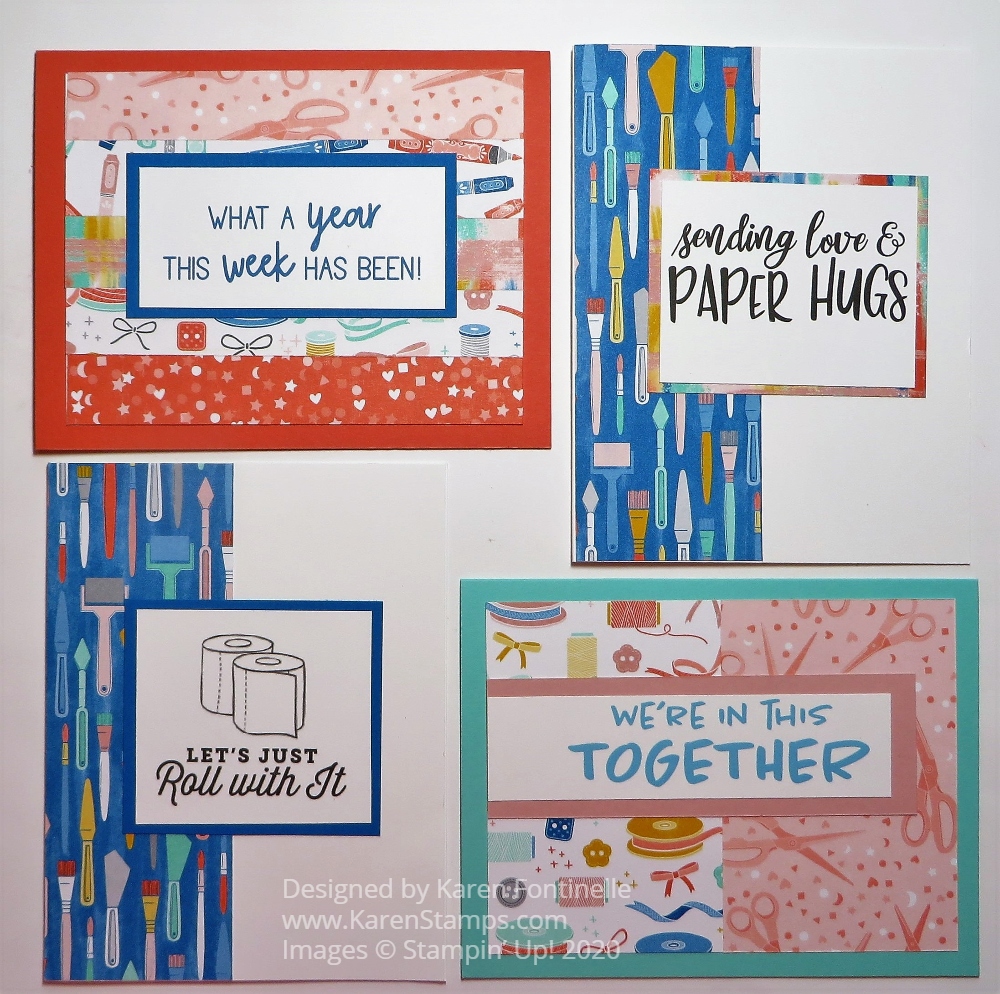
These full-size cards I was able to make while I still had some decent size designer paper pieces! I tried to copy some of the designs I had already made the other day on some. The greetings are from the Share Sunshine download, printed out on Whisper White cardstock, and you can just cut them apart with the Paper Trimmer or use punches or dies….whatever you like! You might add some embellishments like enamel dots or sequins, but I was keeping these quick and simple.

Share Sunshine Square Cards

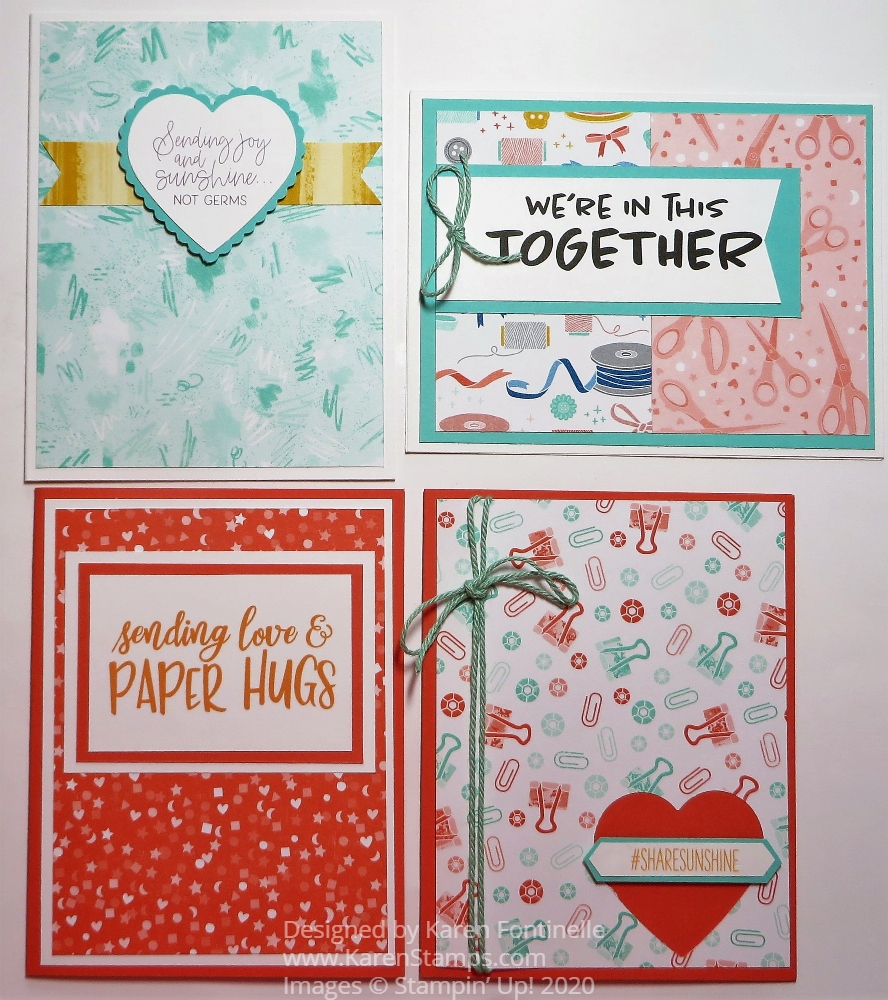
For these cards, I cut the card base at 4 1/4″ so that I could just use 4″ square pieces of designer paper. You can see on the first card I used a die from the Stitched So Sweetly Dies. Some of the rectangle and square dies are good to use, but mostly I just used my Paper Trimmer. Once you cut the greetings apart on the cardstock, you can then use dies or even trim down further with the Paper Trimmer to make it fit your card and layer.

Share Sunshine Hug Card

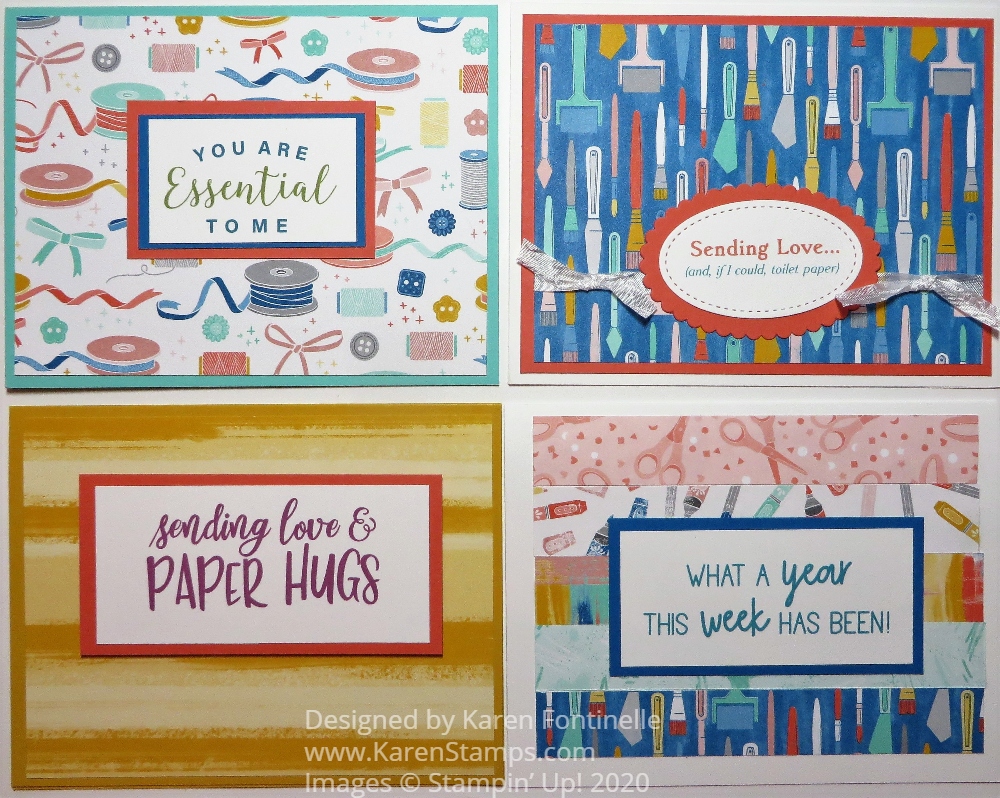
Here’s a card I made for my son. You can see that I used the Stitched Rectangle Dies to cut out the greeting and the layer. You can reposition the dies sometimes to change the size of the die-cut you want to end up with. I’m not sure I did it exactly right but I got it.

Just for fun I cut out more of the sayings and adhered them inside the card! You can leave the inside of the card plain and stamp or write your own personal message inside. If the cardstock is too dark, add a white layer of cardstock inside, perhaps decorate with a strip of matching designer paper.

Share Sunshine Card Inside

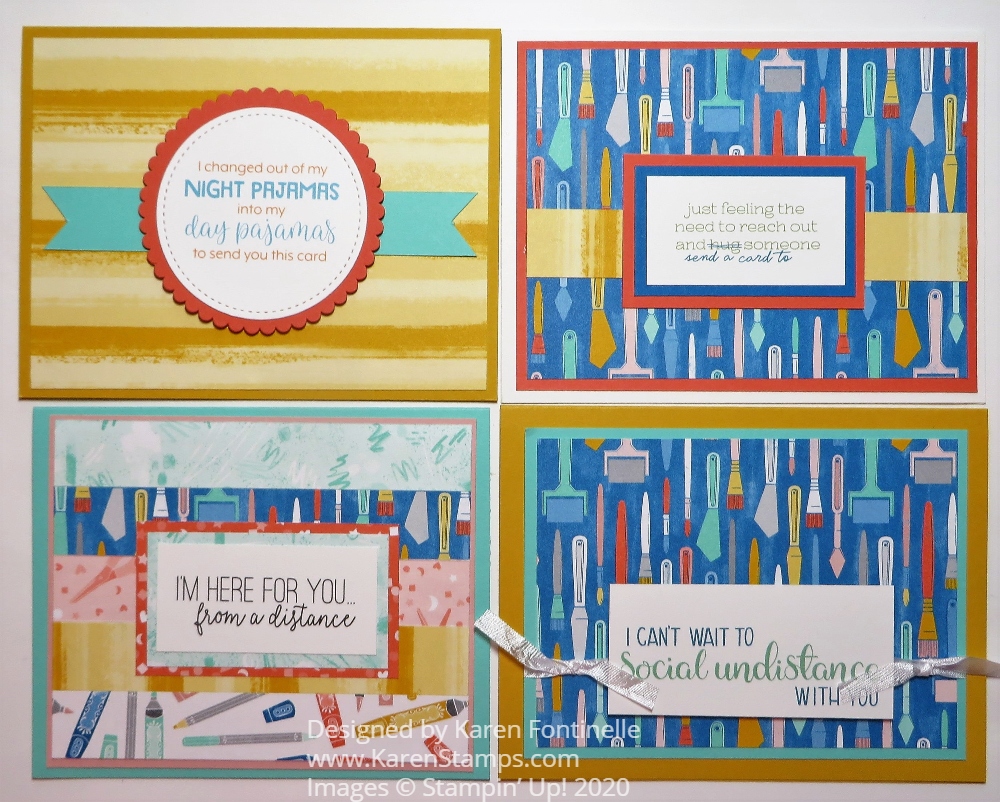
And after all that Share Sunshine cardmaking, these are the designer paper scraps I have left!

Follow Your Art Scraps

Probably just enough to make just a few more cards!

You don’t have to use this Follow Your Art DSP to make these same cards, use whatever paper looks fun for you to use! And if you make a lot of cards, it’s a great way to use smaller strips and scraps of the designer paper, even if you just use a small piece. Get creative!

If you missed it, be sure to check out my Facemask Cards I finally got to make! You might want to make some of those yourself to send to someone who might enjoy or appreciate a card! That’s what #ShareSunshine is about!

Facemask Cards with Peaceful Poppies Paper

Facemask Cards with Peaceful Poppies Paper

The first time I saw one of these face mask cards online I thought it was so clever and I have been anxious to make one since then so here are my Facemask Cards with Peaceful Poppies Paper. Not all face masks have to be those medical blue ones! Some are getting quite creative! A famous furniture store owner here in Houston is wearing a face mask with a face printed on it when he does his commercials on TV!

These face mask cards are relatively easy to make. You just take a small scrap of paper, preferably designer series paper because it will fold easier than cardstock, score and fold, then tape. If you want, you can then pop up the mask from the underside by pushing out those pleats you folded, just like a real mask. I don’t think this would be workable for mailing but it is fun that you can make the mask look so realistic.

To make the mask, use a piece of designer paper 2 3/4″ x 2 1/8″. Then putting the short end at the top of your Paper Trimmer or Simply Scored scoring tool, score at 1/2″, 5/8″, 1″, 1 1/8″, 1 1/2″ and 1 5/8″. Normally I score most things with my Paper Trimmer because it’s right there, but I think for this little bitty piece of paper it is easier and better to use the scoring board. You want the score lines to go horizontally across the paper, just like a real mask would look.

I used some scraps of Peaceful Poppies Designer Series Paper to make the masks. Why not use some pretty paper?! After scoring the little scrap of designer paper, fold and crease back and forth just like pleats on a real mask. It’s a little tricky to get those narrow folds but just make the paper do what you want! It helps to use the Bone Folder to really give those folds good creases. If you don’t have a Bone Folder, use a spoon or acrylic block or whatever you have.

After you have the paper folded, the sides need to be taped down to hold them in place. Make sure you have everything as straight and lined up and folded down as possible. It might end up slightly off so don’t worry about that. It might not be perfect, just like the masks I sewed, but it doesn’t matter! Try to get it as good as you can.

Cut a strip of Whisper White cardstock 11″ x 1/4″. Apply Tear & Tape along this piece of 1/4″ cardstock all the way down. The width of the tape fits perfectly if you apply it straight. Then pull back just a portion of the adhesive tape so you can adhere the thin strip of cardstock to each side of the mask on the back then cut off the excess. After you tape the sides of the back of the mask do the same on the front on each side. This strip of Whisper White looks like the white borders you often see on masks, so it works great and the Tear & Tape holds it well.

To put a very thin strip of white cardstock on the top and bottom of the front of the mask, lay the strip of Whisper White Cardstock on your table, adhesive side up. Adhere the top of the mask to just half that width (1/8″) of the white cardstock, then cut off the excess. Now you have the other side of that adhesive piece, 1/8″ wide, to adhere to the bottom edge of the mask.

If you want to pop up the mask to make it 3D, push out from the back side to push the pleats open. Then take another piece of the Whisper White strip with Tear & Tape adhesive and adhere it to the inside of the mask down the center to hold the pleats open.

I used 2 3/4″ pieces of the Whisper White 1/4″ Crinkled Seam Binding Ribbon for the ear loops of the mask. Just adhere with Mini Glue Dots. You could use whatever other ribbon you have that would work.

That’s it for making the little mask! For making each card, I just used Whisper White Cardstock for the card base and adhered a narrow strip of the Peaceful Poppies DSP along the side. The mask is adhered with Mini Glue Dots in each corner of the mask. The greeting is layered on a piece of Poppy Parade Cardstock. The measurements depend on the size of the greeting that you cut out.

The greeting comes from the Share Sunshine PDF download that you can get with a $12 donation to organizations that are helping during the pandemic. The full $12 goes to the donation, none is kept by Stampin’ Up!. For your donation, you get 15 pages of light-hearted sayings about the pandemic and quarantine, things we all talk about every day in this situation. You can print out all the pages or just the ones you choose and then cut, die-cut, or punch out the sentiments you want to use and use them on cards. The last day this Share Sunshine download will be available is June 2nd. Get it HERE.

If you want to watch some videos with Sara Douglass on Facebook explaining how she planned out cards to make with the sayings and designer paper and see her family’s craft party that they did virtually along with the Stampin’ Up! employees for their Day of Service, just watch HERE or HERE. I made some cards as I watched and made more the rest of the afternoon. Then my daughter saw them and asked me to make cards for her so I made more! And then I made the mask cards because I liked the saying that went with the face mask!

Facemask Cards With Peaceful Poppies Paper 3D

I hope you will try one of these Facemask Cards and send it to someone who might feel a bit of “sunshine” from receiving a card from you!

Making Covid-19 Cards With Stampin’ Up!

Covid-19 Cards6

Yesterday was the Stampin’ Up! Day of Service and I enjoyed a fun and relaxing hour watching a Facebook Live with Sara Douglass, CEO of Stampin’ Up! and her family at home making Covid -19 cards using sayings on the Share Sunshine PDF download. I made several cards, sometimes taking inspiration from Sara’s instructions and sometimes my own, and afterwards I made more cards. And after dinner, I made even more cards!

These cards were supposed to be kept simple and since I was making a lot I just wanted to mostly make basic cards. I have a few that I may go back and put maybe a few embellishments on, but I may not!

Covid-19 Cards5

If you missed the Facebook Live yesterday with Sara, you can still watch the replay today or at your convenience on Facebook HERE. I would suggest that you watch her previous Facebook Live where she explained how the cards are designed, how to cut your designer paper, etc. You don’t have to follow her designs, you can do your own, too. You don’t have to use these greetings on the Share Sunshine Download, you can use your own.

Covid-19 Cards4

This is a great way to use up some of your retiring or retired designer paper before the new papers come out June 3 in the new Stampin’ Up! catalog! Sara shows an easy way to cut your paper so you can make several card designs that are simple enough for any stamper and then you can embellish if you like.

Covid-19 Cards3

This is the Follow Your Art Designer Series Paper but other papers would be nice too. This paper has a great discount on it so go grab a package! Sara also used some embellishments in the Follow Your Art Embellishment Kit which is also discounted! The kit includes felt accents, charms, linen thread, paper clips and the cute box.

Covid-19 Cards2
Covid-19 Cards1

Sara’s intention was that we stampers can #SpreadSunshine with our cardmaking skills and then send them to friends, family, frontline workers, nursing homes, neighbors, wherever you like.

You might enjoy just watching the Facebook Live video from Sara and her family even if you don’t have time to make cards right then. It’s always fun to see new ideas and see what cards other people are making!

Make Cards With Stampin’ Up! Today!

Click to Enlarge

An Invitation From Stampin’ Up! 

Our Stampin’ Up! Day of Service will be Thursday, May 21 at 2:00 pm MT! With current social distancing practices, employees are participating in Day of Service virtually, which provides us the opportunity to include demonstrators and customers in Stampin’ Up!’s service activity. 

For this year’s Day of Service, we will use the Share Sunshine PDF Download (no longer available) to make and send cards to loved ones, frontline workers, etc. As part of our Day of Service, we will provide each employee with the Share Sunshine PDF Download and will contribute $12 USD per employee to the COVID-19 response funds, as part of our COVID-19 giveback, resulting in a company donation of $5,820 USD for Day of Service!

We invite demonstrators to participate and we encourage you to share the event with your customers so they can join the fun! 

Stampin’ Up! employees, demonstrators, and customers will be gathering virtually for our Day of Service craft party on 21 May at 2:00 PM (MT) to make our cards together in a Facebook Live on Sara’s CEO Facebook page. 

If you or your customers are unable to participate in the live craft party, the replay will be available to view any time on Sara’s Facebook page.

To make it easy for everyone to participate, we’ve also created an instruction sheet for Sara’s four-step cards, which includes a cut map for your Designer Series Paper (any Designer Series Paper will work). Note: A full package of 12″ x 12″ Designer Series Paper will be enough to make four kits (20 cards). You can find the instruction sheet here. We encourage you to come prepared with pre-cut Designer Series Paper! 

SO….YOU are invited to participate in this Facebook Live cardmaking event along with Demonstrators and SU Employees! Feel free to just watch or follow along and copy their cards or just do your own stamping while you watch! You are not required to purchase the download. You can make the same card design and use your own greeting and your own kind of designer paper. If you miss it, like any FB Live, you can watch it later!

Stampin’ Up! Day of Service Facebook Live with Sara Douglass-CEO Stampin’ Up!

Covid-19 Pages