Monthly Archives: October 2019

Holiday Catalog Let It Snow Snowman Christmas Card

Holiday Catalog Let It Snow Snowman Christmas Card

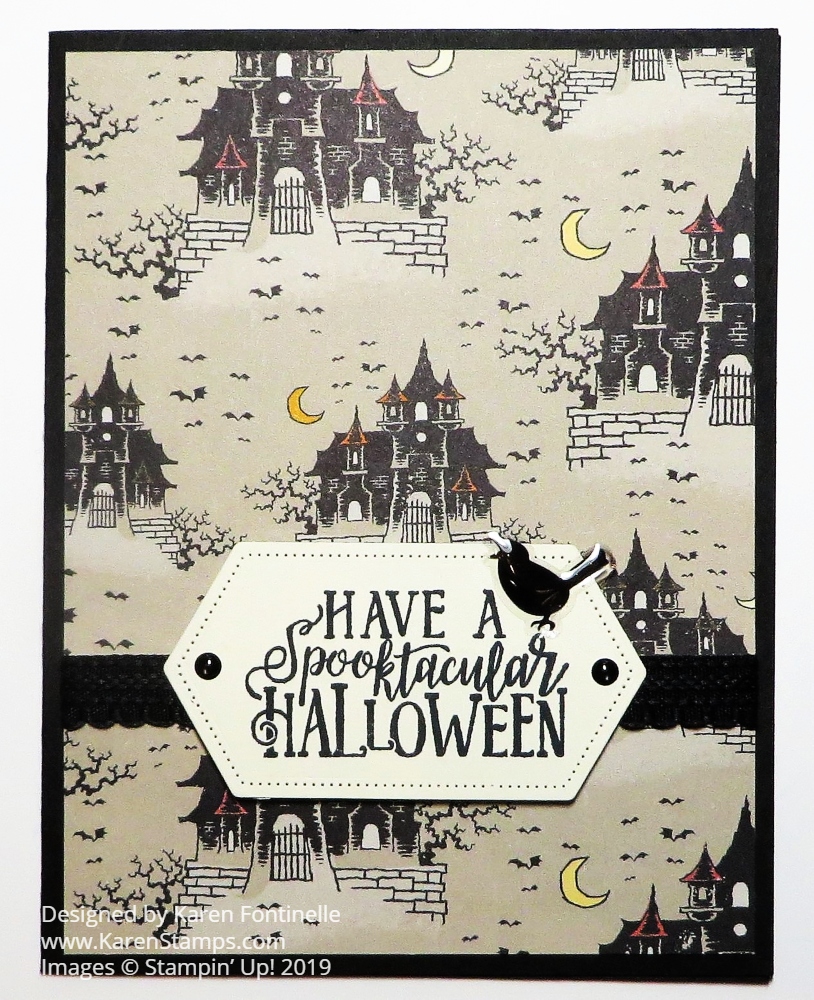
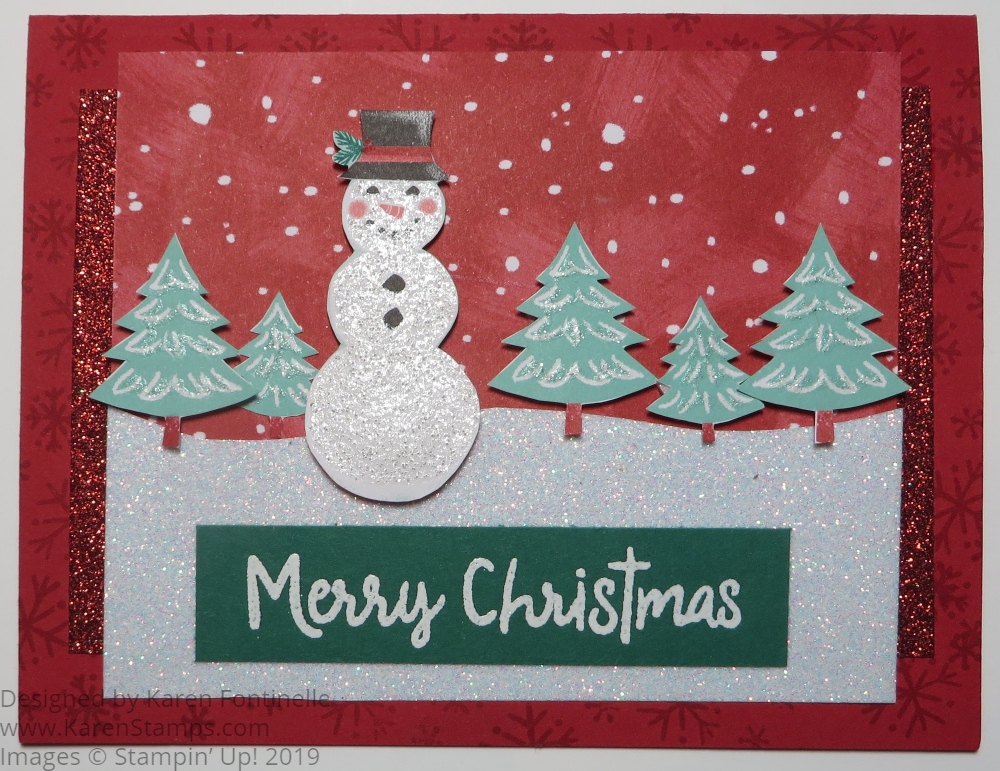
We always say if you need some inspiration, use the Stampin’ Up! catalogs, so that is what I have done with this Holiday Catalog Let It Snow Snowman Christmas Card. You will find a card on the cover of the Holiday catalog that I mostly copied except for the snow.

The Let It Snow Specialty Designer Series Paper is beautiful to use for Christmas cards and projects. This paper is 12″ x 12″ so you have plenty to use. One side has images with bits of glimmer and the other side has more generic images that you can use for non-Christmas projects or after Christmas (if you have any left after using the glimmery sides!).

This card has a Real Red base and is stamped with some Real Red snowflakes with the Snowman Season Stamp Set. Next, there is a piece of the non-glimmer side of the designer paper with the snowmen that I used for the background to look like snowflakes. On the bottom, instead of the way Stampin’ Up! did their card on the catalog cover, I cut a piece of Sparkle Glimmer Paper for the snow. Stampin’ Up! used the new Snowfall Accents Puff Paint on their card but I didn’t own that yet. (As I write this, the Puff Paint had been unorderable but it is back in stock right now so go order it while you can!) On the sides of this layer are strips of the Real Red Glimmer Paper to set off the layer.

The snowman is punched with the Snowman Builder Punch and the trees are all cut by hand with Paper Snips from the Let It Snow DSP. This is the kind of paper that you hate to cut into for any reason, even for making a great card! But it is made to be used so don’t hoard it! Except for one tree adhered directly to the layer, the rest and the snowman are all popped up with Stampin’ Dimensionals and Mini Stampin’ Dimensionals. The Minis save you from cutting the regular size Dimensionals into smaller pieces! (Did you know there are also Black Stampin’ Dimensionals Combo Packs which have both regular size and mini dimensionals in black, which for some projects “hides” them a little more on your project!)

The greeting is stamped with Versamark Ink and then heat embossed with White Stampin’ Embossing Powder. The greeting is also from the Snowman Season Stamp Set. The cardstock is Shaded Spruce. The Stampin’ Up! samples on the catalog cover also used some Red Rhinestones on the hat.

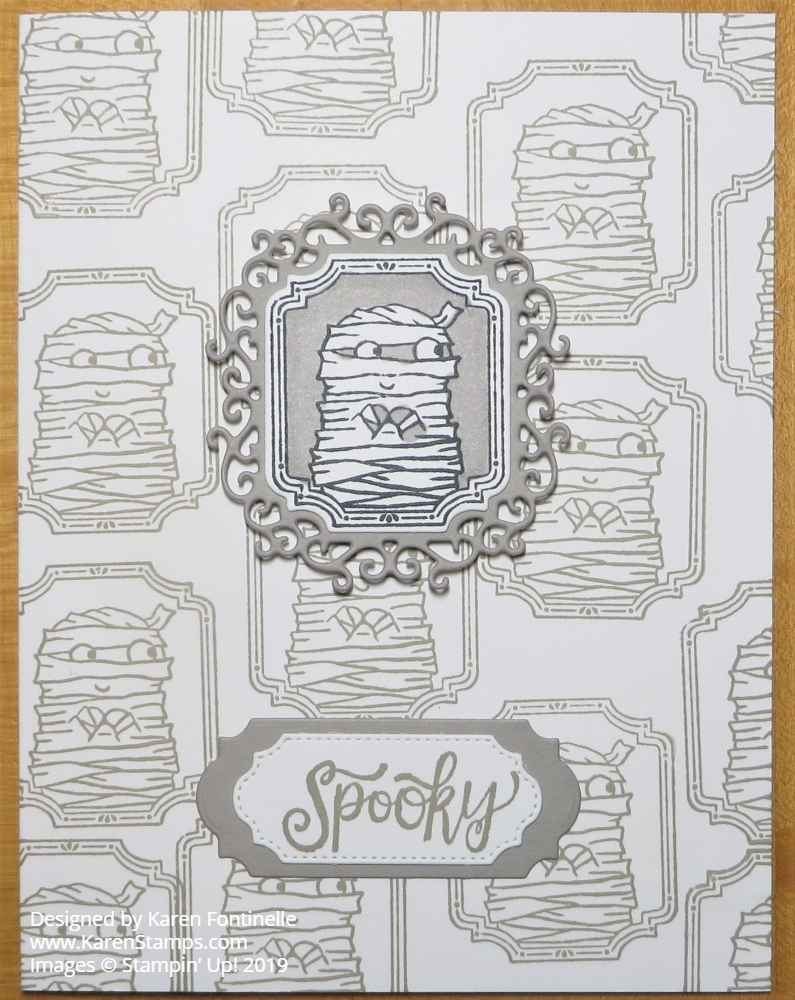
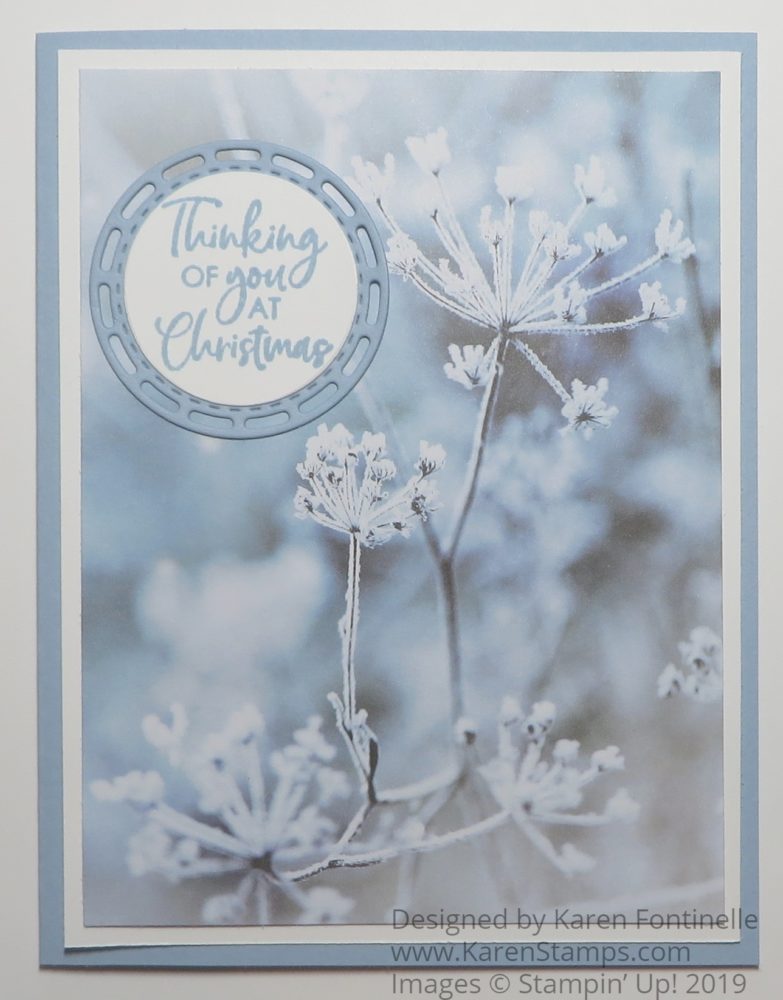
When you use dark cardstock for the card base, you may need to put a layer of Whisper White or Very Vanilla or some coordinating lighter color inside the card so that you can stamp a greeting or write a personal note. In addition, you can also add some decorative stamping. See the inside of this card below.

Holiday Catalog Let It Snow Snowman Christmas Card Inside

It’s time to get an early start making Christmas cards so we won’t be rushed when it gets down to the wire! If you need Christmas card ideas, be sure you are signed up for my Mailing List because I will be sending out Week 3 of my 12 Weeks of Christmas holiday emails. You still have time to get another few weeks of card ideas, then we move on to gift ideas and finally gift-wrapping ideas with tags, bags, etc. Of course, I will also have Christmas card ideas on my blog and Facebook page.

As I said, one of the many places you can get ideas and inspiration for holiday cards is to look in the Stampin’ Up! Catalogs. You can copy or you can just take part of the idea and add your own elements. Lots of times, just having some idea in front of you gives you your own idea as you begin working! Be sure to order your supplies early so something you want is not out of stock.

SHOP STAMPIN’ UP! ONLINE!

Monster Bash Spooktacular Haunted House Halloween Card

Monster Bash Spooktacular Haunted House Halloween Card

This Monster Bash Spooktacular Haunted House Halloween Card is certainly an easy card to make! And I love the paper! I had actually overlooked this pattern in the designer papers so I wanted to use it. The designer paper seemed interesting enough that all I needed on the card was a greeting…..and just a couple of easy embellishments!

The card base is Basic Black but of course, you could use any of the several coordinating colors with the Monster Bash Designer Series Paper. I chose this pattern with the haunted houses, not quite sure what else I would do with it.

The greeting is stamped in Memento Black Ink from the Spooktacular Bash Stamp Set. Then I used the Stitched Nested Labels Dies to cut it out. When I tried it on the card, I didn’t feel like I needed a layer underneath or anything. I used the Basic Black 3/8″ Scalloped Edge Ribbon wrapped around the piece of designer paper.

Just for a little easy embellishment, I added two dots and a bird from the Monster Bash Enamel Shapes to the greeting.

Be sure to adhere a Very Vanilla layer inside the card with a stamped greeting and maybe a little Halloween stamping or strip of designer series paper since the cardstock is black. Then you can write a Halloween note or just decorate the inside of the card a little bit.

If you are making some Halloween cards, try this design that I did with my Monster Bash Spooktacular Haunted House Halloween Card and be sure to mail them to friends and family to wish them a Happy Halloween!

Monster Bash Mummy Halloween Card

Monster Bash Mummy Halloween Card

The ghouls are beginning to come out now that Halloween is getting closer as in this Monster Bash Mummy Halloween Card! It’s a monochromatic card, easy for you to copy now that I figured out the design and it’s just stamping, die-cutting and a tiny bit of coloring to make it.

I essentially made my own designer paper by stamping the front of this card with a mummy stamp from the Spooktacular Bash Stamp Set. It is just random stamping with Gray Granite Ink. I used the Whisper White Thick Cardstock so the card would not feel flimsy with no other layers or designer paper.

Next, I stamped the mummy by itself and die-cut it with the die from the Ornate Frames Dies. When I first started making this card, at this point I had some difficulty deciding on the layering of this stamped mummy. I was trying to keep the card monochromatic. Eventually, I got the idea to color the background around the mummy and with the Light Gray Granite Stampin’ Blend marker which helped it stand out. I chose the frilly frame in the Ornate Frames Dies for the background layer. Then I played around with whether or not to have something horizontal behind this frame.

In the end, I decided to use a horizontal die cut with a die-cut greeting lower on the card. Both dies are in the Ornate Frames, but after die-cutting the horizontal piece, I placed the die on it again and cut it shorter to fit the greeting better. The greeting, of course, is from the Spooktacular Bash Stamp Set.

Once I had all those elements and placed them on the card, I was pleased with the result. Sometimes, many times, you just have to play around with your card if you don’t feel it is quite right. Eventually, you will come up with something that you know is how the card design is supposed to be! Sometimes you have to change colors or stamps or layout, whatever, but it WILL come to you!

Have fun this month making some Halloween cards and treats and be sure to mail out those Halloween cards early so your recipient can enjoy them awhile before Halloween! If a friend isn’t “into” Halloween, then make them a card with pumpkins or something not “spooky” and hopefully they will like that, especially just the idea of getting a card in the mail! You never know what effect your card, that one day at that one time, will have on a person. And it will have an effect on you, just enjoying making the card, thinking of that person, and being happy that you sent them a reminder of your friendship, thoughts, or love.

Get the Spooktacular Bash Bundle and save 10%! You get the Spooktacular Bash Stamp Set together with the Ornate Frames Dies so you can make all kinds of fun Halloween cards, treats, and projects like this Monster Bash Mummy Halloween Card! Order soon because as I write this the inventory is low. Hurry!

SHOP THE STAMPIN’ UP! HOLIDAY CATALOG HERE!

Gather Together Fall Votive Holder

Gather Together Fall Votive Holder

We can do so many things with all our Stampin’ Up! products and supplies and papercrafting skills, like making a piece of home decor such as this Gather Together Fall Votive Holder. I think the colors and items of fall just inspire us so much, like pumpkins, leaves, gourds, mums, scarecrows, and more. That’s what makes it so fun, especially getting relief from the heat of summer!

You can easily make something like this, probably with something you already have in your house, or you can make it for a gift for someone. All you have to do is add a candle inside or one of the flameless ones to be extra safe. If you are using a real candle, make sure the paper is nowhere near the top of the votive holder.

It’s funny how I can start a project with one idea in mind and then come up with something totally unplanned. I almost don’t need to tell you how to make this exactly because I’m sure you have something very similar in your stash and can use what you have.

I started with a checked strip of the Come To Gather Designer Series Paper. When you are using glass, it would be nice if you can to use something that also looks good on the inside since it will be able to be seen. Although unplanned, this strip happens to have the same pumpkins on the opposite side which you can see through the inside of the glass that I used on the decoration.

I started out thinking I was just going to do something with colored leaves but it’s hard to resist the siren call of the beautiful Come To Gather Designer Series Paper. I cut out some of the pumpkins from the paper and I also found some stamped pumpkins from the Gather Together Stamp Set in my stash that I had already colored with Stampin’ Blends. I thought they still fit in with the other pumpkins even though they are more colorful. Next, I stuck in some stamped and die-cut or punched leaves I had just done or already had in my stash. The larger leaves are from the Rooted In Nature Stamp Set.

Once I decided my pumpkins and leaves needed a little background, I die cut a piece from the Ornate Frames Dies. You should really check out these dies because they are pictured in the Halloween section but they CERTAINLY can be used for other things. There is nothing “Halloween” about them. I think they will be very useful well past Halloween. I die cut a large one out of Pretty Peacock Cardstock, even though it is barely visible.

Play around with your elements before adhering and see what layout you like the best. Some of the pumpkins are popped up with Stampin’ Dimensionals® and some are flat. Then I stuck in the leaves and sprigs of greenery wherever I thought they would look good.

Votive holders like this one are fun to decorate for any holiday or occasion so stock up a few at the dollar store or wherever you find them! Here is a Christmas one I made a few years ago. You could also decorate all the way around the holder. So many possibilities!

Shop Stampin’ Up! Online For the Best in Papercrafting Products!

Everything Is Rosy Medley on Clearance!

The Everything Is Rosy Product Medley is now available for 15% off through the Clearance Rack. Everything Is Rosy was the first Stampin’ Up! product medley and sold May 1–31, 2019. After the sales period ended, they found enough remaining inventory to bring this limited-time product offering back—but this is the last opportunity you will have to purchase it.

The Everything Is Rosy Product Medley includes these exclusive products:

  • Everything Is Rosy Photopolymer Stamp Set—18 stamps; suggested blocks: a, b, c,
  • Everything Is Rosy Dies—10 dies; largest die 2-7/8″ x 1″ (7.3 x 2.5 cm)
  • 6″ x 6″ (15.2 x 15.2 cm) Designer Series Paper Stack—48 sheets; 8 each of 6 double-sided designs
  • 6″ x 6″ (15.2 x 15.2 cm) rose gold foil paper—8 sheets
  • Printed die cuts—2 sheets
  • Rose gold die cuts—4 sheets; 2 each of 2 designs
  • Rose gold adhesive backed mirror embellishments—60 embellishments; 1/4″ (6.4 mm)
  • Melon Mambo 1/4″ (6.4 mm) Ruched Ribbon—10 yards (9.1 m)
  • Night of Navy/Rose Gold 3/8″ (1 cm) Metallic –Edge Ribbon—10 yards (9.1 m)
  • Rose Gold Shimmer Paint—1/2 oz. (15 ml)
Everything is Rosy Products

This Medley is available beginning October 8, 2019. It is priced at 15% off the original price. Available WHILE SUPPLIES LAST!

150059 Everything Is Rosy Medley Orig. $80.00 USD. Sale $68.00

Everything is Rosy Sample Pink Card
Everything is Rosy Sample 10

If you missed out on this Product Medley the first time, you might want to pick it up at a discount! I know the Rose Gold Shimmer Paint was a hit, but the whole group of products is beautiful!

The advantage of a Product Medley is you get a whole BUNCH of coordinating products, from stamps to dies to papers to embellishments and more. No picking and choosing what you really need and what you might be able to do without. It’s just all there for you and ready to begin creating!

SHOP THE STAMPIN’ UP CLEARANCE RACK!

Mini Curvy Keepsake Halloween Boxes

Mini Curvy Keepsake Halloween Boxes

These Mini Curvy Keepsake Halloween Boxes are so easy and fun to make! We’re already through the first week in October so Halloween is approaching! It’s time to make some fun treat boxes or use them just as Halloween decorations!

The main thing you need is the Mini Curvy Keepsake Box Die to make these treat boxes. There is the one main die to make these boxes and then quite a few smaller dies for miscellaneous things plus tags. Just lay the die diagonally on a 6″ x 6″ piece of cardstock and it will fit. This die scores the lines where you need to fold.

If you want to make some Halloween treat boxes like mine, do the decorating first before you assemble the box. You might partially assemble the box by creasing all the score lines and see how the box will go together and decide which side you want to be the front of your project. The first time I used this die I had trouble getting the sides to fit over the handles. I found it useful to crease those handles on the score line first, then push down on them as you fit the side slits over them.

To make the Pumpkin Mini Curvy Keepsake Box, I just drew Pumpkin Pie Stampin’ Write Marker lines on all four sides of the box. For the nose, I just snipped a piece of Basic Black cardstock. The mouth, as you can tell, I just drew on myself with a Stampin’ Write Basic Black Marker. It is not a good mouth AT ALL, but I thought I would leave it so you can see a Demonstrator doesn’t do things perfectly either!

If you have the Harvest Hellos Stamp Set, you could stamp the pumpkin face on the box instead. However, you might like adding Googly eyes to your pumpkin. I just used some retired Stampin’ Up! eyes I already had, but you can purchase the cute colored Assorted Googly Eyes in the Holiday Catalog. I also just die cut a leaf and adhered it to the top of the pumpkin box. Any kind of leaf will do and you could also add a greeting if you liked.

For the Frankenstein Mini Curvy Keepsake Box, you can draw or make the face however you like. Look through your dies and see what little pieces you could use to embellish the face. I also added googly eyes to Frankie. You can’t see it, but I cut a piece of Basic Black Cardstock to resemble his bangs, but I made it too short and you can’t really see it on the box tucked up under the top. I just added a greeting that I made into a tag and tied it on with a double piece of the Mossy Meadow Linen Thread in the Magnolia Lane Ribbon Combo Pack. The greeting is stamped from the Itty Bitty Greetings Stamp Set (a must-have, I think!).

There are SO many creatures and critters and boxes and things you can make with these Mini Curvy Keepsake Box Dies, even ideas from back in the day when we had the larger ones. Use them for treats or small gifts for Halloween, Thanksgiving, Christmas, birthdays (like this one), Valentine’s Day…..well, all the holidays and most occasions that you can think of! But I really like these Mini Curvy Keepsake Halloween Boxes!

Shop the Stampin’ Up! Online Store!

World Card Making Day 2019

World Card Making Day 2019

Today is the annual World Card Making Day 2019 which those of us in the cardmaking business like to celebrate! Take some time today to make a card, any kind you want! Then, the real trick is to mail the card next week! Lots of times we make cards for fun or because we saw a cute idea and then we don’t get around to mailing our cards to someone! Don’t let your beautiful artwork go to waste! Send those cards!

Next week Stampin’ Up! has a goal of sending 50,000 cards from Demonstrators and Customers, so if you send a card let me know and I will put it in the count with Stampin’ Up! Apparently, it will be the first annual World Card Sending Week! (Isn’t every day and every week some “holiday”?!)

If you are ever stumped for a card idea, copy yourself! That’s right! Just look back at some of the cards you have made and make another version! Change the paper, the colors, the embellishments or the greeting! Use one of your own good ideas!

Here is a card I made for my niece’s birthday. I realized I hadn’t used my Magnolia Lane Designer Paper in awhile. Instead of coming up with a new design, I just made another card like one I’d made before. I just changed the greeting and the embellishments a little bit.

Magnolia Lane Birthday Card

This card uses Petal Pink Cardstock for the card base with a striped layer from the Magnolia Lane Designer Series Paper. I think this paper is one of the most beautiful Stampin’ Up! has ever had. Even the large flower and leaves are cut out from one of the sheets in the package! The flower is layered on a circle of Vellum Cardstock.

The greeting is stamped in Mossy Meadow Ink from the Itty Bitty Birthdays Stamp Set. Then it was die-cut with the Stitched Nested Labels Dies. I used a piece of Braided Linen Trim across the strip of designer paper. On the greeting, I added three Heart Epoxy Droplets. And to the area with the large magnolia, I added three Basic Adhesive-Backed Sequins.

Magnolia Lane Birthday Card closeup

I just thought I would remind all of us, myself included, that it is okay to copy ourselves! Sometimes we search and search for an idea and the best one might be one right under our noses!

Take some time on World Card Making Day to make a card for someone or anyone and then send it next week during World Card SENDING Week!

A Card For National Taco Day

Taco Day Card

As you can see, I think you can make a card for just about any occasion in the world, even a card for National Taco Day, October 4! When I heard about National Taco Day, I wondered what kind of card I could make. Our family is a big fan of Mexican food or Tex-Mex as it is mostly known here in Houston, Texas.

We’ve had a favorite Mexican restaurant here for almost 40 years! When we came here on our house-hunting trip, some friends who had already been transferred here took us to this little hole-in-the-wall Mexican restaurant nearby. I was not thrilled, admittedly, because we were on an expense account and could have been eating at a finer restaurant! I really don’t remember if I liked the food or not or how that came about. I remember the friend telling us that people stood in line for a table to eat here. This was proven another night later as we drove past and saw, indeed, a line of people out the door IN THE RAIN waiting for a table! Crazy, I thought! After we moved here though, we became addicted to Mexican food, especially at this place and still can barely go a few weeks without eating Mexican somewhere. There are more choices now, more expensive ones, and we go to those places but we always return to our first Mexican restaurant, which has in recent years built a much larger restaurant that is still always packed. And 99.9% of the time I get the Cheese Enchiladas!

This card may make you hungry! It was really pretty easy to make. The card base is Real Red with a layer of Crushed Curry Cardstock, some bright Mexican colors. To make the tacos, I started with two Crumb Cake large die-cut circles, each folded in half, one not quite in half so it would look larger. I stamped the outsides with a stamp from Abstract Impressions Stamp Set (an odd choice, right?). I just wanted something that would look like a little texture.

For the taco “ingredients”, I just cut some Early Espresso curvy pieces to look like taco meat, some Real Red circles cut into smaller pieces for tomato pieces and yellow and orange strips for shredded cheese. For the lettuce, I cut strips of Granny Apple Green Cardstock crimped with my Crimper, but you can also just smoosh them up in your hands so make them look like lettuce. I put Stampin’ Dimensionals inside each taco to pop up the outer shell a little bit.

The greeting, strangely enough, is also from the Abstract Impressions Stamp Set. After wondering what I would put for a greeting on the card, this greeting in this stamp set popped out at me and I thought I could just omit the words “About You”. I stamped and layered it on die-cut pieces from the Stitched Nested Labels Dies.

Now it is time to go have some tacos! Here is a list I came across of where you can get free tacos or some special offer. Or you can make this easy, crazy, fun card for National Taco Day!

How To Take a Feels Like Frost Plain Christmas Card To an Embellished Card

Feels Like Frost Plain Christmas Card

While I thought I could do without this beautiful wintery designer paper, I found that I could not and started working on a card. Just layering the designer paper I chose on the card base I thought looked simple and beautiful enough, especially if you were just sending a personal note. Since the card was so pretty as is, I thought about taking it step by step from a plain Christmas card to an embellished Christmas card and showing you the steps.

As you can see, the first card was just a card base of Seaside Spray Cardstock with a layer of Whisper White under the Feels Like Frost Specialty 6″ x 6″ Designer Series Paper. I think the white helps the designer paper stand out even better. I just thought the card looked so elegant enough with just the designer paper that it barely needed anything else! I could see this paper being used to make a series of note cards or regular size cards for Christmas cards, holiday cards, or just cards for winter. Often when we have someone of a different religion who is not celebrating Christmas, we like to have a more generic card to send them during our holiday.

Feels Like Frost Christmas Card With Greeting

To step up the first card, I added a holiday greeting to this plain card. Since there was kind of an open area on the designer paper, I put the greeting in the upper corner. The greeting is in the Itty Bitty Christmas Stamp Set and is stamped with Seaside Spray Ink, one of the newest In Colors. I die cut it with one of the small circle dies in the Layering Circles Dies. I looked through my dies a little bit and decided to use this cute circle layer in the Stitched Labels Dies.

Feels Like Frost Embellished Christmas Card

Next, to step up the card, even more, I added the Silver 3/8″ Metallic-Edge Ribbon. I moved the greeting down to the lower corner of the card And for a little bling, I added the teeny tiny Snowflake Sequins to the card, three of the tiny silver ones and three of the snowflake ones. I just used the tiniest dot of Multipurpose Liquid Glue to adhere the sequins with the help (and I do mean HELP) of the Take Your Pick Tool. This is a great tool, no matter which end of the tool you use. I have used the pokey end and also the spatula for scooping up jewels off the sheet and applying to the project and today the sticky end for picking up and placing the sequins. Otherwise, you would go crazy without it, so put one on your next order!

Feels Like Frost Embellished Card Closeup

Check out this beautiful paper in the Stampin’ Up! Holiday Catalog and in the Online Store. Even though the photographic wintery images are beautiful, wait until you flip the paper over to the other side with the silver foil images! (As I write this, I see this paper and matching ribbon are backordered. The Feels Like Frost will be back in stock next week and the ribbon at the end of October.) (I must have gotten the last ones!)

If you are unsure about making a card, just start with something very simple like I did with just the designer paper. Then see what greeting you might want to add. Next see if you have some ribbon or jewels you want to add or a layer for the greeting, whatever it is. Sometimes it is good to stop before you overdo it! And sometimes it is good to jazz it up a bit! Anyway, check out the steps I took to take this plain Christmas card to an embellished Christmas card.

The “12 Weeks of Christmas” Holiday Emails Are Coming!

12 Weeks of Christmas Banner 2019

Believe it or not, we are just over twelve weeks until Christmas so it is time for my 12 Weeks of Christmas Holiday Emails to begin! Tomorrow, October 2 is the date!

Every week for 12 weeks I will send my mailing list subscribers a free holiday project that you can use to make your holiday preparations easier! This is a thank you for my mailing list subscribers that I like to do every year. Just like in my regular weekly email, I will send a photo of a project, a list of supplies needed, and all the directions to make it.

In the first few weeks, I will send card ideas since it’s likely that is the first thing most of us will work on at this point. Next, come a few weeks of gift ideas and finally, as we are doing Christmas shopping, some ideas for gift wrap, bags, and gift tags.

These are exclusive projects that I won’t be posting on my blog or anywhere else. You may copy directly, take inspiration from the idea and come up with your own project, or simply enjoy seeing another stamping idea! I know I am all about seeing as many ideas as possible.

However, the only way you can get these special 12 Week of Christmas emails is to be on my Stamping With Karen Mailing List! All you have to do is sign up in the red box in the upper right of my blog or in the form below.

Subscribe to My Mailing List! 

Exclusive Projects

Stampin’ Up! News & Updates

FREE Welcome Gift!

Name: 

Continue reading