Zoo Crew Fun Birthday Card

Zoo Crew Fun Birthday Card

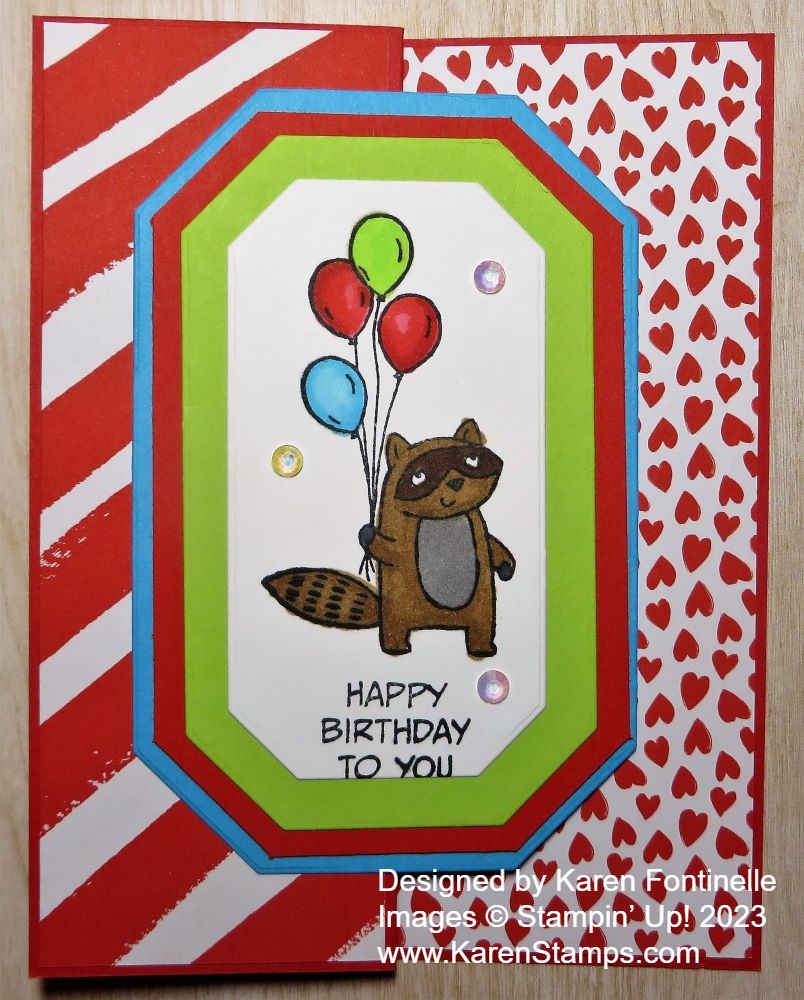
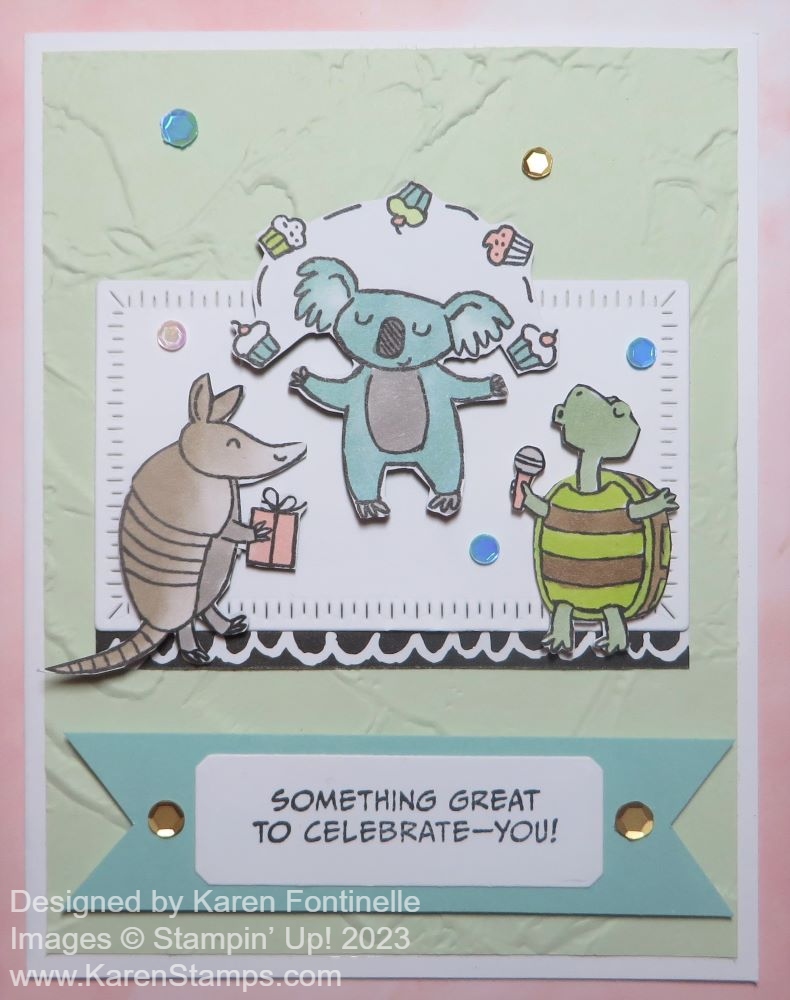
I was in the mood for an easy and fun card and when you want that, you just might turn to the Zoo Crew Designer Series Paper! What turned out was this Zoo Crew Fun Birthday Card. There is no denying how cute and fun this designer paper is along with the stamp set and all the whimsical characters you can create with!

The card base is Basic White with a layer of Soft Sea Foam cardstock. I felt it needed something so I looked through my embossing folders. I chose the Painted Texture 3D Embossing Folder because it has that texture but nothing that competes with the rest of the card.

In my package of Basic White, I found one of these Radiating Stitches die-cuts in the bag so I tried that out to see if it would work on this card and I liked it! It provided a backdrop for my characters to help them show up better but wasn’t distracting. When I saw a narrow strip of a black and white scallop pattern in the designer paper, I stuck that underneath the die-cut just for a little interest there.

The characters on the card front are simply cut out of the Zoo Crew Designer Series Paper. This is just some of the cutest paper that Stampin’ Up! has carried. What is fun about it is all the different characters doing all sorts of different things – knitting, camping, singing, playing musical instruments, dancing, even doing yoga! The characters are partially colored in and look fine as is, but if you want to, you can add more color with whatever coloring technique you like. I chose three characters who were celebratory – one singing, one juggling cupcakes, and one bringing a gift. I did add some extra color with my Stampin’ Blends because I like doing that! There are some dies that fit with some of the characters, but I just cut them out with Paper Snips.

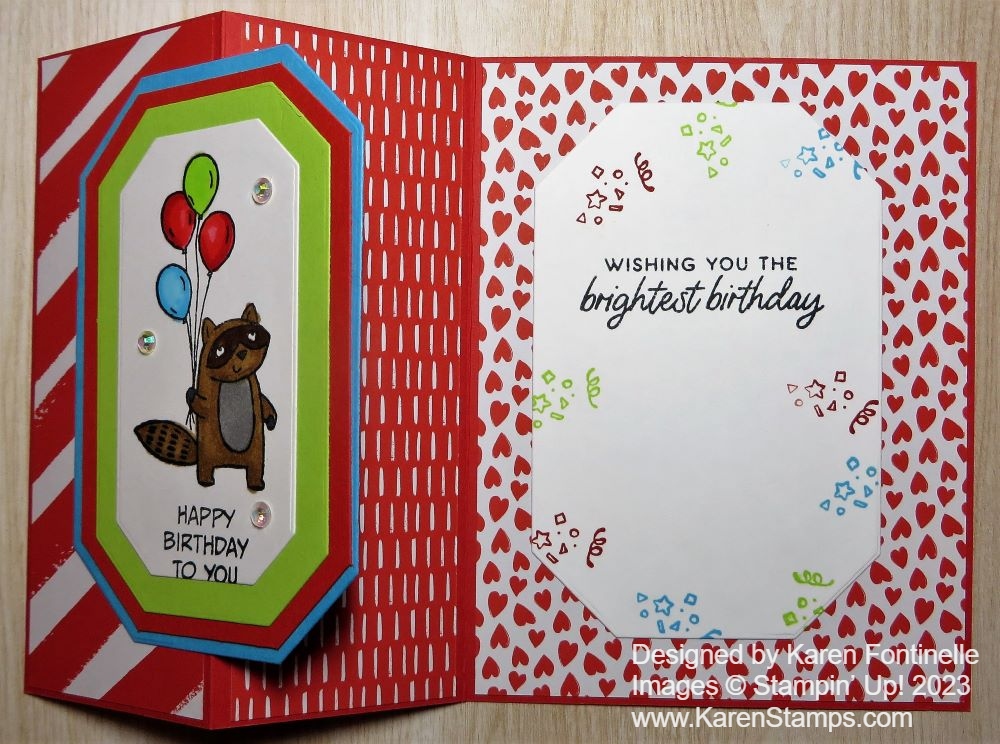
The greeting is in the Zany Zoo Stamp Set. I stamped it with Memento Ink and die-cut it with one of the center dies in the Countryside Corners Dies. It was a good fit! I layered it on a strip of Pool Party cardstock and flagged each end. It is popped up on Stampin’ Dimensionals, as are the three characters. Remember, we have Mini Dimensionals for those little spaces.

For a final touch, I added a bunch of Pastel Adhesive-Backed Sequins in pink, gold, and blue all around the card. Can you ever have too many sequins??!

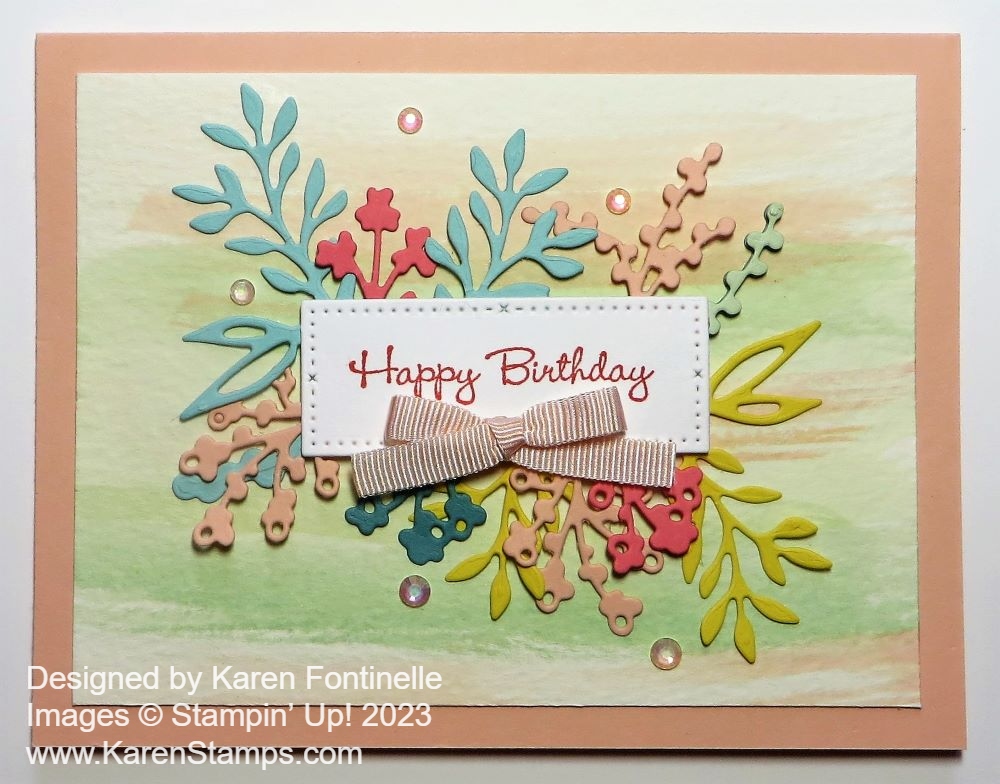
Here’s another card, sort of a similar design, except with three dancers, that I made previously with the Zoo Crew Designer Series Paper.

The holidays and Holiday Mini are approaching, but don’t forget to enjoy the other great products we have in the Annual Catalog!

Be sure to redeem your July coupons if you have them!

Redeem Bonus Coupons

Joy of Christmas Merry & Bright Christmas Card

Joy of Christmas Merry & Bright Christmas Card

This Joy of Christmas Merry & Bright Christmas Card idea came to me and I followed through on it and made the card. Something about this designer paper made me think of wrapping paper, and I got the idea to make the card front look like a wrapped package for Christmas. It’s an easy card to create so it might be good if you are looking for ideas for making multiple Christmas cards to send.

The card base is Real Red cardstock. The layer is one of the patterns in the Joy of Christmas Designer Series Paper (161958). You’ll find it in the Stampin’ Up! Holiday Mini Catalog on page 29 in the Joy of Christmas Suite. This whole Suite is beautiful and you get two different stamp sets and two sets of dies plus the paper and embellishments. I only bought the paper and ribbon at this point, but we’ll see how long I can resist the rest!

The ribbon I used is one of the Online Exclusives that you will find in the online store. It is the Real Red & Gold 3/8″ Dotted Ribbon. It is a very nice ribbon, a little heavier and stiffer than some, but it worked fine on this card. Since I love red, I had to have it and I really like the gold dots on it for something different. I added two pieces of ribbon, one horizontal and one vertical. I even applied a little Stampin’ Seal to the back of the pieces so it would lay flat and stay in place. The bow is tied separately and adhered with a few Glue Dots. To make sure the bow stayed on, I even added a glue dot under each loop of the bow and under each tail. Since the ribbon is a little heavy, the glue dots don’t show at all.

The greeting is in the Brightest Glow Stamp Set (159542), which was carried over from last year’s Holiday Mini catalog. This is a great stamp set for holiday greetings. I stamped this sentiment in Real Red ink and die-cut it with the new Deckled Circles Dies. I also cut a larger Deckled Circle out of Real Red for the layer. You will be AMAZED to open this package of Deckled Circle Dies and see the size and the number of dies you get! They are in the Holiday Mini on page 63 in the upper right corner. It’s not a small picture but I think it’s not very noticeable. I didn’t notice it until I heard about “Deckled Circles” from other Demonstrators! Of course, with so many new beautiful products it’s hard to take it all in!

You could add a little bling to the greeting or on the card if you wanted, maybe some Iridescent Rhinestones or sequins, but I left this card as is. I’m pretty sure I will be making more of this card to send in December! Once you have the idea, it’s easy to make more cards assembly-line style. Get an early start!

Remember to spend your July Bonus Coupons if you have some. Check your email for the codes if you ordered $50 or more in one order in July. The codes expire August 31 and that is coming up soon!

The September-December 2023 Mini Catalog (the Holiday Mini) goes LIVE on Wednesday, September 6th! Make your Shopping List!

Merriest Trees Decorated Christmas Card

Merriest Trees Decorated Christmas Card

This Merriest Trees Decorated Christmas Card is the first card I’ve made with this Merriest Trees Bundle (162048) in the upcoming Stampin’ Up! Holiday Mini Catalog! You can make all kinds of cards with this Bundle from simple to fancy. I think I started with fancy on this one! This card is for someone who likes “little bitty” things. I’ll explain as I go along in this blog post!

This Merriest Trees Bundle comes with the Merriest Trees Stamp Set and the Merriest Trees Dies. (Do you like how they are now naming the stamp set and dies the SAME?!) If you buy them both together in the Bundle, you will save 10% on the price. The stamp set has a tree that you can ink up and stamp as is, or you can use the second tree stamp for some added highlights on that tree. There are some nice sentiments to use and several accessories. There is a tree trunk, gifts, bows, ornaments, a star, and some little twinkles I suppose you would call them! The trees are actually pretty large so you will need Clear Block E for sure!

Merriest Trees Bundle

As you can see in the set of dies, there are LOTS of extra pieces! On the one hand, that is extra-fun and on the other hand, there are some LITTLE pieces there to work with! One great thing is that when you stamp the little ornaments, they are on one stamp and there is a die that matches that arrangement so the die will cut out all three ornaments at one time! The other great thing is that there are THREE ornament dies so you can stamp three sets of three ornaments and die-cut them all in one fell swoop with your machine! You can cut out chains or garlands for the tree with the one die that makes all the different lengths of garlands from that one die. It would be good if you used Adhesive Sheets on the back of the paper before you cut those out! I don’t know how you would get glue on the back of those except with the teeniest drop of glue. Even with the Adhesive Sheets on the back to turn them into stickers, they are very fragile although even if you accidentally tear them apart you can match the ends back up again.

If you stamp the solid tree, it may work better to lay the stamp and block face up on the table and then apply the ink rather than try to ink up the tree by patting it on the ink pad. Even better if you have the retired Stamparatus. Be sure to use a cushion underneath your stamp. It’s often a little difficult to get a perfect impression the first time with a large solid image like this tree.

This card has a card base of Shaded Spruce. I added a layer of Gold Foil underneath this interesting red pattern of designer paper in the Joy of Christmas Designer Series Paper (161958). This designer paper has all kinds of different patterns that can be for Christmas or for other occasions.

The Christmas tree is die-cut from Shaded Spruce. I used the other tree piece with Versamark Ink to stamp and embossed with white embossing powder using a Heat Tool. This makes it look like a little bit of snow on the Christmas tree! Then I used Adhesive Sheets on the back of a small piece of gold More Dazzle 6″ x 6″ Specialty Paper. It’s in the Annual Catalog but you may already have some from a previous catalog. Then I used the die to cut out several different lengths of garlands. If you have the Take a Pick Tool or some other piercing tool it makes it easier to pry off the backing sheet. As I said before, these little diecut garlands are very delicate and fragile.

The little ornaments are stamped in Real Red on Basic White and then diecut. They just need a tiny drop of glue on the back to adhere to the tree however you would like to place them. Use different colors of ornaments if you like. There are two different styles of stars to choose from to put at the top of the tree.

No Christmas tree would be complete without packages! You can stamp little gift boxes and bows and die-cut them, or you could die-cut the presents out of solid cardstock or scraps of designer paper.

The greeting is one in the Merriest Trees Stamp Set. It is stamped in Real Red Ink and die cut with a small banner in the Stylish Shapes Dies. I cut off the banner end on the right so it would line up with the edge of the designer paper background. Once again I will point out that this greeting is very small.

If you like lots of detail when you make a card, this card might be for you. If you want to make a few of these cards to send for Christmas, I say go for it! Once you have your design and make everything in an assembly-line fashion it will be easier than it looks. But if you are making 50 Christmas cards to send, maybe you want a simpler design with fewer little pieces! This exact card takes more than a few minutes to make, so plan ahead!

SHOP STAMPIN’ UP! ONLINE HERE!

Them Bones Halloween Card

Them Bones Halloween Card

It may be the middle of August, but here is my first Halloween card for the season, Them Bones Halloween Card. It was so fun to make a Halloween card, especially with this paper! It’s the Them Bones Designer Series Paper and is coming in the Holiday Mini Catalog on September 6th!

This designer series paper has all sorts of Halloween patterns and colors in it! You can choose from skeletons, bats, gravestones/mausoleums?, Halloween words, and all sorts of other generic patterns you can use on non-Halloween projects.

For this card, I used this sheet of paper that has all the different patterns on this one paper! The Fresh As a Daisy Designer Series Paper had the same thing, which was fun to use. Here is a photo of the whole sheet of paper.

You can see this sheet has all kinds of interesting designs to use on your card or another project. I chose the top right corner image. It has to be trimmed a little to fit on the Pumpkin Pie card base. Then I cut out one of the many skeletons on another sheet of paper plus one of the skeleton dogs to decorate my card.

There is a Bundle of the Bag of Bones Stamp Set and Bag of Bones Dies. If you have the dies, you can diecut some of the skeletons and animals and other images, stamped and printed on the paper. But I just used my Paper Snips for a little detailed cutting to cut out this skeleton from the designer paper and the dog skeleton. I used tiny bits of Multipurpose Liquid Glue to adhere them to the card front to create a little scene.

For the greeting, after looking through my current stamp sets, I got the idea to use the Alphabest Stamp Set and Best Label Punch. I stamped the little outline in black ink and then the letters in Pumpkin Pie ink to spell “boo!” Then I punched out those letters with the Best Label Punch. They are popped up on Stampin’ Dimensionals.

For a finishing touch, I tried to splatter some Wink of Stella around on the card. I used Gold (retired) but I don’t think it showed up well enough.

When you are ready to order some products for Halloween, if you like whimsical and spooky, try the Them Bones Designer Series Paper and maybe the Bag of Bones Bundle with the stamp set and dies. You can also purchase Glow in the Dark 6″ x 6″ Specialty Paper or Glow in the Dark adhesive bats and ghosts to decorate your cards and projects!

SHOP THE HOLIDAY MINI SEPTEMBER 6!

A Walk in the Forest Christmas Card

A Walk in the Forest Christmas Card

It’s the first Christmas card of the season! It’s the A Walk in the Forest Christmas Card! One of the perks of being a Stampin’ Up! Demonstrator is getting to preorder new products coming up in the next catalog so that we can become acquainted with the new things and make samples to show our customers. I’m not usually into animals, but there are brown bears and polar bears in this upcoming Holiday Mini Catalog. For some reason, this time I had to have them! The designer paper, anyway!

For this card, I used the new A Walk in the Forest Designer Series Paper (162377), which you will find at the top of page 5. You might miss it even though there are many samples across the two-page spread, but this paper stands alone. It is not part of a suite or bundle or anything. It’s just paper.

However, if you read the Stampin’ Up! Making a Difference box on page 5, you will find that with each purchase of this designer paper, Stampin’ Up! will donate $3 to support organizations dedicated to spreading cheer and providing support to those in need. So with your fun purchase, you will be helping others during this holiday season.

This A Walk in the Forest Designer Series Paper has bears, trees, snowflakes, stripes, evergreen branches and red berries. Some of the images work with the Merriest Trees Dies and some of the bears can be punched with the Beary Cute Punch.

For this card, I decided to use Pecan Pie cardstock although I was tempted to use Real Red or Cherry Cobbler. I decided Pecan Pie would go better with the outdoor, rustic theme of the card. The “other side” of this paper with the trees and the bears, is this Garden Green with tiny little triangle trees all over it. I chose that side of the paper for the layer on the Pecan Pie card base.

The top layer with the tree in the forest was strategically cut out of the designer paper so that I would have that big tree but not part of a bear along the edge. It worked out to cut it a little smaller than a normal layer which was fine because then a larger margin of the green paper would show. The tree layer is 3 1/2″ x 4. Out of another section of the paper, I cut out the brown bear. You can purchase the Beary Cute Punch, on page 67. It is actually part of a Bundle with the Beary Cute Stamp Set. But for this card, I just used my Paper Snips to cut out the bear by hand. I used a LOT of Stampin’ Dimensionals on the back of the bear because I wanted him popped up but sturdy! It was easy enough with my mostly used-up Dimensionals because I cut along the edges and cut itty bitty pieces for on his legs.

The greeting is in the Merriest Trees Stamp Set on page 12 of the Holiday Mini. I stamped it with Garden Green ink on Pecan Pie cardstock. I wasn’t sure if it would show up well enough but it does. It was diecut with a banner in the Stylish Shapes Dies. It just barely fit but I like it. I popped it up on Stampin’ Dimensionals also.

I have to be honest and say it took everything in me to NOT put any rhinestones or jewels or bling of any kind on this card! I really wanted to add some sparkle to the tree, but I also liked the rustic look of the trees and the bear and didn’t want to spoil that.

The Holiday Mini (officially known as the September – December 2023 Mini Catalog) goes live on September 6 for you to order from. It ends on January 3 (which right now we can’t imagine!). Be sure to order your very favorite things as soon as you can so you don’t have to wait for a backorder situation.

If you liked this A Walk in the Forest Christmas Card just know that it is an easy card to make although you couldn’t make a ton of the same card because you need to work with the trees and the bears on the paper. But otherwise, you just have to glue the layers to the card, punch or cut out the bear and add a greeting. That’s it!

Shop the Holiday Mini Sept. 6th!

Kits Collection Festive Tags Kit

Kits Collection Festive Tags Kit Contents

A great kit to purchase on the Stampin’ Up! Kits Collection Sale during August is this Festive Tags Kit! It is an easy kit to make, no stamping, only takes about an hour total, and you will be using the tags for sure for holiday gifts! It’s a win win!

Inside the box, you get all the supplies you need to make the project, all wrapped up with the easy directions.

Kits Collection Festive Tags Kit Contents2

It’s so fun to open up the package of supplies and see what goodies you got in there! Besides the basic pieces to make the tags, you get some goldish jewels and a roll of twine, plus Dimensionals, which are the only adhesive you need.

Kits Collection Festive Tags Kit Pieces

Here’s a tip that usually works! As you punch out the pieces of any kit, if you keep the stack of the same pieces lined up and together, you can usually punch out all three pieces in the stack at the same time. You don’t necessarily have to do each one on each sheet. Just stack them up perfectly and punch them out! Once you have all the pieces and embellishments laid out on the table, you are in good shape to start assembling the project!

Kits Collection Festive Tags Kit Tags

This Festive Tags Kit makes 15 tags for your holiday gifts! Three each of five designs! That really gives you a good variety! And just stick on the greeting (in another language, if you choose!) instead of stamping! Tied the decorated tag onto a backing tag and you have a cute tag with space to write on the back who the gift is to and from. Once you add those gold-colored self-adhesive jewels, it really makes those cute tags pop!

Watch Sara’s video below and see how she puts the tags together!

You’ll save a little bit of money if you purchase this kit before August 31 while this Kits Collection Sale is on! I would recommend buying more than one kit, maybe even two extra kits! You will enjoy putting the tags together and knowing that you have plenty when you go to gift wrap your packages. Or add the tag you made to the front of a card, perhaps with an extra layer or something to make up the card, and you’ll have an easy card ready to go!

Check out the other holiday tag kits from past years as well!

Shop the Kits Collection Sale HERE!

Here’s the September Paper Pumpkin!

Paper Pumpkin Sept 2023 Love and Gratitude Sq2

It’s always exciting to see what the next Paper Pumpkin Kit will be after the current one goes out in the mail to subscribers! In this case, when I saw the September Paper Pumpkin Kit, With Love & Gratitude, I was very impressed! Just look at the gorgeous box the kit is coming in and the beautiful pumpkin designs and colors!

And the reason it is so pretty is because it was inspired by Shelli Gardner, Founder of Stampin’ Up! If you are new you may not be familiar with Shelli because now her daughter, Sara Douglass is CEO of the company, but Shelli is still active in the company. Those of us who have been with Stampin’ Up! for a long time and feel like we “know” Shelli can attest to the fact that when she has a hand in a project, it will be one we all like!

Express your love and gratitude in elegant style with the September Paper Pumpkin Kit inspired by Shelli! This kit includes eight treat packages (you can also use them for small gifts) and eight miniature note cards with matching envelopes and specialty gold foil embellishments. Whether you’re needing a hostess gift, a sweet surprise for dinner guests, or have another reason to give love and thanks, this kit has you covered.

Plus, don’t miss the Thoughts of Thanks Journal! It matches both the design and intent of the kit, giving you an even more personal way to document and express your gratitude. It’s available as an add-on, but only while supplies last! You can purchase it right now in the Online Store IF you are a Paper Pumpkin subscriber!

Paper Pumpkin Sept 2023 Love and Gratitude Sq3

ABOUT THE KIT
Kit Name: With Love & Gratitude

This kit includes:

8 treat packages
8 note cards
8 coordinating envelopes
1 photopolymer stamp set
1 Lost Lagoon Ink Spot
Specialty gold foil, precut embellishments
Adhesives
Finished treat packaging: 3-1/2″ x 5″ x 2″
Final card size: 3-1/2″ x 3-1/2″
Coordinating Stampin’ Up! colors: Copper Clay, Crumb Cake, gold foil, Lost Lagoon, Mossy Meadow, Pebbled Path

ADD-ON DETAILS
Thoughts of Thanks Journal (163270)
Available starting: August 11, while supplies last

Price: $15.00 USD

This add-on includes:

8″ x 10″ journal
2 specialty gold foil sticker sheets
Gold-clip page marker
Coordinating Stampin’ Up! colors: Copper Clay, Crumb Cake, gold foil, Lost Lagoon, Mossy Meadow, Pebbled Path

SIGN UP RIGHT AWAY SO YOU WON’T MISS OUT!

JOIN PAPER PUMPKIN HERE!

Embossed Countryside Inn Thank You Card

Embossed Countryside Inn Thank You Card

This Embossed Countryside Inn Thank You Card is an easy one to make! Just let the beautiful pattern of the designer series paper do all the work! Just add a greeting and maybe a bit of ribbon. But there was something extra-special that I don’t think I knew before! The embossing folder matches the paper so you can easily emboss the whole card front!

The card base is Balmy Blue and then there is a layer of this pattern in the Countryside Inn Designer Series Paper. I didn’t know I would like this paper as much as I do! I have used it a lot! If you have the Countryside Blossoms Embossing Folder, which embosses a beautiful design on any cardstock, use this one designer paper in the embossing folder because it matches up!! I had the paper upside down at first and nearly had it matched up but not quite! But I finally got it when I realized I had to turn it the other way! You have to kind of play around with cutting out the piece of designer paper that you want to emboss so that you get the piece that matches and that fit in the folder. But it’s not too difficult. If you look closely at the photo below you may be able to see the embossing of the flowers and little leaves.

Embossed Countryside Inn Thank You Card Closeup

The Countryside Blossoms folder adds a nice texture to the front of the card when you use it with this designer paper. The paper is pretty enough on its own, of course, but if you want a little extra something, emboss it!

Before adhering the paper to the card base, tie a piece of ribbon around it in a bow, if you want. My best choice was this retired 1/4″ Whisper White Crinkled Seam Binding Ribbon because I wanted something to embellish the card but not be really conspicuous.

For the greeting, I stamped this one from the Sending Smiles Stamp Set in Balmy Blue ink. I wanted something small and narrow to fit at the bottom of the card front so using this stamp set and greeting was perfect. Overall, I wanted the designer paper to be the whole focus of the card.

Here is another card using this same pattern of the Countryside Inn Designer Series Paper. You can make so many lovely cards with this pretty paper!

SHOP STAMPIN’ UP! ONLINE HERE!

The Ribbon Mystery: Does Your Ribbon Do This??

Messy Ribbon

Here’s a rather silly post for a Saturday as I recover from celebrating one of those “big” birthdays yesterday. Not that I was celebrating hard, just reading texts, cards, opening a gift, answering a few phone calls, plus two long ones with my boys and one more coming today from my daughter. That was a lot for a person of “this age”!! When you’re young you never really think you will ever be “this old” and actually, I still don’t think I am “this old”! I guess that’s good!

My friend sent me a funny card with two ladies having tea and the card says, “Isn’t it weird being the same age as old people?” It certainly is! And to think of friends and family who are just a few years older than me…..wow, they are REALLY getting old! How has this happened?!

Does your ribbon do this? When I discovered this the other day, I wondered if my ribbon was playing around during the night or something! What has been going on here?! It’s kind of like when you wonder what your socks have been doing, disappearing one at a time, for no reason. My long-time acrylic ribbon holder finally completely fell apart recently and I haven’t found a replacement yet, so my few rolls of current ribbon are just laying on the desk, under all kinds of stuff. A good hiding place I suppose! Even though this white ribbon is retired, it was the best choice for the card I was making so I started pulling it out of the heap of ribbons. Why was so much white and red all unwound? Obviously, some mischief had been going on.

I tried just pulling out the loose ends of the white ribbon to lead me to the actual roll, but I couldn’t get it separated from the red. Finally, I had to just pick up both the red and white rolls of ribbon and take them to my kitchen table. But there still was no easy separating of them! Maybe I had tossed some rolls of ribbon onto my desk and the loose ends had gotten kind of intertwined a bit, but these two ribbons had “tied the knot”!

Messy Ribbon Knot

I can understand that maybe, somehow the ribbons had gotten unwound on the desk, hiding under the Paper Trimmer, Paper Pumpkin boxes, envelopes, and cards I’d already made, but how did the two ribbons get almost tied together into a knot?

It took a minute but I finally got them untied and untangled and rewound. I probably better check and see that the other ribbons are up to under there! Maybe you should check and see what your ribbon is up to in the dark of night! And maybe I need to do some cleaning up and organizing!

Altered Gift Bag with Masterfully Made DSP

Altered Gift Bag with Masterfully Made DSP

It just so happened that I needed a larger gift bag and couldn’t find one in my stash of bags in the closet. They are mostly Christmas bags. Luckily, I found this gift bag from a fabulous bakery, but of course, it has the bakery’s name on the front of the bag and the back. I decided to use the bag but decorate over the bakery name and this Altered Gift Bag with Masterfully Made DSP is what came of that project!

The colors on the bag were already interesting. When I started comparing our Stampin’ Up! cardstock, the colors on the bag came very close to Berry Burst and even pretty close to Coastal Cabana. And this bag is at least several years old so they were ahead of the Stampin’ Up! trend!

I played around with some different ideas and originally thought about using the Cheerful Daisies one way or another, but I ended up using the Masterfully Made Designer Series Paper which is extremely colorful but seemed to go along with this bag. I cut a wide enough strip of this roses pattern to cover the bakery name and take up some space on the front. The paper is still 12″ wide so you can get an idea of how much wider the shopping bag is. Then I added narrow strips of the green torn paper pattern in the Masterfully Made DSP to the top and bottom of the strip. I had a few scraps of the rose paper so I cut out the roses as best I could out of the scraps using my Paper Snips and decided to place them on the bag as if they are cascading down.

This isn’t my favorite bag I have ever decorated, but I think it turned out okay and I decided to not get too perfectionistic about it because who knows what will happen to a gift bag after the gift is opened. I really love to decorate and personalize shopping bags I get at certain stores, usually requiring the business name to be covered up, which is pretty simple. This bag being larger and having these two colors on it made it a little more challenging. You can even purchase place kraft or white shopping bags at craft stores or online to have some handy for when you want to make your own creation to go with the gift and occasion.

The back side of the bag also had the bakery name so I just chose a piece of the Bright & Beautiful 6″ x 6″ Designer Series Paper to cover the name. It also has the Berry Burst color in it. Here is a photo of the back of the bag.

Altered Gift Bag back

At least I have a large enough gift bag to use and decorated with some interesting designer paper! I usually save those handled bags when I get them because I know I can turn them into a gift bag and not have to run to the store at the last minute. Here is one example from a few years ago of a bag I turned into a Christmas gift bag.

Look through your bags and see if you have something you can alter and make into a nice gift bag! It’s really a fun project and oh so handy! You will be glad you did!

Inked Botanicals Easy Scrap Cards

Bet you can’t make just one card using this technique! These Inked Botanicals Easy Scrap Cards are so easy and a great way to use up the strips you probably have cut off from 6″ x 6″ designer paper. I used the Inked Botanicals 6″ x 6″ Designer Series Paper, but certainly, you can use any designer paper you like. When you make a card layer, you primarily use a 4″ wide piece of designer paper, leaving 2″ for scrap. Now you can trim those scraps and use them to make interesting cards with different patterns!

To make these easy cards, cut four pieces of designer paper to layer on the card base. Cut the pieces of designer paper at 1 7/8″ x 2 1/2″. On this card, I used two patterns, placed on diagonally opposite corners of the card base. On the right of the card in the photo above is a leftover 2″ strip of designer paper after cutting a 4″ x 5 1/4″ piece for another card. So it is easy to trim this paper down to the size that fits on the card!

This card has a Lost Lagoon cardstock card base. After adhering the pieces of designer paper, I stamped a greeting from the Irresistible Blooms Stamp Set in Lost Lagoon ink on Very Vanilla cardstock. Then I diecut the greeting and the Calypso Coral layer using the Stylish Shapes Dies. I thought about turning the Calypso Coral layer on a diagonal to make it more interesting, so that’s another fun option. I added some gems from the Tinsel Gems Three-Pack to the greeting.

As I said at the beginning, I bet you can’t make just one of these cards using these little scraps! Think of the number of designer paper scraps we all have and we each could make hundreds of cards! This card also uses the Inked Botanicals Designer Paper, but this time I selected four different patterns. I stamped a greeting again from the Irresistible Blooms Stamp Set on Very Vanilla cardstock using Calypso Coral ink. This was layered on a piece of Calypso Coral, both circles diecut with the Stylish Shapes Dies, the stitched circles. This time I adhered the greeting flat on the card and added some gold Festive Pearls to the card.

Get out your 6″ x 6″ designer series paper packages and see what scraps you have that would make easy work of cards like these! Just have fun!

SHOP STAMPIN’ UP! ONLINE HERE!

Timeless Arrangements Watercolor Birthday Card

Timeless Arrangements Watercolor Birthday Card

This Timeless Arrangements Watercolor Birthday Card is a card you can make for almost any occasion. You can also change up the colors for the season or the occasion. It does require some die-cutting! It’s probably a good idea to cut out extra pieces of the foliage, as long as you are die-cutting, so you have plenty for your project and maybe pieces you can save for another card. You could even save up scraps of cardstock and then do a bunch of die-cutting all at one time in lots of different colors.

This card even has something extra about it! The card base is Petal Pink, but the layer is Fluid 100 Watercolor Paper. You may already have some from previous Stampin’ Up! years. Watercolor paper really holds up better, even to a small amount of water, than Basic White cardstock. If you have the now-retired Shimmery White cardstock, that holds up pretty well to water. To add some color, I just used my Water Painters and some ink. Water Painters are like a small paint brush filled with water. Either put a few drops of reinker on something else, like a clear block or in the lid of the ink pad. Then just pick up some of the ink with as much water as you like from your brush and just “paint” across the watercolor paper, preferably pretty lightly. Use whatever color combinations you like. Let the paper dry or use your Heat Tool to help it along.

Place your diecut stems and foliage on the backside of the greeting. You can use Stampin’ Seal to hold it all in place, then if you want to pop up the greeting you can use Dimensionals. I tied a little bow to adhere to the greeting and added a few Iridescent Rhinestones.

If you didn’t want to do the watercoloring, you could select some designer paper that had more of a solid color background, some even have watercolored looks, so as not to distract from the foliage. Just have fun with it and see what you come up with!

SHOP STAMPIN’ UP! ONLINE! (Use your coupons!)

Zany Zoo Brights Z-Fold Birthday Card

Zany Zoo Brights Z-Fold Birthday Card

Sometimes you have an idea for a card but it doesn’t work out. Instead, something else “calls to you” and you come up with a completely different card than you imagined you would make. In this case, this Brights 6″ x 6″ Designer Series Paper caught my eye and I couldn’t resist! I already had some Poppy Parade cardstock out for my original idea, and I found a Z-Fold card base ready to be used in that package! Poppy Parade is one of the many colors in that designer paper pack so I had my card idea in my head! At least, the basics.

To make a Z-Fold card, you will fold the right half of the front of the card back toward the fold on the left. You’re folding the card front back on itself. Start with a piece of cardstock 5 1/2″ x 8 1/2″. Score at 2 1/8″ and 4 1/4″. Fold and crease in half, then fold at the 2 1/8″ score line so when you view the card from the top it looks like a “Z”.

To decorate the card, I cut a Poppy Parade diagonally striped piece of designer paper at 2″ x 5 3/8″ or you can make the measurements 1/8″ smaller at the width and length if you want more of the cardstock to show in the margins. On the inside, I cut a piece of the heart pattern at 4 1/8″ x 5 3/8″. It’s optional to add designer paper to the inside panel on the left of the card. It would be the same measurements as the striped pattern on the front panel.

For the card’s focal point, I thought it would be fun to use the Zany Zoo Stamp Set to go with the bright colors! I picked this cute little guy holding the balloons for a birthday! He is stamped with Memento Ink on a piece of Basic White that is diecut with one of the Countryside Corners Dies. I hadn’t done any coloring in a little while, so I got out my Stampin’ Blends alcohol markers and colored him in with Light and Dark Pecan Pie Stampin’ Blends and a little gray on his front. The balloons are colored with Poppy Parade, Tahitian Tide, and Parakeet Party Blends. The greeting is in the Zany Zoo Stamp Set and I got it to just fit on the piece!

I thought I would like layers of the colors I used for the balloons so I diecut a piece of Parakeet Party, Tahitian Tide, and Poppy Parade. But I didn’t want to make it all TOO big. I cheated a little and used my Paper Trimmer to try to, as evenly as possible, trim off a little of the Poppy Parade layer so I could use the regular-size die for the Tahitian Tide layer. Otherwise, the Poppy Parade would have been the same size as the Tahitian Tide and then the Tahitian Tide layer would have had to be the next largest die up (which might have been the largest one) and that was going to take up a lot of room on the card front.

When whatever your focal point is on the front of the card, you only want to glue half of it to that folded-back front section. So carefully figure out which side the glue will go on and try to center that part as best you can.

If you want a panel on the inside of the card, over a print as I have on this card, cut a shape the same size as the largest layer on the front so it doesn’t stick out and show when the card is closed. Then lay it face down on the back side of the focal piece, apply glue, and make sure it stays in place lined up with the front of the card, then close the back of the card over to the inside panel gets adhere to the inside of the card but stays hidden behind the front piece. You’ll understand when you do it!

For the inside of my card, I stamped a birthday greeting from the Cheerful Daisies Stamp Set and also some confetti with the stamp in the Zany Zoo Stamp Set in the same colors of ink I had already used on the front of the card – Poppy Parade, Parakeet Party, and Tahitian Tide. On the front of the card, I added some Iridescent Rhinestone Jewels for some sparkle.

Z-Fold cards are easy to make and for sure should be in everyone’s repertoire!

Unfortunately, this Brights 6″ x 6″ paper is backordered until the week of September 25 at this time, but many of you may already own it and of course, you can use whatever designer paper you have for the card that you want to make!

Here is a view of the card when opened.

Zany Zoo Brights Z-Fold Birthday Card open

I hope you will be inspired to try a Z-Fold card. Make it as simple or fancy as you like! Keep checking, maybe this Brights DSP will come back in stock sooner! Don’t forget to use your Bonus Coupons if you earned some in July. Use your Bonus Coupons by August 31.

SHOP STAMPIN’ UP! ONLINE HERE!

Kits Collection Festive Tags Kit!

It’s the new Festive Tags Kit in the Stampin’ Up! Kits Collection that was just added this week! I just love these holiday tag-making kits because we always need more tags when we are wrapping packages! It is good to stock up and have lots of tags on hand! Or, if you prefer, make the tag without the string and add it to the front of a card! Tie a bow on the top with ribbon or twine. What a cute decoration to make an easy card!

In this kit, you get a cute snowman, wreath, holly, ornament, and Christmas tree. The pieces are diecut and you get all the embellishments and twine. There is no stamping! Just put them together, according to the directions and video, or change them up a little bit however you like. You also get sentiment stickers in several languages (English, French, German, and Dutch) so if by chance you want to use something other than English, you will have that choice.

Kit includes:

  • Predesigned projects
  • Step-by-step instructions
  • Precut pieces (No prep work! Get right to crafting)
  • Makes 15 tags: 3 each of 5 designs
  • Size range: 1-1/2″ x 2″–2-1/2″ x 3″ (3.8 x 5.1 cm–2.5 x 7.6 cm)
  • Enough adhesive to complete projects
  • Die cut stickers and accents
  • Peel-and-stick gold dots
  • Baker’s twine
    *A 9-7/8″ x 6-1/2″ x 2-3/4″ (25.1 x 16.5 x 7 cm) printed designer box for storage or crafting on the go

Product colors: Basic Black, Flirty Flamingo, Garden Green, Lost Lagoon, Pool Party, Real Red

Kits by Stampin’ Up! are perfect for new crafters, busy crafters, or crafters who want quick and easy projects. All-inclusive project kits have everything you need in one box! Give as a gift or try them yourself. Kits are while supplies last. Order today! Personally, I ordered TWO kits!

Kits Collection Festive Tags Kit

BUY THIS KIT HERE!

(And it’s on sale!)

Textured Floral Petal Pink Thinking of You Card

Textured Floral Petal Pink Thinking of You Card

After making a project for my Stamping With Karen newsletter I sent out today (are you on my Mailing List? If not, sign up in the red box!), I got the idea to make this Textured Floral Petal Pink Thinking of You Card. Specifically, I got the idea to stamp the little flower randomly to make a background layer for a card! The rest followed.

I was in a Petal Pink mood and didn’t know if this would turn out to be a monochromatic card or not, but it didn’t. It is all Petal Pink, though, except for the leaves. I even used a new product I just got.

The card base is Petal Pink with a Basic White layer stamped with the smallest flower in the Textured Floral Stamp Set. These stamps in this set have that “Distinktive” texture to them that produces various shades in the image just by stamping one time. I like the look, especially on these little flowers for some reason!

After stamping that background, randomly, I stamped the large flower in Petal Pink and diecut with the Textured Floral Dies. You can purchase both the stamp set and dies in the Textured Floral Bundle and save 10%. The leaves were stamped in Granny Apple Green ink and diecut.

As I played around with placing the flower and leaves and thinking about a greeting, I thought the flower needed something to help it stand out better as the focal point of the card. I cut a strip of Petal Pink cardstock 1 1/2″ wide by 5 1/4″ long to go across the card behind the flower. I felt it still needed something and I thought of the Vellum Basics Specialty Designer Series Paper which has three different patterns, two sheets each. Vellum always adds a softness to the look when it is used. The one I chose has polka dots and I diecut a stitched circle, the largest one, in the Stylish Shapes Dies. Once I put that behind the flower and leaves, I was satisfied.

After the Petal Pink strip was adhered across the card, I adhered the vellum circle, only putting Stampin’ Seal in the center of the vellum where I knew it would be covered by the flower. We usually try to hide adhesive when we use it on vellum because it shows through the vellum. The flower is poped up with Stampin’ Dimensionals and the leaves are adhered with Multipurpose Liquid Glue flat on the vellum. Then I stuck in a couple of leafy sprigs that were diecut out of two green colors of cardstock behind the flower.

For the greeting, I stamped one in the Layering Leaves Stamp Set with Petal Pink ink on Basic White cardstock and then diecut it using a label in the Timeless Arrangements Dies. Luckily it fit on the card, just barely, because I didn’t plan the greeting before I finished making the rest of the card! For a finishing touch, I spotted a diecut flower on the table, so I popped it up right below the greeting and I really liked that!

As I’ve said before, I am really liking this Textured Floral Bundle for making pretty floral cards! Check out this card I posted on my blog the other day. These stamps are also great for making quick and easy stamped notecards as I posted in my newsletter today. If you order the Bundle, order the Note Cards & Envelopes, in Basic White or Very Vanilla, also because you never know when you might want to write a quick note.

SHOP STAMPIN’ UP! ONLINE HERE!

Check out the Kits Collection Sale, too!