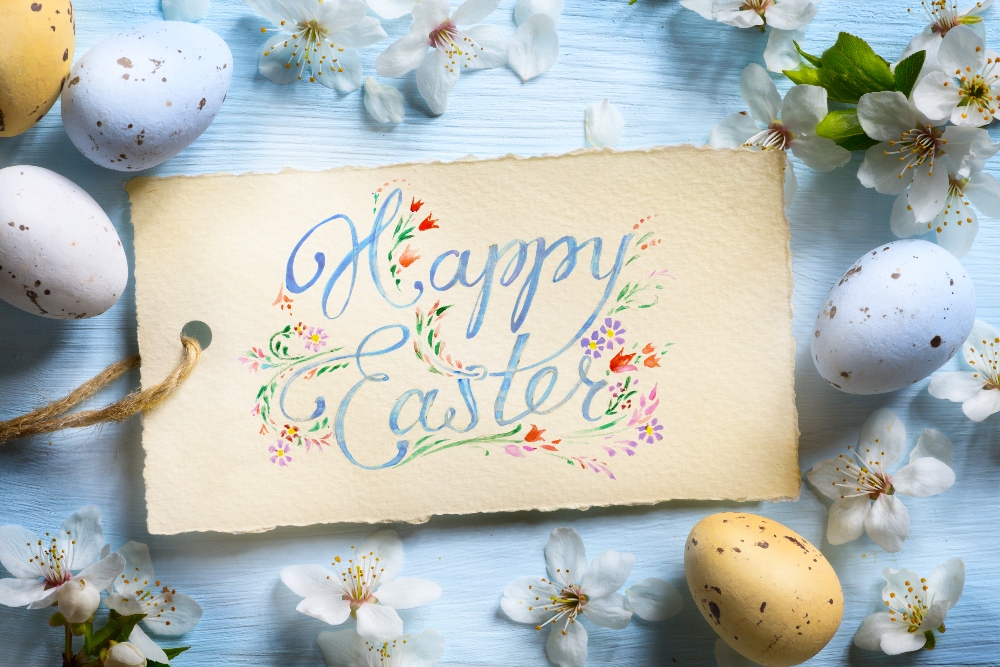
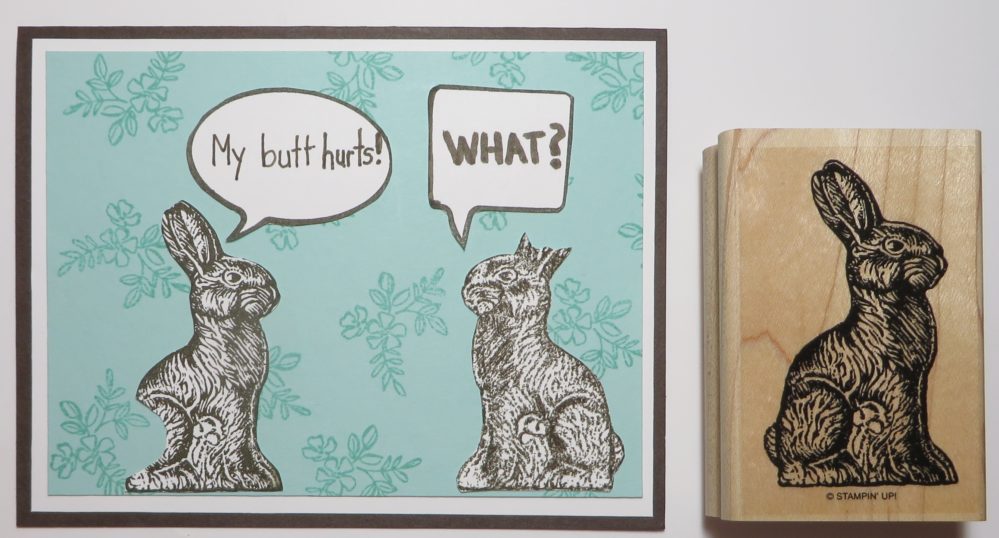
Have a lovely Easter Sunday
and I hope you get to munch on a chocolate bunny!


Have a lovely Easter Sunday
and I hope you get to munch on a chocolate bunny!
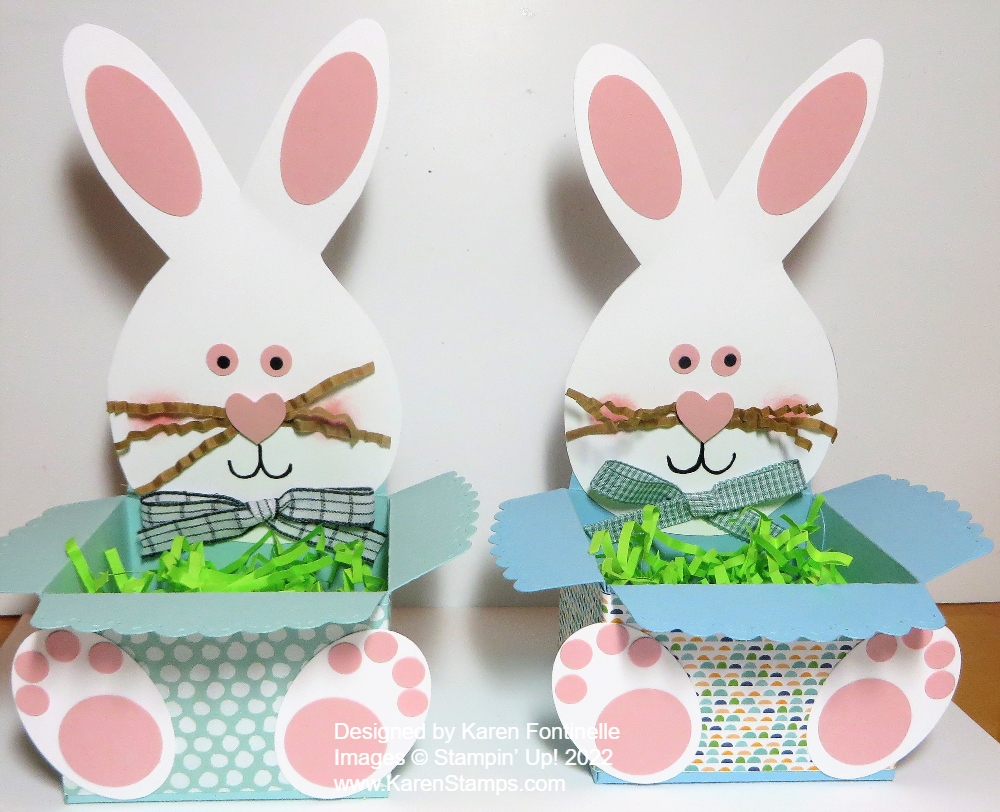
I was asked to make two Easter treat baskets for two little boys. I had kind of a normal little basket idea with a handle (made of cardstock, of course, not a real basket! but when I got home, I saw one of my Easter decorations on my fireplace mantel that I made years ago. I just copied myself and made these two Easter Bunny Treat Baskets! Plenty of room to put some chocolate candy and other treats inside!
To make these baskets, I pulled out a lot of my retired Stampin’ Up! products! The main thing I used was the Sizzix Scallop Envelope Die, I think it is called. It was one of those first dies we had with our Big Shot, the black thick platform kind of die with the cutting blades inside the die. I cut four pieces, cut off one tab on one side of the envelope piece, laid them side by side, adhered them together, and folded in the bottom flaps to form the basket. So if you have been die-cutting for a long time, you may have this die. We could make a lot more things than just an envelope with this die. The bunny on the back of the basket is simply a sketched bunny shape. There may be a template somewhere online. I traced the one I’d already made on my basket. The bunny feet on the front of the basket are made with the retired large oval punch, the 1″ circle punch, and some smaller punched circles. There were several punches I had that could make those, like the Owl Punch and the Gingerbread Man Punch (not sure that’s the correct name). For the ears, I punched oval shapes but you could color them in with a marker. The face can just be drawn in or just small circle punches for the eyes, a small heart, or a circle for the nose. Add a little blush to the cheeks! Draw on some whiskers or use some crinkled strips of paper or this crinkled shred that I happened to have.
If you do not have the Scallop Envelope Die, just make some little kind of square box. Just take a square piece of paper, score it like a tic tac toe board, fold and crease, then cut the flaps at the bottom and the top down to the horizontal scoreline. Fold in all the sides to form a box.
There are so many ways to make bunnies, too! If you are uncomfortable drawing a bunny like mine and cutting it out, just use some circle or heart shapes to put one together! Use dies or cut freehand.
Since these were boy bunnies, I tied bows and attached them to the bunny chins rather than on their ears! You could also make kind of a paper necktie if you wanted! Just have fun with the project! Nothing has to be perfect!
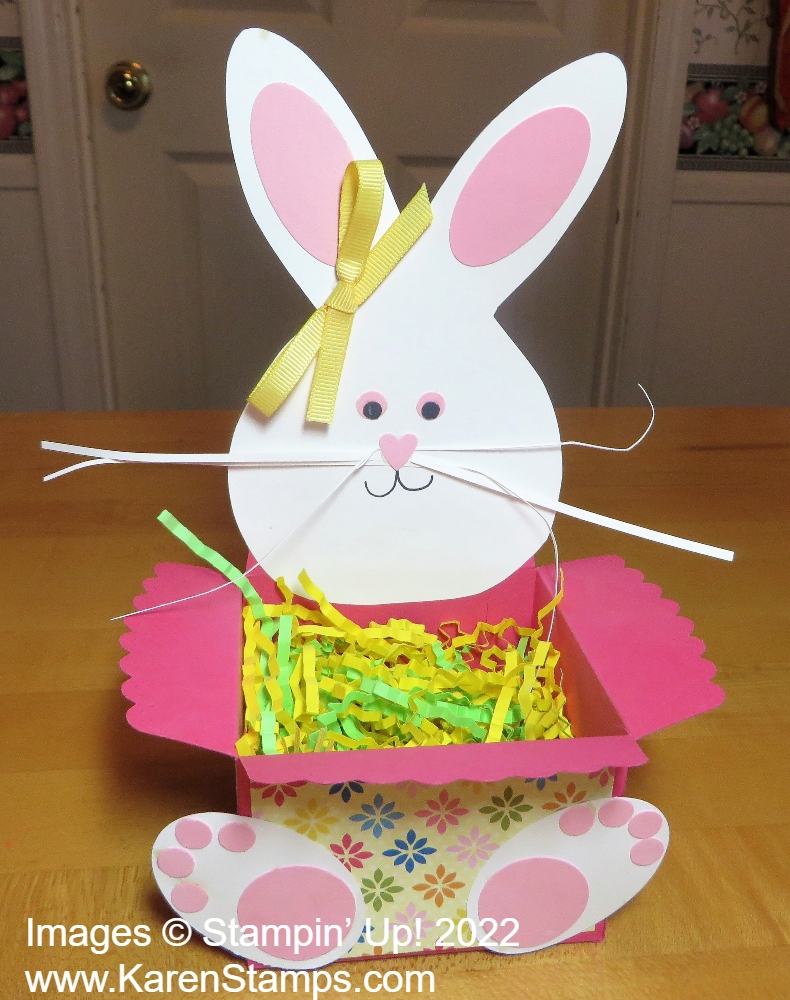
Here is my original bunny I made a few years back I guess!
If you need one more Easter idea, this Easter Bunny Treat Basket might be just the thing to inspire you!
HAPPY EASTER!
In case you are looking for some last-minute Easter ideas, here are a few I made in the past! Maybe it’s something different than what we’re all seeing right now or maybe you have these older stamp sets and products. Just pull them out and start creating! Or update with your current products! It’s all fun! Just click on the title to go to the blog post.
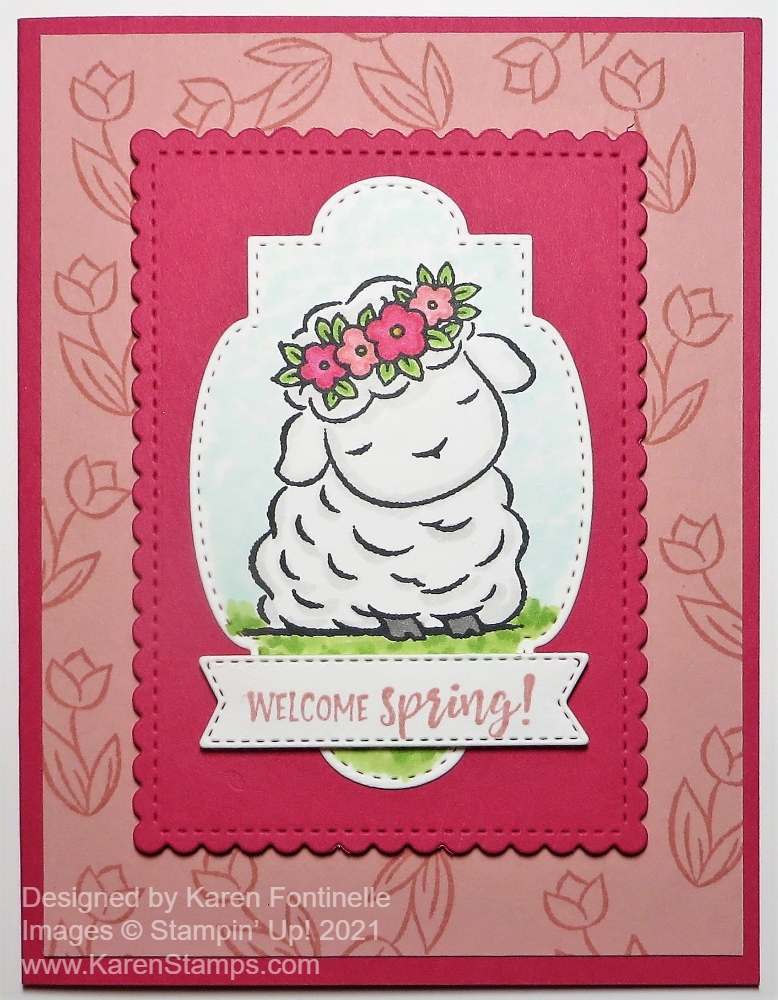
Springtime Joy Lamb Easter Card
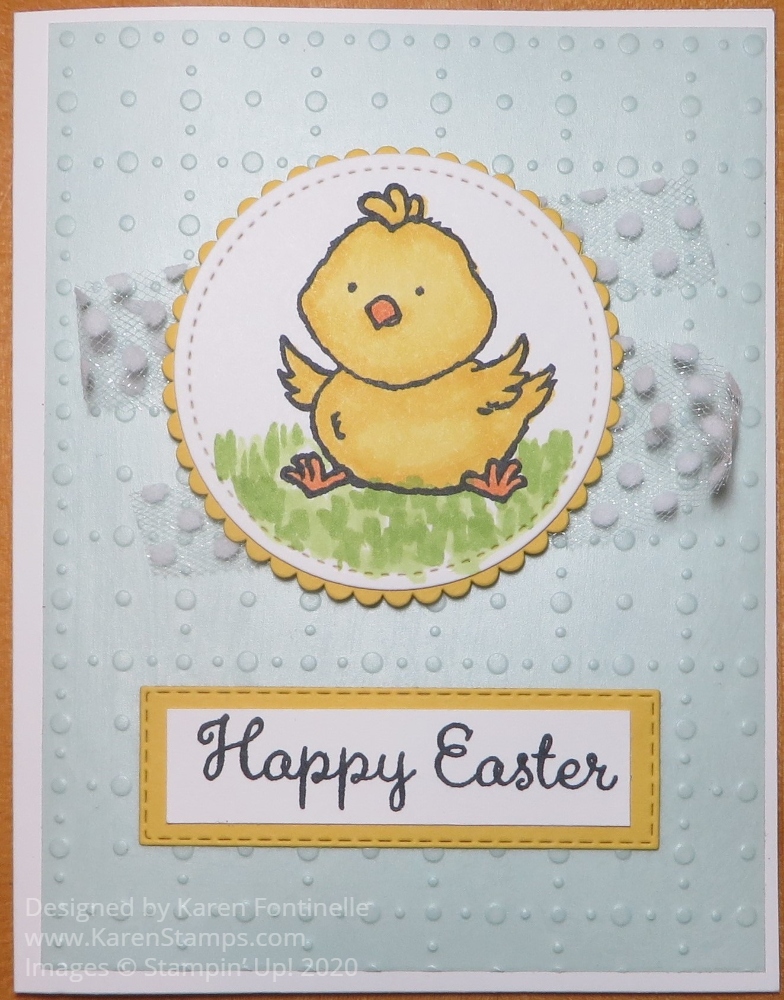
Welcome Easter Yellow Chick Card
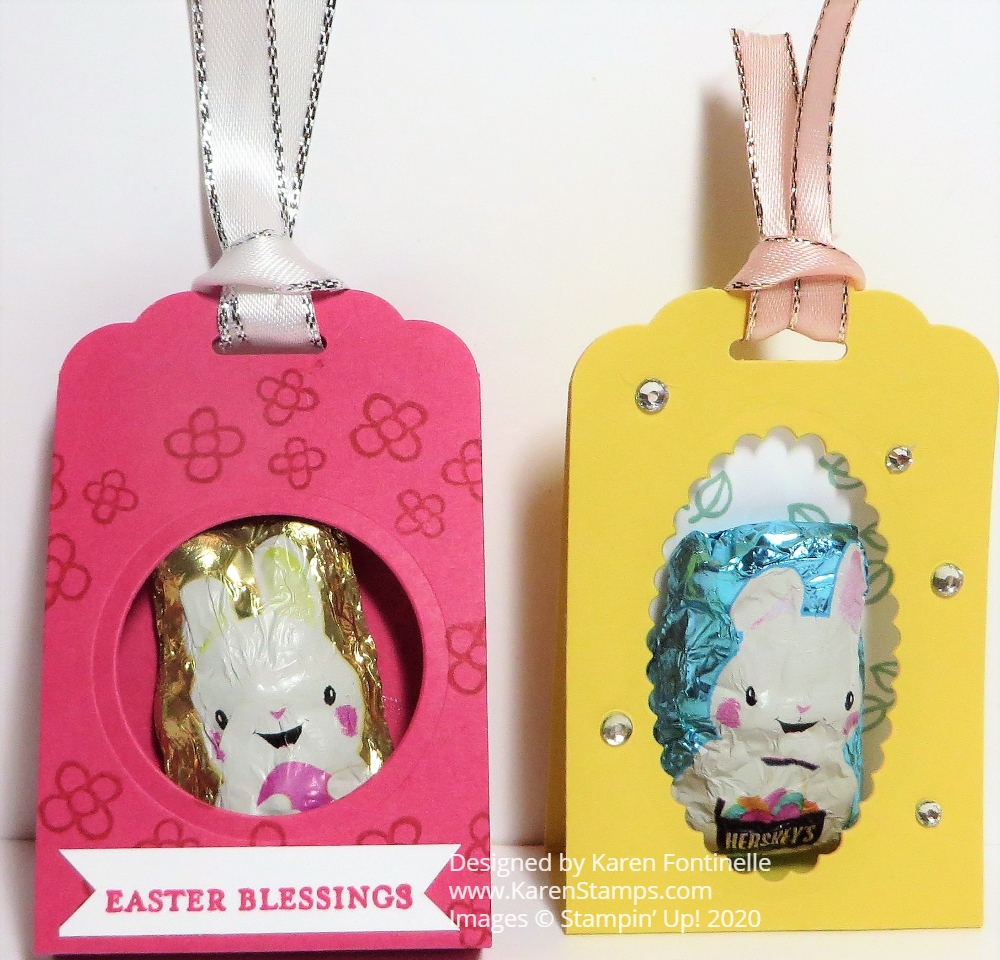
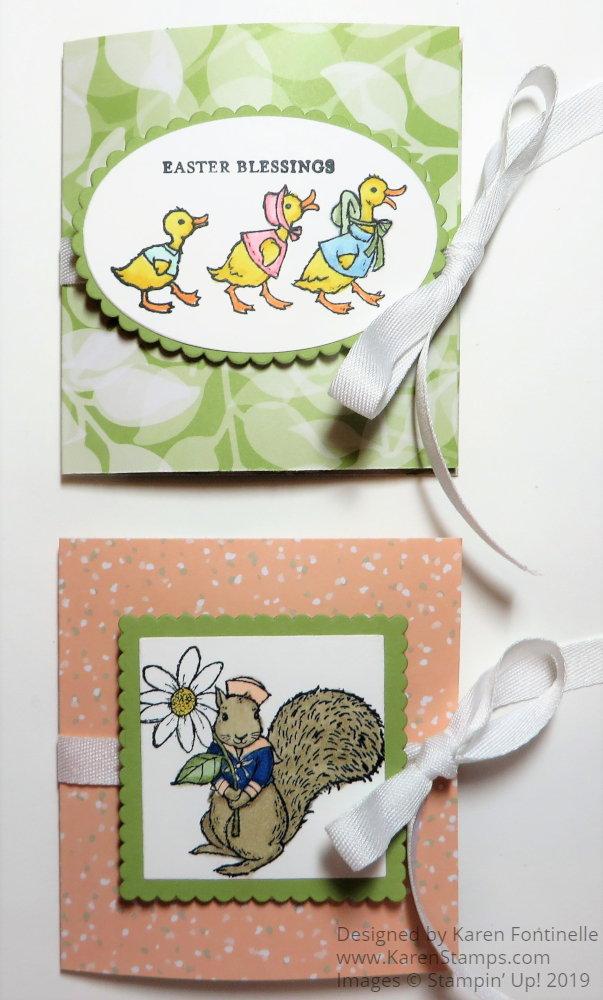
Easy Easter Folded Candy Holders
Make an Easy Paper Easter Basket

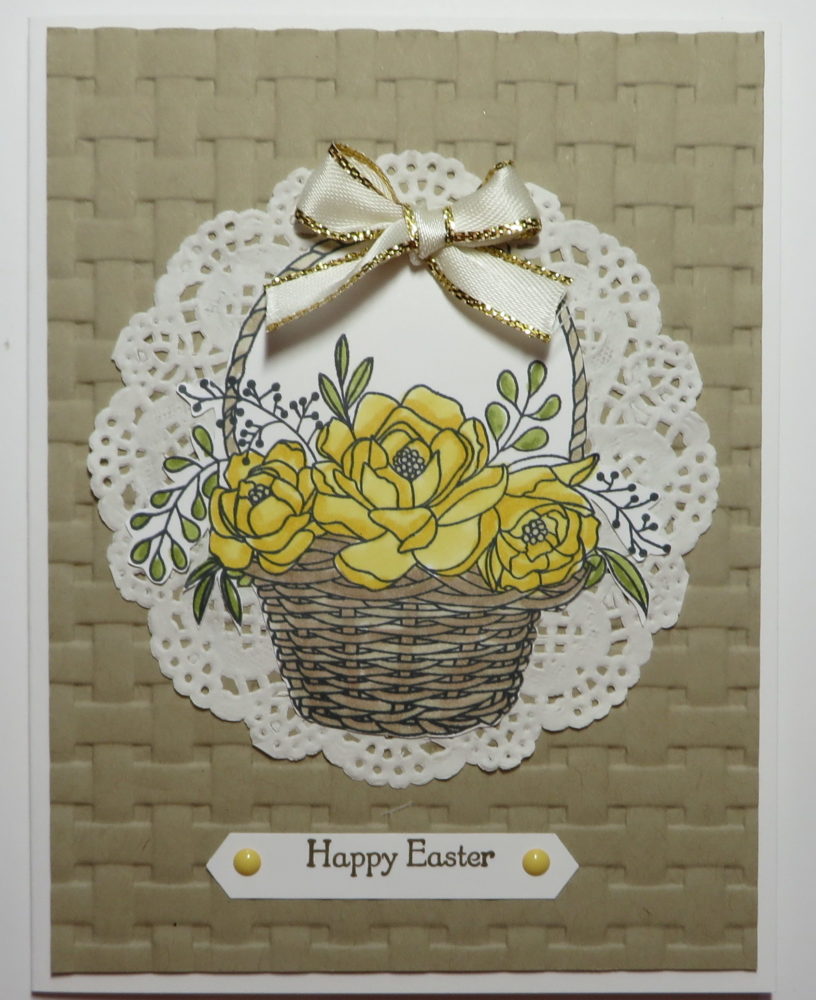
Easter Basket of Flowers Card on a Basket Weave Background
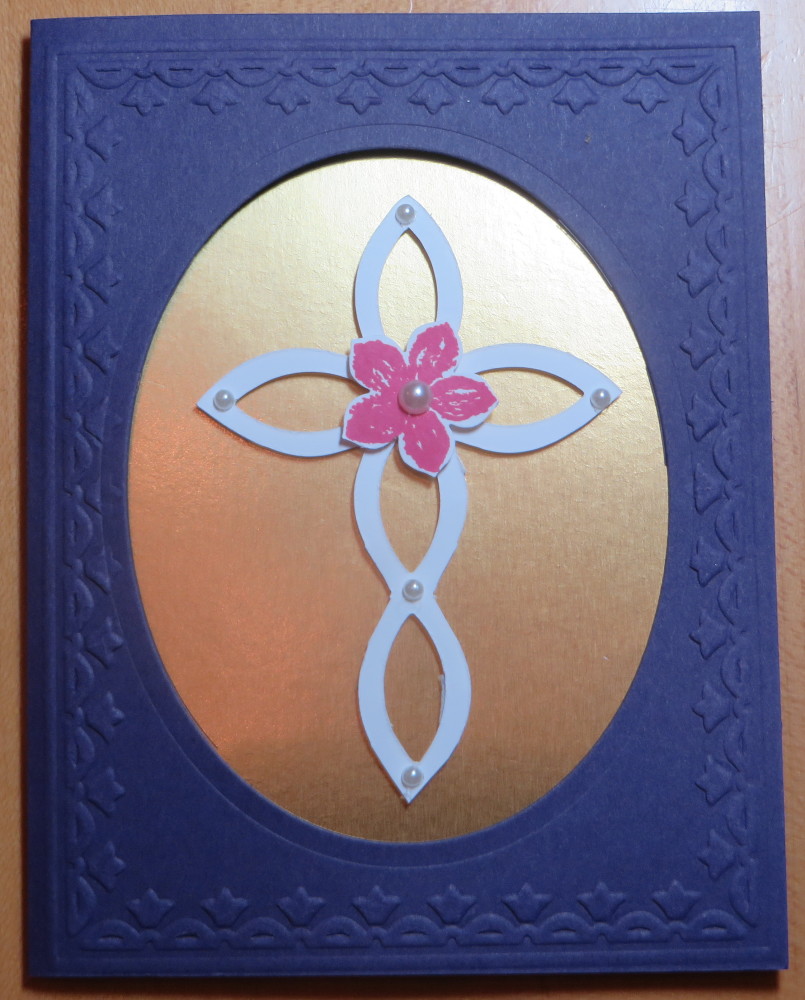
Happy Easter! Lattice Easter Cross Card
Playful Pals Easter Bunny Pyramid Treat Box
Well, that’s probably more ideas than you need but it was fun for me going down Easter Memory Lane! So many cards and treats over many years and seeing them always brings back wonderful memories because stamping is always so much fun! If you need more or different ideas, just select Easter in the Categories drop-down box under the catalogs.
HAPPY EASTER!
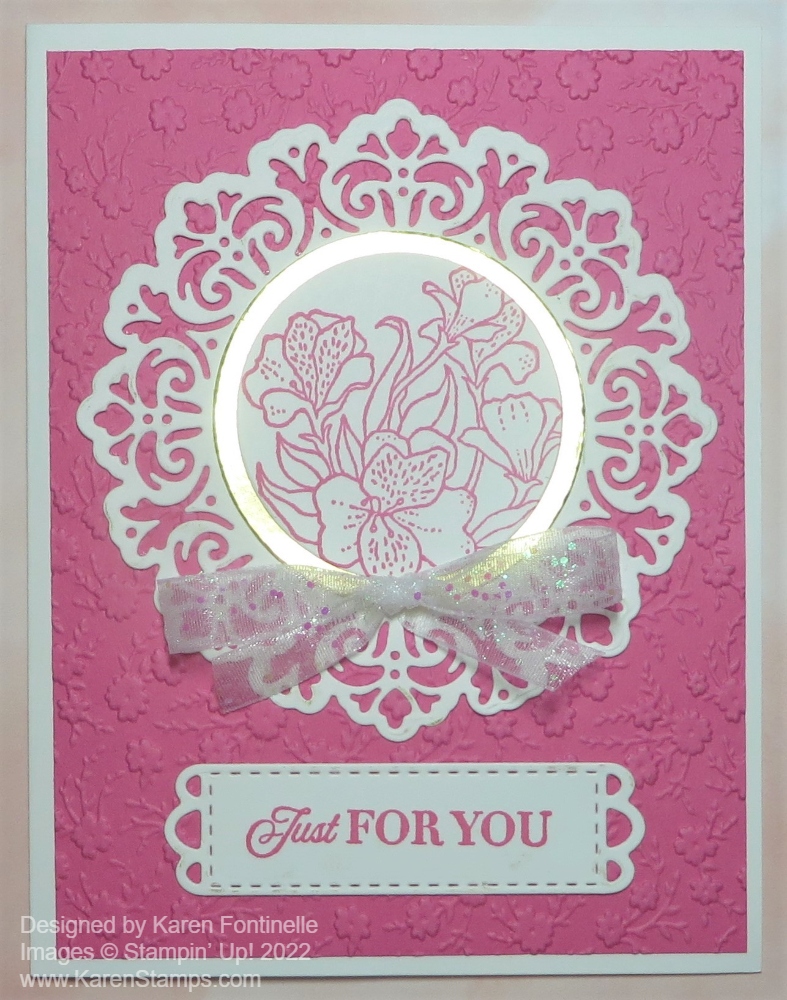
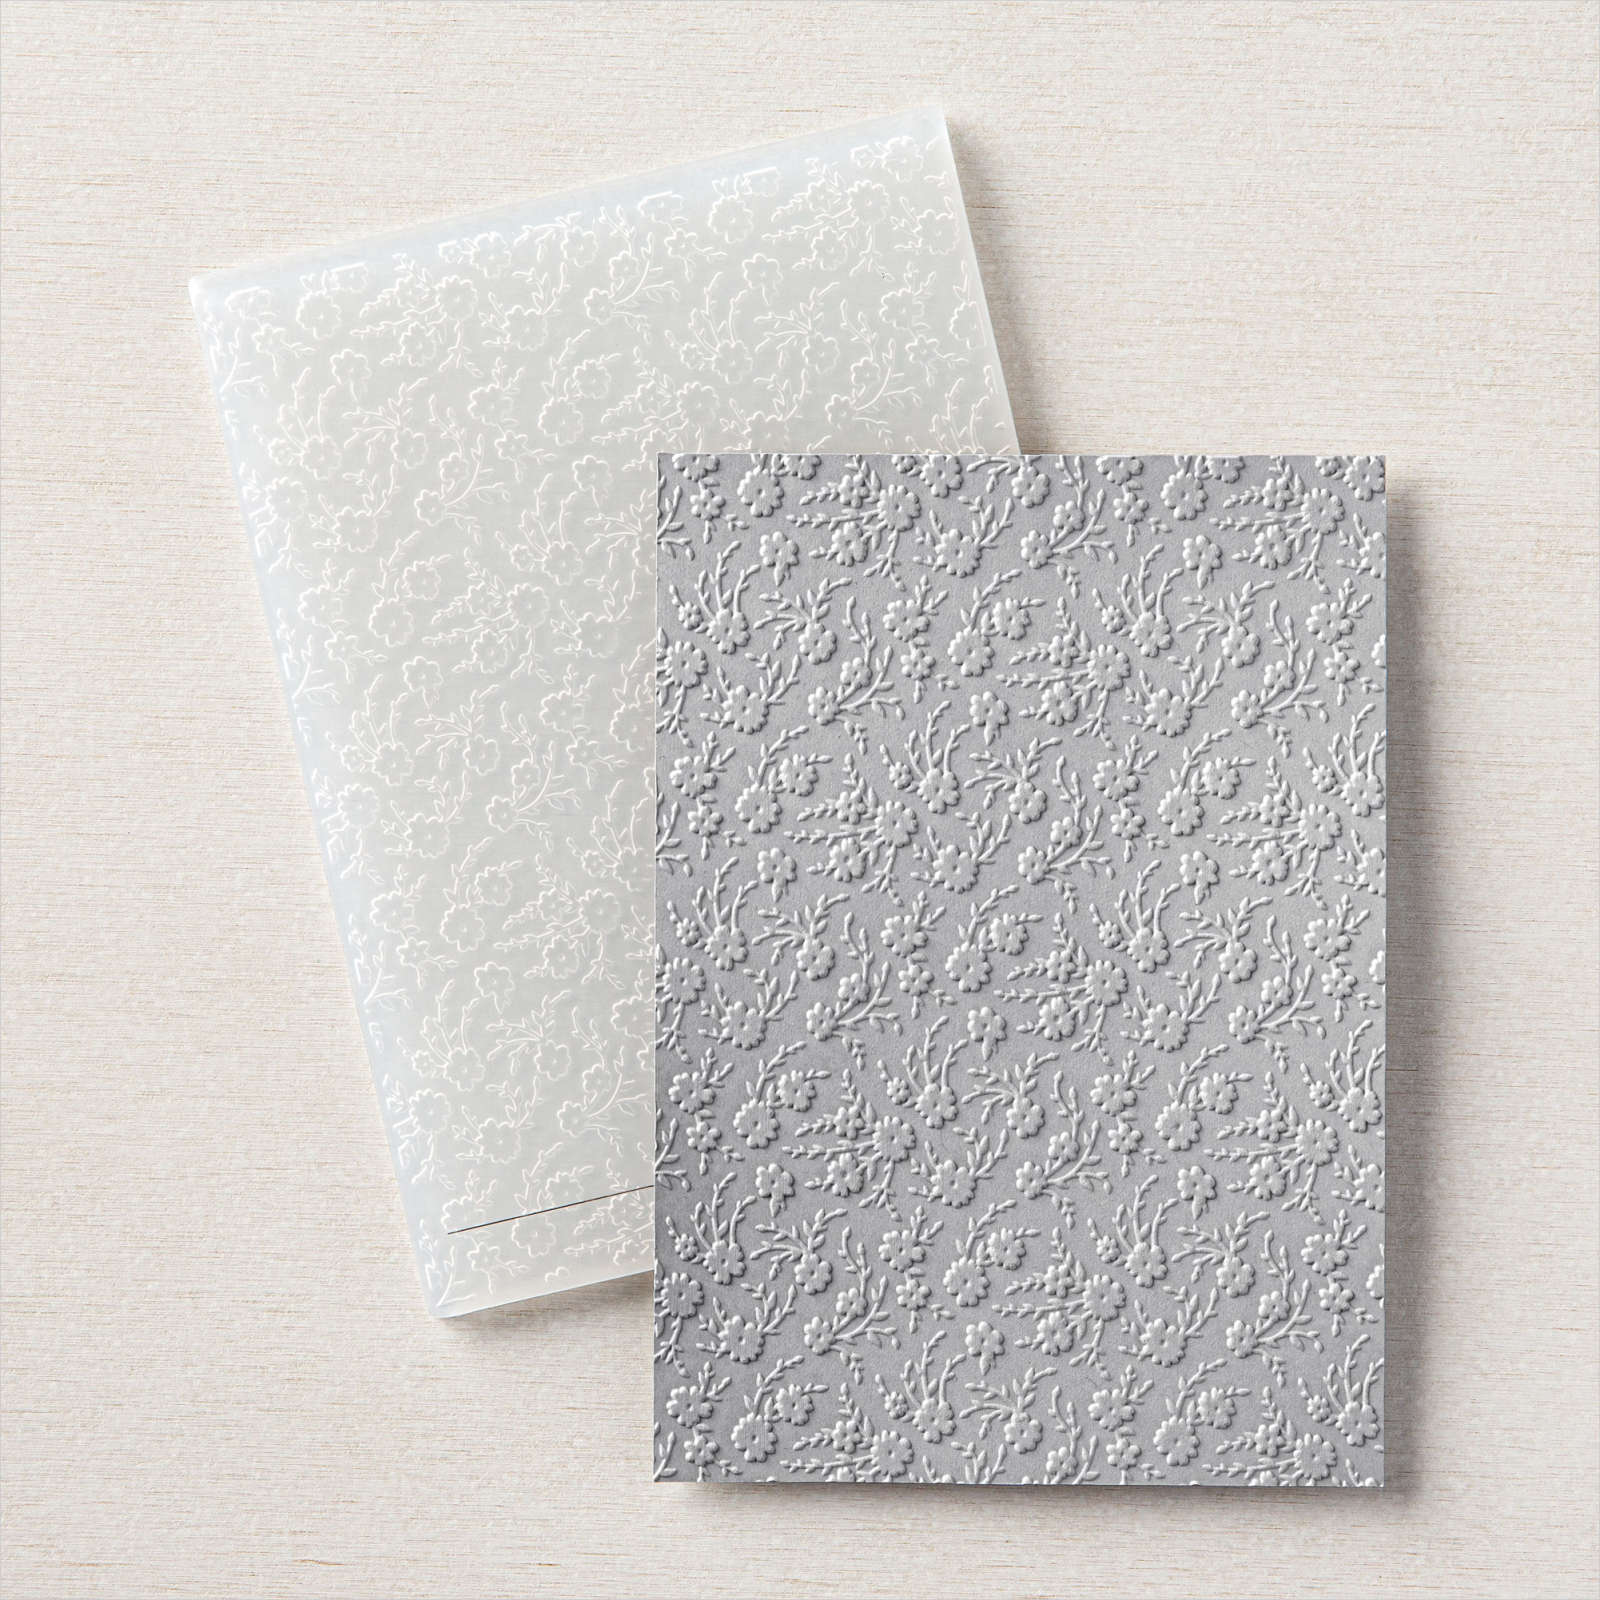
This Encircled In Friendship Bundle of stamp set and dies was one of the prettiest sets, I thought, yet I didn’t use it quite enough and now it is retiring in May. The stamp set is already gone, but the Encircled in Beauty Dies are still available as I write this and that’s really the main thing you need to make a card similar to my Encircled in Friendship Easter Card. The flowers in the center were in the stamp set, but you can stamp any flowers, image, or greeting to put in the center of the beautiful die.
The card base is Basic White with a layer of Polished Pink, one of the current In Colors. These colors are sticking around for another year! I decided to emboss the Polished Pink with the Ornate Floral 3D Embossing Folder. This folder is retiring on May 2 and I recommend it as a pretty and useful folder for a background with a little texture you can use frequently. Lucky for you, it is also discounted on the Last Chance Products Sale! So check it out!
The fancy circle die is cut from Basic White with one of the Encircled in Beauty Dies. For the center portion, I stamped the flowers in the Encircled in Friendship Stamp Set (retired) in Polished Pink. You could also stamp them in Memento Ink or Stazon and color them in with Stampin’ Blends markers or any coloring tool. I thought I would like to have a special layer behind this floral circle, so I die cut with a Layering Circles die that was just a little bit smaller than the center of the die and then a larger circle out of Gold Foil. My fancy die was already cut out or I could have used the center of it.
The greeting, in the Celebrating You Stamp Set, was also stamped in Polished Pink ink and die cut with this cute die in the Meadows Dies. I had also die cut a little banner die in the Tasteful Labels Dies (another product I use frequently and will miss when it retires but it is discounted now!) to see which shape greeting I would like best with the fancy die cut above. I thought the Meadows Die would be too much but I liked it!
For a finishing touch, I tied a bow with the White 3/8″ Glittered Organdy Ribbon. When I pulled this ribbon out to try, I wasn’t sure it would work but once I placed the bow under the circle I loved how it looked! Being sheer is didn’t overpower the front of the card but I thought the pink glitter in the ribbon was perfect for an Easter card. This wouldn’t have to be an Easter card. The greeting on the front is generic so could be for almost anything, but on the inside, I stamped “Happy Easter” from the same Celebrating You Stamp Set.
Here’s another card I made with this Bundle. On that card, I used another fancy die as a layer under the stamped flowers, so you can use one or more of the pretty dies!
If you already own the Encircled in Beauty Dies, make some cards with the fancy dies. I would recommend using Adhesive Sheets on the back of your paper before die-cutting to make gluing them down easier. Otherwise, just use teeny tiny dots of Liquid Glue on the back, preferably using your Silicone Craft Sheet to keep the glue off everything else. If you don’t already own these pretty dies, take a look at them in the Stampin’ Up! Annual Catalog on pages 70 and 169. Use this Encircled in Friendship Easter Card for Easter or for other special occasions!
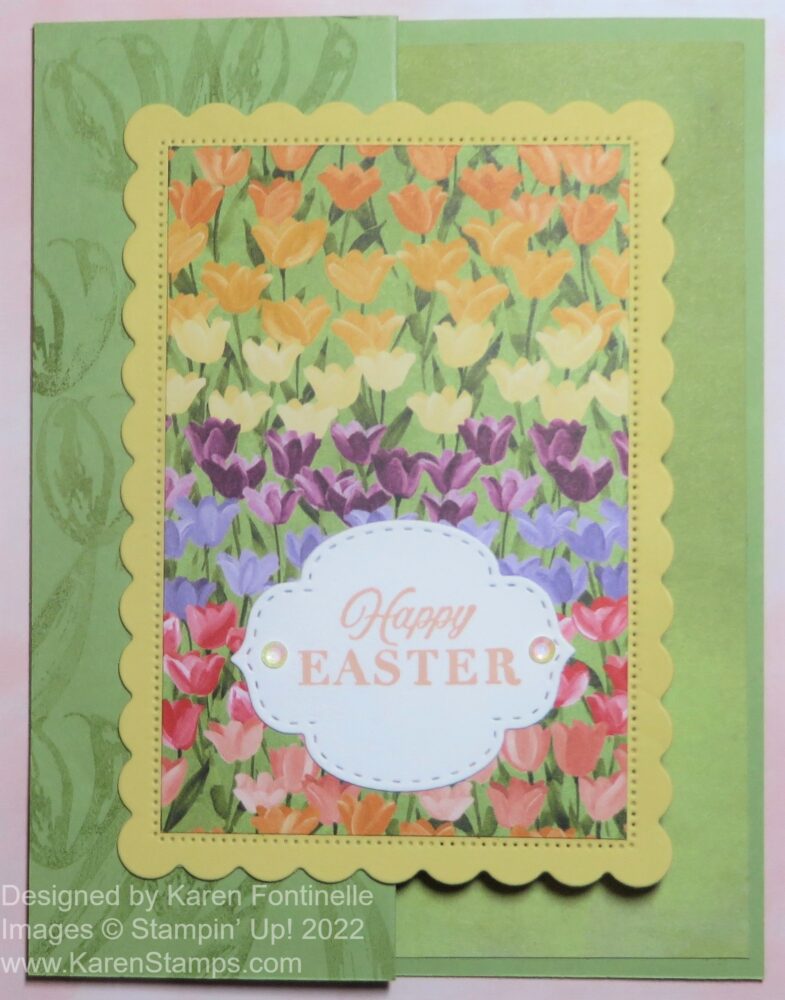
As I looked through my package of the Flowering Fields Designer Series Paper looking to see if a certain pattern was in there, I saw this print of tulips and decided I had to make an Easter card with it right away! As I scored the card in half, I decided to make it a Z-fold card and that’s how this Flowering Fields Z-Fold Tulips Easter Card came about! You never know when you start out what you will actually end up with!
This card was so easy really. I often add pieces of designer paper at least on the folded back front portion but this time I just stamped the smallest tulip in the Flowering Tulips Stamp Set. I used the same Pear Pizzazz ink as the Pear Pizzazz cardstock but I stamped off once on scrap paper because I wanted that light, watermark look down that side panel. I didn’t use the second step of stamping another tulip petal on top of the first because not much was going to show anyway and I just wanted that light look. I did stamp a few leaves to fill in some space.
I die cut a scalloped rectangle from the Scalloped Contours dies (retiring soon!) in So Saffron for the background layer to the tulip paper. For the designer paper, I just measured with a ruler inside the scalloped rectangle and cut out that size rectangle of DSP to fit inside the area. Mine was just a “smidge” under 4″ (about a 1/16th inch less) and about 2 5/8″ wide. If you want to tie a ribbon around that piece, do it before you adhere it to the scalloped rectangle of course.
The greeting is stamped on a die-cut piece from the Stitched So Sweetly Dies (also retiring soon!). I just glued it flat on the card as I am likely to mail this card. I couldn’t resist adding two Iridescent Rhinestone Basic Jewels to the sides of the greeting.
For the inside of the card, to add some interest, I adhered “the other side” of one of the designer papers without a particular pattern except for the shading of colors. This particular piece barely makes a difference in the look from the cardstock, but it’s there and makes a prettier finished look I think.
For the inside, I die-cut a Basic White scalloped rectangle, one size smaller than the card front to adhere inside the card on which to stamp another greeting or write a message and sign the card. You could use one the same size as the front but you would have to line it up perfectly so it wouldn’t stick out from underneath the front card design.
Here is another Z-Fold card I made recently for Easter using the Flowering Tulips Stamp Set instead of the designer paper.
I’ve made lots of Z-Fold cards and I always say they are so easy to make (just fold back the card front!) yet they make such a nice presentation! The recipient will think you are so clever and creative to make such a fancy card! The only difficult part is not to put glue all over the back of the front piece, just on the half that will be adhered to that Z-fold.
Be sure to check the Last-Chance Products list in the Stampin’ Up! Online Store to see what will be retired on May 2 and what is still available. Not everything is discounted, but some things are so grab what you “need”!
Reminder Today is the last day to sign up for Paper Pumpkin to get the April “Change Is Beautiful” Kit!
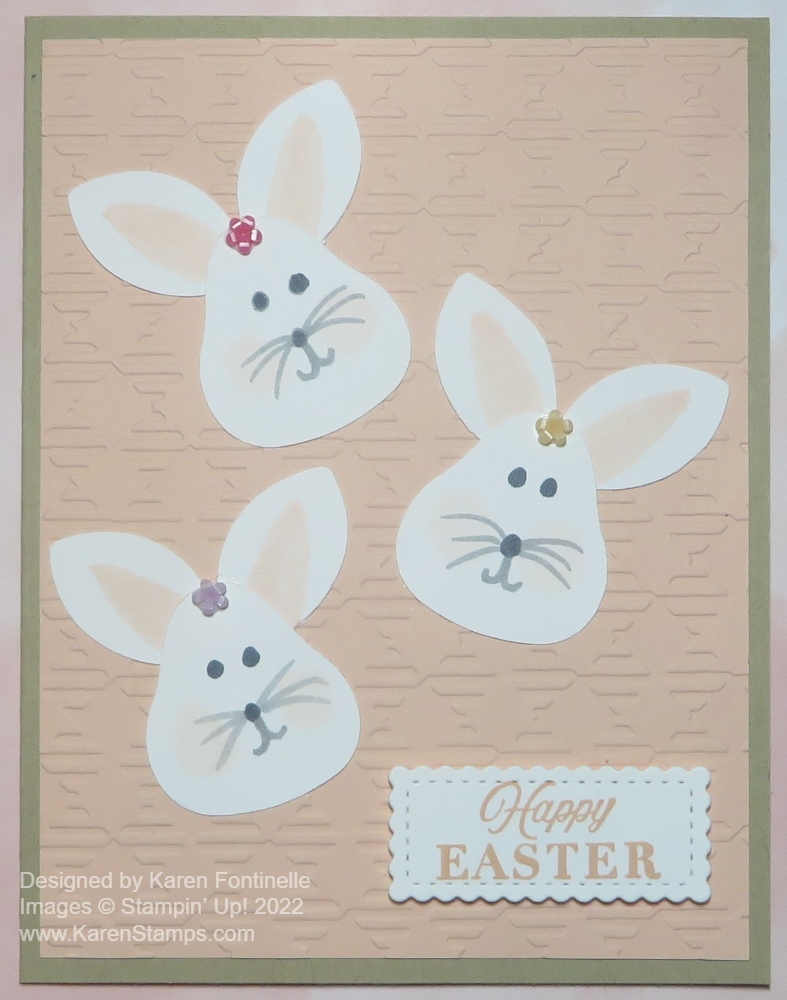
I saw this idea for the punch art bunnies on our Demonstrator group on Facebook but I think I saw the same idea somewhere else online too recently. I thought it was so clever, I went straight for my punches and started making bunnies which turned into this A Trio of Punch Art Bunnies Easter Card!
This “punch art” as we often call something created using different punches that are different than what the punch is meant to be. I don’t know how people come up with these creative ideas, but they do! And the rest of us can copy!
To make these cute little bunnies, just use the Strawberry Builder Punch and the Ladybug Builder Punch. Punch the strawberry shape to make the bunny head. Punch the Ladybug wings to make the bunny ears! I left them attached but I suppose you could cut them apart if you wanted the ears to have different spacing. That’s all there is to it! Isn’t that a fantastic punching idea?!
I colored in the pink on the ears with the Dark Petal Pink Stampin’ Blends. I used the Light Petal Pink color to color some cheeks on the bunnies. The faces are just drawn on with the pointy tip of the Basic Black Marker.
The card base is Crumb Cake cardstock with a Petal Pink layer. I embossed that layer with the Gingham Embossing Folder. The background needed some texture and this folder is good for some generic texture! But it also kind of reminded me of the weaving on an Easter basket so that, of course, went with the bunnies!
The greeting had to be simple and not take up too much space. I wasn’t sure it would fit on this smallest rectangle die in the Stitched So Sweetly Dies, but it did! These dies are retiring on May 2 which I hate! I used these dies a lot. I planned to layer the greeting, “Happy Easter” in the Celebrating You Stamp Set on top of a die-cut Crumb Cake rectangle but it was too big for the card and I like just the Basic White greeting better along with the bunnies.
I adhered the bunnies straight to the card because I wanted to add the tiny little Loose Flower Flourishes on the bunny heads and I didn’t want the flowers to stick up too much if I wanted to mail the card. Luckily these teeny flowers are pretty low so hopefully, they can go through the mail. I always add a piece of paper towel or maybe crimped computer paper to cover embellishments in the envelope to protect them from the post office machines.
Try making some of these bunnies! Bet you can’t make just one! You could use a brown or gray cardstock or maybe even the right pattern of designer paper. Just have fun with it!
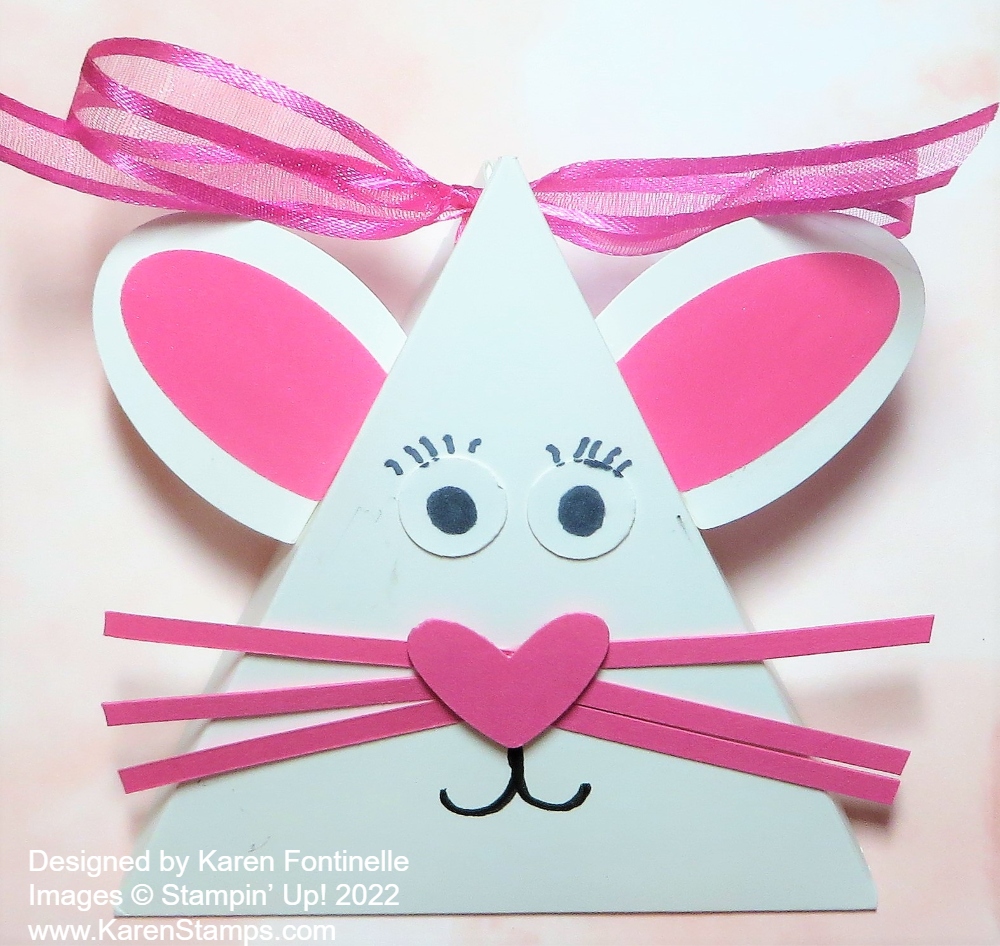
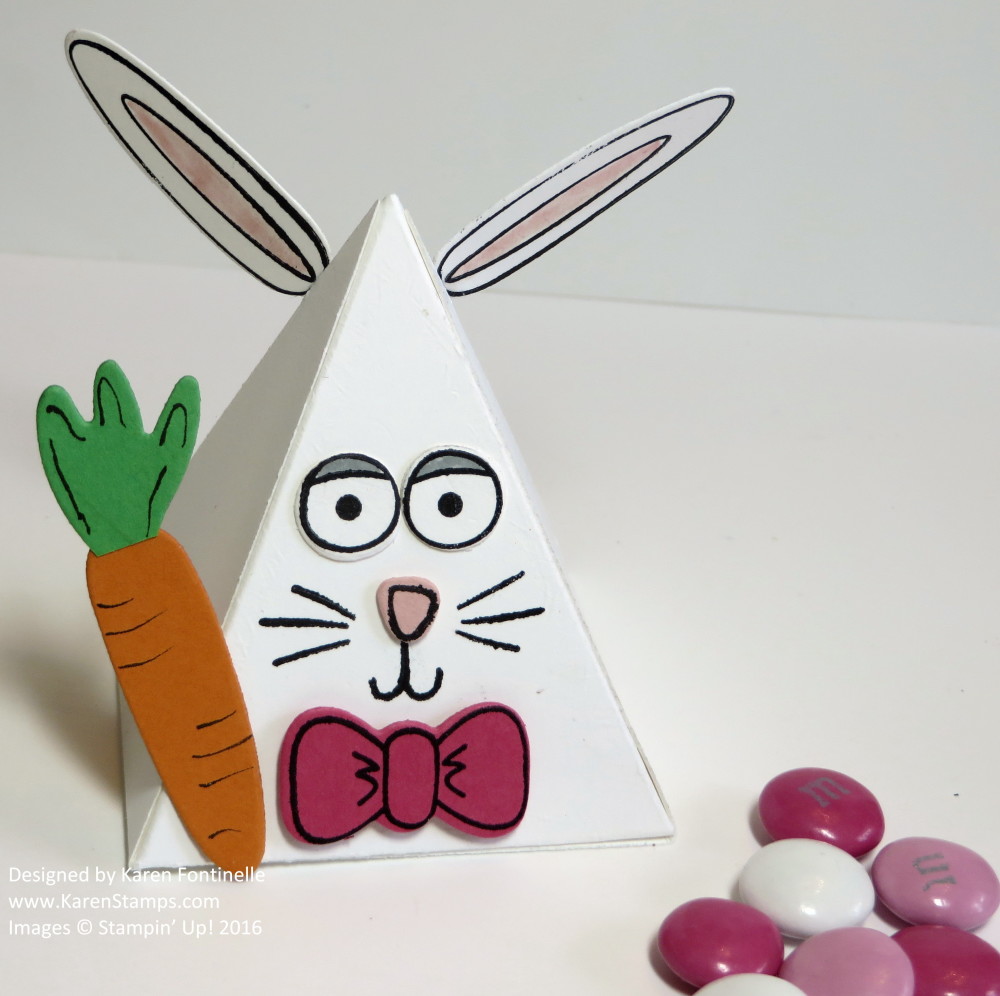
These triangle boxes are so fun and easy to make. I have made lots of them over the years for different holidays or occasions but I may not have ever made one for Easter like this Triangle Box Easter Bunny Treat. All you need is a piece of paper and then score it according to directions. You can vary the size of the paper depending on what size treat box you want. Put some candy or a small gift inside for a fun treat!
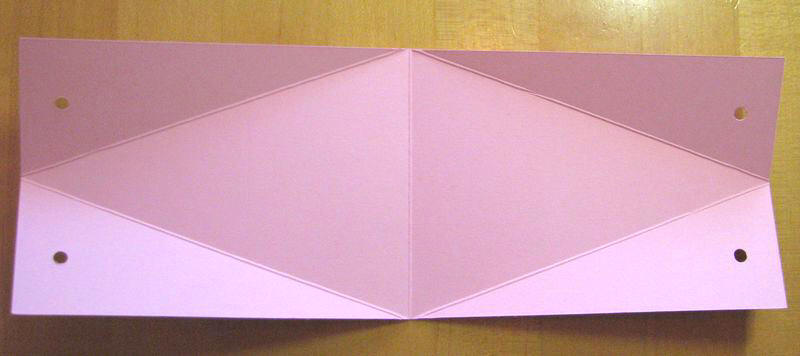
My Basic White cardstock is cut at 4″ x 8″. Use the diagram below to see how to score, but it is simple! At each end of the cardstock, put a light pencil mark at the halfway point which in this case would be 2″. Score the paper in half at 4″. Then in that awkward manner, with your Paper Trimmer, score from that 2″ middle point at one end down to the middle score line which will be on a diagonal. Do that on both sides of one end, then turn the paper and score at the other end in the same way.

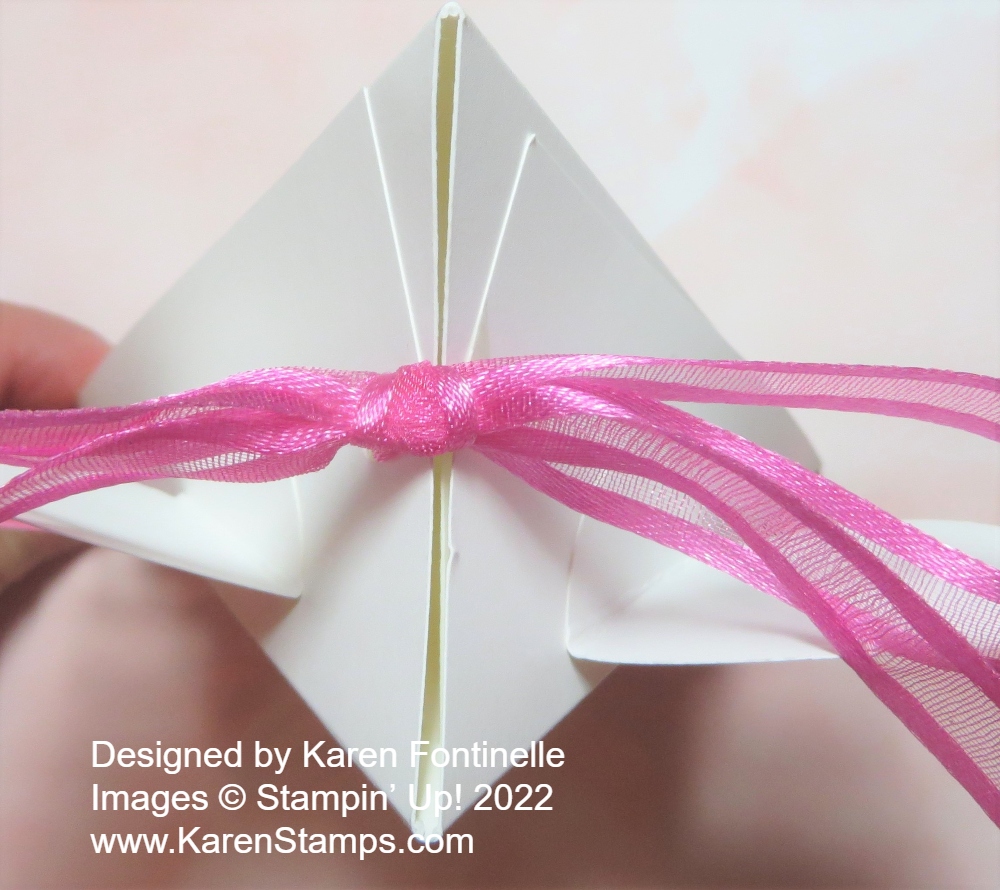
Now fold and crease all the score lines. You will see how it will fold together to make the triangle box. Determine which side will be the front or top of your box that you will want to decorate and how the flaps will go so that the top view of the box will have the fold of the flaps showing and not the open side. Once you see how it folds together how you like, you can use any hole punch to punch holes in the sides near the top. You want the two holes on each side to align. This is how your paper should look creased and with holes punched.
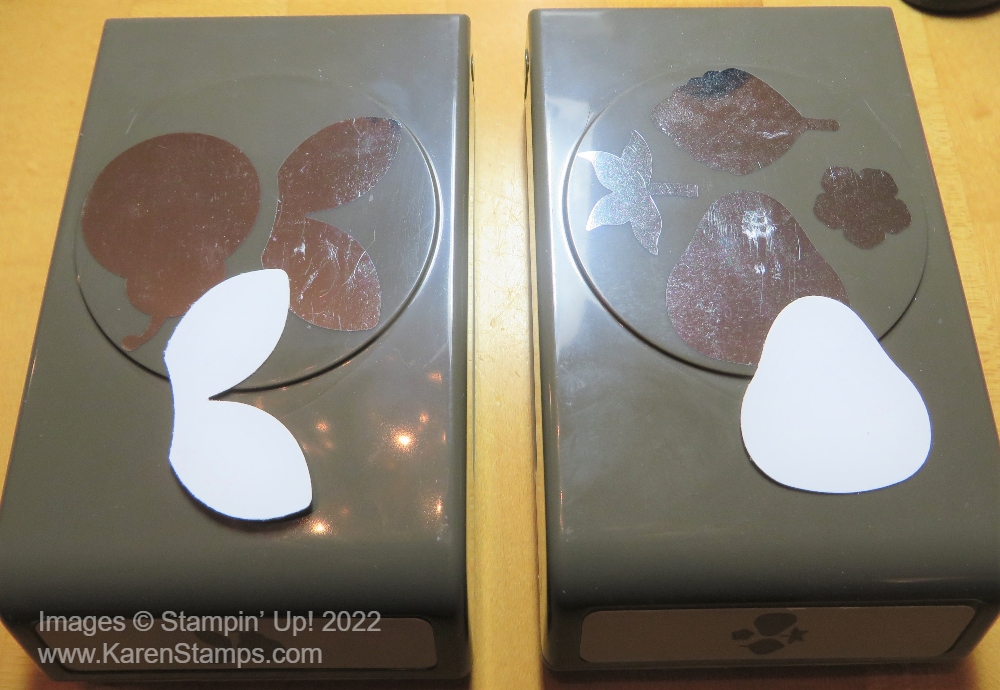
To decorate my Easter Bunny treat box, I used punches that are retired now but you can use whatever you have. There is the Double Oval Punch or maybe you have retired punches and dies that you can use….or simply cut out by hand! For the ears, I punched a large oval for the white ear and then I found the 2021-23 In Color Shimmer Vellum that I have and have barely used! It’s on the Last-Chance List and even on sale! To attach the ears to the box, I simply scored a bottom portion of the ears and folded then adhered each to the box. You can use Multipurpose Liquid Glue but you will have to hold it in place for a few moments.
For the eyes, I punched 1/2″ circles with my old punch and colored in the black portion. I had originally drawn them right on the box but later I smeared the ink somehow so I covered that mess up with the punched eyes! “There are no mistakes in stamping!” I think it looks better this way! The nose is a little larger than I planned on but I used one of the hearts in the Sweet Hearts Dies. I had to have something a little large since I attached these whiskers. If you have been papercrafting for any length of time you probably have a heart die or punch somewhere in your stash or you can just cut one by hand. The mouth is just drawn on with the Black Stampin’ Blend marker.
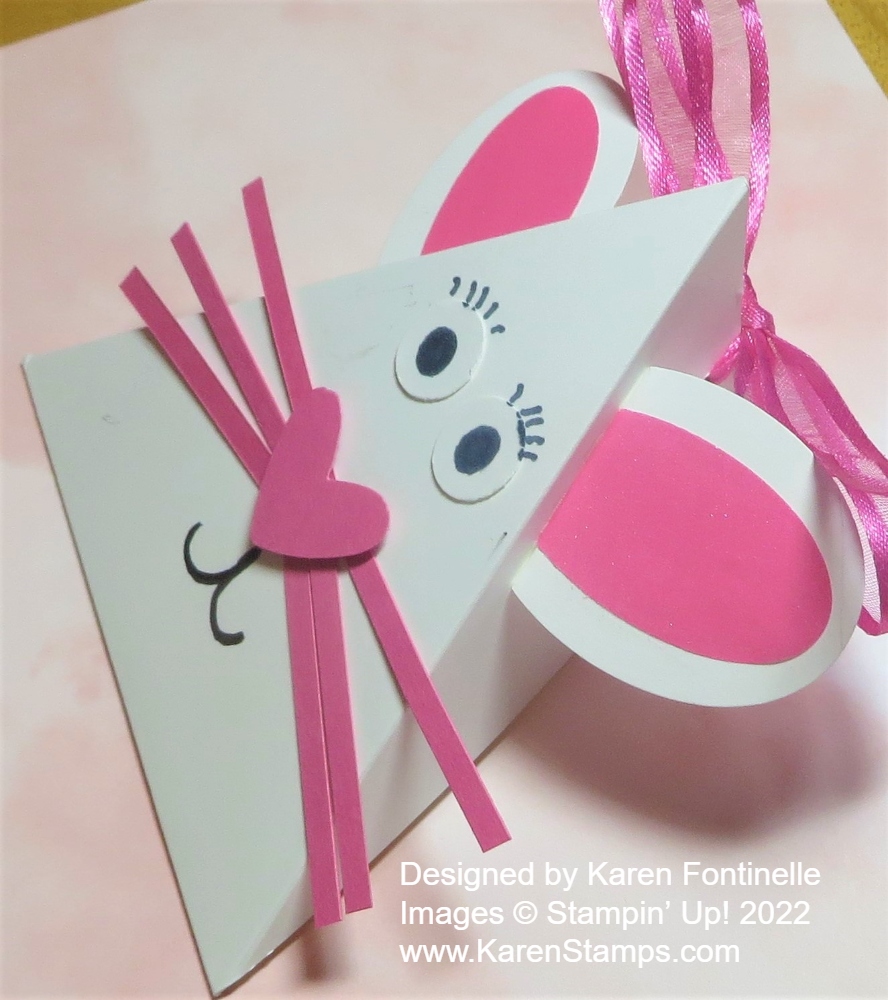
After putting your treat or gift inside the box, you can tie it closed with either an inconspicuous piece of ribbon or do as I did and use a larger bow that matches my bunny colors that looks somewhat like a bow tied on the bunny’s head! My pink colors are the In Color Polished Pink in the paper and ribbon. The ribbon is the 3/8″ Open Weave Ribbon. Such pretty ribbon in all the In Colors! Luckily these In Color ribbons are carrying over into the new Annual Catalog!
That’s it for making a triangle box! Here is another example in THIS POST. Just decide on the size of paper you want to use, score in half, score on the diagonal to each end from that scoreline, punch holes if you want to be able to tie it shut, and decorate as I did in this Triangle Box Easter Bunny Treat.
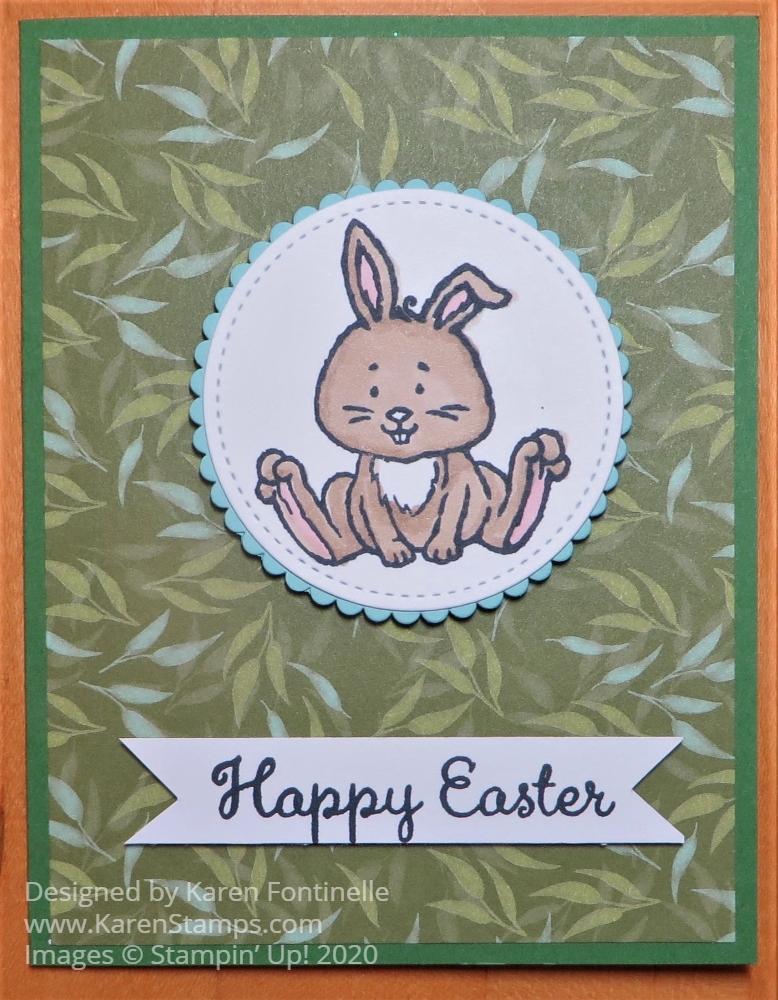
This Friends of the Forest Bunnies Easter Card is an easy one to make! But is it an Easter card?? Or is it a baby card?? Well, I made it as an Easter card but the whole time I was making it I thought this sweet bunny reminded me of baby cards! In fact, I was so taken with stamping the cute little bunny that I forgot about a greeting! But I’ll show you the inside and I think we don’t ALWAYS have to put a greeting on the outside.
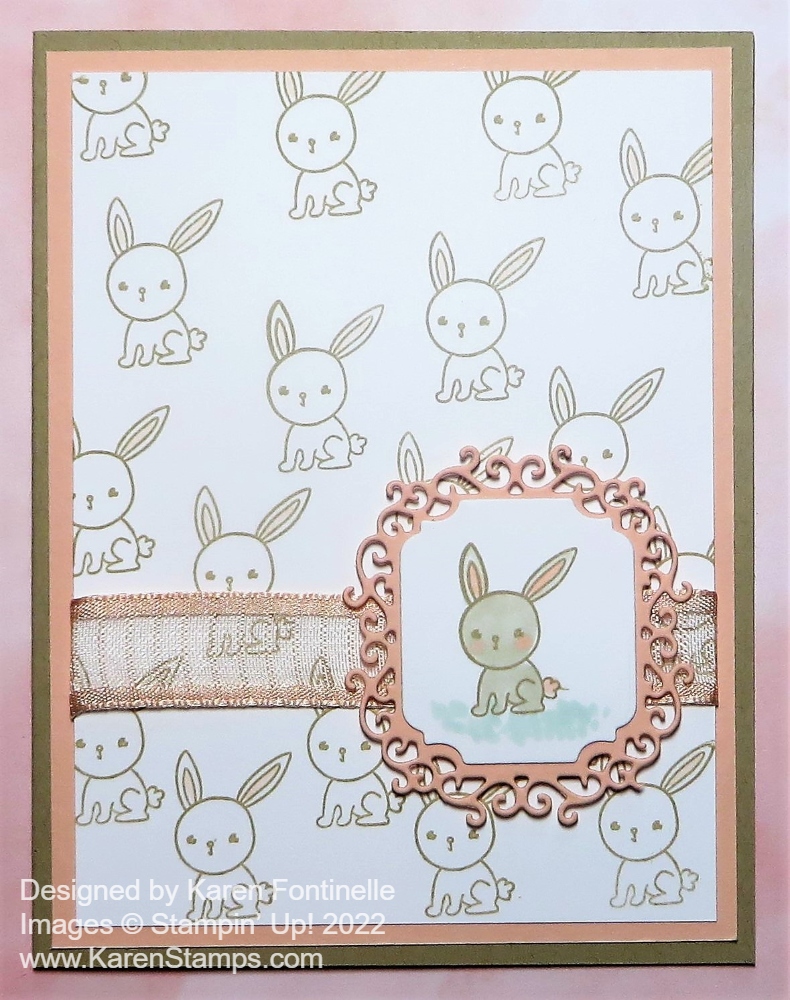
This bunny is in the Friends of the Forest Stamp Set in the Spring Mini Catalog on page 19. This is not an “Easter” set but of course, the bunny is perfect for Easter. I did one of the things I like to do best … I randomly stamped the bunny on the Basic White layer to make my own designer paper! Or simply a pretty background! I used Crumb Cake ink and I went back and colored in the ears with the Light Petal Pink Stampin’ Blends Marker. I had to stop myself before I started doing even more coloring because I didn’t want all the bunnies colored.
The card base is Crumb Cake cardstock, although it looks darker in the photo. Then there is a layer of Petal Pink underneath the Basic White. You could use any pink and you could use a darker brown like Soft Suede. Or change up the color scheme altogether.
I actually copied myself making this card! I remembered a card in THIS POST that I had always liked so I updated it with this bunny!
I wanted a colored bunny to be the focal point so I stamped the bunny on Basic White and die cut with one of the dies in Ornate Frames that fits on the frilly die cut in the same set. This one is on Petal Pink cardstock and was already in my bag of cardstock so I must have diecut it before and didn’t use it! Just seeing it in with the other Petal Pink cardstock gave me the idea. It was the perfect size for the bunny!
The bunny is just colored with a Light Crumb Cake Stampin’ Blend Marker. I wanted to keep him light and didn’t do any blending with another color. I used the narrow tip of the Petal Pink marker to color the insides of the ears, the tail, and the cheeks. I could have stopped there but I added a bit of grass for him to sit in with the Light Mint Macaron marker.
To embellish the card a bit I simply wrapped around a piece of the Petal Pink 5/8″ Organdy Striped Ribbon. This has been one of my favorite ribbons so I am sad it is retiring on May 2, if not before. It is even on sale so check it out (or stock up!). The bunny piece, on the Ornate Frames diecut is popped up on Stampin’ Dimensionals®.
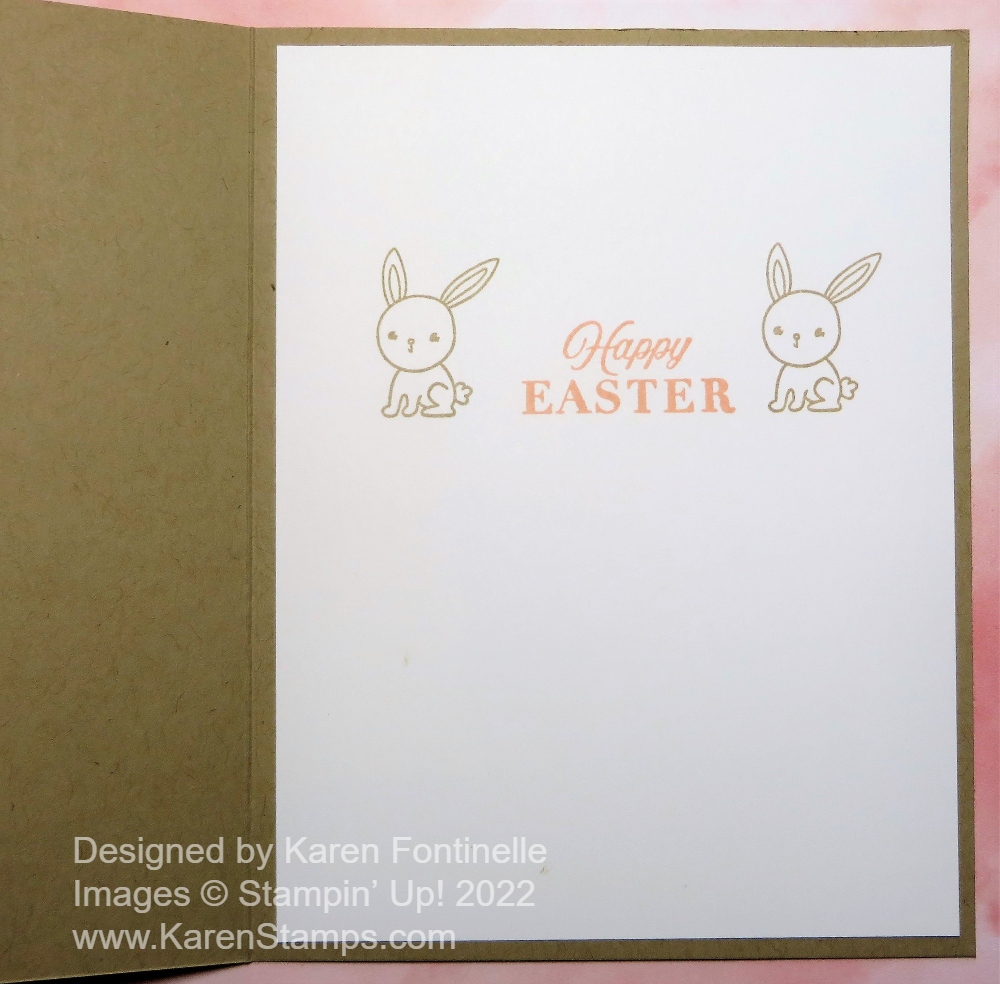
After I got this far on the card, I realized I didn’t have a greeting and no space for one. I guess I could have fit one on somehow, but sometimes I think a card is fine without a greeting on the front. Or sometimes I make a generic pretty card that I like and don’t want to put the greeting on until I need the card. That way I can add whatever the occasion calls for.
On this card, I got the idea to make the greeting inside a little fancier. I stamped the greeting from the Celebrating You Stamp Set. What a great set of greetings! It is in the Spring Mini Catalog but it is also carried over to the new Annual Catalog! Yea!! On each side of the Petal Pink greeting, I stamped the bunny in Crumb Cake ink to match the outside. I think it’s really cute! It’s common to stamp a little something inside the card or add some of the designer paper, but I like the idea of stamping something on each side of the greeting! I should color the inside of his ears with Petal Pink as I did on the front of the card.
Be sure to check out the Last-Chance products and sale on some of them in my Online Store! Get the goodies you want before they sell out!
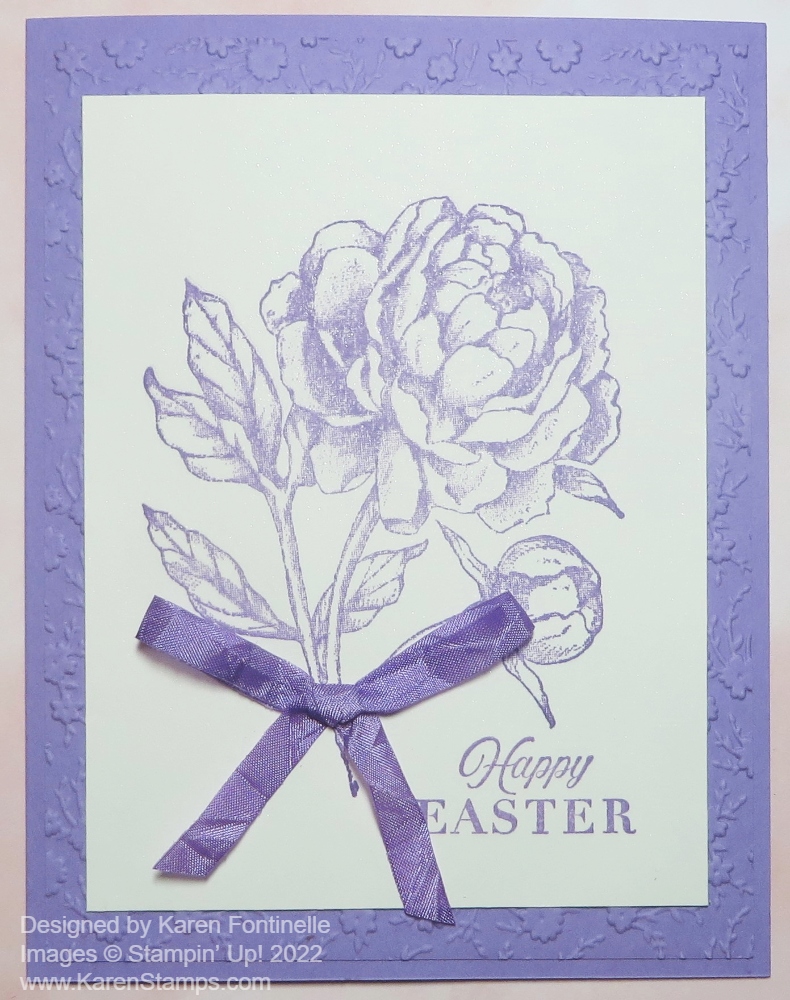
If you would like to make a pretty easy Easter card, this Prized Peony Monochromatic Easter Card will do! When you use one color, it takes some design decisions out of the way. I did some embossing on a layer but you could skip that. Just stamp, assemble your card, maybe add a ribbon for embellishment and it’s finished.
The card base is Highland Heather. Based on inspiration from an embossed piece of cardstock in the package, I decided to use the Ornate Floral 3D Embossing Folder to add a little extra to the card. It is a separate layer on the card, not the card base.I like to use these tiny embossed flowers, but sadly, it is retiring! It is on sale, though, so if you want it, grab it.
The flower, from the Prized Peony Stamp Set, is stamped in Highland Heather ink on my favorite paper, Shimmery White. The Prized Peony Stamp Set is a Distinktive Stamp Set, that design by Stampin’ Up! that adds texture and depth right in one stamp. That’s why this peony stamp works well if you want to make a monochromatic card because all the design is already in the stamp. You don’t have to do another thing to it unless you want to. I was daring and stamped the greeting right in the corner of the card rather than on a layer (but I could have covered it if I messed up!). The Easter greeting is from the Celebrating You Stamp Set. The Prized Peony Stamp Set does come with some very useful greetings for other occasions, just not Easter!
For a little something, I finally tried something new. I wanted to have a bow on the flower stem so I colored the ribbon to match the card. I used the White 1/4″ Crinkled Seam Binding Ribbon and then, on scrap paper, ran the side of a Highland Heather Stampin’ Blends Marker over the ribbon. The alcohol markers dry very quickly. I tried both the Light Heather and the Dark Heather markers and decided the Dark was probably a better match to the card. I could have left the ribbon white, but I happened to think about dying the ribbon with the marker. Nothing to it unless you get colored fingers. But do remember to use scrap paper underneath! The ink goes through this thin ribbon so you only have to color one side.
Here are the two products that are retiring in the Last-Chance Sale AND discounted! The Prized Peony Stamp Set is on sale for $19.20 and the Ornate Floral EF is on sale for $5.40!
Easter is coming soon, so if you would like to send out cards, start making some Easter cards so it won’t be a last-minute rush! Make a card something like this Prized Peony Monochromatic Easter Card if you are looking for something quick and easy but still pretty!
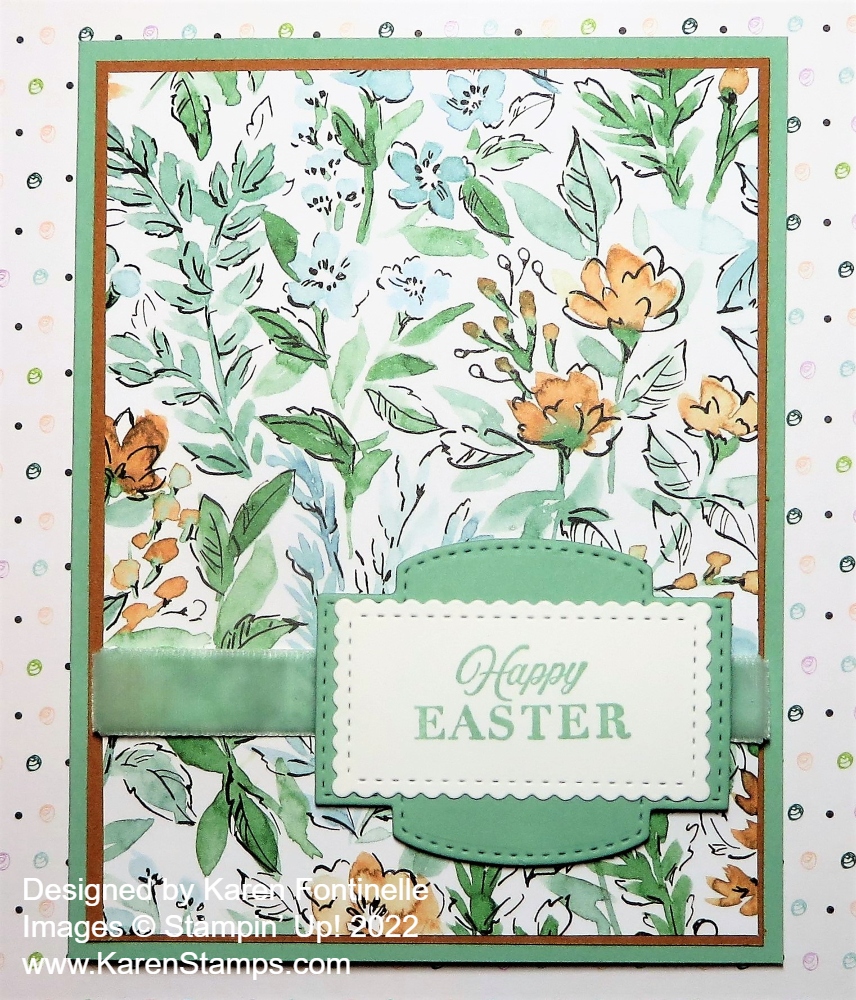
The other day after I made the Easter basket I posted yesterday, I was cleaning up my mess and as I saw the Hand-Penned Designer Series Paper up against the Mint Macaron Cardstock, I loved it and had to make a card with that combination. Since I had made the Easter basket out of Cinnamon Cider and since this paper has some Cinnamon Cider in it, I added a narrow layer underneath the designer paper.
This is a really easy card to make yet looks perfect for a spring or Easter card. The card base is Mint Macaron with a layer of Cinnamon Cider (retiring soon!) and then the Hand-Penned Designer Series Paper. Before adhering the designer paper to the Cinnamon Cider layer, add the ribbon first, if you are using ribbon. I used the wide, velvet Mint Macaron Soft Velvet Ribbon. This ribbon is beautiful but I hadn’t even used it yet and now it is retiring! Since that ribbon is wide, I didn’t try to add a bow, plus the background paper is pretty busy so I wanted to just keep it simple.
The greeting is in the CelebratingYou Stamp Set. I stamped it on Basic White with Mint Macaron Ink and then die cut that piece with one of the Stitched So Sweetly Dies and layered it on a larger die in the same set. These Stitched So Sweetly Dies are retiring soon, which I hate as I have used these dies a lot!! Not that I can’t continue to use them, but of course, once we get new things, we like to use the new things!
For the inside of the card, I added a layer of Basic White. To decorate it a bit, I cut out two flowers from the designer paper and adhered them inside the card. It’s always fun if you take the time to decorate the inside a little to match the outside of the card. You can take a strip of any designer paper you used on the card and adhere it to the bottom of the inside of the card or along the side or do a little stamping.
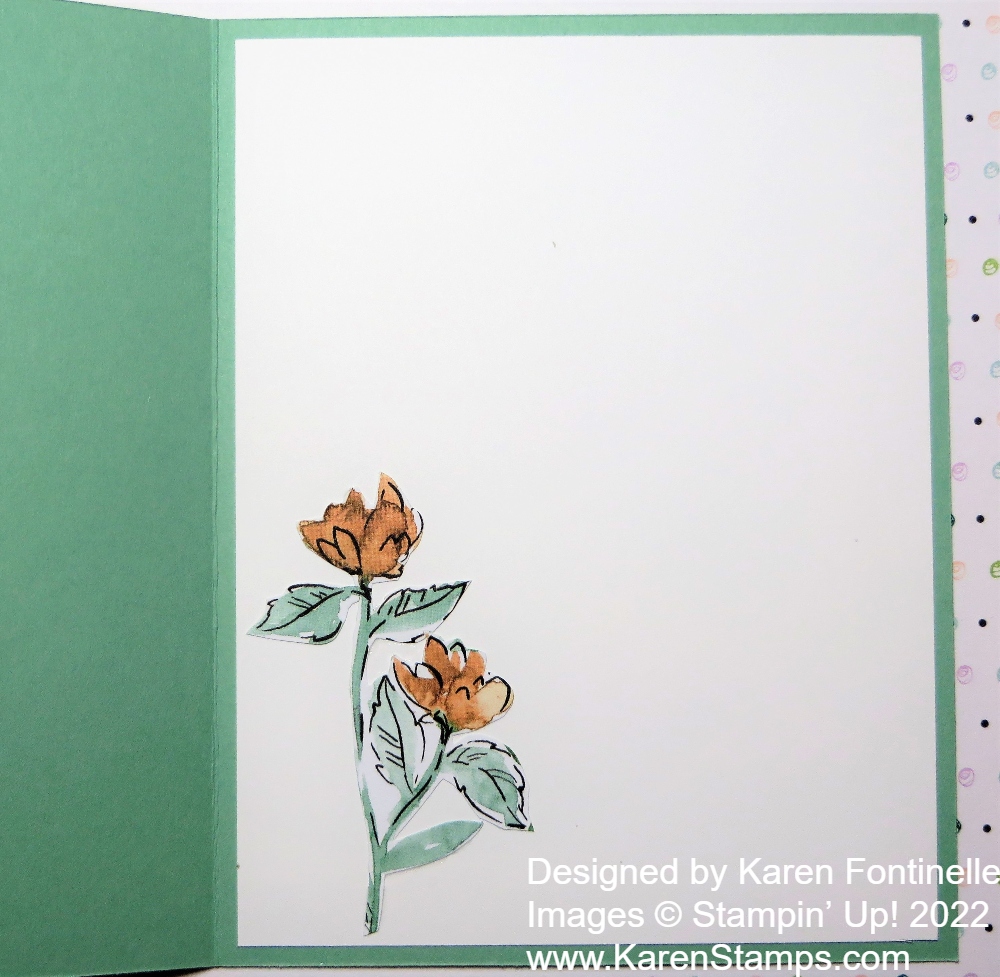
I know it’s hard to believe I didn’t add any jewels or gems on this card! I was just keeping it simple, but you could certainly add some sparkle!
And here is the Easter basket that started it all! See this post for all the details.
Now you are all set with this Woven-Look Easter Basket and the Hand-Penned Easter Card!
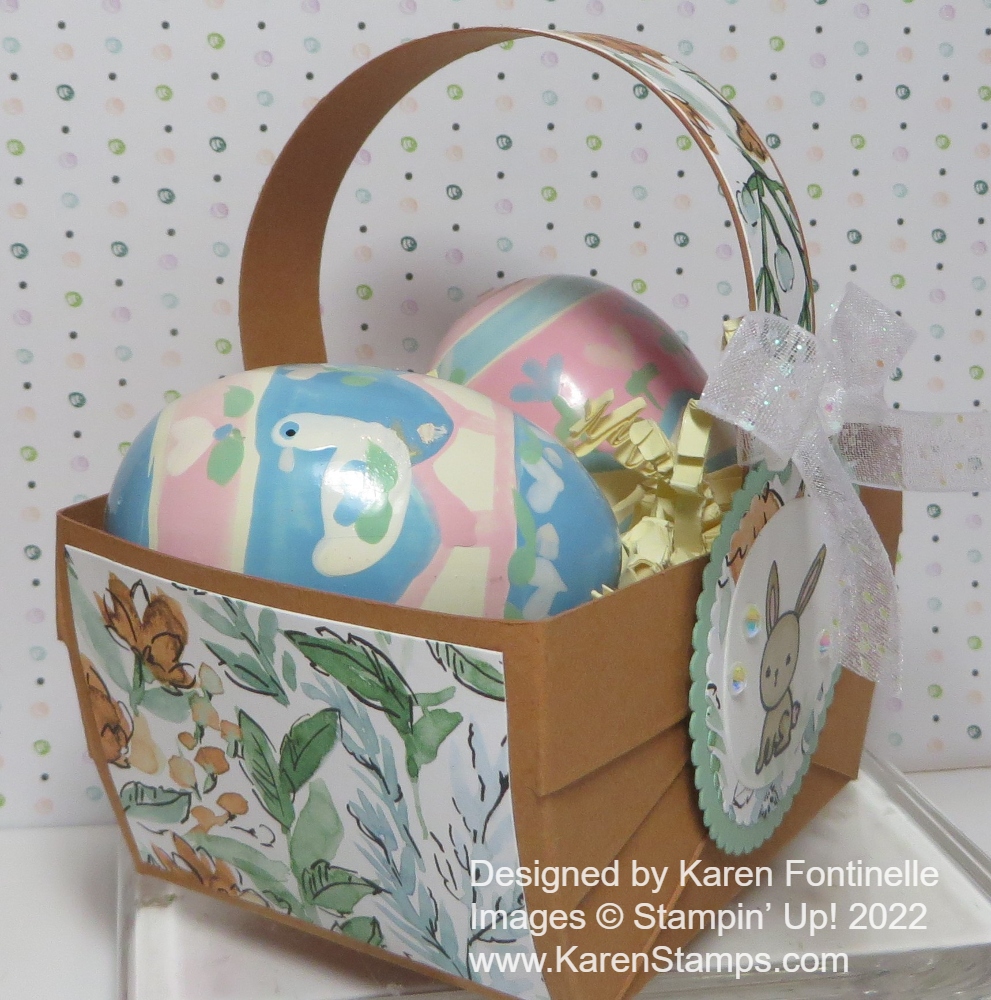
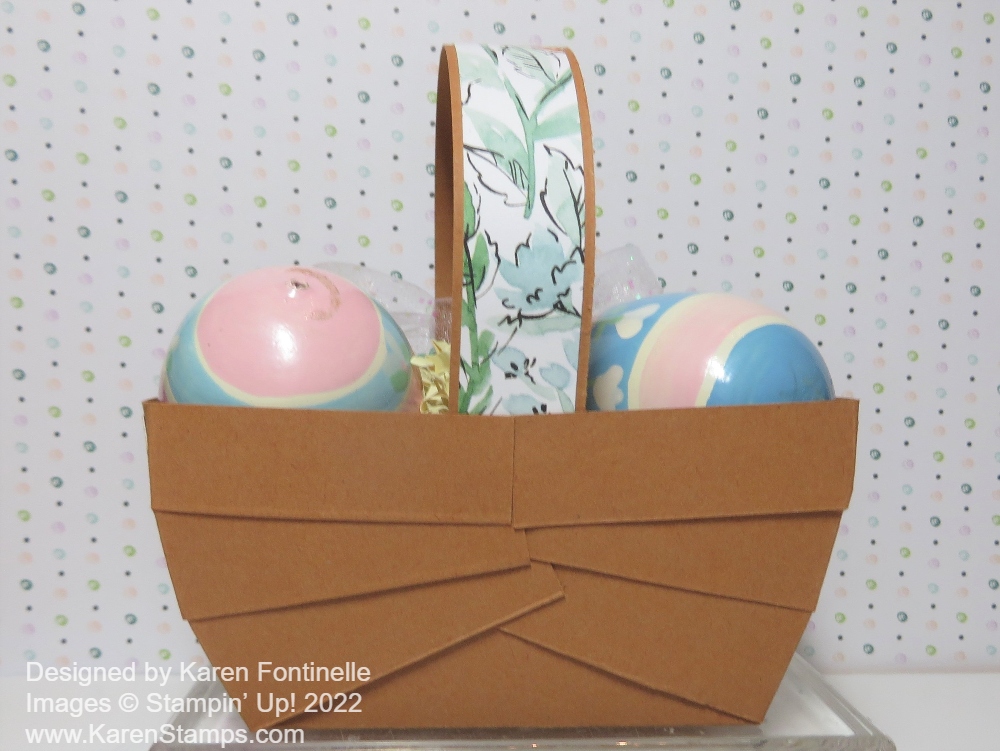
I’ve made a few paper Easter baskets in the past, but I hadn’t tried this fun-looking design. I called this the Woven-Look Easter Basket in Cinnamon Cider to differentiate the kind of basic ones like I made recently in this post. I don’t know what design it would really be called! It is made by cutting strips on parts of the paper and then adhering them one by one, side by side to the front and back of the basket. Somehow it turns out like this! Who thinks of all these ideas?!
I have a lot of photos to hopefully show you how to make one of these baskets!
Start with a piece of cardstock cut at 7″ x 6 1/2″. You will also need a basket handle later cut at 3/4″ x 6″ or whatever size you like. If you want to cover it with designer paper, cut it just slightly narrower and just as long. You can also add designer paper to the sides of the basket if you like, or even each strip that we will make. Or just keep it plain and simple!
With the 7″ side at the top of the Simply Scored Scoring Tool or the Paper Trimmer, score each of the four sides at 2″. (See the red lines.) Then with the 7″ side at the top, on the two outer squares, score from the top only down to the horizontal score line. (Green lines.) Score at 5/8″, 1 1/4″, 5 3/4″, and 6 3/8″. Then turn the paper with the other 7″ side at the top and do the same thing.
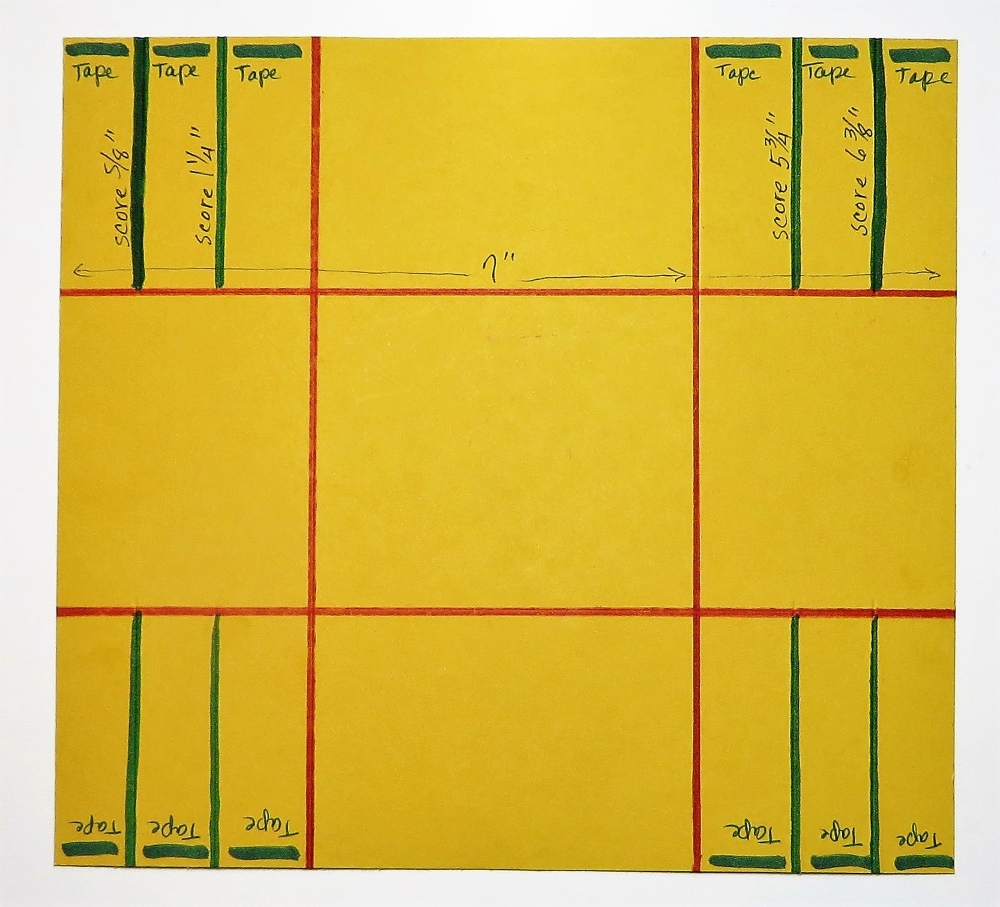
In preparation for assembly, add pieces of Tear & Tape to each end of those scored strips as you see in the diagram. You could use Multipurpose Liquid Glue but you would have to hold each strip in place for a moment, so Tear & Tape is really easier. You “could” apply the tape across all three strips at once because you are going to cut them apart next anyway.
Next, use scissors to cut on the scored (green) lines just up to the horizontal score line. Also, cut the red line, just up to the red score line, so that you have three “fringe-like” pieces on each side (all four corners).
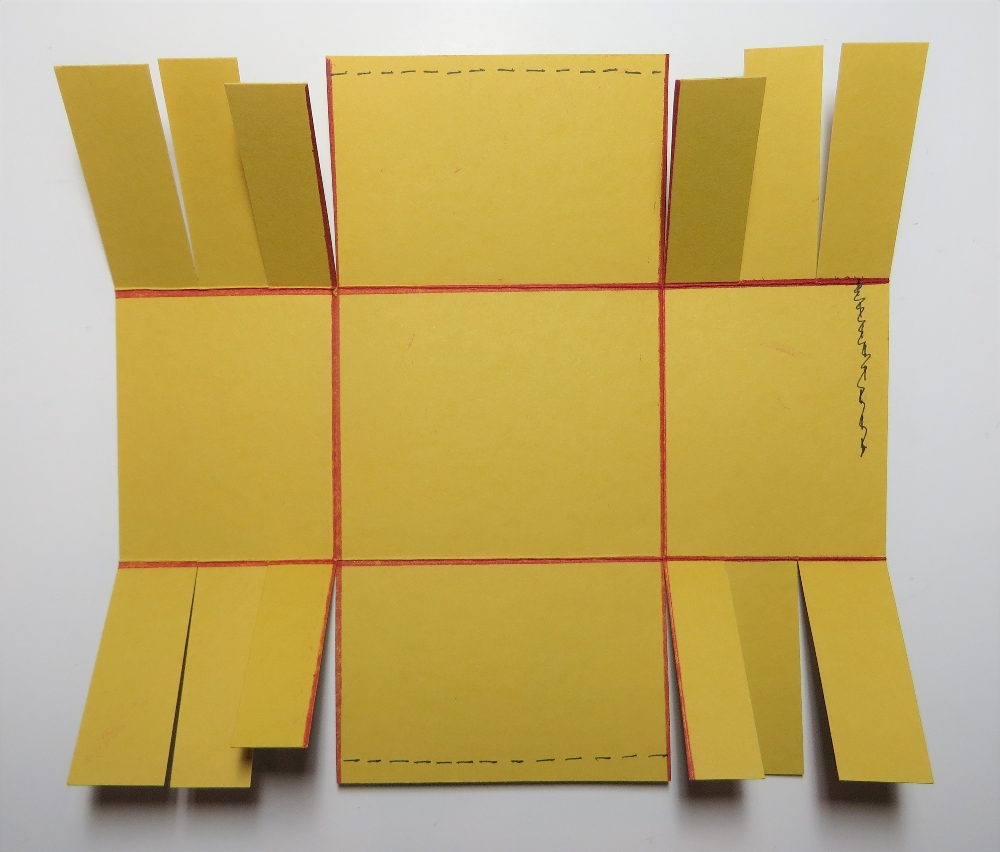
In that middle section, top and bottom, you see a dotted line. That is where you will fold over just about 1/4″ to the inside of the basket. Score it first if you like. Adhere well. Tear & Tape works best if you make it as wide as the tape. The Liquid Glue you have to hold a few moments. (That squiggle over on the right is a boo-boo! Ignore it!)
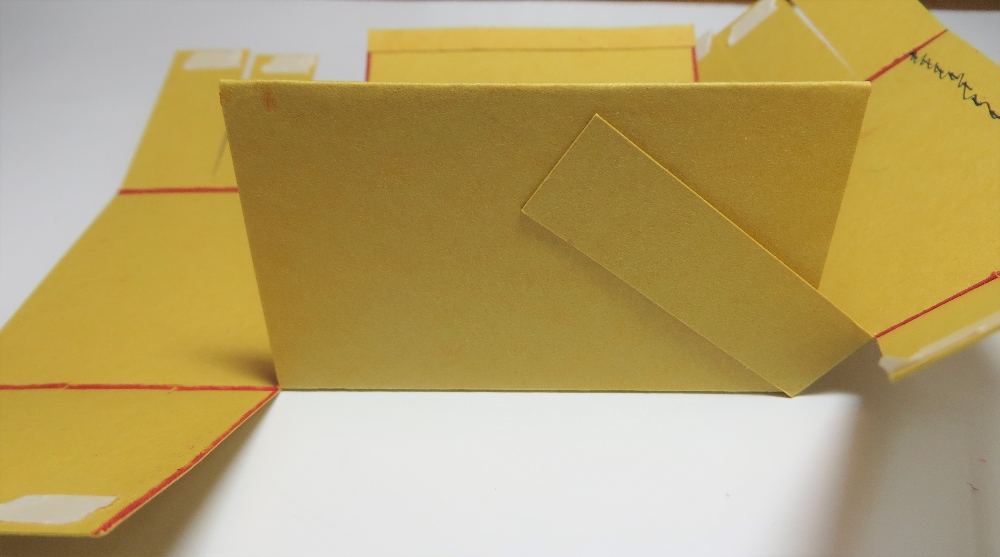
Now you will assemble the basket by removing the Tear & Tape one strip at a time. Pull the inside strip over toward the center of that center section, adhering it about 1/4″ below the top edge. Next do the strip on the left side, also 1/4″ below the top edge.
Next, go to the next (middle) strip on the right, remove the tape and pull it over adhering it right about at the top edge of that middle section. Do the same with the one on the left.
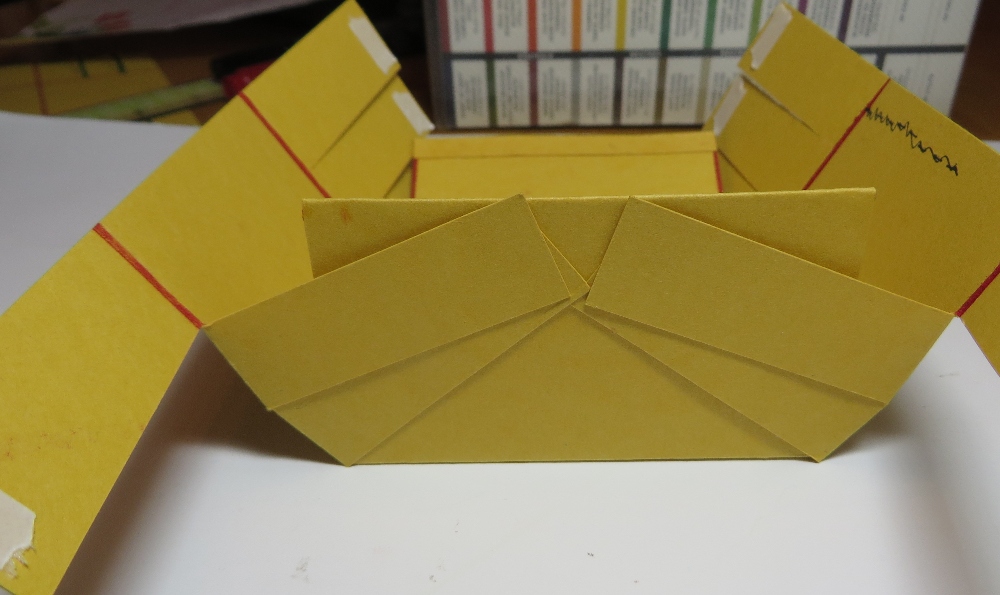
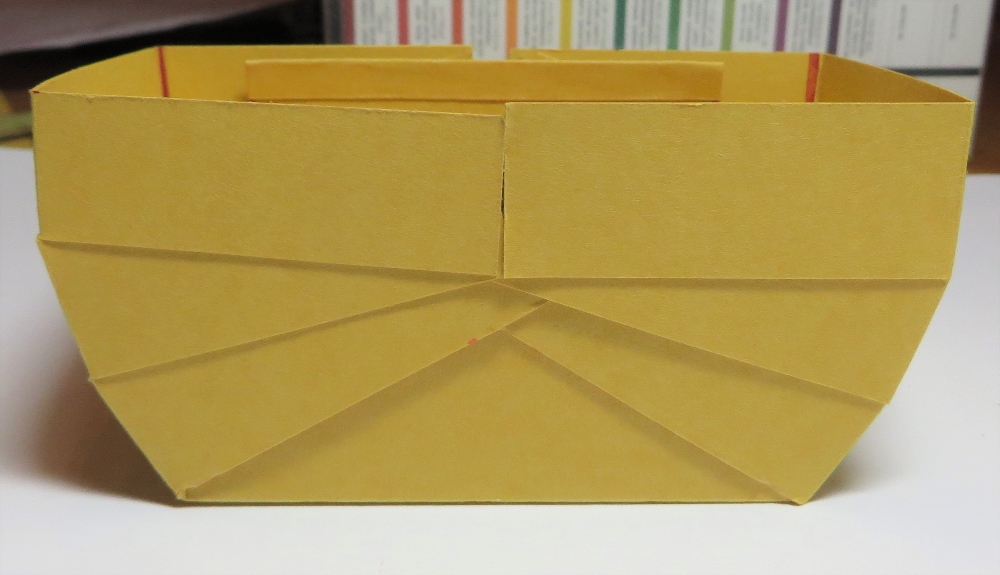
Now you are on the last strip. Pull that over so that it is fairly level and straight with the top of that middle section. Now do the last one on the left, also making it straight with the top. That’s it! As you take a look at the basket, you will see that curve that developed! Don’t worry if everything isn’t lined up perfectly because you are likely to be covering this side (and maybe the back section, too) with a decoration. Do all the same steps on the other side of the basket.
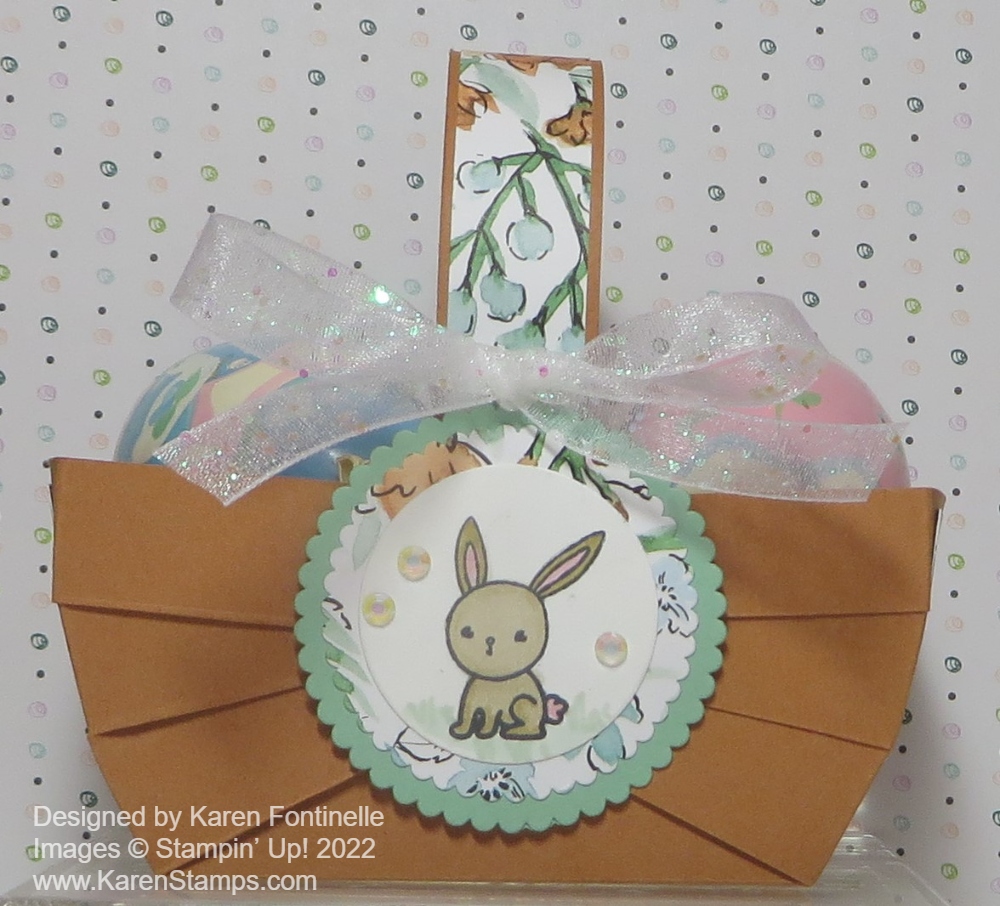
Try to stick the end of the handle down in between the layers of the basket if you can or just adhere wherever you like. Add whatever decoration you want, whether a greeting or some layered circles, punches, rectangles, whatever. Tie on a ribbon if you like. Decorate both sides or just one. Add some small pieces of designer paper on the basket sides if you want. I stamped the little bunny in the Friends of the Forest Stamp Set and layered it on a piece of the Hand-Penned Designer Series Paper on top of Mint Macaron cardstock.
Here is the back side. I almost stamped a “Happy Easter” greeting for the back but I didn’t. I thought just decorating the front was fine!
If you want to decorate the sides of the basket with designer paper, just cut two pieces 2 1/4″ x 1 3/4″. Make sure you have any design going in the correct direction if there is a pattern. This Hand-Penned Designer Series Paper is on the Last-Chance List of retiring products so if you need more, be sure to get it while it is available! And the Cinnamon Cider cardstock is also retiring as it is one of the outgoing In Colors!
Make a few Easter baskets either for your own decoration around the house or as a decoration at each place setting at your Easter dinner table!
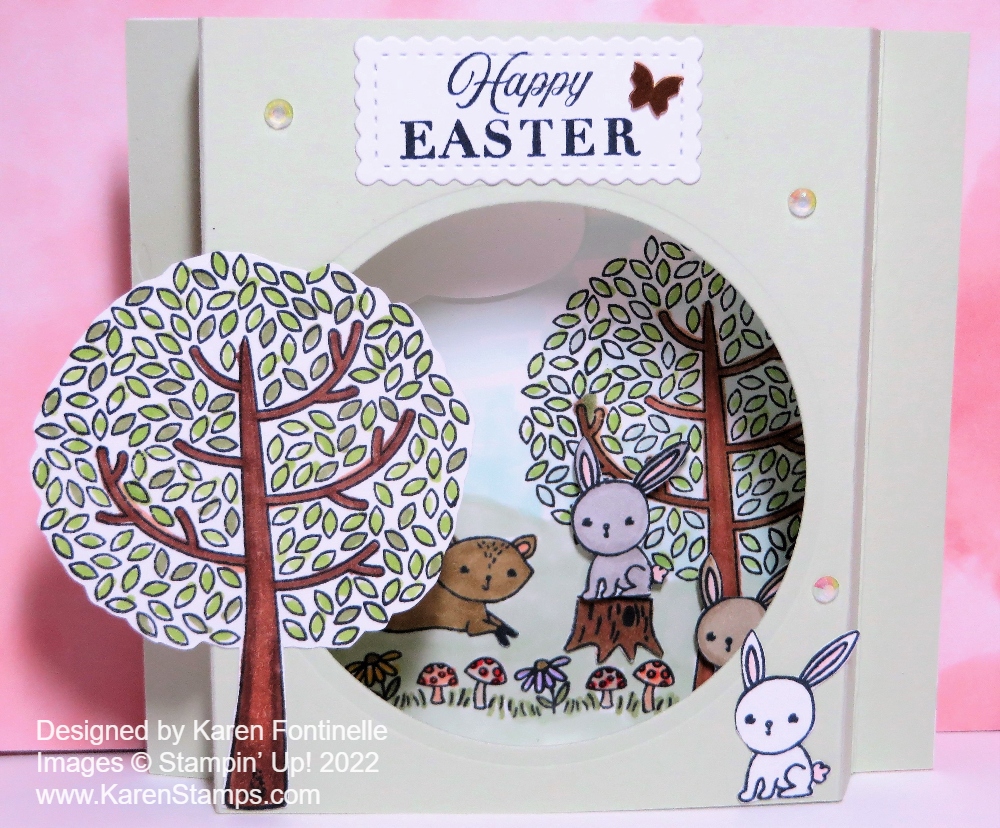
I’ve wanted to make this Friends of the Forest Easter Diorama Card ever since I got this stamp set in the Spring Mini Catalog! I could just imagine making a diorama card with some kind of little scene using the stamps in the Friends of the Forest Stamp Set!
This diorama card is actually a regular card size so you can fit it in an envelope. It folds flat! You could even make a middle layer inside a diorama card and make it as fancy and involved as you like, but this style is easy and just fine! All you need are two pieces of cardstock and an opening cut in the front so you can see the scene or decoration inside.
Start with two pieces of cardstock, each 4 1/4″ x 5 1/2″. Score at 1/2″ and 1″ from each end on each cardstock piece. Fold and crease the score lines and play with them a little to see how it is going to go together. For this card, I used Soft Sea Foam Cardstock for the front and Basic White for the back.
Here is the diagram I used on a previous card. Since we no longer have the oval dies, I changed this card to cutting the opening with a circle die in the Layering Circles Dies, the largest one. You could use a rectangle or whatever you have that would make a hole large enough for whatever you want to do. The lines show the score lines.

To make the card, I stamped a tree and a bunny on Basic White and cut them out for the front of the card. On the inside, I stamped the tree, fox, flowers and mushrooms directly onto the Basic White and colored them in. But I also stamped two bunnies and a tree stump separately and cut them out by hand to add to the inside scene. Some things are popped up on Stampin’ Dimensionals and some are glued flat on the card.
On the inside, after I had the scene made I decided to color in some grass. I used the Light Sea Foam Stampin’ Blend Marker. For the sky, I used the Light Pool Party Stampin’ Blend. Just scribble lightly, you don’t even have to cover all the white space. I punched out a cloud with the Cloud Punch. It was too big, so I just cut off the side that was too long and popped it up on Dimensionals.
I colored all my pieces with Stampin’ Blends. I didn’t keep track of the colors. It doesn’t matter because you can do your own thing! I did discover after I finished, that the Stampin’ Blends bled through the back of the Basic White background, which I hadn’t thought about so I cut another piece of Basic White to cover that up on the back.
I adhered one cut-out tree and one bunny on the front of the card. The greeting is stamped with the Celebrating You Stamp Set and die cut with a small rectangle in the Stitched So Sweetly Dies. For a little embellishment, I added a cute little Brushed Brass Butterfly on the greeting and a few little Iridescent Rhinestone Basic Jewels.
Here is a view of the card from the top. Just glue the ends together to connect the front and back and make sure everything creases well.

For another idea, here is a card I made two years ago in a similar design.
If you just try this card design, once you cut and score the paper and crease the lines, you will see how the card goes together. It’s really very easy but will make a great impression on whoever you decide to send it to!
SHOP STAMPIN’ UP! ONLINE HERE! REMEMBER THE LAST-CHANCE SALE!
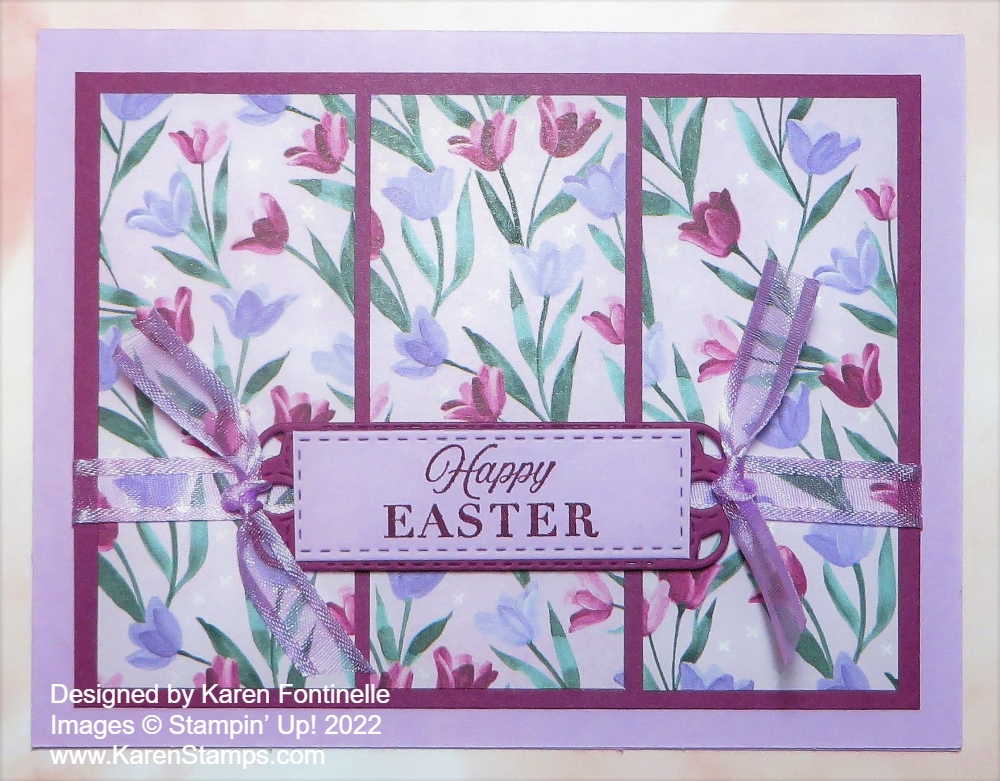
If you like purple or know someone who does, I think you will love this Flowering Fields Fresh Freesia Easter Card! Of course, the Flowering Fields Designer Series Paper (the tulip paper, I like to call it!) is so pretty to use on cards! I chose this purple-ish floral tulip pattern to use on this card and I like how it turned out!
The card base is Fresh Freesia, one of the coordinating colors with the Flowering Fields Paper and one of the 2021-2023 In Colors. These colors will be sticking around for another year but the 2020-2022 In Colors will be retiring.
A fancier way to do this card front is to cut the designer paper into strips rather than have a solid piece. These pieces are 1 1/2″ x 3 1/2″ and fit perfectly on the Rich Razzleberry layer that is 5″ x 3 3/4″. You can just eyeball the spacing, making sure it is as even as possible. Lay it out before you glue to make sure everything fits properly! I wanted the Fresh Freesia color to show so I made the margin wider than we usually do.
Before adhering the Rich Razzleberry layer with the strips of designer paper, I wrapped around a piece of Fresh Freesia 3/8″ Open Weave Ribbon. I wanted some ribbon on the card but not something that was going to overwhelm the tulips so this ribbon was perfect. It’s there but you can see through it and it adds a little bit to the card design.
For the greeting, I happened to have the die cut already in my package of Rich Razzleberry cardstock so I wondered it that would be good to use. The “Happy Easter” greeting is in the Celebrating You Stamp Set. This is a great stamp set to have with some basic greetings you will be glad that you have! I stamped it in Rich Razzleberry ink on Fresh Freesia cardstock. I thought Basic White might be too stark against the card since it didn’t have any other white on the card.
The die set I used is the Meadows Dies for the little label with the fancy ends. As I said, I already had one cut in my cardstock so I used that for the layer. After stamping the Easter greeting I cut it with the same die. Then I very carefully trimmed off the curvy ends, leaving the stitching. It just barely fits on the Rich Razzleberry layer even though it overlaps the fancy ends a tiny bit. Then I tied a knot on each end with the Fresh Freesia ribbon, which kind of obscures the die cut, but I still like it. The greeting is popped up with Stampin’ Dimensionals®.
Here is my first Easter card of the season, a Z-Fold card, but it uses another paper in the Flowering Fields package with similar tulips as on this card except in orange colors.
Because you don’t have to figure out the measurements for a card like this, just copy mine, this card will be easy for you to make! It really didn’t take much time. Easter is less than a month away now, so make some of those pretty Easter cards to send like this Flowering Fields Fresh Freesia Easter card.
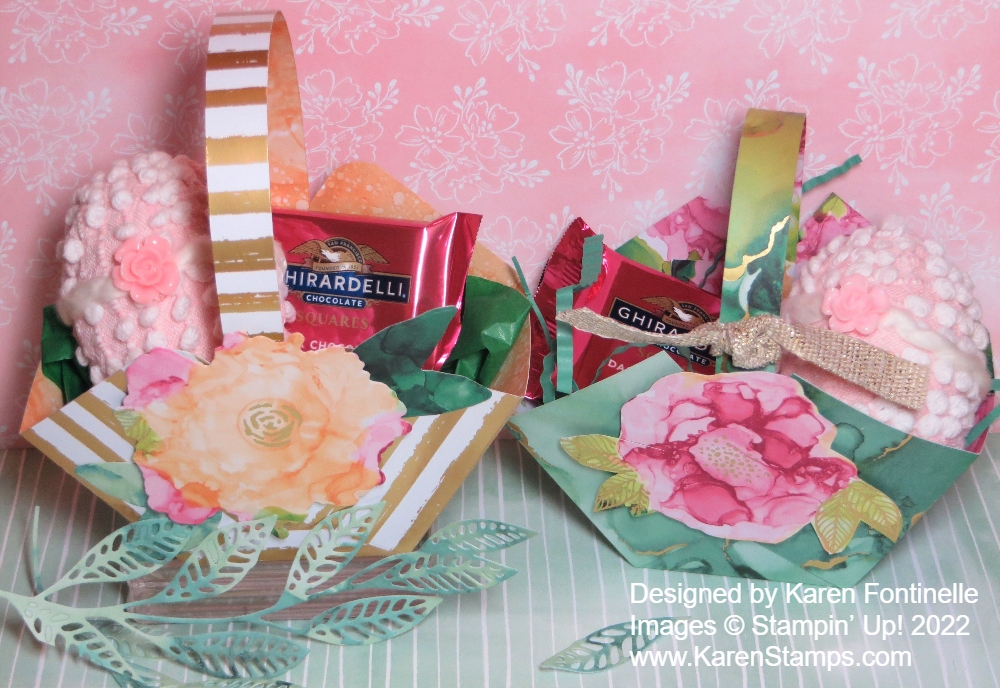
Easter will be here soon, less than a month now, so you might be thinking about making some little Easter decorations such as these Expressions in Ink Easter Baskets. These little baskets are super easy, you have probably made them before. After you make them with designer paper or cardstock, just decorate and embellish however you like.
I had the idea to make these Easter baskets a little “fancy” by using the Expressions in Ink Specialty Designer Series Paper. I love the watercolored look of all the designs on the paper plus the gold foil accents on some of the papers. It is incredibly beautiful paper! If you want a sturdier basket I would suggest making the basket with cardstock, maybe even the Basic White Thick Cardstock, and then adhering designer paper on the cardstock to decorate. My baskets are just made with designer paper and then the inside is also gorgeous!
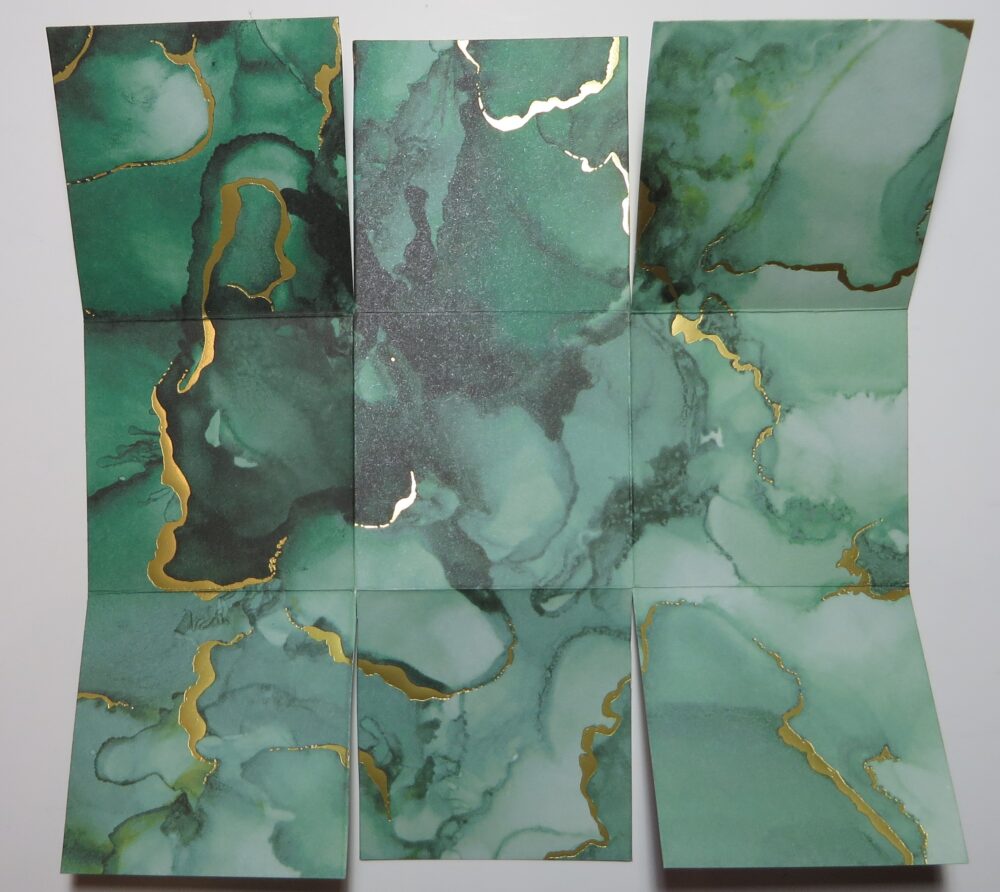
To make the basket, cut a piece of paper at 6″ x 6″ and score like a tic-tac-toe board. Score at 2″ and 4″, then turn the paper and score again at 2″ and 4″. Cut up on the two vertical score lines up to the horizontal score line. Do the same on the opposite side. See the photo below. Cut a handle of about 8 1/2″ x 1/2″.
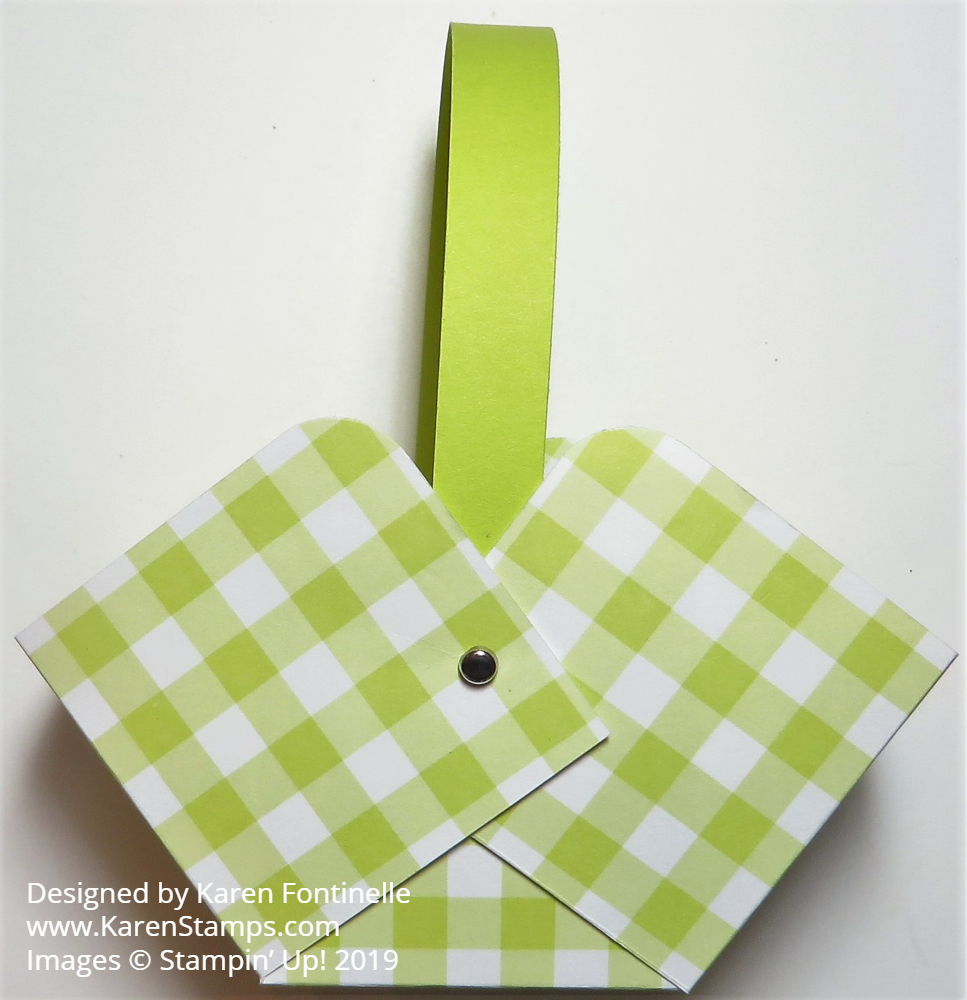
Here’s how to fold the sides in and how to overlap them. If you want to round the corners, you can do that with and corner rounder punch you have or the current Detailed Trio Punch. The photo below from a couple of years ago shows how I folded the sides. You can mostly eyeball where they go or make a pencil mark on the inside of the basket at the 1″ mark since each section is 2″ wide and you can use that mark as a guide to see how far in the sides should go to be even. Use a brad on each side or just some decent glue to hold the basket together.
On the basket I made on the left side with gold stripes, I die cut the flower out of a piece of the designer paper using the Artistic Dies. It didn’t match exactly but it was pretty close and looked fine. Then I also cut out some leaves with the greenish portions of the designer paper.
On the green basket, I simply cut out the flower and leaves by hand. It doesn’t have to be exact because the flowers are so “flowy” anyway, there isn’t an exact image line. On both baskets, I popped the flowers up with Stampin’ Dimensionals.
If you don’t have “Easter grass”, you can make some but cutting narrow strips of green cardstock and then running it through a Paper Crimper if you have one (mine is from long ago when I first started stamping) or just crush and crumble it in your own hands and that will work too! In the other basket, I found a piece of green tissue paper and just wadded that up in the bottom of the basket.
The fabric-covered egg in each basket is handmade from @sewafineseam on Instagram that I purchased last year!
Here are some other Easter baskets made three years ago if you need more ideas!
It’s time to start making Easter cards, treats, decorations, and these little Easter baskets would serve as a treat or a decoration for your home or your Easter dinner table. Have fun making some! Bet you can’t make just one!
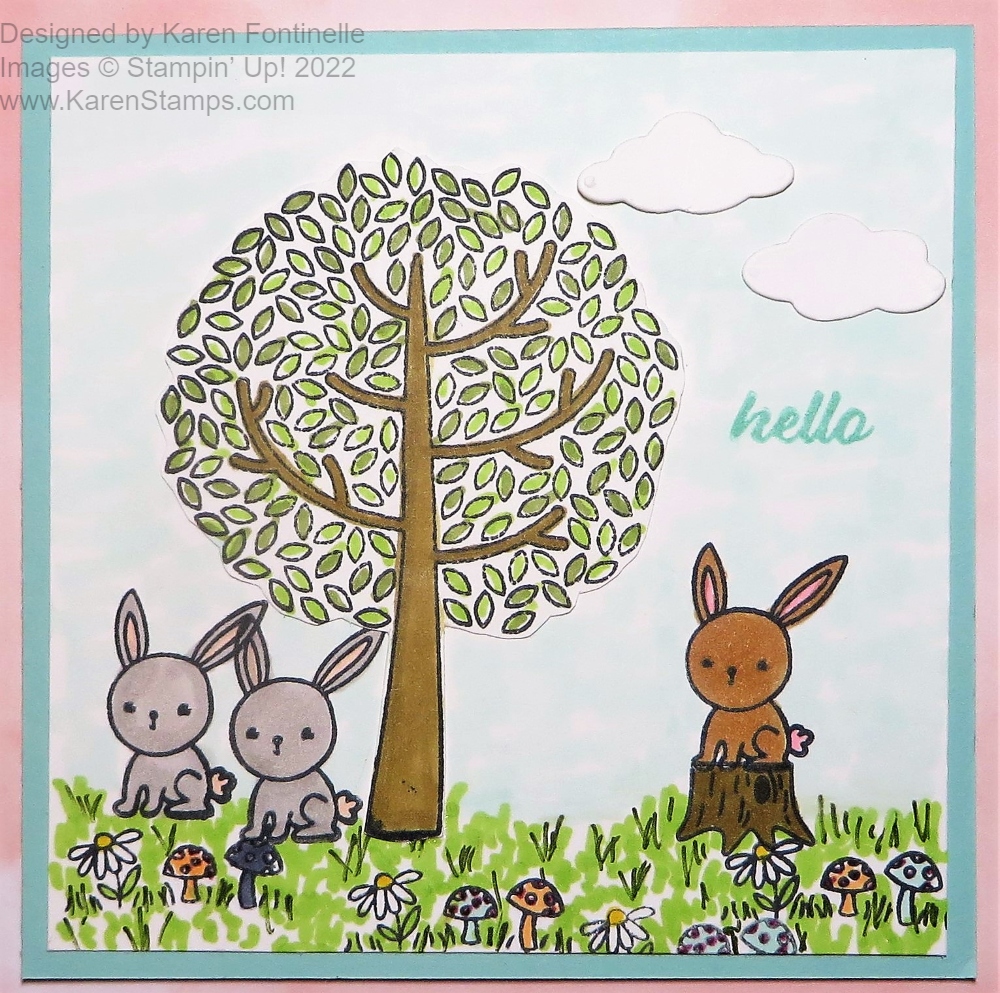
I’ve been wanting to play with this new stamp set in the Spring Mini for a while now and finally, I got my chance to make this Friends of the Forest Bunnies Hello Card! I didn’t “plan” it very well, actually, in making it. I stamped the tree knowing I would cut it out, but I stamped the bunnies directly on the card front hoping it would all work out in the end! That’s the fun of it sometimes!
The card base is Pool Party, one of my favorite colors. I thought a square card would suit the little scene I planned to make so the card base is 4 1/4″ x 4 1/4″. The Basic White cardstock layer is 4″ x 4″. All this card takes is some stamping and some coloring and it’s not that complicated even though it may look tedious! It’s all in what you enjoy!
The stamps are in the Friends of the Forest Stamp Set in the January-June 2022 Spring Mini Catalog on page 19. It’s not a stamp set with a lot of fanfare except for the Deer Punch coordinating with the deer stamp. No dies, no matching designer paper, but maybe that’s why the set appealed to me besides the cute forest animals! Just simple stamping.
I stamped the tree with Memento Ink on Basic White and colored it in with Stampin’ Blends. The trunk and branches are colored with Light and Dark Soft Suede and the leaves with Light and Dark Granny Apple Green plus a bit of Light Mossy Meadow. You might think “Oh, I can’t color all those leaves!” but I just dabbed each one with some green, scattered around so there would be the different shades of green in the leaves. Don’t worry about perfection or staying in the lines. Just hit each one with a bit of green! I cut out the tree with Paper Snips, again not being perfect with the leaves, just wiggling my scissors around the edge going in and out the tiniest bit.
The bunnies would be fun to cut out but I just took a chance and stamped them on the card where I thought I wanted them to be. Two are colored with a Light and Dark Gray Granite and the other one with one of the new Natural Tones Blends, #500 plus a little shading with Light Soft Suede. The insides of the ears are pink. The tree stump is Dark Soft Suede. I also stamped the grass, flowers, and mushroom stamp several times and colored those in. But I needed more grass so I just drew in little sprigs of grass with two shades of the Granny Apple Green and then the Dark Mossy Meadow Blend. They are just little lines and squiggles, no big deal.
I couldn’t leave the background just white, so I just squiggled in sky with the Light Pool Party Stampin’ Blend. It’s fine if some white shows because that’s how skies look. Just squiggle in the color with the side of the marker here and there and don’t worry about it. You can fill in more if you want and it will dry lighter.
Since I didn’t have much space, I stamped the “hello” greeting directly on the front of the card. This word is in the Hello Ladybug Stamp Set. Had I messed it up, I would have stamped it on a small die-cut or rectangle and placed that over the boo-boo! There is always a way to fix your stamping! As I was getting ready to photograph my card, I noticed two little die-cut clouds from the Brilliant Rainbow Dies so I adhered those in the sky.
My Friends of the Forest Bunnies Hello Card is just a fun little springtime card that I could also use for Easter. Go take a look at this stamp set if you’ve missed it in the Spring Mini and see if you “need it” in your “collection”!