Tag Archives: Scalloped Contours Dies

Flowering Fields Z-Fold Tulips Easter Card

Flowering Fields Z-Fold Tulips Easter Card

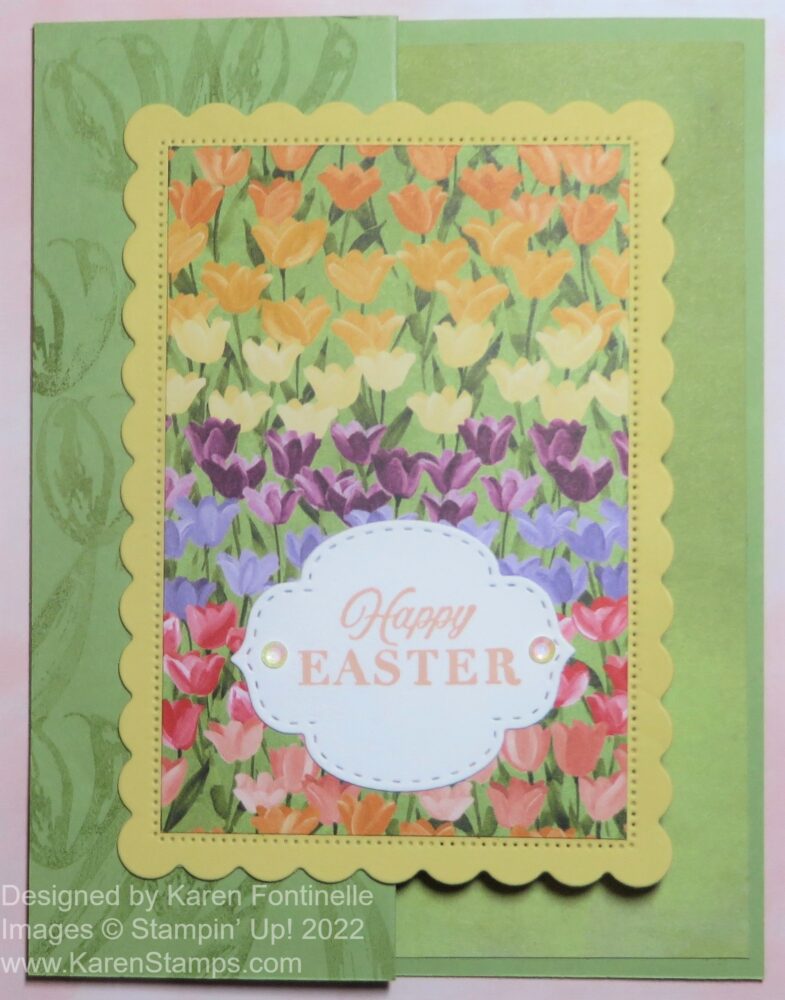
As I looked through my package of the Flowering Fields Designer Series Paper looking to see if a certain pattern was in there, I saw this print of tulips and decided I had to make an Easter card with it right away! As I scored the card in half, I decided to make it a Z-fold card and that’s how this Flowering Fields Z-Fold Tulips Easter Card came about! You never know when you start out what you will actually end up with!

This card was so easy really. I often add pieces of designer paper at least on the folded back front portion but this time I just stamped the smallest tulip in the Flowering Tulips Stamp Set. I used the same Pear Pizzazz ink as the Pear Pizzazz cardstock but I stamped off once on scrap paper because I wanted that light, watermark look down that side panel. I didn’t use the second step of stamping another tulip petal on top of the first because not much was going to show anyway and I just wanted that light look. I did stamp a few leaves to fill in some space.

I die cut a scalloped rectangle from the Scalloped Contours dies (retiring soon!) in So Saffron for the background layer to the tulip paper. For the designer paper, I just measured with a ruler inside the scalloped rectangle and cut out that size rectangle of DSP to fit inside the area. Mine was just a “smidge” under 4″ (about a 1/16th inch less) and about 2 5/8″ wide. If you want to tie a ribbon around that piece, do it before you adhere it to the scalloped rectangle of course.

The greeting is stamped on a die-cut piece from the Stitched So Sweetly Dies (also retiring soon!). I just glued it flat on the card as I am likely to mail this card. I couldn’t resist adding two Iridescent Rhinestone Basic Jewels to the sides of the greeting.

For the inside of the card, to add some interest, I adhered “the other side” of one of the designer papers without a particular pattern except for the shading of colors. This particular piece barely makes a difference in the look from the cardstock, but it’s there and makes a prettier finished look I think.

For the inside, I die-cut a Basic White scalloped rectangle, one size smaller than the card front to adhere inside the card on which to stamp another greeting or write a message and sign the card. You could use one the same size as the front but you would have to line it up perfectly so it wouldn’t stick out from underneath the front card design.

Here is another Z-Fold card I made recently for Easter using the Flowering Tulips Stamp Set instead of the designer paper.

I’ve made lots of Z-Fold cards and I always say they are so easy to make (just fold back the card front!) yet they make such a nice presentation! The recipient will think you are so clever and creative to make such a fancy card! The only difficult part is not to put glue all over the back of the front piece, just on the half that will be adhered to that Z-fold.

Be sure to check the Last-Chance Products list in the Stampin’ Up! Online Store to see what will be retired on May 2 and what is still available. Not everything is discounted, but some things are so grab what you “need”!

Reminder Today is the last day to sign up for Paper Pumpkin to get the April “Change Is Beautiful” Kit!

Rainbow of Happiness Card

Rainbow of Happiness Card

This Rainbow of Happiness Card is sure to brighten someone’s day and probably even yours as you make it! This Rainbow of Happiness Bundle is sure to be a popular item in the Spring Mini Catalog. There are so many different ways you can use the coordinating products.

I didn’t think this was going to be one of my best cards because I still don’t have my mojo back since Christmas and everything is still out of place since decorating! Plus the light I use for photographing my cards has konked out so I see some weird orange shadows underneath the popped-up clouds on this card! Even my coffee maker has broken, so what can you do?!

Even though this isn’t one of my best cards, I ended up thinking it was okay. This was my first try with this card and dies and I found out things didn’t match up the way I envisioned! But it proves you can kind of do your own thing with these stamps since they are photopolymer. They can be stretched a bit into the size or shape you want. You still want to be careful and not overdo it, but these stamps in particular can be maneuvered a little bit!

The card base is Basic White with a Flirty Flamingo cardstock layer. I decided to emboss this layer with the new Gingham Embossing Folder mainly to try it out and see how it looked.

The rainbow is stamped with the Rainbow of Happiness Stamp Set. I was slightly trying to copy the card sample on page 18 in the Spring Mini. I haven’t watched any videos yet on how people use these stamps and dies so I was just winging it! I used the four individual rainbow arcs on one large block (the largest one!) expecting to cut out the rainbow with the dies, but the dies were small, much to my surprise! But it was okay, I just cut out the rainbow with my scissors! To ink up the rainbow, I used my Stampin’ Write markers in Highland Heather, Petal Pink, Pool Party and Flirty Flamingo. (Flirty Flamingo is one of the Brights colors.) I just colored each marker on the parts of the rainbow and breathed on the stamps before stamping. Even though I tried to “prime” the new photopolymer stamps a few times first, using the markers, which are usually lighter anyway using this technique, the stamped rainbow came out a little sketchy! So I just used the markers themselves to lightly color over the rainbow. I intended to color over the rainbow with my Wink of Stella Brush, but that is old and not working right either! A new one is on my next order!

I used the sentiment in the stamp set to stamp the greeting right on the rainbow using Calypso Coral Ink. I like the way that looks! I wanted something that would coordinate well but not blend into the same colors of the rainbow.

To add some layers behind the rainbow, I die cut a piece of Mint Macaron cardstock with one of the Scalloped Contours Dies. Then I liked the look of a certain paper in the Sunshine and Rainbows 6″ x 6″ Designer Series Paper. You can earn this paper FREE during Sale-A-Bration with a $50 purchase. It’s very cute! Be sure you get it soon so you can use it with this Rainbow of Happiness Bundle. I die cut the paper with the same size Scalloped Contours Die but then I trimmed off the scallops so it would fit inside the stitching on the Mint Macaron die cut piece. I adhered those two layers together and adhered that piece to the card.

I don’t own the Cloud Punch yet (unless it is hidden under some other messes!) so I just cut out my own clouds so my card would look somewhat like the sample in the catalog I was copying. There are also cloud dies in the Brillliant Rainbow Dies in the Bundle.

The rainbow is popped up on Stampin’ Dimensionals® but you need to think about where the clouds are going to go underneath the rainbow if you are copying this idea and place the Dimensionals so they are out of the way if you are going to stick a cloud underneath! Both of my clouds are also popped up on Dimensionals. I also used a piece of the Glittered White Organdy Ribbon to tuck underneath.

For a finishing touch, I had to use the new Iridescent Rhinestones Basic Jewels. I placed three of the smallest jewels right on the rainbow and then two larger ones outside the rainbow. These are really pretty!

So there you have my first rainbow card! I’m looking forward to making more, hopefully, a little better, but as I said, I ended up being happy with this card! Sometimes you just have to keep working and the right design will eventually magically appear!

Have fun shopping the new Spring Mini!

Hand-Penned Petals Monochromatic Bumblebee Card

Hand-Penned Petals Monochromatic Bumblebee Card

I didn’t have much mojo left when it was time to make a card so I knew I had to come up with something simple, and when you’re in that situation, sometimes a monochromatic card makes it all easy! This Hand-Penned Petals Monochromatic Bumblebee Card was just the perfect card to make after a busy day and evening.

The card base is Bumblebee Cardstock. Have you ever thought about how this color name is the only one that is just one word? Just “Bumblebee”. I looked through some of my designer paper for inspiration even though I was thinking about a monochromatic card. When I saw this Bumblebee-colored designer paper in the Pansy Petals Designer Series Paper, I knew what I was going to do.

I could have had just a layer of the designer paper on the card front, but I thought a bit of white underneath would help it stand out a little. For the front of the card, I stamped the floral bouquet from the Hand-Penned Petals Stamp Set in Bumblebee Ink on Basic White Cardstock, then cut it out with the Scalloped Contours Dies. These are some of the best dies we’ve ever had, in my current opinion! I love them! For an embellishment, I tied a bow out of the Bumblebee 1/4″ Gingham Ribbon. I planned to stamp a greeting on the card, but we don’t ALWAYS have to have a greeting on the front of the card! Sometimes it can just be plain and you can stamp something inside or write a note. Or add a greeting when you are ready to send the card, if you are just making cards for fun, and then decide which greeting would be appropriate.

I also thought about putting some jewel embellishments on the card to look like they matched the yellow of the Bumblebee, but I just said to myself, “Stop!” The card was fine as it was, simple but nice enough, with a small bow for an embellishment, not to mention the very nice scalloped rectangle die complete with the stitched look. It was fine and sometimes you just have to know when to stop!

The days are winding down for the January-June 2021 Mini Catalog so be sure you are looking through the catalog another few times and getting everything you want. Some things carried over to the new Annual Catalog so we don’t have to say goodbye to those products! And some retiring products are reduced in price for the Last Chance Sale so see if you can find any bargains you “need”.

SHOP STAMPIN’ UP! ONLINE HERE!

Color & Contour Pattern Party Card

Color & Contour Pattern Party Card

Once again, as I looked through the Pattern Party package of designer papers, this Flirty Flamingo stripe jumped out at me and screamed to be made into a card which resulted in this Color & Contour Pattern Party Card. I had almost forgotten this set of dies has this scalloped edge die in it which just helps to make this card! I love how this card turned out!

The card base is Flirty Flamingo Cardstock. The striped paper is from the Host Product in the new Stampin’ Up! Annual Catalog. This means that with an order of $150 or more, instead of choosing some other free merchandise in the catalog, you can go to the back of the catalog where there is this designer paper option (48 sheets!) and some other stamp sets, all that you can choose as your Stampin’ Rewards at a discounted price. I think this package of paper is going to be a hit because it’s something different (just stamp sets have been offered as Host Rewards) and you will love the paper patterns! Look for the Pattern Party Designer Series Paper on page 171.

The striped paper is die cut with a die in the Scalloped Contours Dies. You can purchase the Color & Contour Stamp Set and the dies in a Bundle and save 10%. I love the stitched look along the scalloped edge. Whether you purchase the stamp set or not, I would buy the Scalloped Contours Dies by themselves. They are that good!

I do have the Color & Contour Stamp Set and I do like the flowers in the set! You can do two-step stamping to color in rather abstractly the flowers, or you can color in the open design yourself with whatever coloring technique you like. Then you can cut them out with the dies. You can set on the set that the individual leaf has a very open design, but I just stamped it in Memento Ink, colored in with two colors of green Stampin’ Blends, and cut out the leaf itself, not the extra squiggle! The lower flower is popped up on Stampin’ Dimensionals and the other two and the leaves adhered right to the card. The flower center is stamped with Daffodil Delight Ink.

It IS a little tricky to line up the two-step stamp with the first stamped impression and then to line up the die with the flower. You could spend some time lining them up and then put a black mark on the stamp and on the die to remind you of how to line them up. But since the design is rather abstract anyway, it kind of doesn’t have to be perfect. For some of us, though, who like things “perfectly lined up”, well, we can fiddle with it and we can get it lined up!

The greeting is in the stamp set but I did use another set of dies to cut out the greeting. I used the Stitched So Sweetly Dies to get a smaller rectangle to fit at the bottom of my card. This is another set of dies that I have used a lot and recommend you have in your supplies!

Not one to leave well enough alone, I saw the “speckle” stamp in the set and thought maybe it would look interesting in the bottom portion of the card. Usually it is not a good idea to stamp something more on a card that is nearly finished and could potentially be ruined if you mess up, but I took a chance and it worked out! I inked the stamp with Flirty Flamingo Ink but stamped off before stamping on the bottom of the card.

On the inside of the card, I put a piece of Basic White for a layer and stamped one of the flowers, just the outline, in Flirty Flamingo Ink down in the right-hand corner. Later I can stamp a message on the inside of the card or write a personal note.

If you have a large order of $150 or more, remember that you can choose Stampin’ Rewards of 10% or more and remember that there are special Host choices in the back of the catalog, one being this year the Pattern Party Designer Series Paper. This is 48 sheets, 4 sheets each of 12 different designs. This card, the Color & Contour Pattern Party Card, shows off one of the pretty patterns in this package of paper! You will enjoy it I’m sure!

Shop Stampin’ Up! Online Today!