Tag Archives: Easter basket

Two Little Easter Baskets For You

Easter Bunny Plaid Easter Basket

Next weekend is Easter, believe it or not! If you need some little Easter baskets for a little treat for someone, a dinner table favor, or just a little home decor, try this basic easy basket patterns! Decorate however you like once you know the way to make the basket!

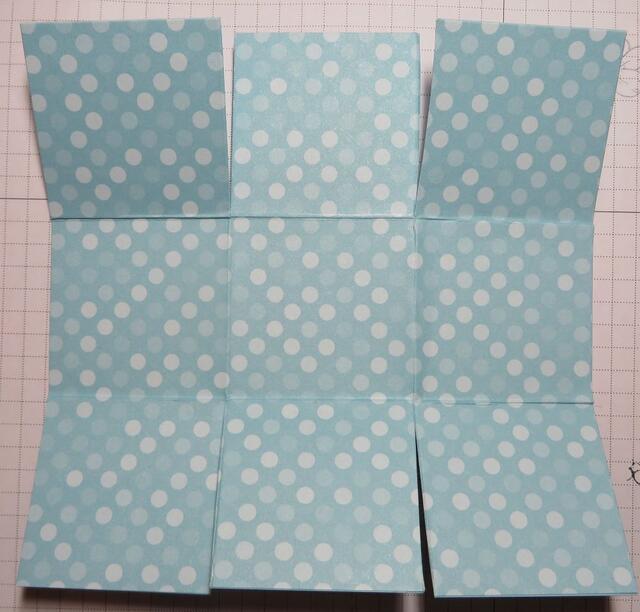
I used the same pattern for both baskets. Just start with a 6″ x 6″ square piece of paper and score like a tic tac toe. Score at 2″ and 4″, then turn and score at 2″ and 4″. Cut on the two vertical score lines up to the horizontal score line. Do the same on the opposite side. See the diagram below. Cut a handle of about 8 1/2″ x 1/2″.

Easter Basket Pattern

Crease and fold all score lines. If you like, round all four corners. Or you can leave them as is. Form the paper into a basket and use brads or glue to hold the sides and handle together. The handle goes in between the two side flaps and the center flap. That hides it a little bit on the inside. (If you think of it ahead of time! Or it can just be glued to the inside of the basket.)

Decorate the basket with designer series paper or stamping or whatever you like.

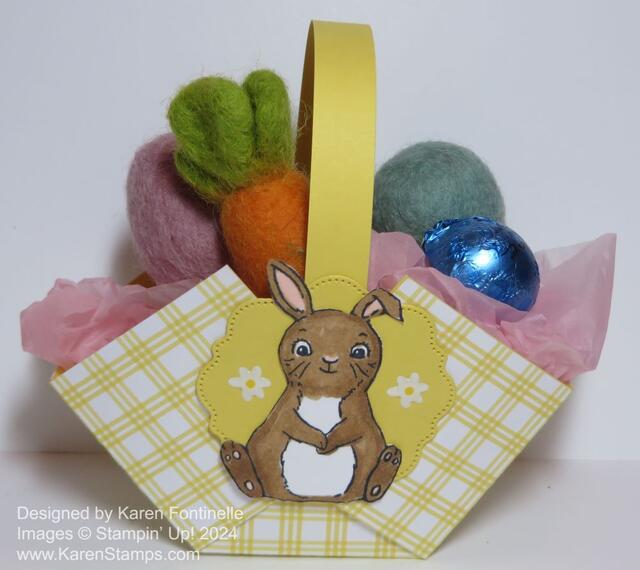
For the basket in the photo at the top I cut a 6″ x 6″ piece of Daffodil Delight cardstock and the plaid pattern in the Bee Mine Designer Series Paper. I glued them together so the whole front of the basket would have the yellow plaid design.

After assembling the basket, I stamped a bunny in the Easter Bunny Stamp Set (retiring soon!) and colored in with Stampin’ Blends. For the bunny, I used Light Pecan Pie and Petal Pink for the ears. I cut out the bunny and layered him on a diecut from the Thoughtful Expressions Dies. It’s cute-shaped label with a stitched look around the edge. It will retire soon also. I also added two of the Adhesive-Backed Hearts & Flowers Embellishments.

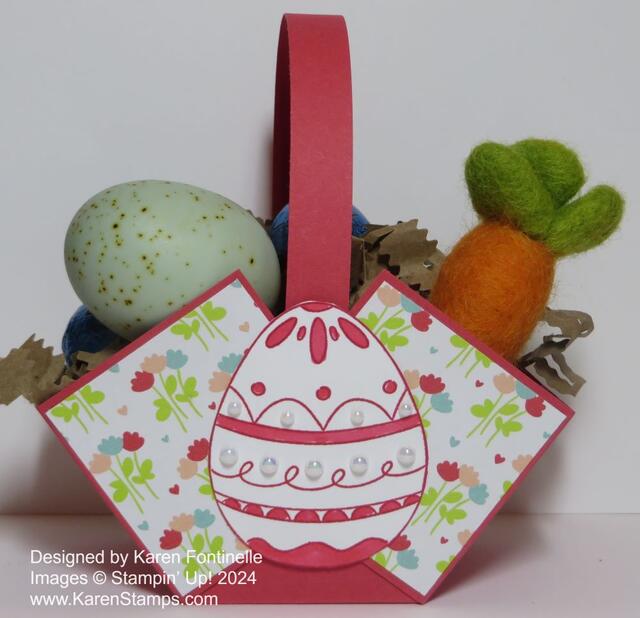
Excellent Eggs Sweet Sorbet Easter Basket

For this basket I used Sweet Sorbet cardstock, but added the cute little flowered paper in the Bee Mine Designer Series Paper cut in squares to decorate each side, front and back. Since each square is 2″ x 2″, I cut the DSP at 1 7/8″ x 1 7/8″ .

The Easter egg is in the Excellent Eggs Stamp Set (retiring) and to keep it all simple, I stamped it with Sweet Sorbet ink, then colored in just parts of the egg with the Light Sweet Sorbet Stampin’ Blend marker. I cut out the egg by hand, although there are dies if you like. After adhering it to the basket, I added some Iridescent Pearl Basic Jewels in two different sizes. Very easy!

If you want to check out some other baskets I have made, look HERE and HERE.

You will be surprised at how easy these little baskets are to make. You can make them for other occasions, not just Easter or spring!

SHOP STAMPIN’ UP!

An Easter Treat Easter Basket

An Easter Treat Easter Basket

These little Easter baskets are fun and easy to make! Make them for a treat to give someone or for table favors on your Easter table at dinner. Decorate as simply or as fancy as you like.

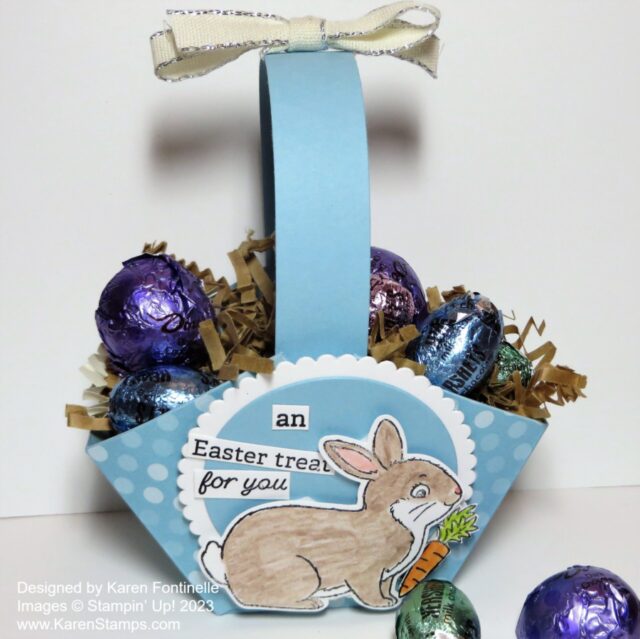
This An Easter Treat Easter Basket is made with both cardstock and designer paper. What I meant to do was make a basket out of cardstock and glue on pieces of designer paper. But I accidentally cut and scored the designer paper first and then realizing my mistake, I just cut a piece of cardstock and glued the designer paper onto it. It worked out fine and made it sturdier than if I had just used designer paper.

This basket is made with Balmy Blue cardstock and a polka dot pattern in Dandy Designs Designer Series Paper. This designer paper was a free product in the Sale-A-Bration Brochure with a $100 purchase and has all this great paper in it. I spotted the polka dot pattern and thought that would be perfect for my basket. Of course, you can use anything you like or even just cardstock.

The way you make a basket like this one is to cut a piece of paper (cardstock or designer paper) at 6″ x 6″. Then score at 2″ and 4″. Turn the paper and score at 2″ and 4″ This will look like a tic tac toe pattern so you know if you have it right! Then cut the two vertical score lines top and bottom to the horizontal score line. Crease all the fold lines. You can see the diagram below.

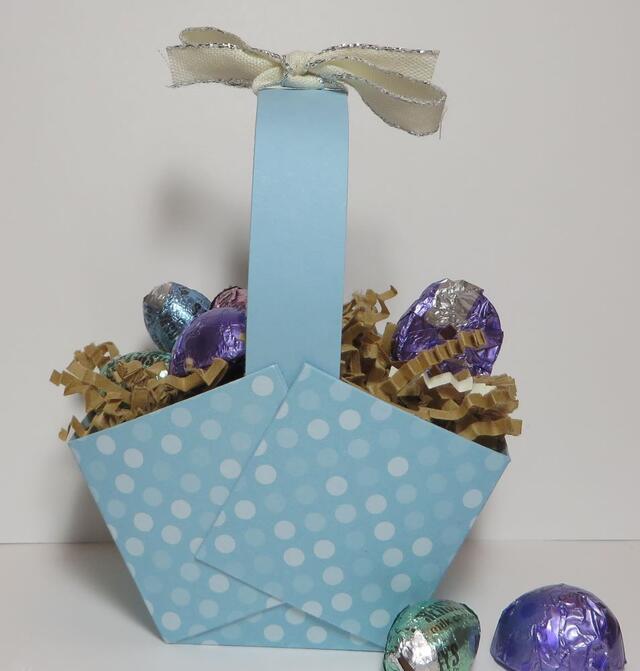
Fold the sides together at angles as you will see in the photo below. Have the basket handle ready to sandwich in between the layers. I cut my handle at 8 1/2″ x 3/4″. Or if you forget, just adhere it to the inside of the basket.

An Easter Treat Easter Basket back

Decorate the basket however you like! I stamped one of the bunnies in the Easter Bunny Stamp Set on Basic White cardstock and colored him in using Watercolor Pencils in both Assortments and smoothed out the coloring with a Blender Pen. I also stamped and colored one of the carrots for the bunny and cut it out by hand. The bunny was punched out with the Easter Bunny Punch. It was so popular it’s been out of stock for a while but more punches are due back in the week of May 15. I diecut a plain circle and a scalloped circle out of the Layering Circles Dies for the side of the basket. There was not enough room for a little Easter greeting, but I used this one in the stamp set and just cut it apart to fit it on the decoration in a way that it would fit! The bunny and the circles were all popped up on Stampin’ Dimensionals.

Since I hadn’t done anything fancy with the basket handle, I just tied on a bow with the Silver 3/8″ Metallic Edge Cotton Ribbon. Then just put some “shred” or tissue paper in the basket and add your Easter treats!

Here is a blog post from a few years ago showing three different Easter baskets I made!

Have fun trying out these Easter basket ideas for a cute Easter treat!

Woven-Look Easter Basket in Cinnamon Cider

Woven-Look Easter Basket in Cinnamon Cider

I’ve made a few paper Easter baskets in the past, but I hadn’t tried this fun-looking design. I called this the Woven-Look Easter Basket in Cinnamon Cider to differentiate the kind of basic ones like I made recently in this post. I don’t know what design it would really be called! It is made by cutting strips on parts of the paper and then adhering them one by one, side by side to the front and back of the basket. Somehow it turns out like this! Who thinks of all these ideas?!

I have a lot of photos to hopefully show you how to make one of these baskets!

Start with a piece of cardstock cut at 7″ x 6 1/2″. You will also need a basket handle later cut at 3/4″ x 6″ or whatever size you like. If you want to cover it with designer paper, cut it just slightly narrower and just as long. You can also add designer paper to the sides of the basket if you like, or even each strip that we will make. Or just keep it plain and simple!

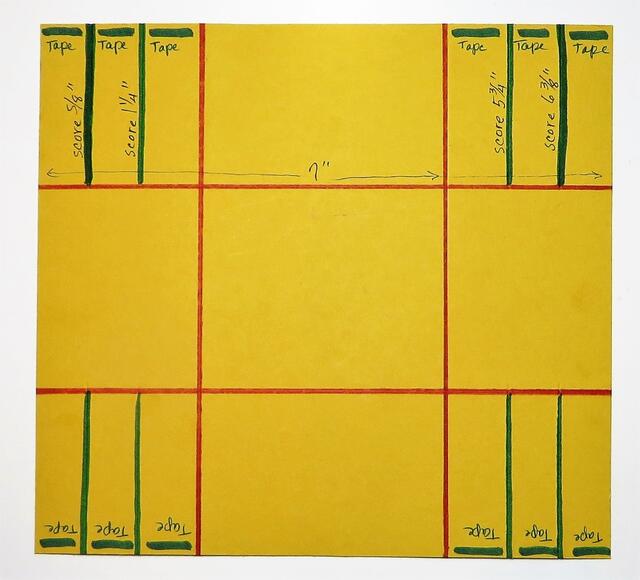
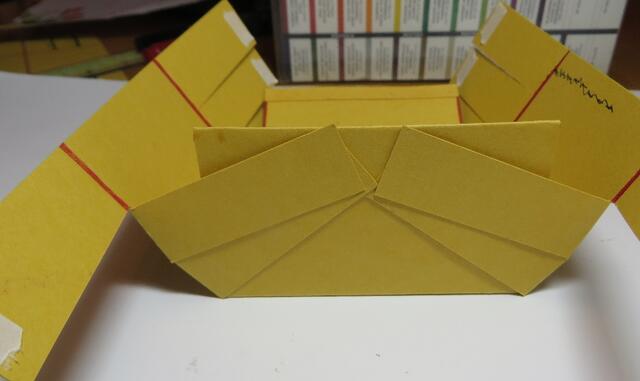
With the 7″ side at the top of the Simply Scored Scoring Tool or the Paper Trimmer, score each of the four sides at 2″. (See the red lines.) Then with the 7″ side at the top, on the two outer squares, score from the top only down to the horizontal score line. (Green lines.) Score at 5/8″, 1 1/4″, 5 3/4″, and 6 3/8″. Then turn the paper with the other 7″ side at the top and do the same thing.

Woven-Look Easter Basket Diagram1

In preparation for assembly, add pieces of Tear & Tape to each end of those scored strips as you see in the diagram. You could use Multipurpose Liquid Glue but you would have to hold each strip in place for a moment, so Tear & Tape is really easier. You “could” apply the tape across all three strips at once because you are going to cut them apart next anyway.

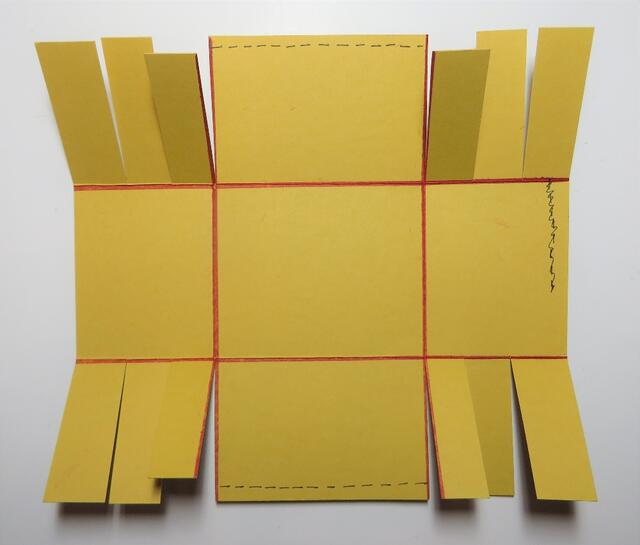
Next, use scissors to cut on the scored (green) lines just up to the horizontal score line. Also, cut the red line, just up to the red score line, so that you have three “fringe-like” pieces on each side (all four corners).

Woven-Look Easter Basket Diagram2

In that middle section, top and bottom, you see a dotted line. That is where you will fold over just about 1/4″ to the inside of the basket. Score it first if you like. Adhere well. Tear & Tape works best if you make it as wide as the tape. The Liquid Glue you have to hold a few moments. (That squiggle over on the right is a boo-boo! Ignore it!)

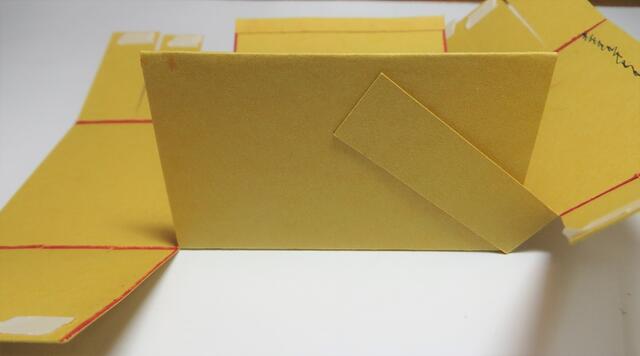
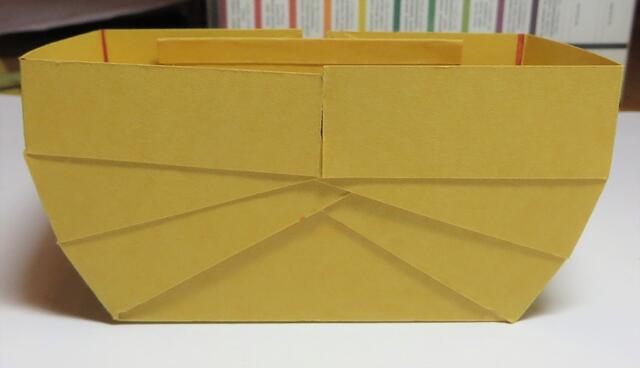
Now you will assemble the basket by removing the Tear & Tape one strip at a time. Pull the inside strip over toward the center of that center section, adhering it about 1/4″ below the top edge. Next do the strip on the left side, also 1/4″ below the top edge.

Woven-Look Easter Basket Diagram4

Next, go to the next (middle) strip on the right, remove the tape and pull it over adhering it right about at the top edge of that middle section. Do the same with the one on the left.

Woven-Look Easter Basket Diagram5

Now you are on the last strip. Pull that over so that it is fairly level and straight with the top of that middle section. Now do the last one on the left, also making it straight with the top. That’s it! As you take a look at the basket, you will see that curve that developed! Don’t worry if everything isn’t lined up perfectly because you are likely to be covering this side (and maybe the back section, too) with a decoration. Do all the same steps on the other side of the basket.

Woven-Look Easter Basket Diagram6

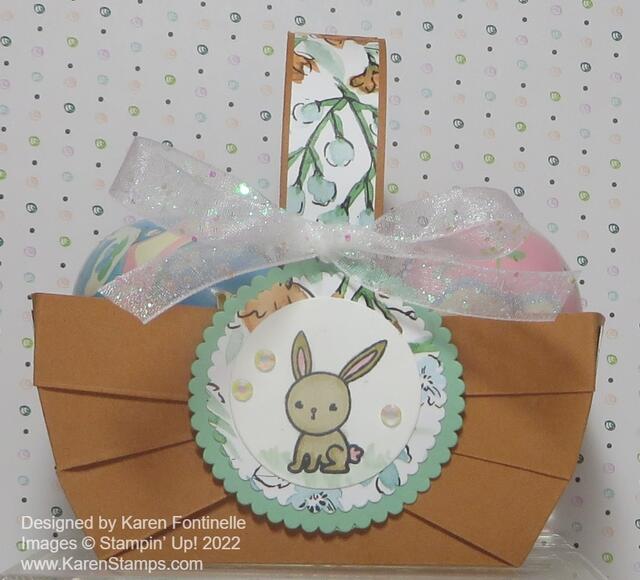
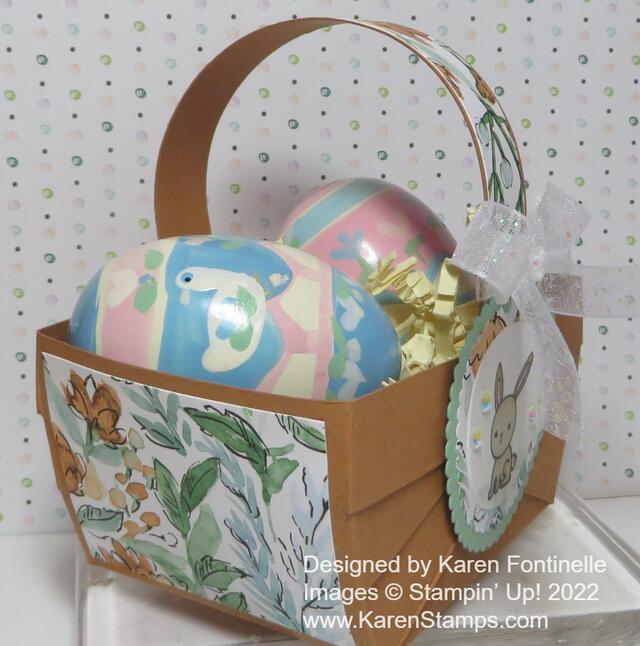
Try to stick the end of the handle down in between the layers of the basket if you can or just adhere wherever you like. Add whatever decoration you want, whether a greeting or some layered circles, punches, rectangles, whatever. Tie on a ribbon if you like. Decorate both sides or just one. Add some small pieces of designer paper on the basket sides if you want. I stamped the little bunny in the Friends of the Forest Stamp Set and layered it on a piece of the Hand-Penned Designer Series Paper on top of Mint Macaron cardstock.

Woven-Look Easter Basket in Cinnamon Cider Side

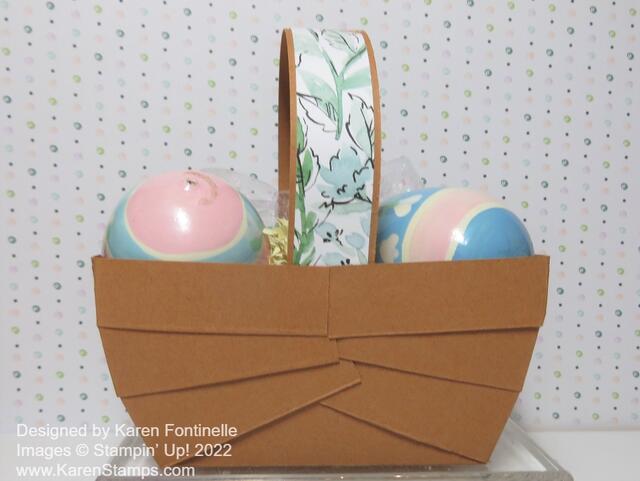
Here is the back side. I almost stamped a “Happy Easter” greeting for the back but I didn’t. I thought just decorating the front was fine!

Woven-Look Easter Basket in Cinnamon Cider Back

If you want to decorate the sides of the basket with designer paper, just cut two pieces 2 1/4″ x 1 3/4″. Make sure you have any design going in the correct direction if there is a pattern. This Hand-Penned Designer Series Paper is on the Last-Chance List of retiring products so if you need more, be sure to get it while it is available! And the Cinnamon Cider cardstock is also retiring as it is one of the outgoing In Colors!

Make a few Easter baskets either for your own decoration around the house or as a decoration at each place setting at your Easter dinner table!

SHOP STAMPIN’ UP! ONLINE HERE!

Expressions in Ink Easter Baskets

Expressions in Ink Easter Baskets

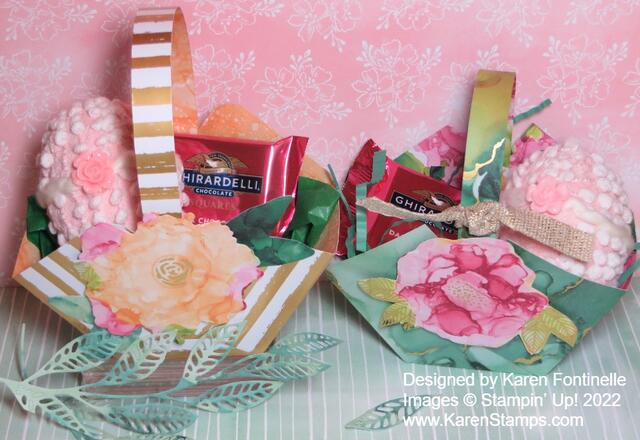
Easter will be here soon, less than a month now, so you might be thinking about making some little Easter decorations such as these Expressions in Ink Easter Baskets. These little baskets are super easy, you have probably made them before. After you make them with designer paper or cardstock, just decorate and embellish however you like.

I had the idea to make these Easter baskets a little “fancy” by using the Expressions in Ink Specialty Designer Series Paper. I love the watercolored look of all the designs on the paper plus the gold foil accents on some of the papers. It is incredibly beautiful paper! If you want a sturdier basket I would suggest making the basket with cardstock, maybe even the Basic White Thick Cardstock, and then adhering designer paper on the cardstock to decorate. My baskets are just made with designer paper and then the inside is also gorgeous!

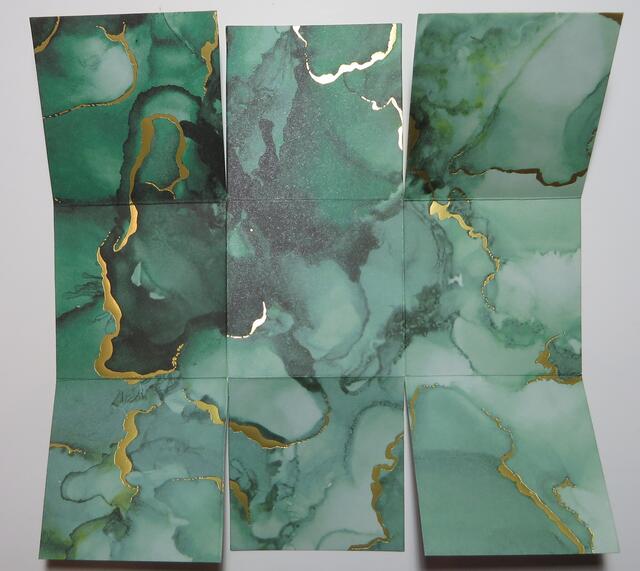
To make the basket, cut a piece of paper at 6″ x 6″ and score like a tic-tac-toe board. Score at 2″ and 4″, then turn the paper and score again at 2″ and 4″. Cut up on the two vertical score lines up to the horizontal score line. Do the same on the opposite side. See the photo below. Cut a handle of about 8 1/2″ x 1/2″.

Score and Cutting on Easter Basket

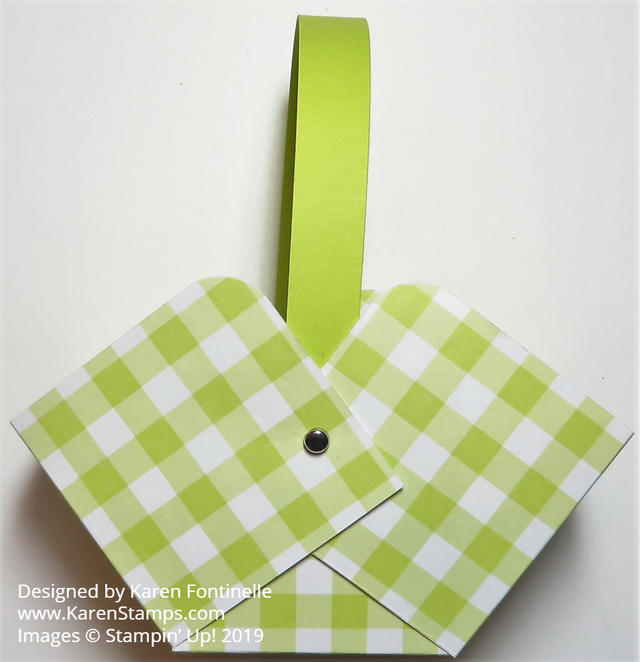
Here’s how to fold the sides in and how to overlap them. If you want to round the corners, you can do that with and corner rounder punch you have or the current Detailed Trio Punch. The photo below from a couple of years ago shows how I folded the sides. You can mostly eyeball where they go or make a pencil mark on the inside of the basket at the 1″ mark since each section is 2″ wide and you can use that mark as a guide to see how far in the sides should go to be even. Use a brad on each side or just some decent glue to hold the basket together.

Easy Paper Easter Basket Assembled

On the basket I made on the left side with gold stripes, I die cut the flower out of a piece of the designer paper using the Artistic Dies. It didn’t match exactly but it was pretty close and looked fine. Then I also cut out some leaves with the greenish portions of the designer paper.

On the green basket, I simply cut out the flower and leaves by hand. It doesn’t have to be exact because the flowers are so “flowy” anyway, there isn’t an exact image line. On both baskets, I popped the flowers up with Stampin’ Dimensionals.

If you don’t have “Easter grass”, you can make some but cutting narrow strips of green cardstock and then running it through a Paper Crimper if you have one (mine is from long ago when I first started stamping) or just crush and crumble it in your own hands and that will work too! In the other basket, I found a piece of green tissue paper and just wadded that up in the bottom of the basket.

The fabric-covered egg in each basket is handmade from @sewafineseam on Instagram that I purchased last year!

Here are some other Easter baskets made three years ago if you need more ideas!

It’s time to start making Easter cards, treats, decorations, and these little Easter baskets would serve as a treat or a decoration for your home or your Easter dinner table. Have fun making some! Bet you can’t make just one!

Fable Friends Bunny Easter Basket

Fable Friends Bunny Easter Basket

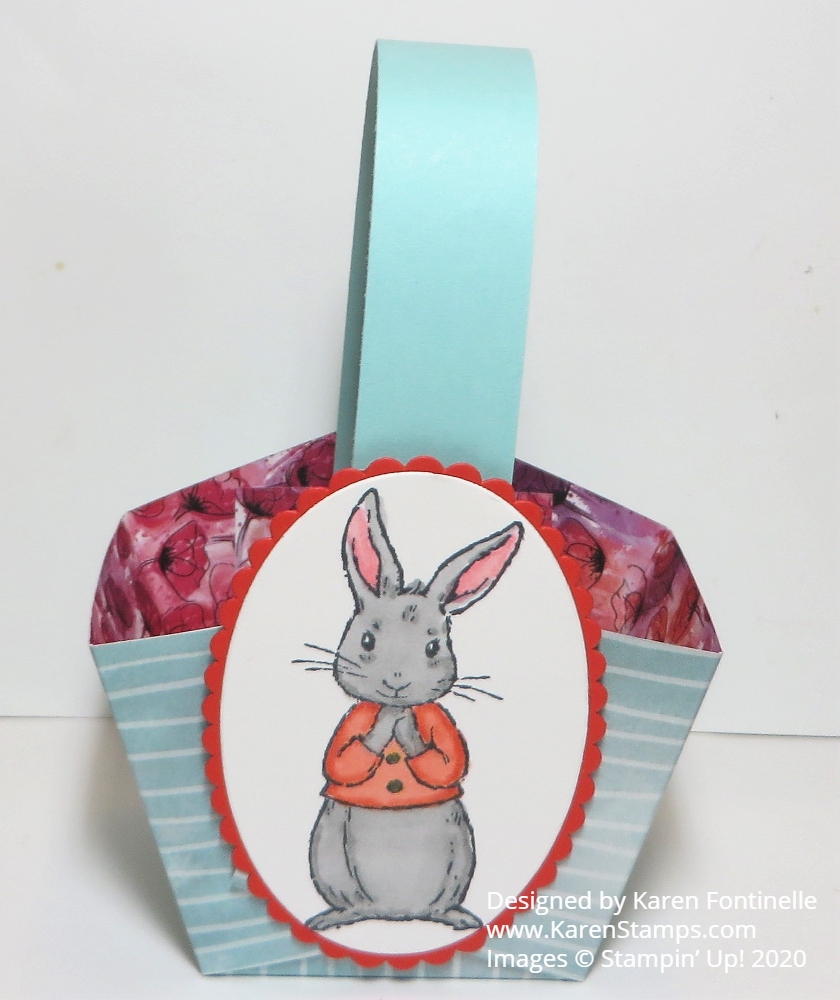
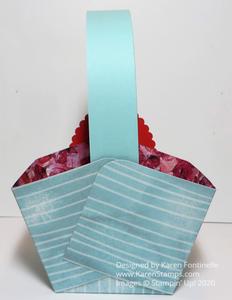
Today is the first day of spring, the earliest first day of spring since 1896, so here is a Fable Friends Easter Basket to celebrate! These are so easy to make you could make a ton now in your “free time”!

This is the Peaceful Poppies Designer Series Paper and I liked the Pool Party stripe paper for the basket. And then you can see the floral pattern on the inside of the basket.

The bunny is stamped from the Fable Friends Stamp Set in the Annual Catalog. I love that bunny! I colored his fur and jacket with Stampin’ Blends and then die cut him with a Layering Oval die, then layered on a scalloped oval die. Don’t think I picked the correct color for the scalloped oval to match the inside of the basket but it’s fine!

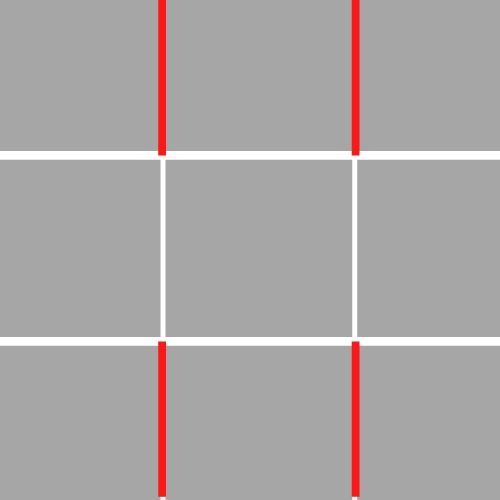
Just use a 6″ x 6″ square of paper and score at 2″ and 4″. Turn the paper and score again at 2″ and 4″. Then on opposite sides, cut up to the scored horizontal line. Round the four corners if you wish with the Detailed Trio Punch. In the rough (?) diagram below, you can see how you score all the lines like a “tic tac toe”, then cut on the red lines up to that horizontal score line. Then crease and fold on all the lines and begin assembling the basket.

Fold on the score lines and overlap the sides of the basket. You don’t have to be exact on the placement, just try to have both sides pretty much the side. Either adhere with strong glue or use Metallic Brads. Back in the day we were really into brads of all kinds so you probably have some in your stash, but Stampin’ Up! does also carry the Metallic Brads. You can see the sides of my basket in the photo below and I did not put a lot of effort into getting them into some perfect shape!

Fable Friends Easter Basket Back

Last year I made several baskets in one post and you can see those ideas and directions HERE.

I think it just feels better to know that it is spring now! Spring is a happier season, things start growing and blooming, the weather is nicer, we are outdoors more. Look through your designer paper and make a few spring or Easter baskets to brighten up your home. You couldn’t have to put a bunny or anything on the side. You could use cardstock to make the basket and add designer paper on some of the squares. You could just tie on a tag or put a pretty bow on the handle. The handle, by the way, is just a strip of cardstock, probably cut about 1/2″ or 3/4″ wide and however long you would like it. It’s a simple project and would be fun and easy to make if you have kids at home now! Or just make it for yourself! Use larger paper for a larger basket! Maybe I will try that myself! Try your hand at a spring basket like my Fable Friends Bunny Easter Basket!

SHOP STAMPIN’ UP! ONLINE BEFORE SALE-A-BRATION ENDS MARCH 31!

Fable Friends Bunny and His Basket

Fable Friends Bunny and His Basket

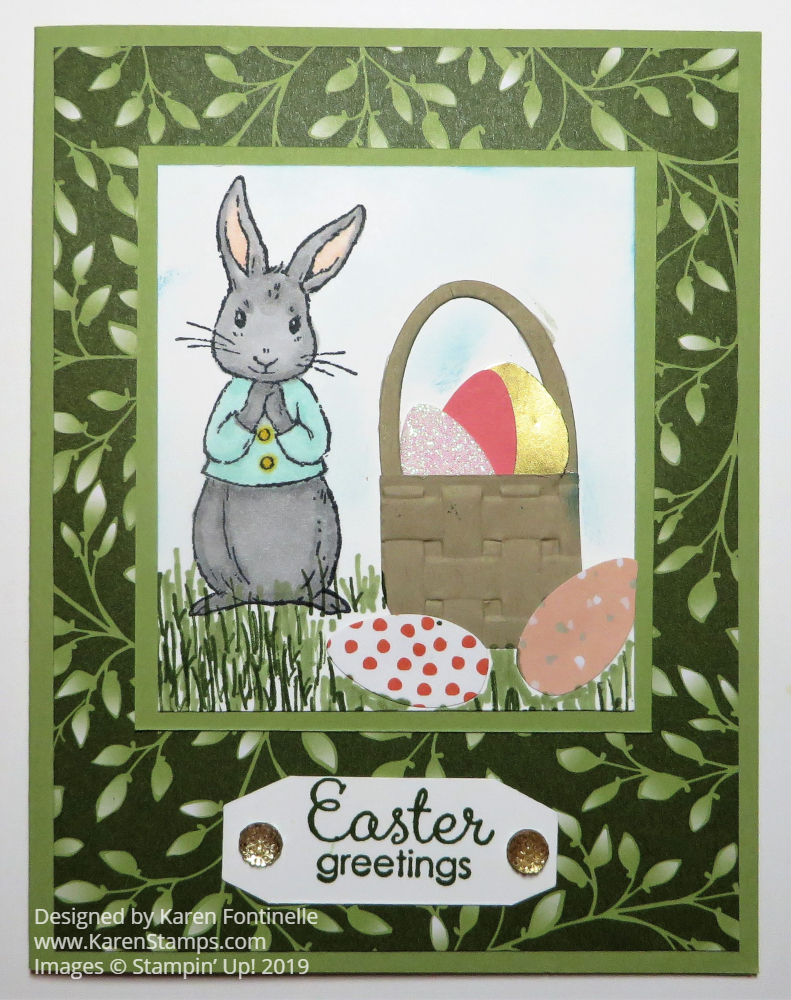
There’s still a little bit of time for Easter bunnies, so here is the cute Fable Friends Easter Bunny and his basket! I wanted to make a gray bunny for a change and I found a way to make some small Easter eggs with a punch!

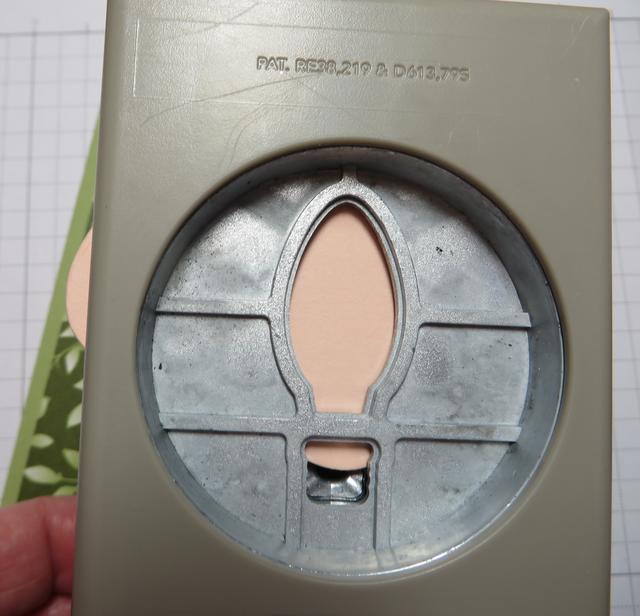
The other day I discovered that I could use the Christmas Bulb Builder Punch. I just punched out the bulb and trimmed off the little thing on the end. Voila! You have an Easter egg! I just grabbed some scrap cardstock and designer paper to punch out some eggs, even one stamped heart! Instead of laying in the scrap heap, it is now an Easter egg!

The card base is Pear Pizzazz to coordinate with the Floral Romance Specialty Designer Series Paper layer. I liked the look of the leaves as if the bunny is out in the forest with his Easter basket!

The bunny is stamped in Memento Ink and colored in with Stampin’ Blends markers. Love those! I originally thought I would cut out the bunny, but then I thought he might not show up very well so I left him on the Whisper White paper and added the basket. The basket is just a piece of Crumb Cake cardstock embossed with the Basket Weave Embossing Folder. The grass is first stamped with a tiny little grass stamp in the Sheltering Tree Stamp Set. I have actually used this grass stamp a lot! Then I filled in with a Stamping Blends marker. I used Mossy Meadow ink with the stamp and Pear Pizzazz marker. I also sponged a little Balmy Blue ink in the background for some sky. The plain white looked too stark.

The greeting is in the Fable Friends Stamp Set, along with other greetings you can use for other occasions. I used the Tailored Tag Punch to finish off the ends of the greeting. I’m not sure that was the best choice but it’s okay. I used some Gold Faceted Gems for an embellishment. I’m so glad this stamp set is carrying over! It will be great for baby cards also!

Be sure to check the Last-Chance products in the Online Store! That’s the best way to see everything and to see what is still in stock. Click on THIS POST to find the links to the lists and for more information.

If you own the Fable Friends Stamp Set, make a fun bunny card today and give it to someone on Easter!

Make an Easy Paper Easter Basket

Three Easy Paper Easter Baskets

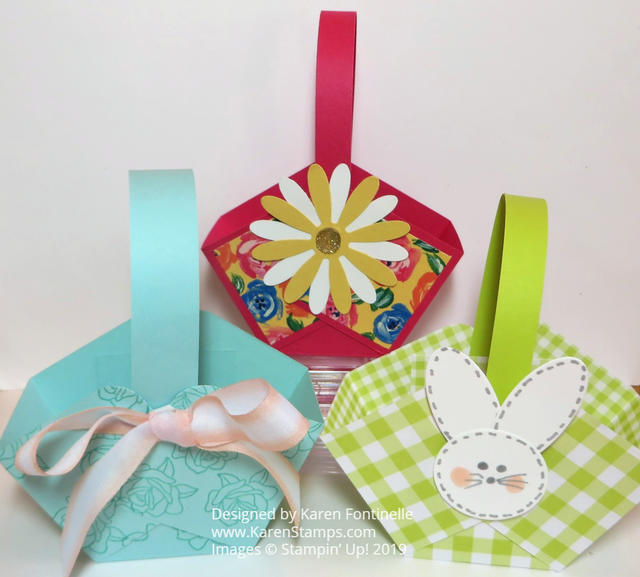
Here is an easy paper Easter Basket anyone can make, so easy in fact that you can make THREE little Easter baskets for treats! At least here are three different ideas for you to show you what you can make!

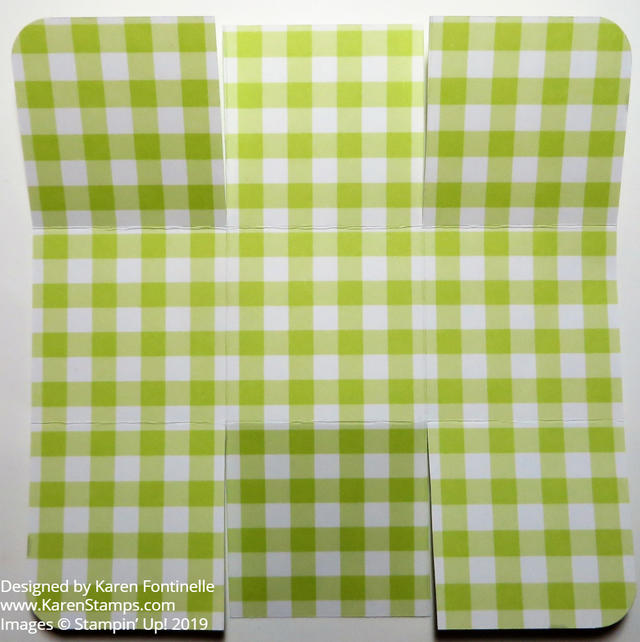
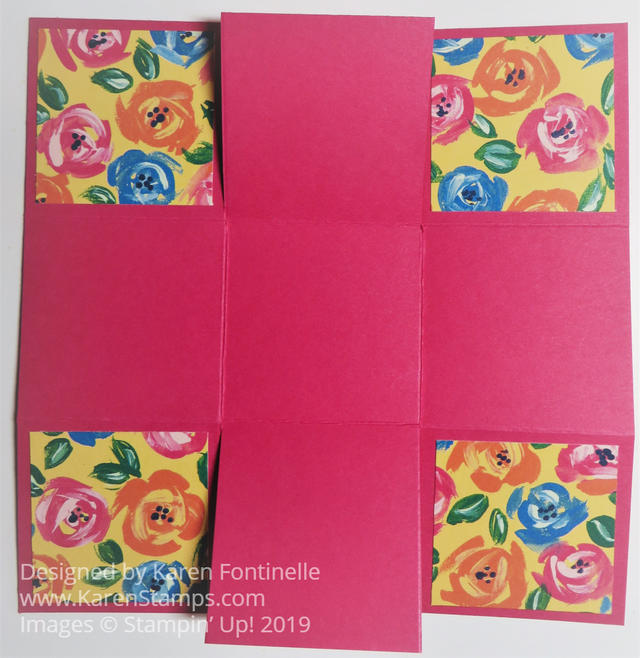
Just start with a 6″ x 6″ square piece of paper (I used a sheet of Gingham Gala 6″ x 6″ Designer Series Paper) and score like a tic tac toe. Score at 2″ and 4″, then turn and score at 2″ and 4″. Cut up on the two vertical score lines up to the horizontal score line. Do the same on the opposite side. See the diagram below. Cut a handle of about 8 1/2″ x 1/2″.

Easy Paper Easter Basket Scored Diagram

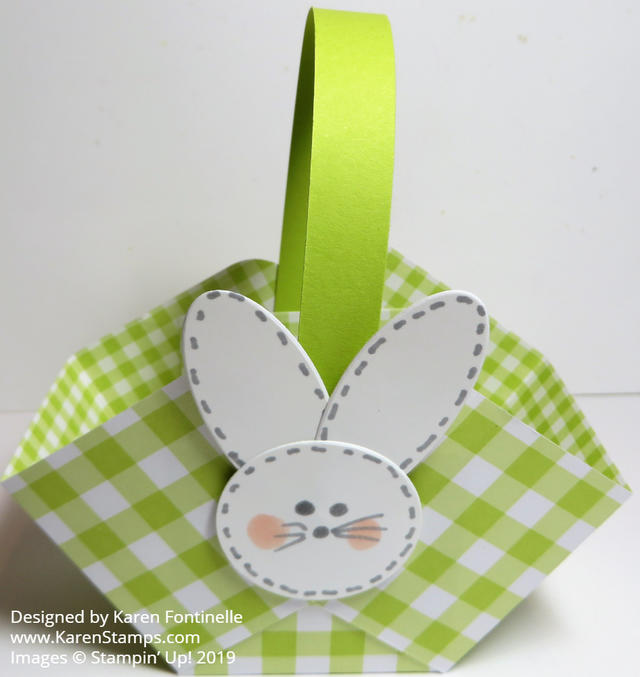
Crease and fold all score lines. If you like, use the Detailed Trio Punch to round all four corners. Or you can leave them as is. Form the paper into a basket and use brads or glue to hold the sides and handle together. The handle goes in between the two side flaps and the center flap. That hides it a little bit on the inside.

Easy Paper Easter Basket Assembled

Decorate however you like. I made a bunny face with a Circle Die and two Oval Dies (or you could use punches) and then used the tip end of Stampin’ Blends markers to draw on the pieces to make a face. Just adhere to the side of the basket with Stampin’ Dimensionals.

Easy Paper Easter Basket With Bunny

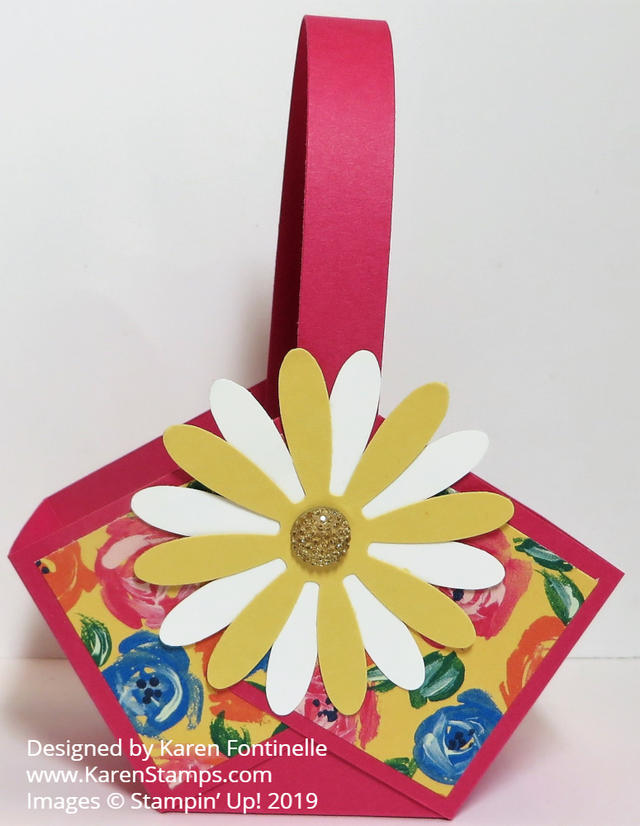
If you would like to use cardstock for the basket and decorate with some designer paper, this is how you would do it! I used Melon Mambo Cardstock and Garden Impressions 6″ x 6″ Designer Series Paper. Everything else is the same as the gingham bunny basket.

Easy Paper Easter Basket with DSP
Easy Paper Easter Basket with Daisy

For this basket, I used the Daisy Punch to punch two layers and adhered the flower to the side of the basket. I added a Gold Faceted Gem to the center.

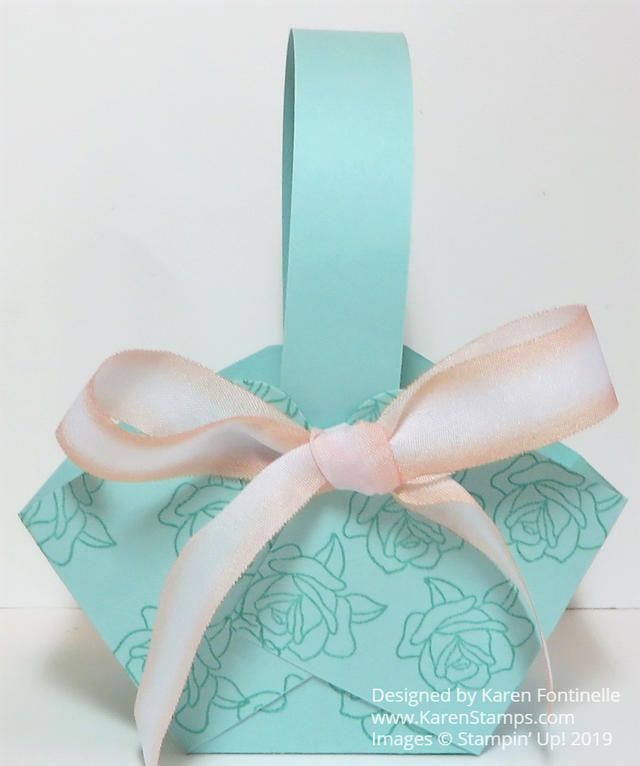
Easy Paper Easter Basket Stamped

For my last basket, I simply stamped on the cardstock to decorate it! It uses Pool Party Cardstock and the flower is from the Painted Glass Stamp Set. To finish it off, I tied a bow with the Petal Pink/Whisper White Variegated Ribbon.

Now just fill the basket(s) with some Easter grass or paper shred and fill with some delicious Easter candy! These would make cute treats for someone or a cute table favor for Easter dinner.

Have fun making your Easy Paper Easter Baskets!

Small Easter Basket With Scalloped Tag Punch

Small Easter Basket With Scalloped Tag Punch

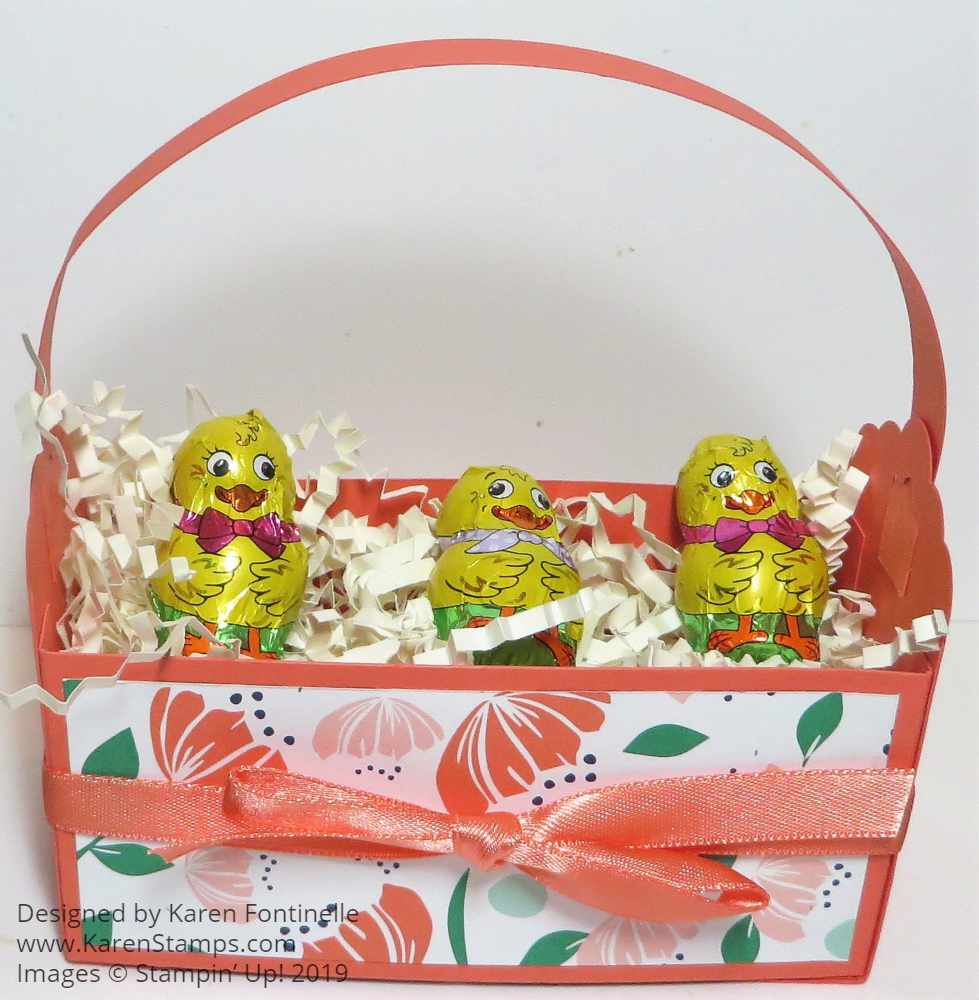
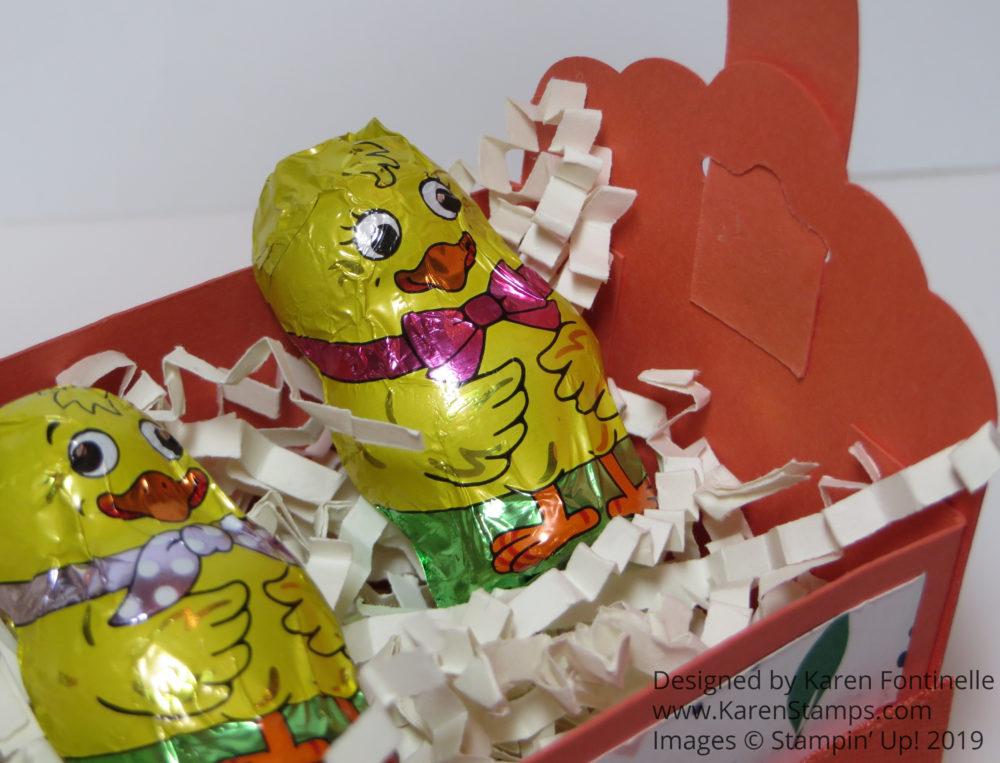
If you are looking for a fun and easy little basket, try this Small Easter Basket with the Scalloped Tag Punch. It is really easy to make and you can decorate it however you like. The Scalloped Tag Topper Punch makes cute sides with an opening for the handle, but if you didn’t have this punch, you could just leave the side as is, unpunched. I just love this cute little Easter candy I found! It looks so cute in a little basket! Some chocolate eggs would be nice, too!

It’s very easy to make this little basket! I used Calypso Coral Cardstock with a layer of Happiness Blooms Designer Series Paper on the front and back sides. You could use whatever paper you like, or stamp the cardstock, heat emboss, or emboss with the Big Shot and a folder. Anything goes! To make the basket, cut two strips of cardstock 2″ x 7 1/2″ and punch one end on each strip with the Scalloped Tag Topper Punch. Score at 3″ from the scalloped top and fold. Those will be the ends of the basket and you can adhere the bottom pieces together, one on top of the other.

Also cut two pieces of cardstock 2″ x 5 1/2″.  Score 1/2″ at each end. These pieces will be the front and back sides of the basket. If you are going to adhere designer paper or stamp or decorate these two pieces, it’s a good idea to do it before you assemble the basket. The designer paper pieces are cut at 1 3/4″ x 5 1/4″. Once you have everything ready, glue all the pieces together to form the basket.

For the handle, cut a strip 1/2″ x 8 1/2″. Insert each end through the scalloped tag punch opening and glue to inside of basket. See photo of inside.

Small Easter Basket With Scalloped Tag Punch Handle

Just to decorate the basket a little, I tied around a piece of Calypso Coral 3/8″ Satin Ribbon. You could make a little paper flower or add an Easter greeting or whatever you like!

Go get your “craft supplies” (chocolate candy!) at the store and then make some Easter baskets like this Small Easter Basket With Scalloped Tag Punch.

Don’t Miss Stampin’ Up! Sale-A-Bration!