
I’ve wanted to make this Friends of the Forest Easter Diorama Card ever since I got this stamp set in the Spring Mini Catalog! I could just imagine making a diorama card with some kind of little scene using the stamps in the Friends of the Forest Stamp Set!
This diorama card is actually a regular card size so you can fit it in an envelope. It folds flat! You could even make a middle layer inside a diorama card and make it as fancy and involved as you like, but this style is easy and just fine! All you need are two pieces of cardstock and an opening cut in the front so you can see the scene or decoration inside.
Start with two pieces of cardstock, each 4 1/4″ x 5 1/2″. Score at 1/2″ and 1″ from each end on each cardstock piece. Fold and crease the score lines and play with them a little to see how it is going to go together. For this card, I used Soft Sea Foam Cardstock for the front and Basic White for the back.
Here is the diagram I used on a previous card. Since we no longer have the oval dies, I changed this card to cutting the opening with a circle die in the Layering Circles Dies, the largest one. You could use a rectangle or whatever you have that would make a hole large enough for whatever you want to do. The lines show the score lines.

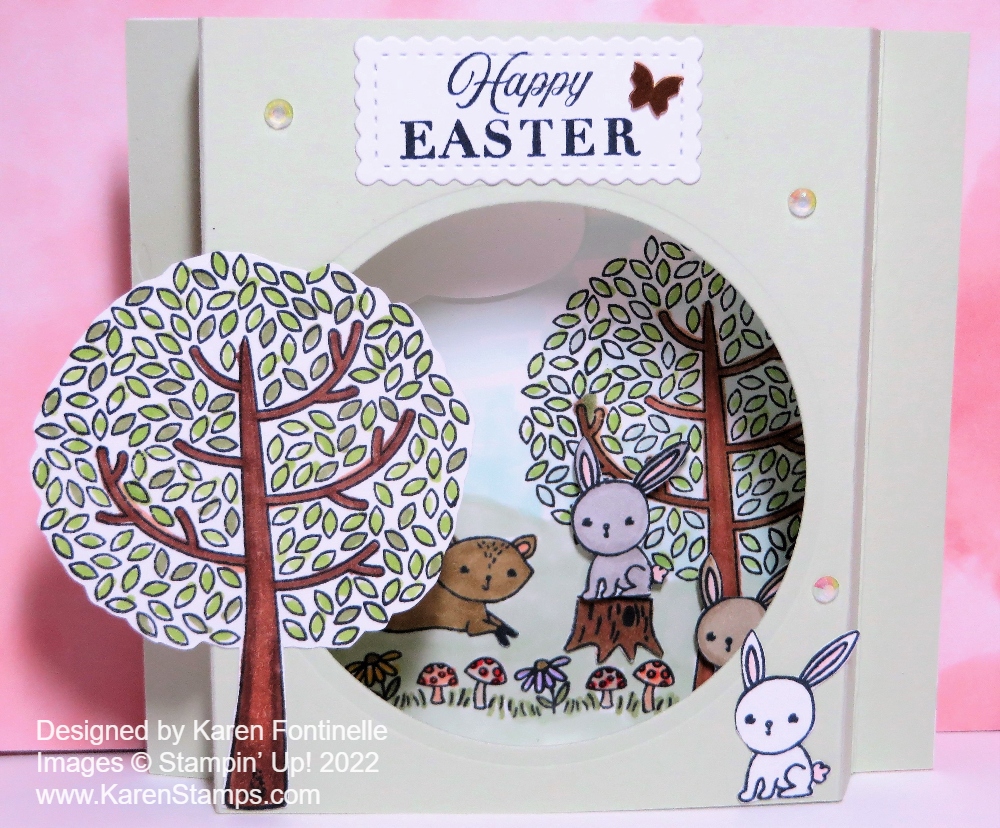
To make the card, I stamped a tree and a bunny on Basic White and cut them out for the front of the card. On the inside, I stamped the tree, fox, flowers and mushrooms directly onto the Basic White and colored them in. But I also stamped two bunnies and a tree stump separately and cut them out by hand to add to the inside scene. Some things are popped up on Stampin’ Dimensionals and some are glued flat on the card.
On the inside, after I had the scene made I decided to color in some grass. I used the Light Sea Foam Stampin’ Blend Marker. For the sky, I used the Light Pool Party Stampin’ Blend. Just scribble lightly, you don’t even have to cover all the white space. I punched out a cloud with the Cloud Punch. It was too big, so I just cut off the side that was too long and popped it up on Dimensionals.
I colored all my pieces with Stampin’ Blends. I didn’t keep track of the colors. It doesn’t matter because you can do your own thing! I did discover after I finished, that the Stampin’ Blends bled through the back of the Basic White background, which I hadn’t thought about so I cut another piece of Basic White to cover that up on the back.
I adhered one cut-out tree and one bunny on the front of the card. The greeting is stamped with the Celebrating You Stamp Set and die cut with a small rectangle in the Stitched So Sweetly Dies. For a little embellishment, I added a cute little Brushed Brass Butterfly on the greeting and a few little Iridescent Rhinestone Basic Jewels.
Here is a view of the card from the top. Just glue the ends together to connect the front and back and make sure everything creases well.

For another idea, here is a card I made two years ago in a similar design.
If you just try this card design, once you cut and score the paper and crease the lines, you will see how the card goes together. It’s really very easy but will make a great impression on whoever you decide to send it to!
SHOP STAMPIN’ UP! ONLINE HERE! REMEMBER THE LAST-CHANCE SALE!