Tag Archives: gift bag

Lovely & Beautiful Gift Bag

Lovely & Beautiful Gift Bag

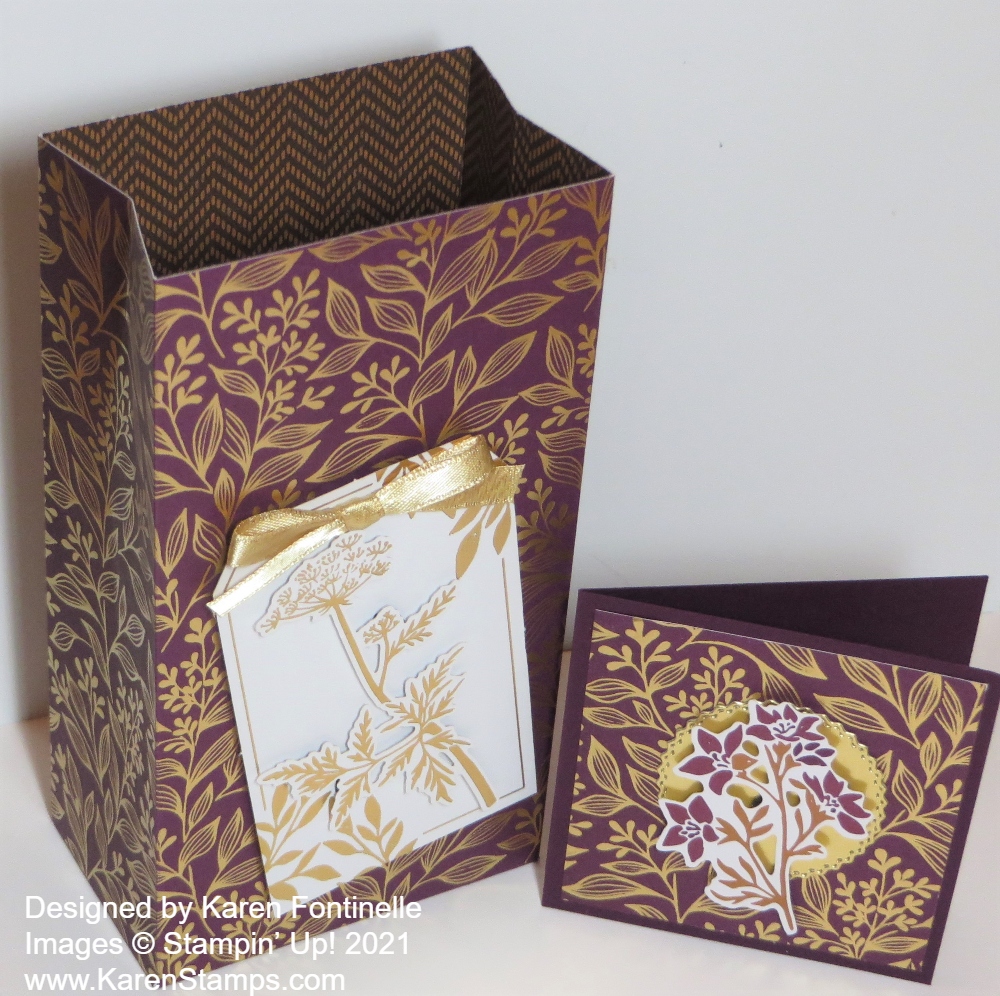
Yesterday I opened up the package of the Lovely & Beautiful Specialty Designer Series Paper, one of the new papers coming next week in the new Stampin’ Up! Spring Mini Catalog.

Lovely & Beautiful Specialty Paper

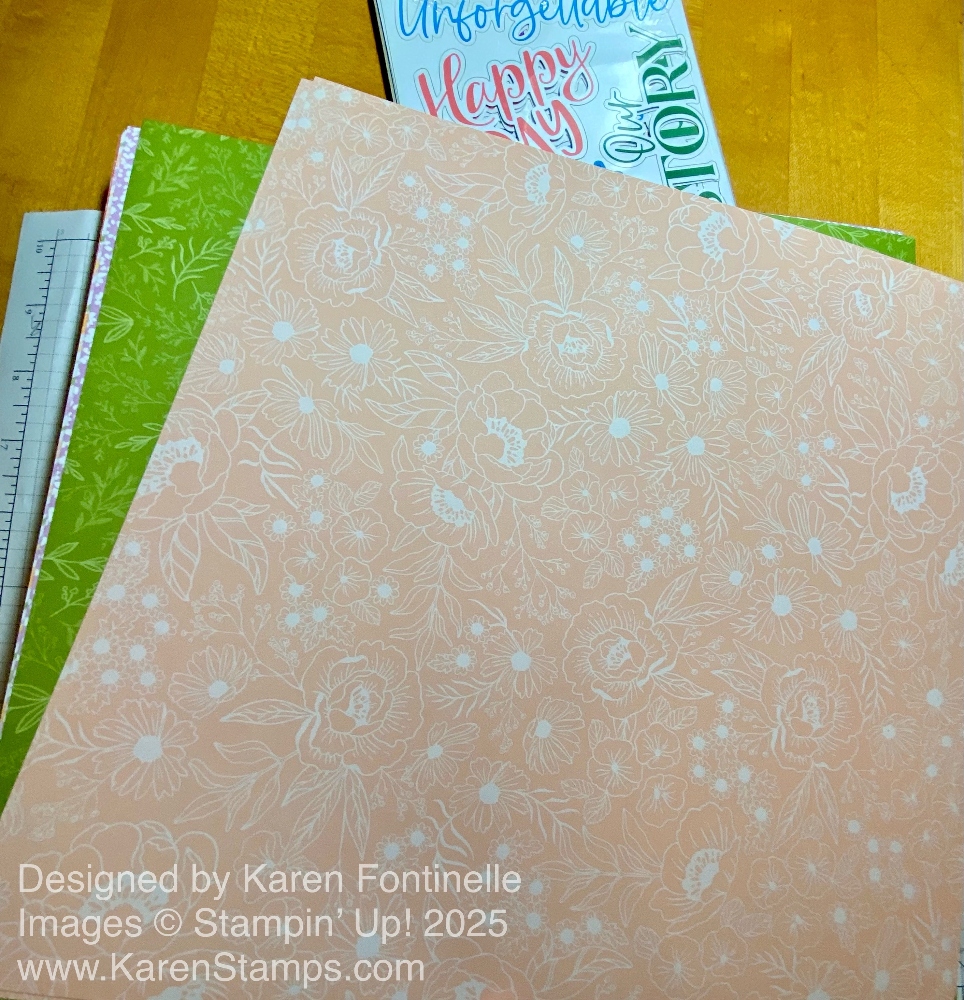
These are the first two papers I saw in the package when I pulled them out. Pretty.

Lovely & Beautiful6

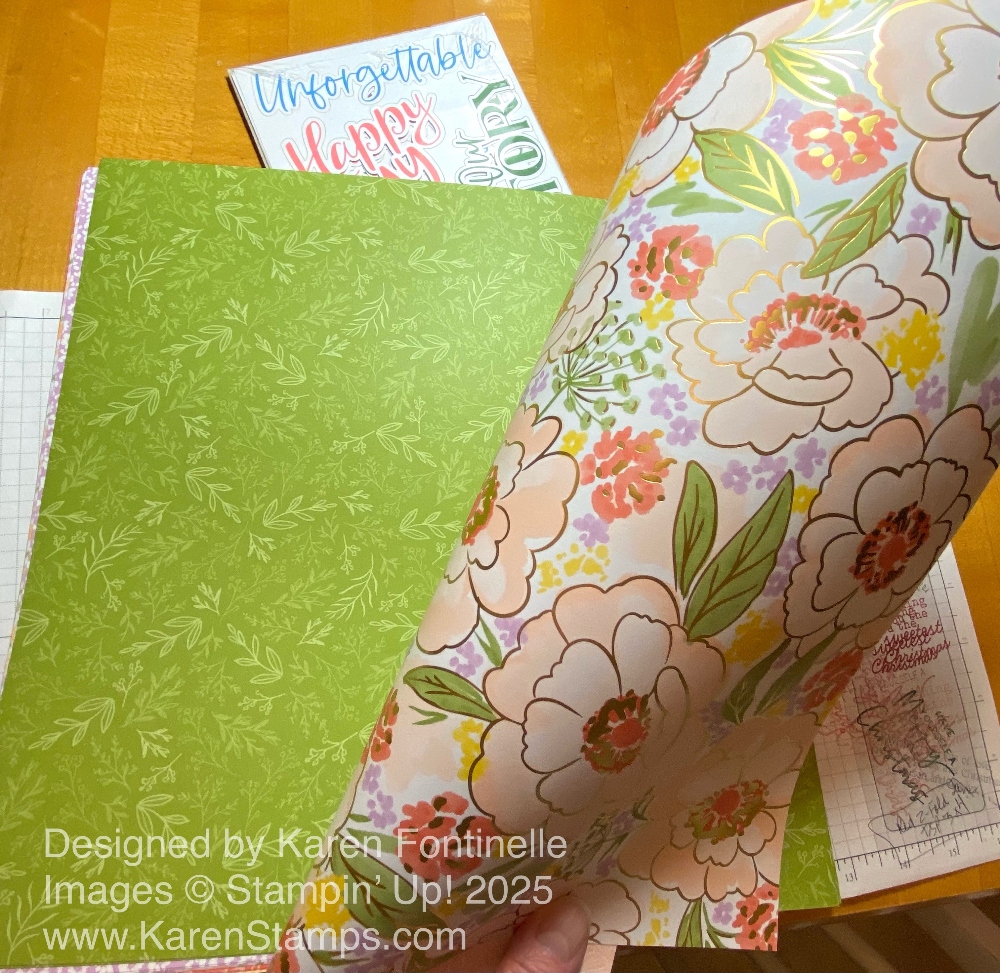
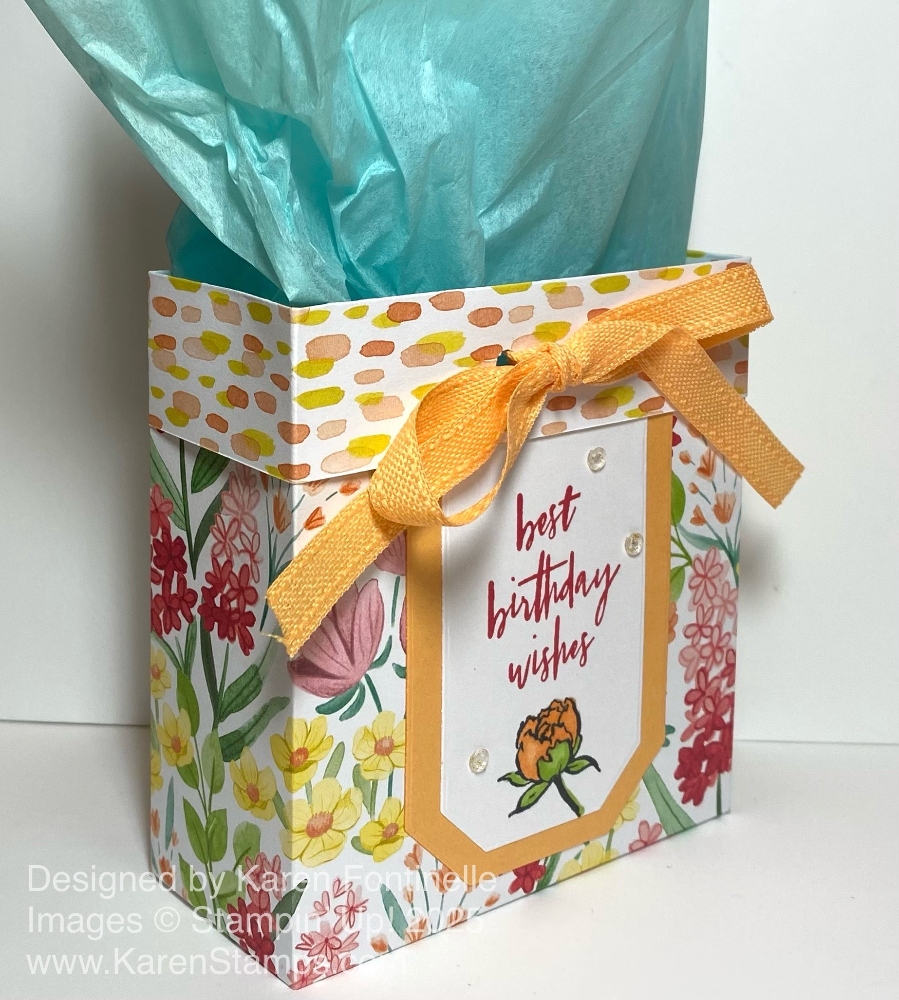
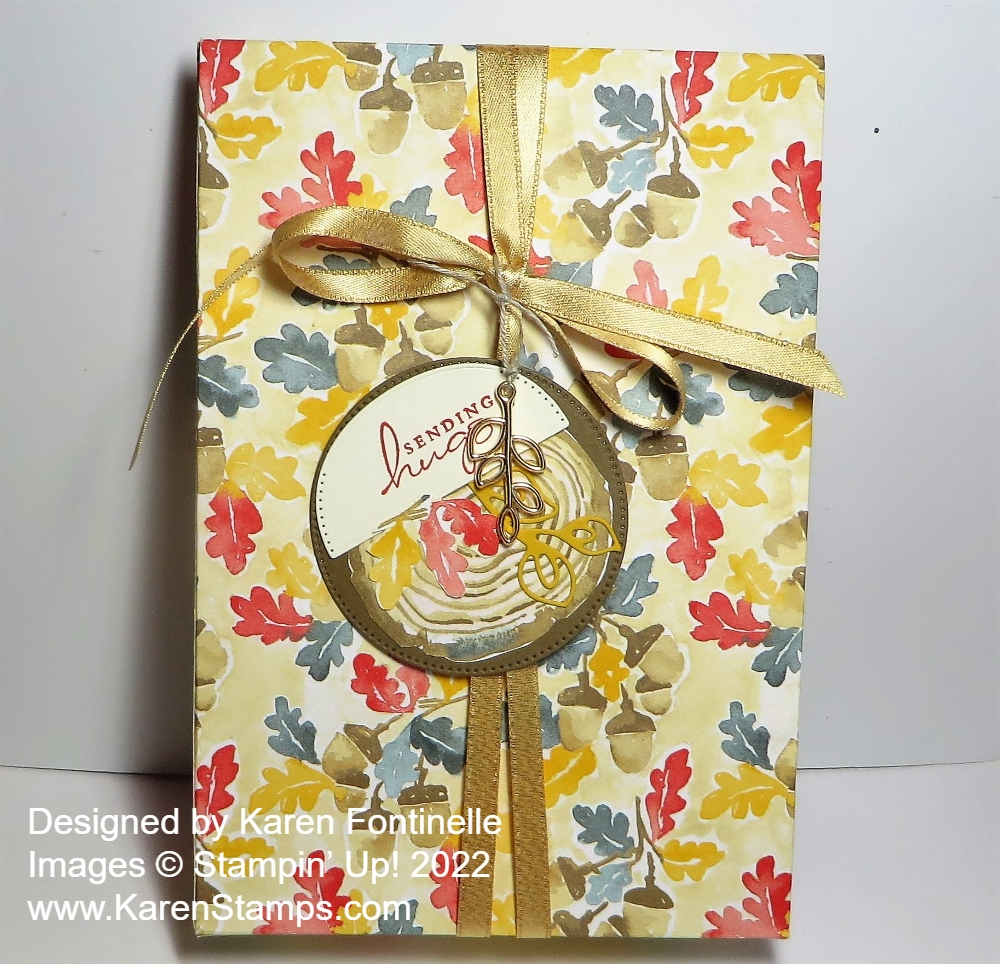
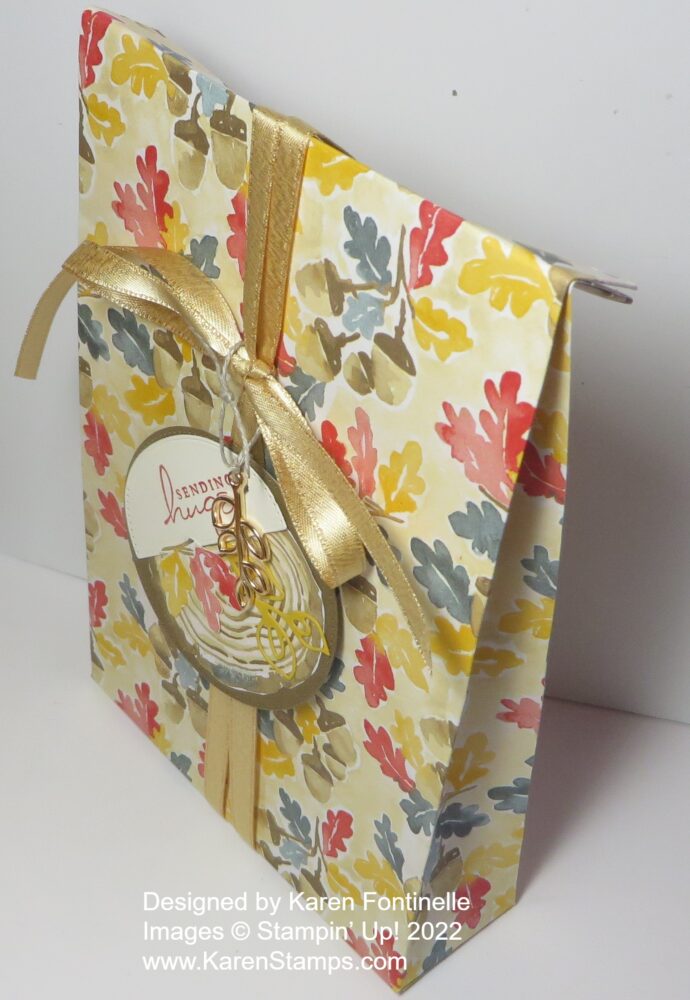
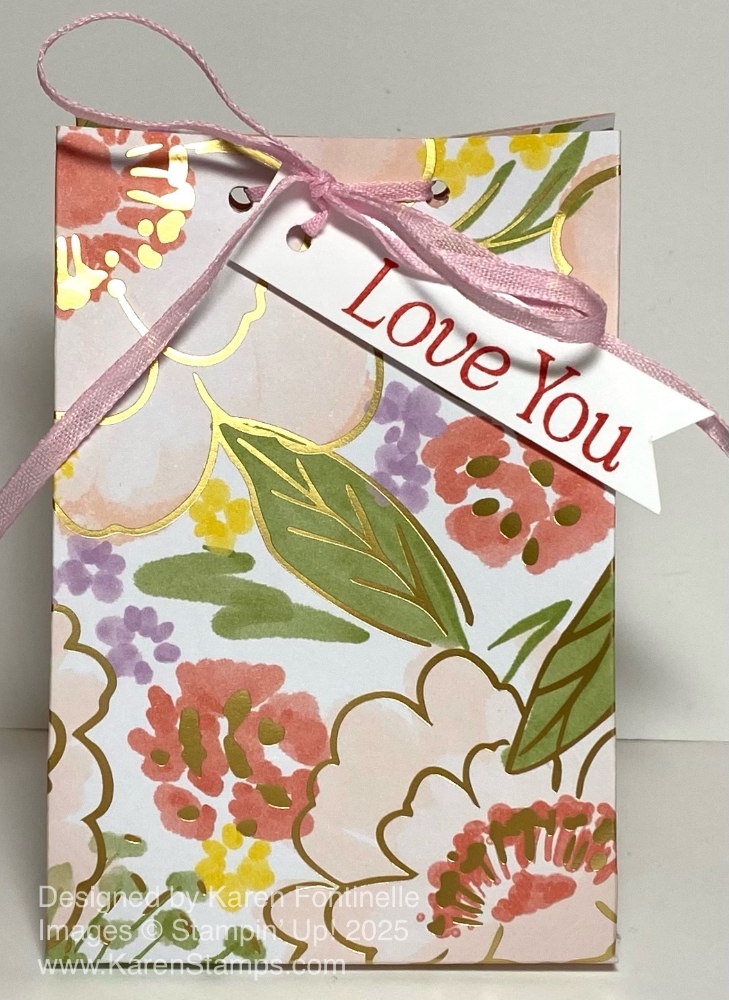
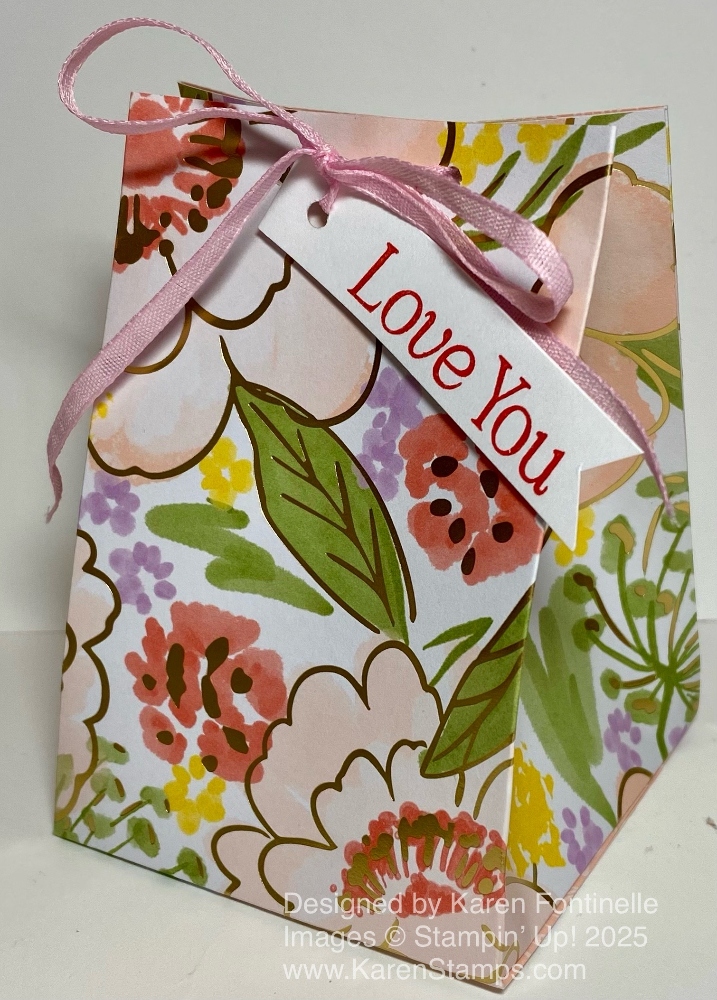
Then I turned back the top paper to see the design on the other side, and I actually exclaimed out loud, “Oh My Gosh!!” Those big flowers with gold foil outlines just took my breath away! From there I knew I was going to use this floral paper for my first card of the New Year. But I ended up making a small gift bag with it.

Before I started working, though, I paged through the designer series paper to see all of the designs. Each one was gorgeous!

Lovely & Beuatiful4

Lovely & Beautiful5

Lovely & Beautiful3

Lovely & Beautiful2
Lovely & Beautiful Paper1

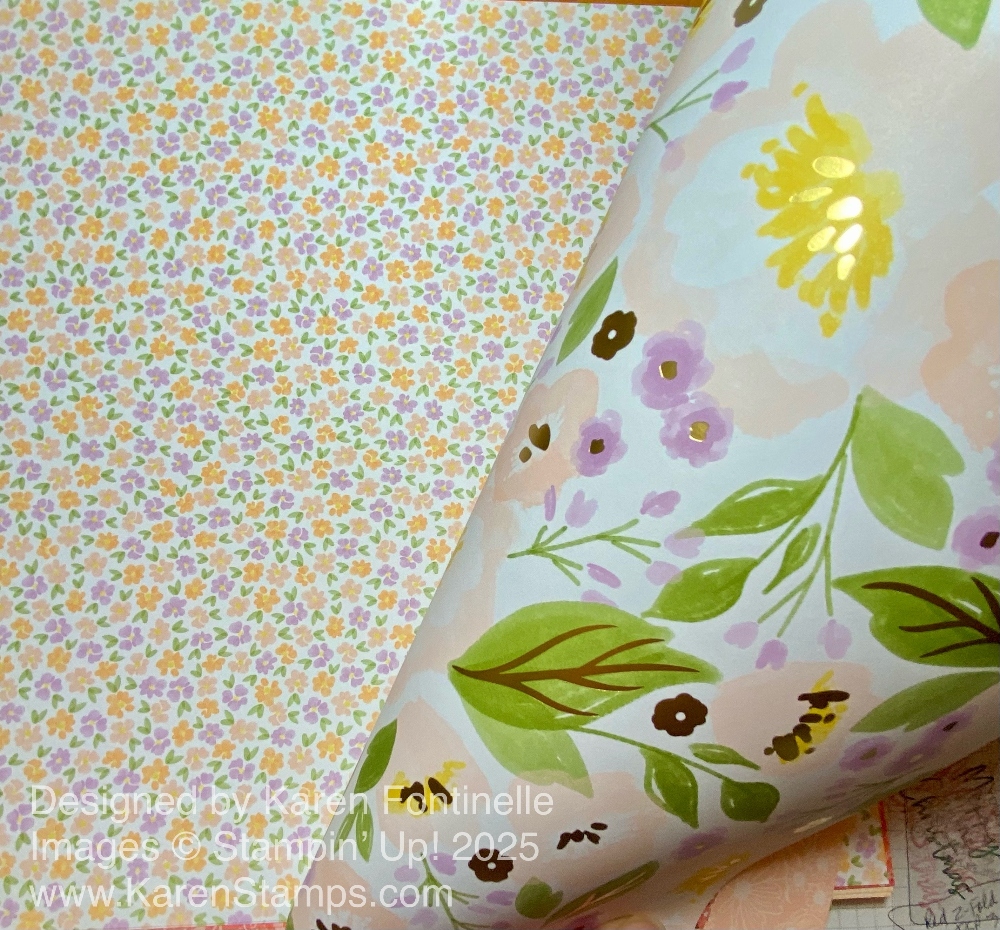
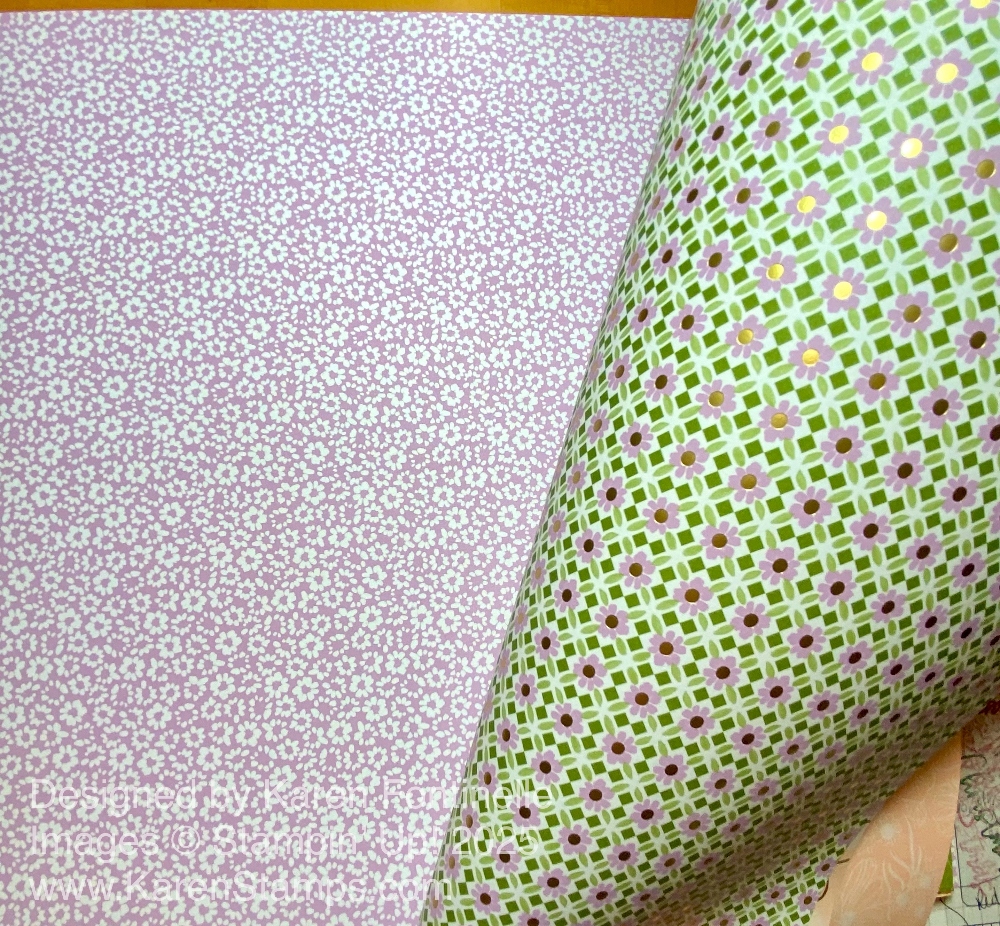
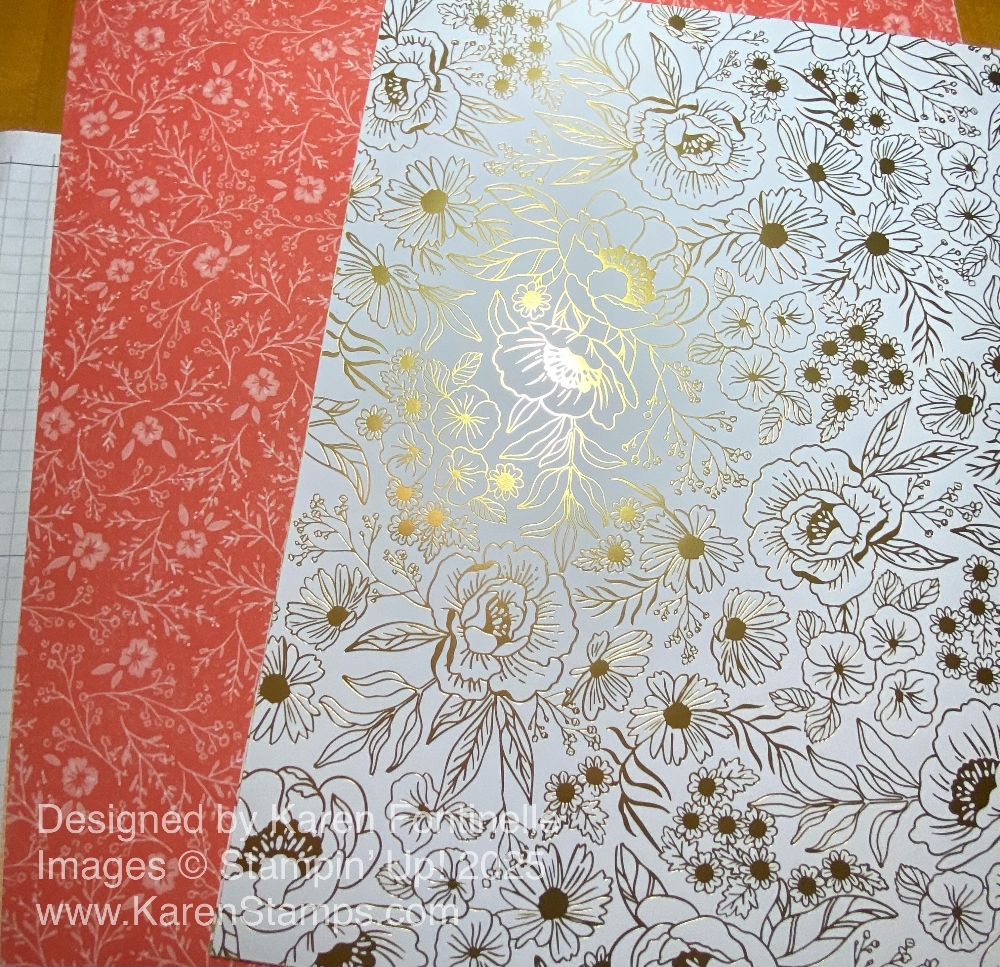
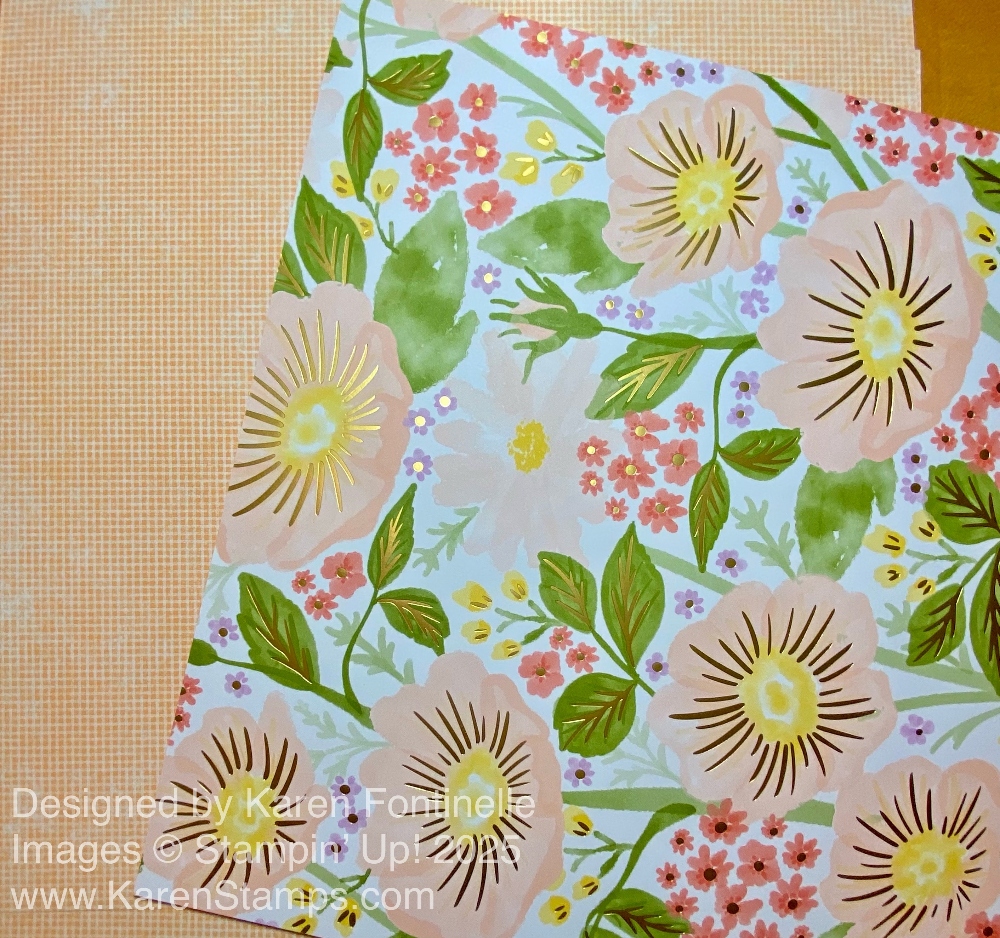
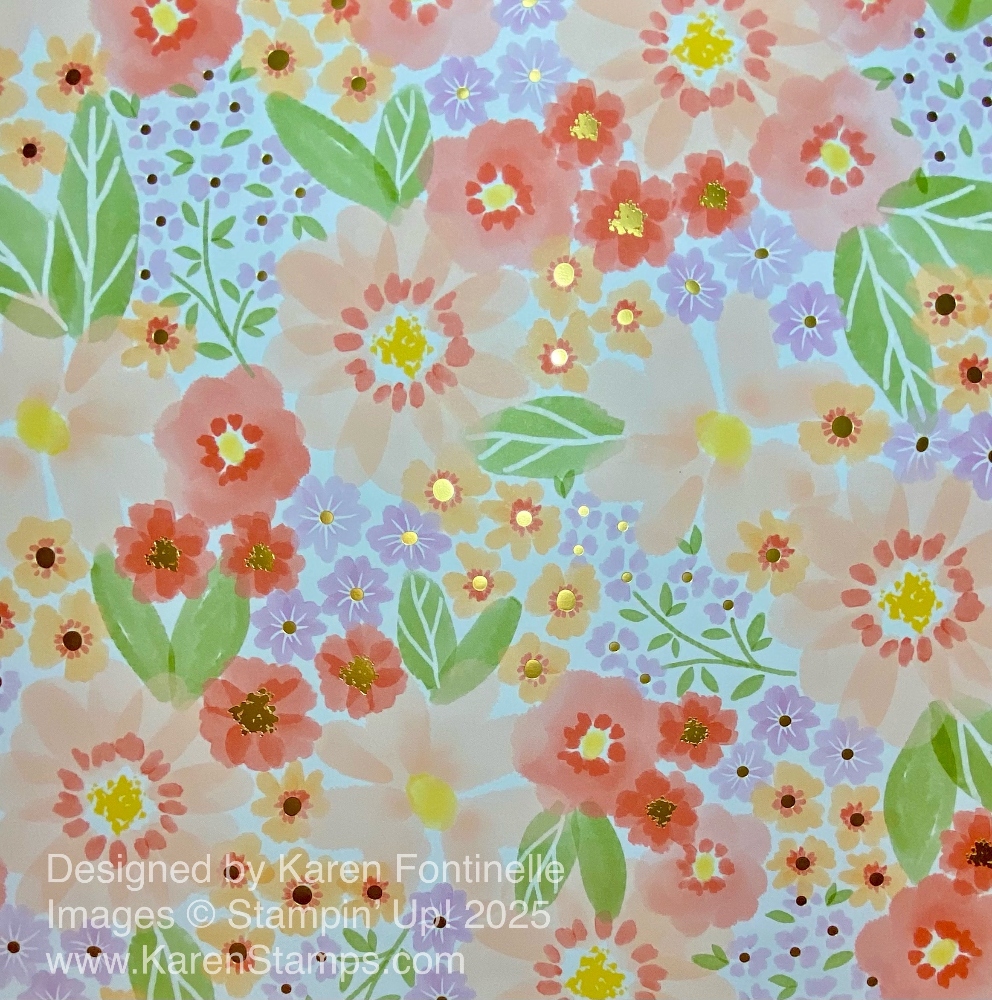
If you think these papers look nice in these photos, wait until you see them in person with the beautiful gold foil accents!

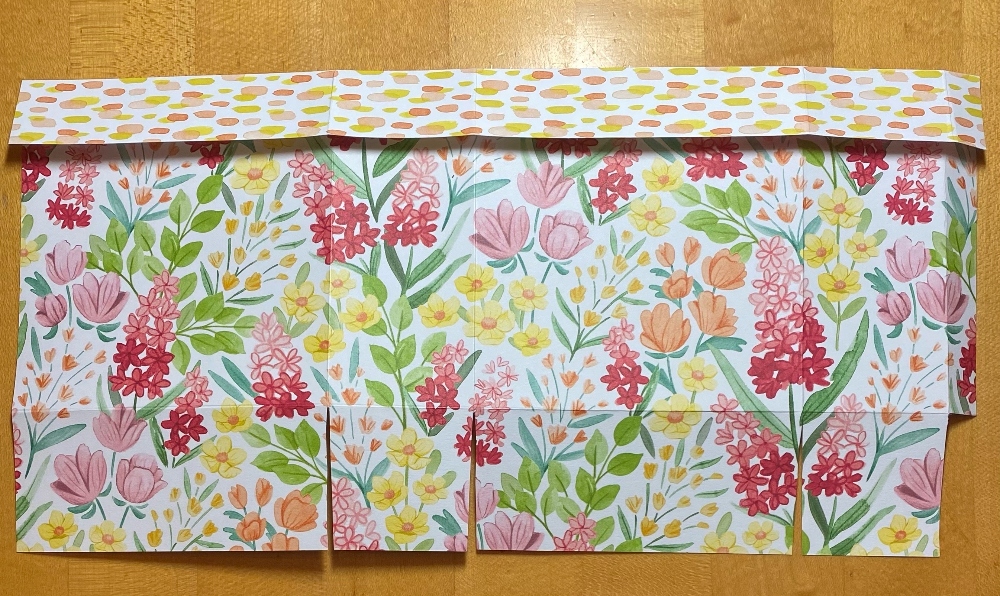
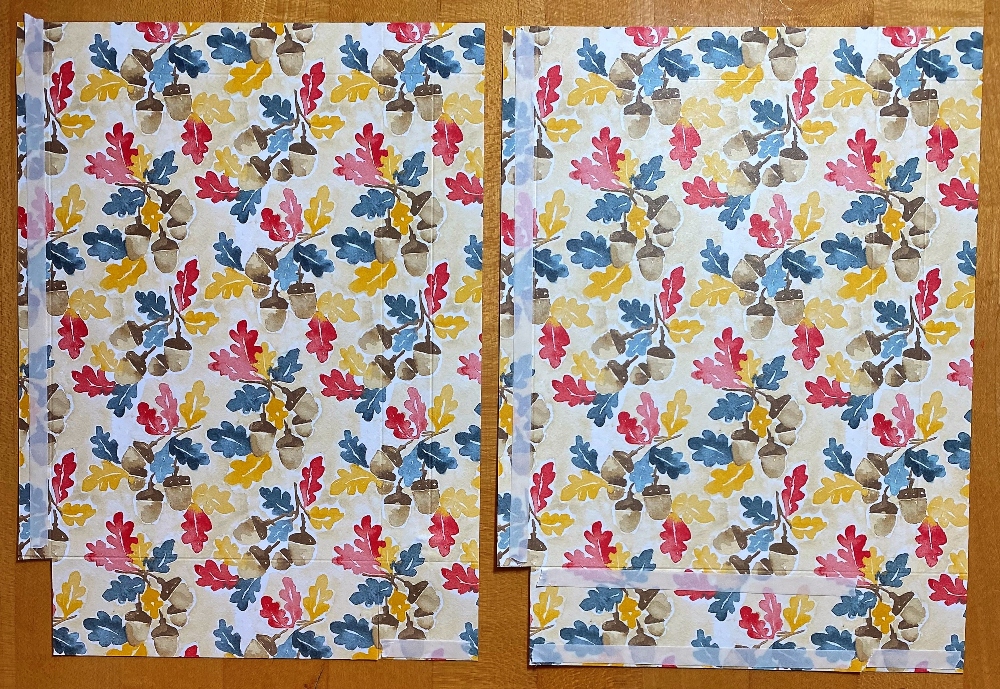
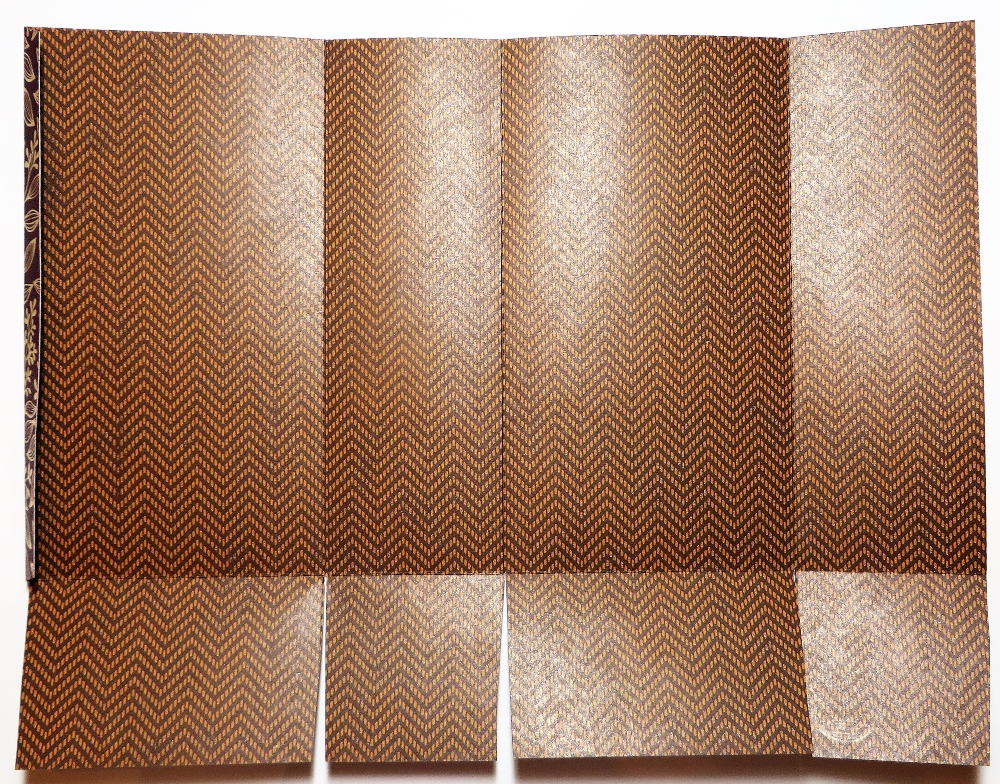
To make this little gift bag, cut the paper at 6″ x 12″. Score at 1″, 3 3/4″, 6 1/2″, and 9 1/4″. Then turn and score at 2″. Pay attention to the direction of the pattern if it is necessary for your paper. The part scored at 2″ will be the bottom of the bag and those score lines will be cut up to the horizontal score lines. See the diagram below. I drew pencil lines on the score lines.

Gift Bag Scored Diagram

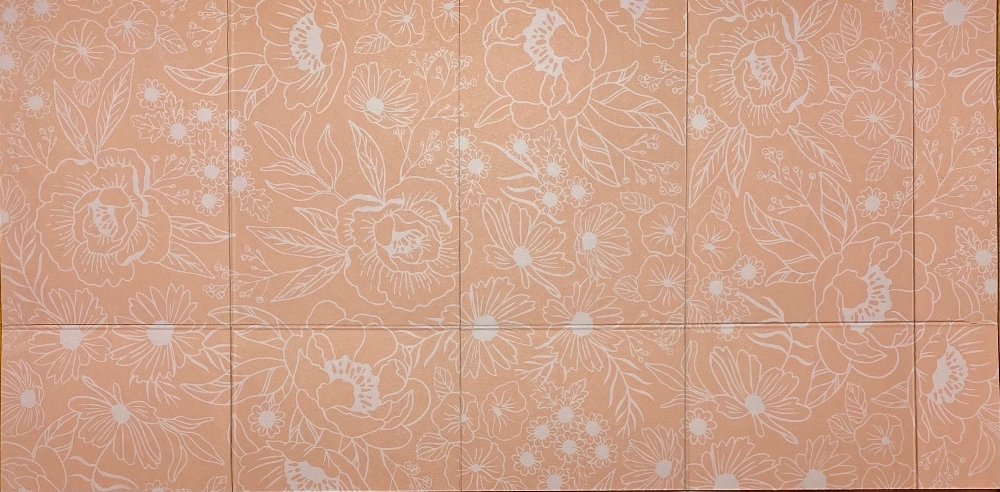
Fold and crease all the score lines. That tiny little 2″ x 1″ piece will be cut out. The piece above that is where you will put adhesive to glue to the other side to assemble the box. Just crease and fold everything to see how it goes together. Adhere that side together, then do the flaps. If you want to close the top of the bag, you can punch holes for ribbon as I did, or you can just use some type of clip. Or you can leave the bag open!

I stamped a little sentiment on Basic White with Calypso Coral ink from the Lovely Arrangements Stamp Set, coming in the January Online Exclusives. It is just tied on with the ribbon with a little Stampin’ Dimensional on the back to hold it in place.

This is just a simple little project where the gorgeous paper does all the work! If you like florals at all, I would definitely get this Lovely & Beautiful Specialty Designer Series Paper.

Lovely & Beautiful Gift Bag side

Remember, Bonus Days are coming on Tuesday, January 6th, which is the day of all new things! Unless you are in a hurry for particular products, hold off until Tuesday or after when you can earn $5 coupons for every $50 you spend IF YOU HAVE YOUR OWN ACCOUNT WITH AN EMAIL ADDRESS! Check your account for an accurate email address because that is how you will receive the $5 coupon codes to use in February. If you don’t have a Stampin’ Up! account, this is a good time to make one – and be SURE to opt in for Rewards and for Marketing so that I can mail catalogs to you from Stampin’ Up!

ALL ABOUT BONUS DAYS HERE!

Make a Decorative Trees Gift Bag

Decorative Trees Gift Bag

I guess it’s time to be wrapping holiday gifts, if you’ve done your shopping, that is! One of my favorite things to do is create decorative gift bags for any occasion, such as this Decorative Trees Gift Bag, perfect for a Christmas gift.

You may have shopping bags like this kraft one from shopping at certain stores, usually nice gift shops. Even if they have the store name on the front, you can usually cover that up with your decorating. You can also buy a pack of gift bags in various sizes like this one, or sometimes in white or colors, at a craft store. It’s just like making a card except on a larger canvas! Creativity knows no ends!

This gift bag is actually the third version of my original idea. Actually, it’s not even close to my first idea except for involving Christmas trees, but creativity often evolves as you work on your project. I saw the Decorative Trees Stamp Set on my shelf and it is still current, on the Last Chance List discounted 50%! When I looked it up in the Stampin’ Up! Online Store, I saw a cute idea for a card which I just translated to a bag. Perhaps you have this stamp set from last year or whenever it came out.

For the background on this bag, I stamped the greeting “O Christmas Tree” in the stamp set diagonally across the bag in Crumb Cake ink. Then I stamped three different colors of trees, just the outline, in Garden Green, Shaded Spruce, and Old Olive. I didn’t want to look for the dies, but there are some although not available at Stampin’ Up!, so I just cut them out by hand. The first two are embossed and the third on has stamping on the inside. The first one is embossed with the Dotted CIrcles Embossing Folder. The second one is embossed with the Forever Plaid folder. I added a little Pecan Pie trunk to each tree. The center tree is popped up with Stampin’ Dimensionals.

If you don’t have tree stamps or dies, just cut some out by hand! We’ve all drawn Christmas trees by hand at least when we were kids, so just channel your inner child! If nothing else, just draw a triangle!

Then the fun began! Decorative the trees and bag with embellishments! Use whatever you have! The first tree has current Traditional Sparkling Sequins in gold and Pool Party (which almost looks like silver). The middle tree has retired Cherry Cobbler and Clear Berries gems (some name like that). I colored the clear ones with a Dark Cherry Cobbler Stampin’ Blend marker to look like berries. Some are in sets of three, some single. The third tree has adhesive gold stars in a strand that a special friend brought me all the way from Japan! They fit perfectly on this tree! And because I came across them, I used the small white stars in the Shimmer Star Foam Stickers to look like little stars or even represent little snowflakes.

Even though my first idea was to use a white paint pen and form a tree shape by drawing small snowflakes on the kraft bag, I thought I should make something that other stampers could copy. But if you wanted that look, you could use white craft ink and a snowflake stamp. There’s always a work-around for ideas!

You probably have a bag of bags in your house somewhere so check it out and personalize a bag or even gift wrapping. If you run out of fancy wrapping paper, use the kraft-colored grocery paper bags or plain wrapping paper. You can always decorate these things with your stamping and scrapbooking supplies!

Decorative Trees Gift Bag

Elegant Pine Snowflakes Gift Bag

Elegant Pine Snowflakes Gift Bag

It might be a little early for Christmas gift bags, but I wanted to use this pretty paper on a gift bag to show it off, so here is the Elegant Pine Snowflakes Gift Bag. If you look through the Elegant Pine Snowflakes Designer Series Paper, you will find this one paper with this huge pine snowflake centered on the paper. How can any one cut up that sheet of paper with that design?! It would be beautiful on a scrapbook page….as long as you didn’t put any photos on it! So my best solution was to center it on a large gift bag!

You might have collected kraft or other gift bags from certain stores that you can use for gift bags. Or you can buy a bunch of them at a craft store, small or large. This bag is 10″ wide so I just trimmed an inch off each side of the designer paper. It is 7 1/4″ from top to bottom. For a border piece on the top and bottom, I was just going to have cardstock, but then I noticed the strips I had cut off from the designer paper, turned them over, and used those. To help offset all the colors and paper designs, I cut strips of Shaded Spruce. You can make these any widths you like. I made the top designer paper strip about 1 1/4″ wide, with 1″ showing and a little bit wider at the bottom. The Shaded Spruce cardstock strips are both 1/2″ wide.

Every gift bag needs a gift tag! I found an already diecut circle of Gold Foil using the Stylish Shapes Dies in my gold foil package. For the greeting, I used “merry & bright” in the Greetings For You Ephemera Pack. These are peel-and-stick greetings in golf foil so they are very easy to use. I also fussy-cut some foliage from the designer paper to decorate the tag. I used some retired Cherry Cobbler ribbon to tie the tag to the bag.

After I took the first photo of the bag, I realized the tag didn’t show up very well plus I remembered I intended to put some red berries gems on the tag to match the berries on the paper. These Cherry Cobbler & Pearl Adhesive-Backed Berries are perfect to go with this paper. You could also add some on the designer paper on the bag.

Elegant Pine Snowflakes Gift Bag Tag closeup

I love to decorate gift bags like this for any occasion and we’ll certainly need a lot of them for Christmas so it’s a good idea to start making some!

SHOP STAMPIN’ UP!

Florals In Bloom Birthday Gift Bag

Florals In Bloom Birthday Gift Bag

And sometimes you forget to hit the “Publish” button after you write a blog post! It was supposed to be on my blog Friday, but I forgot to push the button! Anyway, here is this fun and easy gift bag you can make in no time!

It might be time to make a few gift bags to have on hand this time of year. You probably have graduations coming up or lots of summer birthdays, hostess gifts for parties, maybe even Father’s Day! You can make your own small gift bag in just a few minutes and decorate for the particular occasion.

This particular pattern of gift bag is made with just half a sheet of 12″ x 12″ sheet of paper, whether card stock or designer series paper. This finished gift bag is 4 1/4″ tall, 4″ wide, and 1 3/4″ deep. It is large enough for a small gift or maybe a gift card and a congratulatory card. You could put a cello bag with a few cookies or candies in there. So it is small but not tiny!

While you can cut the paper at 6″ x 12″, I made mine 7″ x 12″ so that I could fold the top edge down 1″ to show the other side of the paper for a little interest on the bag. Either way the rest of the measurements and scoring are the same.

For this bag, I used this floral pattern in the Florals In Bloom Designer Series Paper. You’ll find it in the Annual Catalog. It is part of the Florals In Bloom Suite Collection. Make sure any pattern on any paper is going in the direction you want it to go on your project when you cut your paper and when you score, depending on the project.

Start with a 6″ x 12″ piece of paper (or if you want to fold over the top make your paper 7″ x 12″). Score at 4″, 5 3/4″, 9 3/4″, and 11 1/2″. Turn the paper so the short edge is at the top and score at 1 3/4″. This will make the bottom flaps of the bag. Cut those short bottom tabs up to the 1 3/4″ score line. Cut off the little 1/2″ tab on the bottom.  Fold on all the score lines and crease well with the Bone Folder.  Adhere the tab on the end to the other side to assemble the bag.  Then adhere the flaps on the bottom. I used Multipurpose Liquid Glue for the ease of getting things lined up properly before it sticks together or you can use Tear & Tape Adhesive.

Florals In Bloom Gift Bag Scoring

Have fun decorating your bag! I folded over the top 1″ before assembling the bag. You can punch holes front and back to tie ribbon through in order to close the bag or just do it decoratively with a bow as I did. I stamped a Basic White Countryside Corners diecut (dies on the Last Chance list) with a greeting in the Poised Peony Stamp Set (retired). You can use whatever greeting you have. I layered this diecut on the next larger die in Peach Pie cardstock. The greeting is stamped in Strawberry Slush ink and the little peony is stamped in Memento ink and colored in with Peach Pie and Granny Apple Green Stampin’ Blends alcohol markers. I stuck this up underneath the folded over top edge and I think it fits just fine. It looks a little like a banner. I added a few of the new Strawberry Slush & Pretty In Pink Gems to the greeting for a little sparkle.

And that’s how easy making this basic gift bag is!

SHOP STAMPIN’ UP! ONLINE HERE!

Florals In Bloom Birthday Wishes Gift Bag

Bee Mine Gift Bag

Bee Mine Gift Bag

Another pretty thing that is retiring from Stampin’ Up! on Tuesday, April 30 is this cute Bee Mine Designer Series Paper. You only have today and tomorrow to pick up anything that is retiring that will likely be gone for good! Before time is up, I thought I would make one more thing with the honey jar pattern in the Bee Mine paper. This paper doesn’t have to be for Valentine’s Day. You could make this Bee Mine Gift Bag for any time of year for someone! It’s easy to make and would be nice for a “sweet” gift, maybe a special jar of honey and some cookies or tea!

You can vary the height of this bag if you want it taller or shorter. My gift bag starts with a piece of the Bee Mine Designer Paper cut at 6″ x 11″. You want to think about the direction of the pattern, if you use a paper like this one with a pattern. You wouldn’t want the honey jars to be upside down! Score at 2″ across the bottom of the paper, which is where the bottom flaps of the bag will be. Then score at 2″, 5 1/4″. 7 1/4″ and 10 1/2″. Cut up on bottom flap score lines up to that 2″ score line. Cut off the little corner piece that is 1/2″ x 2″. Crease and fold all the score lines and see how the bag is going to go together.

Fold the 1/2″ piece on one side to the inside and apply adhesive. Fold the other side over to adhere both sides to form the bag. Then fold in the bottom flaps and adhere. Stick a Bone Folder or ruler or something down inside the bag to press the bottom flaps together so the adhesive will hold.

You can leave the bag open at the top or pinch it closed, as I did. Then use a hole punch to punch holes for ribbon if you want to tie it closed. You could also use some kind of clip to just clip the top of the bag shut after you put the gift or goodies inside. I used the pretty Sweet Sorbet 1/4″ Bordered Ribbon. I hate to see that color and that ribbon retire!

To decorate the bag a bit, I stamped and punched out parts of the bee with the Bee Builder Punch. To help the bee stand out on the bag, I diecut a Deckled Circle in Sweet Sorbet. The greeting is in the Bee My Valentine Stamp Set. This stamp set and the Bee Punch are NOT retiring, but will not be available as a Bundle in the new catalog. So if you want to save 10% on the stamp set and punch, you need to purchase them before they retire.

Since the greeting was pretty long, I cut it apart and put one part of the greeting above the bee and the remainder at the bottom. I think it turned out cuter like that than one long strip across the bottom of the bag.

If you want to see another gift bag project, click HERE.

This is an easy and cute little project! Make the gift bag and hang on to it until you need it for a gift or treat! You will be happy to have something handy!

SHOP STAMPIN’ UP! HERE!

Gingerbread Gift Bag

Gingerbread Gift Bag

I’ve been seeing gingerbread designs all over the internet in various forms and I don’t mean cookies! Finally, it dawned on me that I could get a pen and play, too, so here is one of my Gingerbread Gift Bags! It is not stamping but it is papercrafting and something quick and easy you might like to do!

Crafty people have been buying any little 3D house or building they could find anywhere, especially the dollar stores, spray painting them a gingerbread brown color, and then using some white paint pen to add the “gingerbread” design! Maybe Pottery Barn started it with expensive decorations and people came up with their cheap knockoffs as we all like to do!

But then I started seeing this technique used on paper and cards or building their own houses out of cardboard! And when I found a stash of plain kraft gift bags in the closet, the lightbulb went off for what I could make! I ordered a set of 8 paint pens on Amazon! I wasn’t sure exactly what people online were using (and I always want to know ‘exactly’), but I found this package of 8 white acrylic paint pens (White Paint Pen for Art – 8Pack Acrylic White Paint Marker) for a good price, even though I only needed one. And I could get them the next day which was fantastic! You could also use a chalk pen or even real chalk or a white gel pen. I loved watching short videos on Instagram of people drawing designs like this on cards or paper decorations, etc. It was mesmerizing! One person said not to be too exact, she liked the wonky look better!

With that, I got out a kraft bag, primed my paint pen (shake it and press the tip down on a piece of scrap paper to get the ink flowing), and started drawing on the bag! The first one I made I completely copied from someone and it only took a few minutes! Then I got out another two bags for gifts and drew on those! The photo above is one of them. My table was so heaped with craft stuff and wrapping paper that there was no decent place in my dark house to take a good photo….so I just placed it on the carpet which didn’t produce a good background! But you get the idea!

This is like drawing when you were a kid and drawing houses all the time! Remember? You didn’t worry if it was perfect or even or crooked, you just drew the house, the windows, the door, and then maybe spiffed it up a bit with curtains or bricks or shingles or plants. That’s all you have to do here, just add the gingerbread features.

I can’t wait to make more real Christmas gift bags. You could draw a small version on a card or a tag if you need some last-minute things! Have fun making a gingerbread gift bag!

Altered Gift Bag with Masterfully Made DSP

Altered Gift Bag with Masterfully Made DSP

It just so happened that I needed a larger gift bag and couldn’t find one in my stash of bags in the closet. They are mostly Christmas bags. Luckily, I found this gift bag from a fabulous bakery, but of course, it has the bakery’s name on the front of the bag and the back. I decided to use the bag but decorate over the bakery name and this Altered Gift Bag with Masterfully Made DSP is what came of that project!

The colors on the bag were already interesting. When I started comparing our Stampin’ Up! cardstock, the colors on the bag came very close to Berry Burst and even pretty close to Coastal Cabana. And this bag is at least several years old so they were ahead of the Stampin’ Up! trend!

I played around with some different ideas and originally thought about using the Cheerful Daisies one way or another, but I ended up using the Masterfully Made Designer Series Paper which is extremely colorful but seemed to go along with this bag. I cut a wide enough strip of this roses pattern to cover the bakery name and take up some space on the front. The paper is still 12″ wide so you can get an idea of how much wider the shopping bag is. Then I added narrow strips of the green torn paper pattern in the Masterfully Made DSP to the top and bottom of the strip. I had a few scraps of the rose paper so I cut out the roses as best I could out of the scraps using my Paper Snips and decided to place them on the bag as if they are cascading down.

This isn’t my favorite bag I have ever decorated, but I think it turned out okay and I decided to not get too perfectionistic about it because who knows what will happen to a gift bag after the gift is opened. I really love to decorate and personalize shopping bags I get at certain stores, usually requiring the business name to be covered up, which is pretty simple. This bag being larger and having these two colors on it made it a little more challenging. You can even purchase place kraft or white shopping bags at craft stores or online to have some handy for when you want to make your own creation to go with the gift and occasion.

The back side of the bag also had the bakery name so I just chose a piece of the Bright & Beautiful 6″ x 6″ Designer Series Paper to cover the name. It also has the Berry Burst color in it. Here is a photo of the back of the bag.

Altered Gift Bag back

At least I have a large enough gift bag to use and decorated with some interesting designer paper! I usually save those handled bags when I get them because I know I can turn them into a gift bag and not have to run to the store at the last minute. Here is one example from a few years ago of a bag I turned into a Christmas gift bag.

Look through your bags and see if you have something you can alter and make into a nice gift bag! It’s really a fun project and oh so handy! You will be glad you did!

Fresh As a Daisy Recycled Gift Bag

Fresh As a Daisy Recycled Gift Bag

This is one of my favorite things to do with my stamping skills, making this Fresh As a Daisy Recycled Gift Bag! Actually, there isn’t even any stamping on this project and it probably only took me ten minutes are the most to make it. This is one of those quality shopping bags that I got at one of my favorite gift shops. Of course, on the front and the back it has the name of the store printed on the bag. But I love to take a shopping bag like this one I got from a store, and then decorate it and use it later as a gift bag. You can decorate it for any occasion. If every time you got one of these handled gift bags from a store, or even purchase a pack of them at the big craft stores, you stopped and decorated the front, covering up the printing, you will have a nice selection of gift bags that you personalized for a certain occasion or a certain person. It’s always handy to have gift bags in your stash for when you need one!

For this bag, I thought I would like to use the Fresh As a Daisy Designer Series Paper. I thought I would use the pattern with the green background and white daisies, but when I came upon this pattern, I chose it! For this bag, to cover up the store name, I cut it at 4 1/4″ x 7″. Of course, your measurements have to be appropriate for your bag.

I layered the daisy designer paper on a piece of Copper Clay Cardstock (one of the new In Colors). Because the handle was made with white ribbon and because of the white border around the edge of the bag, I decided to layer the designer paper and Copper Clay cardstock on a piece of Basic White Cardstock to help it all stand out on the kraft-colored bag.

For just a little embellishment, I added three of the Brushed Brass Butterflies flying around the daisies.

You could use any of the daisy patterns in the Fresh As A Daisy Designer Series Paper on a bag like this! Remember, Stampin’ Up! is having a sale on select Designer Series Papers during the month of June, so if you don’t have this summer Fresh As a Daisy Paper, or if you need more, be sure to order while you can get 15% off!

SHOP STAMPIN’ UP! ONLINE HERE!

Candy Cane Christmas Gift Bag

Candy Cane Christmas Gift Bag

One of my favorite papercrafting things is decorating the front of a bag I may have picked up while shopping and turning it into a gift bag like this Candy Cane Christmas Gift Bag! It’s so easy to do and you can quickly increase your stash of gift bags that are ready for the holidays or other occasions throughout the year! Basically, it is like making a card to put on the front of the bag!

Since this bag was green, I thought I would use the Sweetest Christmas paper. I copied (pretty much) a sample in the Holiday Mini Catalog on page 11. My cute Sweetest Christmas Designer Series Paper is almost gone so my bag looks a little different than the sample in the catalog. Also, they made stamped and diecut leaves but I just stamped the holly and other leaves.

The leave, berries, and banner are from the Christmas Banners Stamp Set. The candy cane I just hand-cut from designer paper but I could have used a die in the Candy Canes Dies. I’m not sure how they made the banner on the card in the catalog, but I stamped mine with Memento Ink and then colored it with Pool Party Stampin’ Blends. Instead of the red ribbon behind the banner, I just tied a bow at the top of the tag shape that is the background for the candy cane and leaves.

Look at your stash of grocery sacks and shopping bags and see what you can find! If you don’t have one of these special bags, you can purchase them at a craft store.

Have fun decorating some Christmas gift bags!

Candy Cane Christmas Gift Bag Closeup

Rings of Love Gift Bag and Tag

Rings of Love Fall Gift Bag

During the Stampin’ Up! Creativity Now virtual stamping event for Demonstrators, one of the projects was a gift bag made with the Splendid Day Designer Series Paper. It was beautiful using that foil paper! Since I watched the recording a couple of weeks later, I had already cut up some of my designer paper. When I made a mistake scoring one of the sides of the bag, I had no extra matching designer paper to use! But a few days later I gave it another try rewatching the video and just used some different designer paper, the Rings of Love Designer Series Paper in the Sale-A-Bration brochure! This pretty fall paper is even FREE with a $50 purchase during Sale-A-Bration.

We’ve all made gift bags before. All you do is cut the paper and score it for folding and forming the bag shape according to the size and style you want. There are just different details. Will the top be open or closed, the sides straight or pinched in, tall or short, wide or narrow, the top closed with ribbon, a clip, staples, or something else? You have lots of options when you make any basic gift bag design!

This gift bag starts with two pieces of designer paper cut at 7″ x 9 1/2″. Pay attention to the pattern of the paper so you know which end of the paper you want for the top and which for the bottom.

  1. Score the paper that will be the top of the bag at 3/4″ on both pieces with the paper horizontal in the Paper Trimmer. Then score at 8″ to make the bottom flaps for the bag. This will leave a 1 1/2″ area at the bottom of the bag.
  2. Turn the paper lengthwise and score at 1/2″, 5 1/2″, and 6 1/4″. On the 6 1/4″ score, don’t go all the way to the horizontal score line at the bottom. Stop before you get there! This will be the line to pinch in the sides of the bag eventually. Do the second sheet the same way. Make sure both paper designs are going the same way. The two papers should be scored exactly the same way.
  3. In the bottom left corner of both papers, cut away that small rectangle formed by the score lines. Over on the right bottom of the paper, cut a slit along the 5 1/2″ score line just up to the horizontal score line.
  4. Fold and crease all the score lines, gently using the Bone Folder. Apply Tear & Tape adhesive as shown in the photo below. You can also check your score lines and cutting using that photo. The adhesive is placed differently on the two papers so look closely. On the left paper, put adhesive along that first scored section and one small piece on that bottom right square piece next to the slit you cut. On the right paper, put adhesive on the same side section, then pieces on the bottom flap and the small bottom right section as on the first sheet. The adhesive goes on the side of the paper you want to show on the outside.
Rings of Love Gift Bag Assembly

5. Adhere the sides together after the lines are creased and then do the bottom flaps. You’ll be able to see where everything goes. Try to have all the seams toward the back of the gift bag.

6. Once the bag is assembled, fold on the top score lines to close by folding to the front or to the back. I folded mine toward the back but you can do either. Be sure you put your gift inside before closing up with the ribbon!

7. Tie ribbon around the gift bag from top to bottom to hold the top closed. I used the Gold 1/4″ Shimmer Ribbon on my gift bag. Add a gift tag if you want. (Directions for my tag are below.)

Rings of Love Gift Bag side

For my gift tag that you see hanging on the front of the bag, I used another sheet of the Rings of Love Designer Series Paper that had the tree ring slices on it. I cut out a circle from the Stylish Shapes Dies in the Annual Catalog from Soft Suede cardstock and adhered one of the tree ring slices on it that I cut out by hand. The greeting is stamped on the half circle die in the Splendid Stems Dies in Poppy Parade ink. I also cut out a segment of the colored leaves from the designer paper as well as a die-cut stem from the Splendid Stems Dies to tuck under the greeting a bit. I poked a hole in the tag off to the side and tied on an Open Leaf Trinket and tied this around the bow. You can have fun making any kind of tag that suits the occasion.

The front of the gift bag turns out to be 5″ x 8″ and about 1 1/4″ wide. You can place a few cards inside or a small gift or treat! Try this Rings of Love Gift Bag and Tag using this designer paper or whatever you have on hand for the occasion!

SHOP STAMPIN’ UP! ONLINE HERE!

Santa Suit Christmas Gift Bag

Santa Suit Christmas Gift Bag

It soon will be time for gift bags and this Santa Suit Christmas Gift Bag is an easy one for you to make out of a plain kraft shopping bag! So fun for Christmas!

You may already have some handled shopping bags like this one in your stash of bags from certain stores or you can purchase a package of bags at the craft store. If they have the store name or design on the side, it will get covered up anyway so it is okay.

For this bag, I just measured the front side of the bag, which was 6″ x 8″, and cut a piece of Real Red Cardstock to cover the whole front for Santa’s red suit. Then I started at the bottom with the fur on the bottom of his red jacket. I just cut a 6″ wide piece of Basic White Cardstock a few inches wide and cut the curves freehand with scissors. They don’t have to be perfect and if you don’t like the look, just redo a few of the curves to even things out a little.

The Basic Black Santa belt is about 2″ wide. You can make yours narrower if you like. The trick to making a belt and belt buckle is to first cut the strip for the belt. Then cut the Gold Foil for the buckle a little wider than the belt, but just a solid square. To look like the black is going through the belt buckle, just cut a square of Basic Black to adhere to the top of the gold foil square. Just line it up even with the black strip and you’ll have a belt and buckle!

For the buttons, I looked through my dies for small circles, but I came across the button dies in the All Dressed Up Dies. They were perfect, but you could use some retired circle punches or just cut out little circles. I realized I probably should have some white fur on his jacket so I just cut a narrow piece of Basic White. Again, the fur doesn’t have to be perfect, fur isn’t perfect.

Attach a tag to the handle and you are all set with a great Santa Suit Christmas Gift Bag for a special, fun gift for someone!

Easy Penguin Playmates Gift Bag

While I was thinking about what to make for the LAST DAY OF SALE-A-BRATION today, I looked in the Sale-A-Bration Brochure for a little review and decided to mostly copy a little sample bag on page 5 and this Easy Penguin Playmates Gift Bag is the result!

I used the same measurements to make this little bag that I did the other day on THIS POST except that I made it shorter! So I started with the Penguin Playmates Designer Series Paper that measured 6″ x 11 instead of 8″ tall on the other bag.

To make any bag like this one, always pay attention to the pattern and direction of your paper, to make sure it will end up with the design going in the correct direction! I first cut another paper (well, actually it was already cut in my package of papers) but it would have had the animal images sideways!! Score this paper at 2″ for the bottom flaps and then score on the long side at 2″, 5 1/4″, 7 1 /4″, and 10 1/2″. Cut away the tiny little piece at the end that is 1/2″ x 2″. Just crease all the lines, then cut the flaps apart at the bottom. Apply adhesive to that narrow little 1/2″ strip on the end and fold the other side over to adhere to that piece. This will start to form your bag. Next fold in the flaps at the bottom, applying some adhesive and trying to pay attention to which is the front of the bag.

Different from the bag I made the other day, I pinched the top together to close it. You can add a tiny bit of adhesive to hold it closed. You can punch holes in the top and thread ribbon through to tie it closed. On this bag, I just tied a piece of ribbon around the top. It’s the Flowers For Every Season Ribbon Combo Pack, of which I used the Just Jade gingham ribbon.

For the tag, I die cut a tag from the Tailor Made Tags Dies. It was too long so I just cut the banner end by hand (doesn’t have to be perfect!) and also cut out one of the penguins from the designer paper by hand with Paper Snips. So many cute images to choose from that you can cut out from the paper! I added a small layer of Basic White Cardstock and popped the penguin up on Stampin’ Dimensionals. Then I added tiny drops of Multipurpose Liquid Glue and adhered 5 little Subtle Shimmer Sequins. I found these in my drawer and hadn’t used them yet! These sequins would be good for shaker cards, which is probably why I bought them!

I ran one end of the ribbon through the tag and tied the bow. You can use a few Mini Glue Dots to hold everything in place if you want. I think the recipient can still get it open with a couple of glue dots! Or you could just adhere the tag to the bag and add a separate bow to the top of the tag, maybe leaving off the ribbon at the top of the bag, or use a smaller bow on the tag.

This was a fun little project to make because the paper is so cute! You could use this paper for little favor bags for Christmas parties. But the only way to get this paper is to place a Stampin’ Up! order TODAY, the LAST DAY OF SALE-A-BRATION to get this paper FREE with a $50 order!! Sale-A-Bration ends tonight just before midnight MT!

Don’t let this be YOU tomorrow!!

SHOP SALE-A-BRATION TODAY!!

IT’S THURSDAY, SEPT. 30 THE LAST DAY!!

Make an Easy Gift Bag and Card With Blackberry Beauty Designer Paper

Blackberry Beauty Gift Bag and Gift Card

The season for gifts will soon be upon us, actually, it is always the season for gifts, so here is how to Make an Easy Gift Bag and Card With Blackberry Beauty Designer Paper. These gift bags, no matter the size, are really so easy to make either out of designer paper or cardstock. You can stamp the cardstock or add a layer of pretty designer paper to dress it up. You can learn to make these small gift bags and it will be faster for you to do it yourself than to drive to the store for wrapping paper or gift bags!

I made this gift bag out of the Blackberry Beauty Specialty Designer Series Paper. As I mentioned above, I thought about making the bag out of Blackberry Bliss Cardstock and then adding a layer of designer paper. It would make the bag sturdier to use cardstock. But using designer paper also makes the inside very pretty!

The paper, whether cardstock or designer paper, is 8″ x 11″. Look at the pattern of the paper before cutting and scoring and make sure your pattern will go in the correct direction. On the side that will be bottom, where the flaps will be, score the paper lengthwise at 2″. Then turn the paper so the long side is at the top, using your Paper Trimmer or Simply Scored Scoring Tool. If using the Paper Trimmer, just make sure you don’t use the cutting blade by accident! You might even want to remove it temporarily! Score at 2″, 5 1/4″, 7 1/4″, and 10 1/2″. This will make the score lines where you will fold to form the bag.

Blackberry Beauty Gift Bag Cutting

Above you see the image of the inside of the paper scored and the flaps at the bottom cut. On the left side of the photo, you can see the 1/2″ flap that I folded inward a bit. Just below that, I cut off that 1/2″ x 2″ section. That 1/2″ flap is where the adhesive will go to form the bag with the opposite side. I like to angle my cuts just a bit as you can see by the spaces between the flaps, which will form the bottom of the bag. If you cut straight on the scored lines, sometimes they don’t overlap perfectly so cutting on an angle takes away that tiny bit of extra paper and makes it all look a little more professional when you assemble the bag. Try it! Plus you don’t have to worry about cutting EXACTLY on the score lines because sometimes they are difficult to see on printed paper!

Apply adhesive to that 1/2″ flap and then just fold over the opposite edge, making sure it is lined up evenly with the flap. I used Stampin’ Seal +. You could use Multipurpose Liquid Glue or Tear & Tape as well.

After connecting the two sides, fold in those bottom flaps, applying adhesive, and then reaching inside the bag on a table with a Bone Folder or something to rub down the flaps to make sure they are adhered well. Decorate the outside of the bag.

You can do the top however you like. For now, I left mine open like a gift bag. Or you can squish in the sides a bit to bring the top edges together and either tie a ribbon around, add a clip to the top, or punch holes and tie ribbon through to close. Make sure you put the gift inside first!

For the front, I used pieces from the Blackberry Beauty Ephemera Pack. As I write this, it is back ordered but should be back in stock in another week. Its been very popular! But you don’t have to have it. Use some gold pieces, tags, ribbon, whatever you have in your stash to decorate the bag. And as long as I had everything out, I made a little gift card to go along with it, folding a 3″ x 6″ piece of cardstock in half and then decorating. You can order 3″ x 3″ envelopes.

This bag is really easy. If you want it shorter, then cut it at maybe 6″ instead of 8″ or make it taller. This Blackberry Beauty Specialty Designer Series Paper is really pretty too with its gold accents and deep colors. This will be so pretty for fall and Thanksgiving cards and projects. Try making something like this Blackberry Beauty Gift Bag today!

Blackberry Beauty Gift Bag top view

SHOP STAMPIN’ UP! ONLINE HERE! LAST WEEK OF SALE-A-BRATION!

Altered Spring Lamb Gift Bag

Altered Spring Lamb Gift Bag

Something I think is fun to do is to take a shopping bag you got at a store and turn it into a gift bag, like this Altered Spring Lamb Gift Bag. The other day when I was cleaning out my “bag of bags”, I came across this small kraft shopping bag I got at one of my favorite gift shops. This bag is about 6″ x 7″ which was perfect for adding this stamped panel to the front of the bag! Even if the bag has printing, such as the name of the store or company, just cover it up with your stamping elements.

This bag already had the white border line around the bag with the store name printed in the middle. This was the perfect size to add my stamped decoration for the front of the bag and turn it into a spring gift bag, maybe for Easter

It was really like making a card, I just made the piece to fit the front area of the bag. The lamb is from the Springtime Joy Stamp Set, very popular right now with Easter coming up soon! The lamb is stamped in Memento Black Ink so I could color him with Stampin’ Blends Markers.

When I looked at the greetings in the stamp set, it seemed I should place the lamb off to the side and put the greeting, layered, right there on the other side. I wanted the lamb to be white, but I used the Light Smoky Slate Stampin’ Blend to just add a bit of color by the fluffs of wool and here and there. Then I also colored the flowers and leaves.

The greeting is stamped and then die-cut with a die in the Stitched So Sweetly Dies. For the layers underneath I just cut out rectangles with my Paper Trimmer.

For embellishments, I stamped a butterfly off to the side of the lamb and colored it with Stampin’ Blends. I also stamped the basket of eggs, colored it, and then cut out with Paper Snips. I decided not to pop it up with Dimensionals and just glued it down flat next to the lamb. Also, that little chick is so cute, I stamped, colored and cut him out and glued him down at the corner of the greeting. Now after all this, if you get a smudge of ink on your work, just add another butterfly to cover it up!

The whole decorative piece is layered on Blushing Bride and then Pear Pizzazz Cardstock. It is centered inside that white border line and looks perfect on this shopping bag turned into a gift bag! You can do this for any occasion! If you don’t have a cute little shopping bag, you can purchase plain bags at the craft store and decorate those. This is especially fun (and useful!) to do before Christmas so you have plenty of gift bags ready for gift wrapping like this Christmas bag.

Look through your bags and see if you have some shopping bags you can alter for whatever occasion you need like this Altered Spring Lamb Gift Bag I did using the Springtime Joy Stamp Set, perfect for a small Easter treat or gift!

Easy Sale-A-Bration Paper Blooms Gift Bag

Easy Sale-A-Bration Paper Blooms Gift Bag

I like to recommend that stampers and papercrafters make some gift bags to have on hand like this Easy Sale-A-Bration Paper Blooms Gift Bag. It just might save you a last minute trip to the store when you want a cute gift wrap for a small gift or treat! It probably only takes about 5 minutes to make an easy gift bag and you can personalize it for the recipient or for the occasion.

When I looked through the Paper Blooms Designer Series Paper in the Sale-A-Bration Brochure, I assumed it would be all florals with some plain designs on the back. But this sheet of paper really caught my eye with these big circles of various colors all over the sheet! It looked so fun and I thought making a gift bag would be a good way to use it.

To make this gift bag, start with half a sheet of designer paper, 12″ x 6″. Using your Paper Trimmer or Simply Scored scoring board, score the paper going across at 3 1/2″, 5 1/2″, 9″ and 11″. Then turn the paper and score at 1 1/4″ and 5 1/2″. Pay attention to the design on your paper so it doesn’t come out upside down. If you are planning to turn that narrow scored area at 5 1/2″ (which leaves 1/2″ to turn down for the top edge and reveal the paper design on the inside), make sure that pattern is also going to work and go in the proper direction.

After scoring, cut on the score lines at the bottom up to the score lines going across. Cut off the smallest little area on the bottom of the bag flaps. You’ll see which part it is. That will leave a 1/2″ edge to adhere to the other side of the bag. Assemble the bag. I used Multipurpose Liquid Glue for that “wiggle room” it gives you but the Stampin’ Seal+ would also be good.

If you like, punch holes in the top edge and tie some ribbon through for little handles. I used the Seaside Spray 1/4″ Metallic Ribbon.

Here’s another gift bag I made a couple of years ago, decorated a little differently to give you another idea.

To decorate the bag a little bit, although it was cute as it was, I cut out some flowers from another sheet of the Paper Blooms Paper. These were easy flowers to cut out and I only needed these two!

If you like this paper, you can get it free with a $50 Stampin’ Up! purchase if you choose it for your Sale-A-Bration FREE product. Be sure to shop by Sunday, February 28th!

This is a quick and easy project to make with this paper. Follow these directions for this Easy Sale-A-Bration Paper Blooms Gift Bag and then you can make even more gift bags with other paper in your stash!