Tag Archives: Rings of Love Designer Series Paper

Rings of Love Cottage Thank You Card

Rings of Love Cottage Thank You Card

This Rings of Love Cottage Thank You Card is one that I kept forgetting to make! I’ve made other cards with this designer paper but I kept forgetting to make something with this cute paper with the little houses and cottages all over it! Finally, I remembered to use this paper!

The card base is Soft Suede with a layer of Mint Macaron. This Rings of Love Designer Series Paper has lots of coordinating colors so you could use other colors on your card. Just cut a piece of the paper to be the front of the card! That’s all there is to it. However, when cutting out the paper for the layer, you might want to “try” to get it to showcase the houses as best you can. For example, had I thought about that idea before cutting, I would have tried to have that greenish house on the right be a little more front and center. But depending on your paper, you might have to take it “as is” so you don’t waste too much paper! No matter what, it will still look pretty because it’s pretty paper!

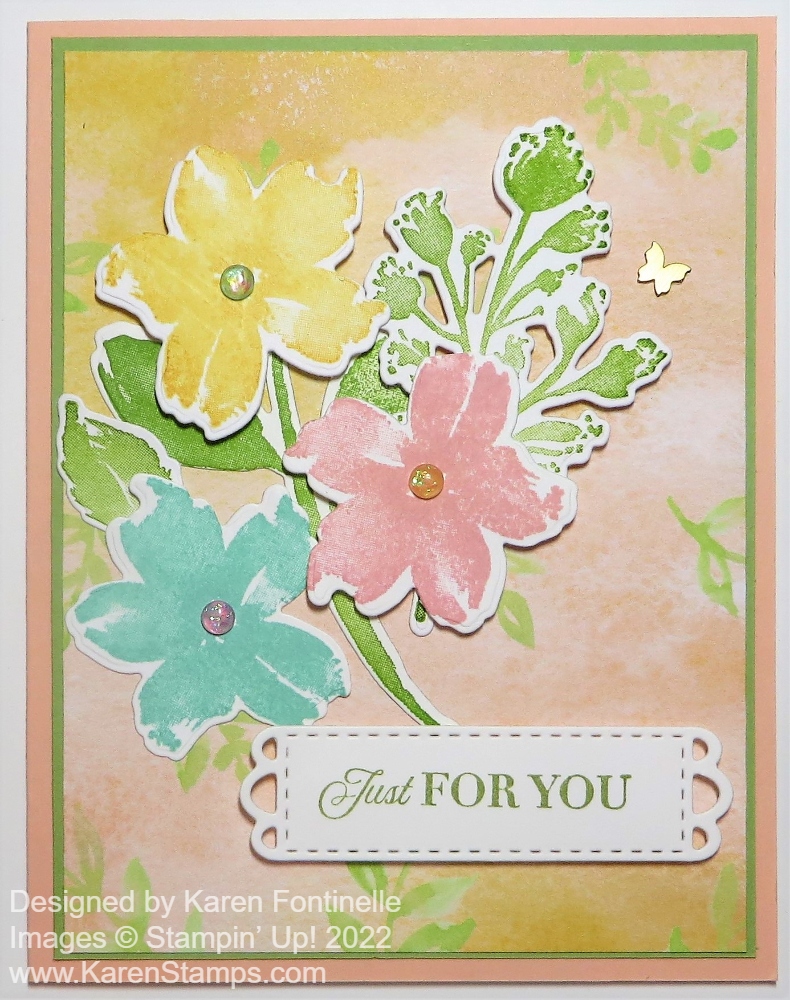
For the greeting, I didn’t want to take up too much space and cover up a house so I just chose a smaller, narrow greeting. I found one I liked in the Dragonfly Garden Stamp Set and simply stamped it on Basic White with Mint Macaron ink. While you might find a die that fits, I just cut a rectangle as close to the words as I could get to keep it as small as possible and put a flagged end on the left. Then I took a scrap of the Whisper White 1/4″ Crinkled Seam Binding Ribbon that I had colored with a Mint Macaron Stampin’ Blends Marker to use on the greeting. I just tied a knot in the center of the piece of ribbon and trimmed the ends so that it is a teeny tiny bow, just a little something to embellish the greeting. I adhered it with a Mini Glue Dot.

One of the best parts of this Rings of Love Designer Series Paper is that you can earn it FREE with a qualifying Stampin’ Up! purchase! When you spend $50, this month, during Sale-A-Bration you can choose a FREE Sale-A-Bration product, like this paper! With a $100 purchase, you may choose a $100 Level product or two $50 Level products! This promotion has been going on for a month already and now it will come to an end on August 31! So be sure to do your shopping early so you can choose which product you would like for free!

This Rings of Love Cottage Thank You Card is a very simple one yet the paper makes it look very special. Another sheet has tree ring images on it that you can cut out and make special card designs or other project designs with them. Other papers have florals and fall images. Check out all the Sale-A-Bration products you could earn and make your choice!

SHOP STAMPIN’ UP! ONLINE HERE!

True Beauty Flowers on Rings of Love Paper Card

True Beauty Flowers on Rings of Love Paper

I was surprised to find the background of this card was the design on the back of the paper I used to make the gift bag on yesterday’s post. That side of the paper looks so “fallish” and this side of the paper is light and “springish”! But it caught my eye and I thought it would make a pretty card! And that’s how this True Beauty Flowers on Rings of Love Paper Card began!

I chose Petal Pink for the card base as it is one of the coordinating colors for the Rings of Love Designer Series Paper. This paper is one that is FREE during Sale-A-Bration with a $50 purchase of any Stampin’ Up! products. There’s only a little more than a month left of Sale-A-Bration! I chose Pear Pizzazz cardstock for a layer under the designer paper. This pattern of the designer paper has a soft background of pink and yellow with printed leaves and stems scattered around. While I was trying out some ribbons to use on the card, I came across a stack of already stamped and die-cut flowers and leaves from the True Beauty Stamp Set. I played around with those on the card and came up with this design! Some of the flowers and leaves are popped up on Stampin’ Dimensionals and some are adhered flat on the card.

The greeting is stamped from the Celebrating You Stamp Set (a fantastic one for sentiments!) in Pear Pizzazz Ink. I used the die in the Meadows Dies to cut out the greeting. It is popped up on Stampin’ Dimensionals also.

For the finishing touch, I looked through all my embellishments and decided on the 2021-23 In Color Opal Rounds. I just chose colors that didn’t match the flowers for the flower centers and a little bling. I also love the Brushed Brass Butterflies and had to stick one on the card by the flowers!

Sometimes it is a surprise what goes together when you make a card or what you come up with that is unexpected! If you have trouble coming up with a design just look through your designer papers or samples in the Stampin’ Up! catalogs to copy or to wake up your inspiration!

SHOP STAMPIN’ UP! ONLINE HERE!

Rings of Love Gift Bag and Tag

Rings of Love Fall Gift Bag

During the Stampin’ Up! Creativity Now virtual stamping event for Demonstrators, one of the projects was a gift bag made with the Splendid Day Designer Series Paper. It was beautiful using that foil paper! Since I watched the recording a couple of weeks later, I had already cut up some of my designer paper. When I made a mistake scoring one of the sides of the bag, I had no extra matching designer paper to use! But a few days later I gave it another try rewatching the video and just used some different designer paper, the Rings of Love Designer Series Paper in the Sale-A-Bration brochure! This pretty fall paper is even FREE with a $50 purchase during Sale-A-Bration.

We’ve all made gift bags before. All you do is cut the paper and score it for folding and forming the bag shape according to the size and style you want. There are just different details. Will the top be open or closed, the sides straight or pinched in, tall or short, wide or narrow, the top closed with ribbon, a clip, staples, or something else? You have lots of options when you make any basic gift bag design!

This gift bag starts with two pieces of designer paper cut at 7″ x 9 1/2″. Pay attention to the pattern of the paper so you know which end of the paper you want for the top and which for the bottom.

  1. Score the paper that will be the top of the bag at 3/4″ on both pieces with the paper horizontal in the Paper Trimmer. Then score at 8″ to make the bottom flaps for the bag. This will leave a 1 1/2″ area at the bottom of the bag.
  2. Turn the paper lengthwise and score at 1/2″, 5 1/2″, and 6 1/4″. On the 6 1/4″ score, don’t go all the way to the horizontal score line at the bottom. Stop before you get there! This will be the line to pinch in the sides of the bag eventually. Do the second sheet the same way. Make sure both paper designs are going the same way. The two papers should be scored exactly the same way.
  3. In the bottom left corner of both papers, cut away that small rectangle formed by the score lines. Over on the right bottom of the paper, cut a slit along the 5 1/2″ score line just up to the horizontal score line.
  4. Fold and crease all the score lines, gently using the Bone Folder. Apply Tear & Tape adhesive as shown in the photo below. You can also check your score lines and cutting using that photo. The adhesive is placed differently on the two papers so look closely. On the left paper, put adhesive along that first scored section and one small piece on that bottom right square piece next to the slit you cut. On the right paper, put adhesive on the same side section, then pieces on the bottom flap and the small bottom right section as on the first sheet. The adhesive goes on the side of the paper you want to show on the outside.
Rings of Love Gift Bag Assembly

5. Adhere the sides together after the lines are creased and then do the bottom flaps. You’ll be able to see where everything goes. Try to have all the seams toward the back of the gift bag.

6. Once the bag is assembled, fold on the top score lines to close by folding to the front or to the back. I folded mine toward the back but you can do either. Be sure you put your gift inside before closing up with the ribbon!

7. Tie ribbon around the gift bag from top to bottom to hold the top closed. I used the Gold 1/4″ Shimmer Ribbon on my gift bag. Add a gift tag if you want. (Directions for my tag are below.)

Rings of Love Gift Bag side

For my gift tag that you see hanging on the front of the bag, I used another sheet of the Rings of Love Designer Series Paper that had the tree ring slices on it. I cut out a circle from the Stylish Shapes Dies in the Annual Catalog from Soft Suede cardstock and adhered one of the tree ring slices on it that I cut out by hand. The greeting is stamped on the half circle die in the Splendid Stems Dies in Poppy Parade ink. I also cut out a segment of the colored leaves from the designer paper as well as a die-cut stem from the Splendid Stems Dies to tuck under the greeting a bit. I poked a hole in the tag off to the side and tied on an Open Leaf Trinket and tied this around the bow. You can have fun making any kind of tag that suits the occasion.

The front of the gift bag turns out to be 5″ x 8″ and about 1 1/4″ wide. You can place a few cards inside or a small gift or treat! Try this Rings of Love Gift Bag and Tag using this designer paper or whatever you have on hand for the occasion!

SHOP STAMPIN’ UP! ONLINE HERE!

Rings of Love You Are Wonderful Card

Rings of Love You Are Wonderful Card

If you want some pretty fall paper with which to make a card like this Rings of Love You Are Wonderful Card, then browse through the current Stampin’ Up! Sale-A-Bration brochure and check out this designer paper! You can earn it FREE with a $50 Stampin’ Up! purchase! You’ll find it on pages 6-7. It’s the Rings of Love 12″ x 12″ Designer Series Paper and has so many usable patterns. There are images of cottages, mushrooms, acorns, birds, tree rings, and flowers. So interesting and so pretty!

This card is so quick and easy to make! You could use almost any of the patterns in the designer paper package and use this card design. You could make the card fold any way you like, but I put the fold at the top for a change. Cut the sheet of cardstock in half lengthwise at 4 1/4″ (half of 8 1/2″, the width of the cardstock) and score at 5 1/2″ for the fold.

The card base is Parakeet Party, which is really a BRIGHT color! I used a layer of Poppy Parade underneath the Rings of Love Designer Paper. The Poppy Parade color is on the designer paper. I just love this sheet of designer paper! Such pretty designs with mushrooms, berries, and leaves plus a butterfly!

For the greeting, I used a strip of Basic White cardstock about 3/4″ x 3 3/4″. The stamped greeting is in the Celebrating You Stamp Set. It is stamped in Poppy Parade ink and off to the right side a little bit. Then it was layered on a wider strip of Poppy Parade.

For a final touch, I added some of the Adhesive-Backed Seasonal Sequins. They are Sweet Sorbet in color but they still look good on the card!

One interesting this about this Sale-A-Bration paper besides being free with a $50 purchase, is that it coordinates with the Ringed With Nature Bundle in the July-December 2022 Mini Catalog (Holiday Mini Catalog) on page 62. So if you purchase that Bundle that comes with the Hybrid Embossing Folder and 16 dies, you can choose this Rings of Love Designer Series Paper FREE and make all kinds of cards and projects with all these coordinating products!

SHOP STAMPIN’ UP! ONLINE HERE!