Mini Stampin’ Cut & Emboss Machine and Bundles Offer Ends Soon!

THIS OFFER ENDS THURSDAY, MARCH 31!

Why are smaller things so cute?! I don’t know but it applies to the Stampin’ Mini Cut & Emboss Machine! Ever since the original Big Shot Machine came out at a Stampin’ Up! Convention I attended YEARS ago I’ve done lots of die-cutting and embossing and think it’s a great addition to our stamping and papercrafting. Then, not too long ago, we got the new Stampin’ Cut & Emboss Machine. This machine works even better, in my opinion, and has the advantage of the platform folding up on both sides if you want to tidy up a bit or carry it somewhere. But if you like the convenience of a smaller machine, taking up less space, easy to travel with, then the Stampin’ Mini Cut & Emboss Machine is for you! Especially when you can save some money! It retails for $60 but with 20% off you can buy it for only $48!

This mini—but mighty—machine is durable, portable, and easy to use. It’s the perfect pick for budding beginners who want to branch out, papercrafting pros who want to craft on the go, or those who are short on storage space! With this trusty tool, any crafter can make precise cuts and embossed designs for their projects with one pass.

During the month of March, you can snag the Mini Stampin’ Cut & Emboss Machine at a 20% discount! This miniature machine is compatible with a large selection of Stampin’ Up! embossing folders and dies. Build your craft collection and combine the Mini Stampin’ Cut & Emboss Machine with any (or all!) of the select stamp-and-die bundles that are also available for 20% off during the month of March!

CHECK OUT THE FLYER HERE!

(Be sure to scroll down to read the entire flyer about the machine AND the Bundles on sale!!)

Details

  • The Mini Stampin’ Cut & Emboss Machine will be available for purchase at a 20% discount.
  • A number of select stamp-and-die bundles that are compatible with the Mini Stampin’ Cut & Emboss Machine will also be available for purchase at a 20% discount.
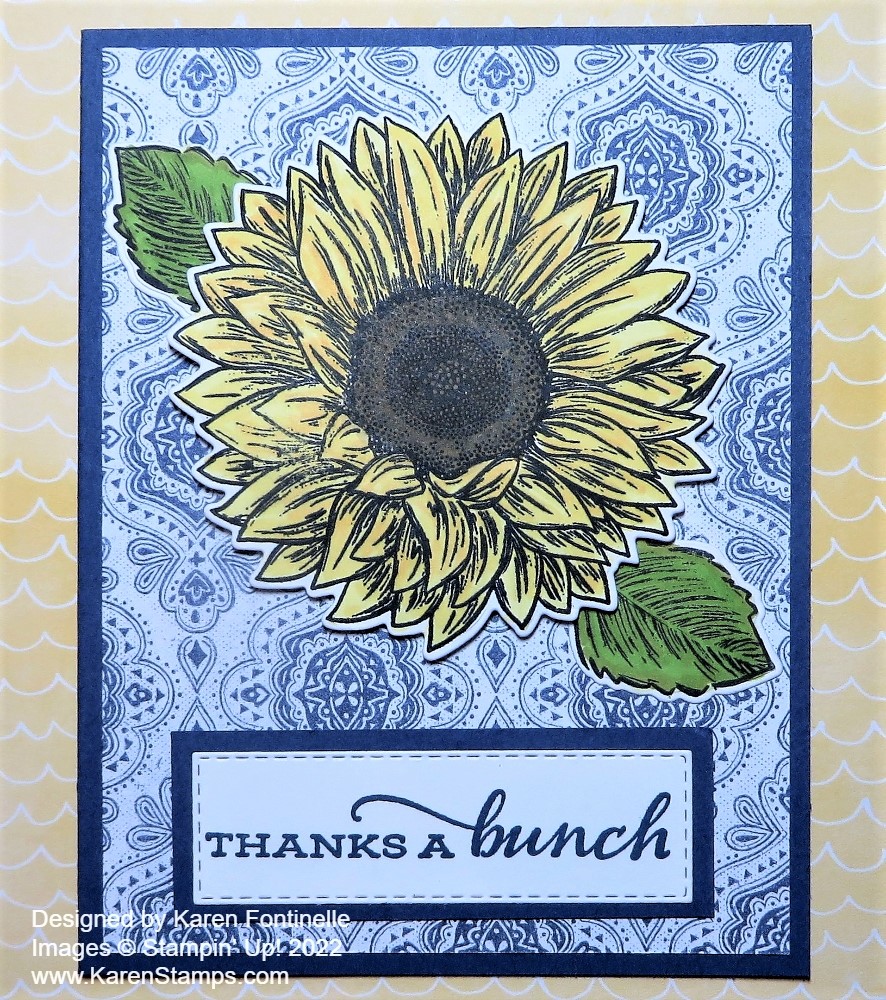
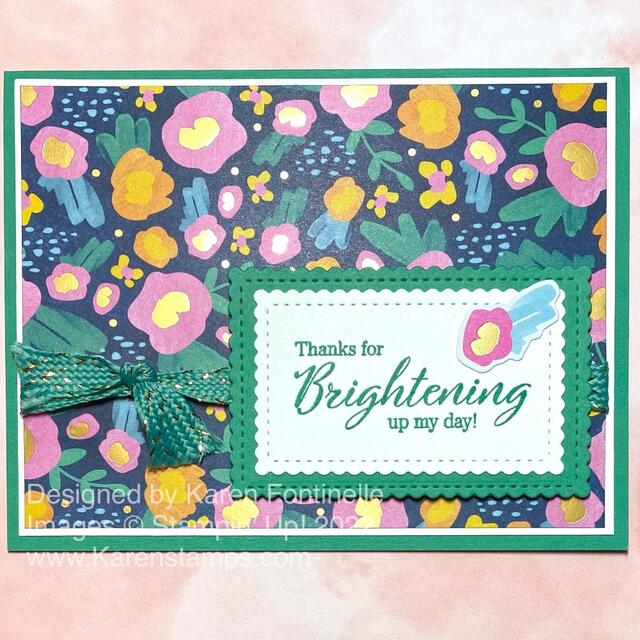
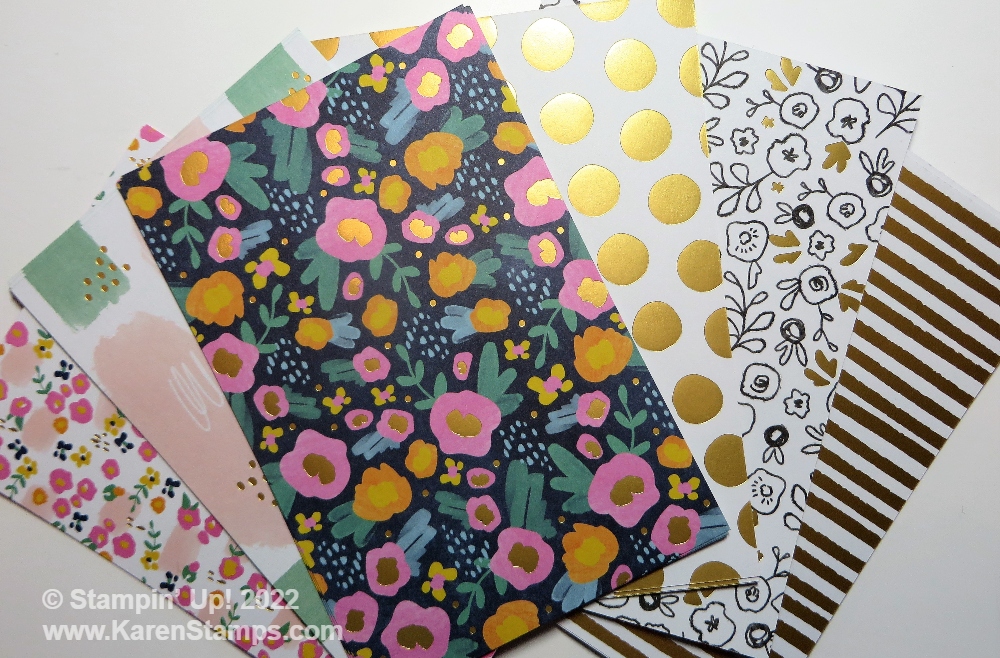
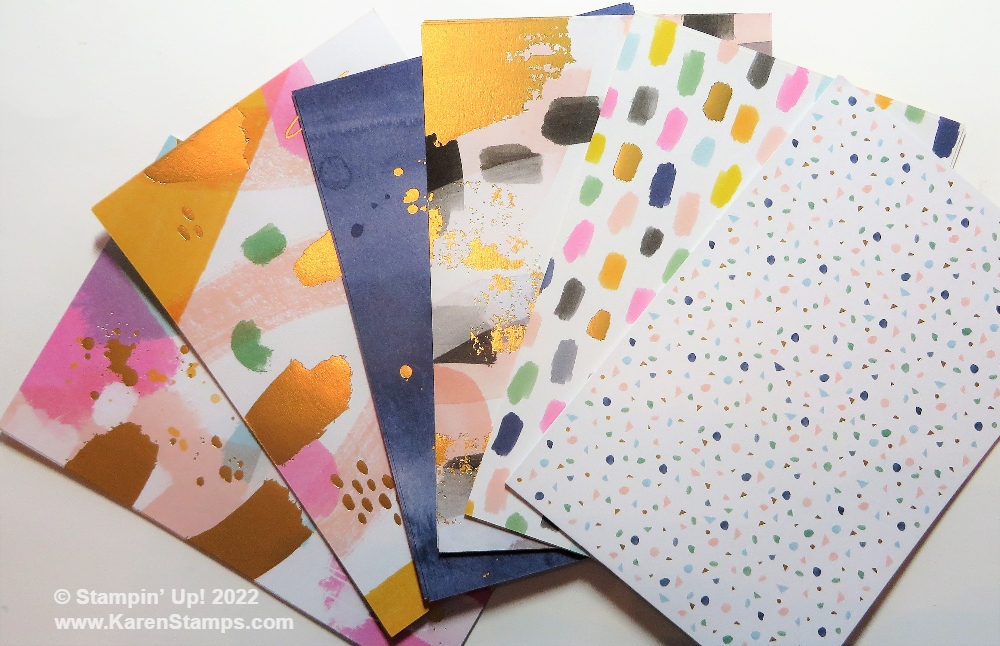
  • For this promotion only, we’ve brought back the previously popular Art GalleryCelebrate Sunflowers, and Garden Wishes bundles. They will only be available in their bundle form during this promotion, so make sure to snag ‘em while you still can!
  • The Mini Stampin’ Cut & Emboss Machine and select compatible bundles can be bought together or separately.
  • There is no limit on the number of Mini Stampin’ Cut & Emboss Machines you can purchase during this promotion. In fact, having more than one machine is ideal for workshops, classes, and other events!
  • Products are available in all markets while supplies last. Offer may vary from market to market based on product availability. No backorders or substitutions will be allowed.
  • The stamp-and-die bundles that can be found in a current catalog will be replenished until they retire. When they do retire, the bundles will be added to the Retiring List.
  • Due to supply chain challenges, this promotion may be altered or ended early. We will post a Current Update with further information if this is anticipated.
  • Discount applies on Stampin’ Rewards.

Take your crafting to the next level with the Stampin’ Mini Cut & Emboss Machine at a discount!

Offer available March 1-31, 2022!

Create With Friends Card

Create With Friends Card

This Create With Friends Card came about because as I looked through the Stampin’ Up! Annual Catalog, I saw that the Create With Friends is a stamp set on the retirement list and I have only used it once or twice! What a shame! It is really a fun stamp set but it kind of got lost in the shuffle I guess! It’s like when you buy new clothes but don’t wear them for a while and then decide to get rid of them and the tags are still on the clothes!

In this stamp set, you will find words in a larger size cursive font that you can use alone or pair with extra words in a small print font. It is a stamp set designed by one of the Million Sales Achiever Demonstrators.

I actually came up with the idea for this card myself! What better word for us stampers to have than “Create”! I’m not exactly sure who you would send this card to except another stamping friend, but it was fun to make anyway!

The card base is Real Red cardstock with a layer of Basic White cardstock. I simply stamped the word “Create” on a diagonal, staggering the word placement. You need to stamp off the edge of the cardstock on each side when you do this so have scrap paper underneath your card! I just used Memento Black Ink but you could also make each word a different color or at least just use a few colors.

The greeting is stamped in black ink on Real Red cardstock and die cut with this die in the Painted Label Dies. Before I adhered the die-cut, popped up on several Stampin’ Dimensionals®, I wrapped a piece of Real Red 3/8″ Faux Linen Ribbon around the stamped layer. After adhering the greeting over the ribbon, I also tied some red ribbon in a knot on each side.

I could have left well enough alone, but why not add a few Holiday Rhinestone Basic Jewels? The red color is actually Cherry Cobbler, but no one will complain it’s not Real Red! I just scattered them among the stamped words.

Remember to check out the Last-Chance List and Sale until the end of the current Annual Catalog, while supplies last!

Hand-Penned Easter Card

Hand-Penned Easter Card

The other day after I made the Easter basket I posted yesterday, I was cleaning up my mess and as I saw the Hand-Penned Designer Series Paper up against the Mint Macaron Cardstock, I loved it and had to make a card with that combination. Since I had made the Easter basket out of Cinnamon Cider and since this paper has some Cinnamon Cider in it, I added a narrow layer underneath the designer paper.

This is a really easy card to make yet looks perfect for a spring or Easter card. The card base is Mint Macaron with a layer of Cinnamon Cider (retiring soon!) and then the Hand-Penned Designer Series Paper. Before adhering the designer paper to the Cinnamon Cider layer, add the ribbon first, if you are using ribbon. I used the wide, velvet Mint Macaron Soft Velvet Ribbon. This ribbon is beautiful but I hadn’t even used it yet and now it is retiring! Since that ribbon is wide, I didn’t try to add a bow, plus the background paper is pretty busy so I wanted to just keep it simple.

The greeting is in the CelebratingYou Stamp Set. I stamped it on Basic White with Mint Macaron Ink and then die cut that piece with one of the Stitched So Sweetly Dies and layered it on a larger die in the same set. These Stitched So Sweetly Dies are retiring soon, which I hate as I have used these dies a lot!! Not that I can’t continue to use them, but of course, once we get new things, we like to use the new things!

For the inside of the card, I added a layer of Basic White. To decorate it a bit, I cut out two flowers from the designer paper and adhered them inside the card. It’s always fun if you take the time to decorate the inside a little to match the outside of the card. You can take a strip of any designer paper you used on the card and adhere it to the bottom of the inside of the card or along the side or do a little stamping.

Hand-Penned Easter Card Inside

I know it’s hard to believe I didn’t add any jewels or gems on this card! I was just keeping it simple, but you could certainly add some sparkle!

And here is the Easter basket that started it all! See this post for all the details.

Woven-Look Easter Basket in Cinnamon Cider

Now you are all set with this Woven-Look Easter Basket and the Hand-Penned Easter Card!

SHOP THE LAST-CHANCE SALE!

Woven-Look Easter Basket in Cinnamon Cider

Woven-Look Easter Basket in Cinnamon Cider

I’ve made a few paper Easter baskets in the past, but I hadn’t tried this fun-looking design. I called this the Woven-Look Easter Basket in Cinnamon Cider to differentiate the kind of basic ones like I made recently in this post. I don’t know what design it would really be called! It is made by cutting strips on parts of the paper and then adhering them one by one, side by side to the front and back of the basket. Somehow it turns out like this! Who thinks of all these ideas?!

I have a lot of photos to hopefully show you how to make one of these baskets!

Start with a piece of cardstock cut at 7″ x 6 1/2″. You will also need a basket handle later cut at 3/4″ x 6″ or whatever size you like. If you want to cover it with designer paper, cut it just slightly narrower and just as long. You can also add designer paper to the sides of the basket if you like, or even each strip that we will make. Or just keep it plain and simple!

With the 7″ side at the top of the Simply Scored Scoring Tool or the Paper Trimmer, score each of the four sides at 2″. (See the red lines.) Then with the 7″ side at the top, on the two outer squares, score from the top only down to the horizontal score line. (Green lines.) Score at 5/8″, 1 1/4″, 5 3/4″, and 6 3/8″. Then turn the paper with the other 7″ side at the top and do the same thing.

Woven-Look Easter Basket Diagram1

In preparation for assembly, add pieces of Tear & Tape to each end of those scored strips as you see in the diagram. You could use Multipurpose Liquid Glue but you would have to hold each strip in place for a moment, so Tear & Tape is really easier. You “could” apply the tape across all three strips at once because you are going to cut them apart next anyway.

Next, use scissors to cut on the scored (green) lines just up to the horizontal score line. Also, cut the red line, just up to the red score line, so that you have three “fringe-like” pieces on each side (all four corners).

Woven-Look Easter Basket Diagram2

In that middle section, top and bottom, you see a dotted line. That is where you will fold over just about 1/4″ to the inside of the basket. Score it first if you like. Adhere well. Tear & Tape works best if you make it as wide as the tape. The Liquid Glue you have to hold a few moments. (That squiggle over on the right is a boo-boo! Ignore it!)

Now you will assemble the basket by removing the Tear & Tape one strip at a time. Pull the inside strip over toward the center of that center section, adhering it about 1/4″ below the top edge. Next do the strip on the left side, also 1/4″ below the top edge.

Woven-Look Easter Basket Diagram4

Next, go to the next (middle) strip on the right, remove the tape and pull it over adhering it right about at the top edge of that middle section. Do the same with the one on the left.

Woven-Look Easter Basket Diagram5

Now you are on the last strip. Pull that over so that it is fairly level and straight with the top of that middle section. Now do the last one on the left, also making it straight with the top. That’s it! As you take a look at the basket, you will see that curve that developed! Don’t worry if everything isn’t lined up perfectly because you are likely to be covering this side (and maybe the back section, too) with a decoration. Do all the same steps on the other side of the basket.

Woven-Look Easter Basket Diagram6

Try to stick the end of the handle down in between the layers of the basket if you can or just adhere wherever you like. Add whatever decoration you want, whether a greeting or some layered circles, punches, rectangles, whatever. Tie on a ribbon if you like. Decorate both sides or just one. Add some small pieces of designer paper on the basket sides if you want. I stamped the little bunny in the Friends of the Forest Stamp Set and layered it on a piece of the Hand-Penned Designer Series Paper on top of Mint Macaron cardstock.

Woven-Look Easter Basket in Cinnamon Cider Side

Here is the back side. I almost stamped a “Happy Easter” greeting for the back but I didn’t. I thought just decorating the front was fine!

Woven-Look Easter Basket in Cinnamon Cider Back

If you want to decorate the sides of the basket with designer paper, just cut two pieces 2 1/4″ x 1 3/4″. Make sure you have any design going in the correct direction if there is a pattern. This Hand-Penned Designer Series Paper is on the Last-Chance List of retiring products so if you need more, be sure to get it while it is available! And the Cinnamon Cider cardstock is also retiring as it is one of the outgoing In Colors!

Make a few Easter baskets either for your own decoration around the house or as a decoration at each place setting at your Easter dinner table!

SHOP STAMPIN’ UP! ONLINE HERE!

Here Are the New Stampin’ Up! In Colors 2022-2024!

SU New In Colors 2022-2024 Collage

Introducing the new Stampin’ Up! In Colors 2022-2024! Thanks to another Demonstrator for creating this graphic to show off all the new colors and even a bit of Stampin’ Up! artwork to show how they all work together! These new In Colors will be available in the next Stampin’ Up! Annual Catalog beginning May 3, 2022.

Stampin’ Up! provided a little quiz each day in our Demonstrator Facebook Group to give us clues as to each new In Color. Then at the end of the day, they would reveal the name and show the color. I was amazed at how easily some of the Demos guessed the names!

It will be fun to see how these colors compare to past colors we have had or even our current ones. I will be eager to see the colors in person and see if I like them. Of course, you almost have to work with them a while to see what you think! There will be new Stampin’ Blends for each color (of course ink pads and reinkers) plus, of course, things like embellishments, ribbon, and designer paper. Fun!

Here is an example of the kind of clues they provided: “I’m a delicious treat on the tip of your tongue. Creamy yet dairy-free is the life for me. Strawberries, watermelon, raspberries, oh my! Just blend a little fruit juice, water, and sugar for a frozen surprise. What’s my name?”

Remember the Last-Chance Sale began yesterday afternoon with retiring products! Not everything is discounted of course but I hope you find some bargains you would like! The Last Chance product list is impossible to read unless you zoom in online or print it and wear your very best reading glasses. But it really is best to just look online in the Store and see what is still available, what is “Low Inventory”, etc. That will be up-to-date. Remember, the Spring Mini Catalog is not retiring yet. That January-June catalog will be live through June 30. Some products will carry over into the new catalog, which you will see when you get the catalog! As much as I love new things, I’m always happy to see products I already have carry over to the new catalog!

Friends of the Forest Easter Diorama Card

Friends of the Forest Easter Diorama Card

I’ve wanted to make this Friends of the Forest Easter Diorama Card ever since I got this stamp set in the Spring Mini Catalog! I could just imagine making a diorama card with some kind of little scene using the stamps in the Friends of the Forest Stamp Set!

This diorama card is actually a regular card size so you can fit it in an envelope. It folds flat! You could even make a middle layer inside a diorama card and make it as fancy and involved as you like, but this style is easy and just fine! All you need are two pieces of cardstock and an opening cut in the front so you can see the scene or decoration inside.

Start with two pieces of cardstock, each 4 1/4″ x 5 1/2″. Score at 1/2″ and 1″ from each end on each cardstock piece. Fold and crease the score lines and play with them a little to see how it is going to go together. For this card, I used Soft Sea Foam Cardstock for the front and Basic White for the back.

Here is the diagram I used on a previous card. Since we no longer have the oval dies, I changed this card to cutting the opening with a circle die in the Layering Circles Dies, the largest one. You could use a rectangle or whatever you have that would make a hole large enough for whatever you want to do. The lines show the score lines.

Diorama Easter card diagram

To make the card, I stamped a tree and a bunny on Basic White and cut them out for the front of the card. On the inside, I stamped the tree, fox, flowers and mushrooms directly onto the Basic White and colored them in. But I also stamped two bunnies and a tree stump separately and cut them out by hand to add to the inside scene. Some things are popped up on Stampin’ Dimensionals and some are glued flat on the card.

On the inside, after I had the scene made I decided to color in some grass. I used the Light Sea Foam Stampin’ Blend Marker. For the sky, I used the Light Pool Party Stampin’ Blend. Just scribble lightly, you don’t even have to cover all the white space. I punched out a cloud with the Cloud Punch. It was too big, so I just cut off the side that was too long and popped it up on Dimensionals.

I colored all my pieces with Stampin’ Blends. I didn’t keep track of the colors. It doesn’t matter because you can do your own thing! I did discover after I finished, that the Stampin’ Blends bled through the back of the Basic White background, which I hadn’t thought about so I cut another piece of Basic White to cover that up on the back.

I adhered one cut-out tree and one bunny on the front of the card. The greeting is stamped with the Celebrating You Stamp Set and die cut with a small rectangle in the Stitched So Sweetly Dies. For a little embellishment, I added a cute little Brushed Brass Butterfly on the greeting and a few little Iridescent Rhinestone Basic Jewels.

Here is a view of the card from the top. Just glue the ends together to connect the front and back and make sure everything creases well.

Friends of the Forest Easter Diorama Card Top

For another idea, here is a card I made two years ago in a similar design.

If you just try this card design, once you cut and score the paper and crease the lines, you will see how the card goes together. It’s really very easy but will make a great impression on whoever you decide to send it to!

SHOP STAMPIN’ UP! ONLINE HERE! REMEMBER THE LAST-CHANCE SALE!

Stampin’ Up! Last Chance Product List & Sale Is Here!

Last Chance Products Banner 2022

It’s here! The Stampin’ Up! list of retiring products and the Last Chance Sale!

SHOP THE SALE HERE!

SEE THE RETIRING PRODUCTS LIST! (put on your glasses or zoom in!)

Exercise patience! The website is pretty crowded as I write this and a little difficult to get on and navigate around!

  • All products are available while supplies last, and there are no purchase limits.
  • Discounted items can be added to a Starter Kit and redeemed as a 50% off item or with Stampin’ Rewards.
  • Only orders opened and closed during the promotion period apply.
  • Stamp Sets are not guaranteed during this promotion and are while supplies last.

SALE ENDS MAY 2, 2022

Coming This Afternoon! Last Chance List!

Last Chance with Heart

Coming today at 1:00 PM MT (Mountain Time)!

The list of Stampin’ Up! retiring products will be released along with a special promotion! All the details will be revealed this afternoon!

This Last-Chance Products Sale will be from March 23 – May 2, while supplies last!

Check back later today, after 1:00 PM MT, 2:00 PM CT, 3:00 PM ET, Noon PT! I’ll need a little bit of time to get the information posted!

(Considering the retiring In Colors 2020-2022 should be at the top of your list….everything with those colors….ribbon, gems, reinkers, paper, etc…..if you need or want any of those items!)

Peruse your Annual Catalog and try to guess what will be retired! Make your list! Exercise patience the rest of the day trying to get on the website. Chances are it will be very busy!

Happy Shopping!

Last Chance Sale Begins March 23!

Last Chance note

Hot off the press!! Stampin’ Up! says it is time to remind our customers that the Last-Chance Products Sale begins tomorrow, March 23, 2022 and runs through the end of the current Stampin’ Up! Annual Catalog on May 2, 2022. You can grab your favorite annual catalog items at a deep discount. This offer is valid while supplies last only. Details will be available tomorrow so stay tuned! Wait until tomorrow to shop!

One of the main things for you to think about, if the past is any indication, is the retiring In Colors 2020-2022. These colors will be retiring and anything containing those colors will retire, such as ribbon, markers, gems, embellishments, and of course ink pads, paper, and reinkers. You might even want to beat the rush, even though I said to wait until tomorrow to shop, to make sure you get what you want/need with these In Colors which often go fast. Maybe they won’t this year, but I see the ink pads are already Low Inventory.

Check back here tomorrow and we’ll see what all the details are on the Last Chance Sale! Get your catalog and Wish List!

Flowering Fields Fresh Freesia Easter Card

Flowering Fields Fresh Freesia Easter Card

If you like purple or know someone who does, I think you will love this Flowering Fields Fresh Freesia Easter Card! Of course, the Flowering Fields Designer Series Paper (the tulip paper, I like to call it!) is so pretty to use on cards! I chose this purple-ish floral tulip pattern to use on this card and I like how it turned out!

The card base is Fresh Freesia, one of the coordinating colors with the Flowering Fields Paper and one of the 2021-2023 In Colors. These colors will be sticking around for another year but the 2020-2022 In Colors will be retiring.

A fancier way to do this card front is to cut the designer paper into strips rather than have a solid piece. These pieces are 1 1/2″ x 3 1/2″ and fit perfectly on the Rich Razzleberry layer that is 5″ x 3 3/4″. You can just eyeball the spacing, making sure it is as even as possible. Lay it out before you glue to make sure everything fits properly! I wanted the Fresh Freesia color to show so I made the margin wider than we usually do.

Before adhering the Rich Razzleberry layer with the strips of designer paper, I wrapped around a piece of Fresh Freesia 3/8″ Open Weave Ribbon. I wanted some ribbon on the card but not something that was going to overwhelm the tulips so this ribbon was perfect. It’s there but you can see through it and it adds a little bit to the card design.

For the greeting, I happened to have the die cut already in my package of Rich Razzleberry cardstock so I wondered it that would be good to use. The “Happy Easter” greeting is in the Celebrating You Stamp Set. This is a great stamp set to have with some basic greetings you will be glad that you have! I stamped it in Rich Razzleberry ink on Fresh Freesia cardstock. I thought Basic White might be too stark against the card since it didn’t have any other white on the card.

The die set I used is the Meadows Dies for the little label with the fancy ends. As I said, I already had one cut in my cardstock so I used that for the layer. After stamping the Easter greeting I cut it with the same die. Then I very carefully trimmed off the curvy ends, leaving the stitching. It just barely fits on the Rich Razzleberry layer even though it overlaps the fancy ends a tiny bit. Then I tied a knot on each end with the Fresh Freesia ribbon, which kind of obscures the die cut, but I still like it. The greeting is popped up with Stampin’ Dimensionals®.

Here is my first Easter card of the season, a Z-Fold card, but it uses another paper in the Flowering Fields package with similar tulips as on this card except in orange colors.

Because you don’t have to figure out the measurements for a card like this, just copy mine, this card will be easy for you to make! It really didn’t take much time. Easter is less than a month away now, so make some of those pretty Easter cards to send like this Flowering Fields Fresh Freesia Easter card.

Expressions in Ink Easter Baskets

Expressions in Ink Easter Baskets

Easter will be here soon, less than a month now, so you might be thinking about making some little Easter decorations such as these Expressions in Ink Easter Baskets. These little baskets are super easy, you have probably made them before. After you make them with designer paper or cardstock, just decorate and embellish however you like.

I had the idea to make these Easter baskets a little “fancy” by using the Expressions in Ink Specialty Designer Series Paper. I love the watercolored look of all the designs on the paper plus the gold foil accents on some of the papers. It is incredibly beautiful paper! If you want a sturdier basket I would suggest making the basket with cardstock, maybe even the Basic White Thick Cardstock, and then adhering designer paper on the cardstock to decorate. My baskets are just made with designer paper and then the inside is also gorgeous!

To make the basket, cut a piece of paper at 6″ x 6″ and score like a tic-tac-toe board. Score at 2″ and 4″, then turn the paper and score again at 2″ and 4″. Cut up on the two vertical score lines up to the horizontal score line. Do the same on the opposite side. See the photo below. Cut a handle of about 8 1/2″ x 1/2″.

Score and Cutting on Easter Basket

Here’s how to fold the sides in and how to overlap them. If you want to round the corners, you can do that with and corner rounder punch you have or the current Detailed Trio Punch. The photo below from a couple of years ago shows how I folded the sides. You can mostly eyeball where they go or make a pencil mark on the inside of the basket at the 1″ mark since each section is 2″ wide and you can use that mark as a guide to see how far in the sides should go to be even. Use a brad on each side or just some decent glue to hold the basket together.

Easy Paper Easter Basket Assembled

On the basket I made on the left side with gold stripes, I die cut the flower out of a piece of the designer paper using the Artistic Dies. It didn’t match exactly but it was pretty close and looked fine. Then I also cut out some leaves with the greenish portions of the designer paper.

On the green basket, I simply cut out the flower and leaves by hand. It doesn’t have to be exact because the flowers are so “flowy” anyway, there isn’t an exact image line. On both baskets, I popped the flowers up with Stampin’ Dimensionals.

If you don’t have “Easter grass”, you can make some but cutting narrow strips of green cardstock and then running it through a Paper Crimper if you have one (mine is from long ago when I first started stamping) or just crush and crumble it in your own hands and that will work too! In the other basket, I found a piece of green tissue paper and just wadded that up in the bottom of the basket.

The fabric-covered egg in each basket is handmade from @sewafineseam on Instagram that I purchased last year!

Here are some other Easter baskets made three years ago if you need more ideas!

It’s time to start making Easter cards, treats, decorations, and these little Easter baskets would serve as a treat or a decoration for your home or your Easter dinner table. Have fun making some! Bet you can’t make just one!

St. Patrick’s Day Glittery Shamrocks Card

St. Patrick's Day Glittery Shamrocks Card

Happy St. Patrick’s Day! I had several other ideas for St. Patrick’s Day cards but ended up with this St. Patrick’s Day Glittery Shamrocks Card. I think it is so fun to make a shamrock with hearts! I knew I had several kinds of glimmery paper so I thought I would use that somehow!

This is just a simple card, just some die-cutting involved. If you don’t have any heart dies you can use a heart punch or just cut them out by hand. I used the Sweet Hearts Dies in the Spring Mini Catalog to die cut all the glittery hearts. I used the Rainbow Glimmer Paper. I had just enough greenish edge scraps to die cut all my hearts! This paper is so fun!

The card base is Granny Apple Green, which is one of the coordinating colors with the Rainbow Glimmer Paper. The layer is Basic White. Before I glued on the shamrocks, I randomly stamped the dots in the Color & Contour Stamp Set with Granny Apple Green ink. The stems of the shamrocks are just cut out by hand, tiny little strips of green.

I looked through a lot of stamp sets and decided on the word “Celebrate” in the Celebrate Sunflowers Stamp Set. I didn’t want to stamp the whole thing so I just used the Granny Apple Green Stampin’ Write Marker in the Brights family to color only the word I wanted and then stamped. I just stamped it on a Basic White scrap, trimmed it down and adhered it to another scrap of the greenish Rainbow Glimmer Paper.

For even more glitter and glimmer, I decided to add some kind of rhinestones or jewels. I decided to try the Evening Evergreen green jewels in the 2021-23 In Color Jewels. They don’t show up in the photo but in the right light, they are green rhinestones!

Don’t forget to wear green today and have fun celebrating St. Patrick’s Day!

Celebrate Sunflowers Thank You Card

Celebrate Sunflowers Thanks You Card

The Celebrate Sunflowers Stamp Set and Sunflower Dies are available this month, until March 31, as a Bundle with an extra discount during the Savings Are in Bloom promotion! You can also get the Mini Stampin’ Cut & Emboss Machine at a 20% savings, but you can buy select Bundles even if you don’t get the machine.

This card came about because I wanted to make a card with the sunflowers set and dies. As I was looking through my designer paper the other day I came across this blue print designer paper in the Heart & Home Designer Series Paper. I thought maybe it would look good with the yellow sunflower. However, when I went to make the card, I thought maybe the print was not a good background for the sunflower. I simply turned the paper over to the wood design and that was fine. However, you never know when you are designing a card! As I went to put adhesive on the blue print side, I decided I really wanted to use it, so I did! Is it too much or just something different?! I don’t know! But I think I like it for now!

The card base is Misty Moonlight, a color I wanted to use before it retires soon. Yellow and blue always look good together. The sunflower is stamped in Memento Ink and then colored with Stampin’ Blends. I started with Light and Dark Daffodil Delight markers and added a bit of Mango Melody. The center is Light and Dark Soft Suede with some black dots that darken it up. The leaves were colored with Granny Apple Green, Light and Dark, but also added some Light Old Olive for a little darker green.

The sunflower is popped up with Stampin’ Dimensionals and the two leaves are adhered flat on the card, stuck under the sunflower a bit. The greeting in the Celebrating Sunflowers Stamp Set is stamped in Misty Moonlight ink on Basic White and die cut with a Stitched Rectangle Die. I was going to use the next larger rectangle for a Misty Moonlight layer but I wanted something narrower so I just cut a rectangle myself from the cardstock.

Be sure to check out the Bundles that are available this month during this promotion!

SHOP STAMPIN’ UP! ONLINE HERE!

Abstract Beauty Card For a Friend

Abstract Beauty Card For a Friend

If you missed the Abstract Beauty Collection in the Spring Mini Catalog on pages 48-49 I think you should go back and look those pages over! There are some interesting and different products! Even without the stamp set and dies, all the rest of the products can be very fun to play with and you can still make cards as I did with this Abstract Beauty Card For a Friend.

The reason I made this card was that I LOVED this particular paper in the Abstract Beauty 4″ x 6″ Specialty Designer Series Paper. I loved the dark blue background with the bright pink flowers and gold foil accents. Actually, this card didn’t photograph very well because of the glare from the foil so the card is really prettier and brighter in person. Did you notice the paper size is 4″ x 6″? It’s a different size to use for scrapbooking, cardmaking, and any other projects. I kept the card design simple so I didn’t have to cut much off this pretty paper!

Abstract Beauty Paper3
Abstract Beauty Paper1

The card base is Just Jade, one of the “old” In Colors that will be retiring soon. It’s a pretty green, so I wish we weren’t losing it. To help set off the designer paper a little bit, I added a layer of Basic White underneath it, just a tiny margin, so the Jade card base would show, too.

The greeting is from the Sale-A-Bration stamp set, Special Moments. I stamped it in Just Jade Ink and die cut the Basic White and the Just Jade layer with the rectangles in the Stitched So Sweetly Dies. Before I adhered the greeting, I wrapped around some ribbon, just adhering the ends to the back of the designer paper. I used the Just Jade and Gold 3/8″ Braided Ribbon. Then I just tied on an extra piece of ribbon to the left of the greeting in a knot.

In the Abstract Beauty Suite is a package called the Abstract Beauty Ephemera Pack. This is a fun package of assorted preprinted and precut elements that you can just add to your project as embellishments. On my card, just adding a flower and leaf to the corner of the greeting seemed like just enough with the bright, busy paper in the background.

Abstract Beauty Ephemera Pack

There are also Adhesive-Backed Hexagons to stick on where you need a little something. There are also Abstract Beauty Cards and Envelopes that have some watercolor design on them which allows for more stamping or embellishing! Use the Ephemera Pack if you like for embellishing the cards. Just have fun!

Abstract Beauty Cards
Abstract Beauty Envelopes

This is a simple card with a basic design, but the Abstract Beauty Designer Paper makes it so beautiful! I have to laugh at the sentiment, “Thanks for Brightening up my day!” I think the pretty paper will brighten up the recipient’s day!

SHOP STAMPIN’ UP! ONLINE HERE!

The Next Paper Pumpkin! April 2022

As soon as the current Paper Pumpkin Kit goes out after the 10th of any month, the next Paper Pumpkin Kit is revealed! This Paper Pumpkin Kit for April 2022 looks perfect for spring!

Growing through life can also mean growing pains. Whether people are climbing their career ladder or moving out for the first time—change can be simultaneously thrilling and scary—but isn’t that what makes life beautiful? Because new beginnings, after all, are simply new adventures. Let your loved ones know you’ll be there to support them through all of life’s chapters! 

The Change is Beautiful kit contains enough supplies to create 9 stunning cards with a unique folding technique to commemorate moments of change. The designs are inspired by the natural cycles of change found in nature. 

ABOUT THE KIT

Name: Change Is Beautiful

This kit includes:

  • Change is Beautiful Photopolymer Stamp Set
  • Melon Mambo Classic Stampin’ Spot®
  • Printed card bases
  • Printed envelopes
  • Printed, shaped die cuts
  • Iridescent sea glass
  • Dimensionals

Card size: 4-1/4″ x 5-1/2″ (10.8 x 14 cm)

Coordinating Stampin’ Up! colors: Balmy Blue, Basic Black, Bermuda Bay, Crushed Curry, Evening Evergreen, Granny Apple Green, Melon Mambo

Don’t miss out on this kit! Paper Pumpkin is a gift you send yourself (or a loved one or friend!) once a month. Wouldn’t it be great to find a treat just for you in your mailbox?! No planning, no missing supplies, just open the box and start crafting! Even adhesives are included. Follow the directions or use the contents to put your own spin on the project. Easy for anyone, even beginners, and no big stash of craft supplies required!

JOIN PAPER PUMPKIN TODAY!