Abigail Rose Tulip Birthday Card

Abigail Rose Tulip Birthday Card

This card came about because I always forget I have this beautiful designer paper, and when I came across it yesterday, I had to use it! It’s always like a new surprise when I find it in my collection of current designer papers!

This is really an easy card to make because you can let the paper do all the work! It’s the Abigail Rose Designer Series Paper in the Stampin’ Up! Annual Catalog in the Abigail Rose Suite on pages 56-57. Sometimes we forget about the Annual Catalog when we get so interested in the Mini Catalogs that are out!

I chose this pattern with tulips, but all the papers are pretty in their own ways. The card base is Early Espresso Cardstock with a layer of Petal Pink. Those are coordinating colors for the designer paper.

The greeting is stamped in Early Espresso with a stamp in the Cottage Rose Stamp Set in the Suite Collection. Besides the pretty flowers, this stamp set also has some lovely sentiments to use.

The greeting is cut out with one of the narrow banners in the the Stylish Shapes Dies. Then I also cut a Petal Pink layer from the Stitched Rectangle Dies to be a layer for the birthday greeting. For a finishing touch I added a bow made with the White 1/4″ Crinkled Seam Binding Ribbon.

So as you can see, this is just a card with a layer under the designer paper and a stamped and diecut greeting! Here’s another “basic” card I made with another pattern of the Abigail Rose paper. These ideas are quick and easy cards to keep in mind when you need to make a card without much time!

SHOP STAMPIN’ UP! ONLINE HERE!

Jingle Jingle Jingle Pastels Christmas Card

Yesterday when I went into one of my favorite gift shops, I saw a display of Christmas nutcrackers, buildings, decorations, and ornaments all in pastel colors! It was all really pretty and I was a little surprised to see a big display like that of those soft colors. That is what inspired this Jingle Jingle Jingle Pastels Christmas Card!

I sometimes forget I own this Jingle Jingle Jingle Stamp Set but I really do like it! I plan to make lots more cards with this stamp set. There are so many ways to use it and extra images to add more whimsy!

For this card, I simply used a Pool Party cardstock base with a layer of Blushing Bride pink cardstock. The top layer is Basic White. I used three colors of ink – Pool Party, So Saffron, and Blushing Bride, plus Memento black for the “all the way” part of the greeting. Maybe I should have used a pastel color instead of black. Then when I spied the candy canes in the stamp set, I stamped those around randomly in the same colors. And for a finishing touch, I added a few of the 2021-2023 Opal Rounds. These aren’t the exact colors I used on the card, but they are close enough since they are light-colored.

I may try another version of this card using these or similar colors. I have some other ideas! We’ll see!

Get your “Jingle” on and check out this fun stamp set!

SHOP STAMPIN’ UP! ONLINE!

Framed Florets Silver Frame Birthday Card

Framed Florets Silver Frame Birthday Card

The more I work with the new Fitting Florets Collection, the more I love it! You can do so much with the pretty designer paper, the more subtle patterns like this card front, and the florals to use as accents and embellishments.

This card starts with a card base of Balmy Blue to match the pretty designer paper in the Fitting Florets Designer Series Paper. I used the Framed Florets Dies to cut out this beautiful oval frame from the silver foil paper in the Silver Foil Specialty Pack. Then I cut the same oval frame with Basic White cardstock so I could have the center of the oval be white. The center white oval is stamped with a birthday greeting from the Framed Florets Stamp Set in Balmy Blue ink.

You can purchase the Framed Florets Dies and the Framed Florets Stamp Set separately, or you can buy them together in the Framed Florets Bundle and save 10%. Do you notice something in that sentence?? From this Spring Catalog forward, Stampin’ Up! will give the stamps, dies, and bundle all the same name!! Now we won’t have to try to remember the different name of the dies that went with a certain stamp set and was the bundle name the same or different??

Did you know that the flowers you see in the lower right corner of the oval frame can be die-cut from the designer paper?! I fussy cut another extra flower to pop up on top of the diecut, but it is nice that one grouping of flowers at least can be diecut!

The group of flowers on the top left of the silver frame were fussy-cut from the designer paper and even altered a bit to fit in that spot and not interfere with the stamped greeting. Plus one extra flower popped up on Stampin’ Dimensionals for some more texture.

For just a little more pizzazz, I added three Iridescent Pearl Basic Jewels on the center oval.

You could make this same card with many other greetings in that center oval. I think that is why florals are so popular because they are so useful. You can use them for birthdays, sympathy cards, or just any card that you want to be beautiful for a special person and reason.

While this Framed Florets Bundle will continue to be available in the January – July 2023 Mini Catalog (the Spring Mini), from now until January 4, 2023 (or while supplies last) is the only time you can purchase the Fitting Florets Designer Series Paper and the Gold Adhesive-Backed Swirls. There is also the Christmas greeting stamp set included in the Collection, Framed & Festive, that is also only available now until Jan. 4th. If you need a Christmas greeting stamp set, I recommend this one!

SHOP ONLINE AT STAMPIN’ UP!

Get on My List For the Remaining “12 Weeks of Christmas”!

12 Weeks of Christmas 2022 frame

Time is flying by and there are only 8 weeks left of my 12 Weeks of Christmas holiday emails! Every week for 12 weeks I send you a free holiday project idea that you can use to make your holidays brighter! The only people who receive these free projects are the people who are on my Stamping With Karen Mailing List! This is my way of thanking my mailing list subscribers for following me, so if you would like to receive these special holiday emails, please sign up!

You have already missed the first four emails but there are eight more to come, starting this afternoon at 1:00 PM Central Time! Sign up right now and here’s how: If you are on my blog, sign up in the red box in the top right sidebar. If you are on your phone, you may have to scroll way down. OR go to my sign-up page HERE and sign up in the red Mailing List box! We’d love to have you!

Besides these holiday emails, I also send out a weekly newsletter on Tuesdays with the latest Stampin’ Up! news and new product information plus a stamping project or two or maybe some papercrafting tips!

Please join us!

Fitting Florets Collection Available TODAY!

Fitting Florets Banner

Today is the first day you can purchase the Fitting Florets Collection in the Stampin’ Up! Online Store! “Add just the right touch of elegance to any occasion, including Christmas and seasonal celebrations, with the sweet Fitting Florets Collection. From color schemes to sentiments and embellishments to dies, these unique products blend together so that your cards and crafts fit whatever occasion you might need. Send birthday wishes, express your gratitude, or spread Christmas cheer—with so many options to mix and match you’ll be set no matter the celebration all year!”

This is an interesting Collection because all of it is available now through January 4th (while supplies last), but the Framed Florets Bundle (stamp set and dies, all of the same name!) will continue on and be in the January-June 2023 Spring Mini Catalog! (I know we can’t comprehend a Spring catalog when we just finished Halloween!)

The best way to get an idea about this whole beautiful Collection is to watch this Stampin’ Up! video!

Click the photos below to read the Flyer.

This is a beautiful set of new products! Use them exactly as is or, as the designer did, turn some into a Christmas presentation. The Framed & Festive Stamp Set has really fun greetings to use right now for our Christmas cards and projects.

Check it all out and let me know if you have any questions! The Framed & Festive Stamp Set, the Gold embellishments, and the designer paper will only be available until January 4th or while supplies last before that. The Framed Florets stamps and dies are available now and will be in the Spring Mini Catalog! It’s all pretty! You’ll like it! Get it all in the Collection or pick and choose what you want!

SHOP STAMPIN’ UP!

Spooky Best Witches Halloween Card

Spooky Best Witches Halloween Card

Happy Halloween!

This Spooky Best Witches Halloween Card is the last Halloween card of the season I guess! I hate to see the end of using the Best Witches Stamp Set and the Scary Cute Stamp Set. I have loved stamping the Best Witches and coloring them with Stampin’ Blends.

This card has a Basic White card base and a layer of Basic Black cardstock. Then I layered on a piece of the Black & White Designs Designer Series Paper for the background and even added a little strip of another pattern down lower on the card.

The witch is stamped with Memento ink on Basic White Cardstock and colored in with various Stampin’ Blends alcohol markers. I diecut her with a Layered Circle Die and layered on a piece of Pumpkin Pie Cardstock cut with a scalloped circle die in the same set. The witch looked a little plain so I colored in the background to look more like Halloween night. I used several different colors of Stampin’ Blends – a little light yellow, some bright green, some orange, then Pale Papaya over all of it, plus some Granny Apple Green to finish it off! You can just play with these markers and see what turns out!

I used the Alphabest Stamp Set and the Best Label Punch to spell out “Spooky!” across the card. I barely had room to fit it in! It’s really a fun set to play with, as I am finding out. You can purchase both the stamp set and little punch in a Bundle and save 10%. You’ll find both in the Stampin’ Up! Annual Catalog.

The ghosts peeking out from the sides of the card have special significance! Ghosts are part of what attracted me to Stampin’ Up! and to sign up to be a Demonstrator 20 years ago, as it turns out! When I saw cards made with ghosts out of hearts cut in half, I was sold on the creative possibilities of stamping!! To make these ghosts I punched a heart with the Heart Pack punch out of Basic White cardstock and cut it in half with scissors. The ghost on the left side is cut down just a little smaller to make him fit better. Then I just added eyes with a marker! So fun!

Here is another card I made with my heart ghosts a few years ago!

I hope you have your Halloween treats all ready for the trick-or-treaters tonight! Not sure we will have as many as we used to have back when more kids lived here and there was a little carnival down the street at the pool. I love handing out candy when the kids come to the door! I have my Paper Pumpkin treat boxes ready plus some extra bags of candy. The Paper Pumpkin treat boxes I already handed out were quite a hit, so consider trying out the Paper Pumpkin Kits especially for holiday times!

Last Minute Halloween Treat Ideas!

These Halloween treat ideas may be from years past, but they still work! Use your current paper and things or use your old retired things you are hoarding! 🙂 The trick or treaters won’t care!

Halloween Candy Bars

This is one of my favorite ideas and simple enough to do. Just wrap a chocolate bar in designer paper! Maybe add some ribbon or a tag if you are making it for someone special. You can use any size of candy bar!

Triangle Halloween Treat Box WIth Ghosts

These triangle boxes are so easy to make and I have made them for lots of occasions! Read my blog post HERE with directions.

Cute Halloween Treats

I always love making treats with chocolate nuggets! Just cut a strip of cardstock at 1 3/4″ x 5 1/2″. Score the paper at 2 1/4″ and 3 1/4″. This makes a little space so it will sit flat and so it will hold a nugget inside. OR just cover nuggets with strips of designer paper and put in a bag or box! A 1″ x 3″ strip should do it!

Witch's Boot with Candy

This witch’s book has been quite a favorite! Save a toilet paper roll or a paper towel roll and cut it down, wrap with designer paper, and add the triangular boot bottom! It’s easier than it looks. Directions on this blog post HERE.

Halloween Witch Trick or Treat Candy Treat Box

Nothing wrong with just making a little box or bag out of designer paper or cardstock and decorating it for Halloween! This one is from five years ago but you can update it easily! Read the blog post HERE.

Those are just a few ideas to spark your creativity for parties or trick or treaters Monday night! Have fun!

Go Astros Baseball Card

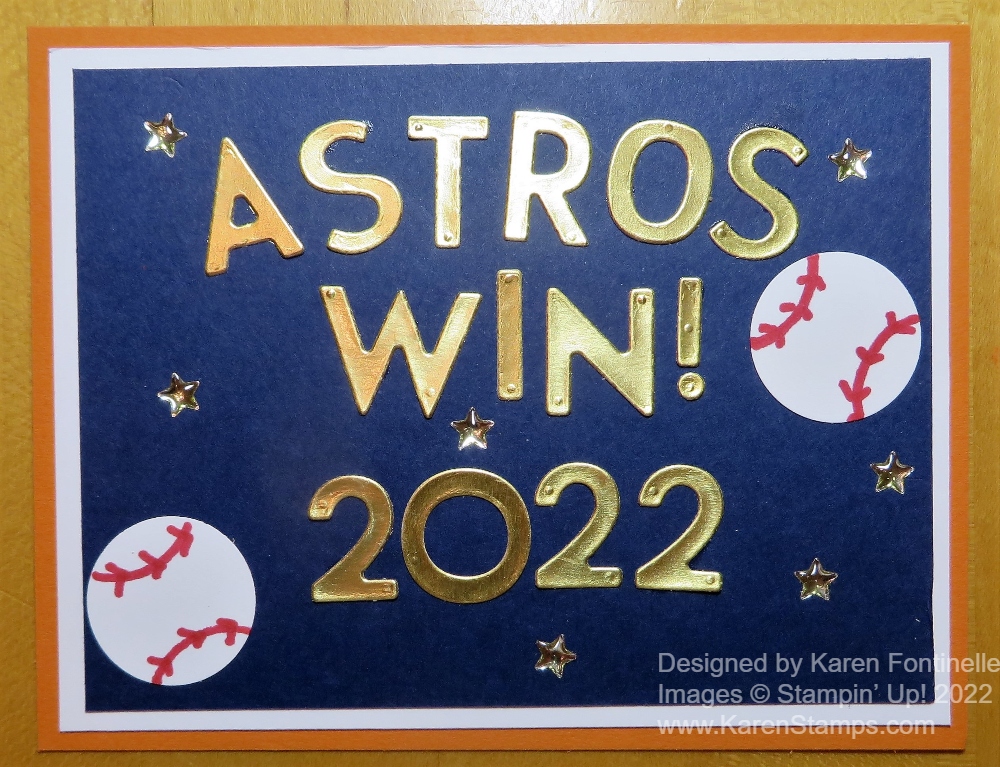
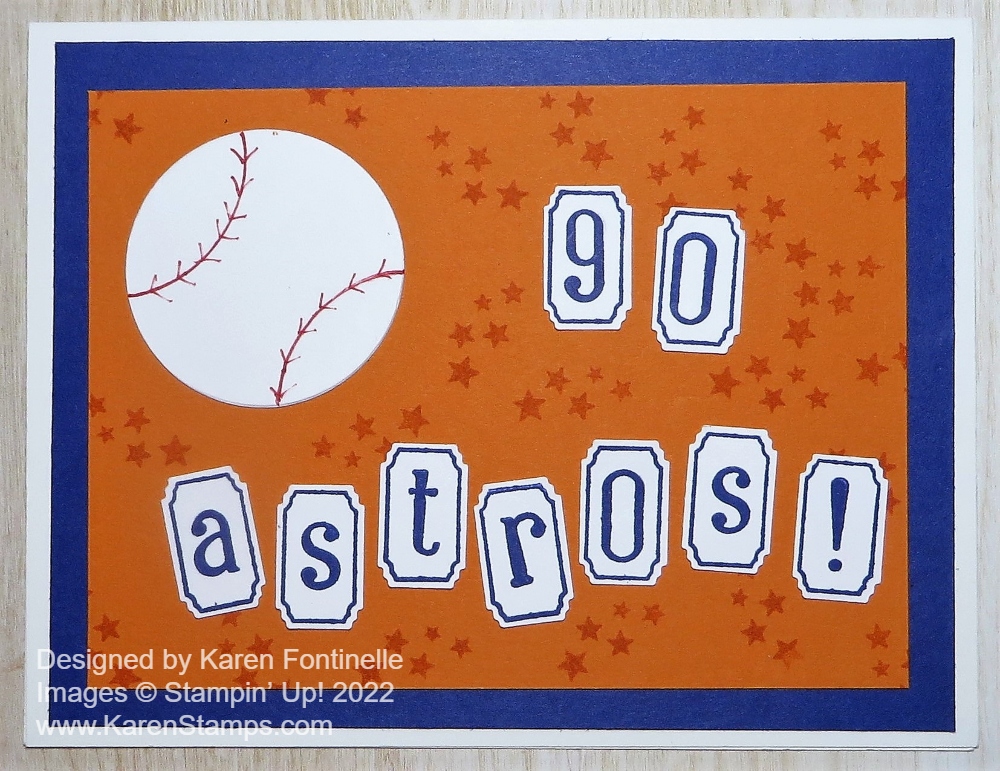
In case you haven’t heard, the Houston Astros have made it to the World Series and the first game is tonight in Houston!! Woohoo!!! When you are a stamper and cardmaker, you make cards to celebrate all kinds of occasions so I made this Go Astros Baseball Card. It’s fun to make something different that is not our usual cardmaking occasions.

This card has just a Basic White card base, then a layer of one of the In Colors, Starry Sky. For the main top layer I used Pumpkin Pie, cut a little smaller than usual to allow more of the blue to show on the card front. Then I stamped it randomly with some little stars in the Alphabest Stamp Set. I only recently purchased this stamp set, maybe during the stamp sale. Even though I’ve had lots of alphabet stamp sets in the past, I was seeing some cute samples online using this stamp set.

There is also a small punch that goes with this Alphabest Stamp Set that makes it particularly appealing! It’s the Best Label Punch. The punched image is only 1/4″ x 3/4″ so you can see that it is quite small. But it is really fun to use with this alphabet stamp set. I’m looking forward to playing with this stamp set and punch a lot more and seeing what other ideas I come up with and checking out some ideas online!

For the baseball, I simply die cut a circle out of Basic White and drew on the lines with a Real Red Stampin’ Write Marker. If you want the curved lines to be shaped well, just use the scrap from the die cut and use that curve as a guide on the baseball to draw the curved lines.

The letters are all stamped on Basic White with Starry Sky ink, using the outline first. Then I went back and stamped the letters inside and punched out. It’s really fun using that little punch! Then I just adhered the letters in a haphazard fashion so I didn’t have to worry about anything being lined up and perfectly straight! It makes it more fun this way, too!

You could also pop up the baseball and/or the letters with Stampin’ Dimensionals, but I just glued mine down flat on the card.

The Houston Astros have been in playoffs and World Series before. I even got to go to a game with a friend who had tickets! One of the thrills of my life to walk into the stadium for a World Series game (although they lost that game!)! Also a thrill to have a one-up on my son-in-law who is a huge baseball fan who hadn’t been to a World Series game at that point, but now he has been with the Dodgers!

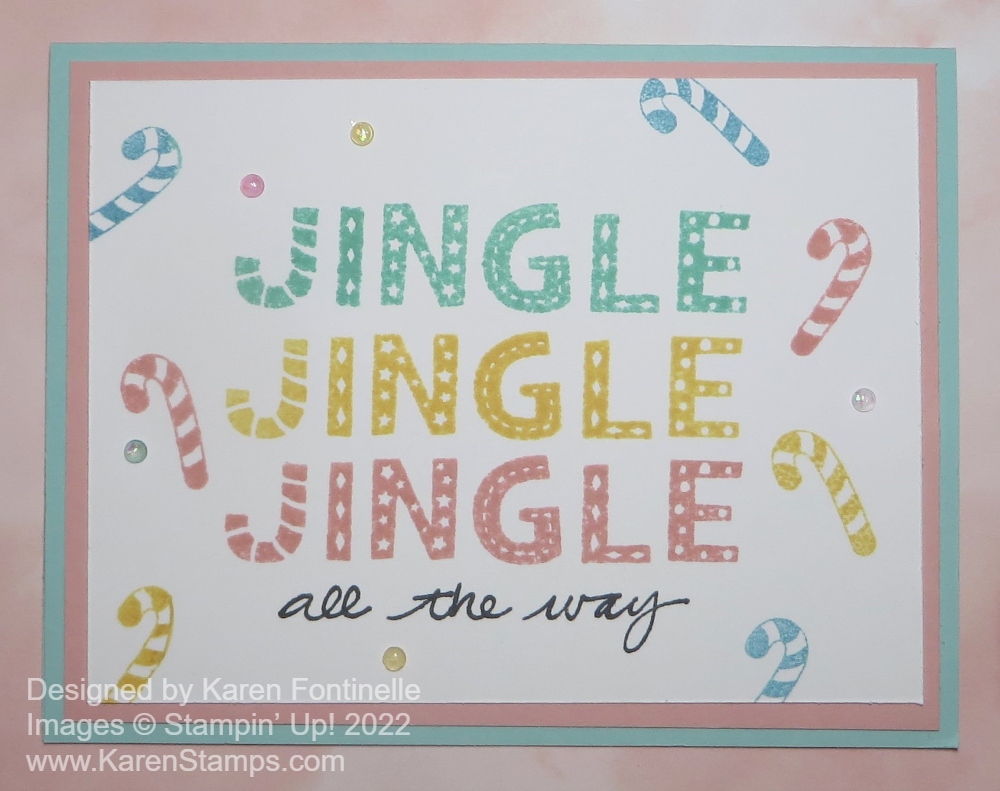
Here is another baseball card I made to celebrate the Astros, even using another alphabet stamp set several years back! If you have an alphabet stamp set, you can do a lot of things with it when you don’t have the proper greeting. But you can also use words like “Celebrate” or “Hooray” and others when you don’t have a baseball or World Series stamp or name of the team! Stars, in stamps or dies, are always great to use!

When you have unusual occasions like the Houston Astros being in the World Series, see what kind of card you can make with what supplies you have as I did with this Go Astros Baseball Card!

GO ASTROS!!

Twinkling Lights Christmas Tree Card

Twinkling Lights Christmas Tree Card

Here’s a Christmas card idea with a pretty diecut Christmas tree, the Twinkling Lights Christmas Tree Card. I felt like I was missing out, not having cards with a Christmas tree on the front! I already purchased this pretty Lights Aglow 6″ x 6″ Designer Series Paper but I found I couldn’t do without a Christmas tree!

This card begins with a Cherry Cobbler card base, one of the coordinating colors of the Lights Aglow paper. Next, I layered a piece of Gold foil (if you want to “cheat”, cut a piece out of the middle of the Gold Foil to use later, it won’t show on the front of the card!) and then a print layer of the Lights Aglow paper.

The Christmas tree is die cut with the tree shape in the Twinkling Lights Dies. Actually, there are two dies to use. One cuts out the tree with the little punched-out dots to look like lights and the other cuts out the same size and shape solid tree. On this card, I die cut the tree out of the Lights Aglow patterned paper with the die that cuts the little holes but I also cut a solid tree out of Gold Foil to show through from the underside of the tree. They are adhered together.

The tree is popped up on Stampin’ Dimensionals with some Gold 1/4″ Shimmer Ribbon that is adhered back and forth on the back of the tree.

The greeting is stamped in Cherry Cobbler Ink from the Brightest Glow Stamp Set. I just cut the banner ends and layered it on a piece of Gold Foil. It is popped up on Stampin’ Dimensionals.

There are so many variations you could make of this same card with different colors and patterns of paper or using cardstock along with the designer paper. Everyone loves a Christmas tree for Christmas cards so if you need one, use the trees in the Twinkling Lights Dies to make a card like this Twinkling Lights Christmas Tree Card.

SHOP STAMPIN’ UP! HERE

Full of Love Note Cards

Full of Love Note Cards

We often forget about making note cards, but it’s a good idea to have some on hand for when you want just a quick note to send someone, like these Full of Love Note Cards. I chose to use this easy stamp set and greetings to stamp on the Stampin’ Up! Note Cards & Envelopes. So handy to have!

Since I wanted to be able to color the images with Stampin’ Blends alcohol markers and they bleed through the paper a bit, I stamped the images on Basic White cardstock and made them as a layer on the notecard. You can purchase the Basic White Note Cards & Envelopes in a package so they are ready to go! With 20 cards and 20 envelopes in the package, they are a good price. They can also be purchased in Very Vanilla and Kraft. The folded note card is 3 1/2″ x 5″ so I cut the cardstock I was going to stamp on at 3 1/4″ x 4 3/4″.

The stamp set I chose is Full of Love and is an easy stamp set to use. No extra expense needed for dies you can’t resist! Just stamp! If you didn’t want to color in, you could just stamp in a color and have them be monochromatic. I colored in with various Stampin’ Blends because I love to use those! Watercolor Pencils and a Blender Pen to soften would be perfect to and could be done without an extra layer. There are good sentiments in the stamp set to fit lots of occasions or you could use one from another stamp set.

Here is another note card I made a couple years ago, much the same way as these and even added an extra colored layer plus decorated the envelope flap with a piece of designer paper!

With this stamp set, you could even stamp the image and cut it into a rectangle or square using either the Paper Trimmer or dies, then mount it to the note card with a colored cardstock or designed paper layer underneath. Make them as simple or fancy as you want!

Just remember, everyone appreciates some “real” mail these days instead of constant junk mail and the people you know would love to hear from you! For a quick note, just pull out a note card and stamp it or have some already made up to send at a moment’s notice. When someone pops into your mind, or you need a quick thank you or even birthday card, just send a note card and get it done right away. You know you will make someone’s day when they find your card in their mailbox!

SHOP STAMPIN’ UP! ONLINE HERE!

Witchy Home Decor

Witchy Home Decor

It’s time for some Witchy Home Decor! ‘Tis the season for decorating your home! Only 10 more days until Halloween! If you need a cute little decoration for your home or a little gift for someone, you’ve got to make something like this votive candle holder! It’s easy and you can make one in any style you like!

Look around your house and find a small votive holder that you almost certainly have in your house somewhere. If you don’t have an official votive holder, maybe you have a glass jar or a small glass vase. Then decide on what kind of decoration you want on the front of it.

I used the Best Witches Stamp Set, which I love for Halloween. I stamped the witch and her broom with Memento ink on Basic White cardstock and colored her in with Stampin’ Blends alcohol markers. You can choose whatever witchy colors you like! Or if you don’t have or don’t want a witch, use a pumpkin or black cat or whatever you have. Wrap a piece of designer series around the votive. Make it whatever width you want. Either you can join the ends in the back or you can join the ends in the front and then cover it with your main image. The witch I had to cut out by hand with Paper Snips because this stamp set has no dies.

Here’s one I made last year with the Cute Halloween Designer Paper. I just wrapped a ribbon around the glass votive holder instead of designer paper and I decorated each side. So easy and so much fun!

When your creation is finished just put a small candle inside, or better yet, a flameless votive for safety. You can change out the decorations on your votive holder for every season!

Fall Treat Bag with Pumpkin and Leaves

Fall Treat Bag with Pumpkin and Leaves

I hadn’t made a little treat or gift bag for awhile so I thought it was time for one for fall. You could give it to someone for Halloween because it has a pumpkin or it would be great for Thanksgiving. Maybe a little treat or party favor for Thanksgiving dinner!

Start with a piece of cardstock or designer paper cut 6″ x 11″. Score it on the long side at 1″, 5 1/2″, and 6 1/2″. Turn and score on the short side at 1″ x 5″. Check the photo below to see how to cut off two corner squares and snip on the sides on the score lines up to the vertical score lines. You can angle your cuts just a little if you like so they fit a little better. Crease all the score lines and play with folding everything together so you see how it goes together.

Fall Treat Bag cutting diagram

I used a pattern in the Rustic Harvest Designer Series Paper to make this bag, but you could use a Garden Green cardstock or any color you like if you prefer. You could also make the bag with cardstock and add some layers or pieces of designer paper to decorate it.

Before you assemble the bag, it’s easier to have the pumpkin adhered to the front panel first. I used the Hello Harvest Stamp Set to stamp the pumpkin on Basic White Cardstock with Memento Ink, then colored in with Light and Dark Pumpkin Pie Stampin’ Blends. I added a touch of green also. You can play with whatever combination you like.

I also stamped two leaves with fall colors in the same stamp set. To ink up those stamps, I used Stampin’ Write Markers using fall colors like green, orange, yellow, and maybe some Cajun Craze. Just lightly color those markers on random areas on the stamp, breathe on the stamp to moisten it, then stamp.

The banner is also in the stamp set. I stamped it on Basic White and colored it with So Saffron Stampin’ Blend.

For all these elements, I used the Rustic Pumpkin Dies to cut out these pieces. You can glue down the pieces flat or pop some or all of them up with Stampin’ Dimensionals. Since the top flap of the bag folds over, you need something to hold it closed. You could punch two holes and tie a ribbon through or use some kind of clip, whether an old Stampin’ Up! one or one in your desk supplies. I adhered just the top of the banner to that top flap and just used a Stampin’ Dimensional to hold the flap shut. It wouldn’t be too hard for the recipient to open it.

After you assemble the bag, just push in the sides, especially at the top a little bit to get it to close. Or cut off the flap and just have an open top.

Make this little bag even if you don’t plan to put anything in it or give it away! It will make a pretty decoration for fall sitting out in your home!

Remember to check the Clearance Rack, refreshed yesterday! Some great bargains you can be using now!

Rustic Harvest Fall Gourds Card

Rustic Harvest Fall Gourds Card

If you are looking for an easy card to make for fall or even Thanksgiving, this Rustic Harvest Fall Gourds Card is a little different with the fall gourds and pumpkins. Change the greeting for whatever sentiment you want to express.

The card base is Garden Green cardstock. This card was cut at 4 1/4″ lengthwise down the middle of a full sheet of cardstock, then scored at 5 1/2″. I intended to make it a top-fold standing card, but the design on the paper seemed like it should go horizontally so I just gave in! The horizontal card opens on the side instead of the usual vertical style.

I loved the gourd design and hadn’t used it yet. I chose the green swirly paper as a margin on the top and bottom of the gourd design. Both patterns are in the Rustic Harvest Designer Series Paper. I cut the green swirly designer paper at 1″ x 5 1/4″. The gourd paper is 3 1/2″ x 5 1/4″.

In my Tuesday newsletter, I talked about a tip to color designer paper, shared by Patty Bennett, if you weren’t entirely happy with how it looked as is. So on this gourd paper, I added some more orange color to the pumpkins and some green to the leaves, plus a little green and brown to the acorns. I used my Stampin’ Blends alcohol markers to add this color. I’m sure you could use Watercolor Pencils or some other coloring method if you wanted to. I thought it was pretty as it was, but I like the added color even better.

To assemble this card, I first adhered the green swirly DSP to the top and bottom of the card leaving a normal margin, then I adhered the gourd paper on top of that.

The greeting is stamped from the Full of Love Stamp Set in Garden Green ink. I die-cut it with a small banner in the Stylish Shapes Dies. I designed it so the greeting would be way over to the right side of the banner so I could have it even with the left side of the card and I cut that side straight off. I popped up the greeting with Stampin’ Dimensionals. For a finishing touch, I added one of the new embellishments, available starting Nov. 1st, in the Fitting Florets Collection. They are the Gold Adhesive-Backed Swirls. I thought this one gold swirl was just perfect to add in this space and great to be flat for easier mailing.

This Rustic Harvest Designer Series Paper is perfect for fall for any cards in general but especially if you wanted to send cards for Thanksgiving or cards in this season of gratitude.

Shop Stampin’ Up!