Cottage Wreaths Christmas Card

Cottage Wreaths Christmas Card

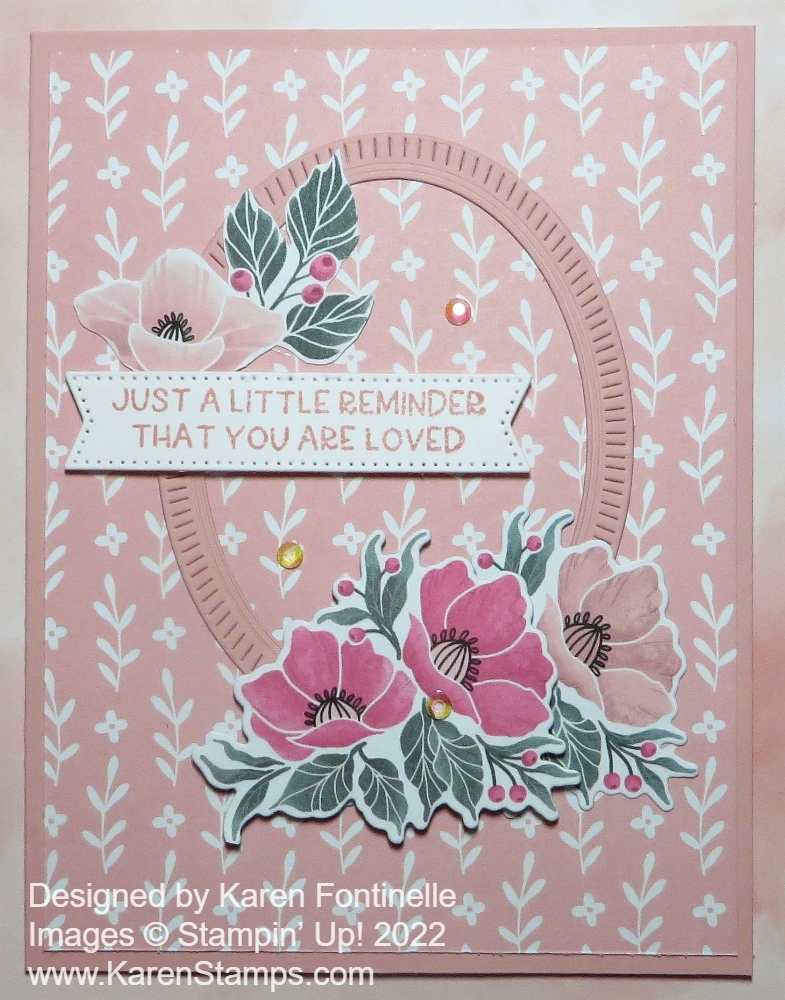
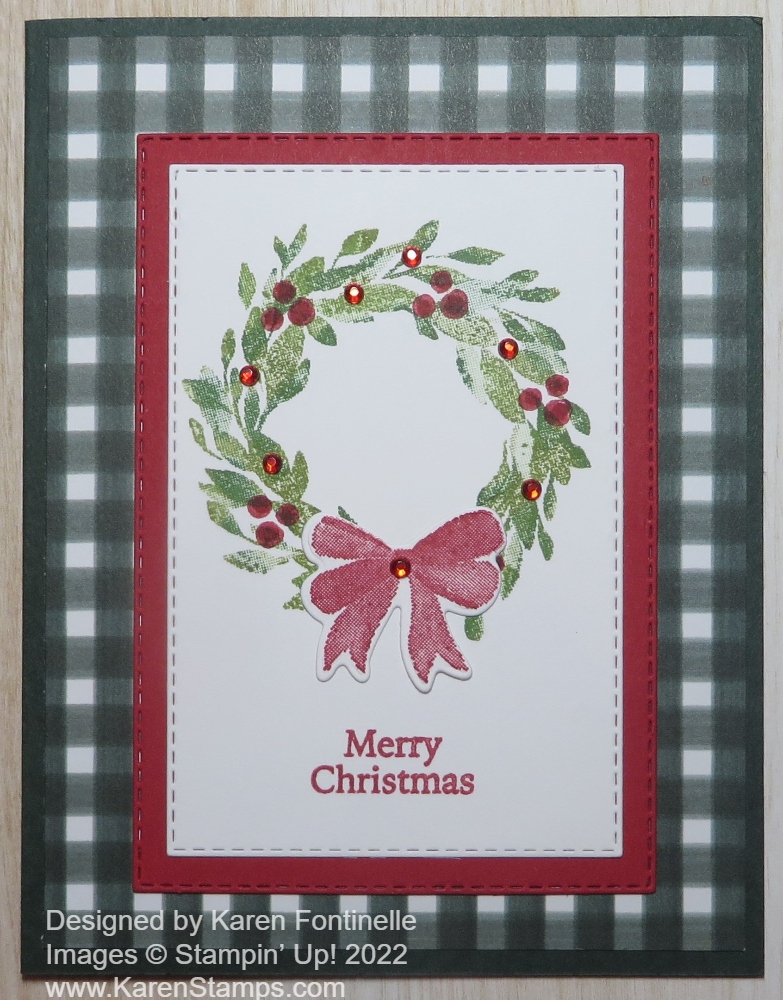
To make this card, I started off with the designer paper in the Fitting Florets Designer Series Paper, a new release coming November 1st. It has lots of flowers so you wouldn’t think you could use it to make a Christmas card. But this Evening Evergreen plaid pattern is perfect for this Cottage Wreaths Christmas Card. I even made it easier than I originally planned on!

The card base is Evening Evergreen to match the designer paper. I thought about putting a layer of Real Red in between the card base and designer paper, but I didn’t. I used the Stitched Rectangle Dies to cut out a piece of Basic White and a layer of Real Red. My Basic White piece is about 2 5/8″ x 4″ and the Real Red layer is 3″ x 4 3/8″. You can just cut out rectangles with your Paper Trimmer if you do not have the dies or you can make yours different sizes.

I simply stamped the wreath and berries in the Cottage Wreaths Stamp Set on the Basic White. I originally thought I would of course die cut it, but then I thought let’s just stamp it. I inked the wreath with Pear Pizzazz ink BUT then I added some other greens with Stampin’ Write Markers. I think I used Garden Green, Old Olive, and Granny Apple Green. I just randomly and lightly added the marker on various leaves of the wreath, trying not to do all of them. This is a Distinktive stamp set so just inking up a stamp and stamping automatically gives that textured look to the image. I thought it worked especially well with this wreath. Then I stamped the groups of three berries around on the wreath in Real Red. They were a little light so I couldn’t resist just adding a dab of Real Red Stampin’ Write Marker to each berry.

The bow in the stamp set was also stamped on a scrap of Basic White and die-cut with the Country Wreaths Dies. I just glued it onto the bottom of the wreath. You could also pop it up on Stampin’ Dimensionals. The greeting is stamped in Real Red and is also in the Cottage Wreaths Stamp Set. The size is perfect for this card design.

To finish it off, I used a few of the Red Rhinestone Basic Jewels. I like a little sparkle but you could easily leave these off or use ones that are not red. You could also color plain rhinestones with a Real Red Stampin’ Blend Marker.

If you want fancier, then use the wreath die cut and leaves and go for it! You can purchase the stamp set and dies in a Bundle, the Cottage Wreaths Bundle.

SHOP STAMPIN’ UP ONLINE HERE!

Framed Florets Greeting Card

Framed Florets Greeting Card

You’re probably wondering where this paper, dies, and stamp came from on this Framed Florets Greeting Card! It’s something brand new, coming soon in November! It’s called the Fitting Florets Collection and it’s coming in the Spring Mini Catalog, the January-June 2023 Mini Catalog. I know! Who can think about the Spring Mini Catalog when we haven’t even had Halloween yet!! But Stampin’ Up! is releasing this Collection on November 1st for customers.

“Add just the right touch of elegance to any occasion, including Christmas and seasonal celebrations, with the sweet Fitting Florets Collection. From color schemes to sentiments and embellishments to dies, these unique products blend together so that your cards and crafts fit whatever occasion you might need. Send birthday wishes, express your gratitude, or spread Christmas cheer—with so many options to mix and match you’ll be set no matter the celebration all year!”

Yes, believe it or not, you can use some of these products for Christmas!

  • Fitting Florets Collection (item 163129)
  • Framed Florets Bundle (item 162407)
  • Framed Florets Photopolymer Stamp Set (item 161815)*
  • Framed Florets Dies (item 160623)
  • Framed & Festive Cling Stamp Set (item 160888)*
  • Fitting Florets Designer Series Paper (item 161814)
  • Gold Adhesive-Backed Swirls (item 161822)

*Available in English and French

NOW…The following products will be available for purchase in the Mini Catalog starting January 2023: Framed Florets Bundle, Framed Florets Stamp Set, and Framed Florets Dies.

The Fitting Florets Designer Series Paper, the Framed & Festive Cling Stamp Set, and the Gold Adhesive-Backed Swirls are only available while supplies last! (until January 4, 2023)

So if you want EVERYTHING, order the Collection early in November before anything sells out.

For this card, I used a card base of Blushing Bride. I diecut one of the frames, plus certain flower groups on the DSP can be diecut with one of the dies. The rest you have to fussy cut! The bottom pink flowers on the frame are all die-cut. The one above the greeting is fussy cut. The greeting is in the Framed Florets Stamp Set. I die-cut it with a banner die in the Stylish Shapes Dies. I also added a few Iridescent Ice Rhinestones.

The Framed and Festive Stamp Set has Christmas greetings. Unfortunately, it is not pictured here. Here’s an interesting feature! The Bundle, the Stamp Set, and the Dies are ALL named the same – Framed Florets Bundle, Framed Florets Stamp Set, and Framed Florets Dies! You won’t have to remember the name of the dies which is different from the stamp set and different from the Bundle name! They are the same!

So there is your sneak peek at this upcoming Collection for November! Always fun to have something new!

New Paper Pumpkin Kit For November!

Paper Pumpkin Banner 3 Nov 2022

This November, Paper Pumpkin delivers this and more with its one-of-a-kind, holiday-themed crafting experience. This festive kit includes 12 fun, sparkly gift tags and (as always!) an exclusive stamp set—plus everything you need for a successful holiday crafting experience. 

This kit includes:

  • This month’s kit contains enough elements to create 12 tags—4 each of 3 designs. This all-inclusive kit includes printed die-cut paper pieces, twine, adhesive, and more!
  • Includes a Cherry Cobbler Classic Stampin’ Spot!
  • You’ll love decorating your gift tags with snowflakes and banner die-cut pieces on our Mint Macaron glitter specialty paper (a Paper Pumpkin exclusive).
  • Create festive gift tags for all your packaging needs this holiday season with classic Christmas colors and designs.
  • Finished gift tag size: 2″ x 3″ (5.1 x 7.6 cm)

Coordinating Stampin’ Up! colors: Basic Black, Cherry Cobbler, Crumb Cake, Mint Macaron, Shaded Spruce, Sweet Sorbet

If you need unique Christmas packaging to round out your gifting, you will be able to purchase these exclusive North Pole Sacks add-ons in the Online Store under Paper Pumpkin Past Kits, for subscribers only. Available now.

Join Paper Pumpkin by November 10th to receive this kit!

SUBSCRIBE NOW!

Full of Love Fall Card

Full of Love Fall Card

I just recently ordered this stamp set because I kept seeing some nice, simple cards with this envelope and flowers. It reminds me of the “simpler” stamp sets we mostly used to have before dies and fancier images!

This is the Full of Love Stamp Set. It’s very simple with just two envelope images with flowers, a couple of extra little flowers, and some nice greetings that are perfect for loved ones or friends. Sometimes just simple is nice!

This card base is Crushed Curry cardstock since it is fall. Of course, you can easily make this card for spring or summer just by changing the colors. I stamped the envelope and flowers with Memento ink on Basic White cardstock. Then I die cut the image with the largest square die in the Stylish Shapes Dies.

You can use any coloring technique you prefer. I used Stampin’ Blends. My flowers were yellow, orange, and pink. But I wanted the big yellow flower to have just a touch of orange. If you don’t pay attention to what you are doing, you can grab the wrong marker and I was coloring the yellow flower with Cajun Craze instead of a light orange! The big flower was originally colored with Daffodil Delight, the orange flowers with Pumpkin Pie, and the pink flowers with a base of Natural Tones 1000 and a tiny bit of highlight of Flirty Flamingo. Believe it or not, you can use the Natural tones markers for things other than animals or skin tones! There was this nice pinkish shade and of course lots of shades of brown. I probably should have added a little shading to the envelope but I forgot.

Since there is no larger square die, I just cut an Old Olive square layer and then a larger square of Pumpkin Pie. The greeting is in the Full of Love Stamp Set and is stamped in Old Olive ink and die cut with one of the banner dies in the Stylish Shapes Dies.

After laying out the pieces of my card, the background looked a little plain so I decided to stamp the little group of three tiny flower shapes in Crushed Curry randomly on the card. Then I adhered all the layers and the greeting. I added a double-strand of Linen Thread tied in a bow and adhered with a Glue Dot to the bottom of the greeting since there was a little extra space there. I also added some Iridescent Pearls around the stamped envelope and flowers.

This is a good stamp set to have on hand when you want to do a little simple coloring and stamping. This set is also good to use on the Basic White Notecards and Envelopes. Those are great to have on hand when you want to write just a short note or message and just want some simple stamping to decorate the card.

Shop Stampin’ Up! Online Here!

A Halloween Witch in the Pumpkin Patch Card

This A Halloween Witch in the Pumpkin Patch Card is one that I had fun making and kept adding more and more to it! You could make something similar but with a lot less detail! You have to like coloring if you make this same card although you could use something other than Stampin’ Blends if you wanted to.

The card base is Pumpkin Pie with a layer of Basic Black. You wouldn’t have to use the extra black layer, but I think it helps the card front to stand out.

The real story of this card is the card’s front layer! It is a piece of Basic White. Of course, the basic information is easy….just stamp the images, cut out and color, place everything and adhere! The witch is from the Best Witches Stamp Set. She is stamped in Memento Ink and colored with Stampin’ Blends. I chose some colors that are a little different so just play around with your markers! This witch obviously has a little too much blush on her cheeks! After coloring the witch, I looked for the die set to cut her out, then remembered that there aren’t any dies! So I just cut her out with my Paper Snips! She is popped up on Stampin’ Dimensionals and even a few Mini Dimensionals.

The first pumpkin I stamped and diecut with the Rustic Pumpkin Dies. It’s the pumpkin on the left that I set down low and trimmed off the overhanging bottom of the pumpkin in order to make it smaller. Then I stamped the pumpkin on the far right and planned to overlap that one with the die cut pumpkin. But then I thought, why not mask that pumpkin and stamp another one behind it?! I used various oranges and maybe some yellow and green on these pumpkins.

To give the witch some way to stand a little higher, I stamped the group of flowers in the Hello Harest Stamp Set in the left corner of the card. I colored the flowers and put some brown down around the flowers to look like ground and dirt for the witch to stand on!

For the sky, I stamped the little stars, colored them in with Dark Daffodil Delight, and then played around with the sky. I ended up using Smoky Slate first in just a scribbly way, then adding some other colors, like Petal Pink, Balmy Blue, and maybe some Pale Papaya. I think it ended up looking a little bit like a Halloween sky!

For the greeting, which I didn’t even think I had room for, I stamped “Best Witches” from the Best Witches Stamp Set on a scrap of Basic White. Then I just trimmed it by hand, cutting pretty close to the letters and cutting apart the words. I really like the way it fits on the card! I also had that stamped and colored little frog in the stamp set and the die-cut bat laying on my table so I stuck those on also! I really think the stamp sets that you can kind of build a little scene with are fun to play with!

If you like to color and make a Halloween night scene in the pumpkin patch, give this card a try!

SHOP STAMPIN’ UP! ONLINE HERE!

Abigail Rose Colored Flower Birthday Card

I’m a later comer to the Abigail Rose Suite and Cottage Rose Bundle but it’s a really pretty, different set to use. There are all kinds of flowers to either stamp or color in on the designer paper, or die cut. So many possibilities! This Abigail Rose Colored Flower Birthday Card came together pretty easily!

The card base is Crumb Cake but I almost used Early Espresso. Either would work. Before adhering the Abigail Rose Designer Paper to the card base, I adhered a piece of the Gold & Vanilla 3/8″ Satin Edged Ribbon around the top and bottom on the side, then tied on a bow with another piece of ribbon. This ribbon is so pretty with the gold and I thought it looked good with the brown print paper.

The flower and leaves are stamped in Early Espresso ink on Very Vanilla Cardstock. To easily and not perfectly color in the flower and leaves, I just used Sponge Daubers. I used Petal Pink Ink, a bit of Daffodil Delight for the flower center, some Gorgeous Grape ink for the tiny flowers, and Granny Apple Green for the leaves. Then I used a die to cut it out. Actually, I cut it out first, then colored it. Either way is fine. I popped this flower up on Stampin’ Dimensionals.

The greeting is in the Go-To Greetings Stamp Set. This is a new set I just got recently that has multiple sentiments but in different sizes and styles so you always have something you can use! I stamped it in Early Espresso Ink on Very Vanilla cardstock then die cut with one of the Painted Labels Dies.

For a finishing touch, I added three Brushed Metallic Adhesive Backed Dots. I thought they would go with the gold on the ribbon.

You could also stamp this flower and leaves and color in with Stampin’ Blends, Watercolor Pencils, Blender Pen and ink, and more. Or even leave it plain for a different, monochromatic look!

Here is another card I made with the Abigail Rose Designer Paper and Cottage Rose Stamps. If you like the look of this Abigail Rose Colored Flower Birthday Card you may want to check out the Suite or Bundle in the Online Store HERE.

Hello Harvest Pumpkins Card with Banner

Hello Harvest Pumpkins Card with Banner

This Hello Harvest Pumpkins Card with Banner turned out differently than the idea I had in my head when I started, but that’s what happens when you start looking through designer paper or different colors of paper or stamp sets. You never know for sure what you will come up with!

The card base is Soft Suede, after trying a multitude of different colors of cardstock! Then there are two layers of the Rustic Harvest Designer Series Paper. The yellow Crushed Curry pattern adhered to the Soft Suede card base is the reverse side of the layer of black and white acorns pattern! I had another black & white striped paper picked out to be the background layer but I liked this acorn pattern better. The acorn layer is 3 1/2″ x 4 3/4″ because I wanted more of the yellow to show.

The pumpkins are made with the Rustic Pumpkin Dies using Pumpkin Pie cardstock. These dies have a texture that transfers to the cardstock. I found that the texture would show better if I ran them through twice. The large pumpkin is made with the extra narrower piece adhered to the center of the large pumpkin piece. I also sponged some Pumpkin Pie ink around the edges of the pumpkin pieces and on top of the textured areas. For the little pumpkins, I die cut a narrow piece and then just trimmed it down, top and bottom, to make the two little pumpkins! The stems are diecut from Soft Suede. The vines are diecut from Shady Spruce and Granny Apple Green on the small pumpkins. I also sponged the little pumpkins but added some green ink because sometimes pumpkins have some variations of color on them.

The banner is stamped on the Crushed Curry Rustic Harvest paper, the same as the card layer. I first stamped the banner on Pumpkin Pie and sponged it but it was too much. The Crushed Curry banner looked better. Normally I don’t like things placed cockeyed, but since the large pumpkin is kind of tall and the banner is kind of large, I decided to place it at an angle in the corner! Sometimes you have to craft dangerously! Try something new!

Here is another fall card I made with the Rustic Harvest DSP with pumpkins. So many pretty patterns of paper for fall.

Shop Stampin’ Up! Online HERE!

My 12 Weeks of Christmas Begins Today!

12 Weeks of Christmas ornaments Starter

Today is the day my 12 Weeks of Christmas holiday emails begin! Hard to believe, I know, to think about Christmas when we have just entered fall! But we crafters know that we must start early on our handmade projects so we can get all the fun things finished on time that we want to make!

It’s just 4 hours until my first 12 Weeks of Christmas email goes out today at 1:00 PM (CT)! The only way you can get these emails is to be on my Stamping With Karen Mailing List! I send out a regular weekly email on Tuesdays and these holiday emails will go out on Wednesdays until Christmas! To get on my email, sign up in the red box on the right side of this blog. If you are on your phone, you may have to scroll to the bottom of your screen.

Or CLICK HERE to sign up for my emails and begin receiving these special holiday emails!

Every year I send out special holiday emails with a single project for you to make or by inspired by on Wednesdays to my mailing list subscribers. This is a thank you gift to them from me for following me and being on my newsletter list. I really do appreciate those who show an interest in my stamping business either by being a customer or even just following my blog and reading my newsletters.

Please join us and sign up now so you don’t miss the first 12 Weeks of Christmas email this afternoon!

New at Stampin’ Up!: Free Shipping Today, New Birthday Organizer, New Offer to Join!

FREE SHIPPING Oct 4 2022

TODAY ONLY!!

If your order is $75 or more today only, you get FREE SHIPPING!

Do a quick inventory of your basic supplies, look through the Holiday Mini Catalog and see what you need for the Holidays, maybe order those Medium Envelopes for your Christmas cards (I can feel a Stampin’ Up! envelope when I get one in the mail before I even see the card!), and don’t forget the new Warm Welcome Bundle, an early release from the Spring 2023 Mini Catalog, that was used on World Card Making Day and you can purchase now! If you are a Paper Pumpkin subscriber, or become one, order the refill for the Spooky Treats Kit so you will have plenty of treat boxes for the Halloween trick or treaters!

SHOP TODAY!

_______________________

New Birthday Card Organizer Kit in the Kits Collection TODAY!

DETAILS


  • Kit includes one 8″ x 10″ (20.3 x 25.4 cm) monthly planner with space to record birthdays each month as well as a pocket sleeve to hold birthday cards.
  • Includes 12 full-size birthday cards, 6 of 2 designs, and 12 coordinating envelopes.
  • Includes Glue Dots, Stampin’ Dimensionals, Adhesive-Backed Embellishments, and Tear & Tape Adhesive
  • Includes die-cut florals and pieces ready for you to use­—no prep work required!
  • Includes sticker sentiments and die-cut labels in Dutch, English, French, and German
  • Coordinating colors: Basic Black, Evening Evergreen, Petal Pink, Sahara Sand, and Soft Succulent

SHOP FOR THE BIRTHDAY CARD ORGANIZER KIT HERE!

__________________

Starter Kit Deal Oct 2022 Square Ad

JOIN STAMPIN’ UP! IN OCTOBER!

Beginning today, October 4th, you can join Stampin’ Up! and become an Independent Stampin’ Up! Demonstrator running your own business! This month is a special deal you will love to take advantage of! During October, starting today, you can join Stampin’ Up! by purchasing the Starter Kit and choosing more products than usual for the same price! Choose $155 in products and pay only $99 for your Starter Kit! Business supplies and catalog are included + the kit ships free!

Think about it and feel free to ask if you have any questions!

Information about Joining Stampin’ Up! HERE!

FREE SHIPPING Oct. 4th at Stampin’ Up!

If you got to watch the Stampin’ Up! Virtual Card Making Event yesterday, you found out that on Tuesday October 4th Stampin’ Up! is offering FREE SHIPPING on an order of $75 or more before tax! It’s a One Day Only deal!

If there are some items in the Holiday Catalog you need for Christmas cards or other holidays, envelopes, adhesives, cardstock, markers, ink refills……whatever you need to stock up on before we really jump into all our holiday crafting, Tuesday would be the day to order!

Check out the Kits Collection for a new Birthday Organizer Kit coming on Oct. 4 plus the Christmas Gifting Kit that is already out plus many more!

ORDER HERE!

And if you would like to start your own stamping business and be a part of Stampin’ Up! there is a deal on the Starter Kit as well! Choose $155 in product for your Starter Kit and pay only $99. Normally you would get $125 in your Starter Kit for $99 so you will get $30 more from October 4 -31 if you join during that time! You also get free business supplies and they ship your kit FREE! Be part of the fun of Stampin’ Up! Starts October 4!

Make out your shopping list today!

Monochromatic Polished Pink Cottage Rose Card

Monochromatic Polished Pink Cottage Rose Card

I wanted to make a quick and easy card so I opted to make this Monochromatic Polished Pink Cottage Rose Card. It basically is easy to make, it just wasn’t so quick as I worked on designing it. I wanted to add extra flowers, but it was difficult to add the additional stems and leaves. It’s imperfect for sure, but most people will not notice! Just us stampers!

This card was made with the very pretty flowers in the Cottage Rose Stamp Set. This is one of the stamp sets that will be shown in the Stampin’ Up! Virtual Cardmaking Event this afternoon! If you forgot or even if you never heard about it before, you can still join it today! It is 2:00 – 5:00 PM (MT). Just click on that link or go to Stampinup.com and click on the banner. It will take you to the link to view the event. You can gather your stamping supplies beforehand if you want to stamp along or just watch and enjoy. And best of all, it is FREE! AND there is a SURPRISE! Watch and find out!

Back to this card…I used a card base of Polished Pink Cardstock because I hadn’t used it in a long time! The card layer is Shimmery White Cardstock, one of my favorite papers! You can’t tell in the photo and it’s even hard to see in person, but the paper has just the lightest glimmer to it. I love it!

I simply stamped the largest floral stamp in Polished Pink ink on the Shimmery White Cardstock. However, I wanted more flowers so I stamped the largest single flower up in the corner. Next, I stamped the three little flowers on the diagonal on the left and right of the large stamp. But there were no stems, just these flowers floating in space. I ended up very carefully inking up a tiny bit of the stem on the leafy stamp and stamping it under each flower. Of course, I didn’t match them up perfectly, so I tried drawing in the rest of the stem in the tiny space with the tip end of the Dark Polished Pink Stampin’ Blend marker. It didn’t work really well, but it is okay! We don’t need “perfect” all the time!

It seemed like there was still empty space so I added two stamped leafy stamps to the top and bottom. At that point, I had to tell myself to stop! As my friend and I used to say when we were painting sweatshirts, wine glasses, plates, and everything else, “You have to know when to stop!”

There wasn’t much space for a greeting, so I just used the “forever friends” stamp in the Cottage Rose set. I covered up the word “forever” as I inked up the word “friends” and then stamped. If I messed up, I would have stamped it on a piece of Shimmer White and adhered it over the mistake. For a finishing touch, I added some sparkle with three Iridescent Rhinestone Basic Jewels.

Whether you get to watch the Stampin’ Up! event or not, take some time today to stamp on World Card Making Day and celebrate the craft we all love!

WORLD CARD MAKING DAY 2022 at STAMPIN’ UP!

Ready For the Stampin’ Up! Virtual Cardmaking Event?

WCMD Event

STAMPIN’ UP! FREE VIRTUAL, CRAFT-ALONG EVENT

Join Stampin’ Up! on Saturday, October 1st for a free, virtual World Card Making Day event. Gather your friends and craft along as we do what we all love—make cards! In just under three hours, we’ll make three unique cards together. Everyone is invited and welcome, and registration is not required.

Don’t miss out on this opportunity to connect with others who love crafting as much as you do and to experience all that Stampin’ Up! has to offer. 

AND…..There will be a SURPRISE!!

On Saturday at the correct time or before, go to the Stampin’ Up! website and click “Join Event”. It’s in big letters right at the top!

This is a worldwide online event, open to EVERYONE!! All you have to do is gather your supplies, get online at the appointed time and join the Stampin’ Up! presentation! Watch from the comfort of your own home or gather some friends together! This virtual card-making event will take place on Saturday, October 1, from 2:00 PM – 5:00 PM Mountain Time (MT).

CLICK HERE TO GET CUTTING INSTRUCTIONS FOR THE CARDS!

World Card Making Day is all about making beautiful, heartfelt cards. During the event, we’ll walk you through several projects, and you’ll create the cards right along with us. You’ll end up with new project ideas and some stunning new cards!

For the presentation, Stampin’ Up! will be using the Cottage Wreaths Bundle, the Cottage Rose Bundle, and the Warm Welcome Bundle. You may have two of those, but if not, just substitute with whatever sets you have that will work. Or just enjoy the ideas!

You can stamp along with the presentation or you can simply watch and enjoy! Registration is not required, but if you would like to be kept informed of the upcoming event, CLICK HERE and register! It’s FREE, remember!! It will be recorded so you can watch it later if you can’t watch it live or if you want to watch it again. It will be fun for sure!

I really encourage you to attend “virtually” and enjoy some stamping time with Stampin’ Up! It’s sure to be fun! And there’s that surprise!!

Coming Next Week! It’s the 12 Weeks of Christmas!

12 Weeks of Christmas ornaments Starter

Believe it or not, Christmas is not that far off, just a little over 12 weeks away, so it is time for my 12 Weeks of Christmas Holiday Emails to begin! These special emails will begin next Wednesday, October 5th!

Every week for 12 weeks you will be getting an email from me with a fantastic holiday project for you to make! It is completely FREE, but it is exclusive to people on my mailing list. You can use these ideas to make your holiday preparations easier!

This is a thank you gift for my mailing list subscribers that I like to do every year. Just like in my regular weekly email, I will send a photo of a project, a list of supplies needed, and all the directions to make it.

In the first few weeks, I will send card ideas since it’s likely that is the first thing most of us will work on at this point. Next, come a few weeks of gift ideas, and finally, as we are doing Christmas shopping, some ideas for gift wrap, bags, and gift tags.

These are exclusive projects that I won’t be posting on my blog or anywhere else. I just want my subscribers to know that you are appreciated! If you are already on my mailing list, no need to do anything!

The only way you can get these special 12 Weeks of Christmas emails is to be on my Stamping With Karen Mailing List! If you are not on my Mailing List, you better get on it before Wednesday, October 5th at 1:00 PM, otherwise, you are going to miss out! The first 12 Weeks of Christmas goes out on Wednesday!

Just sign up in the red box on the upper right if you are on my blog or click the link below!

JOIN THE STAMPING WITH KAREN MAILING LIST!


Paper Pumpkin Spooky Treats and Ghost Card

Paper Pumpkin Spooky Treats and Ghost Card

Here are the Spooky Treats I made from the September Paper Pumpkin Kit plus one Ghost Card I made with the cute ghost stamp and greeting in the Kit! I just loved this Paper Pumpkin Kit and can’t wait to make more of the treat boxes and maybe more “alternative” ideas! I’m thinking about ordering more kits! They will be so fun for Halloween!

Paper Pumpkin Kits are a papercrafting subscription kit you receive in the mail once a month. It is “usually” cards but some months, especially for the holidays, it might be something different. Everything you need is in the kit and with your first kit on your subscription, you receive a special acrylic block. Even the ink is included in a small square ink spot plus adhesives! There is even a video you can watch on your phone or computer so you can see how the kit goes together if you prefer. There is no obligation to continue for any certain amount of time and you can always skip a month if you choose. You can subscribe HERE!

The Spooky Treats Kit made the three treat boxes you see in the photo above. I love that the box is so easy to crease and fold and assemble into the box. That’s where the video comes in handy for the first time or two! And then you decorate the “sleeve” that wraps around the box and it’s all ready for you to add treats later or a small gift! You could make your own sleeve for another holiday or occasion if you wanted to. Do anything you want with your Paper Pumpkin Kit!

For the card, I used a card base of Basic Black with a layer of black and white polka dot paper in the Perfectly Penciled Designer Series Paper. You could also use the Black & White Designs Designer Series Paper in the Holiday Catalog. I stamped the ghosts on Basic White cardstock, Orchid Oasis, Tahitian Tide, and Parakeet Party, then cut them out by hand. The Happy Halloween greeting is in the Paper Pumpkin stamp set in the kit and is stamped with Orchid Oasis ink, then die cut with one of the Stylish Shapes Dies. The ghosts are popped up on Stampin’ Dimensionals. Very fun and easy to make! The kit makes these three versions of treat boxes, six of each!

You might assume that you are too late to get this cute kit, but while supplies last, you CAN purchase the full kit in the Stampin’ Up! Store or the refill if you already have the kit with the stamp set and ink. The only catch is that you must be a Paper Pumpkin subscriber to purchase the kit or the refill.

SPOOKY TREATS PAPER PUMPKIN PAST KIT

SPOOKY TREATS PAPER PUMPKIN REFILL

The only catch is that you must be a Paper Pumpkin subscriber in order to buy any of the Past Kits or Refills, but you will want to be a subscriber so that you receive the October Kit! Be sure to subscribe by October 10th to receive this Ho Ho Ho Kit!

‘Tis the season to make your own Christmas cards with the Ho Ho Ho Paper Pumpkin Kit! This kit contains whimsical designs of Santa and his reindeer in a classic Christmas color palette which is sure to match various styles of holiday décor and look great on mantles everywhere. 

Each kit contains enough supplies to create 9 festive cards—3 each of 3 designs—and 9 coordinating envelopes. These cards are sure to bring a warm holiday spirit. 

And word from the North Pole is that this kit coordinates with next month’s Paper Pumpkin tag kit and the special add-on product! With so much coordination between products, you’ll have a breeze at creating a cohesive look for all your holiday gifting needs. Make this season the most wonderful time of the year for your loved ones—and for yourself!

Sounds like SO much fun to me! I can’t wait!

JOIN PAPER PUMPKIN!

Abigail Rose Get Well Card

Abigail Rose Get Well Card

I just got this Bundle and designer paper recently and tried it out with this Abigail Rose Get Well Card. I wish I hadn’t waited so long because it all looks beautiful and I certainly have seen beautiful cards online made with these products! I bought them because I wanted them and the Cottage Rose Bundle is going to be used in the Stampin’ Up! Virtual Event, FREE for everyone, to be held this coming Saturday, October 1st on World Card Making Day! You are invited to join in, whether you stamp along during the event or whether you just watch and enjoy! There will be a replay if you want to watch it again or if you miss the live event. If you don’t have the Bundles they are using, just substitute with what you have.

For my first card with the Abigail Rose Designer Series Paper and the Cottage Rose Bundle, I wanted to start with something simple. I’m kind of fascinated with the designs and colors of the paper in the package. I don’t know that we’ve had a package before of “brownish” papers. These are all beautiful.

The card base is Early Espresso with a layer of this brownish floral pattern in the Abigail Rose DSP. Who would think some dark brown floral images on a Crumb Cake background could look so pretty and elegant?! I also purchased the Natural Finish Ribbon in the same suite of products. It is quite wide but very pretty. I haven’t tried it yet, but according to the catalog sample, it can be stamped on! This ribbon is made of flax and a cotton blend so it looks a lot like burlap but a lot more sophisticated! I simply adhered it across the width of the card.

The Cottage Rose Stamp Set has beautiful flowers and foliage and very nice greetings. The greeting on this card is one in the set, stamped in Early Espresso ink. I die-cut the greeting using the label in the All That Dies. To embellish the greeting a little bit, I stamped a few of the small flowers in the set around the edge in Crumb Cake ink.

The die-cut leaves were stamped in Crumb Cake ink on Very Vanilla cardstock and one stamped on Crumb Cake cardstock. The greeting is popped up on the Mini Stampin’ Dimensionals at the top and bottom so they would fit above and below the wide ribbon. Then I just tucked the die-cut leaves underneath, cutting some stems to make them a little shorter to fit better.

On the inside of the card, I added a Very Vanilla layer stamped in the corners with one of the flowers in the stamp set.

For my first try with this Cottage Rose Bundle and Abigail Rose Designer Paper, I made a simple but elegant card with a greeting to send to someone who is under the weather for whatever reason and those are good cards to have on hand, ready to send when needed.

I hope you will try to at least watch part of the Stampin’ Up! Virtual Event on Saturday or the replay. I don’t know what this one will be like but Stampin’ Up! events of any kind are always fun and worthwhile. Maybe you will pick up some new ideas or maybe it will just be some time for yourself to relax and watch some beautiful stamping! Just go to the Virtual Stamping Event page to find the link to join. The time of the event will be 2:00 PM – 5:00 PM Mountain Time on Saturday, October 1st.