Tag Archives: Cottage Rose Stamp Set

Abigail Rose Floral Card With Vellum

Abigail Rose Floral Card With Vellum

Today is the last day for the Stampin’ Up! Seasonal Sale so save some money buying all the products for making this card! Today is the last day to save buying punches, stamp sets, dies, embossing folders, and non-specialty designer series paper! These products in the Annual Catalog only are on sale for 10-20% off!

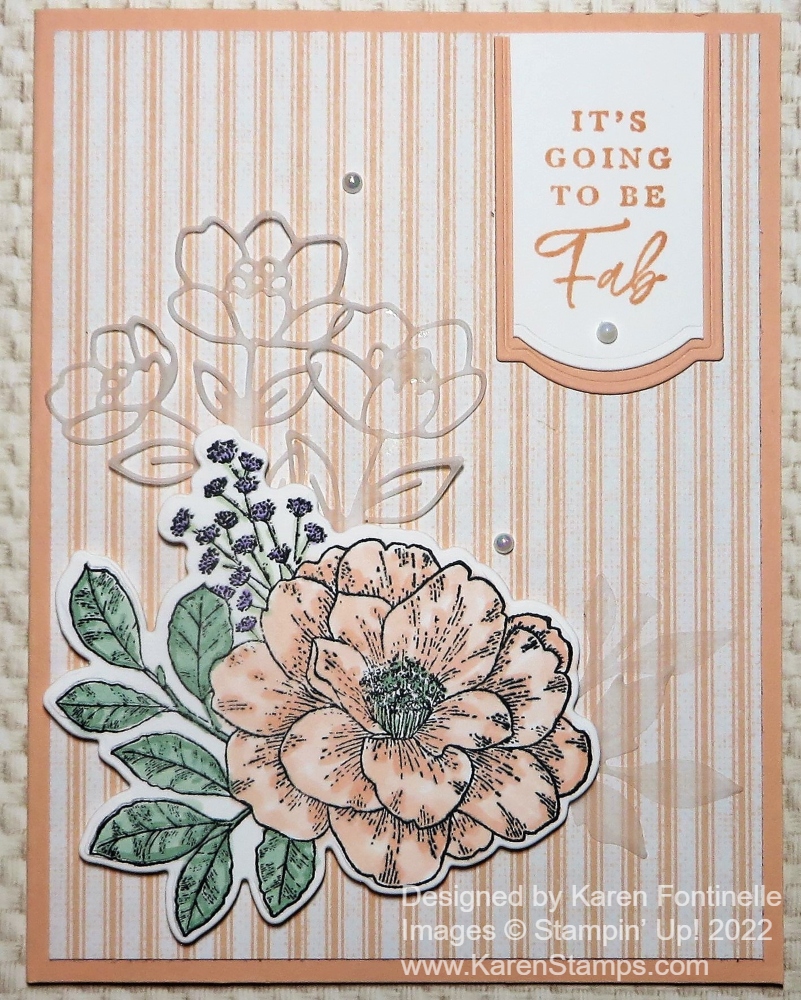
This card is made with some of the products in the Abigail Rose Suite. The card base is Petal Pink with a layer of the pink striped pattern in the Abigail Rose Designer Series Paper. I just love that striped paper! It’s so simple and plain yet so pretty and such a great background for something even greater! This Abigail Rose DSP is regularly $12.00, but it is on sale for $9.60 so you can save $2.40!

For the focal point of the card, I stamped the large flower and leaves in the Cottage Rose Stamp Set. This stamp set is regularly $25.00 but it is on sale for $21.25, saving you $3.75. The floral piece is stamped in Memento ink and then colored in with Stampin’ Blends markers in the Petal Pink Combo and Mint Macaron Combo plus a little Highland Heather for the tiny little flowers. This flower was die cut with the die in the Cottage Flowers Dies. The dies sell for $34.00 but they are on sale for $27.00, a savings of $7.00.

After looking at the dies, I cut out some more flowers using Vellum Cardstock. I stuck the flowers and leaves underneath the popped-up flower. I should have used the Adhesive Sheets to make it easy to adhere the vellum pieces to the card since they are so thin! But tiny drops of Multipurpose Liquid Glue did the trick pretty well.

The greeting on the card is in the Cottage Rose Stamp Set. I stamped it on Basic White Cardstock and then die-cut it using one of the label dies in the Painted Labels Dies. I also cut the same shape out of Petal Pink. In order to layer the pieces, I trimmed down the Basic White just a tad on the sides. I cut off the tops of both so they would line up with the edge of the designer paper at the top of the card. The Painted Labels Dies are also on sale and would save you $7.00!

So just for fun, if you purchase the two die sets to make this card, the stamp set, and the designer paper, you would save $13.15! The Cottage Rose Bundle at $53.00 for the stamp set and dies today costs $4.75 more in the Bundle than if you bought the two products separately!

For a little bling, I added three Iridescent Pearls to the card!

Check your Stampin’ Up! Annual Catalog today and see what you ‘need’ that is on sale today!

10% off all punches
15% off all stamps (Host stamp sets are not included in this sale)
20% off all dies
20% off all embossing folders
20% off all non-specialty Designer Series Paper

SHOP STAMPIN’ UP & the SEASONAL SALE TODAY!

Abigail Rose Tulip Birthday Card

Abigail Rose Tulip Birthday Card

This card came about because I always forget I have this beautiful designer paper, and when I came across it yesterday, I had to use it! It’s always like a new surprise when I find it in my collection of current designer papers!

This is really an easy card to make because you can let the paper do all the work! It’s the Abigail Rose Designer Series Paper in the Stampin’ Up! Annual Catalog in the Abigail Rose Suite on pages 56-57. Sometimes we forget about the Annual Catalog when we get so interested in the Mini Catalogs that are out!

I chose this pattern with tulips, but all the papers are pretty in their own ways. The card base is Early Espresso Cardstock with a layer of Petal Pink. Those are coordinating colors for the designer paper.

The greeting is stamped in Early Espresso with a stamp in the Cottage Rose Stamp Set in the Suite Collection. Besides the pretty flowers, this stamp set also has some lovely sentiments to use.

The greeting is cut out with one of the narrow banners in the the Stylish Shapes Dies. Then I also cut a Petal Pink layer from the Stitched Rectangle Dies to be a layer for the birthday greeting. For a finishing touch I added a bow made with the White 1/4″ Crinkled Seam Binding Ribbon.

So as you can see, this is just a card with a layer under the designer paper and a stamped and diecut greeting! Here’s another “basic” card I made with another pattern of the Abigail Rose paper. These ideas are quick and easy cards to keep in mind when you need to make a card without much time!

SHOP STAMPIN’ UP! ONLINE HERE!

Abigail Rose Colored Flower Birthday Card

I’m a later comer to the Abigail Rose Suite and Cottage Rose Bundle but it’s a really pretty, different set to use. There are all kinds of flowers to either stamp or color in on the designer paper, or die cut. So many possibilities! This Abigail Rose Colored Flower Birthday Card came together pretty easily!

The card base is Crumb Cake but I almost used Early Espresso. Either would work. Before adhering the Abigail Rose Designer Paper to the card base, I adhered a piece of the Gold & Vanilla 3/8″ Satin Edged Ribbon around the top and bottom on the side, then tied on a bow with another piece of ribbon. This ribbon is so pretty with the gold and I thought it looked good with the brown print paper.

The flower and leaves are stamped in Early Espresso ink on Very Vanilla Cardstock. To easily and not perfectly color in the flower and leaves, I just used Sponge Daubers. I used Petal Pink Ink, a bit of Daffodil Delight for the flower center, some Gorgeous Grape ink for the tiny flowers, and Granny Apple Green for the leaves. Then I used a die to cut it out. Actually, I cut it out first, then colored it. Either way is fine. I popped this flower up on Stampin’ Dimensionals.

The greeting is in the Go-To Greetings Stamp Set. This is a new set I just got recently that has multiple sentiments but in different sizes and styles so you always have something you can use! I stamped it in Early Espresso Ink on Very Vanilla cardstock then die cut with one of the Painted Labels Dies.

For a finishing touch, I added three Brushed Metallic Adhesive Backed Dots. I thought they would go with the gold on the ribbon.

You could also stamp this flower and leaves and color in with Stampin’ Blends, Watercolor Pencils, Blender Pen and ink, and more. Or even leave it plain for a different, monochromatic look!

Here is another card I made with the Abigail Rose Designer Paper and Cottage Rose Stamps. If you like the look of this Abigail Rose Colored Flower Birthday Card you may want to check out the Suite or Bundle in the Online Store HERE.

Monochromatic Polished Pink Cottage Rose Card

Monochromatic Polished Pink Cottage Rose Card

I wanted to make a quick and easy card so I opted to make this Monochromatic Polished Pink Cottage Rose Card. It basically is easy to make, it just wasn’t so quick as I worked on designing it. I wanted to add extra flowers, but it was difficult to add the additional stems and leaves. It’s imperfect for sure, but most people will not notice! Just us stampers!

This card was made with the very pretty flowers in the Cottage Rose Stamp Set. This is one of the stamp sets that will be shown in the Stampin’ Up! Virtual Cardmaking Event this afternoon! If you forgot or even if you never heard about it before, you can still join it today! It is 2:00 – 5:00 PM (MT). Just click on that link or go to Stampinup.com and click on the banner. It will take you to the link to view the event. You can gather your stamping supplies beforehand if you want to stamp along or just watch and enjoy. And best of all, it is FREE! AND there is a SURPRISE! Watch and find out!

Back to this card…I used a card base of Polished Pink Cardstock because I hadn’t used it in a long time! The card layer is Shimmery White Cardstock, one of my favorite papers! You can’t tell in the photo and it’s even hard to see in person, but the paper has just the lightest glimmer to it. I love it!

I simply stamped the largest floral stamp in Polished Pink ink on the Shimmery White Cardstock. However, I wanted more flowers so I stamped the largest single flower up in the corner. Next, I stamped the three little flowers on the diagonal on the left and right of the large stamp. But there were no stems, just these flowers floating in space. I ended up very carefully inking up a tiny bit of the stem on the leafy stamp and stamping it under each flower. Of course, I didn’t match them up perfectly, so I tried drawing in the rest of the stem in the tiny space with the tip end of the Dark Polished Pink Stampin’ Blend marker. It didn’t work really well, but it is okay! We don’t need “perfect” all the time!

It seemed like there was still empty space so I added two stamped leafy stamps to the top and bottom. At that point, I had to tell myself to stop! As my friend and I used to say when we were painting sweatshirts, wine glasses, plates, and everything else, “You have to know when to stop!”

There wasn’t much space for a greeting, so I just used the “forever friends” stamp in the Cottage Rose set. I covered up the word “forever” as I inked up the word “friends” and then stamped. If I messed up, I would have stamped it on a piece of Shimmer White and adhered it over the mistake. For a finishing touch, I added some sparkle with three Iridescent Rhinestone Basic Jewels.

Whether you get to watch the Stampin’ Up! event or not, take some time today to stamp on World Card Making Day and celebrate the craft we all love!

WORLD CARD MAKING DAY 2022 at STAMPIN’ UP!

Abigail Rose Get Well Card

Abigail Rose Get Well Card

I just got this Bundle and designer paper recently and tried it out with this Abigail Rose Get Well Card. I wish I hadn’t waited so long because it all looks beautiful and I certainly have seen beautiful cards online made with these products! I bought them because I wanted them and the Cottage Rose Bundle is going to be used in the Stampin’ Up! Virtual Event, FREE for everyone, to be held this coming Saturday, October 1st on World Card Making Day! You are invited to join in, whether you stamp along during the event or whether you just watch and enjoy! There will be a replay if you want to watch it again or if you miss the live event. If you don’t have the Bundles they are using, just substitute with what you have.

For my first card with the Abigail Rose Designer Series Paper and the Cottage Rose Bundle, I wanted to start with something simple. I’m kind of fascinated with the designs and colors of the paper in the package. I don’t know that we’ve had a package before of “brownish” papers. These are all beautiful.

The card base is Early Espresso with a layer of this brownish floral pattern in the Abigail Rose DSP. Who would think some dark brown floral images on a Crumb Cake background could look so pretty and elegant?! I also purchased the Natural Finish Ribbon in the same suite of products. It is quite wide but very pretty. I haven’t tried it yet, but according to the catalog sample, it can be stamped on! This ribbon is made of flax and a cotton blend so it looks a lot like burlap but a lot more sophisticated! I simply adhered it across the width of the card.

The Cottage Rose Stamp Set has beautiful flowers and foliage and very nice greetings. The greeting on this card is one in the set, stamped in Early Espresso ink. I die-cut the greeting using the label in the All That Dies. To embellish the greeting a little bit, I stamped a few of the small flowers in the set around the edge in Crumb Cake ink.

The die-cut leaves were stamped in Crumb Cake ink on Very Vanilla cardstock and one stamped on Crumb Cake cardstock. The greeting is popped up on the Mini Stampin’ Dimensionals at the top and bottom so they would fit above and below the wide ribbon. Then I just tucked the die-cut leaves underneath, cutting some stems to make them a little shorter to fit better.

On the inside of the card, I added a Very Vanilla layer stamped in the corners with one of the flowers in the stamp set.

For my first try with this Cottage Rose Bundle and Abigail Rose Designer Paper, I made a simple but elegant card with a greeting to send to someone who is under the weather for whatever reason and those are good cards to have on hand, ready to send when needed.

I hope you will try to at least watch part of the Stampin’ Up! Virtual Event on Saturday or the replay. I don’t know what this one will be like but Stampin’ Up! events of any kind are always fun and worthwhile. Maybe you will pick up some new ideas or maybe it will just be some time for yourself to relax and watch some beautiful stamping! Just go to the Virtual Stamping Event page to find the link to join. The time of the event will be 2:00 PM – 5:00 PM Mountain Time on Saturday, October 1st.