
This year may be different, but I hope you are finding some joy in Christmas today!
Merry Christmas
and we will look forward to a Happy New Year soon!

This year may be different, but I hope you are finding some joy in Christmas today!
Merry Christmas
and we will look forward to a Happy New Year soon!
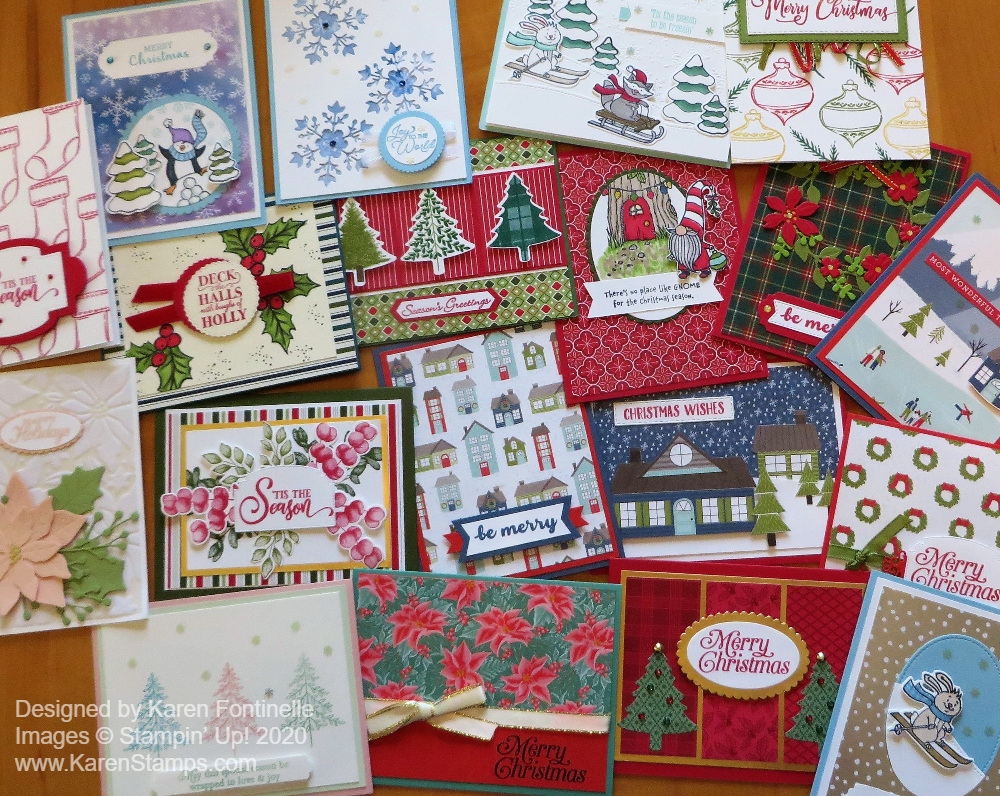
Can any of us relate to this poem?? I knew there were some stamping poems out there, from many years ago, and after searching I found this one in a forum from 2005! I don’t think the Demonstrator knew where it came from, it was shared with her from others, so I have no idea who came up with it, but they knew what they were talking about! I can think of one dear stamping friend in particular, but I think it applies to most of us! (Except for those people who had their cards done last summer! But what fun is that?!)
Enjoy! And have a Happy Christmas Eve!
The Week Before Christmas (In a Stamper’s House)
‘Twas the week before Christmas, and the house was a hush
Save the stamping of rubber in a last minute rush.
The cardstock was cut with precision and care
In hopes that a greeting would soon be stamped there.
The children were tucked in their beds around eight,
But now it’s ten-thirty… How’d it get so late?
And I in my PJs with bleary red eyes
Had finally arranged all the stamping supplies.
It started out simple. (It does every year.)
Just make a few cards for friends who are dear.
I pressed ink to paper. (It looked crisp and clean.)
A sprinkle of powder, heat to a sheen.
When what on my green Christmas card should appear?
Why, a tiny gold Santa with sleigh and reindeer.
On pigment! On powder! On heat from a gun!
Now ribbon and glitter! Can I make eighty-one?
“I can do it!” I said with all of my might
And looked at the clock – ’twas well past midnight.
I went straight to stamping out card after card.
“This might take all night, but at least it’s not hard.”
But after I finished, they looked a bit lame.
I didn’t want fancy, but these were too plain.
And then in a twinkling, a thought came to mind.
“I’ll just dress them up, and then they’ll be fine.”
So I went to my craft room and looked all around,
Then back to the table with all that I’d found.
My Fiskars I brandished (I wasn’t a quitter),
And soon I was covered in EP and glitter.
The cap of a marker I held in my teeth.
I’d lay in some color or maybe gold leaf.
My broad little face was all beaded with sweat,
But I wouldn’t give up – well, not at least yet.
There was glue on the table and ink on the floor.
I laughed at the sight though my fingers were sore.
I did not complain, just kept up my work.
When more things went wrong, I did not go berserk.
When finally finished, one card about six,
It looked pretty good after all of my tricks.
I’m keeping this one. My work on it shows.”
So clutching my card, up the stairs I arose.
I crawled into bed at the crack of dawn,
Creativity all spent, motivation all gone.
But make no mistake, I promise one thing:
You’ll all get your cards, but not ’til next spring!
–Author Unknown
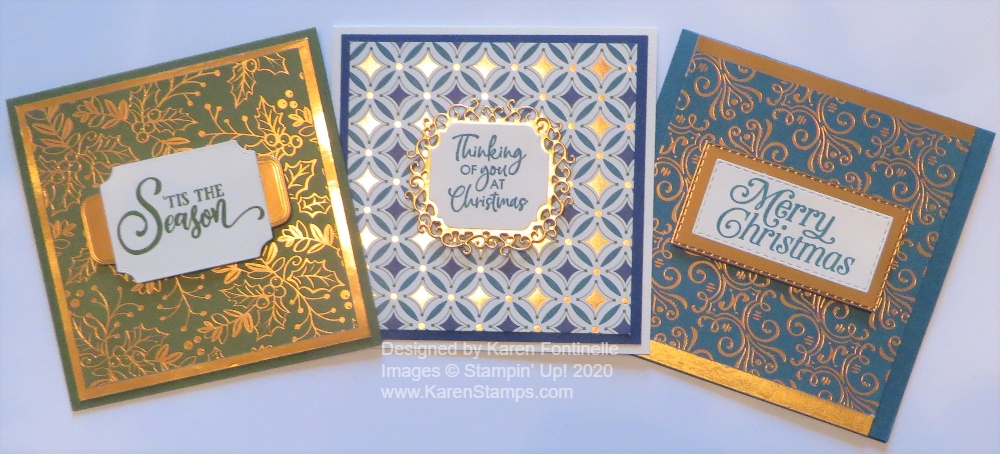
We’re down to the wire but you may still need some easy Christmas cards to make to put with a gift (or even mail late!) so take a look at these Brightly Gleaming Square Christmas Cards that you can make!
You can make square cards any size you like. I made these 4 1/4″ x 4 1/4″ by just cutting across a full sheet of cardstock horizontally at 4 1/4″. Since the paper is 8 1/2″ wide, when you fold it in half you have 4 1/4″ so that works out perfectly! You could also do 3″ x 3″ for a gift enclosure. Just trim your paper at 3″ x 6″.
You can make it super simple and just add a layer of designer paper, but I added some Copper Foil behind the designer paper on two of the cards. The first card has a base of Mossy Meadow Cardstock, then foil under the Mossy Meadow pattern of the paper, all just regular margins like we make on our cards.
The card on the right has a card base of Pretty Peacock Cardstock. When I went to make the foil layer underneath the Pretty Peacock pattern, all I had were scraps of the Copper Foil so I just cut two strips of foil and put them on two sides of the designer paper. It looks like I designed the card that way, not that I ran out of paper!
For the middle card, I used a card base of Very Vanilla with a layer of Night of Navy underneath the designer paper.
Each card just has a stamped greeting that is die-cut and then layered on another die-cut. You could use punches or simply cut squares or rectangles for the greetings and layers. I won’t even list the dies I used, just use what you have!
These cards I made are difficult to photograph because of the pretty foil accents on the Brightly Gleaming Specialty Designer Series Paper. This paper is, as I write this, on the Giant Year-End Closeout sale, discounted 50%! It’s very pretty so you might want to grab some if it is still available.
Square cards are quite the thing these days. The only thing is that if you mail a square card in a square envelope you are supposed to pay a surcharge. But these square cards will fit in our regular Medium Envelopes so no worries. But if you are just enclosing one with a gift or handing one to someone, you can use or make a square envelope with no issues.
These cards with just a card base, layer, and greeting are simple to make. Change up the designer paper or colors and greetings and you can make a card for a birthday or congratulations or whatever you need. Remember to check out this pretty paper in the Stampin’ Up! Online Store. It is well-worth 50% off for sure! If you need last-minute cards, try these Brightly Gleaming Square Christmas Cards!

As we are busy getting ready for Christmas this week, take a moment to breathe and relax by looking online at the Stampin’ Up! Giant Year-End Closeout! Remember, the August-December 2020 Mini Catalog (Holiday Catalog) is retiring January 4th. Some products will carry over to future catalogs, but a lot is leaving.
I hate to see the end of the Holiday Catalog, yet by the time the holidays are over, I am ready for the fresh, new things in the next catalog! The January -June 2021 Mini Catalog (Spring Mini) will go live January 5th as well as Sale-A-Bration! If you are a regular customer of mine, you probably have received (or will receive soon) both the Spring Mini Catalog and the Sale-A-Bration Brochure. Be sure to watch your holiday mail! I know some customers have received theirs but with the mail so unpredictable these days, yours may still be on its way! (Or the mail person is enjoying reading it before giving it to you!!)

Also, the Clearance Rack was “refreshed” not long ago but there are only a few products left! Be sure to check it out. You might find a bargain or two that you “need”!
I hope you are closer to “done” with your Christmas preparations than I am! I’m still doing my cards, believe it or not. It’s my favorite thing to do but it always get saved until last and then it’s a rush. Sending my Christmas cards always reminds me of my mother. She always had her Christmas card register booklet with everyone’s addresses and would write notes inside in her pretty handwriting and address all the envelopes. We had typewriters and return address labels (I think) but no computers to write a Christmas letter. I remember when the mailman would make two trips in a day to deliver Christmas cards! Now that was the “good old days!”
Don’t miss out on the bargains that are available now. Maybe you need a Christmas present for yourself (although you know it won’t arrive until after Christmas!). I’m probably going to pick up something I want this afternoon just because! Take care of yourself, too!
Happy Holidays!
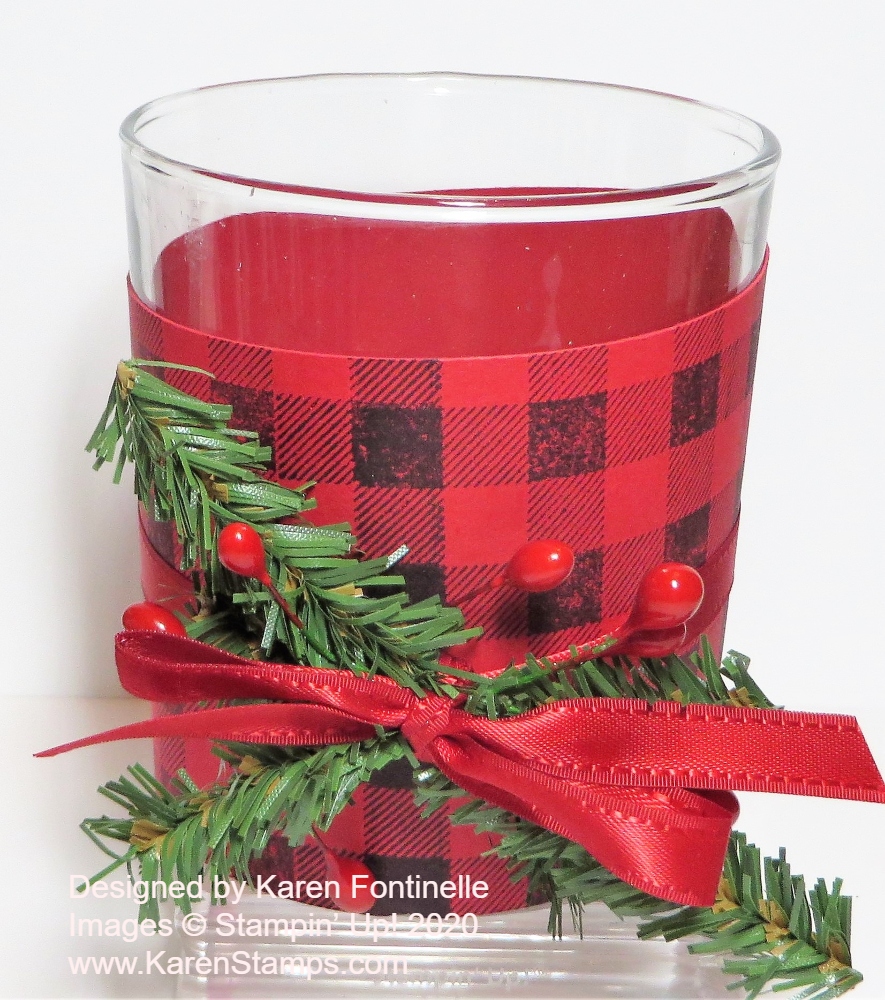
I was watching someone’s Instagram “story” and saw in her home these black and white buffalo check candles. I think black and white is trendy in some Christmas home decorations this year. It gave me the idea to decorate a glass candle holder I had with a red and black buffalo check which is a little more traditional.
If you have a real candle, a flameless candle (even better), or a votive or candle holder of some kind, you can decorate it with your papercrafting supplies. We can do so much with our stamping supplies! That is why it is such a great hobby!
I haven’t used it in awhile, but I got out my Buffalo Check Stamp. This is a large background stamp, as we used to call them. You can purchase either the “cling” or the “wood-mount”. If you choose the cling, you need the largest acrylic block on which to mount it. I have always liked to use my background stamp stamp-side up, ink it up, and then lay the cardstock I am stamping on top of it. Then I take a scrap paper to cover the cardstock so I can rub all over with my fingers to make sure every area gets inked up.
This stamp was a little tricky but I got lucky! Obviously I wanted to line up the pattern going around the strip of cardstock that was going to go around my votive holder and it worked! Somehow I managed to lay down the strip in just the right place, at least close enough.
For decoration, I wrapped around a piece of Real Red Satin Ribbon and then tied on some pieces of greenery I had in my craft stash. I also had some of those red berries that I stuck in there. Maybe I could have added some other embellishments I have but I stopped with this. I could also have added a greeting on the candle. You can do so much with a project like this yet keep it very simple.
Look around your house and surely you will find some votive holders or maybe vases or who knows what that you can decorate for the holidays for little decorations in your home or maybe on your holiday dinner table. Here’s another votive holder I decorated by cutting out images from the fall Gilded Autumn Designer Series Paper. Just use your imagination and you will come up with a fun decoration for a Christmas candle or votive or even to give one as a gift!

How about making some Snowman Gift Tags for your presents you may be furiously wrapping at the last minute?! Here are three ideas you can use! Everyone loves snowmen!
As I was wrapping my gifts, I came across the center Layered Snowman Gift Tag that I had made several years ago. Sometimes we save the tags from packages we open and I put them away until the next year. Then we can reuse them as long as we check the “To:” and “From:” on the tags so there are no mixups! I decided to update my snowman tag.

This is a fun tag to put on a package! Much better than those plain To & From tags you buy, 1000 in a package and have to tape on!
To make this tag, I die cut the largest circle in the Layering Circle Dies and then chose two smaller dies (about every other size) for the body and head. I sponged the edges with Balmy Blue Ink just a little and popped them up on Dimensionals. Just make a hat out of a piece of Basic Black and the brim with a piece from the Classic Label Punch with the ends cut off.
To decorate the hat I just cut a sprig from a Forever Flourishing Die and the three little Real Red flowers from a die in the Budding Blooms Dies. There are certainly a whole lot of other leaf shapes and flowers, whether die-cut, punched, or cut out by hand that you could use! I added the tiniest Gold Glitter Enamel Dots to the flower centers.
The snowman face I just drew on with markers. The ribbon is Seaside Spray Metallic Ribbon to represent the snowman’s scarf. Punch a hole in the top if you want to tie on a ribbon for a tag or even just use the snowman as a decoration on a package!

This Snowman Season tag is really easy since it just uses one ink color, Balmy Blue. First I made a tag out of Balmy Blue Cardstock with the Scalloped Tag Topper Punch and then added a layer of Whisper White. I stamped the one snowman from Snowman Season in Balmy Blue and added the “To: From:” at the bottom. I used the Silver 3/8″ Metallic Edge Ribbon for the tie (one of my all-time favorite ribbons!).

This tag I made a little fancier since the other two were pretty simple. But this one is still simple! I just cut a 3″ x 4″ rectangle of Balmy Blue Cardstock and layered with a piece of Whisper White. The snowman from Snowman Season is stamped with Memento Ink and I did the little bit of coloring with various colors of Stampin’ Blends, even a tiny bit of Balmy Blue around the sides of the snowman for shading and to look a little cool and icy. I also just scribbled some Balmy Blue under the snowman to look like snow. Some glitter would have been nice, too! The snowflakes are stamped from the set and the greeting is from the set. I cut the words out separately after stamping so I could arrange them on the tag. Then I added some Adhesive-Backed Snowflakes (which may be sold out now but you can use other gems and jewels!) for a little more bling!
Once you get started making tags, you might not be able to stop because you will come up with more and more ideas and they don’t have to be fancy! If your packages are wrapped already, you might consider having fun stamping and making tags for next year AFTER Christmas when you maybe have some free time! These Snowman Gift Tags are fun and easy to make and the gift recipient will likely enjoy them!
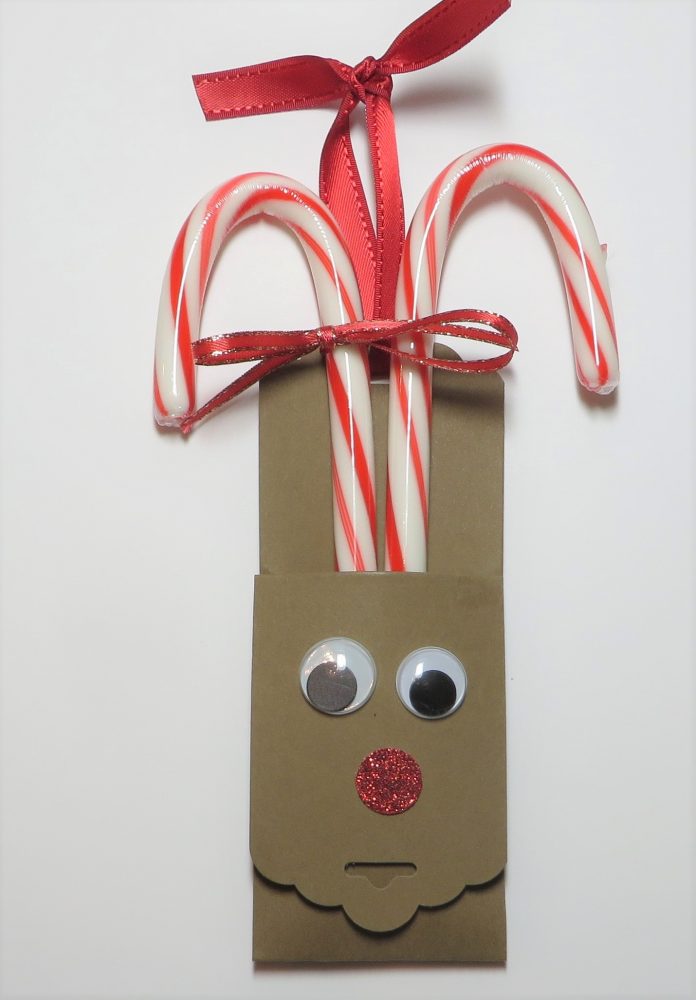
Here’s a cute Reindeer Candy Cane Treat I found online looking for candy treat ideas. This isn’t what I intended to make at all, but once I saw it I had to make it since I did have a box of candy canes! I did see lots of different versions, this one I believe was made by a Demonstrator in the UK. She used a 12″ x 12″ piece of cardstock whereas I used a regular size of cardstock, forgetting that hers was larger! But it all turned out all right in the end!
To make the Reindeer Candy Cane Treat, cut a strip of cardstock 11″ x 2″ (just a smidge under 2″ so it fits in the punch!). Each end is punched with the Scalloped Tag Topper Punch. Score at 2 3/4″ and 5 3/4″. Add strips of Tear & Tape to form the pocket to hold the candy canes.
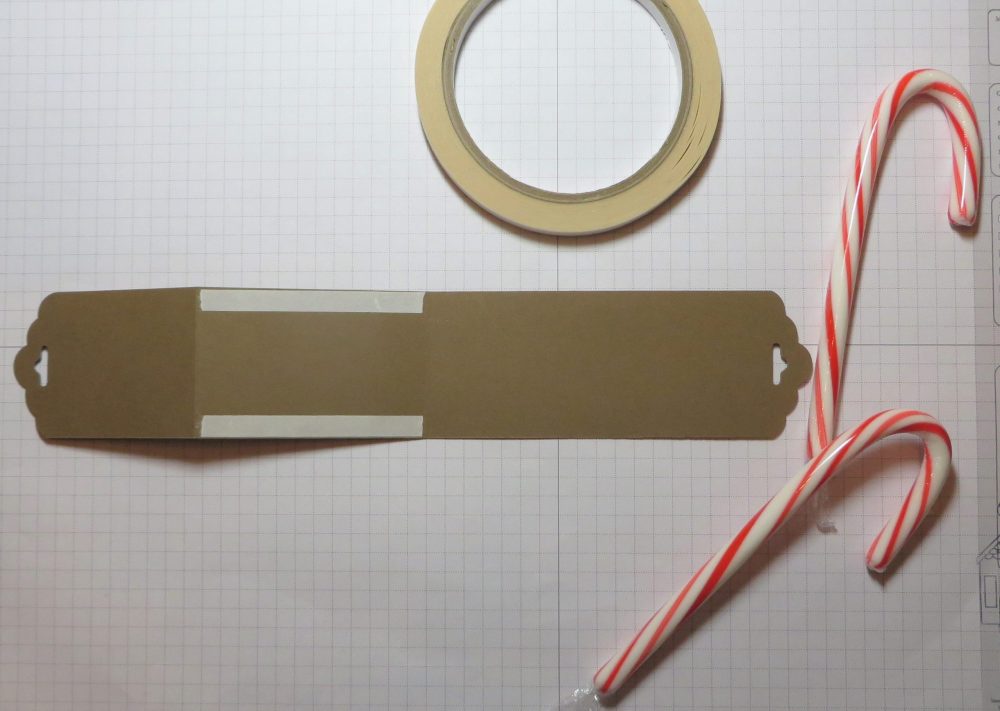
Fold on the score lines in a zig zag fashion.
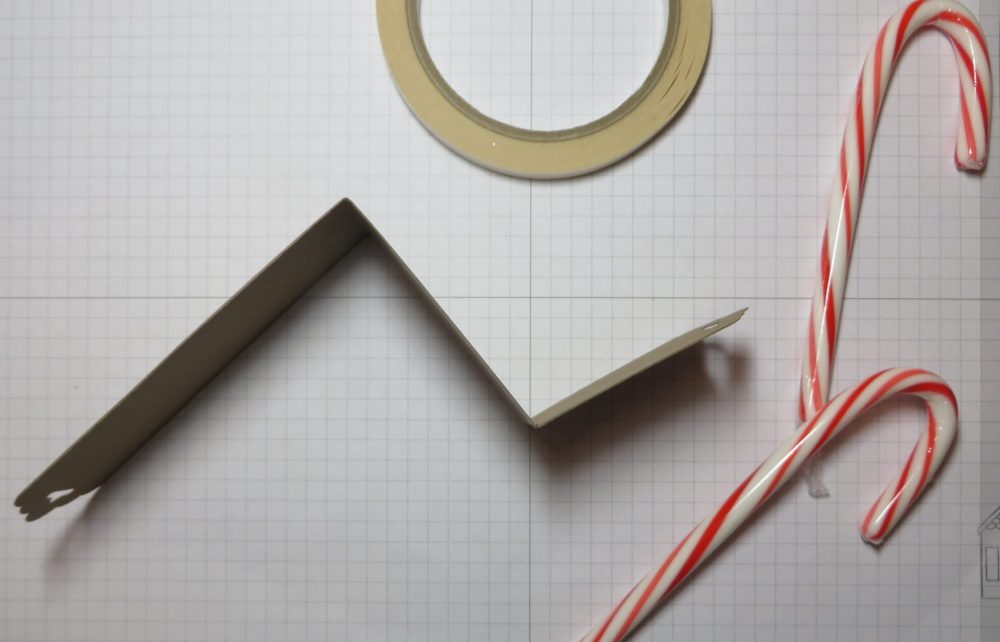
Fold the bottom portion up to form the pocket. The front tag punched end will become the reindeer face!
I punched a 1/2″ circle out of retired Red Glimmer Paper. You could use any red cardstock, foil paper, or the velveteen paper. Use whatever you have. For the eyes, I used some googly eyes I had in my drawer. Of course you can use small circles of white and black for the eyes.
Insert the two candy canes into the pocket. Tie a red ribbon in the punched hole at the top. I also added a bow around one candy cane just for fun.
Just play with this idea and see what you come up with! Use what colors and materials you have. I think it makes a really cute and quick and easy reindeer candy cane treat!
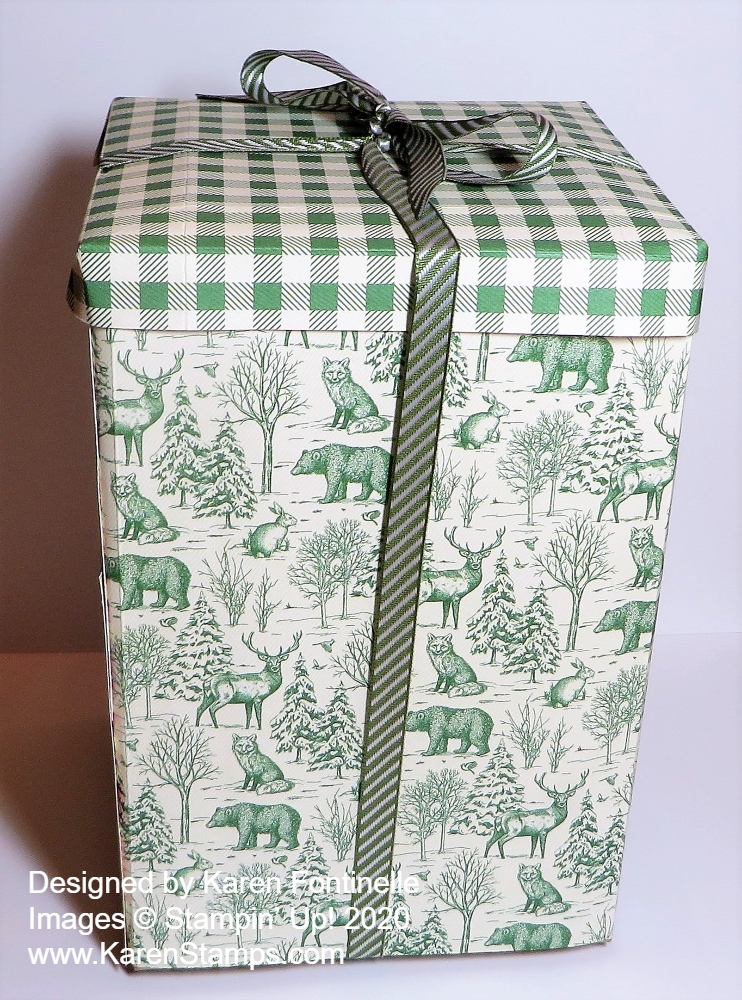
If you happen to run out of wrapping paper as you wrap your Christmas gifts, or gifts any time of year, consider this idea: Wrap Gifts With Designer Paper!
This is a gift for my son and this particular pattern of paper in the Toile Tidings Designer Series Paper I thought would be a fun one for him since he sees some of these animals when he is out hiking where he lives. This paper was in the Holiday Mini Catalog LAST year but surprisingly was carried over to this year. Right now it is discounted on the Year-End Closeout by Stampin’ Up! so it really is a good deal. There is even some “official” Toile Tidings wrapping paper discounted over 50% off on the Clearance Rack right now.
I did not make a box, I just adhered this paper on to the box the gift is packed in. He’s going to have to rip the paper off to get inside the box! I only had one full sheet of this animal paper and another partial sheet so I had to piece it together somewhat. The top is not really a lid, it is another sheet of paper with the checked design folded over the top and that is also just adhered to the box, not really a lift-off lid. I used the Stampin’ Seal+ adhesive for a good strong bond.
The reason I am posting this gift-wrapping idea is to give you a reason to use up your designer paper (maybe especially retired paper that we all hoard!), maybe look for some paper that makes the gift more personalized, and keep you from rushing out to the store for more wrapping paper! You can use some of your old ribbon (or new!) as well.
Now yesterday at the same time I was getting ready to wrap this package, Sara Douglass, Stampin’ Up! CEO was going live on Facebook showing an easy way to make designer paper gift boxes with NO CUTTING! I felt like we were both a little bit on the same wavelength! I just sort of tried her method when I made the lid of my box, although, as I said, it’s not a lid that lifts off, it is glued down. But I did the corners as she did!
Here is the link to Sara’s video on Facebook (if it works!). Don’t forget other gift-wrapping ideas you can use rather than spending a lot of money on wrapping paper or rather than running out to the store.
Those are just a few ideas I hope you will find helpful as we all get pressed for time! I think we all have designer paper that we can spare for wrapping gifts that will make a high quality gift presentation! Keep that idea in mind of wrapping gifts with designer paper whether for Christmas now or future occasions!
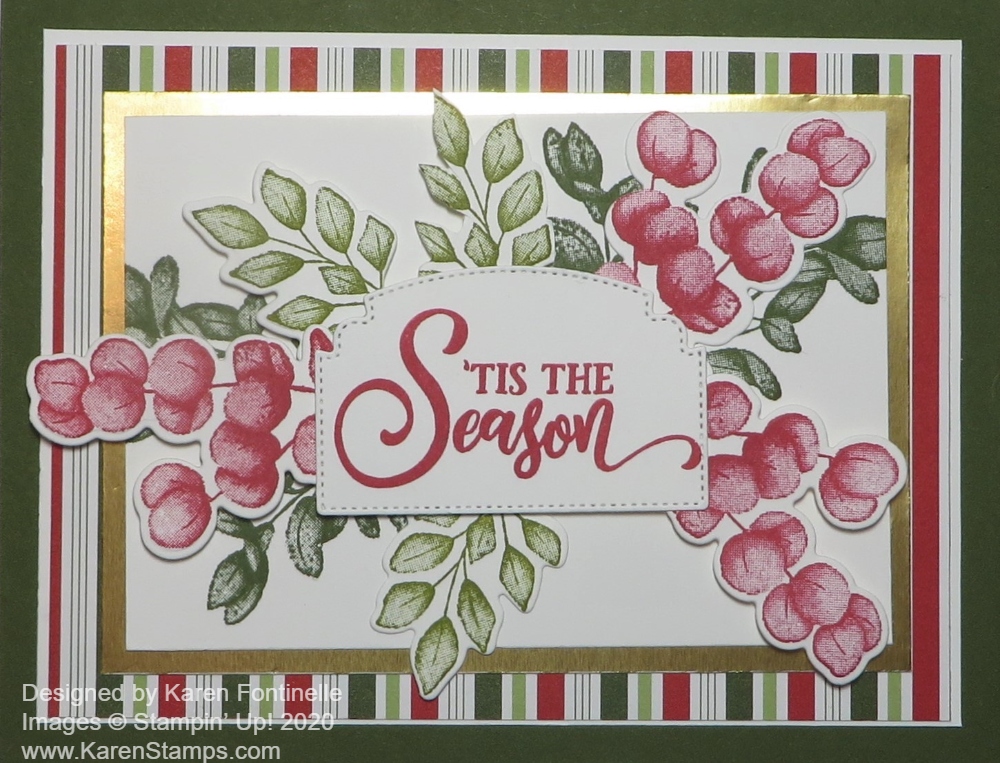
This Forever Fern Stamp Set is so beautiful, more beautiful than you can really imagine until you stamp with it, so I wondered if I could make it into a Christmas card. Another stamper online had wondered the same thing and came up with a card that I copied as far as the layers she used.
The card base for this card is Mossy Meadow, one of the coordinating colors for the Heartwarming Hugs Designer Series Paper that I used for one of the layers. I think this paper is so pretty and so Christmas-y but the patterns can also be used as generic patterns on non-holiday cards.
Over Mossy Meadow is a thin layer of Whisper White to help the designer paper stand out. The front layer of the card is layered on Gold Foil to add some pizzazz to this happy Christmas card.
On the front layer, I stamped the larger ferns in Mossy Meadow Ink in the Forever Fern Stamp Set on the card, with the stems being hidden underneath the greeting, otherwise, those large ferns would not fit very well. Then I stamped some smaller ferns in Old Olive Ink and the berries in Real Red Ink and die cut them with the Forever Flourishing Dies. If you are stamping and die-cutting several images, I think it’s a good idea to stamp a couple extras as long as you are stamping, so in case your die slips or doesn’t come out right, maybe you will then have an extra die-cut to use, or you can save the extra one if they all come out fine.
The greeting is stamped in Real Red Ink and die cut with one of the Ornate Frames Dies. It is popped up on three Mini Dimensionals so I could get it placed in the center but so there was space to slip wonder the die-cut ferns and berries under the greeting. Some of those I popped up on regular-size Dimensionals and some I adhered flat on the card. I resisted the urge to use some Real Red Rhinestones for some bling!
The way these Forever Fern Stamps are designed, the images come out rich and beautiful looking. “This is a Distinktive** stamp set; it has a special texture that gives added depth and dimension in a single step, creating photo-realistic images. **Patent pending” When you first use this type of stamp, you may think it didn’t pick up the ink properly, but that is the way it is designed and as you look at it, you will see the texture and the beauty of the stamping.
If you want to make a card like this Forever Fern Christmas Card, you can make it simpler if you just use basic layers and not these multiple ones. Anything you make with this Forever Fern Stamp Set and dies in the Forever Fern Bundle will be a beautiful card!
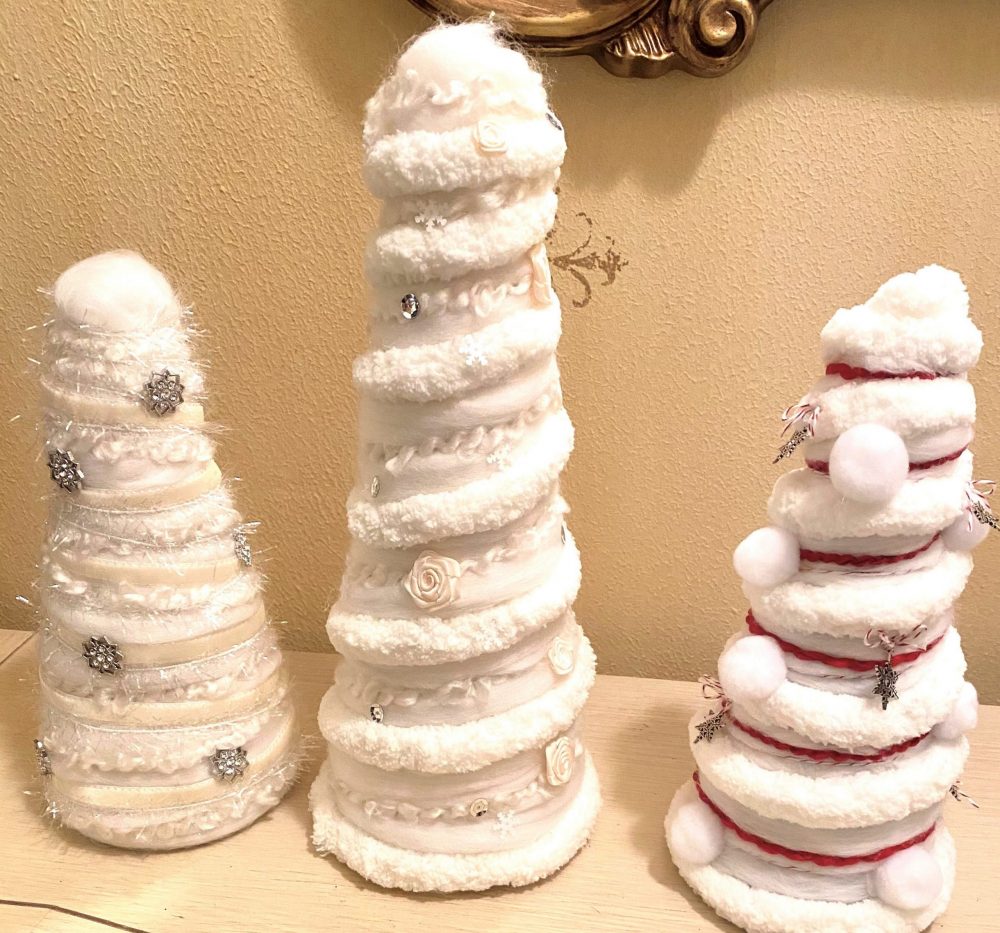
I had to take some time from stamping to do some other crafty things, like make these Yarn Trees With Stampin’ Up! Embellishments! I saw these late last year during the holiday season but didn’t have time to make them, but this year I at least had the styrofoam shapes to make them!
These trees are so easy and fun to make! Even if I would have stopped working on them about five steps back, they would still look great! All you need is a styrofoam shape (mine were cone shapes with flat tops) and yarn! Of course I didn’t have any interesting yarn with which to make these! If I could have just run into a craft store, I’m sure I could have picked out all kinds of fun yarn, but during the pandemic I’m only doing online shopping so it as a lot more difficult and a lot less fun! But I did find a really thick yarn, one that was really felting (maybe?) that just looked smooth, and one that was thin but knobby.
Some videos I watched used a hot glue gun to adhere the yarn, but another just used straight pins, which don’t show at all once you push them in. And if you really wanted to, with pins you could pull the yarn off later and change the tree for the next year. I don’t think I would redo it, but I did use the straight pins.
Just pick a place near the bottom to start and start winding the yarn around and around the styrofoam cone. Pin or glue as you go. When you get near the top, just play with the yarn and get it how you like it. You can curl it around and tuck the end under. It’s a little tricky, but you can do it! I might still add some “topper” to my trees.
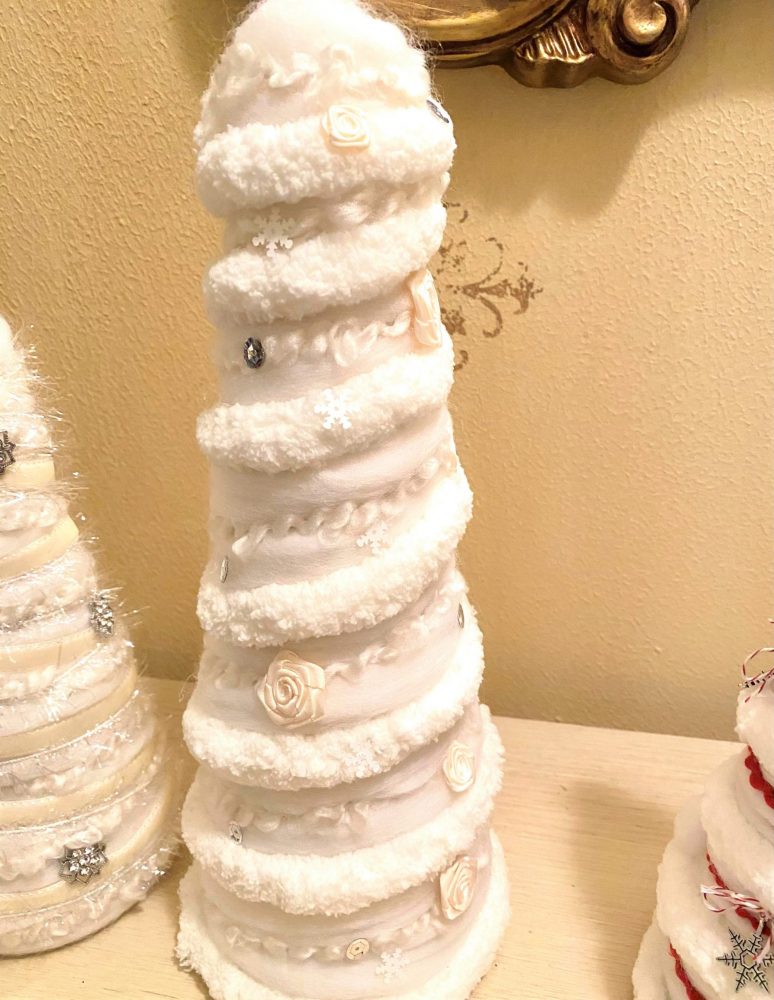
Here is the first tree I made, the largest one. I used the smoothest yarn to wrap around first. Next I used the chenille-type yarn to wrap around but spaced a couple inches apart. Again I used the straight pins to hold it in place. Then I took the thinner, more decorative yarn and wrapped that around in between the rows. I was perfectly happy with the way the tree looked at that point, but I day or two later, when I looked for the second time in my gigantic stash of retired Stampin’ Up! products, I found things I thought I could use! I added these larger and smaller ivory roses and even added just a few snowflake sequins and large silver sequins from a container from awhile back I guess! I used tiny dabs of hot glue to adhere the roses, snowflakes and sequins.
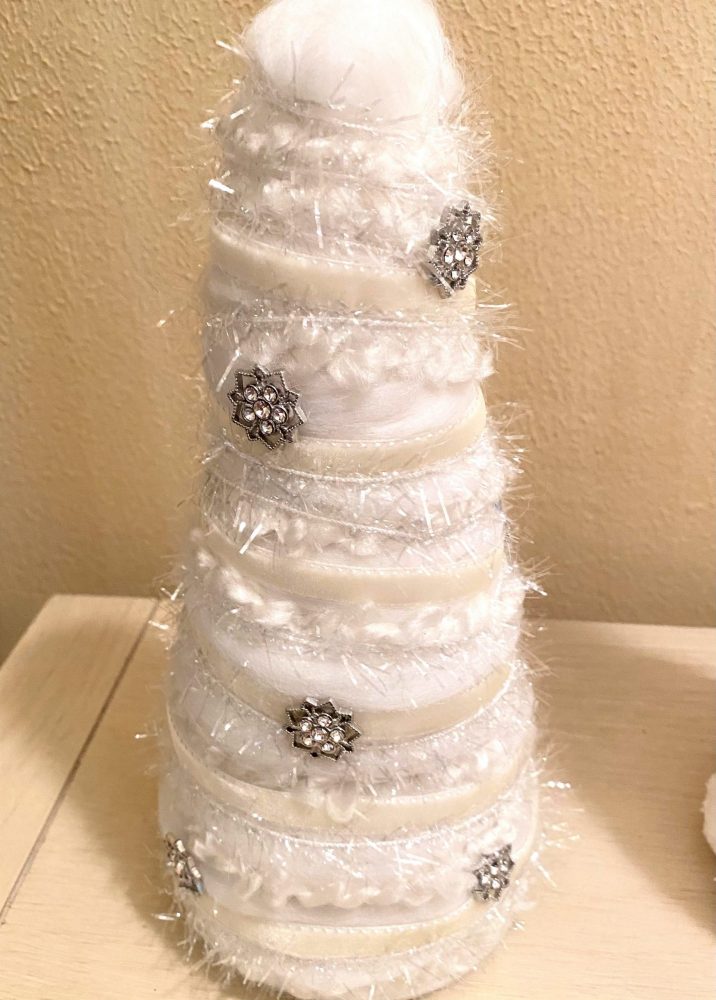
Then I worked on the two smaller trees. This one I started with the smooth yarn all around, then wrapped around the thin yarn spaced apart. In my stash I found this off-white velvet ribbon and also this Transparent Fine Garland. In another box of embellishments. I found these silver decorations with little rhinestones and they looked pretty good, so I hot glued those to the tree
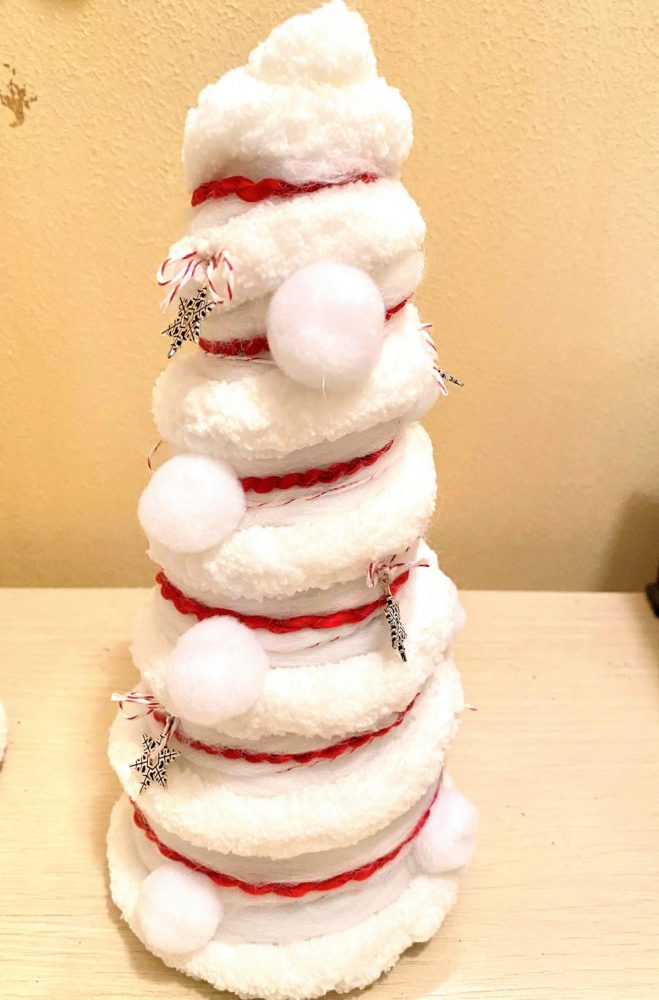
Last, but not least, I made the third tree, wrapped with every bit of leftover smooth yarn to cover the styrofoam shape. I just made it!! Then I wrapped around some rows of the thick chenille (soft!) yard and made that knot on top. I had found this skinny red trim in my Stampin’ Up! stash so I wrapped around that plus some red and white twine! I had these pom poms from Amazon, which were bigger than I’d planned, but I decided to use them anyway! I also found these silver snowflakes, only about five of them that already had red and white twine bows tied onto them! I just poked a straight pin through the tiny know and stuck them onto the tree! It’s a cozy, wintery looking tree I think with the big chenille yard and pom poms!
These yarn trees were a fun, crafty project! Easy, no directions needed! Just start with a styrofoam cone shape and wrap some fun yarn around. You don’t really need the extra embellishments I used – sometimes I think I went past the point where I should have stopped! – but I like all the trees just fine so I don’t mind if they are a bit overdone! At least I used up some of my retired extra supplies from who-knows-how-long ago! If I had more styrofoam shapes, I’d probably make some more trees with some other of my Stampin’ Up! Trims rather than yarn and just see how it would turn out!
Happy Holiday Stamping and Crafting!
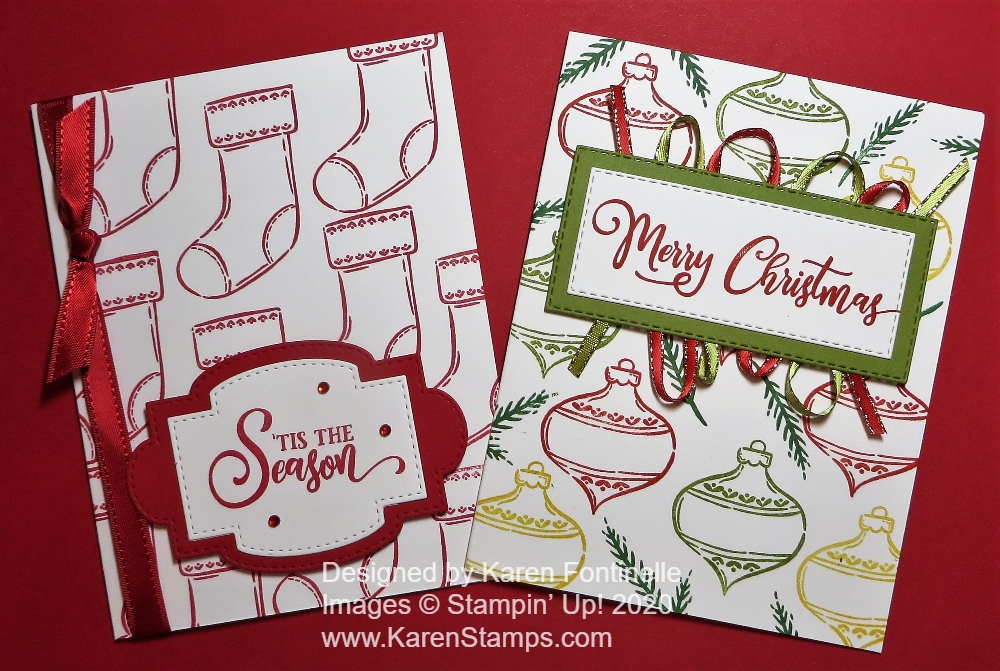
Talk about some easy stamping to make Christmas cards, especially the card on the left, these two Easy Tag Buffet Christmas Cards are it!
The other day when I had the Tag Buffet Stamp Set out, I noticed the stocking and just thought about stamping a background with it! Sometimes I like to just do some repetitive stamping! It feels so good!
For the first card, I just stamped the stocking around on the card front. I used the Thick Whisper White Cardstock because I wasn’t going to have layers. I stamped in Real Red Ink. The greeting is also from that stamp set and die cut with the Stitched So Sweetly Die and layered on Real Red also die-cut from that set.
For some embellishment, I added some Red Satin Ribbon and some Red Rhinestone Jewels. I had to!
After I had fun making that card, I decided to use the ornament stamp in the Tag Buffet Stamp Set and stamp that randomly but with different colors! I used Poppy Parade, Old Olive, and Crushed Curry.
The Christmas greeting is also in the Tag Buffet Stamp Set and I stamped it in Old Olive. The rectangles are in the Stitched Rectangles Dies. Then I used the Ornate Garden Ribbon Combo Pack on the backside of the greeting for some pizzazz with ribbon instead of rhinestones!
So basically, these cards are just stamping and adding a greeting, maybe some ribbon or bling! Time is getting short to finish Christmas cards and get them in the mail so you might try this idea!

If you only had the ‘Tis The Season Designer Paper, I can’t imagine how many different Christmas cards you could make! And there are also generic patterns that you can use long after the holidays.
This was an easy card to design. I picked the candy cane print pattern of the ‘Tis The Season 6″ x 6″ Designer Series Paper. I also chose the red narrow-striped design for the bottom portion of the card. I adhered those two papers together using my Grid Paper to make sure everything lined up for the correct size. Then I was able to wrap around a piece of the Real Red 3/8″ Double-Stitched Satin Ribbon to cover the seam of the two papers.
The greeting is stamped in Real Red Ink from the Tag Buffet Stamp Set. I love the font and style of this writing in this stamp set! Even though it goes with the Tag Buffet Project Kit, it’s really a stand-alone kit for making any Christmas cards and projects. But I also love the Tag Buffet Kit tags!! You can see the ones I made HERE.
I looked through all my dies and decided on this shape for the greeting. It is in the Tasteful Labels Dies. It is large enough and has an interesting shape plus a stitched edge! For a little bling, I couldn’t resist adding some of the Red Rhinestone Basic Jewels. I’m not sure I like how I placed them. What do you think??
Then on each side of the greeting I tied two small pieces of the red ribbon just in a knot, not a bow. A bow would take up too much area and obscure the greeting.
The card base is Shaded Spruce. Since that is rather dark for the inside of the card, just add a layer of Whisper White. I just stamped a holiday greeting on it, but you can also add a strip of the designer paper along the bottom edge of the inside layer for a little decoration.
Tomorrow, Tuesday, December 8th is the first day of the Stampin’ Up! Giant Year-End Closeout. This is a list of the retiring products in the August-December 2020 Mini Catalog (otherwise known as the Holiday Mini Catalog!). These products will not be available after January 4th. However, they are only available while supplies last so don’t wait until January 3rd to get your favorite product you don’t own yet.
Actually, this ‘Tis The Season Designer Paper will be discounted 20% during the Closeout Sale! Check the list for the discounts and save!
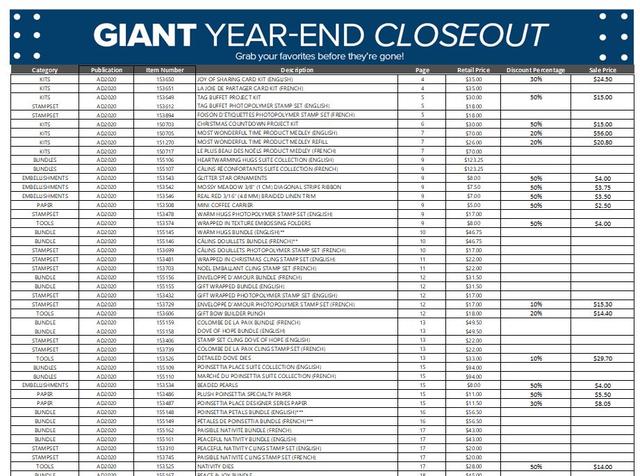
And these products will carryover into future catalogs. Click on the image below and see what is staying!

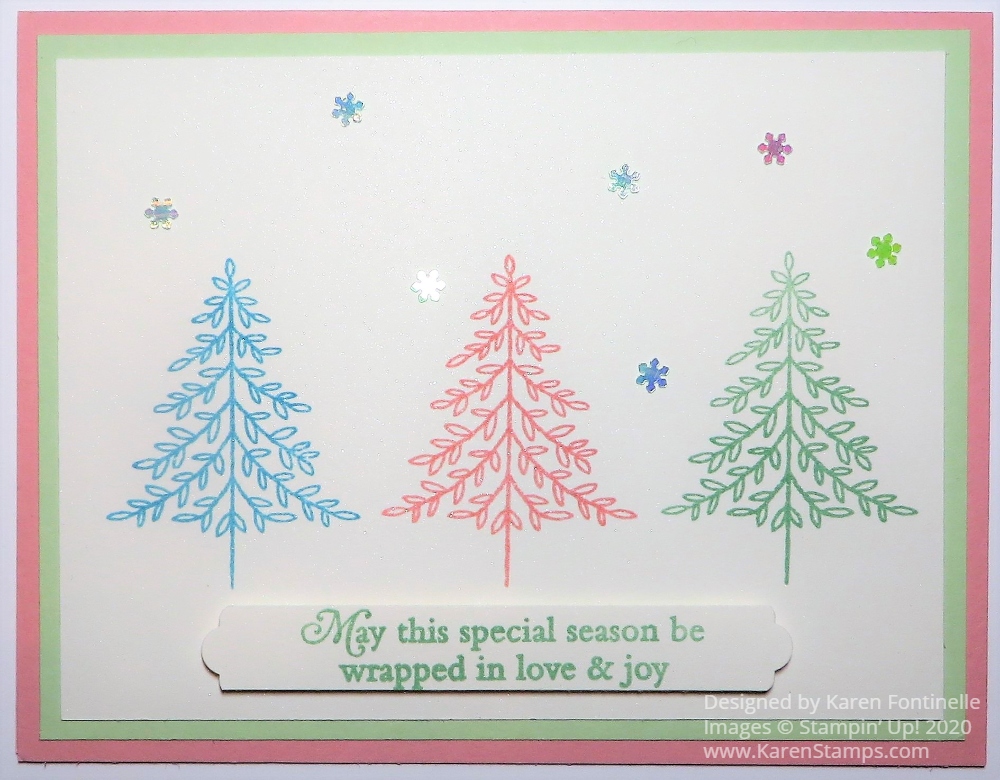
This Perfectly Plaid Pastel Trees Christmas Card came about after seeing some Christmas cards using non-traditional colors, even pastels! I thought I would see what I could do with a pastel color scheme for my card!
The card base is Blushing Bride Cardstock with a layer of Soft Sea Foam Cardstock. I tried putting another layer of Balmy Blue but it looked like too much. I left it at just the pink and green.
The main paper I used is Shimmery White Cardstock. This is my favorite paper ever! It has just the slightest shimmer to it if you look closely. It stamps so well and even takes watercoloring better than regular Whisper White Cardstock. I just love it!
The three trees stamped on the Shimmery White are from the Perfectly Plaid Stamp Set. This stamp set was carried over from last year and I’m glad because it has so many possibilities, not to mention the Pine Tree Punch which coordinates with the trees. I could also have punched out the trees with that punch and made them a little more 3D. The trees are stamped in Blushing Bride Ink, Balmy Blue Ink, and Soft Sea Foam Ink.
The greeting is also stamped in Soft Sea Foam Ink. It is also in the Perfectly Plaid Stamp Set as are some other ones I could have used. I just stamped this on a scrap strip in my Shimmery White Cardstock and then punched the ends with the Lovely Labels Pick a Punch. It is popped up with Stampin’ Dimensionals®.
Then to add a little something extra, I added some Adhesive-Backed Snowflakes. These are little snowflake sequins that have adhesive so they are easy to place and stick on a card! No glue required!
Another thing I could have done, instead of the snowflakes, was to put some Rhinestones or perhaps the Champagne Rhinestone Basic Jewels on the trees. If I would have stamped the trees up just a little bit higher I think that would have worked. Or maybe I could have stamped some small snowflakes. So many different things you can do with stamping!
You could change the color scheme of this card and use traditional red and green colors and see how different it would look. Here is another card I made with this set, in red and green colors, and using all three styles of trees. Or as I mentioned, use the Pine Tree Punch to punch out the trees and pop them up on Dimensionals instead of the greeting. Just play until you are satisfied!
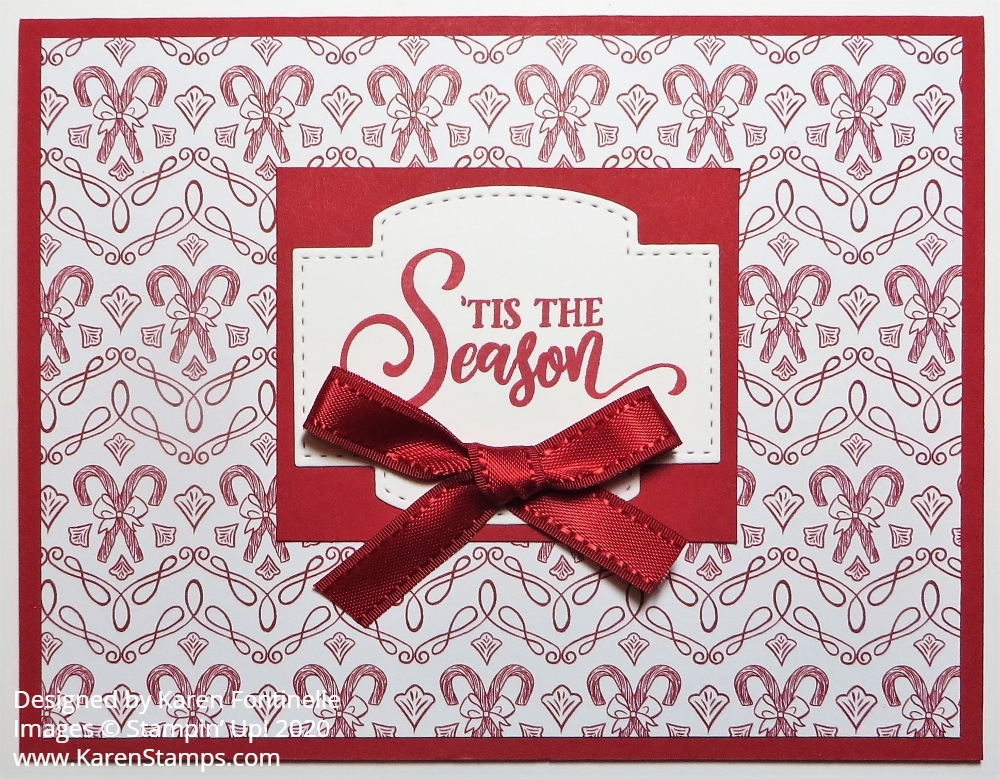
It’s time to get busy on Christmas cards and this ‘Tis The Season Candy Cane Christmas Card is an easy one! Mainly I wanted to just play with the ‘Tis the Season Designer Paper as I did the other day and see what else I could come up with.
In this case, I assumed I would use only this pattern of paper on half the card, but I cut the full size for the layer and I wanted to use it just like that! So simple! The card base is Real Red. I thought Cherry Cobbler looked a little dark, but it is a coordinating color with these papers.
I stamped the greeting in Real Red Ink from the Tag Buffet Stamp Set. I wasn’t sure how I wanted to cut it out, so I just browsed through my sets of dies and settled on this one in the Stitched So Sweetly Dies. I wanted a layer but instead of a die-cut I took the easy way out and just measured a plain rectangle to layer behind it. Sometimes you just don’t have the right size die!
For a final touch, I added a Real Red 3/8″ Double-Stitched Satin Ribbon, tied in a bow. I adhered it with a couple of Glue Dots. That’s all there was to it!
On the inside of the card, I added a layer of Whisper White stamped with a greeting from the Itty Bitty Christmas Stamp Set. All of the “Itty Bitty” stamp sets are great ones to have because you can always find a greeting stamp in one of them!
If you need any supplies for making Christmas cards, there is still time, but I suggest ordering as soon as possible, certainly by December 8th as recommended by Stampin’ Up!

The “12 Weeks of Christmas” is my special Thank You gift to my Stamping With Karen Mailing List subscribers. Each Wednesday for 12 weeks leading up to Christmas I have sent out an email with an exclusive holiday project to give you an idea complete with supply list and instructions. You could use it exactly or use it as inspiration to come up with your own creative project.
This is absolutely FREE and I’m excited to share these project ideas with you! This is my annual gift to my mailing list subscribers, and I love sending out these weekly emails!
The 12 Weeks of Christmas is ONLY for members of my mailing list, however, and I have already sent out eight weeks. But you don’t have to miss any more weeks if you sign up for my Mailing List TODAY by 1:00 pm CT to receive Week 9! We have already done 5 weeks of Christmas card ideas, then Gift Ideas, and now on to Gift Wrap, Bags, and Tags.
Even though you missed some weeks, you can still enjoy these last four! When we start these 12 Weeks it’s almost incomprehensible that we are on the road to Christmas…..and before we know it, we are getting close to the end!!
Just sign up in the red box in the upper-right corner of my blog. You will get a free gift just for signing up! We’d love to have you!