Category Archives: Cards

Scary Cute Halloween Card

Scary Cute Halloween Card

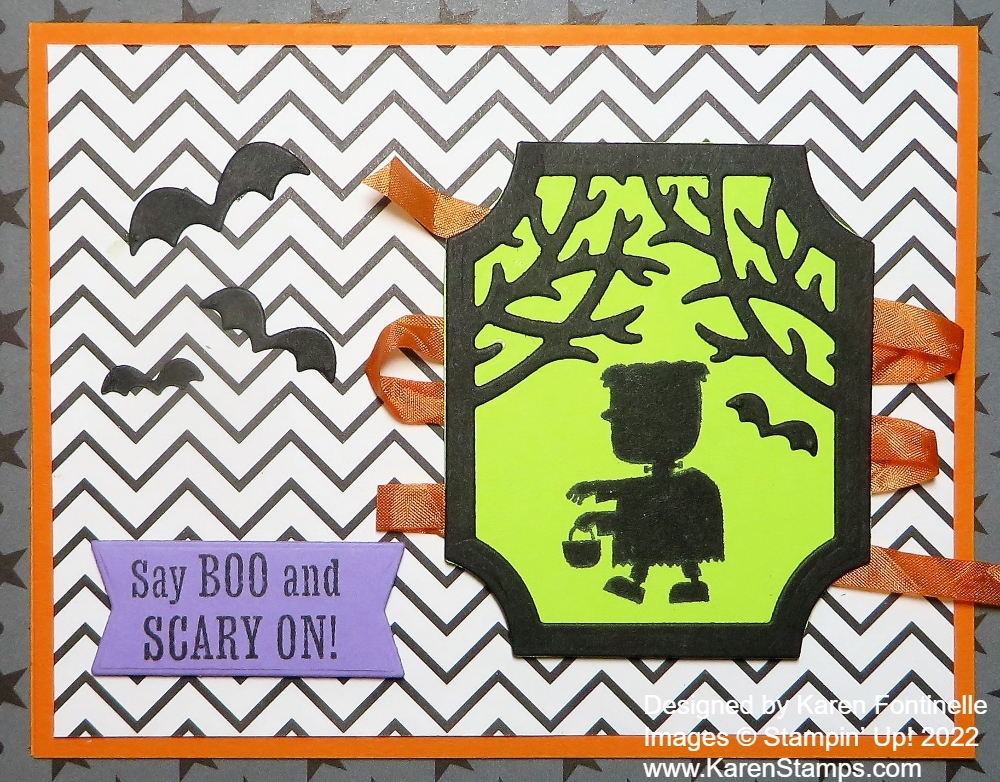
It’s time to start thinking about Halloween! This is my first card using a new bundle in the Holiday Mini, my Scary Cute Halloween Card! This card is somewhat of a copy of a sample in the Holiday Mini on page 56. It looks like it was made into a shaker but I think maybe it’s a box or something with ribbon wrapped around it. My copy is actually a card but not a shaker.

The card base is Pumpkin Pie cardstock with a layer of the Black & White Designs Designer Series Paper. This paper is perfect for making Halloween cards but you don’t have to be restricted to that at all! I used the Scary Cute Bundle to make the images on the card. The spooky image of the tree branches in the frame is a die in the Bundle that I cut out of Basic Black, and I cut another Parakeet Party cardstock piece to be the spooky background piece. I added a little bit of ink with a Blending Brush but it doesn’t really show up. I should have used a darker green if I wanted to do that. The little boy trick-or-treating is stamped in Memento Black ink on the Parakeet Party cardstock.

To match the orange ribbon wrapping around the sample in the catalog, I colored the White 1/4″ Crinkled Seam Binding Ribbon with the Dark Pumpkin Pie Stampin’ Blend marker. Just put a piece of scrap paper underneath as you color the ribbon with your marker. Then I applied some Stampin’ Seal to the back of the framed piece and adhered the now Pumpkin Pie ribbon going back and forth, back and forth. Finally I popped up the piece on Stampin’ Dimensionals which would also help keep the ribbon adhered to the back.

The greeting is included in the stamp set so I stamped that on a piece of Highland Heather cardstock and diecut it with the banner shape in the Scary Cute Bundle. It is also popped up on Stampin’ Dimensionals.

Finally, there are cute little bat dies of three different sizes so I had already cut those out with the black frame. Then I just chose three and adhered them to the card. I might go back and add some sparkle with something.

This Scary Cute Bundle has lots of fun possibilities for Halloween cards, treats, and projects. Just play with it and discover lots of creative ideas!
Lights Aglow Tis the Season Christmas Card

Lights Aglow Tis the Season Christmas Card

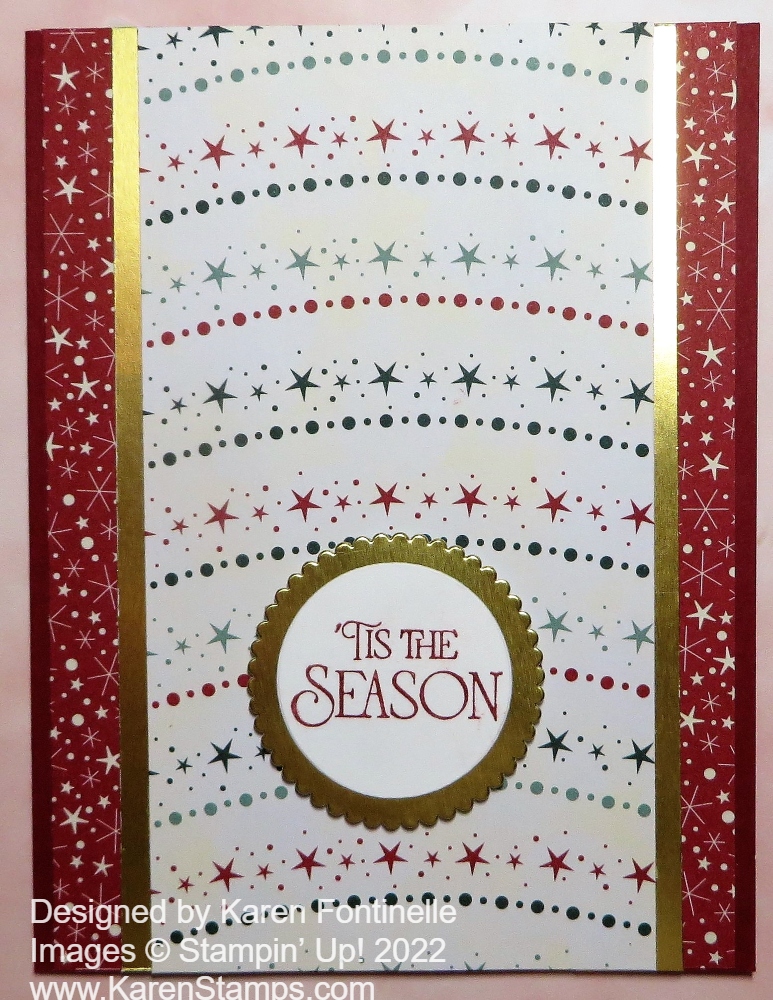
I just got this designer paper and sort of copied a sample card in the Holiday Mini Catalog to come up with this Lights Aglow Tis the Season Christmas Card. When you don’t have an idea of what to make with one of your Stampin’ Up! products, always remember to look in the catalog for ideas. You might think you will copy the card exactly, but I’m willing to bet that as you go along you may just change it up a little as your ideas start to flow.

Although I don’t have the Christmas Lights Bundle in the Lights Aglow Suite, I wanted to get the Lights Aglow 6″ x 6″ Specialty Designer Series Paper. As I write this, the Lights Aglow Paper is not available but should be back in stock in early September. I must have ordered the last pack! LOL! This paper has gold foil dots that are meant to look like twinkling lights! Very pretty papers!

To make this card, I started with a Cherry Cobbler card base. Then I used the Cherry Cobbler paper with tiny stars all over as a layer on the card base. If you wanted to save paper, you could just add strips to the side. I made all the paper layers on this card run the full length of 5 1/2″. The Cherry Cobbler paper with stars is 5 1/2″ x 4″.

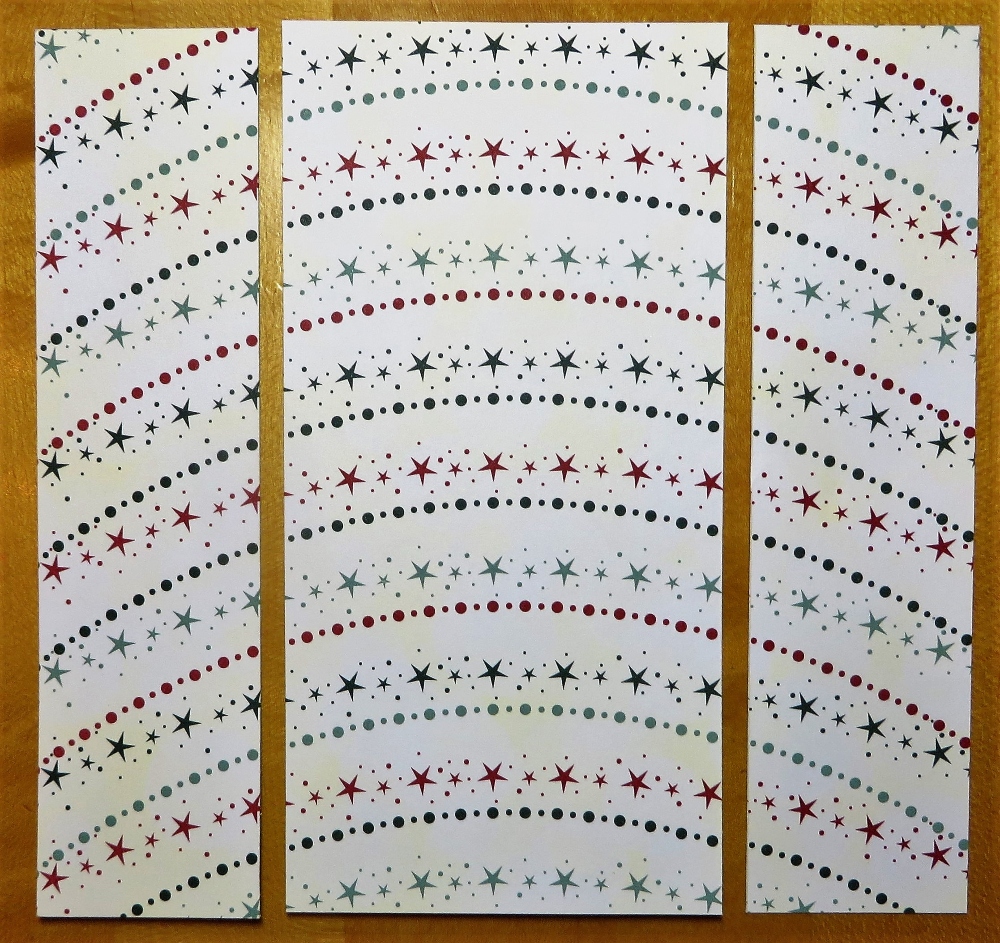
The center portion of the card, the arcs of stars and dots, needs a little extra care. Surprisingly I realized that before I cut it! To get the proper arc, you need to cut the center portion of the sheet of that paper. Below is a photo of how I cut the paper. Since I wanted a 3″ wide section, that left 3″ so I cut 1 1/2″ off each side.

How to Cut the Paper

Before adhering that center paper to the card, add some Gold Foil strips to each side, or as the Holiday Catalog shows (page 30) use the Gold Glimmer Paper in the Glimmer 12″ x 12″ Specialty Paper.

For the greeting, I sort of copied the design of the sample card but changed it up a little bit. I used a sentiment in the Brightest Glow Stamp Set. I think this is a fantastic set of traditional Christmas greetings in pretty fonts. I chose the ‘Tis the Season stamp and stamped it in Cherry Cobbler. Then I die cut it with a small plain circle in the Layering Circles Dies and layered it on a scalloped circle die in the same set, cut out of Gold Foil.

On the inside of the card, I used a layer of Basic White and added a strip of designer paper with the little stars that I used on the front of the card. That way you can stamp a greeting or write a note.

That’s all there is to this Lights Aglow Tis the Season Christmas Card but if you wanted to add any extra embellishments you could do that.

SHOP STAMPIN’ UP! ONLINE HERE!

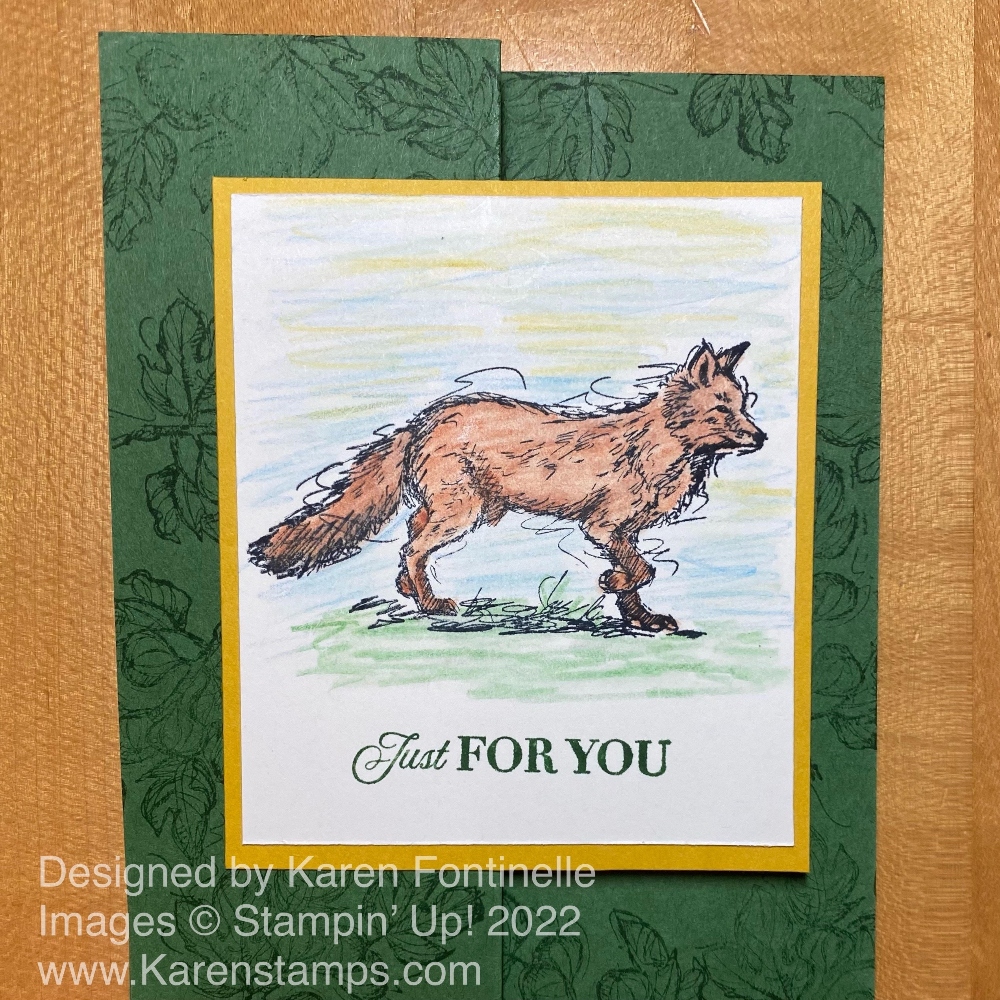
Stylish Sketches Z-Fold Fox Card

Stylish Sketches Z-Fold Fox Card

This Stylish Sketches Stamp Set is one that will make you look like an artist by simply stamping with the fox or geese stamps. Just stamp one of the sketchy-looking images and color in if you like! Maybe the best part is that you can earn this stamp set FREE during Stampin’ Up! Sale-A-Bration until August 31 with a $50 purchase!

This stamp set appealed to me because my son likes foxes (for some reason!). He has seen some out in the wild. This card is easy to make but makes a great presentation because it is a Z-Fold card. It may look extra-special and sound extra-special but all you have to do is fold back the front of the card on itself! That’s how easy Z-Fold cards are! That’s the basic instruction, anyway, then you can stamp the panels or add designer paper.

This card is cut just like a regular card base at 8 1/2″ x 5 1/2″. Score at 4 1/4″ for the fold to form the card. Now on the front of the card, score at 2 1/8″, which is half of the 4 1/4″ front. Fold back on the score line so you have a z-shape. This card base is Garden Green and the folded back panel on the front is stamped in Garden Green ink with leaves in the Stylish Sketches Stamp Set.

The fox is stamped on a 3″ x 3 1/2″ piece of Basic White cardstock. The fox is stamped in Memento Ink. I colored in with Watercolor Pencils and blended in a little bit with a Blender Pen. This just smooths out the coloring a little bit. I also colored in the sky and some grass very lightly and in a scribble fashion just to lay down some color to ground the fox and give him a place to run. The greeting is stamped in Garden Green and is in the Celebrating You Stamp Set. This fox piece is then layered on a piece of So Saffron Cardstock, 3 1/4″ x 3 3/4″.

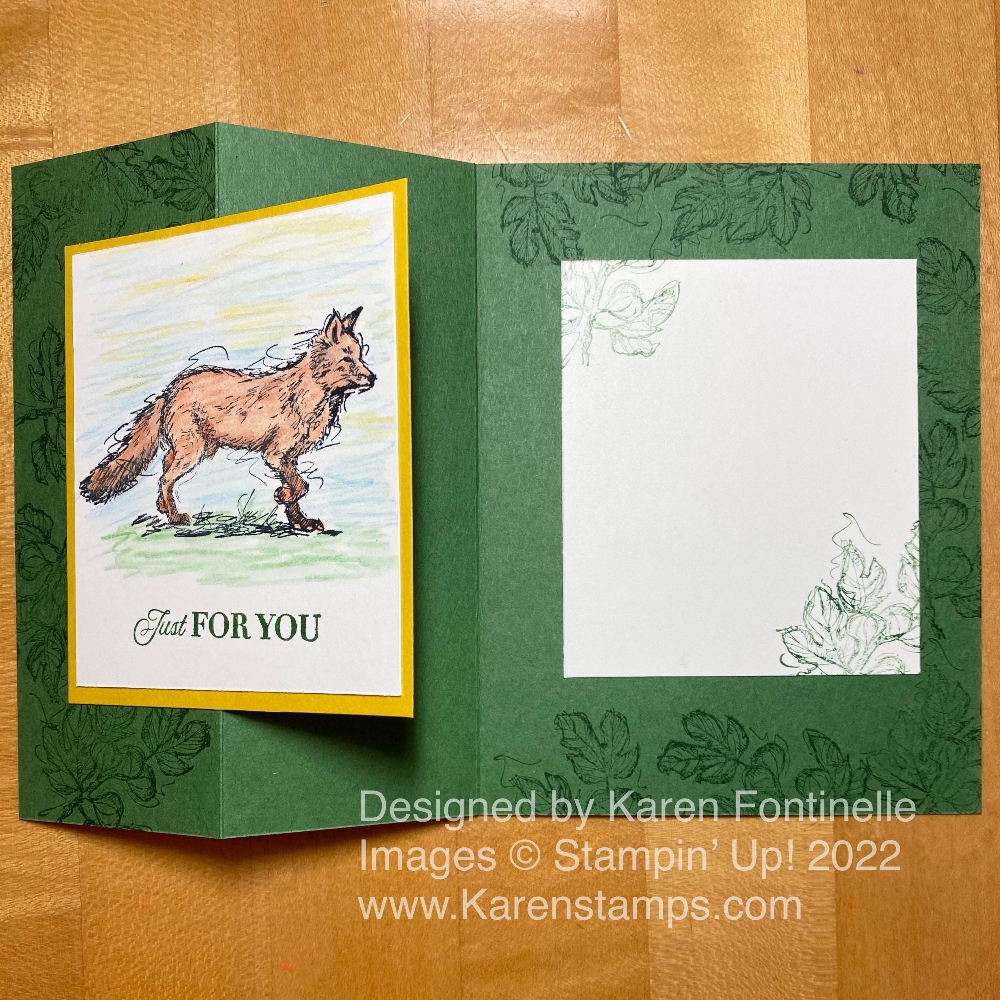
For the inside of the card, since the Garden Green is a rather dark color for stamping a greeting or writing a message, I cut out another piece of Basic White, the same size as the fox piece on the front. I stamped some leaves in the corners and also around the edge of the inside of the card. When you stamp randomly like that, turn your stamp so it goes different ways.

Now for the only tricky part. You want to place that Basic White piece so it will be completely under the front panel and not show from underneath. Adhere the fox piece and layer to the folded panel on the front by only putting adhesive on the left side to adhere to the folded panel and not the inside of the card! Then open the card, put adhesive on the back of the message piece of cardstock, and lay it face down on the inside of the left side of the card, lining it up behind the yellow portion you can see. Then fold over the back panel of the card so that it adheres to the message panel and will be perfectly placed behind that front panel. Check out the photo of the opened-up z-fold card and inside below.

Stylish Sketches Z-Fold Fox Card open

That’s all there is to making this Stylish Sketches Z-Fold Fox Card which would make a great masculine card for a birthday or any occasion. Here is another regular card using the fox stamp and coloring in with Stampin’ Blends. It’s a fun stamp to work with as your creative juices start flowing! Sale-A-Bration ends in just two weeks so don’t miss out on getting some free product with every $50 Stampin’ Up! purchase!

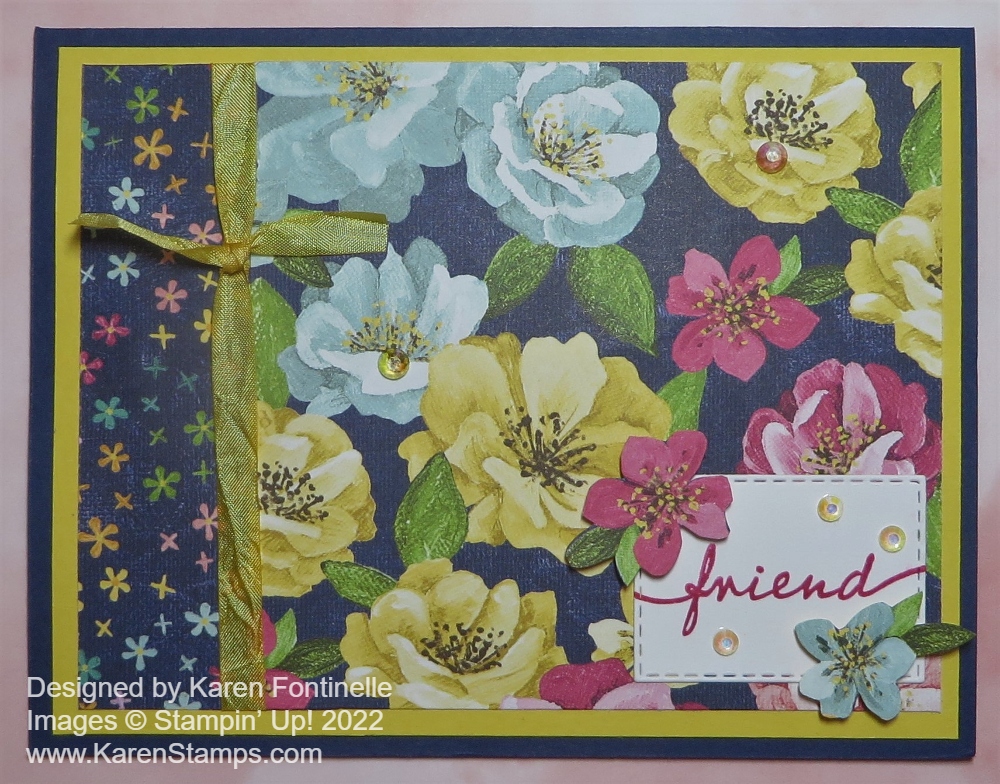
Hues of Happiness Floral Friend Card

Hues of Happiness Floral Friend Card

I was planning to make the entire card with the small print paper on the left side of the card front, but who can resist those gorgeous flowers?! So this card turned into the Hues of Happiness Floral Friend Card with a strip of the paper with the tiny flower designs on the left and a large piece of the floral paper on the right.

This is the Hues of Happiness Designer Series Paper in the Stampin’ Up! Annual Catalog that is so gorgeous! So many flowers in so many different colors! And because the paper is so pretty, it allows you to make easy and simple cards that allow the paper to be showcased.

The card base is Night of Navy with a layer of Daffodil Delight. There are so many other colors I could have chosen as well! Sometimes I get out several colors of paper and see which ones I like the best together. After I decided to use a smaller piece of the print with the tiny flowers, I cut a strip of that at 1 1/2″ x 3 3/4″. The large-flowered piece of designer paper is 3 3/4″ x 4″. The floral piece overlaps the small piece by 1/2″ so they could be adhered together and ribbon wrapped around the piece before it was adhered to the card. The Grid Paper is great for lining things up in a case like this.

The ribbon I used to cover the seam of the two papers adhered together is the White 1/4″ Crinkled Seam Binding Ribbon. I used a Daffodil Delight Stampin’ Blend Marker to color the ribbon quickly and easily to match the card. Just put down a piece of scrap paper, hold one end of the ribbon down, and run the marker along the ribbon. It should dry very quickly but you can wipe a tissue across it to be sure before you use it in case there is any excess or wet ink. Alcohol ink will dry quickly, though. The ink actually stiffens the ribbon a tiny bit which makes it easier to work with. I tied a simple knot around the ribbon with another piece of the colored ribbon.

The greeting is stamped in Melon Mambo ink on Basic White and diecut with one of the Stitched Rectangle Dies. The greeting is from the Happiness Abounds Stamp Set. To add a little extra, I fussy cut two small flowers directly from the designer paper to pop up on Mini Stampin’ Dimensionals® on the corners of the greeting. I also added some Iridescent Rhinestones Basic Jewels to the greeting and on the card front. I almost always like a little bling or sparkle!

Here is another card I made with this same designer paper and cut-out flowers.

There you have an easy card you can copy exactly or just use the design with your choice of designer paper and colors plus a greeting in this Hues of Happiness Floral Friend Card.

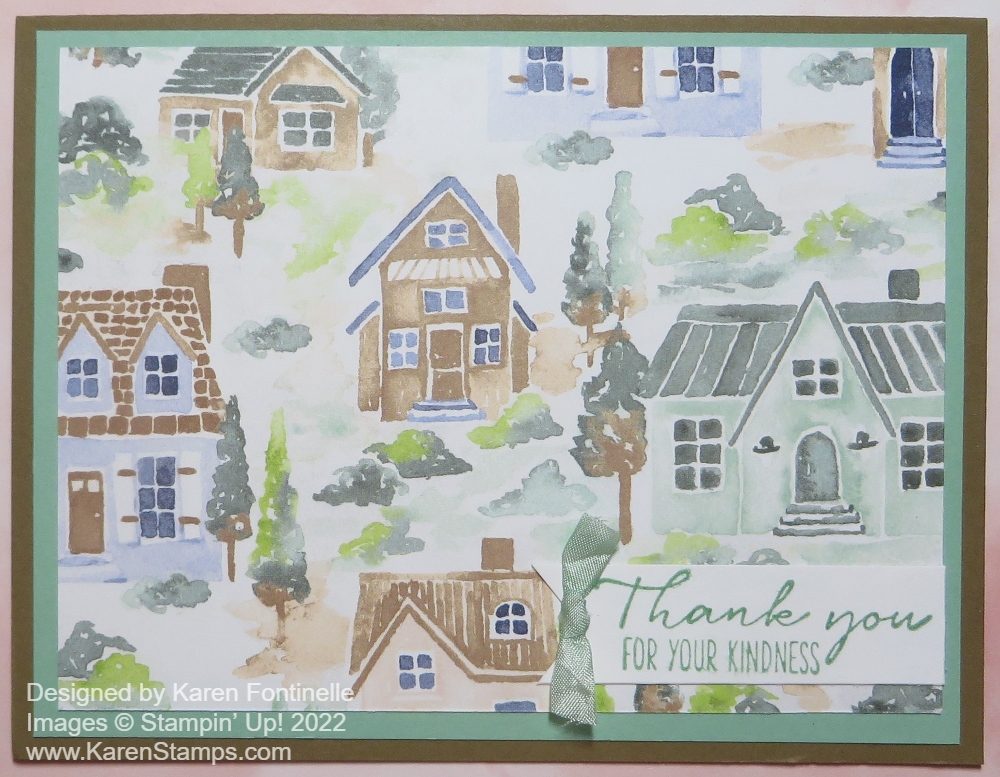
Rings of Love Cottage Thank You Card

Rings of Love Cottage Thank You Card

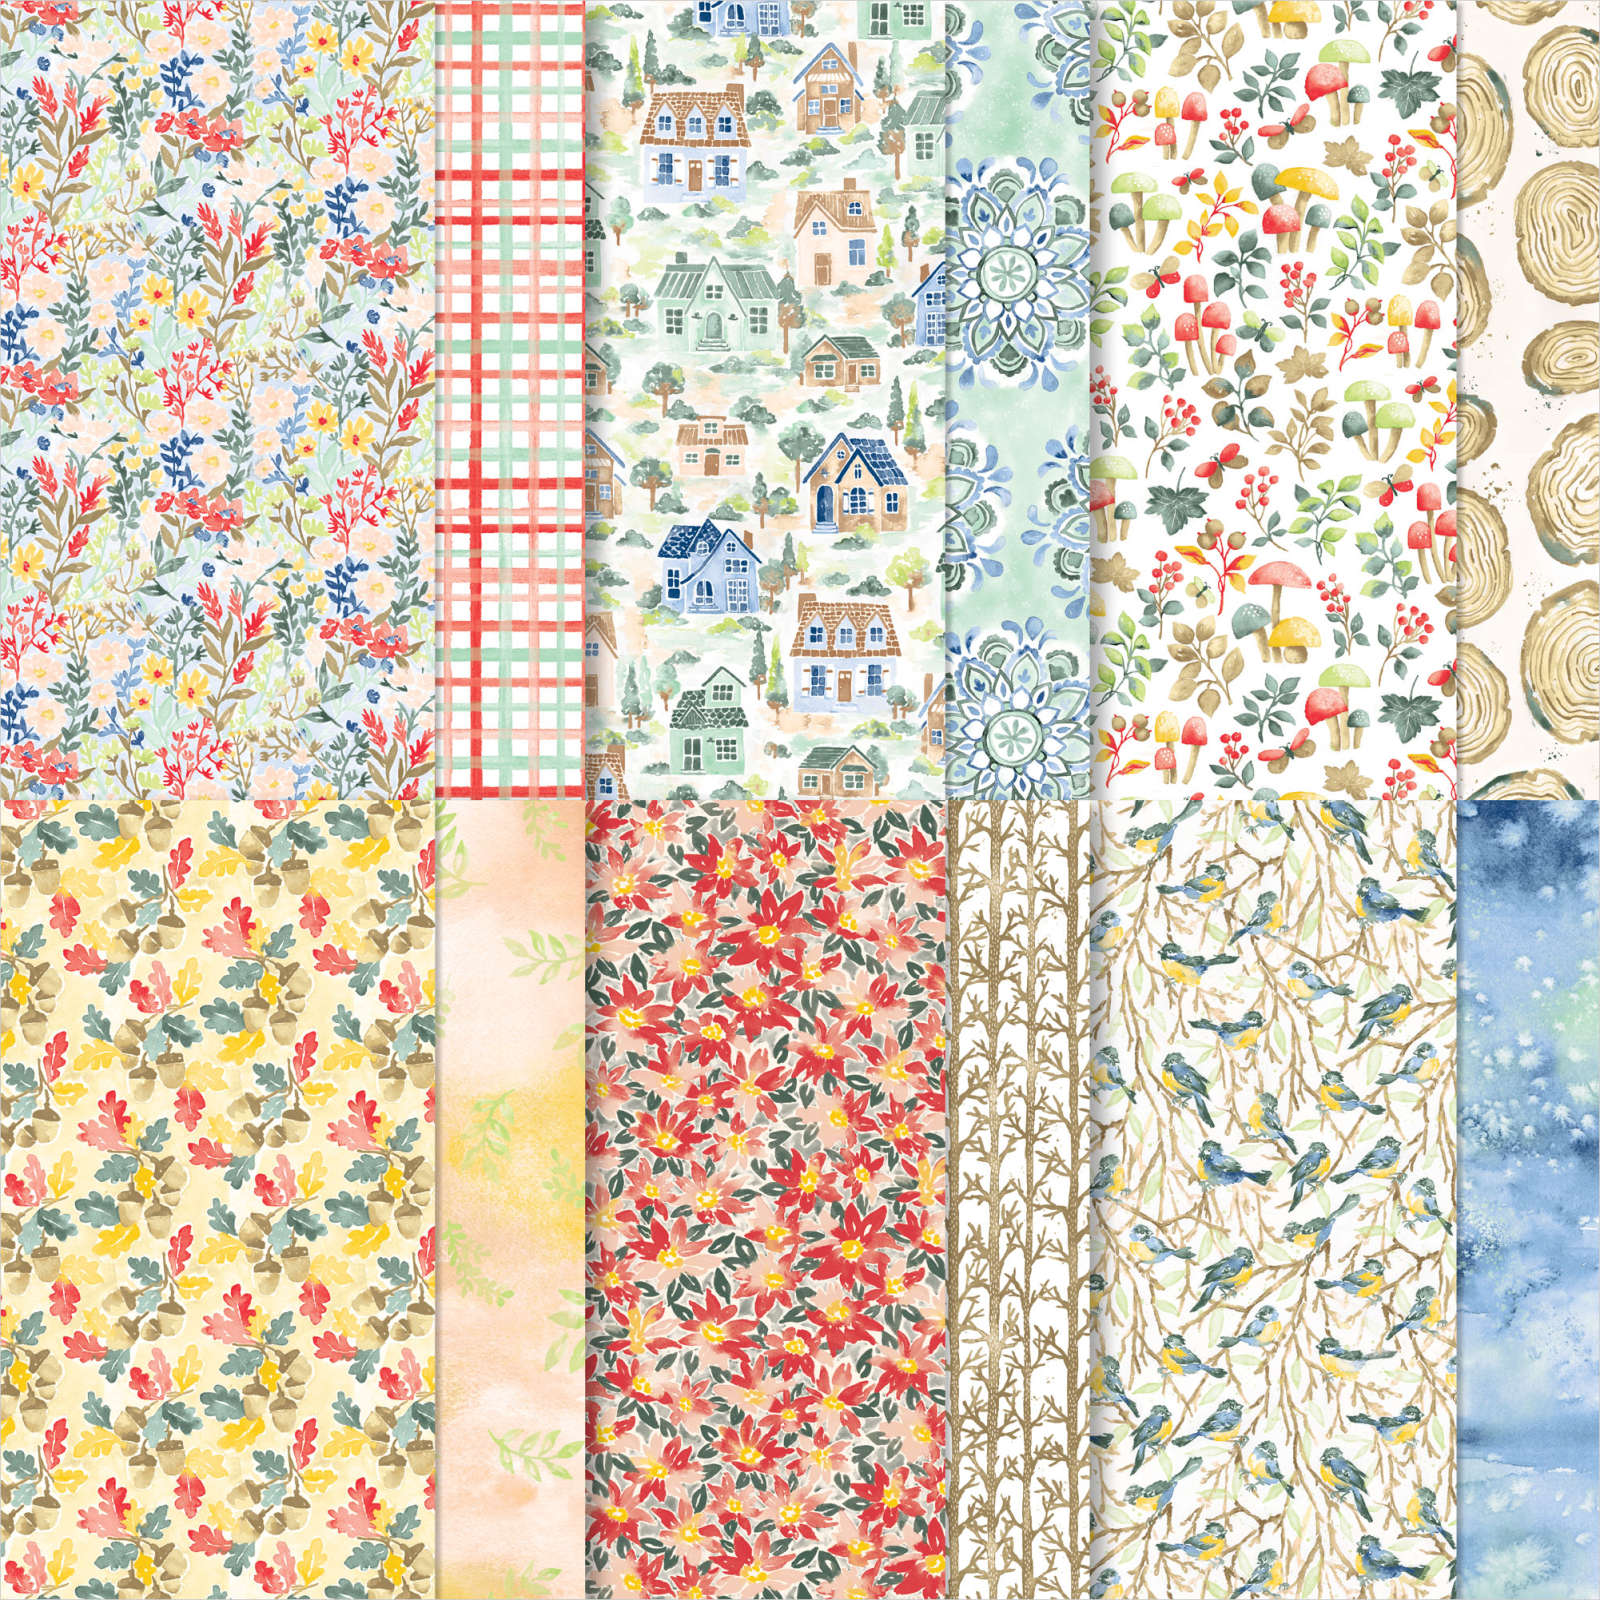
This Rings of Love Cottage Thank You Card is one that I kept forgetting to make! I’ve made other cards with this designer paper but I kept forgetting to make something with this cute paper with the little houses and cottages all over it! Finally, I remembered to use this paper!

The card base is Soft Suede with a layer of Mint Macaron. This Rings of Love Designer Series Paper has lots of coordinating colors so you could use other colors on your card. Just cut a piece of the paper to be the front of the card! That’s all there is to it. However, when cutting out the paper for the layer, you might want to “try” to get it to showcase the houses as best you can. For example, had I thought about that idea before cutting, I would have tried to have that greenish house on the right be a little more front and center. But depending on your paper, you might have to take it “as is” so you don’t waste too much paper! No matter what, it will still look pretty because it’s pretty paper!

For the greeting, I didn’t want to take up too much space and cover up a house so I just chose a smaller, narrow greeting. I found one I liked in the Dragonfly Garden Stamp Set and simply stamped it on Basic White with Mint Macaron ink. While you might find a die that fits, I just cut a rectangle as close to the words as I could get to keep it as small as possible and put a flagged end on the left. Then I took a scrap of the Whisper White 1/4″ Crinkled Seam Binding Ribbon that I had colored with a Mint Macaron Stampin’ Blends Marker to use on the greeting. I just tied a knot in the center of the piece of ribbon and trimmed the ends so that it is a teeny tiny bow, just a little something to embellish the greeting. I adhered it with a Mini Glue Dot.

One of the best parts of this Rings of Love Designer Series Paper is that you can earn it FREE with a qualifying Stampin’ Up! purchase! When you spend $50, this month, during Sale-A-Bration you can choose a FREE Sale-A-Bration product, like this paper! With a $100 purchase, you may choose a $100 Level product or two $50 Level products! This promotion has been going on for a month already and now it will come to an end on August 31! So be sure to do your shopping early so you can choose which product you would like for free!

This Rings of Love Cottage Thank You Card is a very simple one yet the paper makes it look very special. Another sheet has tree ring images on it that you can cut out and make special card designs or other project designs with them. Other papers have florals and fall images. Check out all the Sale-A-Bration products you could earn and make your choice!

SHOP STAMPIN’ UP! ONLINE HERE!

Last Day!! Join Paper Pumpkin and Get This Sweet Sunflowers Kit!

Paper Pumpkin Kit August 2022 Sweet Sunflowers

Get the Sweet Sunflowers Paper Pumpkin Kit for a crafting experience you won’t forget! This month’s kit includes watercolor designs inspired by nature, two Classic Stampin’ Spots for a Two-Step stamping experience, and an all-new twist technique. As a bonus, this month’s kit includes a FREE gift that will add the perfect golden accent to any of your projects. Time to make smiles bloom!

ABOUT THE KIT
Name: Sweet SunflowersItem Number: 161120
This kit includes:

  • All the supplies you need to create 9 cards: 3 each of 3 designs; and coordinating envelopes.
  • An all-occasion stamp set to express words of gratitude, friendship, greetings, and beautiful wildflower-designed images.
  • Specialty Vellum honeycomb shape pre-cut pieces.
  • 2 Classic Stampin’ Spots (Crushed Curry and Soft Suede) for a Two-Step stamping experience with a twist!
  • Paper pieces and embellishments with watercolor designs and images.
  • Mini Stampin’ Dimensionals.
  • FREE GIFT: 8 Gold Foil Honeycomb Sheets

Completed card size: 5-1/2″ x 4-1/4″ 

Coordinating Stampin’ Up! colors: Blackberry Bliss, Crushed Curry, Evening Evergreen, Melon Mambo, Mossy Meadow, Night of Navy, Pumpkin Pie, Soft Suede

SUBSCRIPTION INFORMATION
Subscribe to the July Paper Pumpkin Kit between July 11 and August 10 at www.paperpumpkin.com! Note: Supplies may be limited toward the end of the subscription period.

This looks like a kit I can’t wait to get!! Even the box is so pretty!

Watch this little video!

SIGN UP TODAY!
JOIN PAPER PUMPKIN HERE!

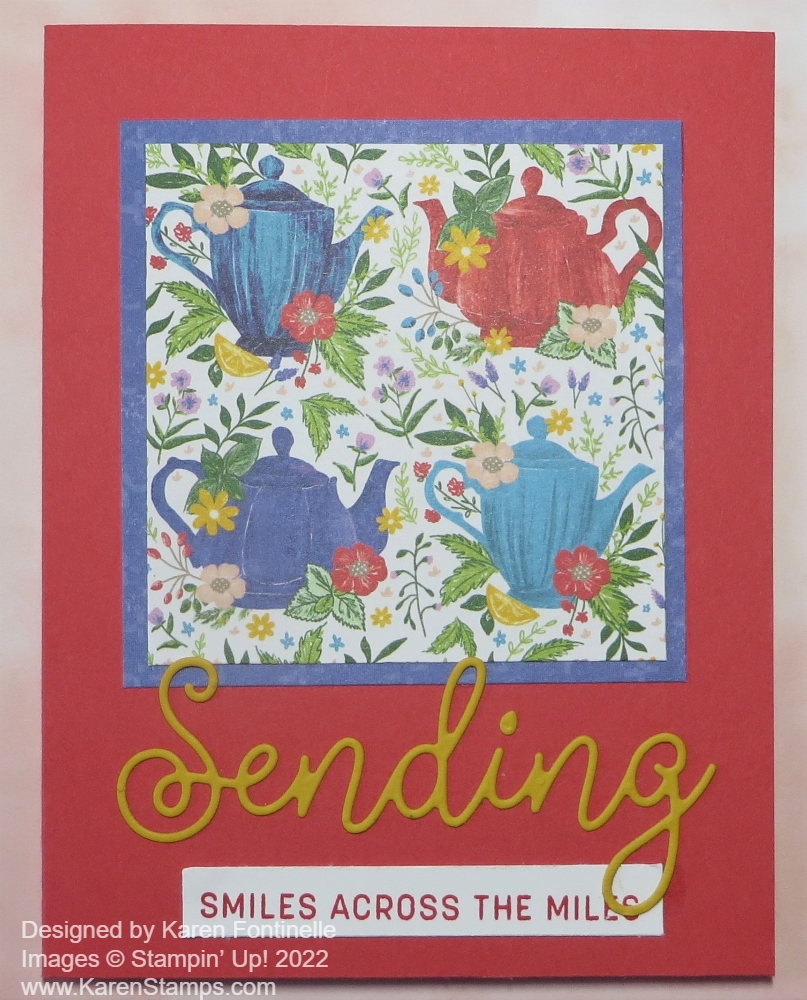
Tea Boutique Sending Smiles Card

ea-Boutique-Sending-Smiles-Card

It’s so funny that the Tea Boutique Suite of products did not appeal to me when the newest Stampin’ Up! Annual Catalog came out. Once I saw some samples made with the stamp set and designer paper, I couldn’t resist! I love a lot of the patterns in the Tea Boutique 6″ x 6″ Designer Series Paper and they go with all the new In Colors so it is a lot of fun to make cards with this Suite. I actually forgot this designer series paper was the 6″ x 6″ size! I kept looking and looking through my 12″ x 12″ designer paper trying to find it until I remembered it was in a different spot with the other 6″ x 6″ paper!

This is really a simple card. The card base is Sweet Sorbet, but I could have used any other new In Colors. I cut a 3″ x 3″ piece of the Tea Boutique DSP and layered it on another piece of the designer paper. This pattern worked out well because of the four teapots that display so well. It fits perfectly on this card.

For the greeting, I used the Sending Dies to cut out the word “Sending” from Crushed Curry Cardstock. Then I stamped one of the many sentiments in the Sending Smiles Stamp Set in Sweet Sorbet ink on a thin strip of Basic White Cardstock. I could have planned a little better to not cover up part of the sentiment with the tail of the die-cut word! Or I could have chosen a different, shorter sentiment.

And when will I ever remember to use Adhesive Sheets before die-cutting something very thin and delicate like the word “Sending”! These are sheets that you adhere the piece of cardstock to that you are going to cut out. Then, after you cut out the cardstock, you simply peel off the backing and you don’t have to apply any bit of glue or adhesive. It’s as if you made your own sticker with the Adhesive Sheets. Put them on your next order and then try them out! But if you forget to use them, use teeny tiny dots of Multipurpose Liquid Glue on the back of tiny, thin pieces and that will work if you are careful and have a steady hand!

On the inside of the card, I added a layer of Basic White cardstock for additional stamping or a written personal message. On one of my scraps of the same designer paper, I cut out one of the teapots and adhered that in the lower right corner on the Basic White cardstock for an extra little touch inside the card.

The Tea Boutique Suite contains the Cup of Tea Stamp Set and the Teacup Dies, which you can buy together in the Cup of Tea Bundle and save 10% if you do not want the entire Suite. Also in the Suite is the Tea Boutique 6″ x 6″ Designer Series Paper which I have told you has lots of really cute patterns in it, especially if you are a tea lover! Even the generic designs that don’t have tea cups or teapots are cute and very usable. You might miss the Tea Boutique Cards & Envelopes in the Suite which are super cute and give you a head start with a card base that you can decorate with stamps, dies, and paper. The envelopes are also printed with flowers and In Colors. You will enjoy decorating these cards and then sending them off in the printed colorful envelopes!

If you are a tea lover, a teacup collector, or a teapot collector like my sister-in-law (and me to a certain extent!) you will enjoy any and all parts of this Tea Boutique Suite!

SHOP STAMPIN’ UP! ONLINE! Earn FREE Sale-A-Bration Products!

Join My Stamping With Karen Mailing List!

I’d like to invite you to join my Stamping With Karen Mailing List to keep up with news from Stampin’ Up! and to be inspired with new stamping projects, tips, techniques, and more from me! There is always something new with Stampin’ Up! from products to catalogs and early releases of new products and I know you’ll want to know all about it.

I send out a newsletter every Tuesday with at least one free project idea, tip, or technique plus the latest Stampin’ Up! news and updates. Stampin’ Up! usually posts updates to Demonstrators every Tuesday morning so a newsletter on Tuesday from me has the news “hot off the press”!

Stampin’ Up! puts out an Annual Catalog once a year, plus two “Mini” catalogs a year {that aren’t so “mini”) plus the big promotion called Sale-A-Bration. These catalogs give you lots of products you will be excited about, want to learn about, and want to see all the ideas for cards and projects possible! Get on my Mailing LIst to keep up with these exciting events and know what to expect. If you’re one of my purchasing customers I’ll send you these catalogs free of charge when they come out.

Keep up with news about the new Paper Pumpkin Kit every month and subscribe if you want to join in the fun of having a project already planned and prepped for you in the cute Paper Pumpkin box! Always sign up or skip a month if you want by the 10th of any month.

As a special gift to my Mailing List subscribers, every year before the holidays I send out my “12 Weeks of Christmas” newsletters, with one new holiday project each week leading up to Christmas. These are ONLY for my subscribers and you won’t find them on my blog or anywhere else

If you are on my blog, you will see a red sign-up box in the top right corner where you can simply put your name (or first name) and best email. If you are on your phone, you probably need to scroll way down to get to the sidebar things. OR you can go to my sign-up page HERE.

When you do sign up, you will receive an email with a link to a free gift from me!

I hope you will enjoy the card and project ideas I send out in my weekly newsletter. Even if you never make the project, maybe just seeing ideas will do your crafty heart good! I know it does mine! I’m all about the ideas!!

Let’s stay connected and in touch with each other over our favorite thing to talk about…..stamping with Stampin’ Up!

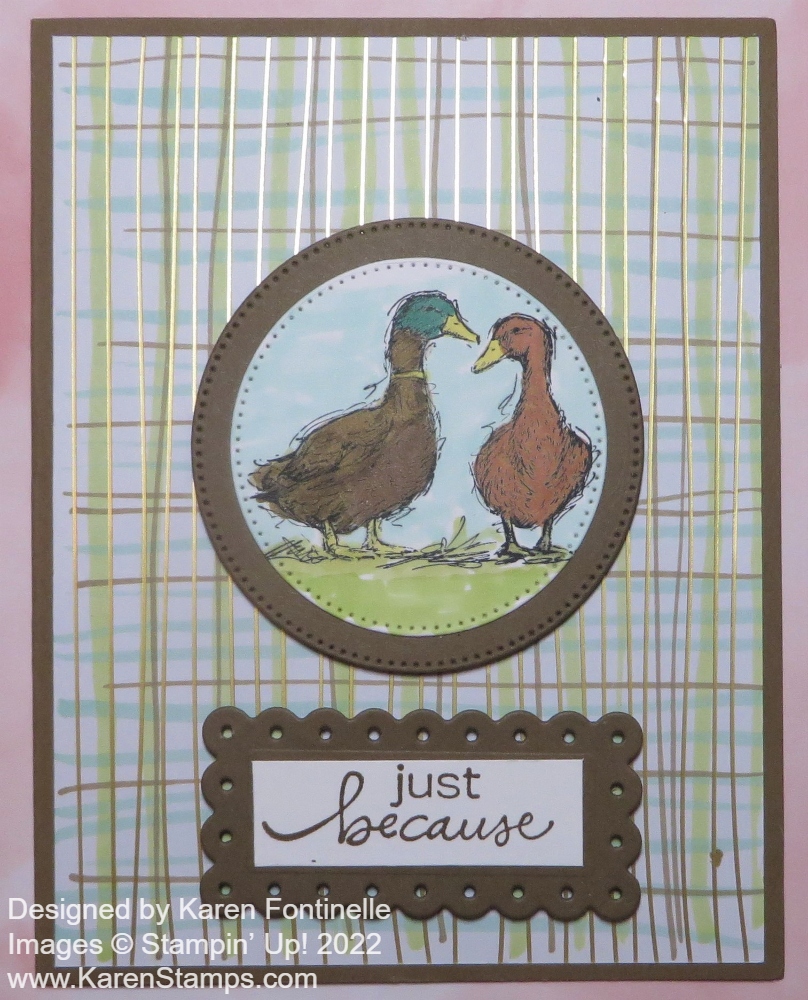
Stylish Sketches Duck Card

Stylish Sketches Duck Card

I’m not sure if these are ducks or geese on this Stylish Sketches Duck Card so you can think of them as whatever you like! I thought they were geese, then I saw several stampers calling them ducks! Whatever they are, you can get this Stylish Sketches stamp set FREE during Stampin’ Up! Sale-A-Bration! With every $50 purchase of Stampin’ Up! products, you can choose a free Sale-A-Bration product. Not only do we have some remaining ones in the Sale-A-Bration brochure, but now we have some extra annual catalog products we can choose from!

This card is made with a card base of Soft Suede cardstock and is layered with another Sale-A-Bration free product with a $50 purchase. It’s the Silver & Gold 6″ x 6″ Designer Series Paper. There are 24 sheets, 12 each of 2 designs. Half have silver foil in stripes or polka dots and the other half have gold. My paper is the gold stripe but I added some Stampin’ Blends stripes! I used Pool Party, Granny Apple Green, and Soft Suede. I drew them in just very casually and not carefully! Stampin’ Up! had a video showing ways to add more to this paper.

The ducks/geese were stamped in Memento Black on Basic White and colored in with Stampin’ Blends. Then it was die cut with one of the circles in the Stylish Shapes Dies. I also cut out a Soft Suede circle to be a layer underneath. This piece is popped up on Stampin’ Dimensionals. The greeting is stamped in Soft Suede ink from the Lovely You Stamp Set. This is layered on the smallest scalloped rectangle die from the Scalloped Contours Dies. This would make a good masculine birthday card or Father’s Day.

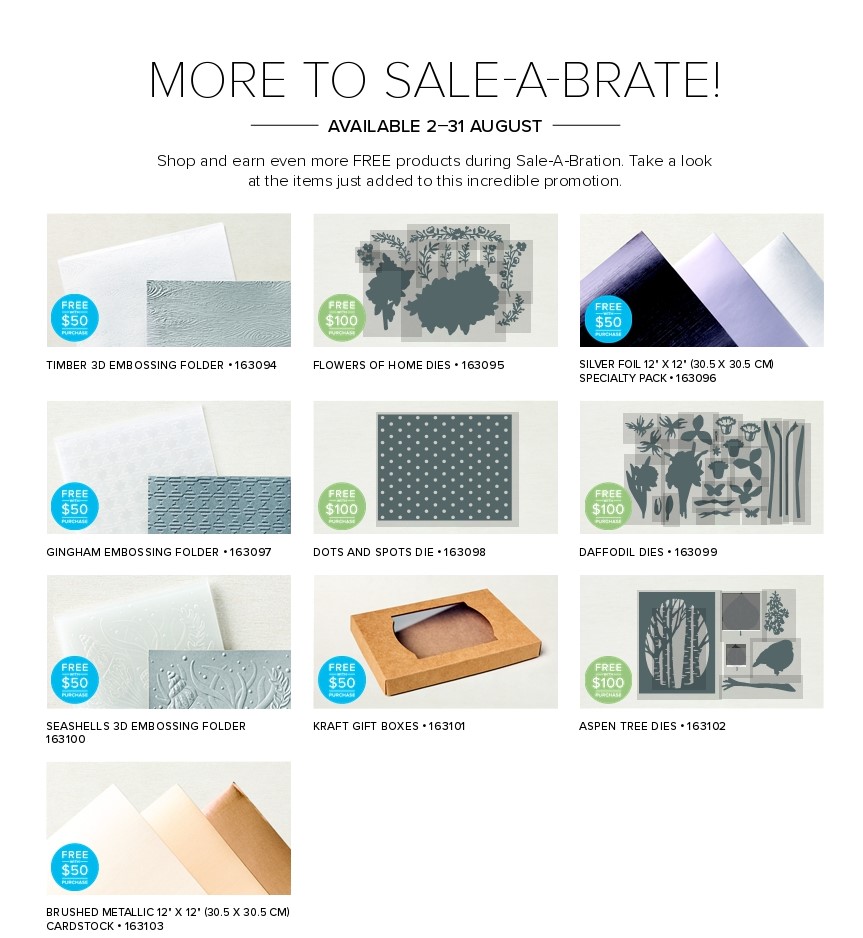
Here are the extra current Sale-A-Bration Choices, while supplies last!

CLICK HERE TO SEE THE SALE-A-BRATION CHOICES IN THE ONLINE STORE!

Back-To-School Tax Holiday Info for Certain States This Weekend!

SHOP STAMPIN’ UP! HERE!

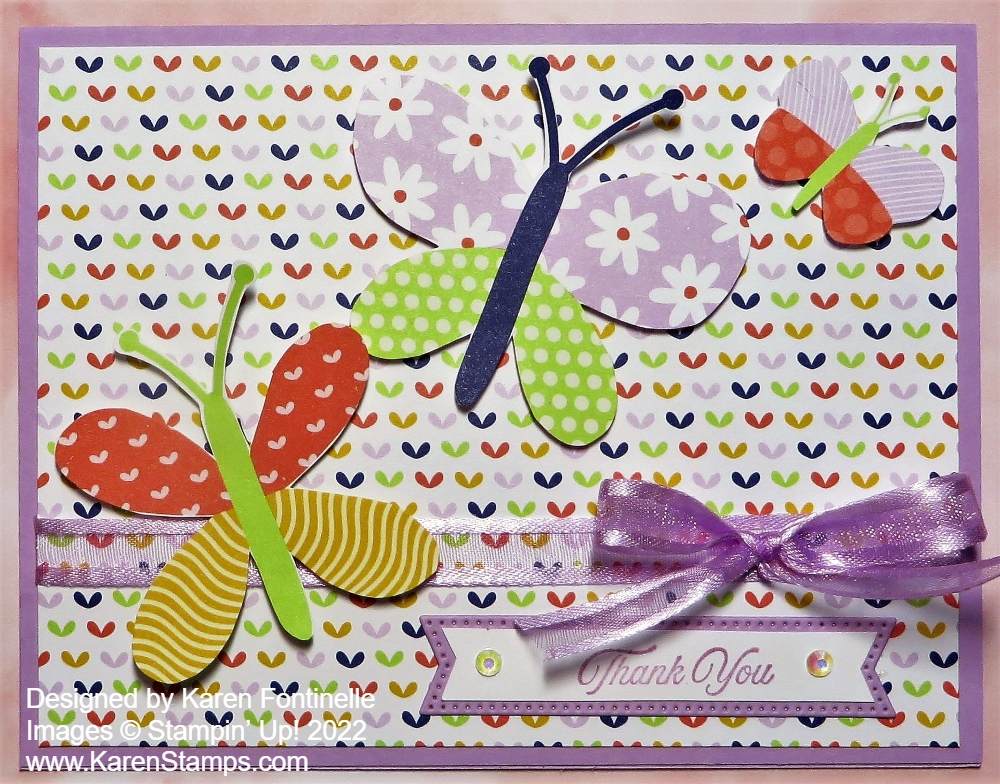
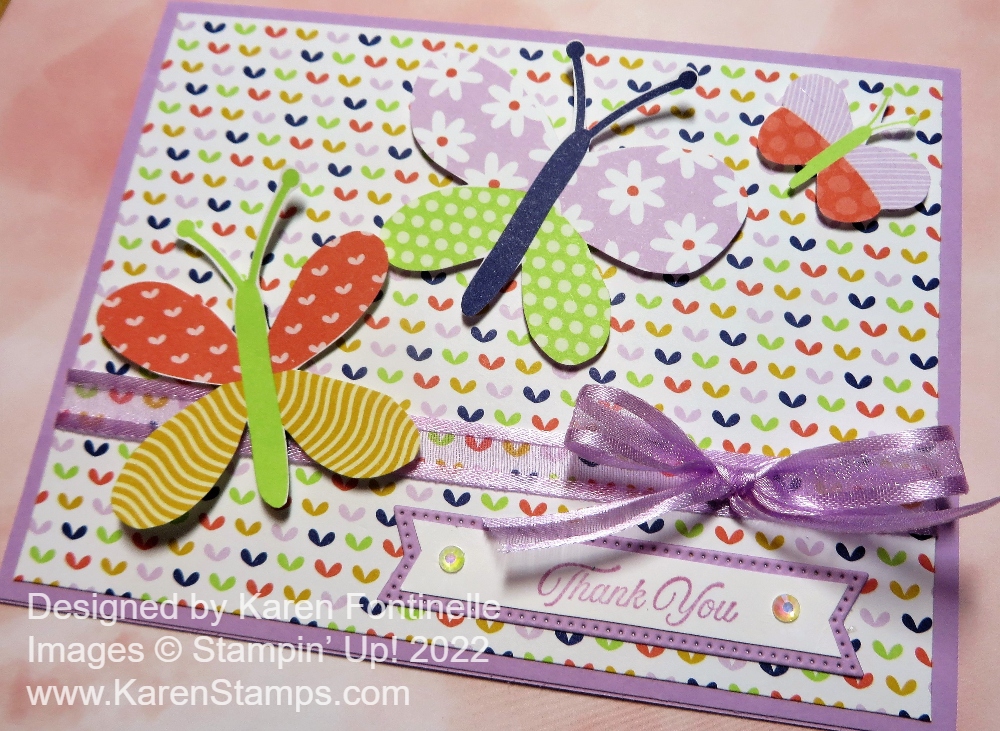
Butterfly Kisses Trio Thank You Card

Butterfly Kisses Trio Thank You Card

Sometimes you just want to make a quick and simple card and that’s how this Butterfly Kisses Trio Thank You Card came about. The basic card design is quick and simple. Just add a layer of designer paper to a card base, add some ribbon and a greeting, and the card is done. With this particular card, there was some fussy-cutting and die-cutting involved so some might not call that so quick and simple! But it was fun to create!

I hadn’t used the Butterfly Kisses 6″ x 6″ Designer Series Paper in a while. I always worry that we forget about the great products and ideas in the Stampin’ Up! Annual Catalog as soon as the new mini catalog comes out, whether Holiday or Spring. It’s still summer (don’t remind me!) so butterflies are still very much in style!

The card base is Fresh Freesia and I chose this happy print in the Butterfly Kisses DSP to be the background. I wrapped around a piece of Fresh Freesia 3/8″ Open Weave Ribbon before adhering the designer paper to the card base. I tied a separate bow and adhered it with Mini Glue Dots. This is an easy way to tie a good bow and not have it be crooked.

If you have the Best Butterflies Bundle or the Build a Butterfly Dies you can stamp and die-cut or die-cut certain butterflies from the designer paper. Otherwise, you can fussy-cut any of the butterflies you like from the many designer papers in the package. That’s what I did because I don’t own the dies. The butterflies are fairly easy to cut out. Some people don’t like fussy cutting, but while you concentrate on cutting out the image, it takes your mind off everything else and that is good!

The greeting is from the Celebrate You Stamp Set. I needed something small like we used to have in the retired “Itty Bitty” stamp sets! Then I die cut two banners in the Stylish Shapes Dies, one in Basic White with the greeting, and one in Fresh Freesia. I trimmed down the Basic White piece, cutting off the stitched edges so I could layer it on the Fresh Freesia banner. For a finishing touch, I added two Iridescent Rhinestones Basic Jewels to each end of the greeting.

Here is another card I made using the Butterfly Kisses Designer Series Paper.

So there you have a relatively quick and simple card to make if you don’t mind a little die-cutting or fussy cutting! I think this Butterfly Kisses Trio Thank You Card is a happy card with its pretty colors to brighten someone’s day.

SHOP STAMPIN’ UP! TODAY!

Butterfly Kisses Trio Thank You Card Closeup

Rustic Harvest Colored Leaves Card

Rustic Harvest Colored Leaves Card

I was thinking I saw this black and white leaves designer paper in the Perfectly Penciled Designer Series Paper in the Annual Catalog but it turns out it is in the Rustic Harvest beautiful pack of designer paper! When I found it I colored in the leaves and made this Rustic Harvest Colored Leaves Card! If you don’t really like coloring in papers like this, this is the technique for you! I should have timed myself but I know it probably only took me two minutes at most to color in all these leaves, even with multiple colors! So fun!

The card base is Mossy Meadow cardstock with a layer of Crushed Curry. Those are coordinating colors for the Rustic Harvest DSP. I simply used the Sponge Daubers to apply ink to the leaves…and with no worry about staying in the lines since the background is black. It would be impossible to stay within the lines with Sponge Daubers anyway, unless you were really careful. And I didn’t worry if every single area was colored. You can see some tiny white areas or places where not as much ink got applied.

Rustic Harvest Colored Leaves Card Coloring Technique

I just chose several ink colors for fall leaves and I think they worked well together. I used Mossy Meadow, Granny Apple Green, Crushed Curry, Pumpkin Pie, and a touch of Mint Macaron. I wanted some yellow and orange for my fall leaves. Sponge Daubers are easy to use. Either just hold them or stick your finger inside to use them. You can just wash out the ink after rubbing off the excess on scrap or Grid Paper. I labeled a lot of mine but you wouldn’t have to have one for each color as long as you get off as much ink (or pastels) as you can.

I used the green ribbon in the Real Red & Garden Green 3/8″ Ribbon Combo Pack. Even though it wasn’t one of the greens I used, I liked it just fine on this card. I wrapped a piece around to the back and adhered it, then used another piece of ribbon to tie on the bow. You can use a Mini Glue Dot to hold the ribbon and bow in place. After the ribbon was adhered, I adhered that piece to the card.

The greeting is stamped in Mossy Meadow on Basic White and originally cut out with the label die in the Meadow Dies. I love that scalloped label die! Since I wanted to layer it on a colored piece, I cut it by hand to make it fit on the die-cut Crushed Curry. Then as I looked through my embellishments, I chose two of the small black dots in the Classic Matte Dots to go with the black background. But I think I wish I’d picked something else! But these are fine!

I have to say after I colored the leaves on this card, I was thrilled with how they turned out!! Try it and see how it goes! Or use your Stampin’ Blends, Watercolor Pencils, ink and Blender Pen, whatever you like! So many ways to color!

Shop Stampin’ Up! Online HERE!

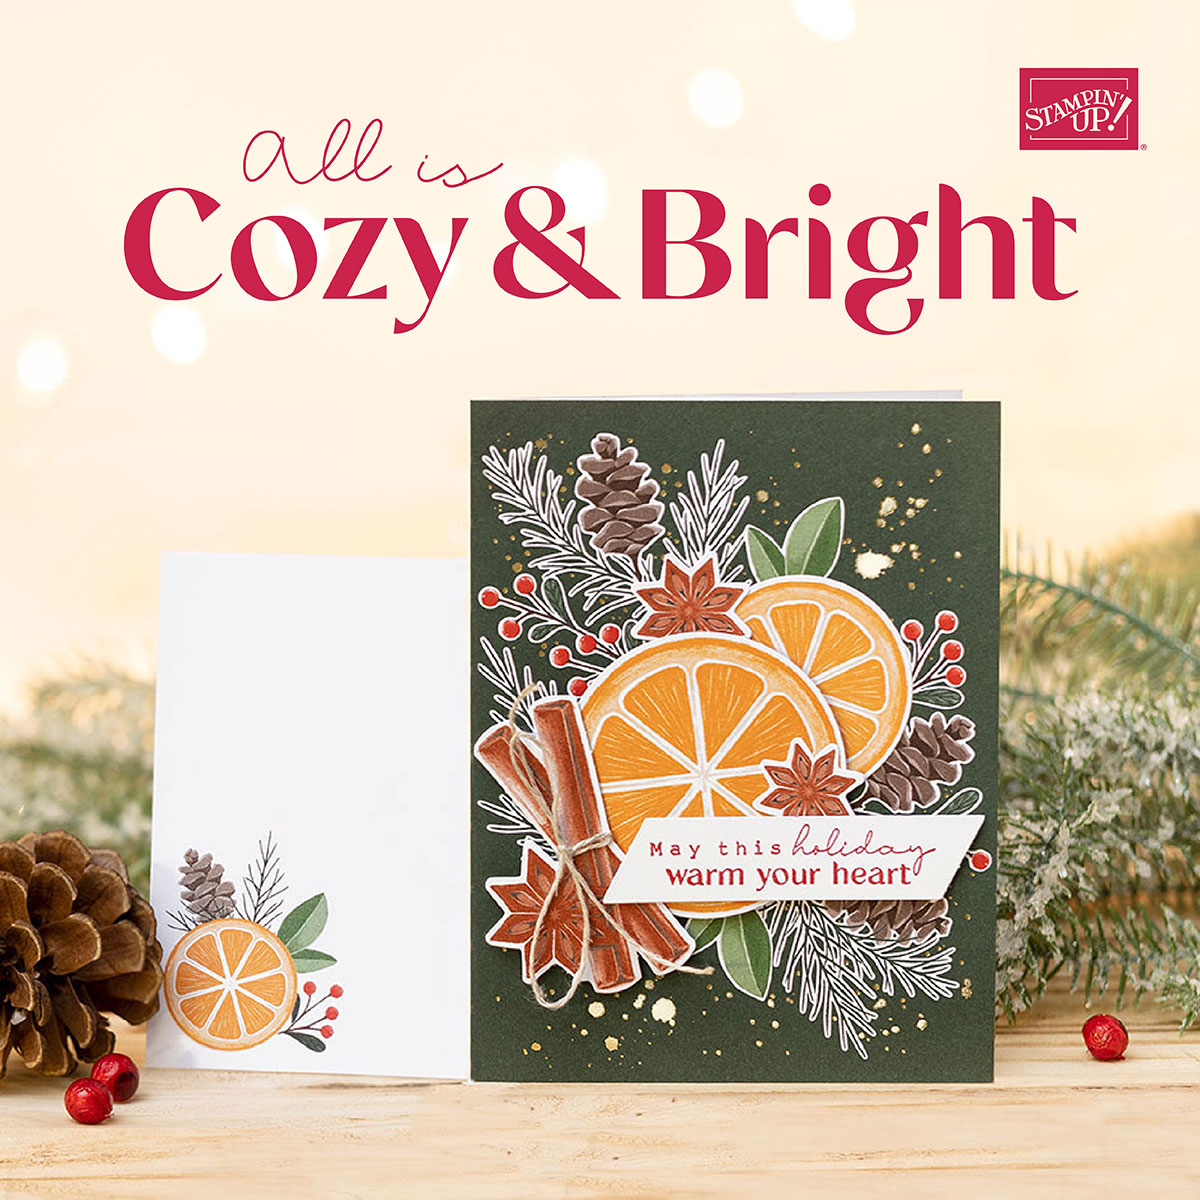
New Kit in the Kits Collection! Cozy & Bright!

Cozy & Bright Kit square ad

Today you will find a new kit in the Stampin’ Up! Kits Collection – the Cozy & Bright Kit! Celebrate the season with a card kit that has everything you need to wish those you love a Merry Christmas and a joyous New Year. Don’t let the holidays overwhelm you–get your all-inclusive kit and make quick multiples everyone will love!

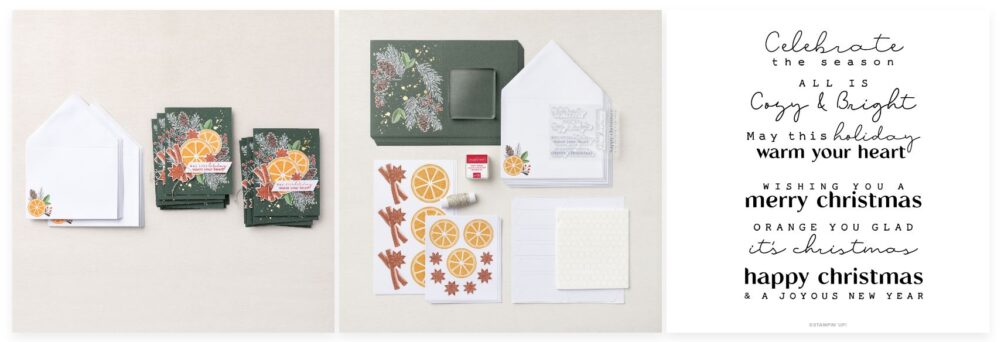
Cozy and Bright Kit in Kits Collection

DETAILS
Kit Includes:

  • Cozy & Bright Photopolymer Stamp Set
  • Acrylic Stamp Block
  • Classic Stampin’ Spot: Poppy Parade
  • Predesigned projects 
  • Step-by-step instructions
  • Precut pieces (No prep work! Get right to crafting). Including printed die-cut sheets: sticker adhesive sheets & non-adhesive sheets
  • Makes 12 cards of 1 design
  • Gold foil accents
  • Folded card size: 5-1/2″ x 4-1/4″ (14 x 10.8 cm)
  • 12 preprinted envelopes
  • Enough adhesive to complete projects
  • Linen thread
  • A 9-7/8″ x 6-1/2″ x 2-3/4″ (25.1 x 16.5 x 7 cm) printed designer box for storage or crafting on the go

Product colors: Cajun Craze, Early Espresso, Evening Evergreen, Garden Green, Poppy Parade, Pumpkin Pie 

Cozy & Bright Kit #160338  $23 USD   $32 CAD

SHOP ALL THE KITS!

New Sale-A-Bration Choices For You!

Click Photo Above to View!

August is the second and final month of Sale-A-Bration and Stampin’ Up! has added these additional products you can choose with a $50 or more purchase! You may know that some of the items in the Sale-A-Bration brochure have sold out but here are some catalog items to give you additional choices for your FREE Sale-A-Bration item. Notice that some are at the $50 Level and some at the $100 Level.

CLICK HERE TO VIEW FLYER!

ALSO:

These two Sale-A-Bration products are BACK IN STOCK!!

RINGS OF LOVE DESIGNER SERIES PAPER

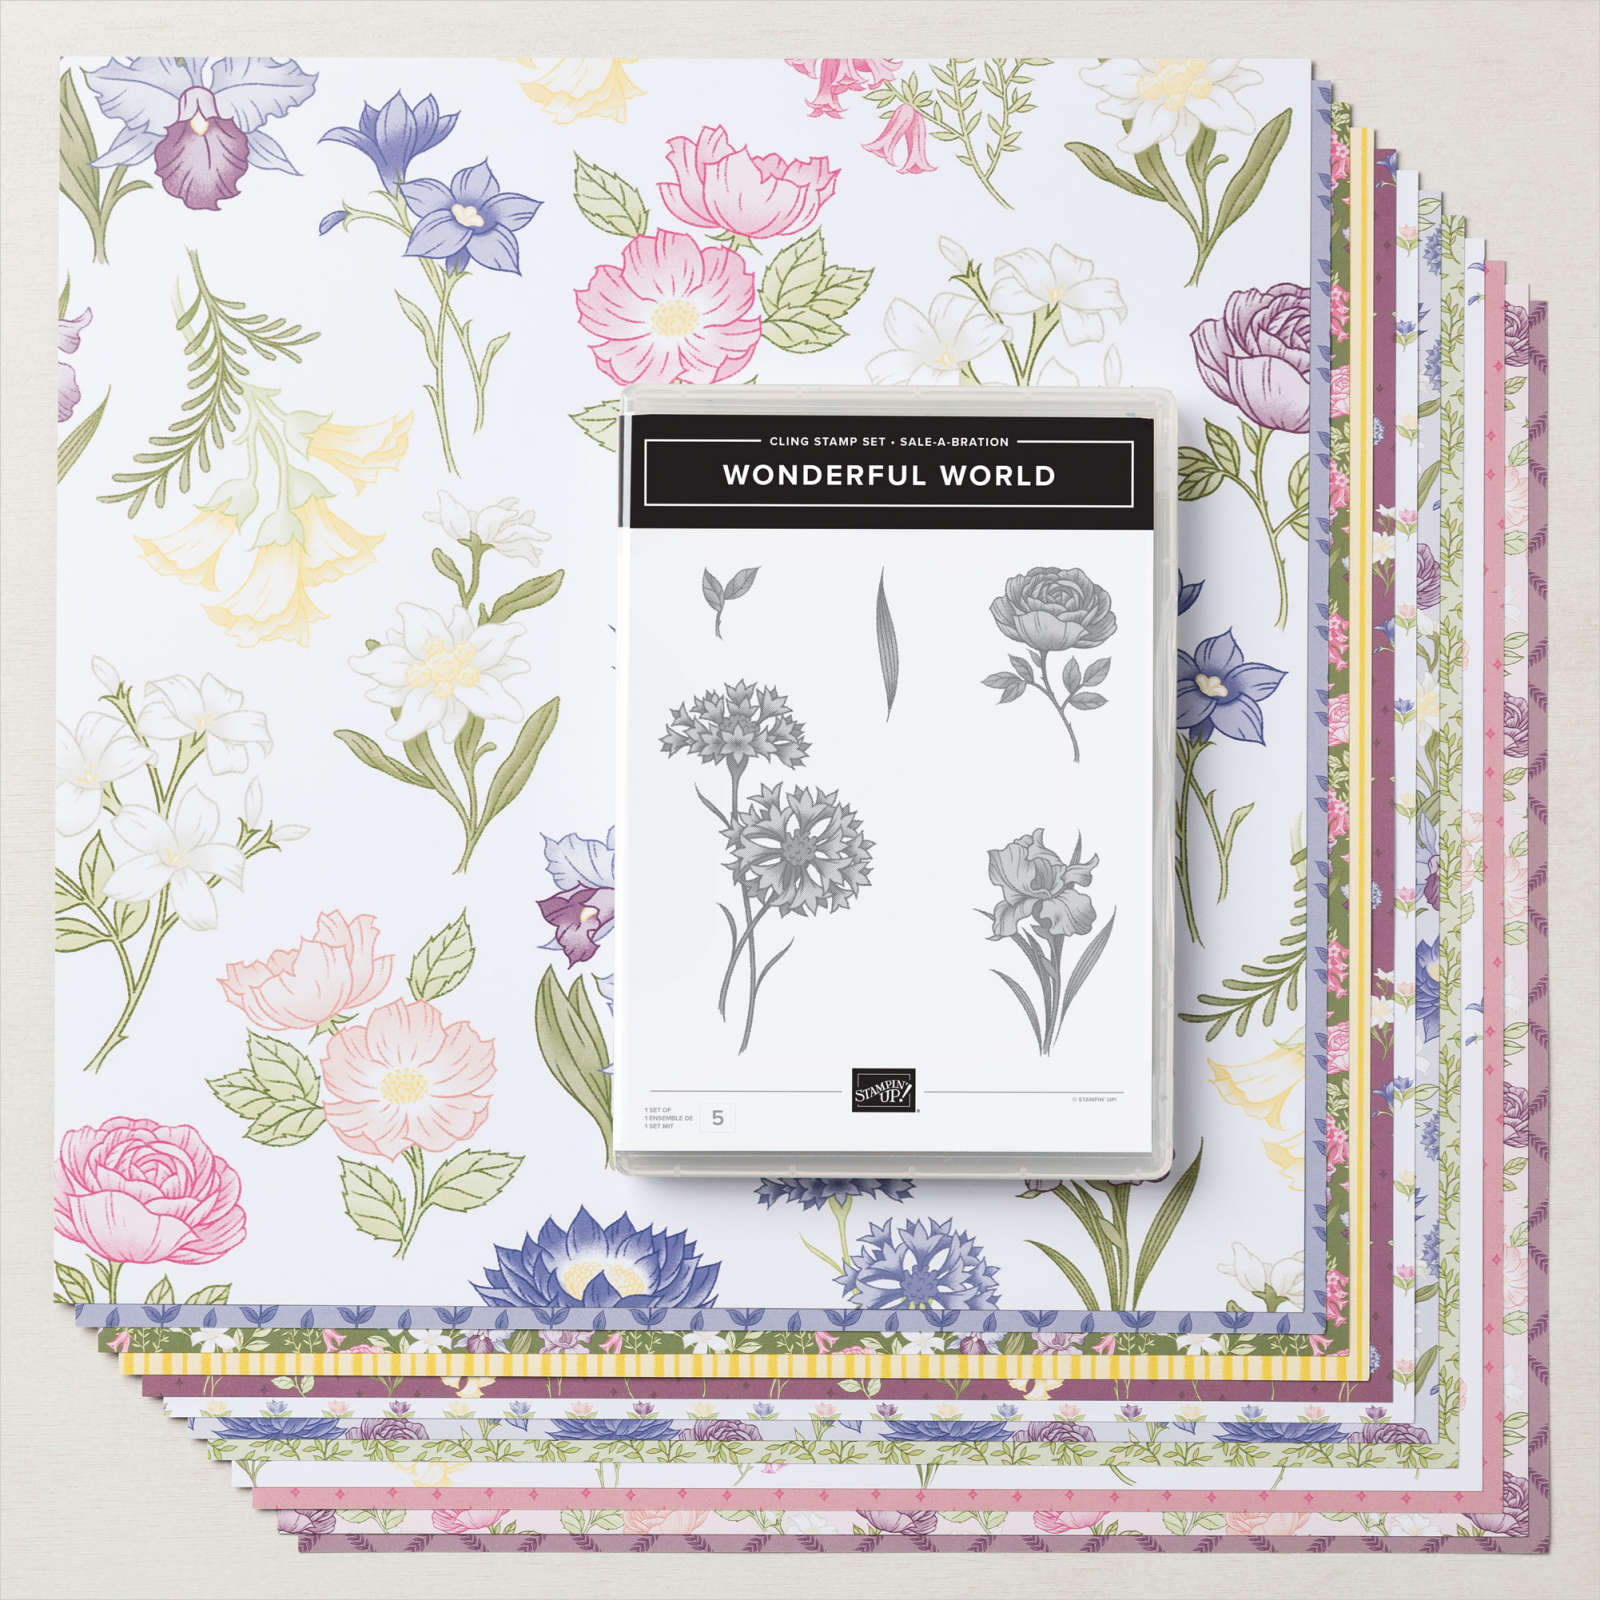
WONDERFUL WORLD BUNDLE

SHOP SALE-A-BRATION HERE!

$50 Level Products

$100 Level Products

Stylish Sketches Fox Card

Stylish Sketches Fox Card

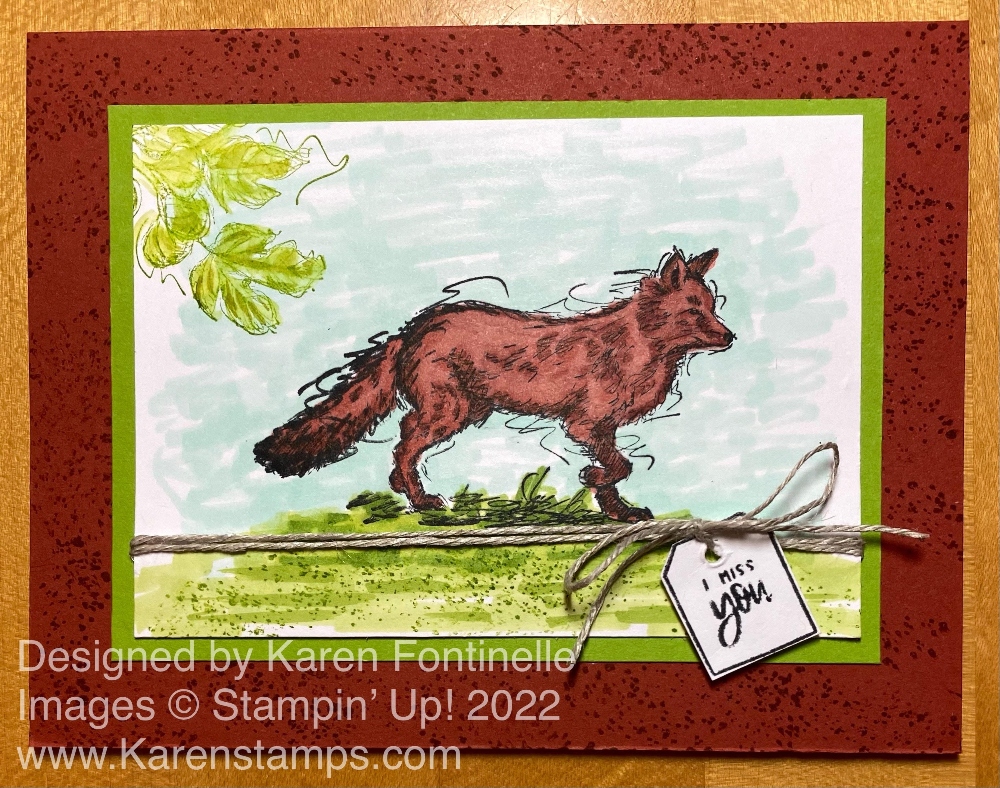
Happy August! August means one more month of Sale-A-Bration at Stampin’ Up! so I thought I would post this Stylish Sketches Fox Card made with a FREE Sale-A-Bration stamp set. There are a few things sold out in Sale-A-Bration choices but I expect to hear something about that today or tomorrow so stay tuned.

I wasn’t quite sure what to do with this fox, but I know my son likes foxes so I’m sure I can send this card to him! I initially thought there isn’t much to this Stylish Sketches Stamp Set, so maybe I should make the stamped area a little smaller. This stamp set has “sketches” of the fox, two geese, leaves, and if you happen to notice, some tiny dots that are good for texture for the ground, perhaps.

The card base is Cajun Craze and after working on the card for a while, and noticing those tiny dots, I decided to stamp those around the border on the card base. The front of the card is stamped on Basic White and layered on Granny Apple Green cardstock.

The Basic White piece is 4 1/4″ x 3″. The Granny Apple Green layer is 4 1/2″ x 3 1/4″. That makes for a smaller stamped area for the fox and a wider border on the card base. The fox is stamped in Memento ink and colored in with Light and Dark Cajun Craze Stampin’ Blends. The grass on the stamp plus the area underneath is all colored with Light and Dark Granny Apple Green Blends, plus stamped with those little dots in green also. I colored around the fox with Light Pool Party Blend marker to resemble the sky. There is nothing artistic about it, I just scribbled back and forth! It matches the “sketchiness” of the way the fox was drawn! I felt it still needed something, so I stamped the bundle of leaves in Granny Apple Green ink and colored it very lightly with ink and a Blender pen. I wanted the leaves up there in the corner to add a little something to the picture but be very subtle.

For a greeting, I decided to tie around a piece of Linen Thread underneath the fox, two times around the Basic White piece, and tied on a greeting. Obviously, I needed a small greeting and I found one in the Cup of Tea Stamp Set. I stamped the little tag shape and the greeting, then just cut around the tag rather than diecut it. I put a Stampin’ Dimensional underneath it to hold it in place and face up.

Sale-A-Bration runs through the end of August! With every $50 purchase, you can choose a FREE Sale-A-Bration item and with a $100 purchase, you can choose two $50 level items or one $100 level item. With a $150 order, you can choose Stampin’ Rewards of 10% PLUS Sale-A-Bration items!

SHOP STAMPIN’ UP! ONLINE HERE!

Christmas Wishes Banner Card

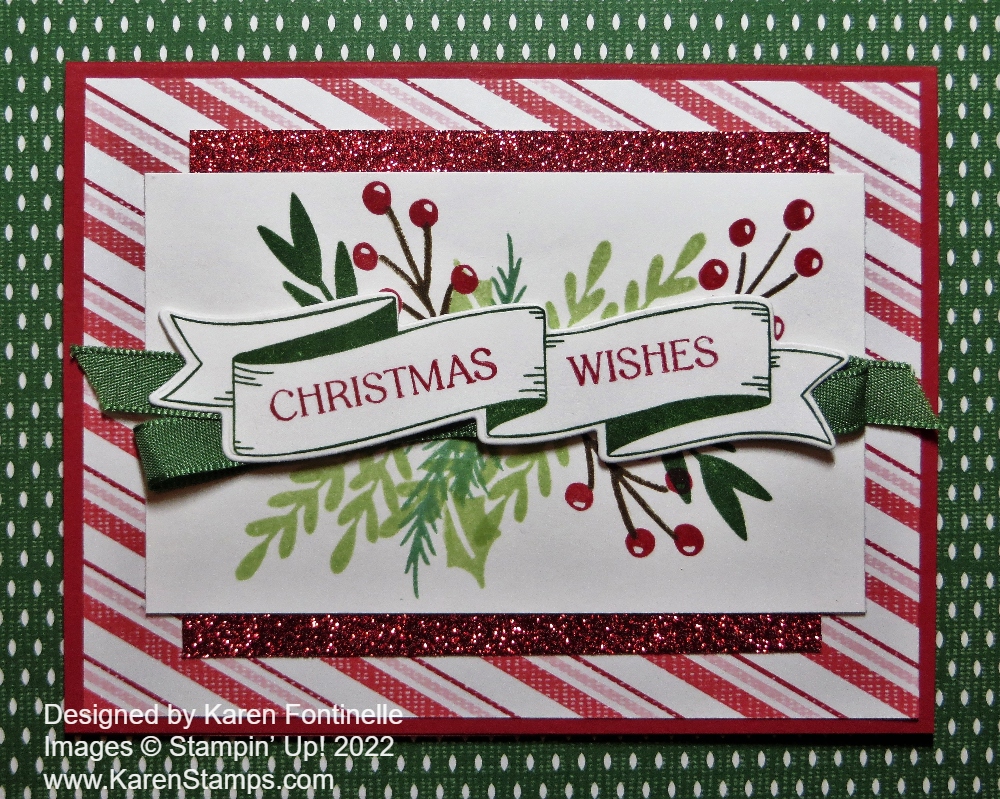
I wanted to make another Christmas card sample so I copied a design in the Holiday Mini Catalog on page 11. I found just the Real Red card base and the striped paper already cut so I just started with that even though the sample design uses a green stripe paper. I was happy with my Christmas Wishes Banner Card when I finished. That red glimmer paper really adds some pizzazz!

The green paper in the background is just another of the Sweetest Christmas Designer Series Paper designs that I put under my card for the photograph, but I kind of like it if I wanted to make a card with that as the layer if I made the center part smaller!

As I said the card base is Real Red with a striped layer of the Sweetest Christmas DSP. The center piece is Basic White cardstock, stamped with leaves, with a die-cut banner overlaid, and some glimmer paper on the top and bottom.

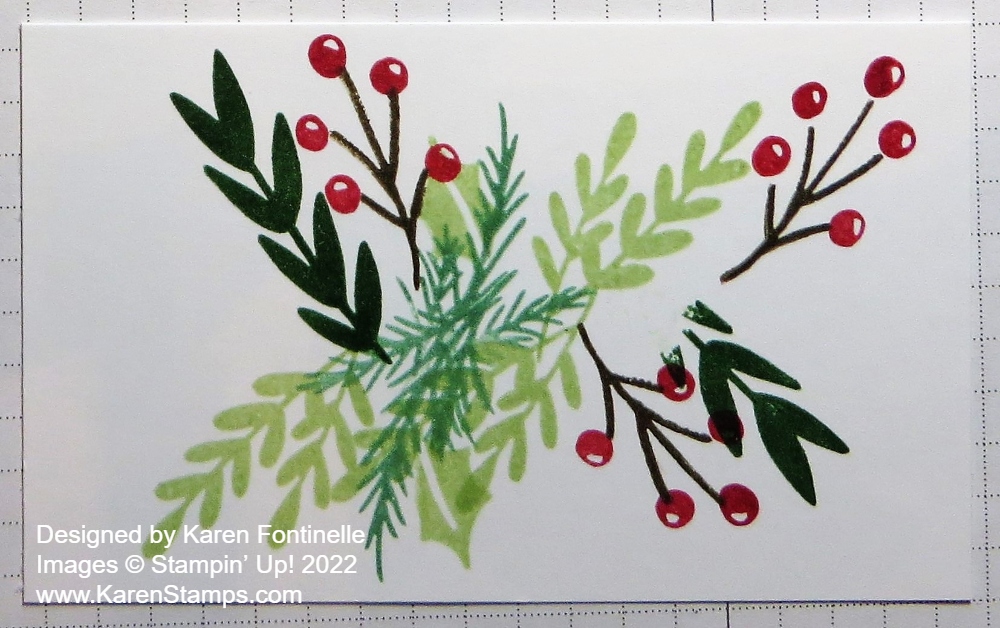
Here are the details! The Basic White piece is 4 1/2″ x 2 3/4″. I stamped various leaves and stems in the Christmas Banners Stamp Set. I used Garden Green, Soft Sea Foam, and Mint Macaron in for the greenery and Soft Suede and Real Red for the stems of berries. I love how those turned out! The berries and stem are two different stamps so you don’t have to color directly on the stamp to get two colors. As I stamped the greenery and berries, I just imagined the banner going across the middle so I didn’t have to worry about how it looked underneath. You can see in the photo below how I stamped all of that.

Christmas Banner Card Stamping

The banner is stamped in Garden Green ink with the greeting words stamped in Real Red. The banner was diecut with the Christmas Banner Dies. You could just place the banner over the center of that stamping, but I noticed the catalog sample looked like it had ribbon underneath it. I used the green ribbon in the Real Red & Garden Green 3/8″ Ribbon Combo Pack. It just goes across and back and then back to the other side so that you can see a loop at each end of the banner. I added some Stampin’ Seal on the back of the banner so I could adhere the ribbon going back and forth and back, then popped up the whole banner with Stampin’ Dimensionals.

Before adhering the piece to the front of the card, I added two scrap pieces of red glimmer paper from the Real Red & White 6″ x 6″ Glimmer Paper to the top and bottom of the center piece. I cut the glimmer paper at 4″ x 5/8″ and adhered to the white cardstock, then adhered the whole thing to the card front.

The sample in the catalog has a little bow tied with one of the Flat Jingle Bell Trinkets. You could also add some jewels if you wanted to, such as the Red Rhinestone Basic Jewels.

Even if you copied this sample, there are ways you could change things up a little if you wanted. It at least helps you to get going to copy something!

Shop Stampin’ Up! Online HERE!