Tag Archives: Brightest Glow Stamp Set

Beary Cute Polar Bear Christmas Card

Beary Cute Polar Bear Christmas Card

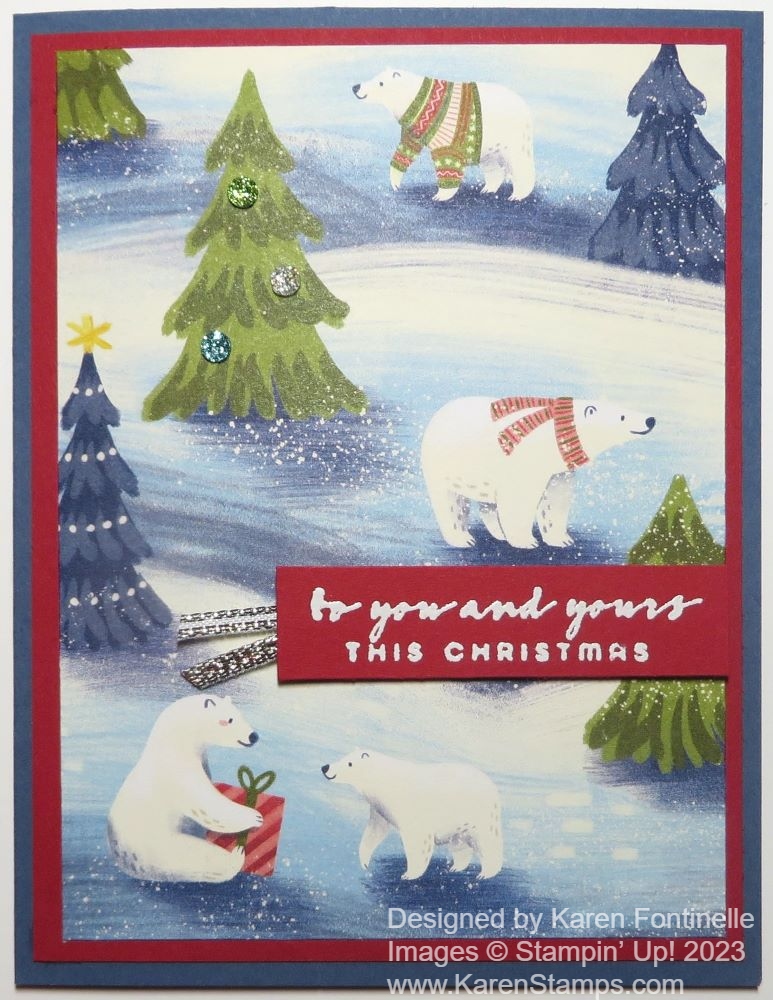
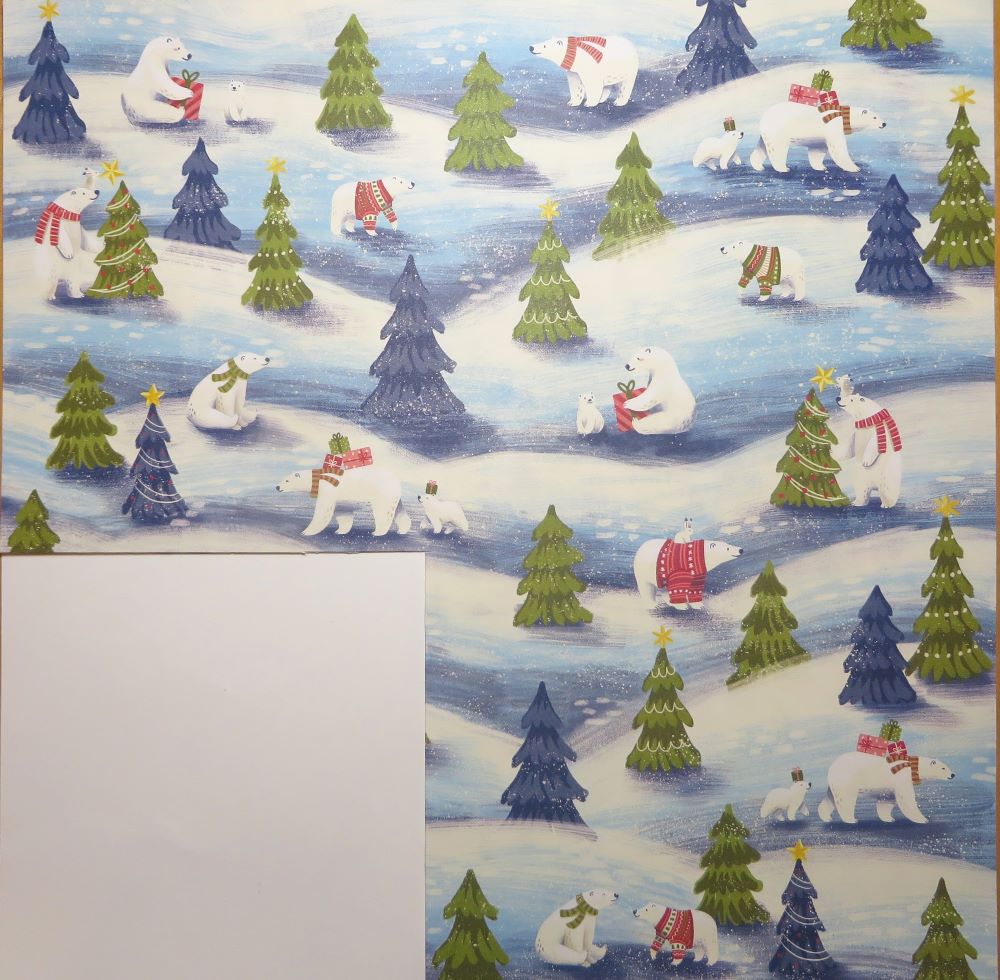
This Beary Cute Polar Bear Christmas Card is made with one of the new designer papers coming TOMORROW in the new September – December 2023 Mini Catalog. The more I use it the more taken I am with it! You can do so many fun things with these cute polar bears of all sizes! I knew the paper was cute when I saw it in the catalog, but it could possibly be my favorite paper in the Mini.

I can guarantee that you will hate to cut into this paper with all the bears and the other forest creatures. But cut into it you must! You can use the Beary Cute Punch to punch out certain of the bears but to really have fun with the paper you can “fussy-cut” the images or diecut some.

To make this card, I simply cut out an area of the Beary Cute Designer Series Paper and adhered it to the card. Now it may not seem simple to do. You just have to figure out an area that can be cut out, either with a die or using the Paper Trimmer, that won’t cut off anything that you really want or won’t include something you don’t want from a neighboring image. You may have to cut it smaller than a normal layer on a card but that will work out. I used a ruler to help me see what part of the paper would work. Just kind of measure the piece you want. You may even initially cut it larger than you want so then you can carefully trim down the piece to have the images you want that will fit on your card or project.

Beary Cute DSP

I liked having the Real Red layer underneath the designer paper for this card to bring out the red on the bears. The card base is Misty Moonlight but Night of Navy looks good, too. You might notice that Very Vanilla is one of the coordinating colors for the designer paper, not Basic White. Most people wouldn’t notice if you sent a card with this paper with Basic White, but officially I guess the color to use for a neutral is Very Vanilla.

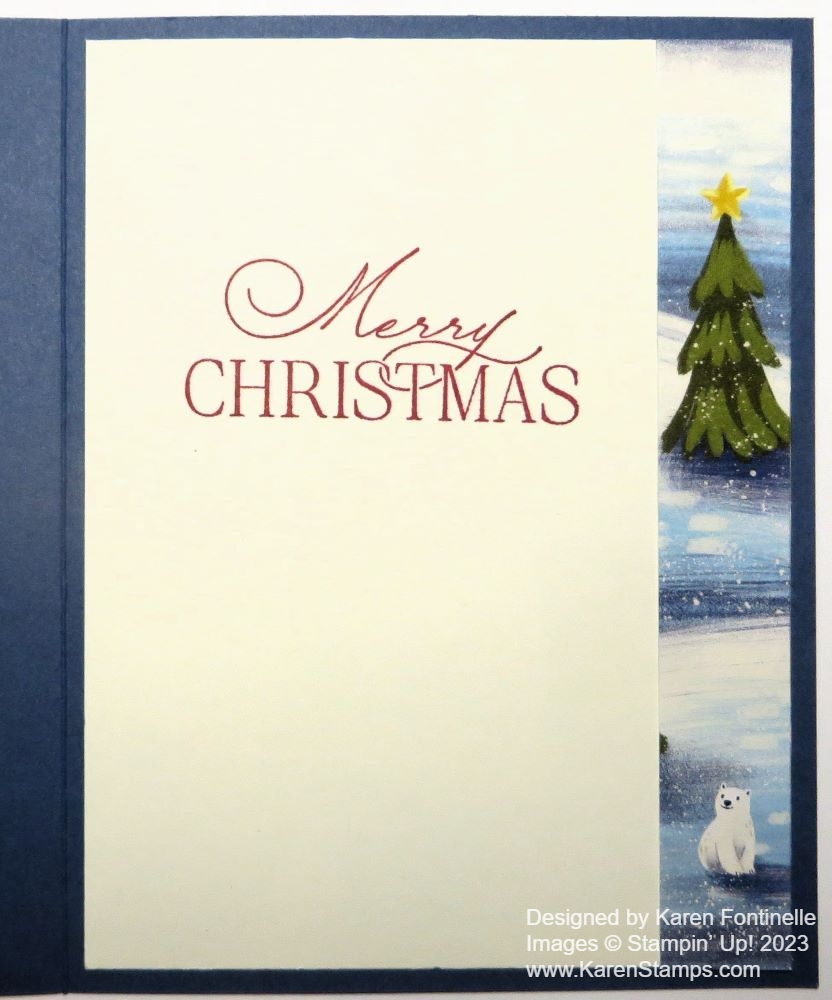
For the greeting, I embossed this one with white embossing powder on a scrap of Real Red cardstock. The greeting is in the Brightest Glow Stamp Set. It is carried over so you will find it online if you search but it is not in the Annual Catalog. To add a little accent to the greeting I simply stuck a folded piece of Gold Trim underneath the edge. And you won’t be able to resist using the Glitter Sequins on page 23 in the Holiday Mini! I stuck a few on the Christmas tree on the paper for a little sparkle!

The area I cut out of the designer paper is a little larger than I used for just the front of the card. After I finished the front of the card I decided I would like a strip of the designer paper on the inside layer of the card. When I looked back at the paper, it looked like a perfect strip of paper just to the side of what I had already cut out for the front of the card. It has a small tree and a small bear! You can see the photo below.

Beary Cute Polar Bear Christmas Card Inside

Get ready with your Shopping List for tomorrow when the Holiday Mini goes live! Remember, the website could be busy but hopefully you won’t have any problems!

SHOP HERE!

Penguin Punch Christmas Gift Tags

Penguin Punch Christmas Gift Tags

If you don’t already own the Penguin Builder Punch, run and get it on the Stampin’ Up! Clearance Rack so you can make these Penguin Punch Christmas Gift Tags! I can’t believe it is still available but it is marked down to $4.50 instead of $19.00! You may as well buy one for that price! Or you may already have one from a previous catalog so dig it out and make something fun for Christmas!

I thought it would be fun to make a couple of gift tags using the Penguin Punch and some new designer series paper. You can use a tag die that you have or cut your own rectangle and then cut the top corners at an angle. I intended to use the tag die in the new Merriest Trees Dies (coming soon!) but then I came across the Tailor Made Tags Dies. If you have those, just use either of the die shapes.

I cut out a piece of designer series paper and cardstock for each of the tags. That makes them both the same size so you can’t layer them, but I just trimmed off inside the stitched marks on the designer paper, which made it fit just inside the stitched lines of the cardstock tag.

The Penguin tag on the left is made with Poppy Parade Cardstock and the Fa La La La La pattern in the Merry Bold & Bright Designer Series Paper (161945). This paper is so bright and happy, you will love it! I adhered the designer paper onto the cardstock tag and popped the penguin up with Stampin’ Dimensionals. For a finishing touch, I got the idea to just cut out a short strand of the Christmas lights on another of the papers and put it on the tag up at the top. If you want, you can put a piece of Basic White on the back of the tag if you think you need something to write your “To & From” on or a personal message.

The penguin tag on the right is made with Misty Moonlight cardstock and the snowflake paper in the Beary Christmas Designer Series Paper (162015). Before I adhered the penguin with Stampin’ Dimensionals, I got the idea to cut out some trees from the A Walk in the Forest Designer Series Paper (162377). It’s the paper at the top of page 5 in the Holiday Mini so don’t miss it. Maybe some dies would have cut out some of these little trees but I didn’t look! (Actually, some dies will cut out the fuller trees, not the skinny straight ones.) For a greeting, I used one in the Brightest Glow Stamp Set but cut the words apart and cut them smaller so they would fit on the tag.

The penguins are super easy to make with the punch. Just cut the two pieces out of black and white and the little feet out of Pumpkin Pie cardstock or something similar. I do not have the coordinating stamp set so I just drew in the little black eyes with a marker and the little beak with a Pumpkin Pie Stampin’ Write Marker. If you want, you could add a scarf around his neck or make a little hat.

The die punches out the hole in the tag so you don’t have to do that. Just pick a ribbon you like to tie through the hole so your tag is ready to go when you start wrapping gifts!

Remember to check out the Clearance Rack and see what other bargains you need plus the Penguin Punch!

SHOP STAMPIN’ UP! HERE!

Joy of Christmas Merry & Bright Christmas Card

Joy of Christmas Merry & Bright Christmas Card

This Joy of Christmas Merry & Bright Christmas Card idea came to me and I followed through on it and made the card. Something about this designer paper made me think of wrapping paper, and I got the idea to make the card front look like a wrapped package for Christmas. It’s an easy card to create so it might be good if you are looking for ideas for making multiple Christmas cards to send.

The card base is Real Red cardstock. The layer is one of the patterns in the Joy of Christmas Designer Series Paper (161958). You’ll find it in the Stampin’ Up! Holiday Mini Catalog on page 29 in the Joy of Christmas Suite. This whole Suite is beautiful and you get two different stamp sets and two sets of dies plus the paper and embellishments. I only bought the paper and ribbon at this point, but we’ll see how long I can resist the rest!

The ribbon I used is one of the Online Exclusives that you will find in the online store. It is the Real Red & Gold 3/8″ Dotted Ribbon. It is a very nice ribbon, a little heavier and stiffer than some, but it worked fine on this card. Since I love red, I had to have it and I really like the gold dots on it for something different. I added two pieces of ribbon, one horizontal and one vertical. I even applied a little Stampin’ Seal to the back of the pieces so it would lay flat and stay in place. The bow is tied separately and adhered with a few Glue Dots. To make sure the bow stayed on, I even added a glue dot under each loop of the bow and under each tail. Since the ribbon is a little heavy, the glue dots don’t show at all.

The greeting is in the Brightest Glow Stamp Set (159542), which was carried over from last year’s Holiday Mini catalog. This is a great stamp set for holiday greetings. I stamped this sentiment in Real Red ink and die-cut it with the new Deckled Circles Dies. I also cut a larger Deckled Circle out of Real Red for the layer. You will be AMAZED to open this package of Deckled Circle Dies and see the size and the number of dies you get! They are in the Holiday Mini on page 63 in the upper right corner. It’s not a small picture but I think it’s not very noticeable. I didn’t notice it until I heard about “Deckled Circles” from other Demonstrators! Of course, with so many new beautiful products it’s hard to take it all in!

You could add a little bling to the greeting or on the card if you wanted, maybe some Iridescent Rhinestones or sequins, but I left this card as is. I’m pretty sure I will be making more of this card to send in December! Once you have the idea, it’s easy to make more cards assembly-line style. Get an early start!

Remember to spend your July Bonus Coupons if you have some. Check your email for the codes if you ordered $50 or more in one order in July. The codes expire August 31 and that is coming up soon!

The September-December 2023 Mini Catalog (the Holiday Mini) goes LIVE on Wednesday, September 6th! Make your Shopping List!

Whimsical Woodland Embossed Christmas Card

Whimsical Woodland Embossed Christmas Card

I’ve had this Whimsical Woodland 3D Embossing Folder for a while but have forgotten to use it! This is my first try with it. Actually, I was trying to copy a card I saw I think just yesterday, maybe the day before, but when I wanted to look at it again, of course, I couldn’t find it! Does that happen to you?! It was just this white embossed Whimsical Woodland background and a greeting on red cardstock. But I still wish I could see it again!

In the meantime, I made my own card! I used Basic White for a card base and cut the embossed piece at the regular layer size, 4″ x 5 1/4″. I could have made it as large as the card base, too.

The greeting is in the Brightest Glow Stamp Set. I stamped it with Real Red ink and then just cut it out with my Paper Trimmer. The Real Red layer behind it is a die in the Painted Labels Dies. I popped up the greeting with Stampin’ Dimensionals.

Very easy card to make and you can do different things with the same card design. Instead of a white card base, use colored cardstock. Or use the white card base but put another colored layer under the embossed layer. Just play with different designs and see what you like!

If you like this Whimsical Woodland Embossed Christmas Card, try one of your own and try varying the design and see what you come up with!

SHOP STAMPIN’ UP! HERE!

Lights Aglow Gold Christmas Card

Lights Aglow Gold Christmas Card Closeup

I looked through the Lights Aglow Designer Paper and chose this pattern without knowing what I would make. That’s a good way to get started when you are trying to come up with an idea. In a little while, I had this Lights Aglow Gold Christmas Card made!

After deciding on this gold foil snowflake pattern of paper in the Lights Aglow 6″ x 6″ Specialty Designer Series Paper, I decided to make the card base Cherry Cobbler cardstock. I started with Real Red, but I think just knowing the coordinating color for this designer paper pack was Cherry Cobbler, Real Red just didn’t feel right. I cut the snowflake layer down a little so I could add some Gold Foil strips to the top and bottom. I cut two Gold Foil strips 3/4″ x 5″ to add a 1/4″ edge peeking out.

For the greeting, I stamped “Merry Christmas’ in the Brightest Glow Stamp Set. I stamped it with Versamark ink so I could heat emboss it with Gold Embossing Powder in the Metallics Embossing Powders using the Heat Tool. I used Very Vanilla cardstock.

To help the Very Vanilla greeting stand out, I diecut it with one of the Painted Labels dies and immediately cut another one out of Gold Foil. The gold foil is then cut in half horizontally so that it could be layered just a tiny bit under the top and bottom of the greeting piece. It’s not absolutely perfect, but plenty close enough.

For a little embellishment, I remembered that I had Gold Holly Leaves leftover from last year’s Holiday Catalog but carried over to the current Holiday Mini. They are almost like little fabric leaves and come in two sizes in the package. Then I die cut some Cherry Cobbler berries from the Christmas Banners Dies. I think they are a little larger than I would have liked but they still are okay. I popped the greeting up not on Stampin’ Dimensionals but on Foam Adhesive Strips. They seem to be a little higher than the Dimensionals so I might have preferred the Dimensionals. But it is fine!

So once you know what the design is on this card, it’s really fairly simple! You can change the background designer paper and make it a little different or even make the card for a different occasion, instead of this Lights Aglow Gold Christmas Card.

Lights Aglow Gold Christmas Card Closeup

SHOP STAMPIN’ UP! and SALE-A-BRATION (until Aug. 31st)!

Lights Aglow Tis the Season Christmas Card

Lights Aglow Tis the Season Christmas Card

I just got this designer paper and sort of copied a sample card in the Holiday Mini Catalog to come up with this Lights Aglow Tis the Season Christmas Card. When you don’t have an idea of what to make with one of your Stampin’ Up! products, always remember to look in the catalog for ideas. You might think you will copy the card exactly, but I’m willing to bet that as you go along you may just change it up a little as your ideas start to flow.

Although I don’t have the Christmas Lights Bundle in the Lights Aglow Suite, I wanted to get the Lights Aglow 6″ x 6″ Specialty Designer Series Paper. As I write this, the Lights Aglow Paper is not available but should be back in stock in early September. I must have ordered the last pack! LOL! This paper has gold foil dots that are meant to look like twinkling lights! Very pretty papers!

To make this card, I started with a Cherry Cobbler card base. Then I used the Cherry Cobbler paper with tiny stars all over as a layer on the card base. If you wanted to save paper, you could just add strips to the side. I made all the paper layers on this card run the full length of 5 1/2″. The Cherry Cobbler paper with stars is 5 1/2″ x 4″.

The center portion of the card, the arcs of stars and dots, needs a little extra care. Surprisingly I realized that before I cut it! To get the proper arc, you need to cut the center portion of the sheet of that paper. Below is a photo of how I cut the paper. Since I wanted a 3″ wide section, that left 3″ so I cut 1 1/2″ off each side.

How to Cut the Paper

Before adhering that center paper to the card, add some Gold Foil strips to each side, or as the Holiday Catalog shows (page 30) use the Gold Glimmer Paper in the Glimmer 12″ x 12″ Specialty Paper.

For the greeting, I sort of copied the design of the sample card but changed it up a little bit. I used a sentiment in the Brightest Glow Stamp Set. I think this is a fantastic set of traditional Christmas greetings in pretty fonts. I chose the ‘Tis the Season stamp and stamped it in Cherry Cobbler. Then I die cut it with a small plain circle in the Layering Circles Dies and layered it on a scalloped circle die in the same set, cut out of Gold Foil.

On the inside of the card, I used a layer of Basic White and added a strip of designer paper with the little stars that I used on the front of the card. That way you can stamp a greeting or write a note.

That’s all there is to this Lights Aglow Tis the Season Christmas Card but if you wanted to add any extra embellishments you could do that.

SHOP STAMPIN’ UP! ONLINE HERE!